Can you use blender for 3d printing
Can Blender be used for 3D printing?
Published on March 2, 2020 by Carlota V.
Created in 1995, Blender is a complete 3D modeling software, very popular in the world of animation and video thanks to the many features it offers. The particularity of Blender is that it is 100% free, open source – which is why it is constantly being improved – and that it benefits from a large community that regularly meets around the world to share best practices and user challenges. Based on polygonal modeling, it is not necessarily the most widely used solution in the additive manufacturing sector, but it does allow 3D models to be exported in formats adapted to the technology. Let’s go back to the main features of the Blender software!
The Blender solution was initially designed for an animation studio and was not intended to be shared worldwide. But the software quickly became open source and today, the Blender Foundation (the association behind the developments) estimates that there are 3 million users worldwide. The software includes various functionalities grouped into a dozen families: modeling, animation, simulation, video editing, 3D rendering, etc. It is rather oriented towards animation studios, artists and small teams working on video creation or cinema – several “Open Movies” are made on Blender. One of the latest is called Spring:
Blender is based on polygonal modelling
As you know, 3D software offers different modelling methods: surface, solid or organic. Here, Blender uses polygons to create a three-dimensional shape. The designed model is therefore composed of a multitude of polygons (or facets) that form what is called the mesh. Each polygon is composed of vertices, edges and faces. By assembling different polygons, a basic shape is obtained: for example, the interlocking of 6 polygons will form a cube. The next step is to deform basic shapes, and to agglomerate them together to design basic objects: 9 deformed cubes will become a chair for example. The user can then play with the edges and move points to progressively add complexity the model.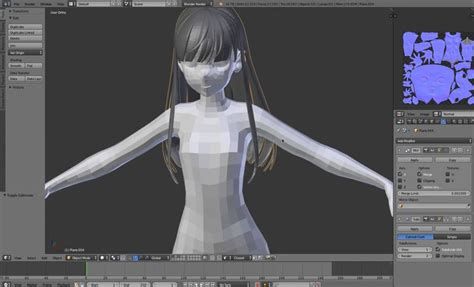
This method of modeling is quite intuitive because the user can move edges and points in space to deform the model until arriving at the desired shape. It also allows to have a greater complexity than through surface processes. On the other hand, it does not offer the best dimensional accuracy because the 3D model is the result of successive subdivisions. This is a major obstacle when it comes to obtaining a stable geometry for additive manufacturing.
Software features for 3D printing
We won’t go back over all of Blender’s features (animation, video, 3D rendering, etc.) because it’s really the 3D modeling part that interests us for 3D printing. You should know that the software offers export formats for additive manufacturing such as STL file but also OBJ file. However, polygonal modeling does not seem to be the most intuitive way to design printable parts. Blender still offers a feature to be added to its software called “3D Printing ToolBox”. This will allow you to analyze your mesh to identify some errors that could cause your printing to fail.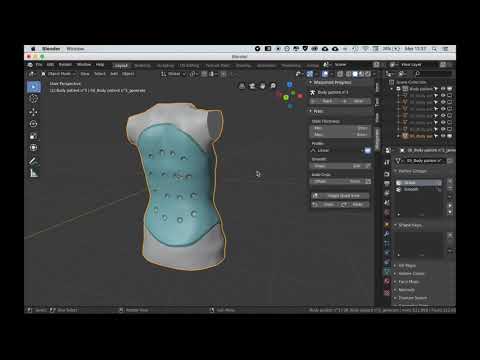 For example, this toolbox can check the minimum thickness of your walls or the geometry of overhangs.
The ‘3D printing toolbox’ enables you to check your model before 3D printing
Blender is therefore not the 3D software most used by 3D printing enthusiasts but it has the merit of being free, open-source and regularly improved by its entire community. We recommend a software more accessible to all beginners like TinkerCAD for example, and Fusion 360 for the most experienced. You can download Blender HERE, the solution is compatible on Mac, Windows or Linux.
Do you use Blender? Let us know in a comment below or on our Facebook and Twitter pages! Sign up for our free weekly Newsletter, all the latest news in 3D printing straight to your inbox!
Is Blender Good for 3D Printing? – 3D Printerly
Blender is a popular CAD software that people use to create unique and detailed designs, but people wonder whether Blender is good for 3D printing. I decided to write an article answering this question, as well as giving more useful information that you can use.
Keep reading to find out more about Blender and 3D printing, as well as some useful tips to get a great start.
Can You Use Blender to Make 3D Prints & STL Files?
Yes, Blender can be used for 3D printing. More specifically, it can be used to design models meant to be 3D printed, as you can’t 3D print directly from Blender.
The key to creating printable models is making sure they contain no errors which could impede the printing process and being able to export them as STL (*.stl) files. Both conditions can be fulfilled using Blender.
Once you have your STL file, you can import it into a slicing software (such as Ultimaker Cura or PrusaSlicer), input the printer settings and 3D print your model.
Is Blender Good for 3D Printing?
Blender is good for 3D printing since you can create highly detailed models and sculptures for free, as long as you have some experience. I’d recommend following a tutorial to get good at using Blender for 3D printing. Some beginners love this software, but it does have a bit of a learning curve.
Fortunately, as it is such a popular program, there are many resources that can help you get the hang of the basic workflow and delve deeper into 3D printing and its particularities.
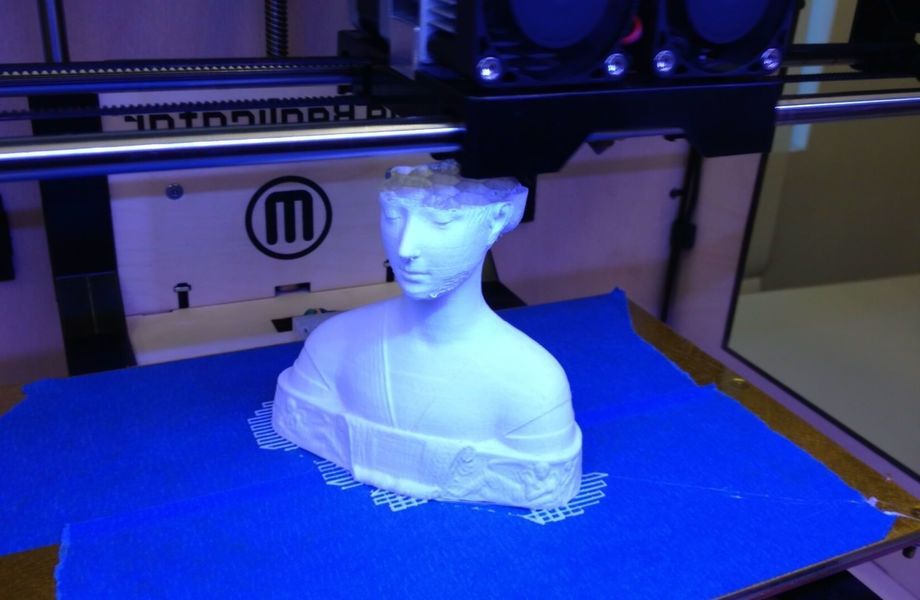
Blender has a flexible and intuitive modelling process that can help you create organic and complex shapes, although it might not be the best choice when it comes to more rigid models, such as mechanical parts for engineering products.
This type of modelling can also result in some issues, as some users have experienced, such as non-watertight meshes, non-manifold geometry (geometry that cannot exist in the real world) or models that don’t have a proper thickness.
These will all prevent your model for printing properly, however Blender includes features that help you check and fix your design before exporting it into and STL file.
Lastly, let us talk about STL files. Blender can import, modify and export STL files. After changing the “Object” mode to “Edit” mode, you can use the 3D Print Toolkit to check for overhangs, inappropriate wall thickness or non-manifold geometry and fix these issues to ensure smooth printing.
Overall, if you are interested in modelling organic, complex or sculptural models, Blender is one of the best choices on the market, not to mention that it is free.
These models can also be 3D printed successfully as long as you keep in mind to always analyze your model and make sure that it displays no errors.
Are there Blender Courses for 3D Printing?
As Blender is such a popular program among creatives, there are many courses available online, and they cover numerous topics, including 3D printing. Chances are, if you were facing an issue related to 3D printing in Blender, someone has had it before and found a solution for it.
Blender to Printer
There are also more complex courses tailored to more specific interests, for example this paid course called Blender to Printer that has a general Blender learning version and a 3D printing for character costumes version.
Some other platforms that offer Blender courses are:
Udemy
This course walks you through modelling, checking for and fixing issues using the Blender 3D Print Toolbox, exporting in an STL format and printing using a Prusa 3D printer or a printing service.
It also includes 3D reconstruction, photo scanning and printing, which is an interesting bonus. It is taught on an example-based approach, which some people might find more helpful than a more general overview.
Skillshare
This focuses more on the steps you need to take to ensure an existing model is suitable for printing. The teacher is using a previously created model and analyzes it to see if it is watertight or if it is strong enough to be printed.
If you know how to model and want a course to guide you through the preparation for exporting, then this one might be more useful
Blender Studio
This course provides a complete overview of Blender modelling and printing. According to its description, it is suitable for both beginners and more advanced users course including both introduction to 3D modelling and awareness of 3D printing issues.
It also includes coloring of the models and assets that you can download to follow along.
How to Use Blender to Prepare/Create STL Files & 3D Printing (Sculpting)
Blender can be downloaded for free from the official software website. You don’t need an account to download and install it. Once you have it, launch the software and we’re good to start modelling.
Let’s have a look at the process of designing and printing your own model using Blender.
1. Open Blender and Do the Quick Setup
Once you open Blender, a pop-up window will appear, allowing you to choose some general selection settings. Once you set these, a new pop-up will appear, allowing you to choose to create a new file or open an existing one.
There are several workspace options (General, 2D Animation, Sculpting, VFX and Video Editing). You will want to choose General for modelling, or else just click outside the window.
You can also select Sculpting if you prefer, and this will allow you to have a more organic, although less precise, workflow.
2. Prepare the Workspace for Modelling for 3D Printing
This basically means setting the units and scale so that they match the ones in the STL file and enabling the 3D Print Toolbox. To adjust the scale, you have to go to “Scene Properties” on the right, select the “Metric” system under “Units” and set the “Unit Scale” to 0.001.
When you have your Length in Meters as default, this will make one “Blender Unit” equal to 1mm.
To enable the 3D Print Toolbox, go to “Edit” at the top, click on “Preferences”, select “Add-ons” and tick the box next to “Mesh: 3D Print Toolkit”. You can now view the toolbox by hitting “N” on your keyboard.
3. Find a Picture or Similar Object for Reference
Depending on what you would like to model, it’s a good idea to find a reference image or object for it, to help you stick to proportions.
To add a reference to your workspace, simply go into Object Mode (default mode), then click “Add” > “Image” > “Reference”. This will open up your file explorer so you can import your reference image.
You can also simply find your file and drag it into blender to insert it as a reference image.
Scale the reference using the “S” key, rotate it using the “R” key, and move it using the “G” key.
Check out the video below for a visual tutorial.
4. Choose Modelling or Sculpting Tools
There are two ways of creating models in Blender: modelling and sculpting.
Modelling is good for more precise objects like an adapter or a jewelry box, and sculpting works well with organic shapes like characters, famous statues etc. People will use different techniques, while you can even decide to combine the two.
Before starting to model or sculpt have a look at the available tools. For modelling, these are accessible by right-clicking with an object selected. For sculpting, all the tools (brushes) are lined up on the left side and hovering over them will reveal the name of each brush.
5. Start Modelling or Sculpting
Once you have an idea of the tools available to you, as well as a reference, you can start modelling or sculpting, depending on your preference and the kind of object you want to create. I added some videos at the end of this section that walk you through modelling in Blender for 3D printing.
6. Analyze the Model
Once you finish your model, there are a few things to check to ensure smooth 3D printing, such as making sure your model is watertight (joining all the meshes in the model into one using CTRL+J) and checking for non-manifold geometry (geometry that cannot exist in real life).
The model analysis can be made using the 3D Print Toolbox, which I will discuss in another section.
7. Export as STL File
This can be done by going to File > Export > STL.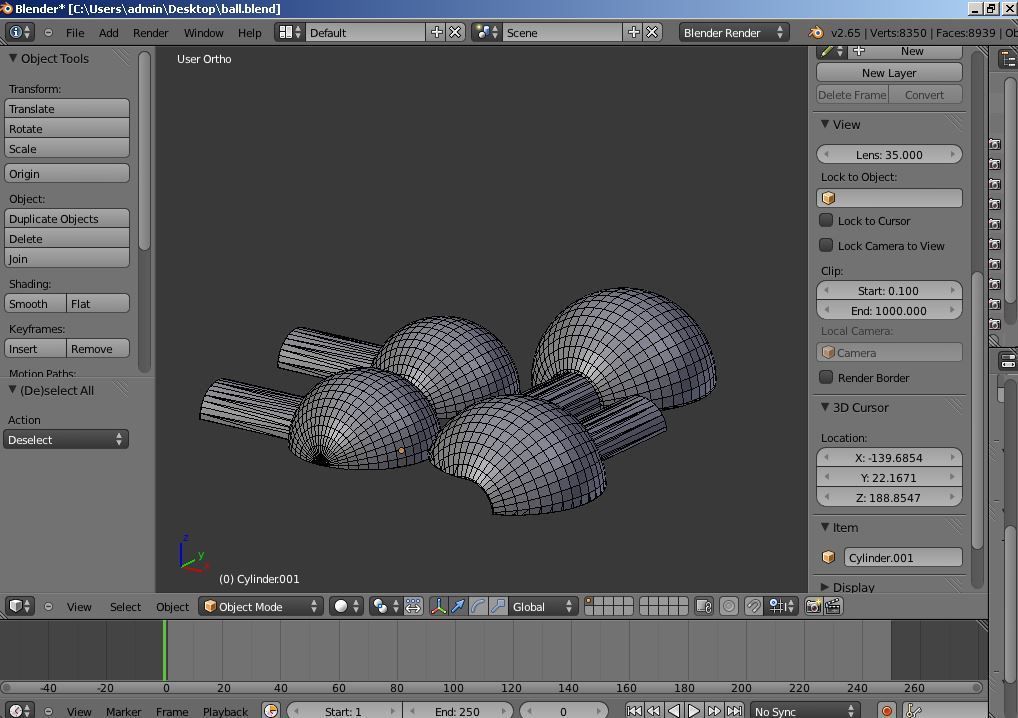 When the Export STL pop-up appears, you can choose to only export the selected models by ticking “Selection only” under “Include”.
Lastly, make sure the scale is set to 1, so that the STL file has the same dimensions as your model (or else, change that value if you need a different model size).
This is a very informative YouTube playlist I found, covering everything you need to know as a beginner in Blender, particularly for 3D printing.
This video from the playlist focuses on analyzing your model and exporting it as an STL file.
FreeCAD Vs Blender for 3D Printing
FreeCAD is a better option for 3D printing if you want to create more rigid and mechanical real-life objects. It makes setup for 3D printing easier, because of its accuracy, however it is not the best when it comes to designing more organic or artistic models.
This is because it has a different target audience from Blender: FreeCAD is designed for engineers, architects and product designers, whereas Blender meets more needs for animators, artists or game designers.
From a 3D printing point of view, both programs can import, modify and export STL files, although FreeCAD models need to be converted into meshes before being exported. Much like Blender, FreeCAD allows you to check whether your geometry can be printed properly.
There is also a “Part CheckGeometry” tool that is sort of similar in function to the “Check All” function in Blender.
The fact that solid models in FreeCAD have to be converted into meshes may result in some loss of quality, although there are tools that allow you to check and repair the converted meshes and usually any loss of quality through meshing is negligible unless you are working with extremely fine parts.
Thus, FreeCAD is a better option for you if you are designing more rigid parts and need dimensional precision. It offers accessible Workbenches to assist in fulfilling the 3D printing requirements, including ensuring proper meshing.
Subsequently, Blender is a better option for more organic, artistic modelling.
It has more features and potential errors to pay attention to, but it also offers Add-ons to help you with fixing these problems, and there is a large community of users who can answer your questions as well.
What is the Blender 3D Printing Toolbox & Plugins?
The 3D Print Toolbox is an Add-on that comes with the software itself and contains tools for getting your model ready for 3D printing. Its primary benefit for the users is checking for and fixing errors in Blender models so that they can be exported and printed successfully.
I explained how to enable and access the toolbox, now let’s have a look at the features it provides, which are grouped under 4 drop-down categories: Analyze, Clean Up, Transform and Export.
Analyze
The Analyze feature contains volume and area statistics, as well as the very useful “Check All” button, which analyzes the model for non-manifold features (that cannot exist in the real world) and displays the results below.
Clean Up
The Clean Up feature allows you to fix distorted faces based on your own criteria, as well as automatically clean up your model using the “Make Manifold” option. Although this can be very useful in some cases, it is good to keep in mind that “Make Manifold” can also alter the shapes in your geometry, and therefore it is sometimes necessary to fix each of the issues manually.
Transform
The Transform section is very useful for scaling your model, either by volume by typing in the desired value or by bounds, in which case you can type the size of your print bed to ensure that your model is not too big.
Export
Using the Export feature you can choose the location, name and format of the export. You can also choose to apply different settings, such as scale or texture, as well as data layers in Blender 3. 0.
0.
The 3D Print Toolbox offers useful tools for ensuring the 3D printing process will go smoothly, and there are many detailed tutorials about how to use it, here is one for Blender 2.8 which I found useful.
Does Blender Work with Cura? Blender Units & Scaling
Yes, Blender does work with Cura: STL files exported from Blender can be imported into the Ultimaker Cura slicing software. There are also additional plugins available for Cura that ebnale the user to open the Blender file format straight into the slicing program.
The plugins are called Blender Integration and CuraBlender and are less time-consuming alternatives for exporting and importing STLs.
It is very important to make sure the units are appropriate, whether you’re using STL files or a Blender plugin for Cura, as many people have had scale problems when importing STL files from Blender into the slicing software.
The model would either appear too big or too small on the printing bed. The reason for this issue is that Cura is assumes the units of the STL files are millimeters, and therefore if you work in meters in Blender, in the slicer the model may appear too small.
The best way to avoid this is to check the dimensions and scale as mentioned above using the 3D Print Toolbox and Scene Properties tab respectively. You can also scale the model in the slicing software if it appears incorrect.
How to Fix Blender Import STL Not Visible
Some Blender users reported being unable to see the imported STL files. Depending on the situation, there might be several reasons for that, mostly having to do with scale or import location.
Let’s have a look at some of the potential causes and solutions:
Origin of Model is Too Far From Origin of Scene
Some models might have been designed too far away from the (0, 0, 0) point of the 3D workspace. Therefore, although the model itself is somewhere in the 3D space, they are outside the visible workspace.
If the geometry appears in the Scene Collection tab, on the right side of the screen, click on it and this will select the geometry, wherever it might be. Now, click Alt+G and the object will be moved to the origin of the workspace.
There are other ways of moving the object to the origin, but I found the keyboard shortcut to be the fastest. From here it is easier to see if the model is too small or too large and make the appropriate scale adjustments if necessary.
Model is too Big: Scale Down
To scale down a very large object, select it from under the Scene Collection, then go to Object Properties (on the same vertical tab list as the Scene Properties, it features a small square with some corner frames) and scale it down by imputing values there.
There’s actually a neat shortcut you can use to bring up the same menu, simply by selecting the object and pressing the “N” key.
You can also freely scale a model by selecting it and pressing “S”, but this might not work for very large objects.
Blender 3D for 3D Printers / Sudo Null IT News
Correct position! But some problems can still be covered by polygonal modeling.
Gathered here the answers to the four most common and non-obvious problems.
Dimensions
When I first tried to order 3D printing from a company about seven years ago, it was like this:
— Igor! You sent an empty file! nine0009 - No! Here's a screenshot, well!
One meter in the Blender is equal to one millimeter in the slicer, nothing has changed in these seven years.
Designing in meters is wonderfully inconvenient, so when exporting to STL/OBJ, set the Scale value to 1000:
Closed geometry The ability to create open geometry is both a scourge and a bonus of polygonal modeling.
In the modern world, slicers (not all) have learned how to work with this, but there may be surprises: want a hole? get a blank wall! nine0003
If you don't like surprises, you should use Blender's geometry analyzer.
In mesh edit mode, select vertex selection, and click Select → Select All By Trail → Non Manifold
To eliminate such trash as on the right ball, there is a Merge By Distance tool. Lives in Mesh → Clean Up → Merge By Distance.
In other cases, it is necessary to either give the wall thickness by extruding, or close up the hole, or is this geometry really necessary? nine0003
And now for the good news: in Blender 2.8 the 3D printing addon is built right into Blender, hooray! Geometry analysis just got easier. You just need to turn it on, and in the edit mode in the N-panel everything will be (and even the preliminary volume of the model!).
Flying geometry
As unclosed, only flying. So the slicer can still try to shove it into the G-code!
The annoyance is that if the volume of the walls was made by a modifier, these mesh pieces can no longer be found with the Non Manifold tool. nine0003
Select any polygon on the target mesh, and use the Ctrl+L hotkey: it will add all physically connected polygons to the selection. After that, invert the selection with the Ctrl+I hotkey and delete everything you don't need.
Normals
Roughly speaking, the polygon has a "face". When the polygon enters the slicer, the slicer looks at where the polygon has a “face”, tries to fill the wrong side with plastic, and at the same time checks for overhangs.
Accordingly, a cube with normals inside will be perceived clumsily. In fairness, in modern slicers this is no longer so important. nine0003
The solution is super-simple: turn on the display of normals:
Flip in the right direction: select the polygon with the normal turned inside out and press Alt+N. Hoba! and the slicer no longer panics about negative angles where they cannot exist.
Generalize
Blender, indeed, is not developed as engineering software, and you should not try to solve furious tasks with it in the spirit of multicomponent kinematic systems.
But the blender + home 3D printer perfectly covers the needs of a small workshop, the main thing is to remember the nuances of polygonal modeling. nine0003
Preparing files for 3D printing in Blender
Share on Facebook Share on Twitter Share on Vkontakte
Look for open edges
If your 3D model consists of several objects or polygon meshes, the first thing you need to do is make sure that the edges of each part are closed, in other words, waterproof. To do this, you need to enter edit mode by pressing A (once to select any faces, twice to deselect), then you need to press the key combination ctrl-alt-shift-M (on Mac computers - ctrl-opt-shift- M). nine0003
After you press this key combination, all open faces will be selected. Often, to fix this error, you need to create a new surface with 3-4 faces (F key). Sometimes there are wandering edges that are either not attached to anything, or connected to only one edge vertex. Often they can be safely removed, unless they were specially made. For example, these faces can be used to shape the model using the Subsurf modifier. In this case, you will need to apply this modifier first, and only then remove the unnecessary edges. In addition, do not forget about those open faces that are part of the intersecting surfaces. nine0003
If your model has 3-4 attached polygons that the software sees as open but says that a surface has been created, you need to delete that surface and try to recreate it. Moreover, inspect the edges of all those faces that were marked as open. Perhaps some of them are wrong: they do not belong to the polygon mesh or they are created in the wrong direction. In this case, you will have to delete this block and recreate it manually. nine0003
Tip: Hide the geometry to focus on the uncovered areas So, you can select not only open faces, but also the areas around them. Next press shift-H to hide the other faces. In this way, the closed parts of the model will be hidden, and it will be much easier for you to eliminate all the flaws. Cleanup: Merge meshes using Booleans. Once all the meshes are closed, make sure that each one represents a separate object. You cannot apply boolean variables to polygon meshes that refer to the same object. At the same time, it is possible to split the meshes by selecting all its faces and pressing P. Next, select one vertex, then, holding ctrl, select all the others. To detach all polygon meshes of one object, press P and select the "All Loose Parts" option. nine0003 Once you've separated all the meshes into objects and made sure they're closed, save the project and save a copy of the blender file to create a printable version of it. Open a copy of the file and select each object one at a time. In object mode, apply any modifiers you want. Next, go into edit mode by pressing the A key once or twice to select all the faces. Then press ctrl-T to triangulate all surfaces. It is not clear what this is connected with, but Blender works better with booleans if the meshes have been triangulated. Return to object mode again, select 2 mutually intersecting meshes and press w. Then select the Union option, after which the meshes will be merged (this action does not delete the sources). The merging process may take some time. Once it completes, select the 2 original objects that were merged and either move them to another layer or delete them altogether. nine0003 Select the new, merged object, go to edit mode, deselect the edges (press the A key 1-2 times), then select the unclosed areas - ctrl-alt-shift-M. Fix these errors in edit mode, it will be pretty easy. Often, combining polygon meshes solves the problem of open areas, but not always. Therefore, we recommend that you still check your model. Otherwise, when further merging meshes that have open areas, you may have problems. Check it EVERY TIME. Then select all meshes and triangulate again. As a result, you will get a single mesh with closed faces that has been triangulated. Such a mesh is completely ready for further merging, if necessary. If you have 2 meshes with incommensurable face density, such as when a rounded mesh is merged with a cube that has 8 vertices, subdivide the part with the fewest vertices. The mesh is then triangulated. For some reason Blender doesn't handle this kind of joins well. The process can take several hours, and it is not always possible to obtain the desired result. Save every time after merging and only then eliminate uncovered areas. nine0003 Finish: Set your model size and export the file. Once you have dealt with all the intersecting meshes and solved the problem of open areas, set your model to the desired size. Please note: 1 size unit in Blender is equal to 1 mm. Check the status bar for the number of surfaces (it should look something like this: Fa:123456 - the number next to the Fa index is what you need). If you have more than 500,000 triangles, use the Polygon Reducer Script tool found in the Mesh - Script menu.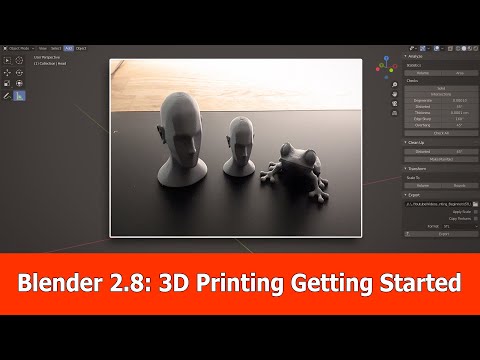 nine0003
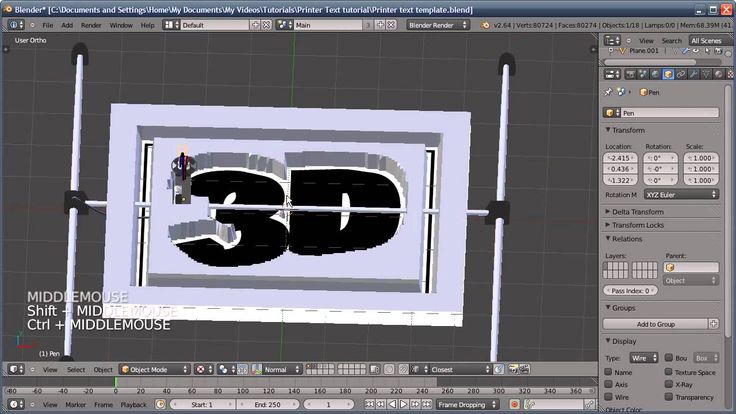
 nine0003