Binder jet 3d printer
2022 Best Binder Jetting 3D Printer - Pros and Cons & Buying Guide
ADVERTISEMENT
There are various techniques and technologies used in printing unique and complex structures with high precision. Binder Jetting 3D printing is one such way. Invented during an MIT project in 1993, the quality of the 3D prints led to the widespread adoption of the technology.
Binder Jetting 3D printing is up to 10x more economical than other metal 3D printing processes, like DMLS/SLM.
Binder Jetting allows the production of complex geometries and shapes with a large build size that requires no support structures during printing, which makes it the go-to printing technique for low to medium metal production.
For instance, its applications range from the fabrication of full-color prototypes (such as figurines), large sand casting cores, and molds as well as manufacturing low-cost 3D printed metal parts.
Unlike traditional manufacturing techniques and some other printing techniques, binder jetting 3D printing ensures good resolution, allowing parts and components to be produced with extremely fine detail.
For example, a clipper brush or a watch ring can be produced cost-effectively compared to traditional manufacturing techniques and with adequate speeds. Binder jetting allows manufacturers to switch to 3D printed parts while maintaining quality.
ADVERTISEMENT
What Is Binder Jetting 3D Printing and How Does It Work
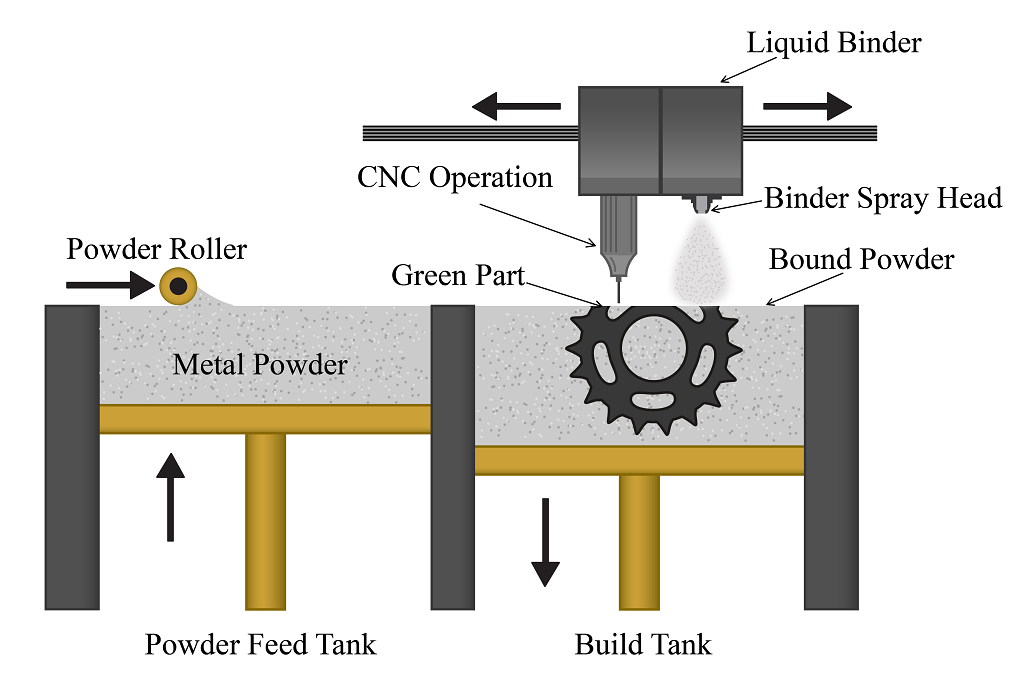
With a diverse range of applications, it is important for a designer to fully understand and grasp how binder jetting 3D printing works to utilize its full capabilities. Binder Jetting 3D printing creates parts additively with a binding agent.
It works by spreading a thin layer of powder over the build platform after which a carriage containing an inkjet nozzle passes along the x and y-axis of the machine, depositing droplets of a binding agent to bind the powder together. Color ink is also deposited during this step if required.
This process is done layer by layer. When one layer is complete, the build platform moves down and re-coats the surface, and repeats the same process until the whole part is complete.
Depending on the material and its characteristics, it’s not always suitable for structural and load-bearing parts, especially metals and the additional post-processing step can add significant time to the overall build process. After the part is printed, it’s left to cure and gain mechanical strength so it doesn’t break down.
The post-processing step is crucial to add mechanical strength and performance to the print part, and in the case of colors, it also adds vibrancy to the part. After curing, the part is removed and unbound and excess powder is removed via pressurized air.
Now, depending on the material, a post-processing step is usually required. Metals, for instance, need to be sintered or infiltrated with a metal that has a low melting point, typically bronze. In infiltration, the part is placed inside a furnace and the binder is burnt out leaving voids.
The resulting part is approx. 60% porous at this point and as mentioned before, bronze is then used to infiltrate the left voids, which results in low porosity and good strength.
Sintering is where the part is placed inside the furnace after printing, where the binder is burnt out and the metal particles remaining are bonded together to ensure low porosity.
Colored parts, on the other hand, are coated with an infiltrant to improve strength and add vibrancy to the colors. Another layer of epoxy can be added after this to further improve strength.
It’s important to ensure the CAD model fed to the printer contains the appropriate color information on a per face approach or as a texture map.
The former is easier to do but texture maps allow finer controls and details to be added. Perhaps the most common use case for binder jetting 3D printers is sand casting and molds.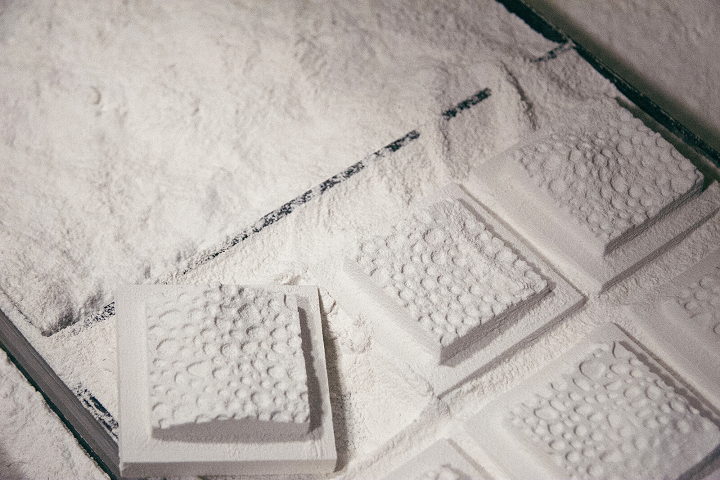
It’s low cost and fairly quick, which makes it an excellent solution for elaborate and complex designs. The cores and molds are usually printed with sand or silica and then are generally immediately ready for casting.
At this point, the casted metal component is removed by breaking the mold and even though the molds are used only once, the time and cost saved compared to traditional manufacturing methods is substantial.
Commonly used materials in binder jetting 3D printing are metals, sand, and ceramics in granular form. Material variety is still limited in binder jetting 3D printing compared to other techniques but it’s gradually improving.
Once the printing job is complete, the part is carefully freed from the build box and the remaining powder is removed with brushes or air blowers. Parts also need to be cured to increase their resistance.
Depending on the material, an extra step is also necessary. For instance, in the case of ceramics, it is necessary to cover them with acrylics to increase the mechanical resistance of the pieces and to improve the colors.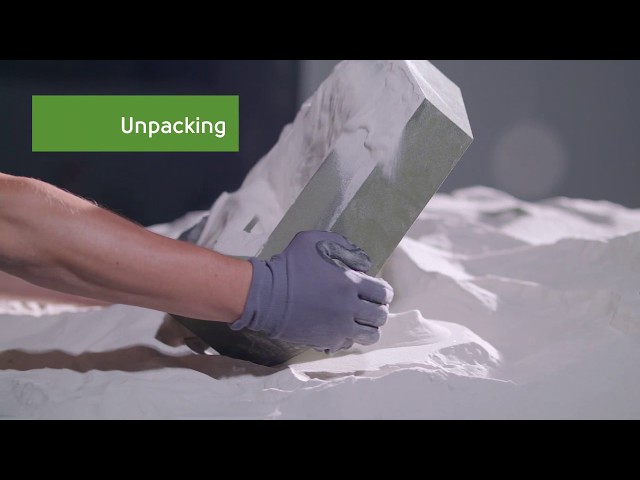
ADVERTISEMENT
Rules Of Thumb
When choosing to go with binder jetting 3D printing there are a couple of things to keep in mind. For instance, metal parts can be printed at a low cost but for applications that require structural parts and high performance, it’s better to stick to DMLS/SLM.
Even though binder jetting offers design freedom, the porosity leads to metal parts that cannot be used as structural parts and thermal effects are not a big issue during the manufacturing process.
Similarly, colored parts produced with binder jetting are brittle and are most suitable as decorative items. The most appropriate use case for binder jetting is producing sand casting cores, molds, and prototyping at a large scale.
What Are the Benefits of Binder Jetting 3D Printers?
As we alluded to earlier, binder jetting 3D printing allows the production of complicated, detailed, and complex parts in a short time period.
It is highly customizable and requires no support structures as that job is fulfilled by the surrounding powder.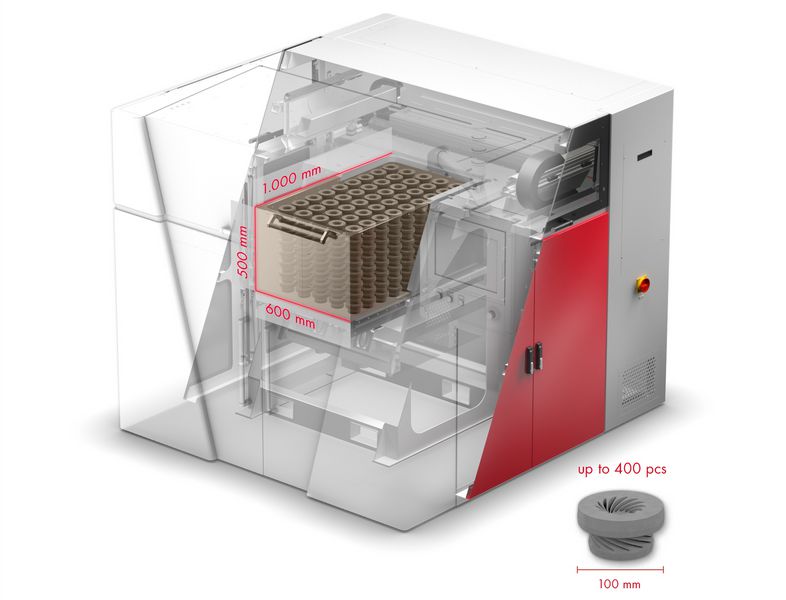 This allows the creation of parts with few geometric restrictions.
Additionally, in binder jetting 3D printing, parts do not need to be attached to the build platform, which means the whole build volume can be fully used and it makes it ideal for low to medium batch production.
Crucially, binder jetting 3D printed parts bond at room temperature, which means that warping due to temperature is not a problem and is a key advantage binder jetting holds over other 3D printing processes.
It allows binder jetting machines to have a larger build volume compared to all 3D printing technologies and thus binder jetting can manufacture large and complex metal geometry parts as it’s not limited by any thermal effects, such as warping. This also allows parallel manufacturing of multiple parts and components at a time are possible.
Part strength is an issue with binder jetting 3D printing, it’s offset by the cost. With so many key advantages, binder jetting has become a mainstay in the industry and is used widely in a large number of applications.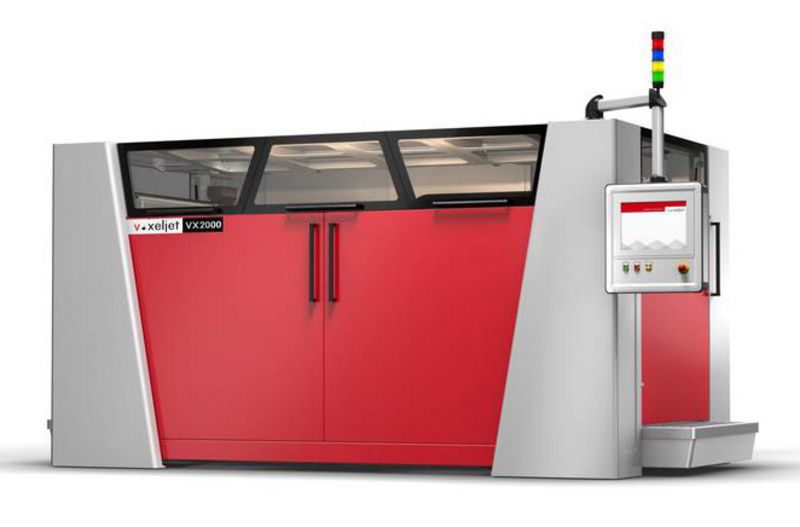 Typically, its capabilities are best utilized for low to medium batch production.
ADVERTISEMENT
Comparison Chart
| Name | Link | Nomination | Overall Rating |
|---|---|---|---|
| Digital Metal DM P2500 | “Impressive features of this 3D printers are a many” Pick3DPrinter | 9 | |
| ExOne M-Flex | “The specialty of M-Flex is in making customized metal parts and functional prototypes utilized in industries” Pick3DPrinter | 8.5 | |
| Voxeljet VX1000 | Industrial-grade, binder jetting 3D printer | 8 | |
| 3D Systems Projet CJP 860 Pro | Five print heads ensure vibrant and realistic color printing | 8.5 | |
| ComeTrue T10 | “Compared with other 3D printers, ComeTrue advantages in faster print speed, superior equipment, cost-effective and better after services.” ComeTrue | 8 | |
| Desktop Metal Production System | Handles large build volume | 9 | |
| HP Metal Jet | Most Consistent Performance | 8. 9 9 | |
| Desktop Metal Shop System | Incredibly Productive | 9 | |
| Markforged Metal X | "The greater the layer resolution, the clearer the layers would be visible" Pick3DPrinter | 8.9 | |
| Tongtai AMS-1200 | Highly Reliable | 8.5 |
List of Binder Jetting 3D Printers
Digital Metal DM P2500
Made from serial production and prototyping, Digital Metal Dm P 2500 has a robust machine design. It lets you print without support structures and ...
Add to wishlistAdded to wishlistRemoved from wishlist 0
Add to compare
|
 01 mm 0 in
The DM P2500 is a highly rated binder jetting 3D printer that offers a fast, flexible and reasonable way to produce metal parts.
The most underrated feature of this printer is undoubtedly its print volume, allowing you to build larger parts. That, combined with eliminating the risk of support structures, resolves one of the main pain points of binder jetting 3D printed parts.
Uses:
- This printer employs high-precision binder jetting technology.
- The DM P2500 has a resolution of 0.035 mm. This enables medical-grade surface smoothness and quality (Ra6).
- It uses Binder jetting technology that allows users to reuse loose powder material, which contributes to environmental sustainability. As a result, there is significantly less waste than with other additive manufacturing techniques.
- The DM P2500 prints without the use of any support structures. And this actually lengthens your overall print time, especially if you are doing a lot of them.
PROS:
- Hands-off concept.
- Room temperature printing.
- Stainless steel alloys and titanium prints.
CONS:
- No way to see or check parts or functional prototypes through a gallery.
- Parts need post-processing, which may lead to budget to time issues.
Digital Metal DM P2500 3D Printer In-Depth Review
ADVERTISEMENT
ExOne M-Flex
ExOne is a household name in the 3D printing industry, operating for more than 20 years. Their 3D printers are popular and amongst the most researched.
ExOne M-Flex is an industrial binder jetting 3D printer featuring a large build volume and material flexibility, allowing it to work with a variety of different materials, like bronze, tungsten, stainless steel, glass, and ceramic sand.
Uses:
- Ideal for industrial use.
- Printing highly accurate parts with a variety of different materials.

PROS:
- No tooling required.
- Easy unloading.
- User-friendly.
- Touchscreen Interface.
- Material flexibility.
CONS:
- Parts need to be cured to enhance their properties, which may take a lot of time.
- Fairly expensive.
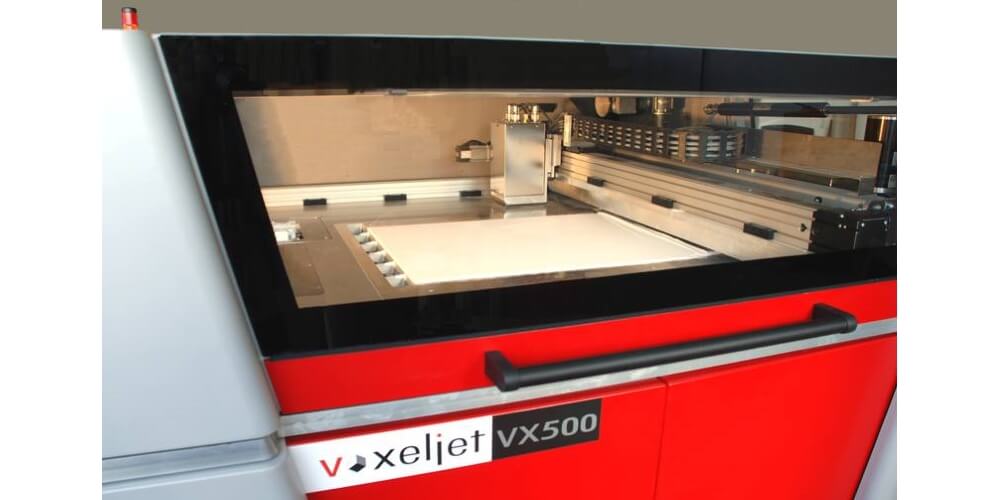
Voxeljet VX1000
The Voxeljet VX1000 is a multi-material 3D printer using binder jetting technology. It offers one of the largest build volumes in a binder jetting 3D printer (1000 mm x 600 mm x 500 mm). In fact, it’s larger than ExOne’s M-Flex.
That combined with its print speed and high-resolution prints of 600 dpi, the VX1000 is one of the most popular 3D printers in its class.
Uses:
- Ideal solution when it comes to sand cores, molds, and thermoplastics.
- Cost-effectively produce molds and other components for small series production.
- Better suited to prototyping and small series production.
PROS:
- Environment friendly.
- Compatibility with an inorganic binder.
- High-performance print head with a resolution of up to 600 dpi.
- Build volume.
CONS:
- Unlike its competitors, it only offers silica sand and PPMA (recyclable transparent thermoplastic).
ADVERTISEMENT
3D Systems Projet CJP 860Pro
The Projet CJP 860pro by 3D Systems is a well-known name in the 3D printing industry with the Project CJP 860pro being the largest in the family of Colorjet printing systems.
Featuring a large build volume and allowing parts to be printed completely in color makes it an attractive option, especially for making prototypes, concepts, and figurines.
As a well-known name, 3D Systems has a made a name for itself as one of the best 3D printing companies with a well-thought-out ecosystem that makes it hard for its clients to choose something else.
Uses:
- Allows the creation of concept models and prototypes in full color.

PROS:
- Full CMYK color 3D printing.
- Low operating costs.
- Build volume.
- East post-processing.
CONS:
- Cannot be used to print functional prototypes.
- High cost.
ComeTrue T10
The ComeTrue 10 is a desktop-class binder jetting 3D printer capable of producing fully colored parts and prototypes and yields an impressive print speed and quality for its price, making it ideal for small-scale printing and quickly prototyping parts.
Uses:
- Desktop 3D printing.
- Wide range of applications, from architectural, bio-medical to arts.
PROS:
- No support structure needed.
- Fast printing speed.
- Expensive.
CONS:
- Lower build volume compared to others.
- Parts printed are brittle and need to be infiltrated.
ADVERTISEMENT
Desktop Metal Production System
Created by inventors of binder jetting and single-pass inkjet 3D printing technology, Desktop Metal Production System is designed to be the fastest .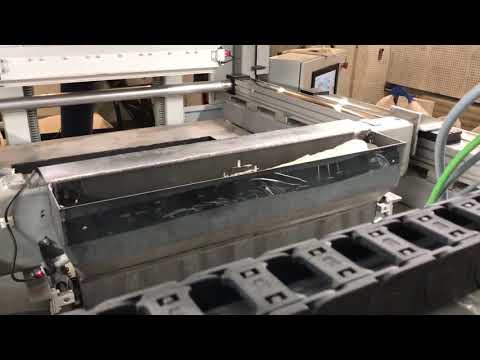 ..
..
Add to wishlistAdded to wishlistRemoved from wishlist 0
Add to compare
|
 99 × 12.99 × 12.99 in
The Production System by Desktop Metal is a great industrial 3D printing solution utilizing binder jetting technology and building a great printer and ecosystem around to make 3D printing a breeze for businesses.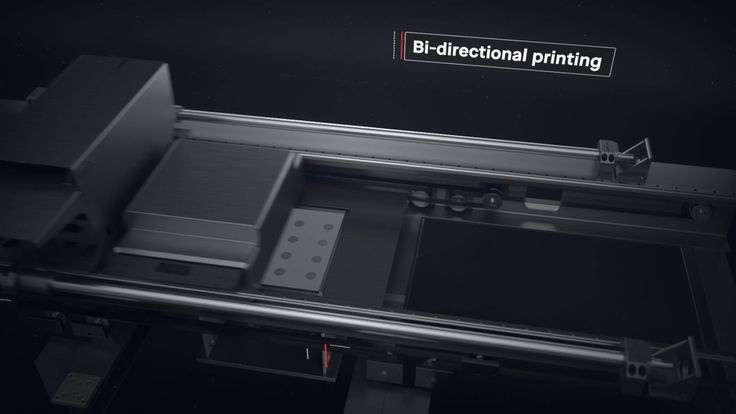
Combine that with extremely high-quality prints, post-processing simplifications, and easy to operate solution, it’s no wonder it’s one of the most popular binders jetting 3D printers.
Uses:
- Works with multiple 3D printing materials.
- Prints high-quality parts.
- Can produce up to 1,000 parts per day, which is best in class.
PROS:
- Sintering.
- Post-processing of parts after printing.
- Tool-free switching to different jobs.
- Print quality.
- Best in its class repeatability.
- Material availability.
CONS:
- Expensive.
Desktop Metal Production System 3D Printer In-Depth Review
ADVERTISEMENT
HP Metal Jet
With Metal Jet, HP entered the binder jetting 3D printing business offering best-in-class features and print quality compared to its competition.
Uses:
- High-quality metal prints.
- Industrial printing (car parts, prototypes, etc).
PROS:
- Material reusability.
- No build plate required.
- Multiple parts produced at the same time.
CONS:
- It is expensive.
Desktop Metal Shop System
Positioned below the Desktop Metal Production System, the Shop System has the benefits and features that make the production system best in its class but aiming at small to medium businesses.
Uses:
- Prints using multiple materials.
- Prints extremely high-quality parts.
PROS:
- Productivity (printing multiple parts per day).
- Material flexibility.
- Print quality.
- Easy to use and operate.
- Sintering.
- Tool-free.
CONS:
- Price.
Markforged Metal X
The printer is the most accessible way for fabricating complex metal parts with the widest available range of advanced metals.:quality(80)/images.vogel.de/vogelonline/bdb/1324400/1324475/original.jpg) Starting from ...
Starting from ...
Add to wishlistAdded to wishlistRemoved from wishlist 0
Add to compare
|
 build size
A new player in the metal 3D printing industry, the Metal X system by Markforged is available at a considerably lower price point than other more expensive industrial solutions.
Uses:
- Prototyping.
- Molding.
PROS:
- Reliable.
- Affordable.
- Material flexibility.
- Ecosystem.
CONS:
- Lower build volume.
Markforged Metal X 3D Printer In-Depth Review
ADVERTISEMENT
Tongtai AMS-1200
Tongtai AMS-1200 is a binder jetting 3D printer using sand. Its serves as an ideal solution for small to medium business offering sand cast molding and prototyping in a reasonable package.
Uses:
- Ideal for molding and prototyping.
- Small volume and customized product production.
PROS:
- High build volume.
- High print resolution.
- Saves time by reducing mold design and machining processes.
- Reusable material.
CONS:
- Material limitation.

Buyer’s Guide
Binder jetting 3D printing is a great way to create parts or prototypes. There are different types of printers for different types of functions.
Binder jetting 3D printers range from desktop use to full industrial setting and you need to know how frequently you will use the printer.
If you plan to use the printer once in a while, you can employ a 3D printing service instead of purchasing a binder jetting 3D printer, which can prove expensive. In other words, you should consider purchasing one for mass production.
Out of the printers listed above, ComeTrue is the only true home 3D printing and desktop 3D printer with binder jetting technology.
Materials also come into play here. For instance, the VX1000 is restricted to silica sand and PPMA and is mostly suitable for manufacturing sand cores, molds, and plastic parts.
Ease of use is also a factor when it comes to buying a binder jetting 3D printer, especially for small to medium businesses that want to spend more time on their product design and want a seamless user experience.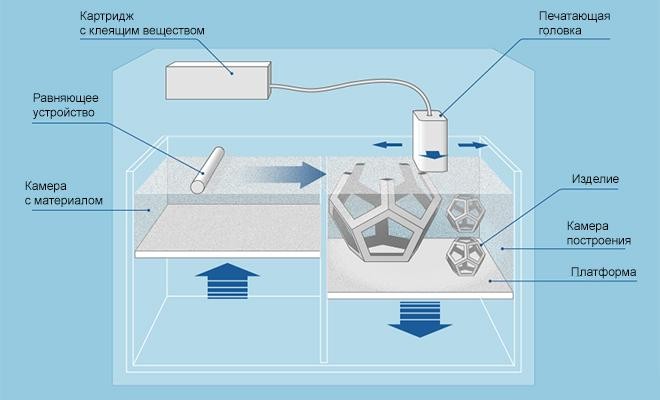
This is where Desktop Metal’s Production system comes into play offering best-in-class print quality, speed as well offering a mostly tooling-free experience.
Ease of use can also be attributed to a large and well-defined ecosystem around a product making it an additional plus when buying.
3D Systems Projet CJP 860pro offers not only a great color binder jetting 3D printer but also a well-thought-out ecosystem. Another consideration when it comes to buying binder jetting 3D printers is the kind of parts that you need to print.
Binder jetting is great for producing high-resolution parts at great speeds, metal parts will have an internal porosity.
Post-processing steps, such as sintering and infiltration, result in 97% and 90% dense parts respectively. This can affect the mechanical properties and can lead to cracks.
There are ways to circumvent this (Hot isostatic pressing) but it’s recommended that DMLS or SLM be used for metal parts where strength is critical.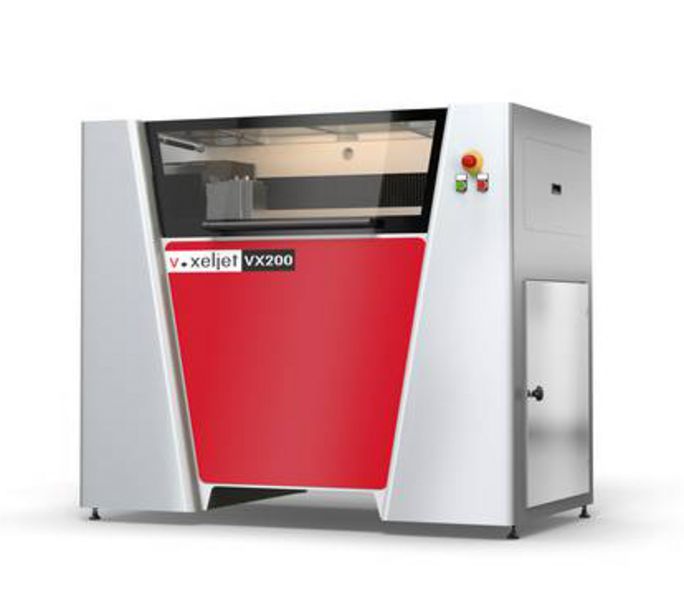 So, if the use case rests on producing metal parts that will be put under stress, it’s better to invest in other solutions.
On the other hand, binder jetting is great at producing parts quickly, especially for prototyping and casting molds. It’s also great at mass-producing parts, molds, and components.
ADVERTISEMENT
Frequently Asked Questions (FAQs)
Where Is Binder Jetting 3D Printing Used?
Binder Jetting 3D printing is an additive manufacturing process based on the same principle as traditional inkjet printers. With binder jetting, mass production, customization, and tooling free manufacturing can be easily achieved.
Combined with speed, a good binder jetting 3D printer like Desktop Metal Production System can create complex shapes and geometries at incredible accuracy.
Something like a clipper blade that has incredibly fine details can be manufactured at speed without relying on expensive traditional tooling. Not only that, binder jetting is cost-effective at scale and uses less material.
While still quite expensive, binder jetting is trickling down to home and desktop use as well, allowing you to quickly prototype parts and customize them as you see fit.
What Are Some Of The Printing Technologies Used Today?
3D printing picked up pace in the last decade. You can produce functional and complex molds, shapes, and prototypes while consuming less material and at a lower cost than a part produced via traditional manufacturing techniques.
New techniques are being developed each day and you have a lot of choices, depending on your use case. Some of the techniques used in binder jetting 3D printing today are:
- Single Pass Jetting.
- Binder Jetting.
- Electron Beam Additive Manufacturing.
Are Binder Jetting 3D Printers Too Expensive?
Binder Jetting 3D Printers listed come in a range of prices, but they all hover on the expensive side. ComeTrue T10 a desktop-class 3D printer costs around $30,000 and it goes up from there.
Large-scale industrial-style printers like Digital Metal DM P2500 start at $250,000. Similarly, Desktop Metal’s Production System is priced at $150,000.
Are 3D Printed Parts As Strong As Traditionally Manufactured Components?
3D printed parts are not as strong as traditionally manufactured parts. All parts also need to be post-processed or cured after print to make them rigid.
This is especially evident in metal binder jetting parts, as they have lower mechanical properties compared to DMSL/SML parts due to higher porosity If the requirement is for the part to be strong, 3D printing isn’t the way to go for now.
Conclusion
3D printing is revolutionary and with binder jetting, the technology reached a new level. The recent developments allowed manufacturers and businesses to use 3D printed materials instead of relying on traditional manufacturing techniques that can be quite expensive and time-consuming.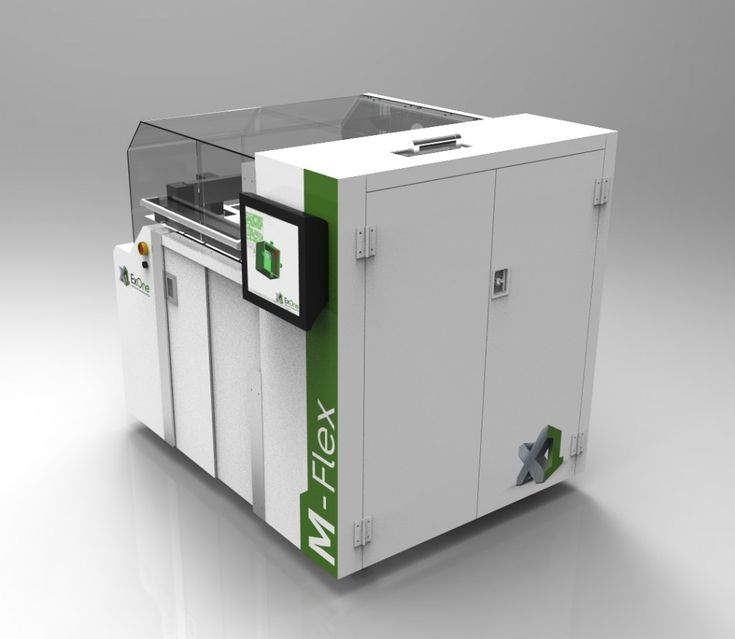
3D printers can reduce lead time by more than half and allow the development of small to large-scale prototypes fairly quickly.
The customizations afforded by these printers are nothing short of amazing as there is no need to wait for days just to make small iterations.
With the technology also trickling down to home and desktop use, home users can now produce and work on parts they cannot find off the shelf. Making something decorative or producing a part to use has never been easier.
While the advantages are many, there are some cons to binder jetting. For instance, metal parts produced with binder jetting have lower mechanical properties compared to DMSL/SML parts due to high porosity.
Material selection is also limited in binder jetting 3D printers compared to other 3D printing processes.
What is Binder Jetting 3D printing?
In this introduction to Binder Jetting 3D printing, we cover the basic principles of the technology. After reading this article you will understand the fundamental mechanics of the Binder Jetting process and how these relate to its benefits and limitations.
How does Binder Jetting work?
Here is how the Binder Jetting process works:
I. First, a recoating blade spreads a thin layer of powder over the build platform.
II. Then, a carriage with inkjet nozzles (which are similar to the nozzles used in desktop 2D printers) passes over the bed, selectively depositing droplets of a binding agent (glue) that bond the powder particles together. In full-color Binder Jetting, the colored ink is also deposited during this step. The size of each drop is approximately 80 μm in diameter, so good resolution can be achieved.
III. When the layer is complete, the build platform moves downwards and the blade re-coats the surface. The process then repeats until the whole part is complete.
IV. After printing, the part is encapsulated in the powder and is left to cure and gain strength. Then the part is removed from the powder bin and the unbound, excess powder is cleaned via pressurized air.
Depending on the material, a post-processing step is usually required.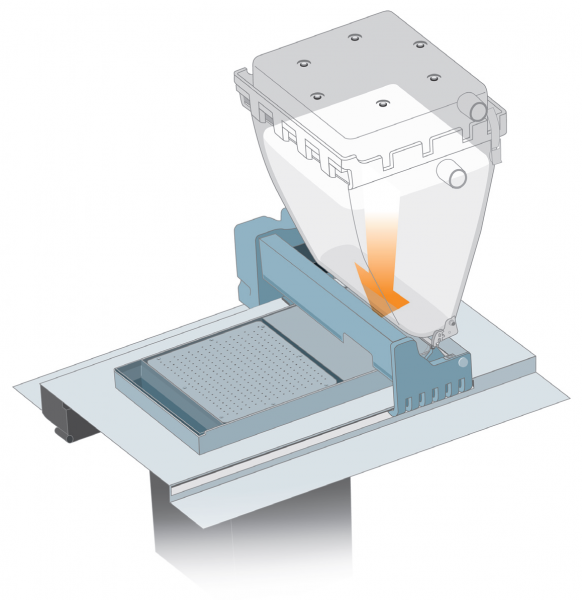 For example, metal Binder Jetting parts need to be sintered (or otherwise heat treated) or infiltrated with a low-melting-temperature metal (typically bronze). Full-color prototypes are also infiltrated with acrylic and coated to improve the vibrancy of colors. Sand casting cores and molds are typically ready to use after 3D printing.
This is because the parts are in a "green" state when they leave the printer. Binder Jetting parts in the green state have poor mechanical properties (they are very brittle) and high porosity.
Schematic of a Binder Jetting 3D printerWhat are the characteristics of Binder Jetting 3D printing?
Printer Parameters
In Binder Jetting, almost all process parameters are preset by the machine manufacturer.
The typical layer height depends on the material: for full color models the typical layer height is 100 microns, for metal parts 50 microns and for sand casting mold materials 200-400 microns.
A key advantage of Binder Jetting over other 3D printing processes is that bonding occurs at room temperature. This means that dimensional distortions connected to thermal effects (such as warping in FDM, SLS, DMSL/SLM or curling in SLA/DLP) are not a problem in Binder Jetting.
As a result, the build volume of Binder Jetting machines are amongst the largest compared to all 3D printing technologies (up to 2200 x 1200 x 600 mm). These large machines are generally used to produce sand casting molds. Metal Binder Jetting systems typically have larger build volumes than DMSL/SLM systems (up to 800 x 500 x 400 mm), which allows the parallel manufacturing of multiple parts at a time. The maximum part size though is restricted to a recommended length of up to 50 mm, due to the post-processing step involved.
Moreover, Binder Jetting requires no support structures: the surrounding powder provides to the part all the necessary support (similar to SLS). This is a key difference between metal Binder Jetting and other metal 3D printing processes, which usually require extensive use of support structures, and allows for the creation of freeform metal structures with very few geometric restrictions. Geometric inaccuracies in metal Binder Jetting come mainly from the post-processing steps, as discussed in a later section.
Since the parts in Binder Jetting do not need to be attached to the build platform, the whole build volume can be utilized. Thus, Binder Jetting is suitable for low-to-medium batch production. To take advantage of the full capabilities of Binder Jetting, it is very important to consider how to fill effectively the whole build volume of the machine (bin packing).
Small metal Binder Jetting with fine holes of great dimensional accuracy.Image courtesy ofDigital Metal
Full Color Binder Jetting
Binder Jetting can produce full color 3D printed parts in a similar way to Material Jetting. It is often used to 3D print figurines and topographical maps, because of its low cost.
Full-color models are printed using sandstone powder or PMMA powder. The main printhead first jets the binding agent, while a secondary print head jets a colored ink. Inks with different colors can be combined to produce a very large array of colors, in a similar way to a 2D inkjet printer.
After printing, the parts are then coated with cyanoacrylate (super glue) or a different infiltrant to improve part strength and enhance the vibrancy of the colors. A secondary epoxy layer can then also be added to further improve strength and color appearance. Even with these extra steps, full-color Binder Jetting parts are very brittle and they are not recommended for functional applications.
To produce full-color prints, a CAD model that contains the color information must be provided. Color can be applied to CAD models via two methods: on a per face approach or as a texture map. Applying color on a per face basis is quick and easy to implement, but using a texture map allows for more controls and greater detail.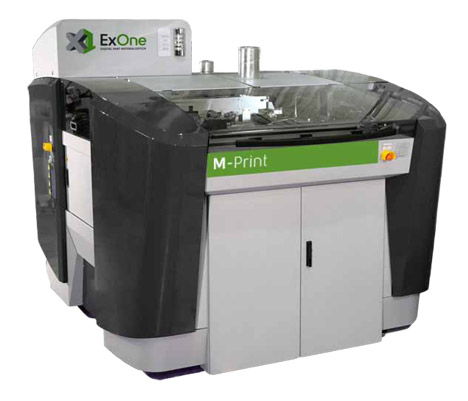 Refer to your native CAD software for specific instructions.
Sand Casting Cores and Molds
The production of large sand casting patterns is one of the most common uses for Binder Jetting. The low cost and speed of the process make it an excellent solution for elaborate pattern designs that would be very difficult or impossible to produce using traditional techniques.
The cores and molds are generally printed with sand or silica. After printing, the molds are generally immediately ready for casting. The casted metal component is usually removed from them after casting by breaking the mold. Even though these molds are used only once, the time and cost savings compared to traditional manufacturing are substantial.
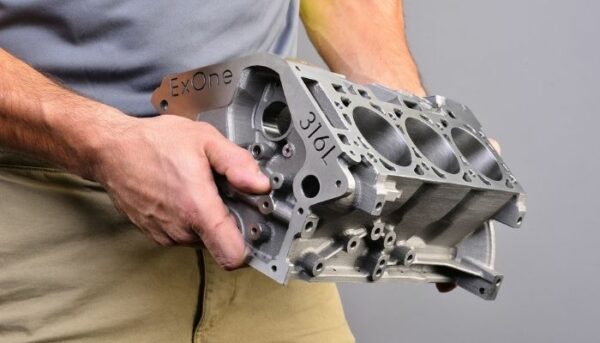
Multi-part sand casting assembly used to cast an engine block.Image courtesy of ExOne
Metal Binder Jetting
Metal Binder Jetting is up to 10x more economical than other metal 3D printing processes (DMSL/SLM).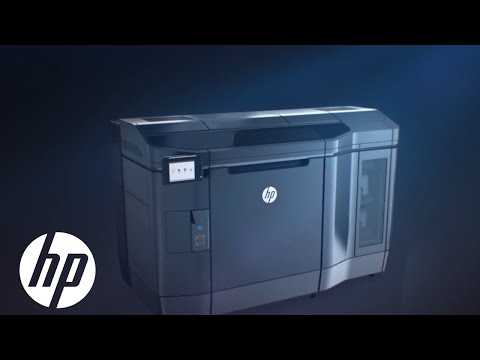 Moreover, the build size of Binder Jetting is considerably large and the produced parts require no support structures during printing, enabling the creation of complex geometries. This makes metal Binder Jetting a very appealing technology for low-to-medium metal production.
The main drawback of metal Binder Jetting parts are their mechanical properties, which are not suitable for high-end applications. Nevertheless, the material properties of the produced parts are equivalent to metal parts produced with Metal Injection Molding, which is one of the most widely used manufacturing methods for the mass production of metal parts.
Infiltration & Sintering
Metal Binder Jetting parts require a secondary process after printing, like infiltration or sintering, to achieve their good mechanical properties, as the as-printed parts basically consist of metal particles bound together with a polymer adhesive.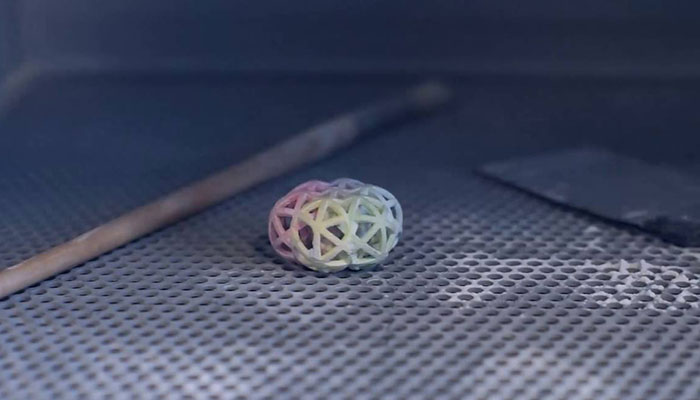
Infiltration: After printing, the part is placed in a furnace, where the binder is burnt out leaving voids. At this point, the part is approximately 60% porous. Bronze is then used to infiltrate the voids via capillary action, resulting in parts with low porosity and good strength.
Sintering: After printing is complete, the parts are placed in a high temperature furnace, where the binder is burnt out and the remaining metal particles are sintered (bonded) together, resulting in parts with very low porosity.
An oil and gas stator printed from stainless steel and infiltrated with bronze. Notice the surface finish, which is typical for Binder Jetted parts.Image courtesy of ExOne
Characteristics of metal Binder Jetting
Accuracy and tolerance can vary greatly depending on the model and are hard to predict as they are greatly dependant on the geometry. For example, parts with length up to 25 - 75 mm shrink between 0. 8 to 2% after infiltration, while larger parts have an estimated average shrinkage of 3%. For sintering, the part shrinkage is approximately 20%. The dimensions of the parts are compensated for shrinkage by the machine's software, but non-uniform shrinkage can be an issue and must be accounted for during the design stage in collaboration with the Binder Jetting machine operator.
The post-processing step can also be the source of inaccuracies. For example, during sintering, the part is heated to a high temperature and becomes softer. In this softer state, unsupported areas might deform under their own weight. Moreover, as the part shrinks during sintering, there here is friction between the plate of the furnace and the lower surface of the part, which may lead to warping. Again, communication with the Binder Jetting machine operator is key here to ensure optimal results.
Sintered or infiltrated Binder Jetting metal parts will have an internal porosity (sintering produces 97% dense parts, while infiltration approximately 90%).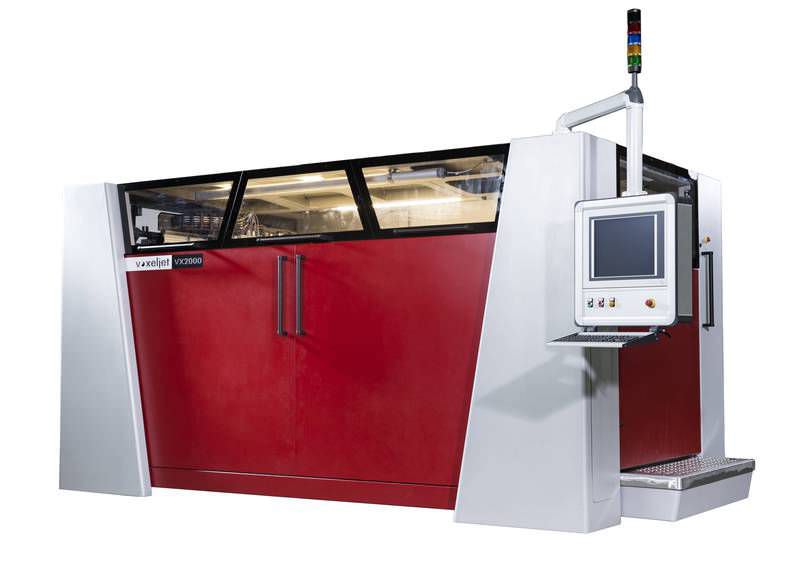 This affects the mechanical properties of metal Binder Jetting parts, as the voids can lead to crack initiation. Fatigue and fracture strength and elongation at break are the material properties that are most affected by internal porosity. Advanced metallurgical processes (like Hot isostatic pressing or HIP) can be applied to produce parts with almost no internal porosity. For applications where mechanical performance is critical though, DMLS or SLM are the recommended solutions.
An advantage of metal Binder Jetting compared to DMLS/SLM, is the surface roughness of the produced parts. Typically, metal Binder Jetted parts have a surface roughness of Ra 6 μm after post-processing, which can be reduced to Ra 3 μm if a bead-blasting step is employed. In comparison, the as-printed surface roughness of DMLS/SLM parts is approximately Ra 12-16 μm. This is particularly beneficial for parts with internal geometries, for example internal channels, where post-processing is difficult.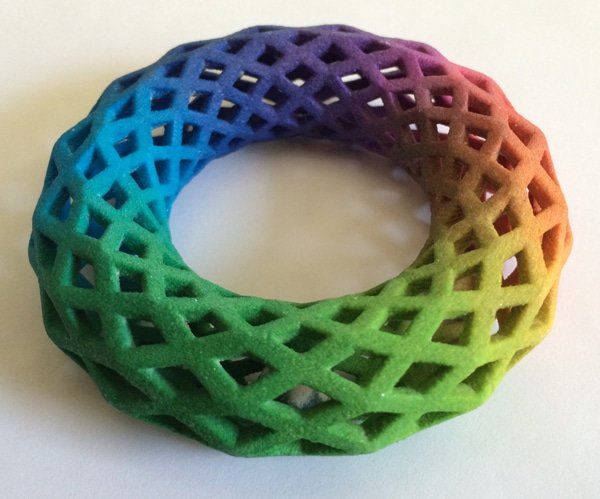
The table below summarizes the differences in the main mechanical properties of Stainless Steel parts, printed with Binder Jetting and DMLS/SLM:
| Binder Jetting Stainless Steel 316 (sintered) | Binder Jetting Stainless Steel 316 (bronze infiltrated) | DMLS/SLM Stainless Steel 316L | |
|---|---|---|---|
| Yield Strength | 214 MPa | 283 MPa | 470 MPa |
| Elongation at Break | 34% | 14.5% | 40% |
| Modulus of Elasticity | 165 GPa | 135 GPa | 180 GPa |
What are the benefits & limitations of Binder Jetting 3D printing?
The key advantages and disadvantages of the technology are summarised below:
Binder Jetting produces metal parts and full-color prototypes at a fraction of the cost compared to DMLS/SLM and Material Jetting respectively.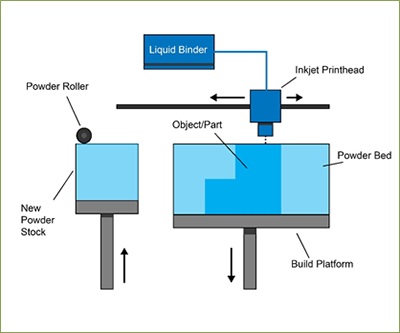
Binder Jetting can manufacture very large parts and conplex metal geometries, as it is not limited by any thermal effects (e.g. warping).
The manufacturing capabilities of Binder Jetting are excellent for low to medium batch production.
Metal Binder Jetting parts have lower mechanical properties than DMSL/SLM parts, due to their higher porosity.
Only rough details can be printed with Binder Jetting, as the parts are very brittle in their green state and may fracture during post processing.
Compared to other 3D printing process, Binder Jetting offers a limited material selection.
The main characteristics of Binder Jetting are summarized in the table below:
| Binder Jetting | |
|---|---|
| Materials | Metals, Ceramics (sand) |
| Dimensional accuracy | Metal: ± 2% or 0. 2 mm (down to ± 0.5% or ± 0.05) Full-color: ± 0.3 mm Sand: ± 0.3 mm 2 mm (down to ± 0.5% or ± 0.05) Full-color: ± 0.3 mm Sand: ± 0.3 mm |
| Typical build size | Metal: 400 x 250 x 250 mm (up to 800 x 500 x 400 mm) Full-color: 200 x 250 x 200 mm (up to 500 x 380 x 230 mm) Sand: 800 x 500 x 400 (up to 2200 x 1200 x 600 mm) |
| Common layer thickness | Metal: 35 - 50 μm Full-color: 100 μm Sand: 200 - 400 μm |
| Support | Not required |
Ready to transform your CAD file into a custom part? Upload your designs for a free, instant quote.
Get an instant quote3D Inkjet Printing (3DP) – 3dprofy
Turch October 21st, 2014
3DP stands for Three-Dimensional Printing , and translates as three-dimensional printing.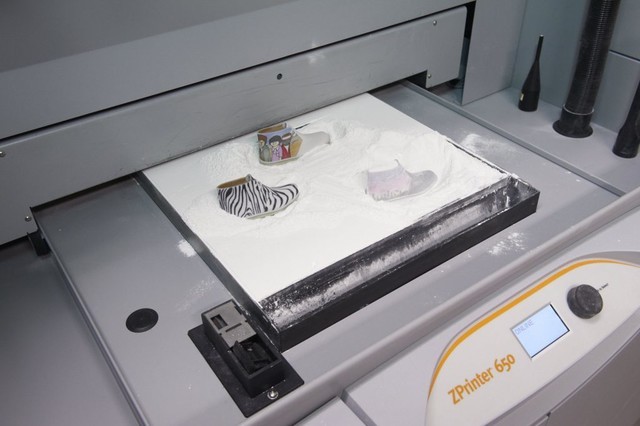 This technology is one of the varieties of systems for the additive construction of a product according to its CAD model and differs from numerous similar schemes in that the process is carried out according to the principle of a conventional printer - through print head nozzles. Thus, 3D inkjet printing is a natural continuation of the development of conventional 2D printing technologies. To date, it has achieved fairly good results, such as color printing.
Products printed on the Z Corp's Spectrum Z510 color 3D printer
The history of the emergence and development of 3DP
For the first time, the idea of \u200b\u200brealizing equipment using this printing scheme was proposed by two students at the Massachusetts Institute of Technology Tim Anderson and Jim Bredt in 1993. It is thanks to them that the term 3D printing has spread around the world. And this is quite fair, because the first model of the device was a modification of a conventional 2D printer.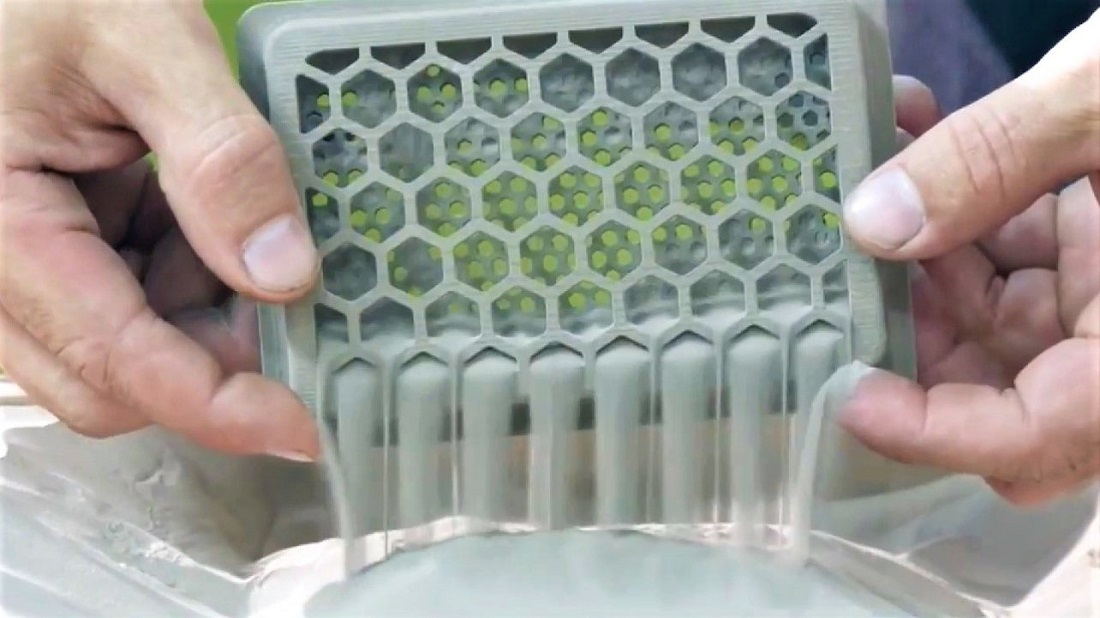 Instead of ink, he used a special adhesive composition, which applied layer by layer to the surface of the bonded substance, the boundaries of the future three-dimensional product.
In 1995, Tim and Jim formed the Z Corporation, which brought this technology to market, improving it to such an extent that in 2012 3D systems Corporation wished to acquire it along with the company. Under her brand, former Z Corporation models are now sold worldwide.
One of the directions of the ExOne company (USA) is the production of 3D printers that use the same technology. This firm was founded in 2005 as a subsidiary of the Extrude Hone Corporation. Using the patents obtained by Anderson and Bedt, they launched a line of printers that even print metal products today.
3D inkjet printing technology
Today there are more than thirty 3D printing technologies, which in one way or another duplicate each other, although each has its own characteristics. The American Society for Testing and Materials (ASTM International) has divided 3D inkjet printing technologies into two categories:
- Material jetting - material jetting.

- Binder jetting Binder jetting.
In the first case, the building material itself is fed directly through the nozzles, which hardens after application. In the second, an adhesive is sprayed onto a thin layer of gypsum, polymer or metal powder. 3DP technology in its original form represented exactly the second method.
If we consider it in more detail, then printing occurs in the following way:0003
- To begin with, a CAD model is loaded into a computer connected via an Ethernet cable to the printer, which is “cut” into layers, about 0.1 mm thick.
- Next, a thin layer of powdered material (gypsum, polymers, sand, metal) is applied with a roller on a special platform.
- The print head sprays the binder (glue, water, special mixture) along the coordinates of the boundaries of the first layer received from the computer.
- After that, the platform with the model is lowered by the thickness of the layer down, and the chamber with the building material is lowered by the same distance.
- Next, the roller unrolls the next layer and the process repeats.
- After the end of 3D printing, the product is removed from the powder layer and thoroughly cleaned of its residues.
When making models from metal powder, a firing process in a special furnace is added. Let's take a closer look at this process.
The figure above shows 4 stages of his stage:
- First, according to the above scheme, the so-called "green model" is formed from the matrix powder and binder (1,2).
- Next, the article is placed in an oven filled with a protective gas, usually nitrogen.
- When the temperature rises to 1000-1100 degrees, the binder is removed, and the free space around the powder particles is impregnated with bronze (or other metal) previously placed next to the "green" model. This process is called infiltration.
Materials used for 3DP printing and their cost
Gypsum has traditionally been used in 3D printing, and water played the role of a binder in this case. However, technology has stepped forward and, as is clear from the previous section, metals (bronze, copper), sand and polymer mixtures are now also used. Dyes are mixed into the binder, which makes it possible to carry out color printing on such a 3D printer.
The cost of the simplest powders is on average 600-700 euros for a 10 kg bucket (8200 cm3), the price of the binder is about 660 euros for 3.8 liters.
Characteristics of finished products and their application
Models made of gypsum and polymers are not too strong to be used in the production cycle as a mold, however, they are quite suitable for rapid visualization of prototypes of various parts and products . It can also be used in various architectural and design works or in the manufacture of souvenirs.
Products using metals have better properties, however, their strength is still at an average level: tensile strength 610 MPa, hardness HRC = 10-20.
Such characteristics are quite suitable for the manufacture of plastic injection molds, which can withstand from 200 to 500 thousand production cycles. They are also used to make parts that work under friction conditions - shafts, bushings, gears, etc.
Disadvantages
- Gypsum-based products are quite fragile and can only be used in a narrow field of activity. As a mold, it can only be used once, after which it is destroyed.
- When working with gypsum powders, a lot of dust is generated, so a good extraction is necessary.
Advantages
- High speed of building parts - about 6 mm in height per hour, with a working area of 780 x 400 mm it will be 1780 cm3, which is an order of magnitude superior to laser rapid prototyping technologies.
- Relatively low cost of consumables.
ExOne offers the following 3D printer models:
M-Flex printer model from ExOne.
Results
Printers using inkjet 3D printing technology is one of the possible solutions to implement the problem of rapid prototyping. It should be noted that despite some shortcomings, it still found a place in the market today and continues to develop actively along with many of its competitors.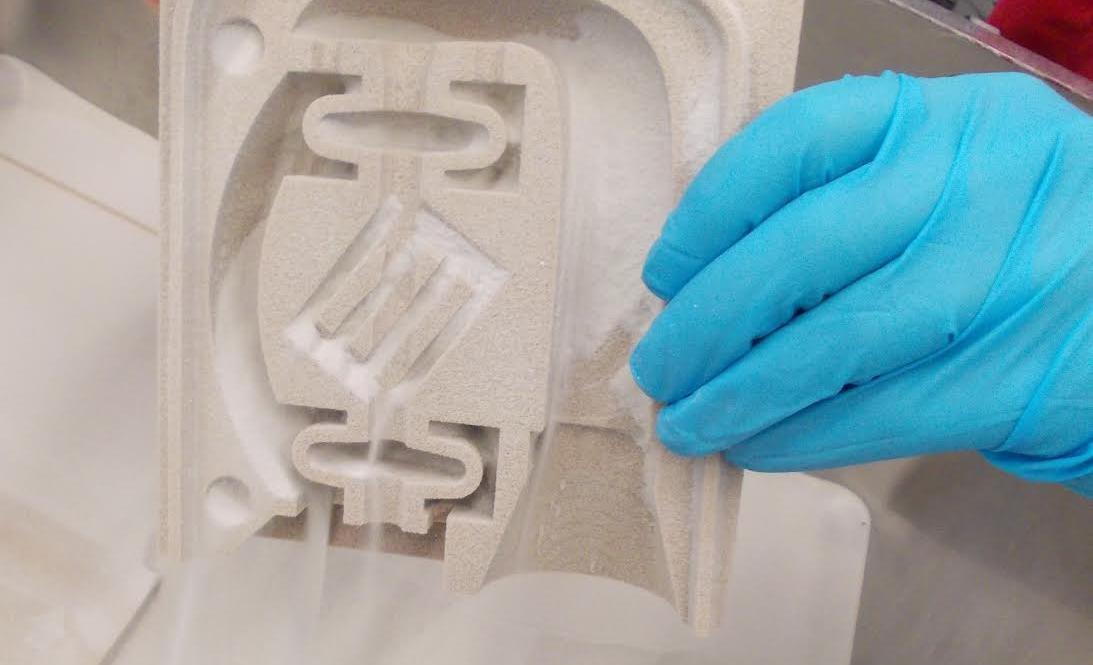
Build a Plan B Inkjet 3D Printer Under $1,300
Archive
Follow author
Subscribe
Don't want
3D printed product Plan B
cannot be called normal. It uses a technology that is fundamentally different from the method of layered deposition and stereolithography. This printer prints products from fine powder, which sticks together layer by layer under the influence of a special binder.
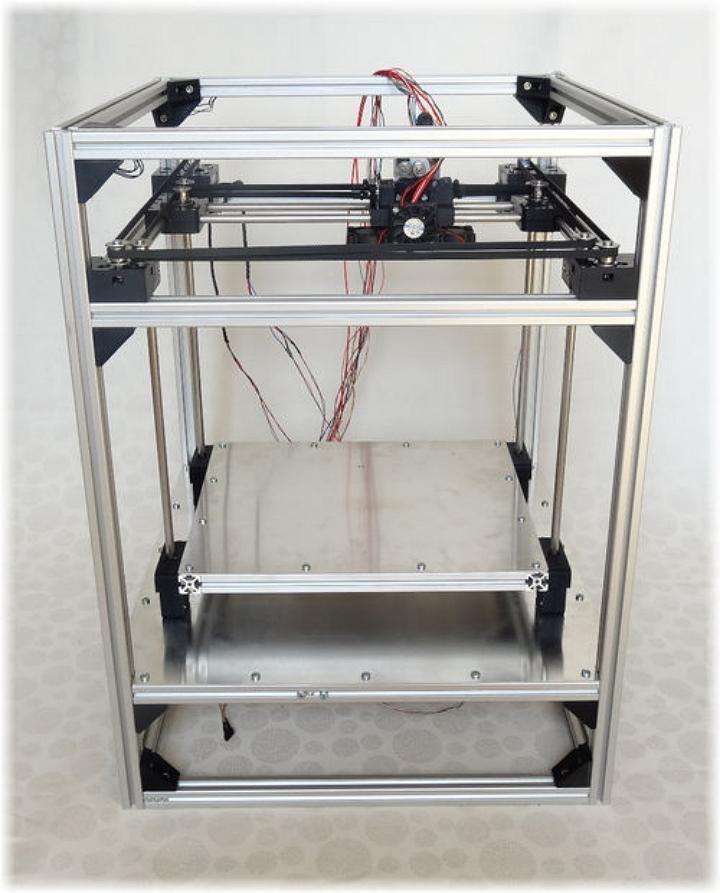
Plan B 3D printer
“3D printing differs from conventional inkjet printing only in its three-dimensionality,” explains Haas. – My 3D printer has several powder containers and a binder cartridge. First, he applies a thin layer of powder to the platform. The head sprays the binder, bonding the powder in the right places. When the layer is ready, the platform drops a little lower. This process is repeated until the product is finished.
Plan B 3D printed product
In general, this method is similar to selective laser sintering, but instead of a laser that sinters the powder, it uses a special adhesive that resembles glue. Haas claims that the Plan B prints much more accurately than fused deposition 3D printers. In addition, no support material is required when manufacturing products with a complex design, since the powder itself serves as a support.
Plan B may not be one of the world's fastest 3D printers, but it prints faster than Cartesian 3D printers because the nozzle doesn't have to move as much as the print head normally does. While stereolithography and fused deposition 3D printers are limited in materials (usually plastic-based substances), Plan B is capable of printing virtually any powder material, including ceramic, stainless steel, graphite, and etc.
Plan B in action
Sounds great, doesn't it. However, there is a fly in the ointment in every barrel of honey. First of all, it is worth remembering that a very fine powder is used for work, which means that it will contain both the platform and the product itself. Also, the 3D printer's containers must always be filled with powder for it to function properly. But, perhaps, the most unpleasant can be considered the post-processing of products. Printed products are quite fragile, so they should be handled very carefully. First you need to brush off the remnants of the powder from them, then cover them with cyanoacrylic or epoxy glue to give them strength. Another way to fasten the product is to burn it in the oven. Agree, not everyone has a personal kiln at hand.
The Plan B 3D printer cost Haas about 1,000 euros to build. Main features:
- Working volume: 150 mm x 150 mm x 100 mm.
- Layer thickness: 0.1-0.25 mm.
- Resolution: 96 dpi (HP C6602).
- Printing material: currently Zcorp gypsum powder and colorless binder (this list will be updated).
- Positioning accuracy (X/Y): 0.05 mm.
- Speed: 60 mm/sec (will be higher with future hardware update).
- Print speed: up to 30 mm/h (will be faster with a future hardware update).
- Power consumption: up to 160 W (about 90 W on average).

- Printer dimensions: 550 mm x 350 mm x 450 mm.
- Printer weight: 16 kg.
- Frame material: aluminum and plastic.
- Linear guides: LM8UU on 8 mm thick steel rods.
- Number of motors: 6 NEMA17 motors.
- Extras: LCD screen, rotary keypad, SD card reader.
3D printer loaded with powder
All instructions for building the Plan B 3D printer can be found on the Haas website.
Article prepared for 3DToday.ru
7
Subscribe to the author
Subscribe
Don't want to
So, you are thinking about the possibility of making money on 3D printing. How realistic is this? Quite, although the way...
Read more
3
Subscribe to the author
Subscribe
Don't want
Recently, cloud-based 3D printing services have been developing.