Best 3d printer for drone parts
3D Printers for FPV Drone Nodes Best 3d printer for drone parts
Awestruck by the intricate-looking plastic thingies yet? Luckily for us, we live in an age where plastic is available and is much easier to handle and manipulate into complex shapes. 3D printers have come a long way in the past 10 years and are much more affordable these days.
A 3D printer is a long-term investment, multiple $10 3D printed mounts will recoup the money of the 3D printer, plus there’s also the added bonus of 3D printing a beautiful vase for the Missus. There are $100 3D printers that work so well that for once we as consumers can think that we are ripping off the manufacturer. Without further ado, Let’s get started....
Which 3D Printer to buy For Printing Drone Parts?
Creality Ender 3 V2
Budget FDM printer
Budget FDM printer
Creality Ender 3 V2
Ender 3 provides cheap and reliable 3D printing on a machine that doesn’t give you a headache with its constant errors and faults, the Ender 3 V2 certainly is your best bet.
$ Check Price on Amazon
Creality makes some of the most popular 3D printers while also providing features at a cheaper price point. The Ender 3 keeps much of the design features from the original Ender 3, with the V2 continuing the characteristic for balancing high-quality printing at $250, a competitive price tag. The build volume is a comfortable 220 x 220 x 250 mm. The equipped Bowden-style extruder gives you the ability to print your typical consumer filaments such as PLA, PETG, and, when carefully managed, TPU. The Ender 3 V2, however, is the addition of belt tensioners, updated electronics that include a 32-bit board and print-silencing stepper motor drivers, an integrated tool storage drawer, touchscreen UI, among a few other improvements. For most hobbyists looking for a cheap and reliable 3D printing on a machine that doesn’t give you a headache with its constant errors and faults, the Ender 3 V2 certainly is your best bet.
Prusa Mini+ FDM Original
Top of the line
Top of the line
Prusa Mini+ FDM Original
The Prusa Mini+ is different from its larger forebear in terms of build volume and size, but the results are largely the same with a fantastic print quality, effortless operation, and class-leading features.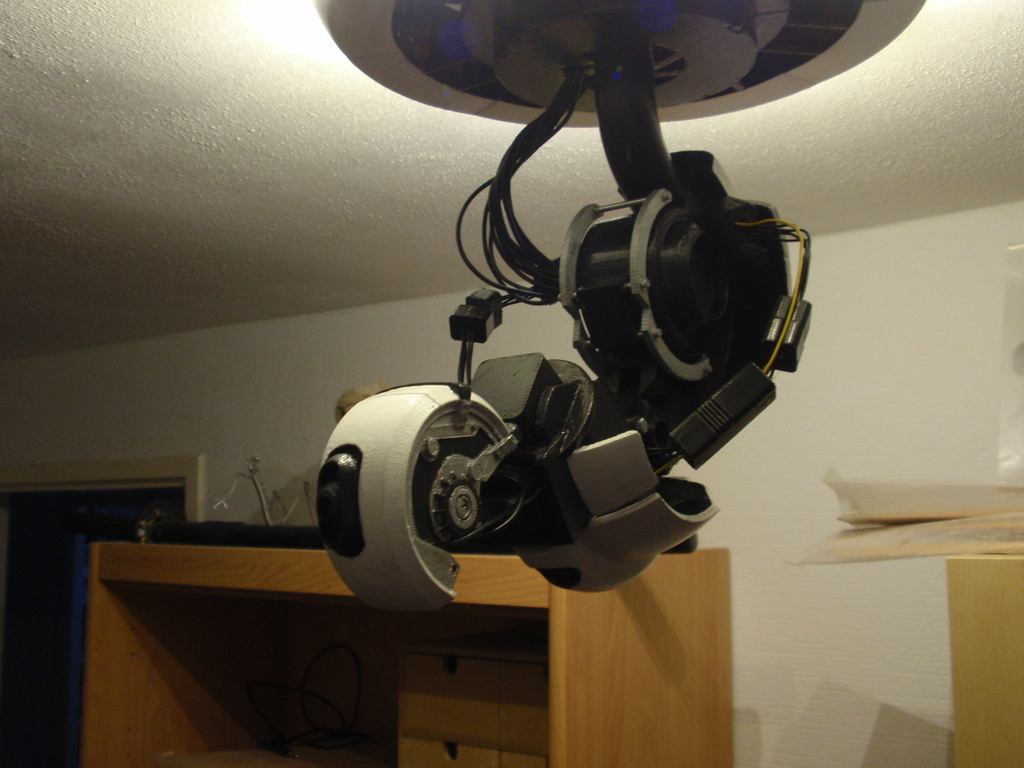
$ Check Price on Amazon
It comes equipped with a removable magnetic PEI-coated print bed, thoroughly developed firmware with vast hardware-backed features such as mesh-bed leveling, regular firmware updates fix bugs, make improvements, and even add all-new features. Arguably, the best thing about Original Prusa machines is the continuing support they receive from the company. The Mini+ is also mini in terms of build volume, coming with a build volume of 180 x 180 x 180mm, which is smaller than the Ender 3 V2’s build volume.
Monoprice Mini Delta V2
Cheap 3D Printer
Cheap 3D Printer
Monoprice Mini Delta V2
The Monoprice Mini Delta V2 is an inexpensive 3D printer that scores high on most of the aspects and falls short on some. Mini Delta is one of the cheapest Delta 3D printers.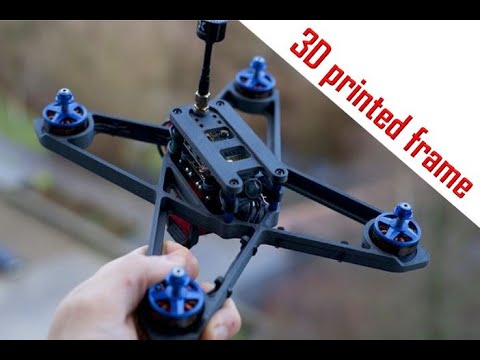 It is easy to set up and use with no calibration needed and is ready to print out of the box.
$ Check Price on Amazon
It consistently delivers prints of acceptable quality, but its smooth and almost misprint-free operation makes it a good introduction to 3D printing. It's also fast and supports a variety of filament types with the only major gripe being the small print area of 110x120mm. Incorporating features such as an adaptive touch screen, advanced auto-leveling, and an internal diagnostic system make it a pleasure to use. This black printer comes in a tiny package with a sturdy steel-and-anodized aluminum frame measuring h27.5 X W11.8 X D11 inches and weighs only 4 pounds.
Related Posts
Workings of a 3D Printer
Most commercial 3D printers use FDM, Fused Deposition Modelling, or SLA, Stereolithography, methods for 3D printing. Both the methods come under additive model methods but vary in which the material is formed.
FDM 3D Printers
Fused Deposition Modeling, as the name suggests fuses plastic in other words melt it, lays it on top of the print bed, and rapidly cools the molten plastic solidifying it. Plastic is molten and is printed layer by layer until the desired output/ model is built.
SLA 3D Printers
SLA printers also fall under the additive model method but vary with how the model is built. SLA printers work by hardening a liquid resin stored inside the 3D printer, and this liquid resin hardens when exposed to the light of particular wavelengths. The print bed moves through the tank with liquid as the object, is built layer by layer. Each layer is then hardened to a solid layer. The print bed then rises slightly to allow the next layer to harden, causing the object to gradually rise from the depth.
Differences | FDM 3D Printer | SLA 3D Printer |
|---|---|---|
Filament Materials | PLA, ABS, TPU, PETG, Nylon, and mixtures of wood, ceramics, metal, and carbon fiber. | Propriety resins, resins vary for every manufacturer |
Filament Cost | $25-$30 | $80-$150 and $40-$80 for resin tanks that need to be replaced after using 3-5 liters of resin |
Printing Speeds | Higher print speeds can be achieved at the expense of lower print quality | Higher print speeds can be achieved without compromising on print quality |
Print Accuracy | Mediocre- High accuracy with 0. | Extremely accurate with a layer thickness of 0.01- 0.05mm |
3D Printer Costs | FDM 3D printers start from as little as $100 | SLA 3D printers cost as 3 times as much as a similar-sized FDM 3D printer |
Advantages |
|
|
Disadvantages |
|
|
 5 to 0.127 mm layer thickness.
Long story short, FDM 3D printers are a suitable choice for 99% of the hobbyists.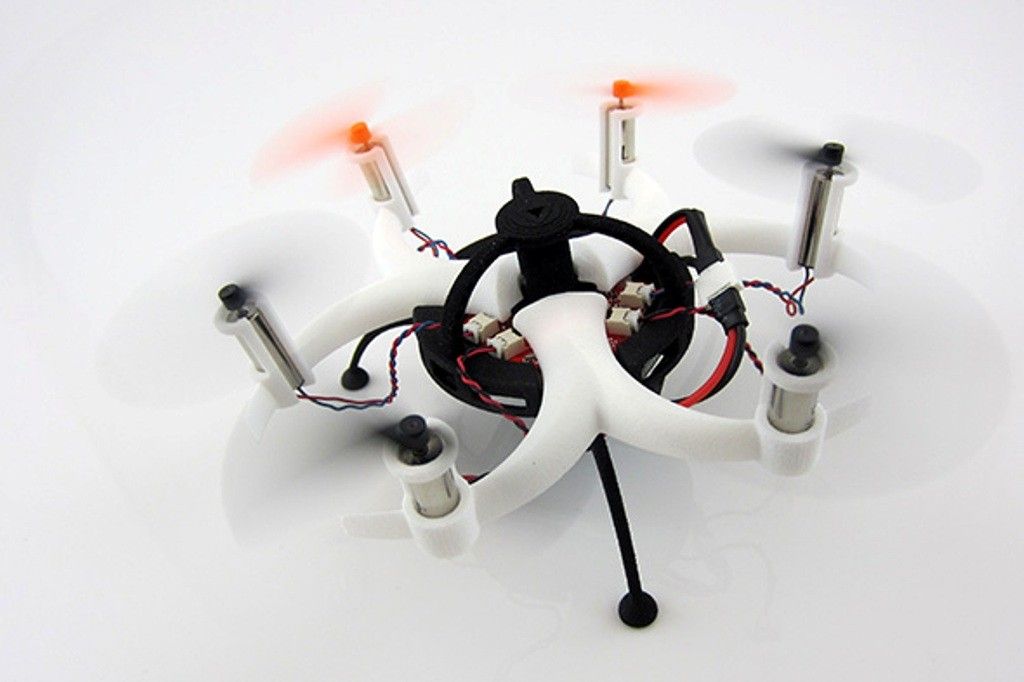
Mode of Operation
The bottom line, SLA is expensive and they are not suitable for most consumers. FDM technology has matured over time and some of the cheaper 3D printers do a decent job of 3D Printing that going cheap is an option. The most popular FDM 3D printers come in 2 modes or types of operation- Cartesian 3D printers and Delta 3D printers.
Cartesian 3D Printer
Cartesian 3D Printers move along the X, Y, and Z axes linearly to position the hot end in three-dimensional space. Usually, the hot end moves on the X- and Y-axes, whilst the print head or the print bed moves up and down on the Z-axis. Some 3D printers move the extruder up and down for each layer, whereas some Cartesian 3D printers have the print bed move up and down instead.
Delta 3D Printer
Delta 3D printers work with three arms fixed to vertical rails which can move both upwards and downwards within the cylinder print structure. The hot end is connected to the end of each arm with hinges, and the arms work together to adjust the position of the hot end.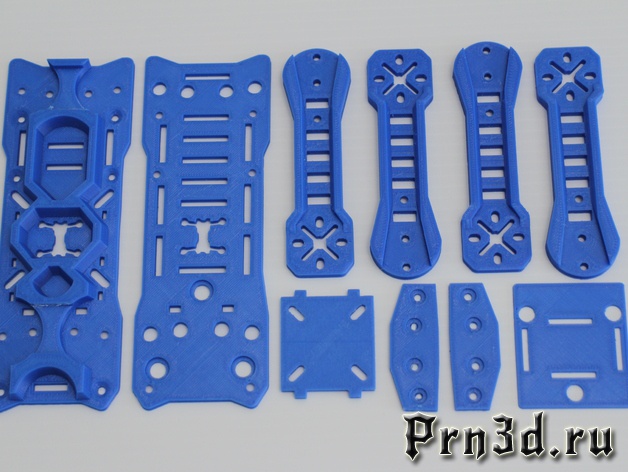 The coordinated movement of a delta printer’s arms controls the hot ends height (Z-axis) and location (X and Y-axes) relative to the print bed.
Differences | Cartesian 3D Printer | Delta 3D Printer |
|---|---|---|
Advantages |
|
|
Disadvantages |
|
|
TL;DR: Cartesian 3D printers are consistent and heavily upgradable whereas Delta 3D printers can print faster and give tall prints.
Now that we’ve outlined the differences between the 2 styles of printers, it is your turn to decide what’s the best style of 3D printer that suits you. Mind you, take into account the other things that you will possibly print apart from the 3D printing only FPV parts.
The 3D Printing Process
All 3D Printers need a model to print, and this model is a 3D object that’s designed in one of the CAD modeling software. This 3D model is fed into the 3D.
3D CAD Model
Well firstly, we need something to print. The first basic requirement of any 3D printing process is a CAD Model. It is the 3D design for the product you want to print and the final output has to be 3D printed. The final file format must be in .STL or .OBJ, with them being the most popular file outputs. TinkerCAD and Onshape are 2 of the most popular CAD software extensively used to build CAD models from scratch.
TinkerCAD is a browser-based computer-aided design (CAD) app from Autodesk that serves as a good entry point for beginners. You can use this 3D printing software to build 3D models from basic shapes, customizing parameters, and allows you to create 2D and convert them into 3D models. Onshape is an enterprise-grade software suite that comes with powerful tools like parametric 3D modeling and STL file viewing, editing, and repairing 3D printing software making Onshape suitable for more advanced users.
If you don’t have the time or patience for tinkering, there are sites like Thingiverse and Yeggi from where models from other creators can be downloaded and printed on your 3D printer for free.
Slicing the 3D Model
Slicing is the step where the Slicer software converts the 3D model into individual layers for the 3D printer to understand and print. This software tells the 3D printer where to point the nozzle and squirt the molten plastic. These slices (also called layers) are then deposited one above the other during the printing process. The slicer converts the design into coordinates which the printer understands and the material is deposited as per the coordinates.
The output of this slicer is in the form of a text file with a file extension being .gcode. Ultimaker’s Cura, PrusaSlicer, and Slic3r are the most popular choices when it comes to slicer software.
Cura is one of the most popular and widely used 3D printing slicers on the market, there’s a good chance that the optimal profile settings for your 3D printer is available on the Cura software as default, making it easy to get started right away without having to mess around the settings. PrusaSlicer has gained a lot of popularity for featuring vast lists of tunable settings and also has some handy useful features. Slic3r is an open-source slicer software with a reputation for offering cutting-edge features that can’t be found anywhere else.
Setting up the 3D Printer and the Parameters
This is the stage inside the Slicer software where we tinker with the parameters to get the desired model. As a beginner, we recommend you stick to the default settings, and once when you gain enough knowledge and experience in 3D printing, you can always play around.
It is easier said than done by changing the print speed from 20mm/s to 100mm/s to get faster prints. There are various parameters like feed rate, infill, feed rate, nozzle retract among few others to factor in which might be too much in the beginning.
Take baby steps. Read this guide on how to modify the settings to get faster prints.
3D Printing
This is the easy part, you load the model onto the 3D printer and hit start to start printing. Depending on the printer you have, you can load the model to the 3D printer via USB, an SD card, transfer the model over a mobile-based application, or print from a cloud service.
Make sure the model is placed in a well-ventilated place so the fumes from the molten plastic has a place to escape. Keep an eye on the printer to ensure it is printing. Sometimes the filament might break or the nozzle might get clogged resulting in the filament not coming out of the nozzle. Saves you time and money if you spot this quicker.
End Result
When the printer is done printing, the printer turns off and notifies you on your smartphone if the printer supports it or you can just find out when the “eek eek eek” creaking music stops. Now all you have to do is pry the model out from the print bed and is ready to use. If the printer uses a heated bed, DO NOT TRY TO REMOVE THE MODEL IMMEDIATELY AFTER THE PRINTING STOPS. The print bed will still be hot and you will burn your hands.
Which filament to use?
A 3D printer plastic, also known as the filament for 3D printing, serves as the ink for the 3D printer. 3D printer filaments come in different types and your filament choice depends on the object that you want to print and the desired physical and chemical properties of the model. Some filament types are demanding to print, while some filaments can get you printing right out of the box. Let’s take a look below.
PLA (Polylactic Acid)
PLA is the most popular filament, often credited to its ease of printing with a melting point of around 150- 160°C.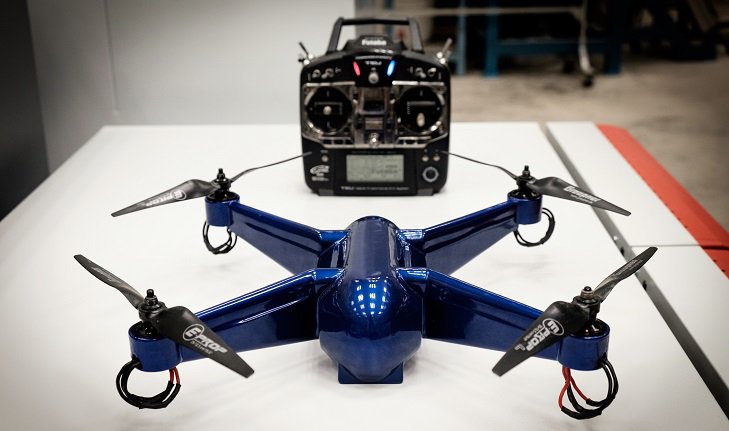 PLA is a biodegradable thermoplastic that is derived from biodegradable resources like cornstarch and sugar cane. PLA is environment-friendly compared to other plastic materials. Another benefit of printing with PLA is that it requires a very low printing temperature. This means that you won’t be running into problems with warping or stringing that are very common with high-temperature filaments.
ABS (Acetonitrile Butadiene Styrene)
ABS is another popular filament because the models printed with ABS have high strength and resilient nature which make it suitable for applications that require impact resistance. ABS melts at a higher temperature of 220- 250 °C which makes it prone to warping when cooled and relatively difficult to print. ABS filaments produce toxic fumes in their molten form during printing, making it dangerous to print with ABS in a room without ventilation.
PETG (Polyethylene Terephthalate Glycol)
PETG is a variation of Polyethylene Terephthalate (PET), one of the most heavily used plastics in the world. While PET has high mechanical strength and moisture-resistant characteristics, adding glycol into the mix results in a plastic that is much more durable, clearer, and easier to handle. PETG filaments melt at a conservative 220- 245 °C and the physical properties of PETG make it suitable for printing objects that will be subjected to a lot of physical stress.
Nylon
Nylon filament is a popular synthetic polymer that is also used in many industrial applications. This 3D printer filament is a cost-effective plastic. It is strong, lightweight, flexible, and wear-resistant. Nylon is the best 3D printer filament for parts that require a lot of mechanical wear and tear. It also has an exceptionally good abrasion resistance. Nylon melts at 260- 280 °C, exhibits excellent layer-to-layer adhesion, further making nylon prints much more durable than those made with other filament materials.
Related Posts
Conclusion
Have you watched how the large bells atop the Churches are made? A mold out of sand is made and the metal is poured into the cavity to form the basic shape of a bell, the hot metal is let to cool down and solidify. The mold is taken apart, the sand removed and a rough shape is obtained, the bell is smoothed off its rough edges, polished, and is ready to be rung by worshippers of the Almighty.
3D Printers changed the way rapid prototyping works. 3D printers are flexible pieces of machinery that have evolved over time to print plastic, metal, and even concrete, 3D printed homes are a thing now. 3D printers are only limited by your imagination, well, and the build volume. In the world of FPV, 3D printers can help you to produce, right from the camera mounts to antenna mounts which eliminate the need to shipping times while also costing much lesser, to the frames themselves, yes you can 3D print Carbon Fiber. Hope this guide helped you to choose best 3d printer for drone parts you need. The applications are limitless, maybe 3D printed frames will be a thing one day. Have fun flying!!
7 Best 3D Printers for Drones, Nerf Parts, RC & Robotics Parts – 3D Printerly
Choosing the right 3D printer can be overwhelming when you see just how many choices there are, which I can definitely understand since I had a similar experience.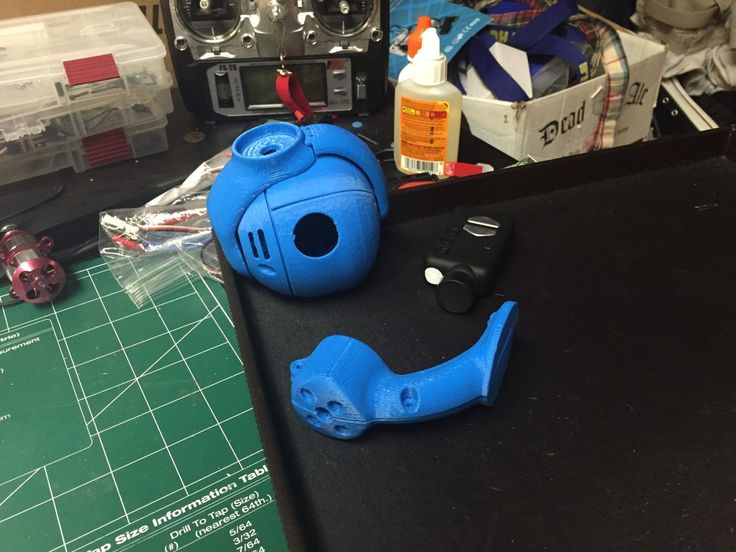
If you are looking for a 3D printer that is specific to a hobby or goal, you’re going to want certain features that you may not find in another machine.
For the people looking for 3D printers for drones, nerf parts, RC (remote control) cars/boats/planes, or robotic parts, this is an article that will help you pick the best of the best.
Let’s waste no more time and dive straight into this list of high quality 3D printers.
The Artillery Sidewinder X1 V4 was released in the market in 2018 and people started to comment that this 3D printer will give proper competition to many well-known 3D printer manufacturing companies such as Creality.
It has a lot of amazing features that are not present or need upgrading in most 3D printers under this price tag of about $400.
Whether it is the AC heated bed, direct drive system, or its completely quiet fans and motherboard, the Artillery Sidewinder X1 V4 (Amazon) has the ability to stand out in the crowd of its competitors.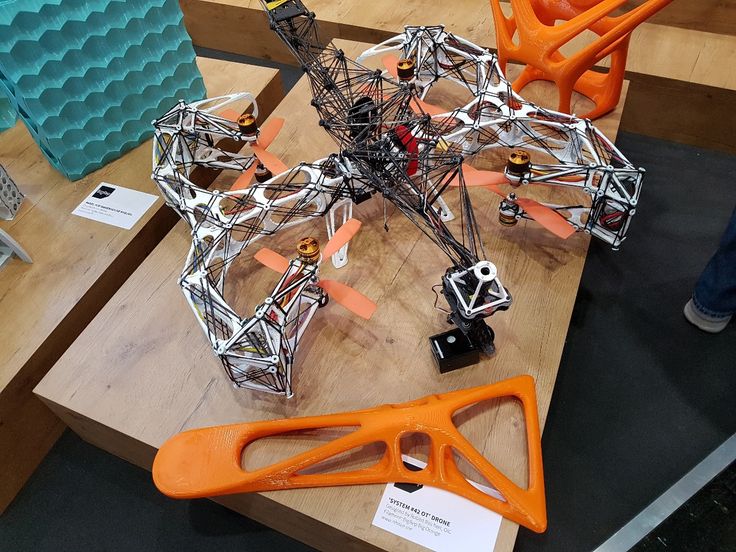
As this 3D printer comes with a build volume of 300 x 300 x 400mm and an appealing look, this could be a great choice for both beginners and experienced 3D printer users.
Features of the Artillery Sidewinder X1 V4
- Rapid Heating Ceramic Glass Print Bed
- Direct Drive Extruder System
- Large Build Volume
- Print Resume Capability After a Power Outage
- Ultra-Quiet Stepper Motor
- Filament Detector Sensor
- LCD-Color Touch Screen
- Safe & Secure Quality Packaging
- Synchronized Dual Z-Axis System
Specifications of the Artillery Sidewinder X1 V4
- Build Volume: 300 x 300 x 400mm
- Printing Speed: 150mm/s
- Layer Height/Print Resolution: 0.1mm
- Maximum Extruder Temperature: 265°C
- Maximum Bed Temperature: 130°C
- Filament Diameter: 1.75mm
- Nozzle Diameter: 0.4mm
- Extruder: Single
- Control Board: MKS Gen L
- Nozzle Type: Volcano
- Connectivity: USB A, MicroSD card
- Bed Levelling: Manual
- Build Area: Open
- Compatible Printing Materials: PLA / ABS / TPU / Flexible materials
User Experience of the Artillery Sidewinder X1 V4
The Sidewinder X1 V4 includes some of the most advanced technologies such as AC heat bed and direct drive extruder, combined with this huge build volume and excellent performance.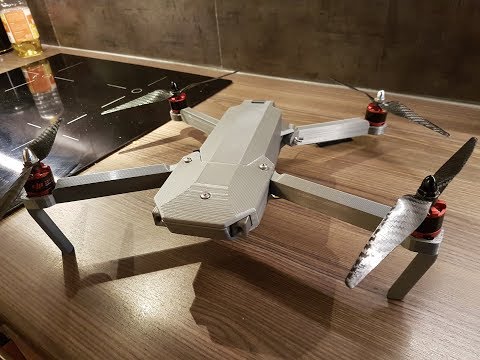
However, you may need to upgrade or replace some of its parts for extra convenience.
This 3D printer may wobble sometimes at the top of Z-Axis, but this is an extremely easy to use and inexpensive 3D printer that is capable of printing some not so common 3D prints ranging from simple 3D models to 3D parts of robotics, drone, boats, etc.
One of the many buyers who have been using this machine from when it first got released and it has had many iterations for improvements that were based completely on user feedback.
The user said in his feedback that with this list of impressive features, technology, reasonable price, and ease of usage, you may rarely find another 3D printer with such abilities.
Print quality varies quite a bit right out of the box. There are plenty of unboxing and setup videos on YouTube that can help you to make necessary adjustments even before turning your machine ON so that you can achieve a great degree of print quality.
One user said in his feedback that after using this popular 3D printer for about 2 months without any break, he can safely say that this is one of his top 3 3D printers.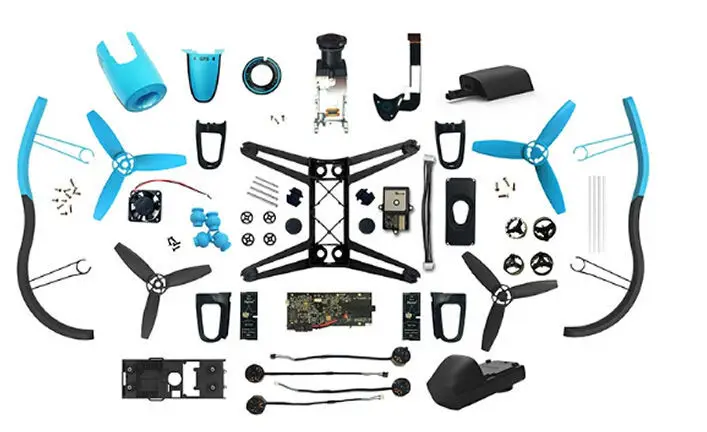
The user said that he hasn’t upgraded or replaced a single component in the machine and is totally happy with the printer’s quality and performance.
Pros of the Artillery Sidewinder X1 V4
- Heated glass build plate
- It supported both USB and MicroSD cards for more choice
- Well-organized bunch of ribbon cables for better organization
- Large build volume
- Quiet printing operation
- Has large leveling knobs for easier leveling
- A smooth and firmly placed print bed gives the bottom of your prints a shiny finish
- Fast heating of the heated bed
- Very quiet operation in the steppers
- Easy to assemble
- A helpful community that will guide you through any issues that come up
- Prints reliable, consistently, and at a high quality
- Amazing build volume for the price
Cons of the Artillery Sidewinder X1 V4
- Uneven heat distribution on the print bed
- Delicate wiring on the heat pad and extruder
- The spool holder is pretty tricky and hard to adjust
- EEPROM save is not supported by the unit
Final Thoughts
If you are a person who needs a 3D printer that allows you to print models of your choice such as robotics or nerf parts while offering convenience, comfort, and ease of usage, this 3D printer could be a great option.
Secure yourself the Artillery Sidewinder X1 V4 from Amazon for a competitive price.
The Ender 3 is a well-known and appreciated series of Creality 3D printers. Previous versions of the Ender 3 have some features and parts that were not much satisfactory for some of the 3D printer users.
To fill those gaps and to bring the best printing experience for their users, Creality has come up with this amazing machine, the Ender 3 V2 (Amazon).
Although most of the previous features and components are improved, some new features are also added such as silent stepper motor drivers, 32-bit mainboard, classy look, and many other minor components.
Features of the Creality Ender 3 V2
- Open Build Space
- Glass Platform
- High-Quality Meanwell Power Supply
- 3-Inch LCD Color Screen
- XY-Axis Tensioners
- Built-In Storage Compartment
- New Silent Motherboard
- Fully Upgraded Hotend & Fan Duct
- Smart Filament Run Out Detection
- Effortless Filament Feeding
- Print Resume Capabilities
- Quick-Heating Hot Bed
Specifications of the Creality Ender 3 V2
- Build Volume: 220 x 220 x 250mm
- Maximum Printing Speed: 180mm/s
- Layer Height/Print Resolution: 0.
 1mm
1mm - Maximum Extruder Temperature: 255°C
- Maximum Bed Temperature: 100°C
- Filament Diameter: 1.75mm
- Nozzle Diameter: 0.4mm
- Extruder: Single
- Connectivity: MicroSD Card, USB.
- Bed Levelling: Manual
- Build Area: Open
- Compatible Printing Materials: PLA, TPU, PETG
User Experience of the Creality Ender 3
Textured glass print bed is widely appreciated for its excellence and smooth printing experience and the Ender 3 V2 has this component pre-installed.
You can easily print complex 3D models such as nerf parts, robotics, drones, or other such accessories because when the bed is hot, filament sticks perfectly to the platform and when it turns cold, the model can be removed easily without any hassle.
As the Ender 3 V2 uses a V-guide rail pulley with stable movement, it emits relatively low noise and prints models with high wear resistance abilities and much longer life.
The 3D printer is equipped with XY-Axis tensioners which offer a great deal of ease and convenience. You can easily lose or tighten the 3D printer’s belt by simply adjusting these tensioners.
Its 4.3 inches color screen enhances the user experience with the newly designed user interface system. This color screen is not only easy to use and operate but can be removed easily for repair. This factor can save a lot of time and energy.
Right out of the box, the 3D printer is not completely assembled and it may take less than one hour to assemble all parts perfectly. You may have doubts about its print quality and efficiency but all these doubts will be cleared after your first print.
Pros of the Creality Ender 3 V2
- Easy to use for beginners, giving out high performance and much enjoyment
- Relatively cheap and great value for money
- Great support community.
- Design and structure look very aesthetically pleasing
- High precision printing
- 5 minutes to heat up
- The all-metal body gives stability and durability
- Easy to assemble and maintain
- The power supply is integrated underneath the build-plate unlike the Ender 3
- It is modular and easy to customize
Cons of the Creality Ender 3 V2
- A bit difficult to assemble
- Open build space is not ideal for minors
- Only 1 motor on the Z-axis
- Glass beds do tend to be heavier so it may lead to ringing in prints
- No touchscreen interface like some other modern printers
Final Thoughts
Although there are many reasons that may urge you to buy this amazing 3D printer.![]()
If you are looking for one of the best 3D printers for objects such as robotics, nerf parts, remote control cars, and planes, then you’ll do great with the Ender 3 V2 from Amazon.
The Anycubic Mega X (Amazon) is a convincing 3D printer that attracts users with its excellent appearance and high-quality prints.
It offers a respectable printing volume and the company says in its advertisement that this 3D printer has enough space to print a bike helmet as a single model.
Its all-metal frame with a compact design not only enhances its charm but also ensures a high build quality and minimum printer’s movement.
Together with the Anycubic Ultrabase, the Anycubic Mega X has the ability to produce consistently high-quality 3D prints with all of your commonly used filaments. This thing not only makes it a good machine to know 3D printing but could be a perfect option for experienced users.
Features of the Anycubic Mega X
- Large Build Volume
- Rapid Heating Ultrabase Print Bed
- Filament Runout Detector
- Z-Axis Dual Screw Rod Design
- Resume Print Function
- Rigid Metal Frame
- 5-Inch LCD Touch Screen
- Multiple Filament Support
- Powerful Titan Extruder
Specifications of the Anycubic Mega X
- Build Volume: 300 x 300 x 305mm
- Printing Speed: 100mm/s
- Layer Height/Print Resolution: 0.
 05 – 0.3mm
 - Maximum Extruder Temperature: 250°C
- Maximum Bed Temperature: 100°C
- Filament Diameter: 0.75mm
- Nozzle Diameter: 0.4mm
- Extruder: Single
- Connectivity: USB A, MicroSD card
- Bed Levelling: Manual
- Build Area: Open
- Compatible Printing Materials: PLA, ABS, HIPS, Wood
User Experience of the Anycubic Mega X
This 3D printer is extremely easy to get started with. The Anycubic Mega X comes as a pre-assembled package along with all necessary instructions present in a USB flash drive and a manual guide as well.
You are only required to set up your 3D printer while initiating, once your printer is set up, you don’t have to tweak its settings and waste your time every time you are going to print a 3D model.
A team of experts used this 3D printer for testing and their final verdict claimed that this 3D printer has met all their requirements and expectations.
They said that some of its features and printed models are so good that they consider the Anycubic Mega X as one of the best 3D printers ever made in this price range..jpg)
One buyer said in his review that he has tried many 3D printers with various upgrades and improvements but if you don’t have the right machine, you can never be satisfied.
According to him, Anycubic Mega X is “The Right Machine” because of the following reasons:
- You don’t need an all-metal hotend upgrade as the printer can easily heat up to 260 Degrees Celsius.
- This model has the best extruder than almost all 3D printers in this price category.
- You don’t need a MOSFET upgrade to reach a higher temperature as the heated bed can get a maximum temperature of 90 Degrees Celsius.
- This 3D printer comes with some extra nozzles of different sizes which ultimately save a bit of your money and a lot of your time.
Pros of the Anycubic Mega X
- Overall an easy-to-use 3D printer with features perfect for beginners
- Large build volume means more freedom for bigger projects
- Solid, premium build quality
- User-friendly touchscreen interface
- Very competitive price for a high-quality printer
- Great quality prints straight out of the box without necessary upgrades
- Improved packaging to ensure safe delivery to your door
Cons of the Anycubic Mega X
- Low maximum temperature of the print bed
- Noisy operation
- Buggy resume print function
- No auto-leveling – manual leveling system
Final Thoughts
This 3D printer offers a respectable build volume, as well as excellent performance and ease of use.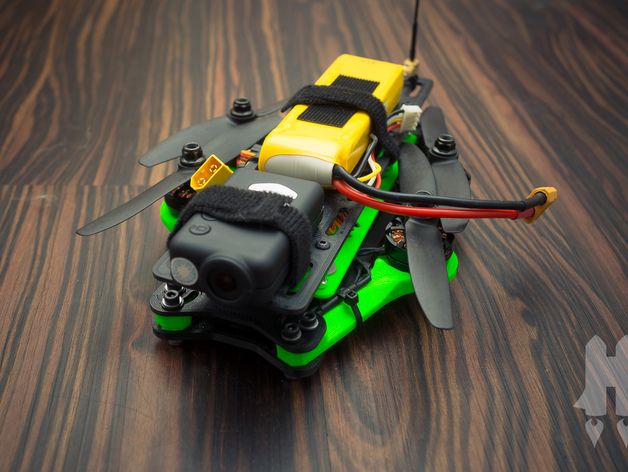 It’s a great choice for 3D printing parts to do with robotics, RC cars and planes, drones, and nerf parts.
I’d recommend checking out the Anycubic Mega X from Amazon for your 3D printing needs.
Creality is constantly focusing on improvement and getting new things. The CR-10 Max is a modern version of the CR-10 series, but incorporating some serious build volume along with it.
The build volume of the CR-10 Max has been dramatically increased, branded components and many life-enhancing features have been included, all this is available for $1,000.
This is considered the best and most premium 3D printer in the CR-10 line and it is only a bit less than being a perfect 3D printer.
The CR-10 Max (Amazon) included upgrades and improvements so that you can get the most from your 3D printer which cannot be achieved using its predecessors.
Features of the Creality CR-10 Max
- Super-Large Build Volume
- Golden Triangle Stability
- Auto Bed Leveling
- Power Off Resume Function
- Low Filament Detection
- Two Models of Nozzles
- Fast Heating Build Platform
- Dual Output Power Supply
- Capricorn Teflon Tubing
- Certified BondTech Double Drive Extruder
- Double Y-Axis Transmission Belts
- Double Screw Rod-Driven
- HD Touch Screen
Specifications of the Creality CR-10 Max
- Brand: Creality
- Model: CR-10 Max
- Printing Technology: FDM
- Extrusion Platform board: Aluminum Base
- Nozzle Quantity: Single
- Nozzle Diameter: 0.
 4mm & 0.8mm
 - Platform Temperature: up to 100°C
- Nozzle Temperature: up to 250°C
- Build Volume: 450 x 450 x 470mm
- Printer Dimensions: 735 x 735 x 305 mm
- Layer Thickness: 0.1-0.4mm
- Working Mode: Online or TF card offline
- Print Speed: 180mm/s
- Supporting Material: PETG, PLA, TPU, Wood
- Material diameter: 1.75mm
- Display: 4.3-inch touch screen
- File format: AMF, OBJ, STL
- Machine Power: 750W
- Voltage: 100-240V
- Software: Cura, Simplify3D
- Connector Type: TF card, USB
User Experience of the Creality CR-10 Max
You rarely have to change settings while printing simple 3D models but you may need to tweak the printer’s settings if you are going to print complex models such as robotics, drones, planes, or nerf parts.
The CR-10 Max has the ability to print for a much longer time as compared to many other 3D printers in the market. One of the CR-10 Max users said in his feedback that he has constantly printed for 200 hours without facing any kind of issues.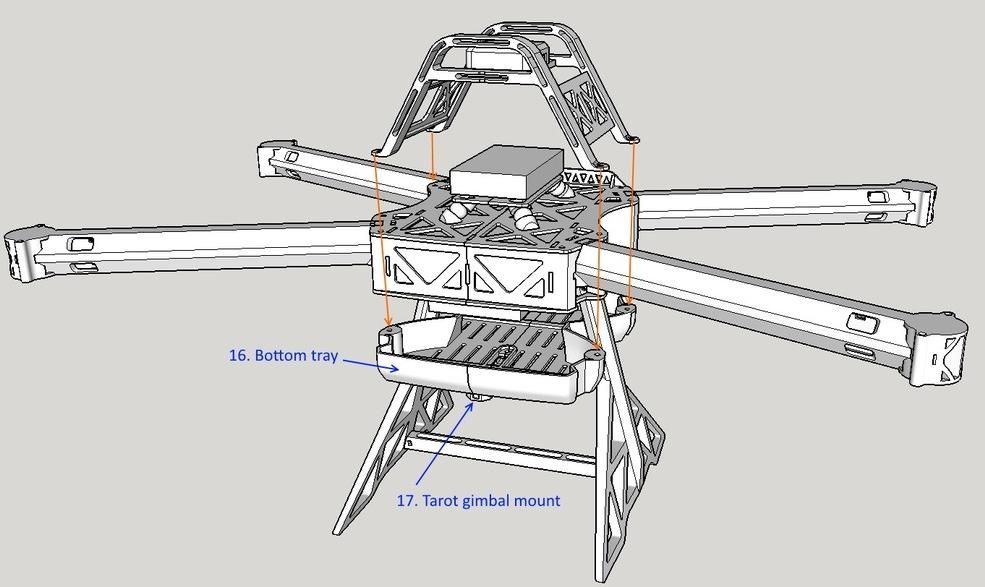
Because of its advanced, unique, and creative design, you can easily switch or change filaments while printing so that you don’t have to stop your printing process while working on some major projects such as nerf parts, robotics, RC boats, etc.
You may not be able to print on 100% area of the build platform in many common 3D printers in the market, but this 3D printer comes with upgraded hardware that has the ability to heat up the 100% area of the platform.
It means that you can print a 3D model of the exact platform’s size without any hassle.
Pros of the Creality CR-10 Max
- Have a massive build volume to print larger 3D models
- Provide a high degree of printing precision
- Its stable structure reduces vibration and improves stability
- High print success rate with auto-leveling
- Quality certification: ISO9001 for guaranteed quality
- Great customer service and response times
- 1-year warranty and lifetime maintenance
- Simple return and refund system if necessary
- For a large-scale 3D printer the heated bed is relatively fast
Cons of the Creality CR-10 Max
- The bed turns off when the filament runs out
- The heated bed doesn’t heat up very fast compared to average 3D printers
- Some printers have come with the incorrect firmware
- Very heavy 3D printer
- Layer shifting can occur after replacing the filament
Final Thoughts
If you are looking for a 3D printer that allows you to print very large models with maximum success while providing expected results, this 3D printer should be considered.
You can check out the Creality CR-10 Max on Amazon today.
The CR-10 V3 comes with more powerful components and advanced features than its previous versions such as CR-10 and CR-10 V2.
This 3D printer can reach high temperatures allowing you to print hard filament such as ABS and PETG with ease.
As the Creality CR-10 V3 (Amazon) comes with a glass print bed, it offers maximum convenience when it comes to adhesion and removal of the model from the build platform.
Because of its sharp printing quality and reasonable pricing, this printer is considered a complete package of required features that can be operated without any hassle.
Features of the Creality CR-10 V3
- Direct Titan Drive
- Dual Port Cooling Fan
- TMC2208 Ultra-Silent Motherboard
- Filament Breakage Sensor
- Resume Printing Sensor
- 350W Branded Power Supply
- BL-Touch Supported
- UI Navigation
Specifications of the Creality CR-10 V3
- Build Volume: 300 x 300 x 400mm
- Feeder System: Direct Drive
- Extruder Type: Single Nozzle
- Nozzle Size: 0.
 4mm
4mm - Hot End Temperature: 260°C
- Heated Bed Temperature: 100°C
- Print Bed Material: Carborundum glass platform
- Frame: Metal
- Bed Leveling: Automatic optional
- Connectivity: SD card
- Print Recovery: Yes
- Filament Sensor: Yes
User Experience of the Creality CR-10 V3
Direct drive extruders are not so common in this price range but the CR-10 V3 comes with these most favorite features which could bring a lot of ease and better performance while printing.
Its build plate is not the best but provides excellent support and can bring better results.
One of the buyers said in his review that he runs a big engineering company and was looking for a 3D printer that can not only print parts like robotics and drones but brings significant reliability and durability as well.
The Creality CR-10 V3 is one of his most favorite and trusted 3D printers in this regard to this day.
One buyer said in his review that the Creality CR-10 V3 is his 6th 3D printer and 2nd Creality 3D printer and it is the cheapest yet most reliable 3D printer he has ever used.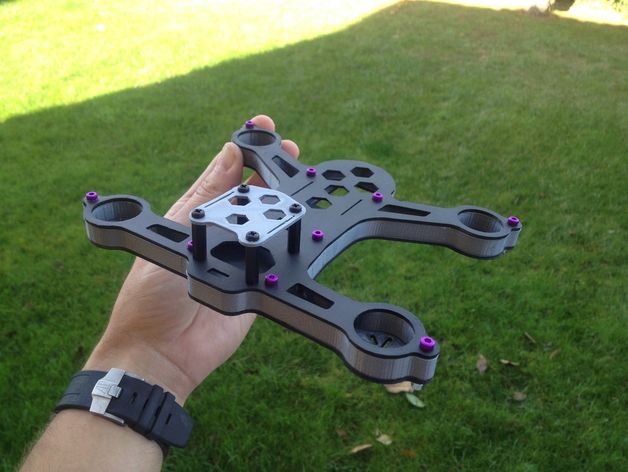
The user said that the machine was 80% assembled right out of the box and it only took less than 30 minutes to get things started.
One user said that he has printed 74 hours in less than a week. One of his prints took about 54 hours and the 3D printed model is more than perfect.
Pros of the Creality CR-10 V3
- Easy to assembly and operate
- Quick heating for faster printing
- Parts pop of the print bed after cooling
- Great customer service with Comgrow
- Amazing value compared to other 3D printers out there
Cons of the Creality CR-10 V3
- Not any significant cons really!
Final Thoughts
Considering its large build volume, high-end features, precision, and quality, this 3D printer is likely to bring you nothing but comfort and happiness.
Check out and order the Creality CR-10 V3 3D printer on Amazon today.
Creality is well known for its high-quality 3D printers and the Creality Ender 5 Plus (Amazon) is truly a perfect candidate to become the best 3D printer.
It brings a build volume of 350 x 350 x 400mm which is quite massive and helpful when it comes to print larger parts at once instead of printing in various separate parts.
It comes with a lot of valuable features that offer incredible 3D quality, but there are still some features that may need some upgrades or improvements.
When it comes to the Ender 5 Plus, Creality has focused mainly on its features and functionality instead of style.
This is the reason that makes it worthy of being listed as one of the best 3D printers for drones, nerf guns, RC, and robotics parts. When you have the Ender 5 Plus on your side, you can expect 3D print models of great quality.
Features of the Ender 5 Plus
- Large Build Volume
- BL Touch Pre-Installed
- Filament Run-out Sensor
- Resume Printing Function
- Dual Z-Axis
- 3-Inch Touch Screen
- Removable Tempered Glass Plates
- Branded Power Supply
Specifications of the Ender 5 Plus
- Build Volume: 350 x 350 x 400mm
- Display: 4.
 3 Inch
 - Print Accuracy: ±0.1mm
- Nozzle Temperature: ≤ 260℃
- Hot Bed Temperature: ≤ 110℃
- File Formats: STL, OBJ
- Printing Materials: PLA, ABS
- Machine Size: 632 x 666 x 619mm
- Net Weight: 18.2 KG
User Experience of the Ender 5 Plus
The Ender 5 Plus is one of the well-engineered 3D printers that offer a premium print experience. You will be amazed to see the quality, detail, and precision of your 3D printed parts on the Ender 5 Plus.
Whether you are a beginner or an experienced person who wants to try some new things, this could be a great choice with its large build volume and reasonable price.
Some users faced issues with the stock extruder not working properly at full capacity but with the help of Creality’s experienced and professional customer support, users were able to deal with and fix such issues without any major efforts.
One buyer said in his feedback that this 3D printer offers great print quality right out of the box.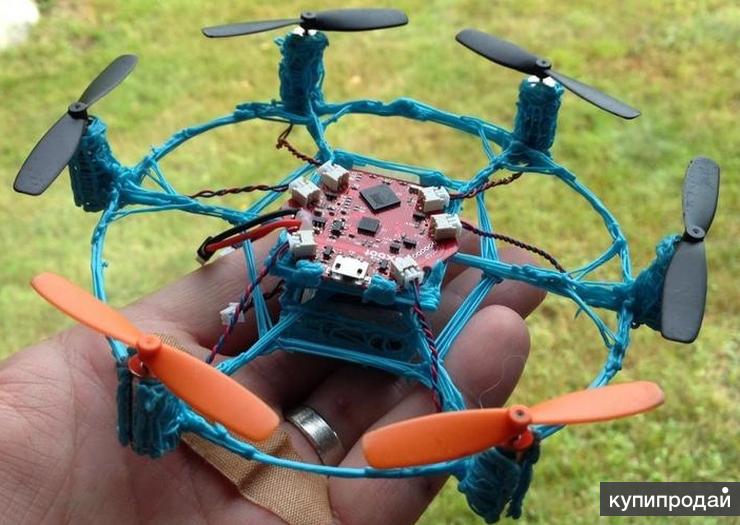 The user printed a model, its layer lines are smooth and well-aligned that are creating the least amount of unwanted texture.
The best thing about this 3D model is that it took more than 50 hours to get completed without causing any issues.
As this 3D printer has a filament runout sensor, you will be immediately notified in case of filament shortage. The 3D printer will display a message with two options, either to change the filament manually or cancel the print.
You can go with the first option and then resume the print from where it was paused.
Pros of the Ender 5 Plus
- The dual z-axis rods provide great stability
- Prints reliably and with good quality
- Has great cable management
- Touch display makes for easy operation
- Can be assembled in just 10 minutes
- Very popular among customers, especially liked for the build volume
Cons of the Ender 5 Plus
- Has the non-silent mainboard meaning the 3D printer is loud but can be upgraded
- Fans are also loud
- Really heavy 3D printer
- Some people have complained about the plastic extruder not being strong enough
Final Thoughts
The Ender 5 Plus is a fully open-source, durable, and reliable 3D printer that offers room to print larger models.
I’d definitely look into getting the Ender 5 Plus from Amazon.
Sovol mainly focuses on manufacturing 3D printers that can provide their users with all major features at a minimum price tag. Well, with its SV01 and SV03, Sovol has achieved its goal to a great extent.
Although Sovol is not so well known in the 3D printers market, the Sovol SV03 should not be ignored for any reason. It only costs you about $450 and comes up with a full range of amazing features.
One of the major factors behind its best-selling streak is its large build volume.
The Sovol SV03 (Amazon) can be classified as a big brother of the SV01 which has similar direct drive extrusion but the SV03 has plenty of upgrades as well as new features and components.
Features of the Sovol SV03
- Immense Build Volume
- BLTouch Preinstalled
- TMC2208 Silent Motherboard
- Direct Drive Extrusion
- Filament Run-Out Sensor
- Dual Z-Axis Design
- Print Recovery Function
- Meanwell Power Supply
Specifications of the Sovol SV03
- Technology: FDM
- Assembly: Semi-assembled
- 3D Printer Type: Cartesian-XY
- Build Volume: 350 x 350 x 400 mm
- Extrusion System: Direct Drive
- Print Head: Single
- Nozzle Size: 0.
 4 mm
4 mm - Maximum Hot End Temperature: 260°C
- Bed-Leveling: BL-Touch
- Connectivity: SD Card, USB
- Print Recovery: Yes
- Camera: No
- Filament Diameter: 1.75 mm
- Third-Party Filaments: Yes
- Materials: PLA, TPU, HIPS, ABS, PETG, Wood
User Experience of the Sovol SV03
The Sovol SV03 is a machine worthy of being purchased because this 3D printer has a bunch of features that make it capable of doing its job in the best way possible.
Its new 32-bit motherboard is almost silent and gives a greater boost to printer operating performance. With its advancement, all the new features that come with the Marlin firmware can be utilized with the Sovol SV03.
If you are a beginner or even an experienced user, bed leveling can sometimes become a lot more difficult, wasting a lot of your time. The SV03 is equipped with BL-Touch automatic bed leveling system that offers huge ease and convenience.
A beginner 3D printer user shared his first-time experience of 3D printing stating that he purchased the Sovol SV03, took it out of the box, assembled it, leveled the x-axis, leveled the bed, and started the printing process.
The user only used the recommended settings without any further modification or tweaking of the settings. Although the resultant print was not 100% perfect, it can be classified as a good 3D print without any modification.
Pros of the Sovol SV03
- The Sovol SV03 is well-built and has a sturdy aluminum frame
- Exceptional for making large-sized prints
- Has a purchasable bundle with a touchscreen and Tungsten nozzles
- Comes ready for action out of the box and requires little effort in assembly
- The upgraded motherboard can run better versions of Marlin firmware
- Performs extremely well
Cons of the Sovol SV03
- The ribbon cable wire harness could pose issues in the long run
- The SV03 occupies a footprint that might seem too space-taking for most users
- Bed heating can take longer due to the sheer size of the build plate
Final Thoughts
With this price tag, auto-bed leveling system, filament run-out sensor, power recovery, and many other powerful features, this 3D printer can compete with many 3D printers of well-known manufacturing brands.
You can get yourself the Sovol SV03 from Amazon today for your drone, RC, robotics and nerf parts.
What is the best 3D printer to choose for printing a quadrocopter?
Have you been amazed by the intricate plastic gizmos? Lucky for us, we live in an age where plastic is affordable and much easier to process and shape into complex shapes. 3D printers have come a long way in the last 10 years, and they are much more affordable these days.
3D printed quadcopterA 3D printer is a long term investment, a few $10 3D printed mounts will pay off the cost of a 3D printer plus you can print a beautiful vase for your hostess. There are $100 3D printers that work so well that for once, we consumers might think we're stealing from the manufacturer. Without further ado, let's get started.... nine0003
WHICH 3D PRINTER TO BUY FOR PRINTING DRONE PARTS?
Creality Ender 3 V2
Budget FDM printer V2 is definitely your best bet.
Creality makes some of the most popular 3D printers while providing features at a lower price point. The Ender 3 retains most of the design features of the original Ender 3, while the V2 continues the signature features to balance high quality printing at a competitive $250 price point. The build volume is a comfortable 220 x 220 x 250 mm. Equipped with a Bowden type extruder, you can print typical consumer materials such as PLA, PETG and, with care, TPU. nine0003
However, the Ender 3 V2 adds belt tensioners, upgraded electronics including a 32-bit board and stepper motor drivers with print noise reduction, an integrated tool storage box, a touchscreen user interface, and a few other improvements. For most hobbyists looking for cheap and reliable 3D printing on a machine that doesn't give you headaches with its constant errors and malfunctions, the Ender 3 V2 is by far the best choice. nine0003
Prusa Mini+ FDM Original
Best in class
Prusa Mini+ FDM Original
Prusa Mini+ differs from its larger predecessor in volume and build size, but the results are basically the same: fantastic print quality, simple control and best-in-class features.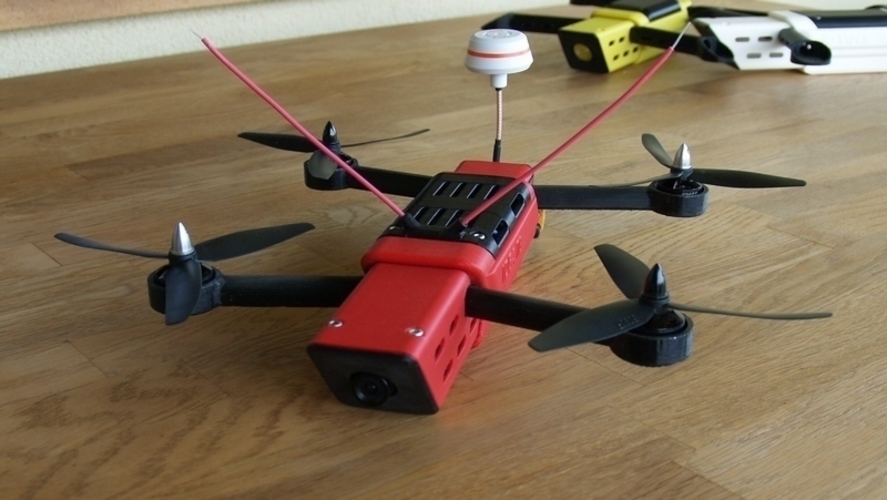
It features a removable PEI-coated magnetic print layer, carefully designed firmware with rich hardware support such as mesh layer alignment, regular firmware updates fix bugs, make improvements, and even add brand new features. Perhaps the best thing about original Prusa machines is the constant support they receive from the company. The Mini+ is also tiny in terms of build volume, measuring 180 x 180 x 180mm, which is smaller than the Ender 3 V2 build volume. nine0003
Monoprice Mini Delta V2
Cheap 3D Printer
Monoprice Mini Delta V2
The Monoprice Mini Delta V2 is an inexpensive 3D printer that scores well in most aspects. Mini Delta is one of the cheapest Delta 3D printers. It's easy to set up and use, requires no calibration, and is ready to print right out of the box.
It consistently produces prints of acceptable quality, and its smooth and almost error-free operation makes it a good introduction to 3D printing.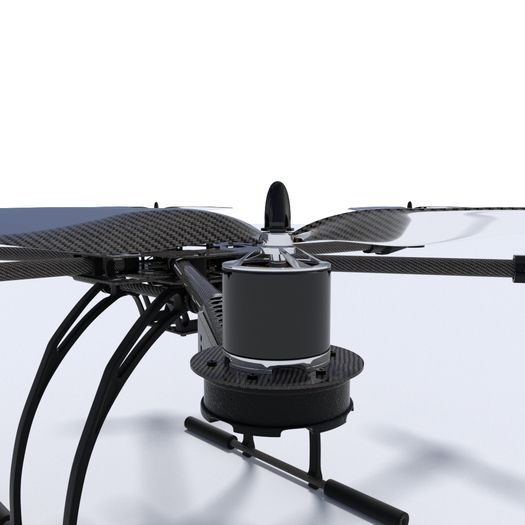 It's also fast and supports a variety of filament types, with the only major downside being the small 110x120mm printable area. Features such as an adaptive touch screen, an advanced auto-leveling system, and an internal diagnostic system make it a pleasure to use. This black printer comes in a tiny h27.5 X W11.8 X D11 inch solid steel and anodized aluminum frame and weighs only 4 lbs. nine0003
3D PRINTER OPERATION
Most commercial 3D printers use FDM (Fused Deposition Modeling) or SLA (Stereolithography) methods for 3D printing. Both methods belong to the additive modeling methods, but differ in the way the material is formed.
FDM 3D Printers
Fused Deposition Modeling, as the name implies, melts the plastic, in other words, melts it, lays it on the printing plate and quickly cools the molten plastic, solidifying. The plastic is melted down and printed layer by layer until the desired result/model is obtained. nine0003
SLA 3D printers
SLA printers also belong to the additive modeling method, but differ in the way the model is built.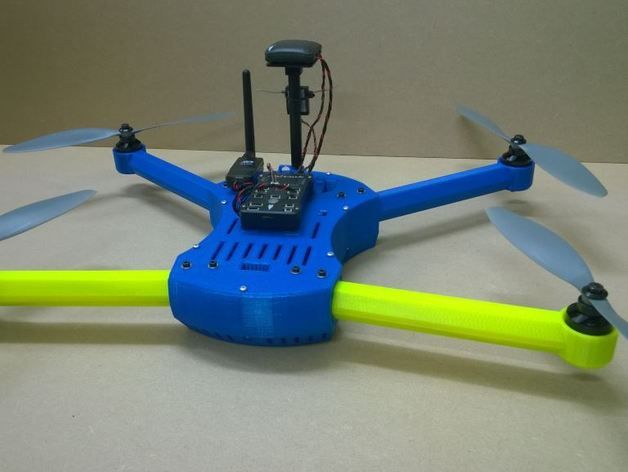 SLA printers work by solidifying a liquid resin stored inside the 3D printer, and this liquid resin solidifies when exposed to light of a certain wavelength. The printing plate moves through the fluid reservoir as the object is built layer by layer. Each layer then hardens to a hard layer. The printing plate is then lifted slightly to allow the next layer to solidify, causing the object to gradually rise from the depth. nine0003
| Differences | FDM 3D printer | SLA 3D printer |
| Thread materials | PLA, ABS, TPU, PETG, nylon, and wood, ceramic, metal, and carbon fiber blends. | Proprietary resins, resins vary by manufacturer |
| Thread price | $25-$30 | $80-$150 and $40-$80 for resin tanks that need to be replaced after using 3-5 liters of resin |
| Print speed | Higher print speed can be achieved at the expense of print quality | Faster print speeds achieved without compromising print quality |
| Print Precision | Moderate - High accuracy with layer thicknesses from 0. 5 to 0.127 mm. 5 to 0.127 mm. | Extremely accurate with 0.01-0.05 mm layer thickness |
| 3D printer costs | FDM 3D printer prices start at just $100 | SLA 3D printers are 3 times more expensive than a similarly sized FDM 3D printer |
| Benefits |
|
|
| Drawbacks |
|
|
In short, FDM 3D printers are the right choice for 99% of hobbyists.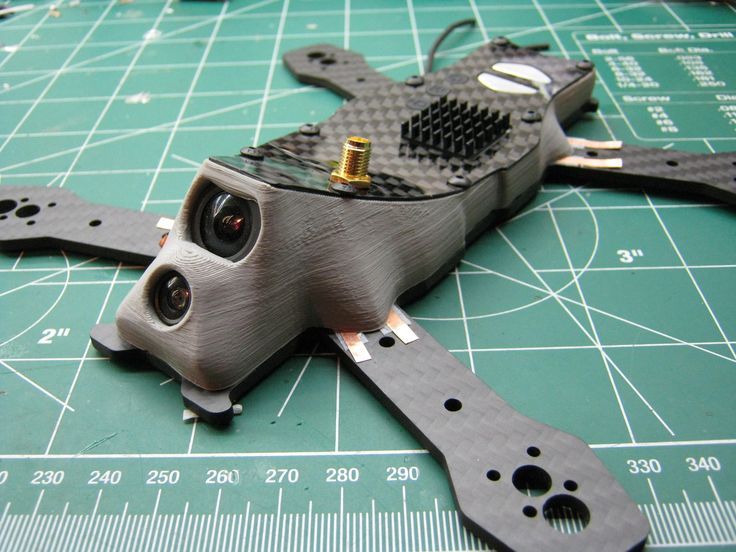
OPERATING MODE
In summary, SLAs are expensive and not suitable for most consumers. FDM technology has matured over time, and some of the cheaper 3D printers do a decent job of 3D printing, making the cheap option a viable option. The most popular FDM 3D printers come in two modes or types of operation - Cartesian 3D printers and delta 3D printers. nine0003
CARTSIAN 3D PRINTER
Cartesian 3D printers move linearly along the X, Y and Z axes to position the hot end in 3D space. Typically, the hot end moves in the X and Y axes while the print head or print bed moves up and down in the Z axis. In some 3D printers, the extruder moves up and down for each layer, and in some Cartesian 3D printers, instead moves up and down the platen.
DELTA 3D PRINTERS
Delta 3D printers operate with three arms mounted on vertical rails that can move up and down within a cylindrical print structure. The hot end is attached to the end of each arm with hinges, and the arms work together to adjust the position of the hot end.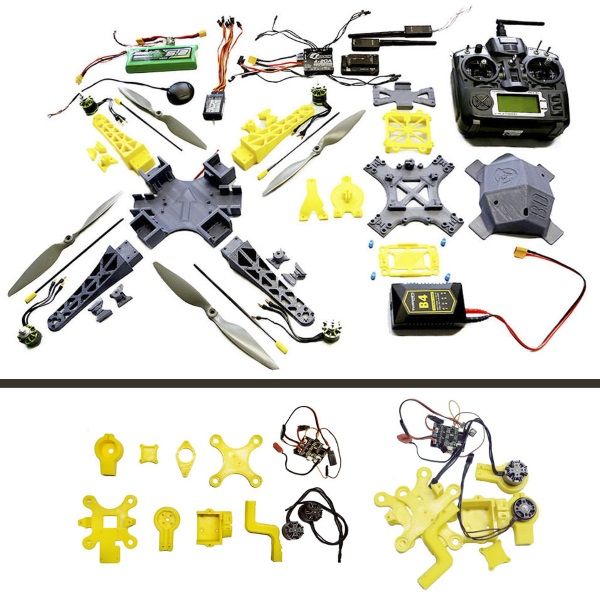 The coordinated movement of the delta printer arms controls the height (Z-axis) and position (X- and Y-axes) of the hot end relative to the print bed. nine0003
| Differences | Carthusian 3D Printer | Delta 3D Printer |
| Benefits |
|
|
| Drawbacks |
|
|
TL;DR: Cartesian 3D printers are consistent and highly upgradeable, while delta 3D printers print faster and produce higher prints.
Now that we've described the differences between the two styles of printers, it's your turn to decide which style of 3D printer suits you best. Don't forget to consider other things you might be printing besides just 3D printing FPV parts.
3D PRINTING PROCESS
All 3D printers need a model to print, and this model is a 3D object designed in one of the CAD modeling programs. This 3D model is fed into a 3D printer. nine0003
3D CAD MODEL
First, we need to print something. The first basic requirement of any 3D printing process is the CAD model. This is the 3D design of the product you want to print and the end result should be 3D printed. The final file format should be .STL or .OBJ, these are the most popular. TinkerCAD and Onshape are the 2 most popular CAD software widely used to create CAD models from scratch.
TinkerCAD is a browser-based computer-aided design (CAD) application from Autodesk that serves as a good starting point for beginners. You can use this 3D printing software to create 3D models from basic shapes, adjust settings, and also allows you to create 2D and convert them to 3D models. Onshape is an enterprise-grade software suite that comes with powerful tools such as parametric 3D modeling and viewing, editing, and repairing STL files, making Onshape suitable for more advanced users. nine0003
If you don't have the time or patience to mess around, there are sites like Thingiverse and Eggy where you can download other creators' models for free and 3D print them.
SLIPPING THE 3D MODEL
Slicing is the step in which the Slicer converts the 3D model into separate layers for the 3D printer to understand and print. This software tells the 3D printer where to point the nozzle and pour out the melted plastic. These slices (also called layers) are then stacked one on top of the other during the printing process. The slicer converts the design into coordinates that the printer understands, and the material is applied according to those coordinates. nine0003
The output of this slicer is a text file with a .gcode extension. Cura by Ultimaker, PrusaSlicer and Slic3r are the most popular options when it comes to slicer software.
Cura is one of the most popular and widely used 3D printing slicers on the market, and there is a good chance that the optimal profile settings for your 3D printer are available in Cura by default, making it easy to get started right away without having to fiddling with the settings. PrusaSlicer has gained a lot of popularity thanks to its extensive list of customizable options, as well as the presence of several handy useful features. Slic3r is an open source slicer software with a reputation for cutting edge features not found anywhere else. nine0003
3D PRINTER SETUP AND PARAMETERS
This is the step inside the Slicer where we fiddle with the settings to get the desired model. As a beginner, we recommend that you stick with the default settings, and once you've gained enough knowledge and experience with 3D printing, you can always play around with them.
Easier said than done by changing the print speed from 20 mm/s to 100 mm
Take it step by step. Read this guide on how to change settings for faster printouts. nine0003
3D PRINTING
This is the easy part: you load the model into the 3D printer and press the start button to start printing. Depending on which printer you have, you can upload the model to the 3D printer via USB, SD card, transfer the model via a mobile application, or print from a cloud service.
Make sure the model is placed in a well ventilated area to allow the fumes from the melted plastic to escape. Monitor the printer to make sure it is printing. Sometimes the filament may break or the nozzle may become clogged, causing the filament to not come out of the nozzle. This will save you time and money if you notice it faster. nine0003
END RESULT
When printing is finished, the printer turns off and notifies you on your smartphone if the printer supports this feature, or you can simply find out when the squeaking stops.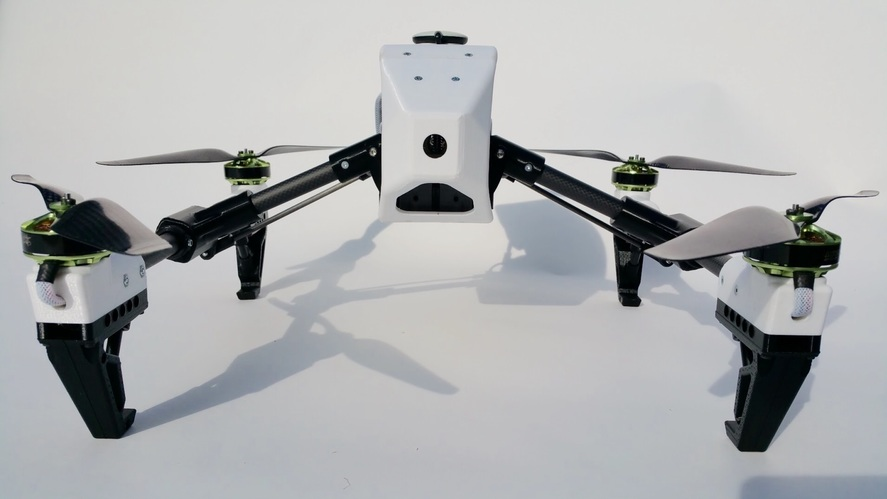 Now all you have to do is take the model out of the print bed and it's ready to use. If the printer uses a heated bed, DO NOT require the model to be removed immediately after printing has stopped. The print bed will still be hot and you will burn your hands. nine0003
WHICH 3D PRINTER FILA SHOULD I USE?
3D printer filament, also known as 3D printing filament, serves as ink for a 3D printer. There are different types of filaments for 3D printers, and the choice of filament depends on the object you want to print and the desired physical and chemical properties of the model. Some types of filament require a lot of effort to print, while some filaments can help you print right out of the box. Let's see below.
PLA (polylactic acid)
PLA is the most popular material, often due to its ease of printing with a melting point of around 150-160°C. PLA is a biodegradable thermoplastic derived from biodegradable resources such as corn starch and sugar cane.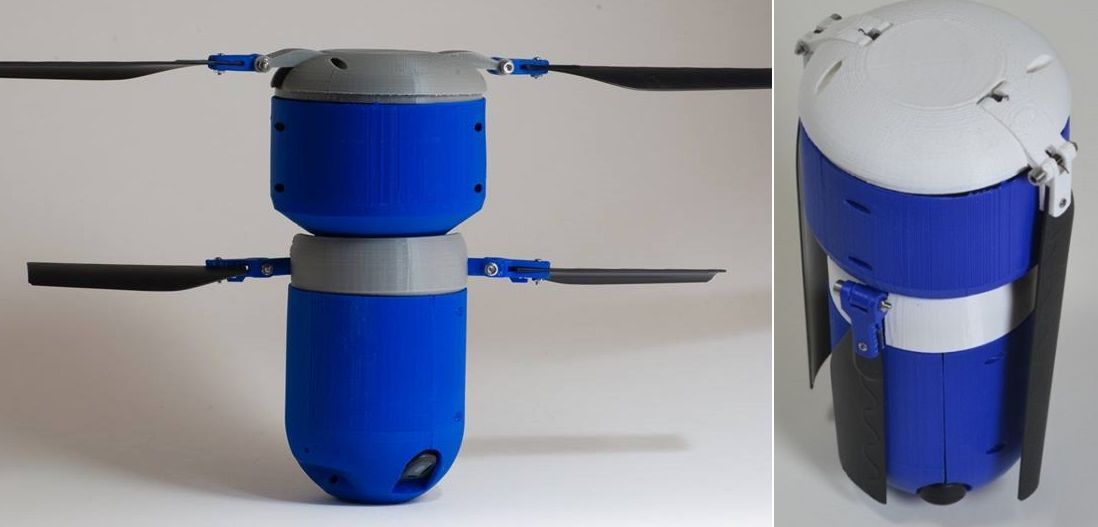 PLA is an environmentally friendly material compared to other plastic materials. Another benefit of printing with PLA is that it requires very low printing temperatures. This means you won't experience warping or twisting issues that often occur with high temperature filaments. nine0003
ABS (Acetonitrile Butadiene Styrene)
ABS is another popular material because ABS printed models have high strength and resilience, making it suitable for applications requiring impact resistance. ABS melts at a higher temperature of 220-250°C, which makes it prone to warping when cooled and relatively difficult to print. During printing, molten ABS filaments release toxic fumes, making it dangerous to print ABS in an unventilated room. nine0003
PETG (polyethylene terephthalate glycol)
PETG is a form of polyethylene terephthalate (PET), one of the most commonly used plastics in the world. While PET has high mechanical strength and moisture resistance, the addition of glycol to the mix results in a plastic that is much stronger, clearer, and easier to handle. PETG filaments melt at a conservative temperature of 220 - 245 °C, and the physical properties of PETG allow it to be used for printing objects that will be subjected to high physical stress. nine0003
Nylon
Nylon filament is a popular synthetic polymer that is also used in many industrial applications. This 3D printer material is a cost-effective plastic. It is strong, lightweight, flexible and wear resistant. Nylon is the best material for 3D printers for parts that require a lot of mechanical wear. It also has exceptionally good abrasion resistance. Nylon melts at 260-280°C and exhibits excellent intercoat adhesion, making nylon prints much more durable than other materials. nine0003
CONCLUSION
Have you seen how large bells are made on top of churches? A sand mold is made and the metal is poured into the cavity to form the basic shape of the bell, the hot metal is allowed to cool and solidify. The mold is dismantled, sand is removed and a rough shape is obtained, uneven edges are smoothed, polished, and the bell is ready for the ringing of the worshipers of the Almighty.
3D printers have changed the way rapid prototyping takes place. 3D printers are flexible machines that have evolved over time to print on plastic, metal and even concrete, 3D printed houses are something. The possibilities of 3D printers are limited only by your imagination, well, and the amount of assembly. In the world of FPV, 3D printers can help you with production, from camera mounts and antennas that eliminate the need for shipping and also cost a lot less, to the frames themselves, yes, you can 3D print carbon fiber. I hope this guide has helped you choose the best 3d printer for your drone parts. The applications are endless, maybe 3D printed frames will become a thing one day. Successful flights!!! nine0003
3D printer drone and quadcopter models
This article is an introduction to building your own quadcopter drone with a 3D printer. You will get acquainted with some basic principles of drone building, and we will describe some points step by step. The task will be relatively simple, since the description will be detailed.
What we need to get started
In addition to the 3D printer, we will need some non-printable parts such as a motor, batteries or accumulators, some electronics, sensors, a remote control and a knack to put it all together. nine0003
Why print a drone?
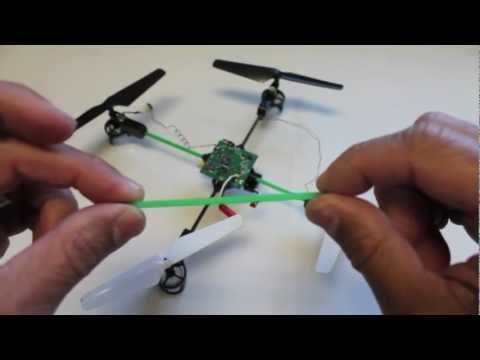
Actually, we will be printing the frame and body structure. Sometimes propellers can be printed. Why is it important? Because drones fall and break. Especially if you are a beginner pilot. This picture shows everything clearly:
If we 3D print parts, we will have an almost infinite supply of spare parts, which will make it easier to survive pilot training and regular plane crashes. Apart from the fact that the quadcopter will be easier to repair, a homemade drone will allow you to get a better feel for its inner workings and mechanics. nine0003
And one more important point: 3D printing allows you to quickly develop parts according to your own project. Let's say you have purchased a new camera and want to install it on your quadcopter. Then you just open up your favorite 3D modeling program and end up printing out the part and testing it. Make changes, print again, etc.
What is a quadcopter drone?
A quadcopter is a multi-rotor helicopter that rises and moves with four main rotors and does not have a tail rotor. This is the most common type of amateur radio-controlled drones. nine0003
Small in size and highly maneuverable, these quadcopter drones can fly both indoors and outdoors. In addition, at this size, quadcopter drones are cheaper than conventional helicopters and more reliable due to their simple design.
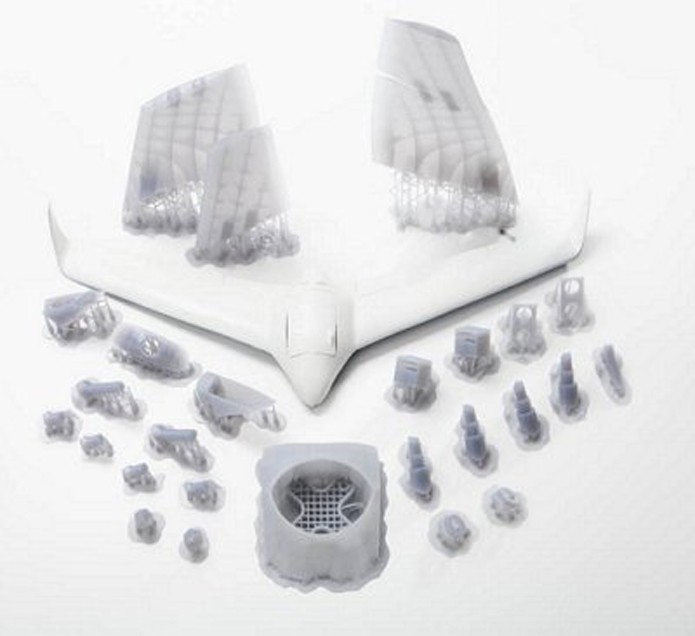
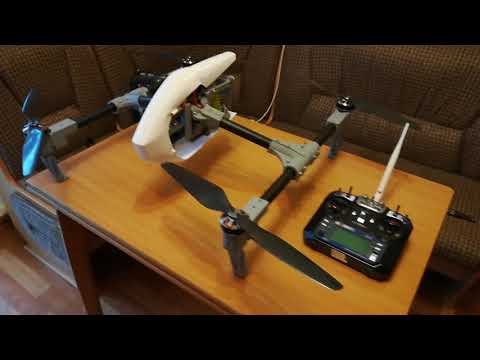
Here is a detailed overview of the details of a commercially available high-end quadcopter drone used for aerial photography.
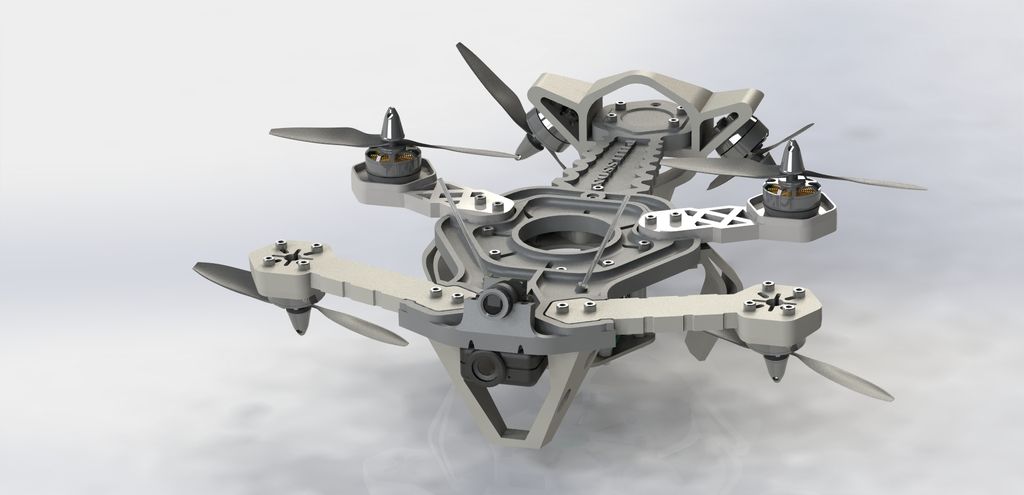
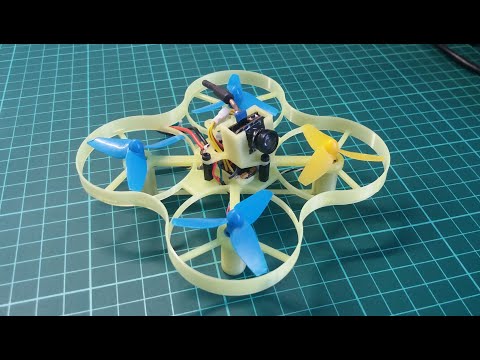
Almost all parts that are not motor or electronics can be 3D printed. The printed version of the drone looks a little different. nine0003
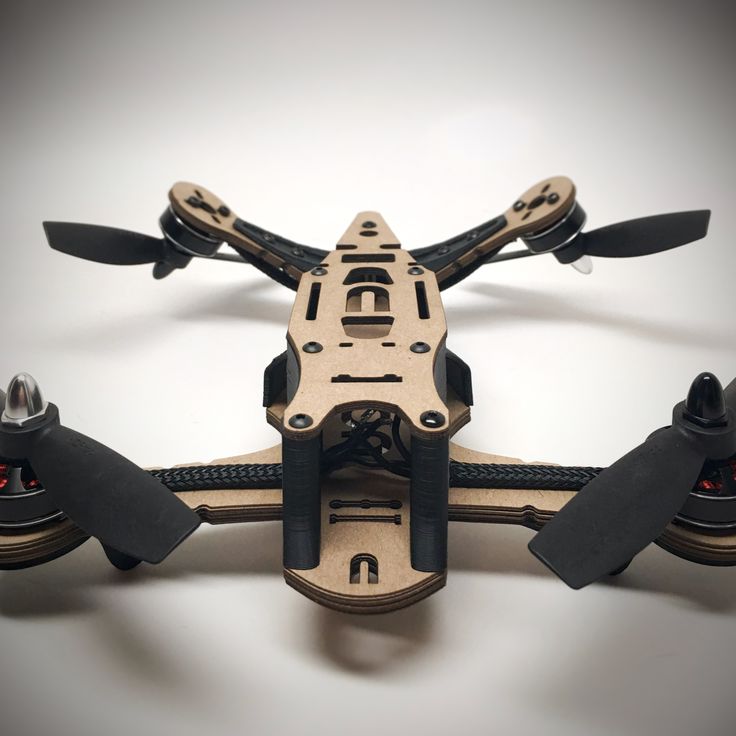
3D printed Crossfire quadcopter. Link to project: http://www.thingiverse.com/thing:32281
In addition to the visual and aesthetic differences, the printed version has the advantage of being easy to update and modular. In the next video, Dennis Baldwin talks in detail about his quadcopter.
How to Print a Quadcopter Drone
If you want to build your own drone, we offer several entry points to the project. Here is a detailed guide to 3D printed quadcopter:
http://www.instructables.com/id/3D-Printed-Quadcopter-with-Arduino/?ALLSTEPS
Titch Micro Drone
https://www.myminifactory.com/object/ 38967
Brushed Y6 Micro Quad
https://www.myminifactory.com/object/brushed-y6-micro-quad-31348
Millennium Falcon Drone Shell
https://www.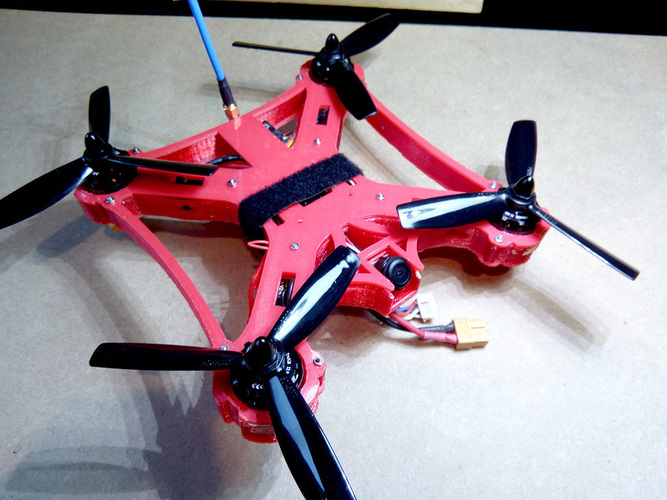 myminifactory.com/object/millennium-falcon-drone-shell-10144
Micro 105 FPV Quadcopter
https://www.myminifactory.com/object/micro-105-fpv-quadcopter-21362
Micro 105 FPV Quadcopter
https ://www.myminifactory.com/object/3drobotics-iris-19615
Hexacopter drone
https://www.myminifactory.com/object/hexacopter-drone-19600
And this is the instructions for building an H-shaped drone:
http://www.instructables.com/id/Make-an-H-Quadcopter-with-3D-printing/?ALLSTEPS
Printed remote control
If you want to 3D print
insectoid ornithopter on a 3D printer
9002 Detailed Guide to the Insectoid Ornithopter:http://www.