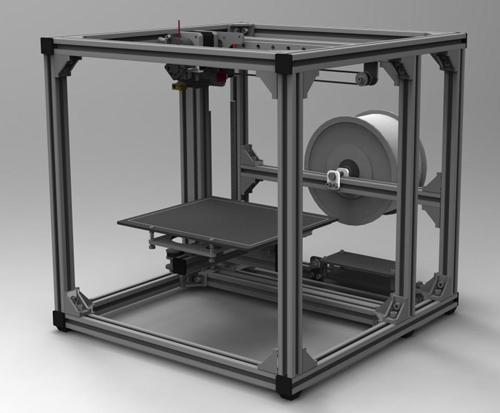
Bed clips 3d printer
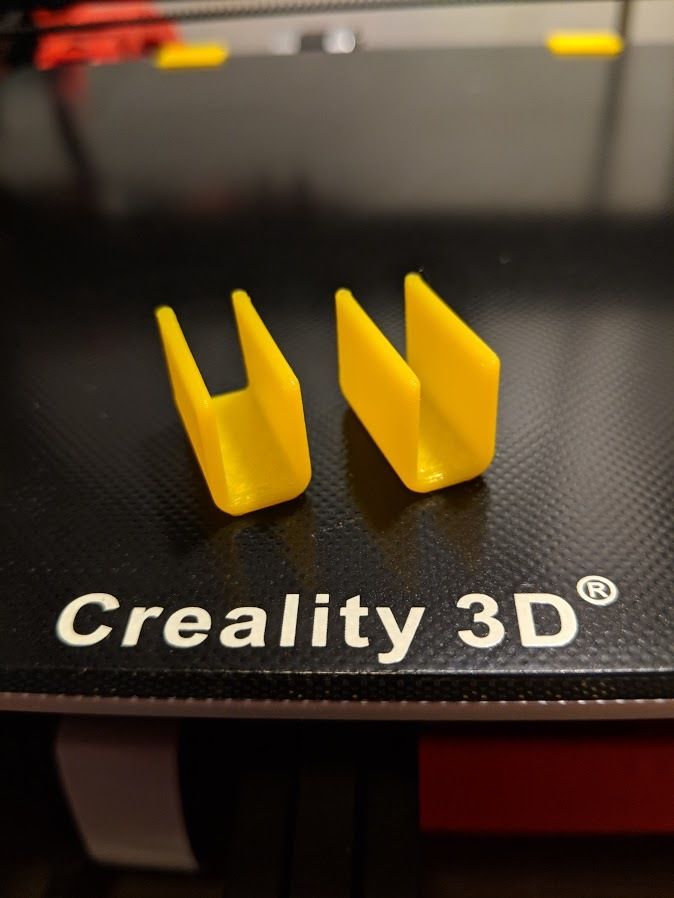
3D Printer Glass Bed Clips Ender 3 Swiss Mounting Clips
Etsy is no longer supporting older versions of your web browser in order to ensure that user data remains secure. Please update to the latest version.
Take full advantage of our site features by enabling JavaScript.
Click to zoom
116 sales |
5 out of 5 stars €2. 52
Loading
Low in stock
VAT included (where applicable), plus shipping
Quantity
1234
Ships to Germany
Explore related categories & searches
Listed on Jul 16, 2022
6 favorites
Report this item to Etsy
Choose a reason…There’s a problem with my orderIt uses my intellectual property without permissionI don’t think it meets Etsy’s policiesChoose a reason…
The first thing you should do is contact the seller directly.
If you’ve already done that, your item hasn’t arrived, or it’s not as described, you can report that to Etsy by opening a case.
Report a problem with an order
We take intellectual property concerns very seriously, but many of these problems can be resolved directly by the parties involved. We suggest contacting the seller directly to respectfully share your concerns.
If you’d like to file an allegation of infringement, you’ll need to follow the process described in our Copyright and Intellectual Property Policy.
Review how we define handmade, vintage and supplies
See a list of prohibited items and materials
Read our mature content policy
The item for sale is…not handmade
not vintage (20+ years)
not craft supplies
prohibited or that use prohibited materials
not properly labeled as mature content
Please choose a reason
Tell us more about how this item violates our policies. Tell us more about how this item violates our policies.
8 Best Alternatives to 3D Printer Bed Clips – Printing It 3D
3D printer bed clips tend to get in the way, and they will interfere with the area available on your print bed. However, what if I told you that you could secure anything to your print bed without using bed clips with a bit of creativity?
The 8 best alternatives to 3D printer bed clips are:
- Custom 3D printed clips
- Binder clips
- C-Clamps
- Painter’s tape
- Hairspray
- Double-sided thermal tape
- Silicone thermal pad
- Borderless picture frame clips
So, let’s look at these printer bed clip alternatives together. I’ll explain the pros and cons of each and help you find a bed clip solution that will work for you, your budget, and your 3D printer.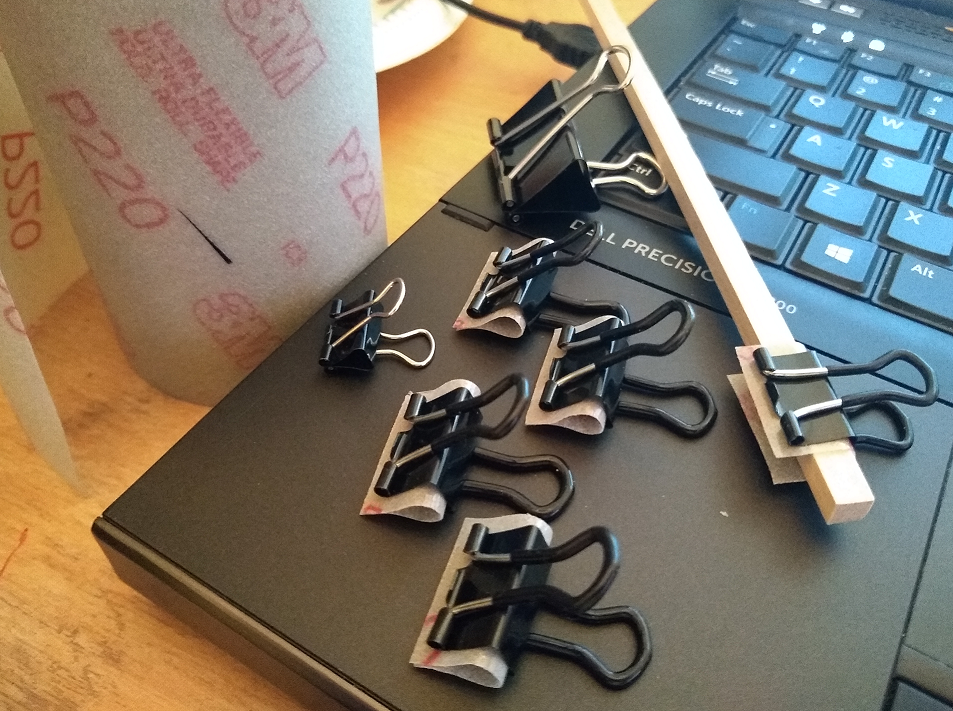
1. Custom 3D Printed Clips
Are you feeling creative? Why not make a custom bed clip with your 3D printer?
Printing your own clips gives you the ability to free up printer bed space and eliminate any nozzle-knocking obstructions. Plus, you’ll have the option to use the colors and filament of your choice, making for a totally unique clip.
Of course, if you don’t want to go through the design and development phase, tons of custom clips are available from websites like Thingiverse. For example, I use these low-profile glass bed clips from Thingiverse user Dakanzla on my Prusa MK2, and they have served me well for several years.
Still, there are plenty more out there, so run a quick search for your model printer, and I’m sure you’ll find that someone has already put the work in for you!
2. Binder Clips
The most common alternative to branded 3D printer bed clips is binder clips. These cheap, small metal office clips are helpful for any binding purpose.
Still, some people complain that the nozzle hits the clips during print jobs. So I’ve found that it’s best to slide the metal “keys” out of the clip, leaving only the flat-ish metal piece if you want to minimize the possibility of obstructing the nozzle.
In addition, you won’t need to use them on all four corners. Placing two of them on the back corners usually does the trick, and it will also give you more print bed space.
In addition, binder clips can give your 3D printer a bit of a custom look since they come in thousands of colorful designs.
3. C-Clamps
Clamps like these luluxing Stainless Steel C-Clamps (available on Amazon.com) are a cheap and durable alternative to traditional 3D printer clips, and you might even have a few lying around if you do any other sort of crafting.
Unfortunately, these clamps aren’t low-profile, so you may have difficulty with the nozzle hitting them when you make larger prints.
However, they hold down the bed tightly and are easy to adjust, so in my opinion, they’re a great alternative.
In addition, since you can adjust the tightness, you might be able to get away with only using one or two, making for more print space on the bed.
4. Painter’s Tape
Painter’s tape is a convenient go-to tool for most 3D printers, and aside from being an excellent print bed adhesive, it can help you secure your glass print bed.
Painter’s tape makes for a suitable temporary solution, but it can come loose and wear down faster than the other clips and adhesives on this list.
That said, the most significant pro of using painter’s tape is that you can print objects on top of it. So, you won’t have to sacrifice any space.
5. Hairspray
Hairspray will do the trick if you wish to attach a glass plate to your print bed.
Hairspray will make one side (or both sides) of the glass sticky, allowing you to temporarily glue down the glass to the print bed and stick your print to the glass with one convenient, cheap product.
Since it sticks so well, most 3D printers recommend Aquanet Extra Super Hold (available on Amazon. com). I haven’t used any other hairsprays for print beds, but I will say that this one does the trick.
When you’re done, spritz your glass plate with a bit of isopropyl alcohol for an easy clean.
6. Double-Sided Thermal Tape
Double-sided thermal tape offers a strong hold that will resist burning or melting. In addition, it goes on the back of your glass plate, which means that you won’t have to deal with any clips or obstructions on the top side.
Tapes like this AVNTKER Thermal Adhesive Tape (available on Amazon.com) are fantastic for adhering glass to your print bed, and they usually last quite a while, too.
Still, you’ll have to change it out every once in a while, mainly if you use your heated bed at higher temps frequently. However, you get a lot of tape in one roll, and it’s incredibly affordable.
The only real con to using double-sided thermal tape is that it may leave a residue. Yet, all you have to do is wipe your bed and plate down with some isopropyl alcohol to remove it.
You can also use this tape for electrical purposes, so it’s never a bad idea to have some lying around.
7. Silicone Thermal Pad
A silicone thermal pad is a grippy, conductive sheet that you can place between your glass plate and print bed.
These pads won’t catch on fire or melt since they are silicone, but they get stickier when warm. So, as you print, the pad will grip more and more, making the bond super secure.
If you often use a glass plate, these are the way to go. They’ll last many years, and they don’t reduce the space on your print bed or obstruct the nozzle.
I always recommend this ZUPAYIPA Silicone Thermal Pad (available on Amazon). It is thin enough to keep the glass plate warm, but it grips perfectly. It’s also a decent size, so you can cut it down to make it fit your 3D printer model.
8. Borderless Picture Frame Clips
One tip I’ve picked up from other 3D printing enthusiasts and pros is to use the clips from borderless picture frames as bed clips. In fact, this super creative solution is probably the most affordable.
Clips like these Uxcell Picture Frame Clips (available on Amazon.com) are fantastic. They are almost the same clip style as the Creality printer bed clips, but they are easier to find and come at a fraction of the cost.
Still, these clips aren’t any better than the brand-name printer bed clips, and they may still obstruct your nozzle. However, if you only want an alternative clip because you’re on a budget, then these are the way to go.
Final Thoughts
There are tons of things you can use to secure a glass plate to your 3D printer’s bed, and they don’t have to be expensive or fancy.
Materials like thermal tape, painter’s tape, hairspray, and silicone mats are ideal if you’re looking for a way to maximize your print bed space. On the other hand, custom 3D printed clips, binder clips, and picture frame clips are cheaper, easier-to-find alternatives to brand-name products.
Free STL file Clamps for dogs with honeycomb beds・3D printed model to download・Cults
miniVICE Y-Series - Modular miniature holder, painting and hobby system
Free
miniVICE X-Series - Modular miniature holder, painting and hobby system
Free
Simple, super fast to print, zone mortalis
Free
CR-10 Heavy Duty customizable modular e3D V6 mount Volcano 5015 ABL
Free
Sculpfun S10 limit switch holder
Free
K40, K40D, K40E right angle hose mount
Free
Filament Guide, Sensor, Cleaner & Cable management for the CR-10 with MK8 Aluminum Extruder
Free
Soundbar
Free
The best files for 3D printers in the Tools category
Predator Action Pliers Mk2
Free
Dyson vacuum cleaner head wall bracket
5 €
3D Printed Pi Monitor Game Controller Mount
Free
Vice jaws for bicycle maintenance
Free
DIYnder V1 - stop motion linear winder set
14. 32 €
32 €
Cooling system Minimus Hotend
€2.51 -thirty% 1.76 €
Flexbot With Lego
Free
Flexi Chameleon Pencil Attachment
Free
Bestsellers in the Tools category
Filament shielding
2.94 €
GEAR AND DRIVE
3.54 €
FAST PRINT STACKING STORAGE BOXES STACKING CONTAINERS
1,50 €
Version 2 Alligator 2 || Repeating crossbow || 3d printed shop || Inspired by Joerg Sprave
1.50 €
Ender 3 Briss fang Gen2, red lizard, spider, nf crazy, dragonfly, etc.
€1.85
NEW GENERATION CAR PHONE HOLDER
2,50 €
SUPERBOX
1,50 €
Creality CR-10 Smart Pro Camera Mount Bracket X2 and CR10 screw
1. 14 €
14 €
INDICATOR FOR BETTER BED LEVELING FOR ENDER 3 V2
3.03 €
PRECISION CALIPER 3D PRINT DIY
3,05 €
Ratchet holders - magnetic - holders for toolbox organization
2,88 €
Tool holder for 3D printer V3.0
1.11 €
telephone ring holder
0,90 €
Grinder | Grinder
1.50 €
ENDER 3 S1/PRO SPRITE, V3 AIR DUCT 5015 OR 4020
€2.27 -fifteen% 1.92 €
UNIVERSAL BED LEVELING INDICATOR FOR VERY ALL PRINTERS
3.03 €
Do you want to support Cults?
Do you like Cults and want to help us continue our journey on our own ? Please note that we are a small team of 3 people, so supporting us in maintaining activities and creating future developments is very easy. Here are 4 solutions available to everyone:
-
AD: Disable your AdBlock banner blocker and click on our banner ads.
-
AFFILIATION: Shop online with our affiliate links here Amazon.
-
DONATIONS: If you want, you can donate via PayPal here.
-
* INVITE FRIENDS: * Invite your friends, discover the platform and great 3D files shared by the community!
EasyThreed Nano Plus 3D Printer User Manual
NANO plus USER MANUAL
Please watch the operation video on the Website or YouTube
Channel: Easythreed3D
Thank you for purchasing NANO plus 3D printer, NANO plus is a kind of consumer 3D printer, it can bring your customized creations to life. Just connect the printer, load the models, click ``Print'' and watch you place the object into the world through 3D printing
For updated information visit www. easythreed.com
- Remove NANO plus from the shipping box. Remove bubble wrap, foam. Ribbon.
- Inside there is a NANO plus 3D printer and an accessory box with instructions, filament, power adapter, TF card, card reader, screwdriver. Filament holder
- Be sure to remove the "clips" at the left and front right corners of the printer. The clips are only for protection during transport (as shown in Figure 1 above).
- Install the filament holder on the left or right side of the printer, the right side is the best side. (Do not put on the front and back sides. These two sides will not be good for print quality.) Please refer to the picture below. And hang on a thread.
Slicer software
(The STL 3D file format needs to be cut into a code format that the printer can recognize).
- This 3D printer works with its own developed slicing software called NANO plus, it is on the TF card included in the accessory box, copy it to your computer, no need to install, you can also download NANO plus from the official site.
 website, and you can watch a video about the slicer on the Youtube channel. The NANO plus slicer can recognize the STL 3D files format.
 - STL 3D file format needs to cut to .gcode format, save to TF card and insert TF card into printer, then you can print 3D file. (3D printer can only read file code format)
Warm Notice: There is a file code inside the TF card when it comes from factory
Plug and turn on the printer the print button will light up.
1. Platform Leveling, The first time you use this printer, you need to level the platform.
Adjust the distance between the nozzle and the platform in 1,2,3,4 points, the distance should be equal to the thickness of the sheet of paper (alignment is done with the help of adults).
a), press the button, the Z axis will return to its original position. After the Z axis returns to the home position, turn off the power, after the power is turned off, you can manually move the X and Y axes (Note: when the greenhouse is heating, the home position function will not respond until the temperature of the greenhouse reaches the set temperature)
b) Move the nozzle 1 point and place a sheet of paper between the nozzle and the platform, if the distance is too large, turn the hand-tight nut counterclockwise to make the print platform rise to the standard distance. If the distance between the nozzle and the platform is too small, turn the hand-tight nut clockwise to make the print platform fall to the standard distance (Check whether the distance is correct or not. That is, when drawing A4 sheet, the nozzle must be attached to A4 sheet without scratching it) .
c), do the same to adjust another 2,3,4, three points。
g), when the distance between the nozzle and the platform is correct at 1,2,3,4, four points, the alignment is completed and successful.
After leveling the platform, turn on the power again.
 .
 (b), press the button, the button indicator is on and flashing,the nozzle is heating up, wait about 2 minutes, the machine will start feeding, when ordinary silk comes out of the nozzle, feeding is successful, then you can press the button to finish feeding.
Note: Make sure that the distance between the nozzle and the print bed is at least 3 cm. If there is not enough space, press the button for 3 seconds, then release, the Z axis will rise 1 cm (when the printer is turned on, press 3 seconds, then release, each time the nozzle rises 1cm)
3. printing
Insert a TF card into the printer, press the button, and the button indicator will flash, wait about 5 minutes for the nozzle and hearth to heat up, the printer will start printing when the temperature rises to the set value (the printer will select the latest code file for automatic printing).
4. Pause / Resume
during printing, click, the button light stops flashing, then printing is paused. If you need to continue printing, press to restore, the button light flashes again, the printer returns to printing.
5. Stop printing
If you want to stop printing during printing, press the button for 3 seconds, then release, the machine will stop printing, then printing will be canceled.
6. Unload filament, retract
If users want to change the filament or make the machine stop working for quite a long time, then need to unload the filament, press the button, the light inside will flash, please be patient and wait for about 2 minutes, the motor inside the head will run and pull out the filament, then remove the filament from the print head.
After printing, remove the platform, and easily remove the object.
Maintenance
- Do not attempt to use methods other than those described in this manual to disassemble or modify the unit to avoid damage to the printer or other more serious accidents.
- When turning off the power, wipe the printer regularly with a cloth to remove dust and residue. If a damp cloth is required, do not use flammable solvents to touch the internal circuit of the printer to avoid fire or electric shock.
- Recommended working environment temperature: 5C-30C, do not ventilate the machine body with a fan during the printing process.

- Recommended operating environment humidity: 20% -80%.
Safety
- Safety & Warning:
Children under the age of 10 should use this printer under adult supervision, the printhead nozzle, extruded plastic, and areas near the nozzle can be very hot. Keep your finger away from the print head and spit out unless it has been unplugged for a while. at least 10 minutes. Use products in a well ventilated area. Use the printer only for its intended use as described in the user manual. Do not leave a running product unattended. - precaution
None of the components of the NANO plus 3D printer or parts printed on it or using filaments are subject to
food safety certification and should not be considered food safe, therefore should not come into contact with by mouth or foods/liquids that will be swallowed by humans or animals. - Maintenance: Extended or incorrect use, nozzles, nozzle assembly parts or other parts may need to be replaced or cleaned, print beds and their pads may need to be replaced, extruder may need to be cleaned.
FAQ
Q1: Why can't the print head move after pressing the print button at initial printing?
A: Remove clips at front left and right corner before using machine. The clamps are transport protection.
Q2: How to feed the thread and how to judge the thread feed correctly?
A: First, straighten the thread and carefully push it into the feed hole, at the same time operate the screen with the other hand to “in thread” select it and confirm. Then wait about 1 minute (the machine is warming up), release the material when you feel the thread is caught by the machine. Then wait another 10 seconds to see if the "silk" comes out of the machine. It comes out about 10 cm of thread. So far, the filament feeding has been successful. If you follow the steps above and the silk does not come out of the nozzle after waiting more than 5 minutes, turn the machine back on and try again.
Q3: How to remove the thread? How to decide when the thread does not retract
A: move the rear gear to ``retract'' the gear, usually this method is retracted successfully, if it fails, please try feeding first and then retracting.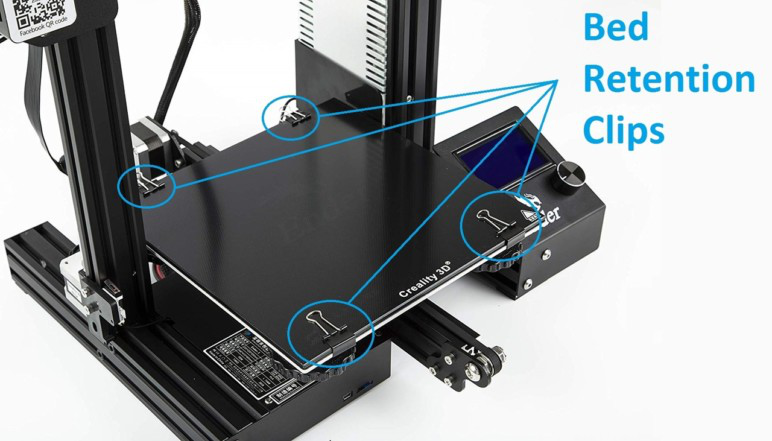 Pay special attention to gently pulling on the media so that the filament does not completely come out of the printer head.
Q4: What is the reason why the model can't stick to the printing platform in the initial state, when printing, or during printing?
A: The gap between bed and nozzle is too big, you need to level the bed, use the method we mentioned above (Article 4.4)
Q5: What should I pay attention to when setting up the printing platform? Need to check the bed before every print?
A: Adjust the printing platform, you need to use the screwdriver in the accessory box to turn the bed screws when rotated clockwise, the bed goes down, when rotated counterclockwise, the bed goes up.
There is no need to always adjust the alignment every time you print.
How to perform alignment, please refer to the above (Article 4.4).
Q6: How to determine the optimal distance between the nozzle and the print bed? What difference does it make if he's too close or too far?
A: The standard distance between nozzle and print bed is the thickness of A4 paper. Insert a piece of paper between platform and nozzle, with normal tension and resistance as standard; in the condition that the bed does not scratch. The closer, the stiffer the model will be.
- The correct distance between the nozzle and the bed: the “silk” is even, very smooth and without burrs.
- The distance is too large: the "silks" are rounded, laid out unevenly on the bed, with gaps and slope. Thread
descends onto the bed under the influence of gravity. The sticking effect of rounded strips is poor, they move easily. The printing effect is very unsatisfactory. - Distance too short: "silks" are uneven protrusions (with burrs) on both sides, but thin in the middle. Or no silk. Or the bed is scratched with a deep mark.
Q7: Why does a lot of filament curl around the nozzle during printing? Model turned into a hodgepodge of silk?
A: There are several situations:
- When this happens at the initial printing, the distance between the nozzle and the platform is too large, the silk cannot stick to the platform, so the filament may become dirty.
 Turn the 4-flat screws 90 degrees counterclockwise. If still not OK, rotate 90 degrees counterclockwise again until normal printing.
 - Bed with oil, please use a dry towel to clean the bed, do not touch the bed directly with your hand.
Q8: How can I move the print head X, Y?
A: Turn off the power, then manually move the print head to the desired location. Please do
do not try to move the head up and down, the Z axis cannot be moved manually.
Q9: How can I lift the print head?
A: Only if the printer is on but not printing, press the print bed for 3 seconds, then release, it will rise 1 cm.
Q10: Do I need to warm up the printer before each print?
A: Feeding and retracting require warm-up. In normal printing, you only need to select a model and wait about 1 minute, then the printer will start working.
Q11: Can the model continue to print if the power goes out?
A: If there is no electricity during the printing process, models cannot continue printing.
Q12: Can I pause printing while printing?
A: Yes, press the print button, printing will be paused. Then press again, printing will continue.
Q13: How to stop printing?
A: Hold down the print button for 3 seconds, then release it, then printing will stop (precautions: it is impossible to continue printing after stopping).
Q14: The filament will run out soon during printing, what should I do?
A: Please pause printing, then slide the switch to remove the gear, pull the filament by hand (precautions: do this before all the filament enters the feed hole, otherwise the filament hand cannot pull up. ). Then insert a new thread into the hole, and with the other hand slide the switch to feed the gear, wait about 10 seconds until the thread comes down. Then move the switch to the middle gear position and briefly press the print button to resume printing. Pay special attention to switching to the middle gear in time after 10 seconds to avoid the appearance of a pimple thread on the model.