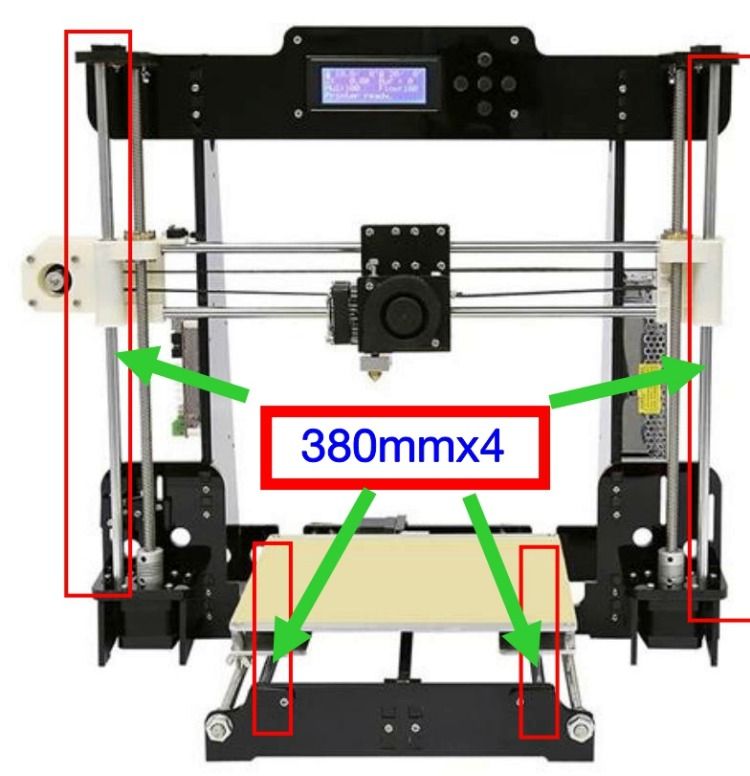
8 cubic feet 3d printer
Largest 3D printers in 2022 for XXL prints
Large-scale 3D printers are able to print massive objects thanks to their gigantic build volumes. This guide covers some of the largest 3D printers in the world that are commercially available.
Last update June 23, 2022
We removed discontinued products and updated the BLB Industries The BOX lineup, which has been replaced by The Industry MAGNUM. We also added MASSIVit's latest solution, the Massivit 10000.
Table of contents
Handpicked related content
Large scale 3D printers (XXL): 2022 selection
BIG-Meter V4
F1000
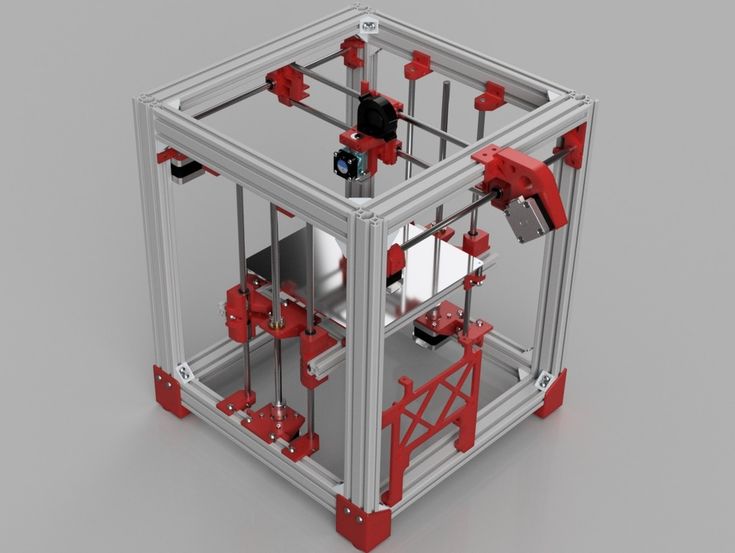
BigRep ONE v4
400 Series WORKBENCH XTREME
T3500
MAGNUM
Massivit 10000
MAMA
3D printing furniture
3D printing large prototypes
3D printing production series
Customized large scale 3D printers
What are the best large scale 3D printers?
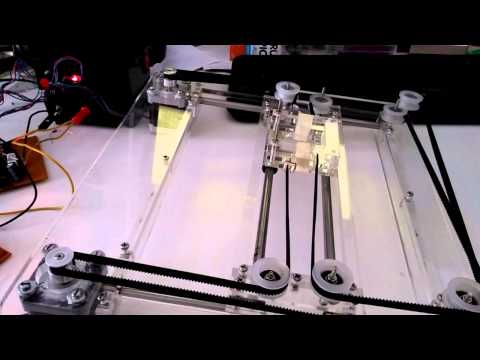
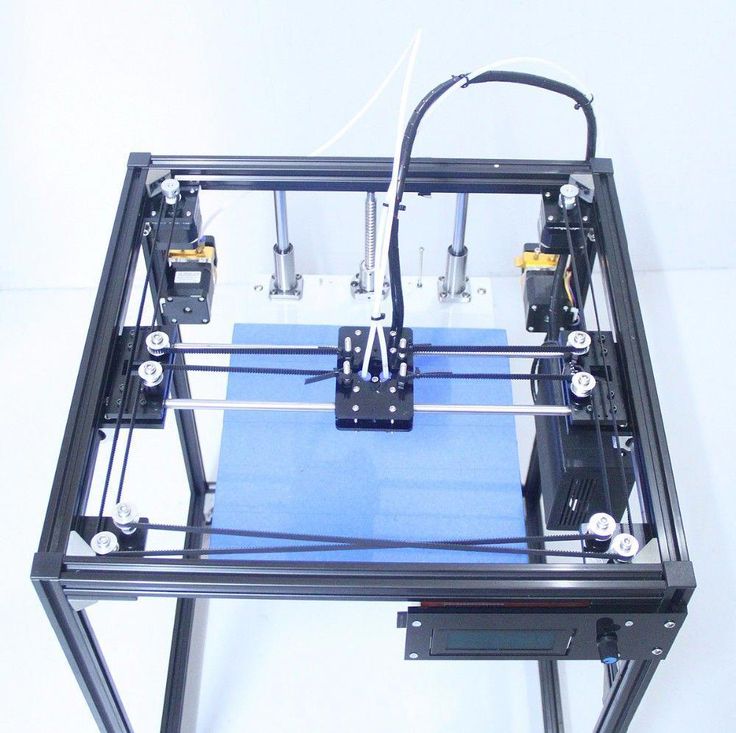
Large-scale 3D printers have been in the spotlight for quite some time. When we say large scale, we mean it– these machines can 3D print objects of over 1 square meter. They can be used to 3D print pieces of furniture, large prototypes, or several series of smaller objects in one go.
The professional 3D printers featured in our article are basically super-sized versions of ordinary desktop 3D printers. They almost all use extrusion 3D printing technology (FFF) and work the same way as regular desktop printers.
Our “largest 3D printers” selection does not include construction 3D printers, which fit into a different category.
Handpicked related content
If these large scale 3D printers (XXL) are too big, check out our other selections:
- Large format 3D printers (XL)
- Large volume 3D printers (L) for desktops/benchtops
- Large resin 3D printers (L)
Large scale 3D printers (XXL): 2022 selection
| Brand | Product | Build size | Country | Price Approximate starting prices based on supplier-provided information and public data. | |
|---|---|---|---|---|---|
| Modix This brand is a certified partner from our network. | BIG-Meter V4 | 1010 × 1010 × 1010 mm39.76 × 39.76 × 39.76 in | Israel | $ 13,50013 723 €11,975 £2,012,256 ¥ | Buy |
| CreatBot | F1000 | 1000 × 1000 × 1000 mm39.37 × 39.37 × 39.37 in | China | $ 29,99930 494 €26,610 £4,471,531 ¥ | Buy |
| BigRep | BigRep ONE v4 | 1005 × 1005 × 1005 mm39.57 × 39.57 × 39.57 in | Germany | $ 30,00030 000 €26,611 £4,471,680 ¥ | Quote |
| 3D Platform | 400 Series WORKBENCH XTREME | 1000 × 1500 × 700 mm39.37 × 59.06 × 27.56 in | United States | $ 49,99950 823 €44,351 £7,452,651 ¥ | Quote |
| Tractus3D | T3500 | ⌀ 1000 x 2100 mm | Netherlands | $ 59,00049 900 €52,335 £8,794,304 ¥ | Quote |
| The Industry | MAGNUM | 1500 × 1200 × 1200 mm59. 06 × 47.24 × 47.24 in 06 × 47.24 × 47.24 in | Sweden | $ 135,000129 990 €119,750 £20,122,560 ¥ | Quote |
| MASSIVit 3D | Massivit 10000 | 1420 × 1110 × 1500 mm55.91 × 43.7 × 59.06 in | Israel | upon request | Quote |
| Modix This brand is a certified partner from our network. | MAMA | 2000 × 5000 × 1000 mm78.74 × 196.85 × 39.37 in | Israel | upon request | Quote |
 Prices may vary by region, over time and do not include additional products or services (taxes, shipping, accessories, training, installation, …).
Expand to see more specs
The products in the table are ranked by price (low to high).
| Brand | Product | Build size | Build volume | Country | Price Approximate starting prices based on supplier-provided information and public data. Prices may vary by region, over time and do not include additional products or services (taxes, shipping, accessories, training, installation, …). | |
|---|---|---|---|---|---|---|
| Modix This brand is a certified partner from our network. | BIG-Meter V4 | 1010 × 1010 × 1010 mm39.76 × 39.76 × 39.76 in | 1030.3 L | Israel | $ 13,50013 723 €11,975 £2,012,256 ¥ | Buy on Modix |
| CreatBot | F1000 | 1000 × 1000 × 1000 mm39.37 × 39.37 × 39.37 in | 1000 L | China | $ 29,99930 494 €26,610 £4,471,531 ¥ | Buy on CreatBot |
| BigRep | BigRep ONE v4 | 1005 × 1005 × 1005 mm39.57 × 39.57 × 39.57 in | 1015.08 L | Germany | $ 30,00030 000 €26,611 £4,471,680 ¥ | Get a quote |
| 3D Platform | 400 Series WORKBENCH XTREME | 1000 × 1500 × 700 mm39.37 × 59.06 × 27.56 in | 1050 L | United States | $ 49,99950 823 €44,351 £7,452,651 ¥ | Get a quote |
| Tractus3D | T3500 | ⌀ 1000 x 2100 mm | 1649.34 L | Netherlands | $ 59,00049 900 €52,335 £8,794,304 ¥ | Get a quote |
| The Industry | MAGNUM | 1500 × 1200 × 1200 mm59. 06 × 47.24 × 47.24 in 06 × 47.24 × 47.24 in | 2160 L | Sweden | $ 135,000129 990 €119,750 £20,122,560 ¥ | Get a quote |
| MASSIVit 3D | Massivit 10000 | 1420 × 1110 × 1500 mm55.91 × 43.7 × 59.06 in | 2364.3 L | Israel | upon request | Get a quote |
| Modix This brand is a certified partner from our network. | MAMA | 2000 × 5000 × 1000 mm78.74 × 196.85 × 39.37 in | – | Israel | upon request | Get a quote |
Overview of the best large scale professional 3D printers
The Modix BIG-Meter offers over one cubic meter of build volume. As all Modix printers do, the BIG-Meter is delivered as a self-assembly kit, which contributes to the printer’s relatively low price point.
This large scale 3D printer comes with a dual extruder (E3D Aero and E3D Volcano print heads), full automatic bed leveling (bed tile and bed mapping), a Wi-Fi controller, and a range of industrial-grade components. The print bed heats up to 120°C.
Buy on Modix Get a quote Add to comparison
The F1000 from CreatBot offers a full cubic meter of fully enclosed and heated (60°C) build volume. There’s also a filament chamber that can hold two spools of up to 5kg each and heat up to 45°C or 65°C.
Its dual nozzles are able to heat up to 420°C, while the print bed heats up to 100°C. Compatible materials range from standard PLA and ABS to PETG and carbon fiber-filled and flexible materials.
Buy on CreatBot Get a quote Add to comparison
The BigRep ONE, currently in its third generation of upgrades and updates, is one of the only large-sized 3D printers to provide independent dual extrusion (IDEX). IDEX can cut production times in half thanks to duplication or mirror modes.
The printer’s large touchscreen grants access to the webcam and allows users to resume prints even after a power outage. The filament holder is able to hold multiple spools of up to 8kg.
Contact manufacturer Get a quote Add to comparison
This large format 3D printer with dual extrusion is customizable. Various extruders are available, and it’s possible to add an enclosure. The enclosure can be heated and/or include an air filter as well.
It’s possible to choose from two different control systems; with Wi-Fi or with Ethernet connectivity. The automatic leveling probe touches over 400 points on the print bed to ensure optimal calibration.
Contact manufacturer Get a quote Add to comparison
The T3500, a huge delta 3D printer, offers a massive build size that can 3D print to an exact scale of 1:1 up to 2.1 meters high.
The large-scale Tractus3D T3500 can 3D print exotic materials with its hot-end extruder capable of reaching up to 300°C. This 3D printer features a heated bed and can be equipped with an optional dual extruder.
Contact manufacturer Get a quote Add to comparison
The Industry MAGNUM is a very large format 3D printer by The Industry (previously called BLB Industries), a manufacturer based in Sweden. This XXL 3D printer offers a build volume of 2. 16m³ and comes with a set of nozzles ranging from 2 to 8mm in diameter. The MAGNUM is based on the company’s previous model, the BLB Industries THE BOX.
Contact manufacturer Get a quote Add to comparison
The Massivit 10000 is an industrial large format 3D printer produced by MASSIVit 3D. MASSIVit 3D is a 3D printer manufacturer based in Israel. This 3D printer offers a build volume of 1420 x 1110 x 1500 mm.
Contact manufacturer Get a quote Add to comparison
Modix has nicknamed their printer “Personal Car Factory”, a quick way to indicate how big the MAMA (Modular Additive Manufacturing Assembler) system really is. It’s equipped with a high-speed pellet extruder, and is also capable of 3D printing with spools of filament.
This huge FFF 3D printer isn’t available yet.
Contact manufacturer Get a quote Add to comparison
Applications for large scale 3D printing
3D printing furniture
The largest 3D printers can be used to 3D print furniture in one go. This includes tables, chairs, and even bathtubs. 3D printing furniture can also generate unique, complex pieces that would be difficult to create otherwise.
Hence, customized furniture is becoming more and more accessible thanks to extra-large 3D printers.
The BigRep One is in action. Source: QMES3D printing large prototypes
The professional large-scale 3D printers featured in our article can also be used to 3D print large prototypes. This enables businesses to test out their products before actually launching production. Industrial designers and engineers are able to perform more revisions in significantly less time.
They can test their future products extensively while at the same time reducing the production-to-market time.
3D printing production series
Large-scale 3D printers don’t have to exclusively 3D print large objects and prototypes. Their huge build platform also enables 3D printing big series of smaller objects.
Customized large scale 3D printers
There are several manufacturers that mainly offer tailored solutions rather than standardized 3D printer models. Tobeca, for instance, is a French team that builds 3D printers from scratch and is based entirely on their customers’ needs and requirements.
US-based Erectorbot also provides on-demand builds, although they do have a lineup of standard models. Then there’s Colossus, a company in Belgium that constructs 3D printers within shipping container-like structures. CNC Barcenas, a Spanish manufacturer, also offers tailored, large-scale 3D printers with a range of options to choose from.
Large Scale 3D Printers Big Enough to Print Furniture
Home / 3D Printers / Large Scale 3D Printers Big Enough to Print Furniture
Use Cases
Just like all types of 3D printing, XL 3D printing has its own strengths and tradeoffs. Users are constantly finding more applications for these gigantic machines so the XL 3D printing space is getting bigger and bigger. Let’s have a closer look.
Quick jump to:
- Request XL 3D printer quote
- Request XL service quote
When To Consider Large Scale 3D Printing
It takes a large scale 3D printer to print furniture, vehicle parts and architectural components. Obviously, size is the driving factor in choosing to use large-format printing but there’s more to it than that. Here’s a breakdown of some of the less-obvious considerations:
- Unibody Parts – Often, producers are already able to fabricate their large objects through traditional methods of assembly but those objects would perform better if they were produced as one solid piece, something only a large 3D printer can do efficiently.
- Weight Reduction – Large objects are usually made of wood, metal, or injection molded plastics.
 Printing the same objects in plastic will make them much lighter, especially when factoring that users can easily adjust the density infill of 3D printed objects. Consolidating large assemblies into single components also reduces weight by eliminating the need for fasteners like nuts and bolts.
 - Faster Development – The larger an object, the longer it takes to create and setup the tooling to fabricate it through traditional means. With 3D printing, there are essentially no setup steps so large prototypes are significantly faster to print than to make them any other way. A large object may take a while to print, but by cutting out the time-consuming tooling step, it may also be faster to do production runs of large objects, depending upon the specifics.
- Reduced Cost – 3D printed large parts can be cost competitive with conventionally-made parts almost entirely because of the tooling costs of the latter. Consolidated assemblies usually cost less as well because fewer materials have to be sourced from different places.

- Design Freedom – Using conventional manufacturing methods, many geometries are just not possible, such as internal channels and complex lattice structures. Many large objects, like furniture, benefit from such features and XL printers are the only way to realize those designs.
Large Scale 3D Printing Examples
- Restoration and replication – XL 3D printing has become rather popular among paleontologists as the technology allows them to both study and preserve the delicate fossils that they regularly handle.
- Furniture – Thanks to large-scale 3D printers it is now possible to create complex functional designs within a fully digitized process chain. From full-size prototyping to production of 3D printed furniture.
- Display advertising – XL 3D printers are perfect for making high-quality, modern signage and lettering for retail stores, businesses and exhibitions.
- Props – With the introduction of large scale 3D printers, designers can now produce enormous set pieces – overnight.
 3D printing can help designers quickly manifest their wildest imaginations into the physical reality, and the Film & TV industry has taken notice.
Pellet Extrusion
One of the differences between desktop-sized machines and XL printers is the possibility to utilize pellet extrusion systems on the large printers. Pellet extrusion doesn’t use spooled filament as feedstock but instead uses the same virgin plastic pellets that are used for injection molding, which are much cheaper than spooled filament. This makes it easy to mix different plastics to make custom polymer blends and colors. These systems can also take shredded plastics as feedstock, which enables users to directly recycle water bottles, milk jugs, and failed and unneeded prints into new objects. Such a degree of a circular ecosystem can not be achieved with any other form of manufacturing.
That’s all great but what compels most users to opt for pellet extrusion is its blazing speed as the technology enables output of several kilograms per hour.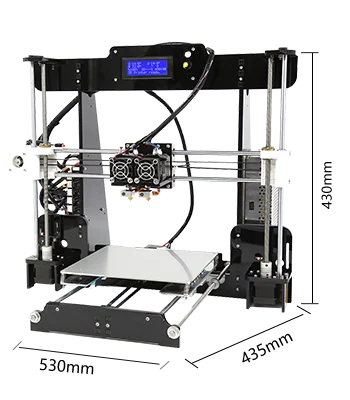 Printing times scale exponentially with part size so having a high extrusion rate is pretty important for large-format 3D printing. One drawback of pellet extrusion systems is that they struggle with retraction, a feature that filament extruders employ to improve surface finish by pulling back on the filament during non-extrusion travel moves; retraction reduces or eliminates blobs, dots, and stringing on prints. Some XL printers can operate with both filament and pellet extrusion systems, allowing users to choose the best toolhead for their specific application.
Get a Quote
Large Scale 3D Printers
Looking to implement large scale 3D printers in your production process? Get a quote from Modix or Industry
Modix BIG Meter
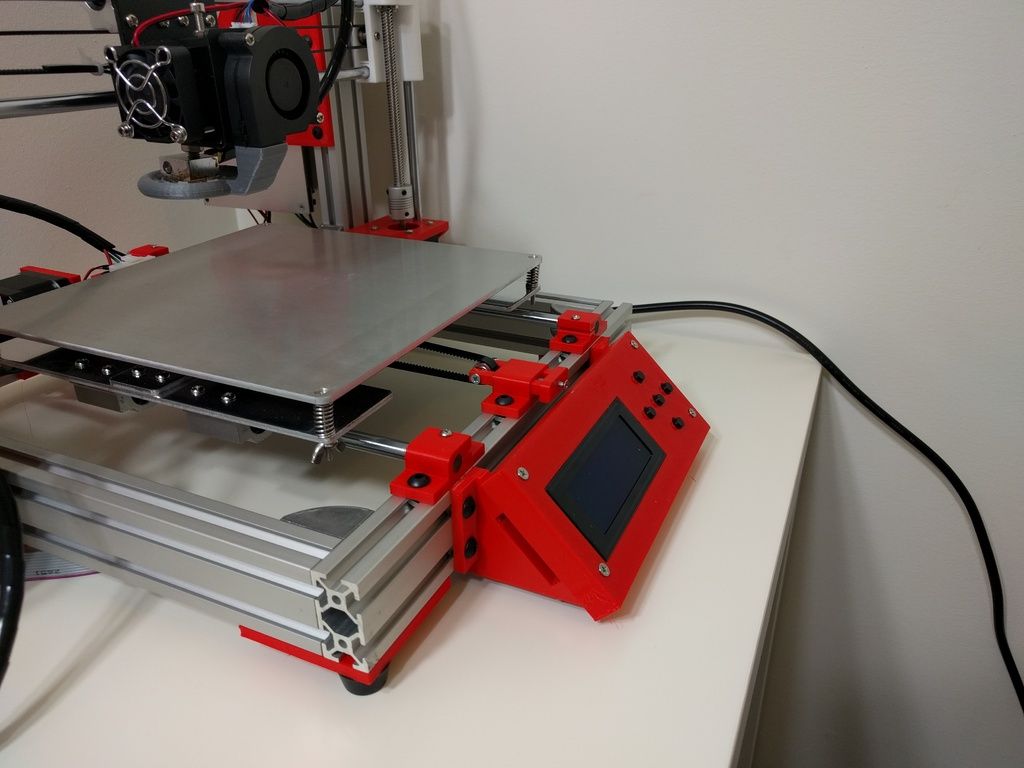
With the Modix BIG Meter, you are now able to manufacture objects as large as 1010 x 1010 x 1010 mm in one go!
$13,500Modix
Request a Quote
modix big meter
- Benefits
- Applications
- - DIY self-assembly kit
- - Print Volume: 1010 x 1010 x 1010 mm
- - Printer Dimensions: 1300 x 1470 x 1830 mm
- - Shipping Weight: 200kg
- - Included: Dual print head, E3D Aero & Volcano 1.
 75mm
75mm - - Reprap Firmware developed and supported by Duet3D
- - 7 inch touchscreen made by Duet3D
- - E3D Titan Aero extruder with E3D Volcano hotend
- - Automatic bed tilt calibration
- - Power Requirements: 32A, single phase, 208-240V
Mold Making, Prototyping, Research and Development, Restoration
Industry MAGNUM
Hailing from Sweden, Industry is a company that has made major waves in the world of 3D printing. The new MAGNUM large scale pellet 3D printer enables you to print parts measuring 1500 x 1200 x 1200 mm.
A powerful E25 extruder manufactured to handle shredded material, granules or pellets. The MAGNUM handles nozzles between 2-8mm and has an average output between 1-8 kg / hour & a maximum output of 15 kg / hour.
MAGNUM offers powerful control features based on Bosch Rexroth MTX system control. It comes with a camera and mail/text module for external monitoring. A large touch screen display allows for easy setup and agile control.
€159,000Industry
Request a Quote
Industry MAGNUM
- Benefits
- Applications
- - Large scale pellet 3D printer
- - XL build size: 1500 x 1200 x 1200 mm
- - Granular extruder, which reduces material costs
- - Fast build rate: up to 15 kg per hour
- - Touch screen display
- - High quality linear motion modules from Bosch Rexroth MTX
Mold Making, Production, Prototyping, Research and Development, Restoration
Modix BIG-180X
The BIG-180X features a print volume of 1800 x 600 x 600 mm and comes at a competitive price of $12,000 USD. The unique extra width of the build chamber is designed per request of customers working in the automotive industry.
$15,500Modix
Request a Quote
modix 180
- Benefits
- Applications
- - DIY self-assembly kit
- - Print Volume: 1800 x 600 x 600 mm
- - Printer Dimensions: 2170 x 1060 x 1430 mm
- - Shipping Weight: ~240kg
- - Included: Dual print head, E3D Aero & E3D Volcano 1.
 75mm
75mm - - Reprap Firmware developed and supported by Duet3D
- - 7 inch touchscreen made by Duet3D
- - E3D Titan Aero extruder with E3D Volcano hotend
- - 4 X Z axis motors are controlled individually providing automatic bed tilt calibration.
- - Minimal Electricity requirements: 32A, single phase, 208-240V
Prototyping, Research and Development, Restoration
Modix BIG-120Z
The closed enclosure of the BIG-120Z is made of aluminum composite panels and polycarbonate doors. It incorporates a premium motion system including HIWIN motion rails, Gates timing belts and IGUS signal cables. This is a smart 3D printer providing several key reliability features including power-off resume, filament runout sensor, 120 probing points based automatic bed leveling, stall detection and more. The manufacturer offers an active air filter device as an add-on.
$7,500Modix
Request a Quote
BIG-120Z
- Benefits
- Applications
- - DIY self-assembly kit
- - XL print volume of 600 x 600 x 1200 mm
- - Z axis guides, HIWIN MGW Linear Rails
- - Duet 2 Wifi, 32Bit controller developed by Duet3D
- - Reprap Firmware developed and supported by Duet3D
- - 7 inch touchscreen made by Duet3D
- - Dual print head
- - E3D Titan Aero extruder with E3D Volcano hotend
Displays, Fashion, Mold Making, Prototyping
Modix BIG-120X
Modix BIG-120X Version 3 represents a major leap forward with regards to the printer reliability, print quality, ease of assembly and readiness to future advanced updates. Since Modix big60 and 120X share the same core design the new update is benefiting both models.
$7,500Modix
Request a Quote
BIG-120X
- Benefits
- Applications
- - DIY self-assembly kit
- - XL print volume of 1200 x 600 x 660 mm
- - Duet 2 Wifi, 32Bit controller developed by Duet3D
- - Reprap Firmware developed and supported by Duet3D
- - 7 inch touchscreen made by Duet3D
- - E3D Titan Aero extruder with E3D Volcano hotend
- - Closed loop motion system (optional)
Mold Making, Prototyping, Research and Development, Restoration
Get a Quote
XL 3D Print Service
3D printing is a viable option for display advertising, large scale concept models, car parts, furniture, molds & tooling. We offer both cost effective solutions with thick layers and rough surfaces for rapid prototyping as well as highly detailed & post-processed end-use objects. Please contact — [email protected] — for any questions or complete the form below and we’ll answer you as soon as possible.
- Technologies: FDM, SLA, GDP
- Materials: From PLA to CF composites & more
- Maximum print size: 1450 x 1100 x 1800 mm
- Post-processing: Spray paints, metal coatings, assembly & many more
3 Unique Features of New WorkCenter 3 Large Format 500D Printer
Platform 3D has released a fairly large 3D printer, the WorkCenter 500 - and the build volume of this beast is significant, 1400 x 2800 x 700mm (55″ x 110″ x 27″) , or 2.7 cubic meters (95 cubic feet) of volume. It should be able to meet the needs of many large parts manufacturers.
500D Platform WorkCenter 3 Large Format 3D Printer I know what you're thinking, this is another oversized desktop 3D printer. Do you think? Well, you might be surprised. The WorkCenter 500 has three very interesting features that 3D Platform has developed over the past few years to build and sell large format 3D printers.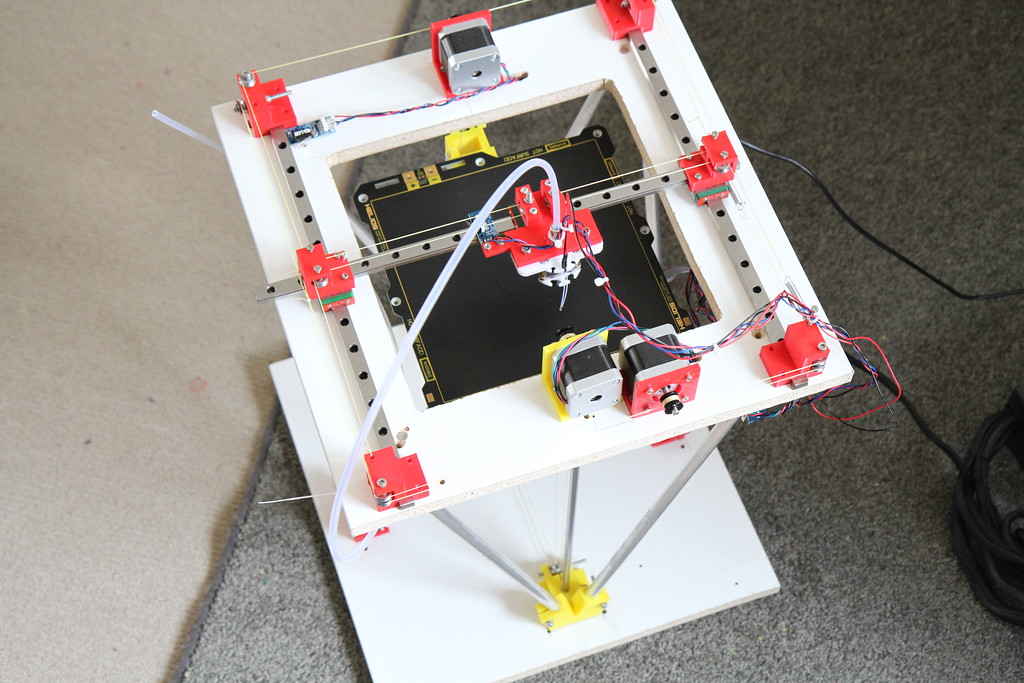 nine0003 Several high speed extruders available for 3D Platform WorkCenter 3D printers
1. PETG and nylon materials
One of the innovations is the type of materials that can be used. More primitive large format 3D printers of this type can only work with PLA material due to its low tendency to warp. 3D printing a "deformed" material like ABS has been exceptional.
ABS is still out of the question for the WorkCenter 500, but they tell us they can successfully 3D print PETG and some nylons, making the device a lot more useful than your typical giant PLA machine. nine0003 The huge 500D Platform WorkCenter 3 3D printer includes a massive aluminum build plate.
2. High speed 3D printing.
Typical large format 3D printers also suffer greatly from increased print times. If you think a 6-hour desktop 3D print is too long, then you'll be amazed at systems that simply scale up the same technology to print a week's worth of prints as a result. This is simply unacceptable, and it turns out that the 3D Platform has done considerable work to overcome this barrier. nine0003
The company offers a variety of very advanced hot end extrusion systems that are specifically designed to deliver thermoplastic material much faster than a typical desktop hot end. The standard WorkCenter 500 output is 1 kg (2.2 lb) of material per hour, but there are optional larger extrusion systems that can increase the deposition rate to 6.8 kg (15 lb) per hour.
3D Platform WorkCenter 500 has a fairly powerful high speed extrusion system. nine0005Part of this increase in speed is due to the increased nozzle sizes that the 3D Platform can provide. Their product line includes 0.7mm, 1.4mm and 2.8mm nozzles.
To put this into perspective, you would need to change 1kg spools every 8 minutes and 49 seconds. Obviously the 3D Platform uses much larger spools on this machine.
3. 6mm 3D Printer Filament
While the company does offer pellet solutions, one of the more interesting innovations is the 6mm filament shown in this image. The enlarged diameter ensures there is enough material to feed into the thirsty high speed extrusion system. However, he is quite tough. You might be wondering how they can properly unwind such a thick thread so that it runs smoothly along the path of the thread. nine0003 Thick 6mm 3D printer filament from 3D Platform. Hard!
The answer is that the 3D Platform actually preheats this thick filament to make it slightly more pliable and thus able to successfully follow the filament's path.
One very intriguing suggestion we heard from the company is their interest in using this thick thread for other purposes. In particular, the diameter of the thick filament may allow for additives that could not be foreseen with thinner filaments. nine0003
One example of this advantage would be the inclusion of much longer fibers. Material suppliers today sell "carbon fiber" filament, which is essentially PLA or nylon mixed with the very common chopped carbon fibers. While these tiny segments do add strength, their effect is limited by their length.
But that may change with the introduction of the huge 3mm 6D Platform filament. They can potentially add much longer fibers and get a corresponding increase in the strength of printed parts. And it will work for any type of fiber, such as glass, which is often used in place of carbon fiber these days. nine0003
It's not part of their 3D printer configurator yet, but the 3D Platform WorkCenter 500 is available for around $200,000, which is 400 times the price of the $50,000 WorkCenter at $40,000.
Learn more about 3D printing at Fabbaloo!
Whirlpool 15.7cc Upright Freezer User Manual Frost Free
report this ad
report this ad
Whirlpool 15.7 Cubic Feet Upright Freezer Freeze Free
Your safety and the safety of others is very important
There are many important safety messages in this manual and on your device. Always read and follow all safety messages.
- This is a warning symbol.
- This symbol alerts you to potential hazards that could kill or harm you or others.
- All safety messages will follow the warning sign and the word DANGER or WARNING. These words mean:
DANGER!
You could be killed or seriously injured if instructions are not followed immediately.
WARNING
You could be killed or seriously injured if you do not follow instructions.
All safety messages tell you what a potential hazard is, tell you how to reduce the chance of injury, and tell you what can happen if instructions are not followed. nine0003
IMPORTANT SAFETY INSTRUCTIONS
WARNING:
To reduce the risk of fire, electric shock, or injury when using this product, follow basic safety precautions, including the following:
- Supervise children to ensure they do not play with device.

- This device is not intended for use by persons (including children) with reduced physical, sensory or mental capabilities, or lack of experience and knowledge, unless they are supervised or instructed in the use of the device by a person responsible for their safety. nine0069
- Do not use an extension cord.
- If the power cord is damaged, it must be replaced by the manufacturer, its service agent or a similarly qualified person in order to avoid a hazard.
- Connect to potable water only.
- This appliance is intended for use in households and similar areas such as: staff kitchens in shops, offices and other workplaces; farmhouses and clients in hotels, motels and other residences; bed and breakfast environment; as well as catering and similar non-commercial applications. nine0069
- Do not store explosive substances such as aerosol cans containing flammable gas in this appliance.
- Do not use replacement parts not recommended by the manufacturer (for example, parts made at home with a 3D printer).
- Make sure that the ventilation openings in the device housing or built-in structure are not obstructed.
- Do not use mechanical devices or other means to speed up the defrosting process, other than those recommended by the manufacturer. nine0069
- Do not damage the refrigerant circuit.
- Do not use electrical appliances inside food storage compartments unless they are of the type recommended by the manufacturer.
- An ice maker can be added to some models. View the serial number tag model information of the ice maker inside the food compartment of the device.
- Have a qualified service person install the plumbing and ice maker. See the installation instructions that came with the ice making kit for details. nine0069
SAVE THESE INSTRUCTIONS
Proper disposal of your old freezer
WARNING: Risk of trapping a child. Before you throw away your old refrigerator or freezer:
- Remove the doors.
- Leave shelves in place to make it difficult for children to climb in.
WARNING
Choking Hazard
Remove the doors or cover from the old appliance. Failure to do so may result in death or brain damage. nine0003
IMPORTANT:
Child capture and suffocation are not problems of the past. Abandoned or abandoned freezers or refrigerators are still dangerous, even if they are "only a few days old". If you are disposing of an old refrigerator or freezer, follow these instructions to prevent accidents.
Important Refrigerant Disposal Information:
Dispose of the freezer in accordance with federal and local regulations. Refrigerants must be recovered by a licensed EPA certified refrigerant technician in accordance with established procedures. nine0003
MAINTENANCE AND MAINTENANCE
Cleaning the freezer for frost protection (on some models)
WARNING
Explosion
- Risk of explosion.

- Flammable refrigerant used.
- Do not use mechanical devices to defrost the refrigerator. Do not pierce refrigerant pipes.
No frost means you don't have to defrost your freezer. Frost is removed by air movement, collecting moisture and depositing it on the cooling coil. The cooling coil is periodically heated to melt the frost and then drains into a drain pan (located behind the base grate) where it evaporates. nine0003
A complete cleaning must be carried out at least once a year.
- Press and hold the Temp Setting button for 3 seconds or turn the knob to "0" to turn off the cooling.
- Unplug the freezer or turn off the power.
- Remove all frozen food. Wrap the frozen food in several layers of newspaper and cover with a blanket. Food stays frozen for several hours. You can also store frozen food in the refrigerator, an additional refrigerator/freezer, or in a cool place. nine0069
- Remove all removable parts from the interior, such as shelves and baskets.
- Thoroughly hand wash, rinse and dry detachable parts and internal surfaces. Use a clean sponge or soft cloth and mild detergent in warm water.
- Do not use abrasive or aggressive cleaners such as window sprays, cleaners, flammable liquids, cleaning waxes, concentrated detergents, bleaches, or cleaners containing petroleum products on plastic parts, interiors, or doors. pads or pads. Do not use paper towels, washcloths, or other harsh cleaners. They can scratch or damage materials. nine0069
- To remove odors, you can wash interior walls with a mixture of warm water and baking soda (2 tablespoons to 1 quart [26 g to 0.95 L] of water).
- Replace detachable parts.
- Use the appropriate cleaning method for your exterior finish. Painted Metal: Wash outside with a clean sponge or soft cloth and mild detergent in warm water. Do not use abrasive or harsh cleaners or cleaners designed for stainless steel. Dry thoroughly with a soft cloth. nine0069
- Remove the bottom grill by opening the freezer door and removing the two Phillips screws.
 Pull the grill towards you to remove it.
Use a vacuum cleaner with a long nozzle to clean the condenser coils when they are dusty or dirty. Coils may need to be cleaned as often as once every two months. This can help save energy. - Replace the main grille by lining up the ends of the grille with the alignment nodes on each side and snapping the grille into place. Reinstall the screws. nine0069
- Replace all frozen food.
- Turn the freezer on or reconnect the power.
- Set the temperature controller to the desired setting.
Defrosting and cleaning the manual defrost freezer (on some models)
WARNING
Explosion hazard
- Risk of fire or explosion.
- Flammable refrigerant used.
- Do not use mechanical devices to defrost the refrigerator. Do not pierce refrigerant pipes. nine0069
- Press and hold the Temp Setting button for 3 seconds or turn the knob to "0" to turn off the cooling.
- Unplug the freezer or turn off the power.
- Remove all frozen food. Wrap the frozen food in several layers of newspaper and cover with a blanket. Food stays frozen for several hours. You can also store frozen food in the refrigerator, extra refrigerator or freezer, or in a cool place. nine0069
- Remove the base grille. Open the freezer door and remove the bottom rack by unscrewing the two Phillips screws and pulling the rack towards you.
- Look under the device and pull the drain hose out through the hole. The drain hose drains the defrost water from the freezer and passes through the area behind the lower rack. Place a large, shallow pan under the drain hose. Remove the drain plug from inside the freezer.
NOTE: Check the drain pan frequently to avoid water overflow. Have a second pan handy to make it easier to empty. nine0069 - Place pots of hot water in the freezer with the door open to speed up the melting. Directing the air from the electric fan into the freezer will also help.
 Do not place a fan or any electrical device in the freezer.
 - Remove frost with a plastic scraper.
NOTE: Do not use an ice pick, knife or other sharp object to defrost the freezer. Damage may occur. - Wipe water off the walls with a towel or sponge. nine0069
- Wash the interior walls with a solution of mild detergent and warm water or 2 tablespoons (26 g) of baking soda per liter. (0.95 l) warm water. Do not use abrasive or harsh cleaners.
- Rinse well and dry with a clean soft cloth.
- Use the appropriate cleaning method for your exterior finish. Painted Metal: Wash outside with a clean sponge or soft cloth and mild detergent in warm water. Do not use abrasive or harsh cleaners or cleaners designed for stainless steel. Dry thoroughly with a soft cloth. nine0069
- On models with a drain system, replace the drain hose, drain cap and base grate.
- Replace the main grille by lining up the ends of the grille with the alignment nodes on each side and snapping the grille into place.
 Reinstall the screws.
 - Replace all frozen foods.
- Turn the freezer on or reconnect the power.
- Set the temperature controller to the desired setting.
Bulb replacement
Not all lamps are suitable for the freezer. Be sure to replace the bulb with a light bulb of the same size, shape, and wattage.tage. Do not use LED or colored light bulbs instead. nine0003
Style 1 - manual defrost models
- Unplug the freezer or turn off the power.
- To remove the lamp, pull on the light lens.
- Replace the light bulb with a 40W or less electric bulb.
- Connect the freezer or reconnect the power.
Style 2 - Auto Defrost Models
- Unplug or unplug freezer. nine0069
- Remove the light shield by squeezing the lens from the sides, pushing and pulling down.
- Replace the lamp with a 40W or less instrument lamp or an LED lamp rated for wet/daylight areas.

NOTE: Some replacement LED bulbs are not recommended for wet/daylight environments. The fresh food compartments and the freezer compartment in the refrigerator are considered damp environments. Read and follow all instructions on the LED packaging when replacing the factory LED bulb. A replacement LED lamp can be purchased from an authorized dealer. nine0069 - Replace light shield.
- Connect the freezer or reconnect the power.
Key removal lock
WARNING
Trap
- Keep the key out of the reach of children.
- Failure to do so could result in death, suffocation, or frostbite.
To lock or unlock the freezer, you must hold the key in the lock while turning. The lock is spring loaded, so the key must not be left in the lock. If the key is lost, contact your dealer for a replacement. When requesting a replacement key, always include the model and serial number of your freezer. nine0003
NOTE: Keep the key out of the reach of children. Do not store the key near the freezer/refrigerator.
Ensuring proper air circulation
Proper airflow in the freezer must be ensured to maintain the correct temperature. As shown in the figure, cold air enters from the wall of the freezer and moves down. The air is then recirculated through a vent at the bottom. Do not cover these vents with food packages. If the vents are blocked, airflow will be restricted and temperature and humidity issues may occur. nine0003
IMPORTANT: Wrap or cover food tightly to prevent odor transfer and food drying.
Power failures
If the power goes out for 24 hours or less, keep the door closed to keep food cold and frozen.
If the power goes out for more than 24 hours, do one of the following:
- Remove all frozen food and store it in the frozen food cabinet.
 nine0069
 - If a food locker is not available, eat or you can eat perishable food right away.
NOTE:
A full freezer stays cold longer than a partially filled one. A meat freezer stays cold longer than a bakery freezer. If you see that food contains ice crystals, it can be re-frozen, but this may affect its quality and taste. If food is in poor condition, dispose of it.
Travel
When you move your freezer to a new home, follow these steps to prepare it for the move.
- Remove all frozen food.
- Turn off the freezer.
- Take out all the removable parts, wrap them well and fasten them together so they don't move or rattle while driving.
- Thoroughly clean the freezer compartment.
- Tape the freezer compartment and attach the electrical cord to the cabinet.
When you move into a new home, refer to the Quick Start Guide and "Installation Instructions" in the Owner's Manual for information on installing and setting up the controls.
INSTALLATION INSTRUCTIONS
Unpacking the freezer
WARNING
Excessive weight hazard
- nine0069
- Failure to do so may result in back or other injury.
Remove packing materials
- Remove tape and glue residue from the surfaces before starting the freezer. Apply a small amount of liquid dish soap to the adhesive with your fingers. Wipe with warm water and dry.
- Do not use sharp instruments, rubbing alcohol, flammable liquids, or abrasive cleaners to remove tape or adhesive. These foods may damage the surface of the freezer. See the Upright Freezer Safety section for more information. nine0069
When moving the freezer
Your freezer is heavy. When moving the freezer for cleaning or maintenance, be sure to cover the floor with cardboard or fiberboard to avoid damaging the floor. When moving, always pull the freezer straight out.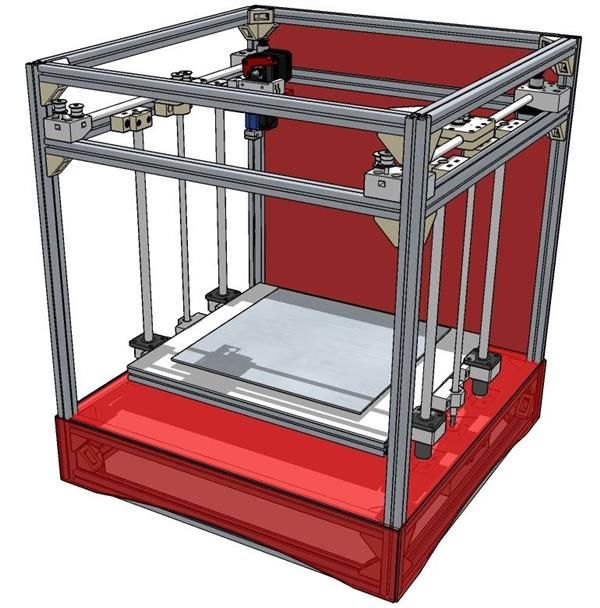 Do not move or "walk" on the freezer in an attempt to move it, as this may damage the floor.
Clean before use
After removing all packing materials, clean the inside of the freezer before using it. See cleaning instructions in the Maintenance and Care section. nine0003
Important information about glass shelves and lids:
Do not wash glass shelves or lids with warm water when they are cold. Shelves and covers may break if subjected to sudden changes in temperature or shock, such as impact. Tempered glass can shatter into many small pebble-sized pieces. This is fine. Glass shelves and lids are heavy. Take them off with both hands to avoid dropping them.
Power requirements
WARNING
Electrical Hazard
- Connect to a grounded three-prong outlet.
- Do not remove the ground prong.
- Do not use adapter.
- Do not use an extension.
- Failure to follow these instructions could result in death, fire, or electrical shock.
Before moving the freezer to its final location, it is important to make sure you have the correct electrical connection. nine0003
Recommended grounding method
Requires grounded power supply 115 V, 60 Hz, AC only, 15 A or 20 A with fuse. It is recommended to provide a separate circuit serving only your freezer. Use an outlet that cannot be turned off by a switch. Do not use an extension cord.
NOTE:
Before performing any type of installation, cleaning, or removing the bulb, turn the knob to position "0" on manual defrost models or press and hold the "Temperature" button for 3 seconds on auto defrost models to turn off refrigeration . Then unplug the freezer from the power supply. nine0003
Style 1 - Models with manual defrosting
Style 2 - Models with automatic defrosting
Requirements for
Warning
The danger of explosion 9000
Ventilation and clearance
- Keep flammable materials and vapors such as gasoline away from the freezer.
- Do not cover the freezer with items such as blankets, sheets and tablecloths. This reduces air circulation.
- Leave a gap of at least 3 inches (7.5 cm) on both sides of the freezer and 2 inches (5 cm) between the back of the freezer and the wall. If the freezer must be next to a fixed wall, leave extra space on the hinge side so the door can open wider. nine0069
Temperature
The freezer works most efficiently when it is located where the temperature does not drop below 40°F (5°C). Place the freezer in a place where the temperature will not fall below the recommended temperature.
When moving to final location
- The dimensions below apply to 16″, 18″, 20″ upright freezers as long as they do not have side bumpers.
- See below for side impact and cooler information. nine0064 NOTE: This freezer can be installed next to another freezer or refrigerator. Leave 1 inch (2.54 cm) space behind the freezer and 1/4 inch (6.4 mm) clearance between appliances.
Plumbing requirements (on some models)
Gather necessary tools and parts before installation. Read and follow the instructions that come with any of the tools listed here.
Required tools:
- Slate with a flat sting
- Horn 7/16 ″ and 1/2 ″ or 2 divorces
- Hague key 1/4 ″
- Drunk 1/4 ″
- Battery drill
Your freezer dealer has a kit with 1/4″ (6.35 mm) seated check valve, fitting and PEX tubing. Make sure the seat valve complies with your local plumbing codes before purchasing. Do not use piercing or 3/16″
seat valve (4.76 mm) which reduces water flow and clogs more easily.
IMPORTANT:
- If you turn on the freezer before connecting the plumbing, turn off the ice maker.
- All installations must comply with local plumbing code requirements.
- Use PEX tubing and check for leaks. Install PEX tubing only in locations where the temperature will remain above freezing.
Water pressure
The water dispenser and ice maker require a cold water supply with a water pressure of 30 to 120 psi (207 to 827 kPa). If you have questions about water pressure, see the Troubleshooting section online or call a licensed qualified plumber.
Reverse Osmosis Water Supply
If a reverse osmosis water filtration system is connected to your cold water supply system, the water pressure in the system must be at least 40 to 60 psi (276 to 414 kPa). nine0064 If the water pressure in the reverse osmosis system is less than 40-60 psi (276-414 kPa), a booster pump can be inserted into the small tube from the cold water line to the reverse osmosis system.
If the water dispenser still does not supply water properly:
- Check if the sediment filter in the reverse osmosis system is blocked. Replace filter if necessary.
- Let the storage tank on the reverse osmosis system fill up after heavy use. nine0069
- If your refrigerator has a water filter, it can further reduce water pressure when used in conjunction with a reverse osmosis system. Remove the water filter.
If you have questions about water pressure, see the Troubleshooting section on the Internet or call a licensed qualified plumber.
Connect the water supply
Connect the water supply
- Unplug the freezer or turn off the power. nine0069
- Turn off the main water supply. Turn on the nearest faucet long enough to clear the line of water.
- Locate a 1/2″ to 1 1/4″ (12.7 mm to 3.18 cm) vertical cold water pipe near the freezer.
IMPORTANT:- Make sure this is a cold water pipe.

- A horizontal pipe will do, but drill at the top of the pipe, not the bottom. This will prevent water from entering the drill and prevent normal sediment from building up in the valve. nine0069
- Make sure this is a cold water pipe.
- Determine the required length of copper or PEX tubing. Measure the distance from the connection at the bottom left rear of the freezer to the water pipe. Add 7 feet (2.1 m) for cleaning. Use 1/4″ (6.35 mm) OD copper or PEX tubing. Make sure both ends of the copper or PEX tubing are cut square.
- Using a cordless drill, drill a 1/4 in. (6.35 mm) hole in your chosen cold water pipe.
- A. Cold water pipe
- B. Clamp pipe
- C. Copper or polyethylene pipes.
- D. Compression nut
- E. Compression sleeve
- F. Stop valve
- G. Seal nut
- Attach the stop valve to the cold water pipe with the cl.amp. Make sure the outlet end fits snugly into the 1/4″ (6.35mm) drilled hole in the water pipe and the washer is under the cl.
 amp tube. Tighten the packing nut. Tighten the pipe clamp screws slowly and evenly so that the washer makes a waterproof seal. Do not overtighten or you may break the copper or PEX tubing. nine0069
 - Slide the compression sleeve and compression nut onto the copper or PEX tube as shown. (The Pex tube is shipped with the compression sleeve and nut installed.) Insert the end of the tube into the exit end at a right angle until it stops. Screw the union nut onto the outlet end using an adjustable wrench. Don't overtighten.
- Place the free end of the tubing in a container or sink and turn on the water supply. Flush the tube until the water runs clear. Close the shut-off valve on the water pipe. Wind up copper tubing or PEX tubing. nine0069
Connect to freezer
- Connect copper tubing or PEX tubing to the valve inlet with a union nut and sleeve as shown. Tighten the compression nut. Don't overtighten.
- A. Tube clamp
- B. Tube clamp screw
- C.
 Copper or polyethylene pipes.
 - D. Compression nut
- E. Valve inlet
- Use the clamp tube on the back of the freezer to attach the tubes to the freezer as shown. This will help prevent damage to the pipes when the freezer is pressed against the wall. nine0069
- Turn on the shut-off valve.
- Check for leaks. Tighten any leaking connections (including those on the valve) or nuts.
- The ice maker is equipped with a built-in water filter. If your water conditions require a second water filter, install one on the 1/4 in. (6.35 mm) plumbing at any pipe connection. Get a water filter from your nearest appliance dealer.
WARNING
Electrical Hazard
- Connect to a grounded three-prong socket.
- Do not remove the ground prong.
- Do not use adapter.
- Do not use an extension.
- Failure to follow these instructions could result in death, fire, or electrical shock.
- Connect to a grounded three-prong socket.
Freezer door
Tools needed: 5/16″ hex socket wrench, 3/8″ hex socket wrench, 2″ flat spatula. nine0003
IMPORTANT:
- All graphics used in the following instructions are included at the end of this manual. The illustrations show a door with a right-hand door arrangement (hinges are installed at the factory on the right).
- If you only want to remove and replace the door, see Removing the Door and Hinges and Replacing the Door and Hinges.
- Turn off controls and remove food and adjustable door or utility containers from the door before starting. nine0069
Remove the door and hinges
- Unplug the freezer or turn off the power.
- Keep the freezer door closed until you are ready to take it out of the cabinet.
NOTE: Provide extra support for the door when moving the hinges. Don't rely on door magnets to hold the door in place while you work.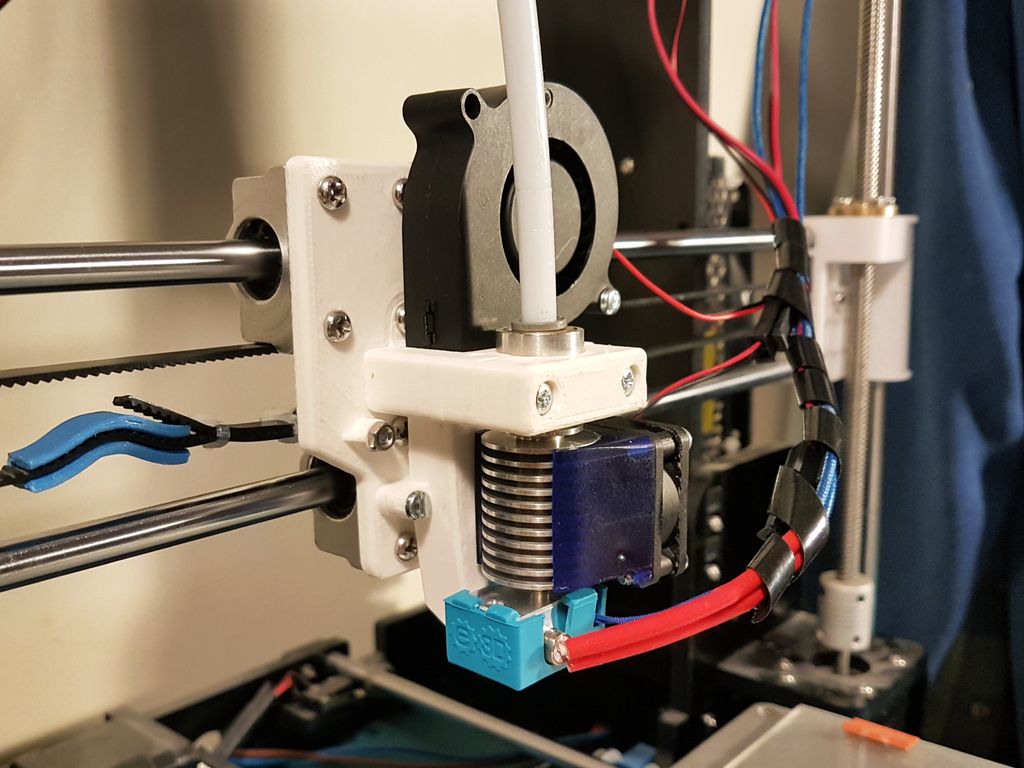
- Remove the top hinge pieces as shown in the top hinge figure.
- Remove the freezer door from the bottom hinge and cabinet and set it aside.
- Remove four hex head screws and lower hinge assembly. See figure "Bottom hinge".
Back door (option on some models)
IMPORTANT:
If you want to flip the door so it opens in the opposite direction, continue with the "Reverse door (optional on some models)" instructions. If you are not turning the door over, see Replacing the Door and Hinges. nine0003
Cabinet
- Remove the cabinet hinge hole plugs from the top of the cabinet and move them to the hinge holes on the opposite side as shown in Figure 2.
- Remove the lower hinge pin from the hinge bracket.
- Remove the stickers covering the holes on the opposite side of the lower hinge.
- Install the lower hinge pin into the other hole in the hinge bracket.
 See Figure 3.
 - Install the hinge bracket into the cabinet with four hex head hinge screws. nine0069
Doors
- On some models, remove the hinge hole plug at the top of the door.
- Remove the door stop from the bottom of the door.
- Move the door stop to the opposite side, making sure that the hole in the door stop bracket is exactly aligned with the hole in the door for the bottom hinge pin.
- Using the screws removed in step 2, attach the door stop bracket to the bottom of the door. nine0069
- Tighten all screws. Set the door aside until the bottom hinge is in place.
Replace door and hinges
NOTE: Graphics may be upside down if door is opened backwards.
- Replace the bottom hinge parts as shown and tighten the screws. See figure "Bottom hinge". Replace freezer door.
NOTE: Provide extra support for the door when moving the hinges. Don't rely on door magnets to hold the door in place while you work. nine0069
 - Assemble the parts of the top hinge as shown in the picture "Top hinge". Do not fully tighten the screws.
Final Steps
- Check all holes to make sure plugs and screws are in place. Replace the upper hinge cover. See figure "Top hinge".
- Using the stickers provided, cover the remaining holes on the side opposite the bottom hinge.
- Connect to a grounded three-prong socket. nine0069
- Reset control.
- Return all removable door parts to the door and return food to the freezer.
Leveling the freezer and closing the door
Style 1 - no grate
- Locate the two front leveling feet strapped together among the packing materials.
- Screw these feet into the front holes on the bottom of the freezer. The back of the freezer rests on two fixed supports. nine0069
- Adjust the front legs so that the cabinet is off the floor.

- Place the leveling tool on top of the freezer first from side to side, then from front to back. Rotate your foot counterclockwise to raise the angle. Rotate your foot clockwise to lower the corner.
- Repeat step 4 until the freezer is level.
- After the freezer is fully loaded with food, check the level again as in step 4.
Style 2 - with grate
The freezer has two front adjustable feet - one on each side. The back of the freezer rests on two fixed rollers. The base grate covers the adjustable brake feet and casters located at the bottom of the freezer under the freezer door. Before making any adjustments, remove the base grate and move the freezer to its final location.
Required tools:
1/4″ hex screwdriver, Phillips screwdriver
- Remove base grille screws. Grasp the grate firmly and pull it towards you. Open the freezer door to access the brake feet.
NOTE: To make the freezer rotate more easily, raise the brake feet by turning them counterclockwise. The front rollers will touch the floor.
 - Move the freezer to its final location.
- Lower the brake feet by turning them clockwise until the casters are off the floor and both brake feet are firmly on the floor. This prevents the freezer from rolling forward when the freezer door is opened. nine0064 IMPORTANT: If you need to make further adjustments to the brake feet, you must turn both brake feet by the same amount to keep the freezer level.
- Check that the door closes easily. If you are comfortable with opening and closing the door, skip the next section. However, if the door does not close easily or it opens, adjust the angle.
To adjust the tilt of the cabinet:
NOTE: When someone presses on the top of the freezer, the brake feet are partially released. This makes it easier to turn them over. nine0067 - Open the freezer door. Use a 1/4" hex screwdriver to turn both brake legs clockwise the same amount. This will raise the front of the freezer.
 It may take a few turns to close the door more easily.
To stabilize the freezer:
- Open the freezer door. Using a 1/4" hex screwdriver, turn both brake feet clockwise an equal amount until the brake feet are firmly on the floor. Check again. If you are not satisfied, continue to adjust the brake feet by half a turn of the screw until the freezer stops rolling forward when the door is opened.
Remove and replace the handle (on some models)
To remove the handle: See figure "Reversing the Doorway and Removing the Handle". 
Learn more