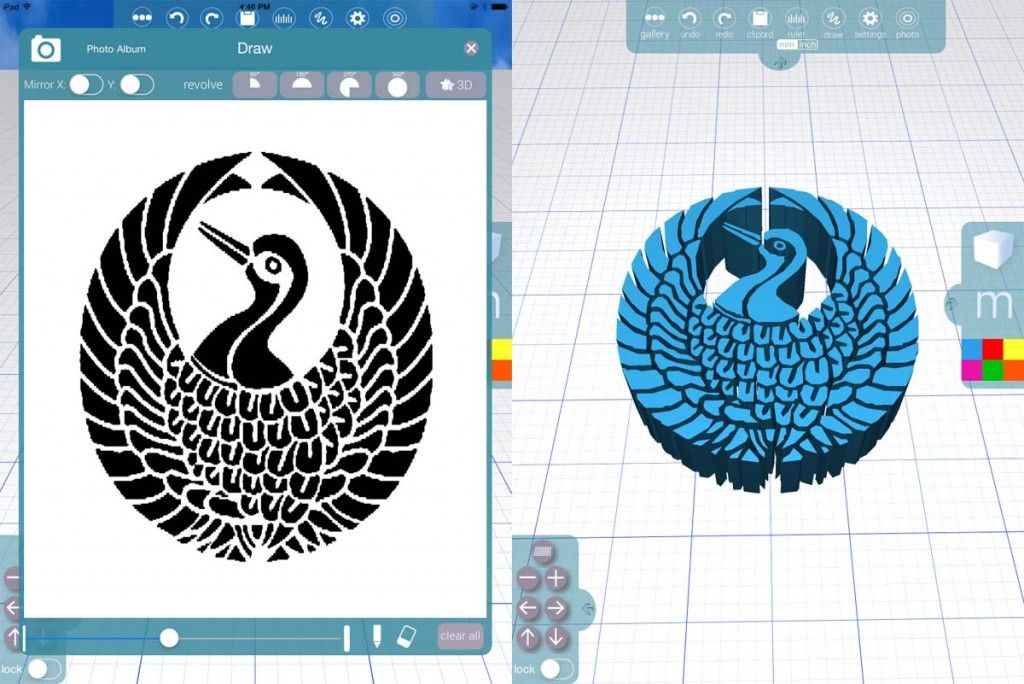
3D printing software adobe
Stratasys Collaboration With Adobe Enables Designers to 3D Print Full-Color and Tactile Models Directly From Adobe Substance 3D Painter :: Stratasys Ltd. (SSYS)
Workflow enables users to texture, render, and print 3D models without the need for additional software or processes
EDEN PRAIRIE, Minn. & REHOVOT, Israel--(BUSINESS WIRE)-- Stratasys Ltd. (NASDAQ: SSYS), a leader in polymer 3D printing solutions, today announced a collaboration with Adobe that gives artists and engineers using Adobe® Substance 3D Painter a workflow that allows them to easily turn digital 3D renderings into 3D-printed models using Stratasys PolyJet™ 3D printing technology - all without the need to employ additional software or outside processes.
This press release features multimedia. View the full release here: https://www.businesswire.com/news/home/20211026005384/en/
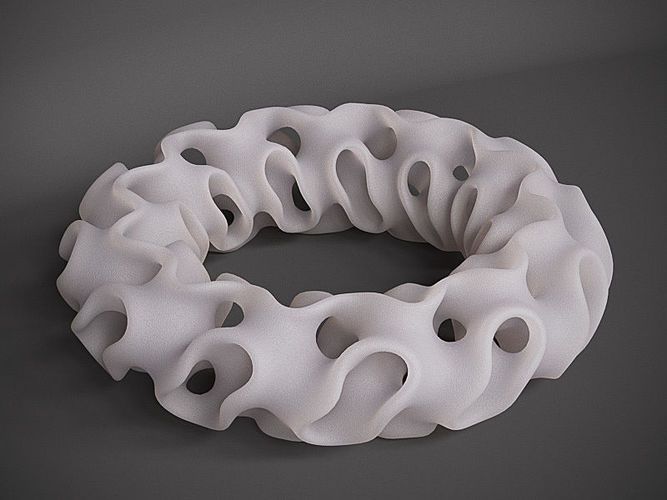
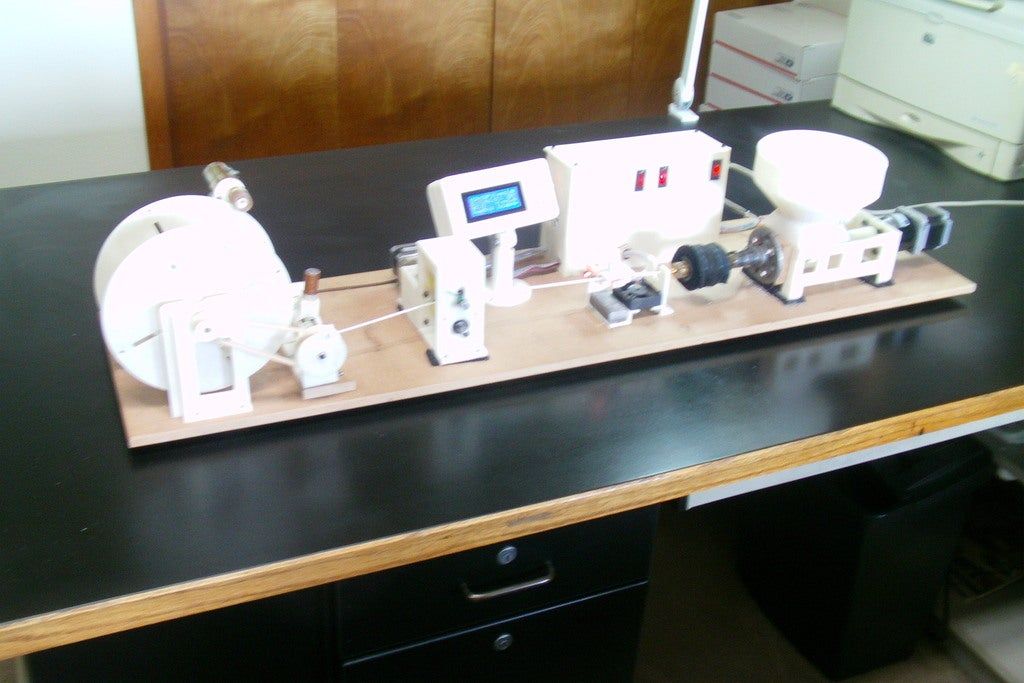
Items printed on Stratasys PolyJet printers directly from Adobe Substance 3D Painter (Photo: Business Wire)
Adobe Substance 3D tools can be used to create renderings for applications such as games, films, fashion, architecture, product design and consumer packaged goods. When combined with 3D printing, Substance software can be used to create product prototypes and package designs that can then be translated to 3D printed objects on Stratasys PolyJet printers.
Previously, Substance users would need to rely on additional external software applications or processes to prepare their designs for 3D printing – without these outside tools, designs would print without color or the texture created in the design software. Now, Substance users can seamlessly create, render and print their full-color models with physical textures directly from Adobe Substance to their Stratasys PolyJet printer.
“This collaboration has allowed us to see our designs for the very first time in the physical world - which is every artist’s and designer’s dream,” said Pierre Maheut, Head of Strategic Initiatives and Partnerships, 3D and Immersive - Substance for Adobe. “And to be honest, we have gotten a little bit emotional seeing our designs come to life and in a way that is so realistic. ”
”
With the ability to include full color, material and finish (CMF) models into their design process, artists, designers and engineers can test various iterations of a product without added cost or time. By incorporating 3D-printed models into the product design process, artists, designers, and their customers are able to see, touch and interact with a product prototype in a way that isn’t possible in a purely digital world. This helps to ensure that the end product matches the original design intent.
“After seeing the amazing digital models created in Adobe Substance 3D, we challenged ourselves with being able to 3D print them, identically, in the real world, bringing them to life,” said Pat Carey, Senior Vice President of Strategic Growth for Stratasys. “We have not only accomplished our goal but have seen excitement from Adobe about what this means for their Substance users.”
Visit the J55 Prime and J8 Series webpages to learn more about Stratasys PolyJet technology.
Stratasys is leading the global shift to additive manufacturing with innovative 3D printing solutions for industries such as aerospace, automotive, consumer products and healthcare. Through smart and connected 3D printers, polymer materials, a software ecosystem, and parts on demand, Stratasys solutions deliver competitive advantages at every stage in the product value chain. The world’s leading organizations turn to Stratasys to transform product design, bring agility to manufacturing and supply chains, and improve patient care.
To learn more about Stratasys, visit www.stratasys.com, the Stratasys blog, Twitter, LinkedIn, or Facebook. Stratasys reserves the right to utilize any of the foregoing social media platforms, including the company’s websites, to share material, non-public information pursuant to the SEC’s Regulation FD. To the extent necessary and mandated by applicable law, Stratasys will also include such information in its public disclosure filings.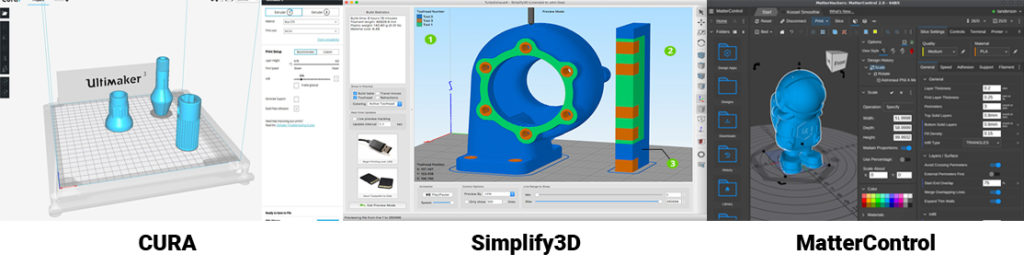
About Adobe MAX
Adobe MAX (October 26-28, 2021) is a free, virtual, and global creativity conference designed to refuel creative passions, inspire, educate, entertain, and foster relationships across the global creative community. Featuring more than 400 sessions, keynotes, technology sneaks and workshops from creative luminaries, inspiring celebrities, musicians and like-minded peers, Adobe MAX offers endless opportunities for seasoned creative pros, students, and hobbyists to take their creative skills to the next level. Notable speakers and presenters featured throughout the conference this year include Chloe Zhao, Kenan Thompson, Henry Golding, Tilda Swinton, Bryan Cranston, Aaron Paul, Casey Neistat, Young Thug and Imagine Dragons, among others.
Stratasys and PolyJet are trademarks or registered trademarks of Stratasys Ltd. and/or its affiliates. Adobe and Substance 3D Painter is either a registered trademark or trademark of Adobe or its subsidiaries in the United States and/or other countries. All other trademarks are the property of their respective owners, and Stratasys assumes no responsibility with regard to the selection, performance, or use of these non-Stratasys products.
Attention Editors, if you publish reader-contact information, please use:
- USA +800-801-6491
- Europe/Middle East/Africa +49-7229-7772-0
- Asia Pacific +852 3944-8888
View source version on businesswire.com: https://www.businesswire.com/news/home/20211026005384/en/
Stratasys Corporate & North America
Heather Morris
[email protected]
+1 612-875-2751
Investor Relations
Yonah Lloyd
[email protected]
+972-74-745-4919
Europe, Middle East, & Africa
Jonathan Wake / Miguel Afonso,
Incus Media
[email protected]
+44 1737 215200
Brazil, Central America & South America
Erica Massini
erica. [email protected]
+55 (11) 2626-9229
Asia Pacific & Japan
Alice Chiu
[email protected]
+852-9189-7273
Source: Stratasys Ltd.
Released October 26, 2021
3D Printing With Adobe Demensions – Open World Learning
Adobe Demensions is a powerful 3D modeling and rendering program used by artists and designers to create amazing 3D graphics. While it is not specifically designed for 3D printing, it can be used to create 3D printable models with some workarounds. In this article, we’ll show you how to use Adobe Demensions to create 3D printable models.
With Adobe Dimension CC, graphic designers can quickly and easily create high-quality, photorealistic 3D images. To test out a design concept, drag and drop a logo or graphic onto a 3D model. In the latest update to Photoshop CC, Adobe adds the ability to print 3D objects. As of today, a 3D printing feature is available in Adobe Photoshop Creative Cloud. Graphic designers can create realistic, high-quality 3D images in a matter of minutes. Users can design products, visualize their brand, create packaging, and more using 3D modeling. Adobe Dimension is still in use today, and Adobe will continue to support it.
According to the OP, Illustrator cannot print to 3D; those who mentioned Photoshop were correct; Photoshop can design (albeit poorly) 3D models and can print to a small number of 3D printers.
Which Adobe Program Is Best For 3d Printing?
There is no definitive answer to this question as it depends on the specific needs and preferences of the 3D printing user. However, some popular programs that are often used for 3D printing include Adobe Photoshop, Autodesk Maya, and Blender.
Photoshop CC has now been updated to support 3D printing as a result of this feature. Creating 3D models from scratch requires a full-featured program. If you don’t feel like you’re ready for that big learning curve, you can customize an existing model with Adobe Photoshop. The private beta of Adobe Substance 3D Modeler is now open for early access. It does not necessitate extensive learning to download and add color and texture to existing models. The free drawing you receive can be used to make a 3D model, which I’ll touch on later.
What 3d Files Work With Adobe Dimension?
There are a number of different types of 3D files that can be imported into Adobe Dimension, including OBJ, FBX, Collada, and 3DS. Each of these file types has its own advantages and disadvantages, but all of them can be used to create stunning 3D visuals.
1,048 models are currently available in the Adobe Dimension file format for download. There are low poly models that require less computational power to render using the ‘Poly count’ filter. On CGTrader, 3D assets can be found in a variety of file formats. More.obj,. NET,. NETS,. NETS2,.
NETS3,. NETS4,. NETS5,. NETS6,. NETS8 can be used.
With Adobe Dimension, businesses can now design and create products in-house for a low cost. Businesses of all sizes will be able to save money and time as a result of this development.
Adobe Dimension not only saves time and money, but it also enables businesses to improve the quality of their designs. Businesses can use the software’s 3D compositing capabilities to generate high-quality prototypes that can be used to test their products’ suitability for use.
If you want to improve your design quality and save time and money, you should think about using Adobe Dimension.
Can Adobe Make Stl Files?
Can we open stlt files with any third party apps? ManyCAD-friendly software packages, including Adobe Photoshop, allow you to open STL files. With 3D design editing and preparation, the printer can be used to send the finished design.
This step-by-step guide teaches you how to create an STL file for a 3D model with Adobe Photoshop. There is also a built-in slicer, making it simple to edit STL files. It also enables you to print the edited model directly from your 3D printer. Import and export STL files, which are used in 3D printing, are both possible in SketchUp. 2D layers can be used to create a variety of basic 3D objects in Photoshop. All you need is an Intel Core i5 or higher, a graphics card with basic or integrated graphics capabilities, and 8GB of RAM. SketchUp is a modeling software for 3D printing that is simple, fun, and predictable in design.
Anyone who wants to use SketchUp can do so; all they have to do is model and then print an object. You can use any platform to save STL documents (Windows, Linux, and MacOS). You can even try it for free.
What Software Is Used To Create Stl Files?
SummarySoftwareFunctionSystemMeshmixerSTL Editor, STL Repair, DesignWindows, macOSMeshLabSTL Editor, STL RepairWindows, macOS, LinuxUVToolsFile analysis, modification, MSLA toolboxWindows, macOS, LinuxWebPrinterG-code viewerWeb browser18 more rows.
Adobe Dimension
Adobe Dimension is a 3D design and rendering software. It allows users to create photorealistic 3D images and illustrations.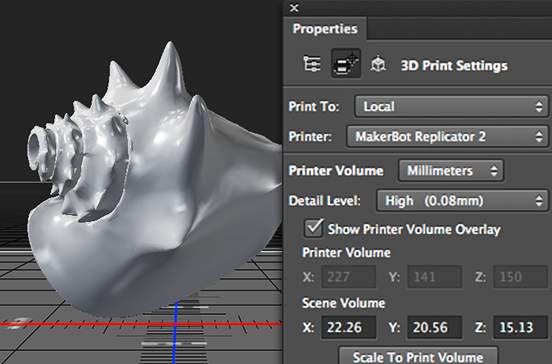 It offers a variety of features and tools to help users create professional-looking images and illustrations.
Adobe’s massive push into 3D is exemplified by its new product, Adobe Dimensions, which assumes that the user has little to no knowledge of how to manipulate 3D assets and provides a large range of assets. It can take assets from both 2D and 3D applications and quickly and easily render them to a professional standard. Adobe Dimension CC includes an extensive library of demo materials for demonstrating graphic design elements such as packaging for food, book covers, clothing, and T-shirts. Moving, scaling, and rotating objects in this application makes it simple to set up a scene. The application can create professional-grade renders on its own or using V-Ray, and it comes with its own engine. The Adobe Libraries system is used to exchange assets between Adobe Dimension and Adobe Libraries. You can find these assets by going to stock.adobe.com (opens in a new tab) or Adobe Fuse. Other assets are available to be created in applications such as Illustrator and Photoshop, which can be added to a library.
Blender is an all-in-one 3D modeling, rendering, and animation suite, whereas Adobe Dimension is a more specialized tool for creating mock-ups. As a result, if you want to create realistic 3D models and scenes, it’s best to use Blender.
Adobe’s Creative Cloud 3d: A Powerful 3d Rendering Tool
The powerful Adobe Dimension tool makes it simple to create 3D visuals. Furthermore, this program is simple to use, making it an excellent choice for beginners as well as professionals.
Adobe plans to replace Dimension with Creative Cloud 3D, which is similar to Dimension, but it has a few extra features.
You can still use Adobe Dimension for 3D rendering on Creative Cloud if you want, and it is included with the All Apps plan.
3d Printing Capabilities
3D printing is a type of additive manufacturing technology where a three-dimensional object is created by laying down successive layers of material. 3D printing is used in both rapid prototyping and additive manufacturing. Objects can be of almost any shape or geometry and are produced using digital model data from a 3D model or another electronic data source such as an Additive Manufacturing File (AMF) file.
3D printing, also known as additive manufacturing, creates three-dimensional solid objects by digitally printing them. A printer places one layer of material on top of another, exactly as indicated by the design in a computer program that it employs. A part can take anywhere from 45 minutes to 24 hours to print.
Printing 3D Objects in Photoshop
User's Guide Cancel
Search
Last update Dec 13, 2021 08:23:10 PM GMT
- Photoshop User Guide
- Introduction to Photoshop
- Dream about it. Do it.
- What's New in Photoshop
- Editing the first photo
- Create documents
- Photoshop | FAQ
- Photoshop system requirements
- Transferring presets, operations and settings
- Introduction to Photoshop
- Photoshop and other Adobe products and services
- Working with Illustrator artwork in Photoshop
- Working with Photoshop files in InDesign
- Substance 3D Materials for Photoshop
- Photoshop and Adobe Stock
- Working with the built-in Capture extension in Photoshop
- Creative Cloud Libraries
- Creative Cloud Libraries in Photoshop
- Working in Photoshop using the Touch Bar
- Net and guides
- Create transactions
- Cancellation and transaction history
- Photoshop on iPad
- Photoshop on iPad | General questions
- Introduction to the working environment
- System requirements | Photoshop on iPad
- Create, open and export documents
- Adding photos
- Working with layers
- Drawing and painting with brushes
- Selecting areas and adding masks
- Retouch compositions
- Working with Adjustment Layers
- Adjusting the key of a composition using the Curves layer
- Applying transform operations
- Trim and rotate compositions
- Rotate, pan, zoom and restore canvas
- Working with text layers
- Working with Photoshop and Lightroom
- Getting missing fonts in Photoshop on iPad
- Japanese text in Photoshop on iPad
- Application parameter management
- Touch shortcuts and gestures
- Key combinations
- Image resizing
- Live stream your creative process in Photoshop on iPad
- Fix imperfections with Healing Brush
- Creating brushes in Capture and using them in Photoshop
- Working with Camera Raw files
- Creating and using smart objects
- Adjusting the exposure of images with the Dodge and Burn tools
- Photoshop Web Application Beta
- Frequently Asked Questions | Photoshop Web App Beta
- Working environment overview
- System requirements | Photoshop 9 Web App Beta0010
- Keyboard shortcuts | Photoshop Web Application Beta
- Supported file formats | Photoshop Web Application Beta
- Opening and working with cloud documents
- Collaboration with stakeholders
- Limited editing options for cloud documents
- Cloud Documents
- Photoshop Cloud Documents | Frequently Asked Questions
- Photoshop Cloud Documents | Workflow Questions
- Work with and manage cloud documents in Photoshop
- Cloud storage update for Photoshop
- Unable to create or save cloud document
- Troubleshooting Photoshop cloud documents
- Collection of cloud document synchronization logs
- Sharing and editing cloud documents
- File sharing and commenting in the application
- Working environment
- Working environment basics
- Learn faster with the What's New panel in Photoshop
- Create documents
- Working in Photoshop using the Touch Bar
- Tool gallery
- Performance settings
- Using tools
- Touch gestures
- Touch gestures and customizable workspaces
- Technology overview versions
- Metadata and comments
- Default key combinations
- Touch gestures and customizable workspaces
- Putting Photoshop images into other applications
- Installations
- Default key combinations
- Rulers
- Show or hide non-printing auxiliaries
- Specifying columns for the image
- Cancellation and transaction history
- Panels and menus
- File storage
- Positioning of elements with referencing
- Positioning with the ruler tool
- Setting sets
- Customizing keyboard shortcuts
- Net and guides
- Web, screen and application content development
- Photoshop for design
- Artboards
- View on device
- Copy CSS from layers
- Splitting web pages into fragments
- HTML options for snippets
- Changing the arrangement of fragments
- Working with web graphics
- Create web photo galleries
- Understanding images and working with color
- Resizing images
- Working with raster and vector images
- Image size and resolution
- Importing images from cameras and scanners
- Creating, opening and importing images
- Image viewer
- "Invalid JPEG marker" error | Opening images
- Viewing multiple images
- Customize color palettes and color swatches
- HDR images
- Image color matching
- Converting between color modes
- Color modes
- Erase sub-images
- Blend Modes
- Choice of colors
- Making changes to indexed color tables
- Image information
- Distortion filters not available
- Color details
- Color and monochrome corrections with channels
- Selecting colors in the Color and Swatches panels
- Sample
- Color mode (or picture mode)
- Shade
- Add color mode change to operation
- Add swatches from HTML CSS and SVG files
- Bit depth and settings
- Layers
- Understanding Layers
- Reversible editing
- Create and manage layers and groups
- Selecting, grouping and linking layers
- Putting images into frames
- Opacity and layering
- Layer masks
- Application of smart filters
- Layer compositions
- Move, arrange and lock layers
- Layer masking with vector masks
- Manage layers and groups
- Effects and Layer Styles
- Editing layer masks
- Extract resources
- Display layers with clipping masks
- Generation of graphic resources from layers
- Working with Smart Objects
- Blend Modes
- Combining several fragments into one image
- Combining images with Auto Layer
- Alignment and distribution of layers
- Copy CSS from layers
- Load selections based on layer boundaries or layer masks
- See-through to show the contents of other layers
- Layer
- Mixing
- Composite images
- Background
- Selections
- Select and Mask workspace
- Quick area selection
- Getting Started with Selections
- Selecting with the Marquee Toolbox
- Selection with the Lasso tools
- Selecting a color range in the image
- Pixel highlight setting
- Convert between contours and selection boundaries
- Channel Basics
- Moving, copying and deleting selected pixels
- Creating a temporary quick mask
- Save selections and alpha channel masks
- Selecting focus areas in an image
- Duplication, splitting and merging of channels
- Channel calculation
- Extraction
- Bounding box
- Image corrections
- Perspective distortion
- Blur reduction due to camera movement
- Healing Brush Tool Examples
- Export color lookup tables
- Image sharpening and blurring
- Introduction to color grading
- Applying the Brightness/Contrast setting
- Shadow and Highlight Detail Correction
- "Levels" correction
- Hue and saturation correction
- Juiciness correction
- Adjusting the color saturation in image areas
- Quick tone correction
- Applying special color effects to images
- Image enhancement with color balance correction
- HDR images
- View histograms and pixel values
- Image color matching
- Crop and straighten photographs
- Converting a color image to black and white
- Adjustment and fill layers
- Curves correction
- Blend Modes
- Target Imaging for Press
- Color and tone correction with Levels and Curves eyedroppers
- HDR Exposure and Toning Compensation
- Filter
- Blur
- Lighten or darken image areas
- Selective color correction
- Changing object colors
- Adobe Camera Raw
- Camera Raw system requirements
- What's New in Camera Raw
- Introduction to Camera Raw
- Creating panoramas
- Supported lenses
- Camera Raw 9 Vignetting, Grain, and Haze Removal0010
- Default key combinations
- Automatic perspective correction in Camera Raw
- Reversible editing in Camera Raw
- Camera Raw Radial Filter Tool
- Manage Camera Raw Settings
- Processing, saving and opening images in Camera Raw
- Improving Images with Camera Raw's Improved Spot Remover
- Rotating, cropping and modifying images
- Camera Raw color correction
- Function overview | Adobe Camera Raw | Issues for 2018
- Overview of new features
- Processing versions in Camera Raw
- Making local adjustments in Camera Raw
- Fixing and restoring images
- Removing objects from photos using Content-Aware Fill
- Content-aware patching and relocation
- Retouching and fixing photos
- Image Distortion and Noise Correction
- Basic troubleshooting steps to solve most problems
- Image transformation
- Object transformation
- Crop, rotate and canvas adjustment
- Crop and straighten photographs
- Creating and editing panoramic images
- Deforming images, shapes and contours
- Perspective
- Using the Liquify filter
- Content-aware scale
- Transforming images, shapes and paths
- Deformation
- Transformation
- Panorama
- Drawing and painting
- Drawing symmetrical ornaments
- Options for drawing a rectangle and changing the stroke
- Drawing details
- Drawing and editing shapes
- Paint tools
- Creating and modifying brushes
- Blend Modes
- Adding color to contours
- Edit contours
- Painting with mix brush
- Brush Presets
- Gradients
- Gradient interpolation
- Fill and stroke selections, layers, and paths
- Drawing with the pen tool group
- Making patterns
- Creating a pattern with the Pattern Builder filter
- Loop control
- Managing pattern libraries and presets
- Drawing with pen tablet
- Creating textured brushes
- Adding dynamic elements to brushes
- Gradient
- Draw stylized strokes with the Artistic Archive Brush
- Drawing with pattern
- Synchronizing presets across multiple devices
- Text
- Adding and editing text
- Universal text editor
- Working with OpenType SVG Fonts
- Character formatting
- Paragraph formatting
- Creating text effects
- Text editing
- Leading and letter spacing
- Font for Arabic and Hebrew
- Fonts
- Troubleshooting fonts
- Asian text
- Create text
- Text Engine error when using Photoshop's Type tool | Windows 8
- Adding and editing text
- Video and animation
- Video editing in Photoshop
- Editing video and animation layers
- Introduction to video and animation
- Video and animation preview
- Drawing frames in video layers
- Import video files and image sequences
- Create frame animations
- Creative Cloud 3D Animation (Preview)
- Create timeline animations
- Creating images for videos
- Filters and effects
- Using the Liquify filter
- Using Blur Gallery group effects
- Filter basics
- Filter effects guide
- Adding lighting effects
- Using the Adaptive Wide Angle filter
- Oil Paint Filter
- Effects and Layer Styles
- Application of specific filters
- Image area feathering
- Saving and exporting
- Saving files in Photoshop
- Export files to Photoshop
- Supported file formats
- Saving files in other graphic formats
- Moving projects between Photoshop and Illustrator
- Saving and exporting video and animation
- Saving PDF files
- Digimarc copyright protection
- Saving files in Photoshop
- Printing
- Printing 3D objects
- Printing with Photoshop
- Printing and color management
- Checklists and PDF presentations
- Print photos in a new image layout
- Spot color printing
- Duplexes
- Printing images on a printing press
- Photoshop Color Enhancement
- Printing troubleshooting | Photoshop
- Automation
- Create activities
- Creation of data-driven images
- Scenarios
- File batch processing
- Operation playback and management
- Adding conditional operations
- About actions and the Actions panel
- Recording tools in operations
- Add color mode change to operation
- Photoshop UI Development Kit for Plugins and Scripts
- Color Management
- Understanding Color Management
- Accurate color assurance
- Color settings
- Working with color profiles
- Color management of documents for viewing on the web
- Color management for printing documents
- Color management of imported images
- Perform proofing
- Content authenticity
- Learn more about content credentials
- Identity and origin of NFT tokens
- Connecting accounts for creative attribution
- 3D objects and technical images
- 3D in Photoshop | Common questions about deprecated 3D features
- Creative Cloud 3D Animation (Preview)
- Printing 3D objects
- 3D drawing
- 3D Panel Enhancement | Photoshop
- 3D Concepts and Tools
- Rendering and saving 3D objects
- Creating 3D objects and animations
- Image stacks
- 3D graphics workflow
- Measurements
- DICOM files
- Photoshop and MATLAB
- Image object count
- Combining and transforming 3D objects
- Editing 3D textures
- HDR Exposure and Toning Compensation
- 3D panel settings
Photoshop allows you to print any compatible 3D model without worrying about the limitations of a 3D printer. When preparing to print, Photoshop automatically renders 3D models impenetrable. Photoshop also generates the necessary support structures—platforms and bases—to help you achieve successful 3D printing results.
- Select the menu item Window > Workspace > 3D to switch to 3D mode.
- Open the 3D model in Photoshop. If necessary, resize the 3D model while opening the file.
- Select menu item 3D > 3D Print Settings.
- In the 3D Printing Preferences panel, choose whether to use a printer connected to your computer via USB (local printer) or online 3D printing services such as Shapeways.com or Sculpteo.
You can now print 3D models as 3MF (3D Manufacturing Format) files. When specifying 3D printing options, select 9 for option0844 Print to is Local and Printer is 3MF File. When you send a 3D object to print, Photoshop creates a 3MF file. On Windows computers, Photoshop also launches the Microsoft 3D Builder application to further process the 3MF file.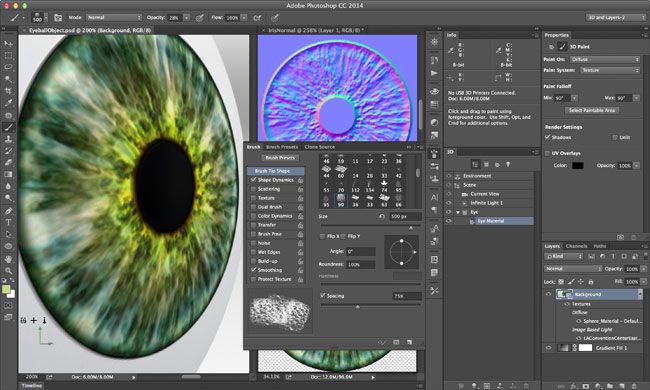
To update the list of supported printers or online profiles, select Get Latest Printers from the Send to Print To pop-up menu.
- Select a local printer or Shapeways.com print profile.
View estimated prices for printing 3D models using available Shapeways.com profiles by selecting Printer > Estimated Price.
- Select the unit of measure for print volume from inches, centimeters, millimeters, or pixels. This unit will serve to measure the dimensions of the volume of the printer as well as the dimensions of the printing plate.
A. 3D model B. Printing plate C. Printer volume overlay
- Select the 3D Printing Detail Level—Low, Medium, or Fine. The time it takes to print a 3D object depends on the level of detail selected.
- If you do not want to see the bounds of the 3D model's print volume, clear the Show Printer Volume Overlay check box.
- Set the Scene Volume options to the appropriate size for the 3D printed object. When you change one value (X, Y, or Z), the other two values are scaled proportionally. When resizing the Stage Volume, notice that the print plate under the 3D model resizes accordingly.
You can scroll through the Scene Volume settings by clicking the size label (X, Y, or Z) and dragging the cursor left or right. By holding down the Shift key, you can scroll through the values faster.
- Select Scale by printer volume if you want to automatically resize the 3D model so that it takes up the entire available printer volume on the selected printer.
- If the 3D model includes normal maps, bump maps, or transparency maps, you can ignore these types of maps when printing the model. Notice how the 3D model changes in real time as you change the Surface Detail settings.
- Optionally, you can exclude the support structures of the 3D object (platforms and bases) from printing.
 Use this option with caution as printing a 3D model without the necessary support structures may produce unsatisfactory results.
 - If your printer supports multiple materials, select the material you want to use to print this 3D object.
You can enable an experimental feature that allows you to print continuous tones with your MakerBot Replicator 2x 3D printer.
Requirement: Enable experimental Photoshop features
Experimental features must be enabled in Photoshop before using multitone printing:
- Select Preferences > Experimental Features.
- Select the Enable multitone printing check box.
- Click OK.
- Restart Photoshop.
Experimental features not yet fully tested. They should be used with caution.
Choose a multi-tone surface material
- Select the MakerBot Replicator 2x printer in the 3D Printing Settings panel.
- In the Material field, select Multitone Surface.
 If you don't see this option, make sure the experimental Multitone 3D Printing feature is enabled.
- Set other parameters according to the generated 3D model.
- To view and print a 3D object, select 3D > 3D Print.
After setting the 3D printing options, follow these steps.
- Click the Start Print icon () or select the menu item 3D > 3D Print. Photoshop will combine the 3D elements of the scene and prepare it for the printing process.
- If you choose to print with a Shapeways.com profile, Photoshop will display a message that the actual print cost may differ from the estimated cost displayed. Click OK.
- In the preview window that opens, you can use the 3D camera tools to rotate, scale, or move the 3D object.
Rotate the 3D camera.
3D camera rotation.
Move the 3D camera.
3D camera slide.
Return to the home position of the 3D camera.
- If necessary, select the Show restoration check box.
 Photoshop displays various restoration colors such as Initial Mesh, Thickened Walls, and Hole Closed.
- You can also turn on Ray Tracing Preview. Viewing ray tracing allows you to more accurately reproduce the printed material.
- If you want to export the 3D printing settings to an STL file, click the Export button and save the file to the desired folder on your computer. This STL file can be sent to a network service server or moved to an SD card for printing with your own printer.
- View a summary of the 3D print object and click the Print button.
You can cancel the current 3D printing process using the menu item 3D > Cancel 3D printing.
Photoshop provides interactive step-by-step utilities that you can use to set up, calibrate, and maintain your 3D printer. These utilities can only be used when the 3D printer is turned on and connected to a computer.
- Select the menu item 3D > 3D Printer Utilities.
- Select the utilities you want to run.
Print plate calibration
Helps in leveling the printing plate. This utility includes the following general steps:
- Requires you to remove all residual print materials from the 3D printer.
- Initializes the print head.
- Allows you to adjust the amount of gap between the platen and the printhead at nine nozzle positions.
You can use this utility in wizard mode or manual mode.
Download Thread
Helps load filament into a Fused Deposition Modeling (FDM) 3D printer. To facilitate filament loading, Photoshop starts the head heating process and the filament loading mechanism.
Remove thread
Helps to remove the filament from the FDM 3D printer. To facilitate the removal of the filament, Photoshop starts the head heating process and the filament loading mechanism.
Replace thread
Helps to replace the old filament in the FDM 3D printer with a new one. To make changing filament easier, Photoshop starts the head heating process and the filament loading mechanism.
- Follow the instructions on the screen.
Sometimes you may want to print multiple instances of an object on the same panel. Do the following.
- Select the required objects in the 3D panel.
- Select 3D > Pack Objects on Ground Plane.
- Start printing objects.
Photoshop currently supports the following 3D printers:
- MakerBot Replicator 2
- MakerBot Replicator 2x
- ZCorp Full Color
- Mcor Iris
- MakerBot Replicator 5th Generation
Photoshop also supports several Shapeways.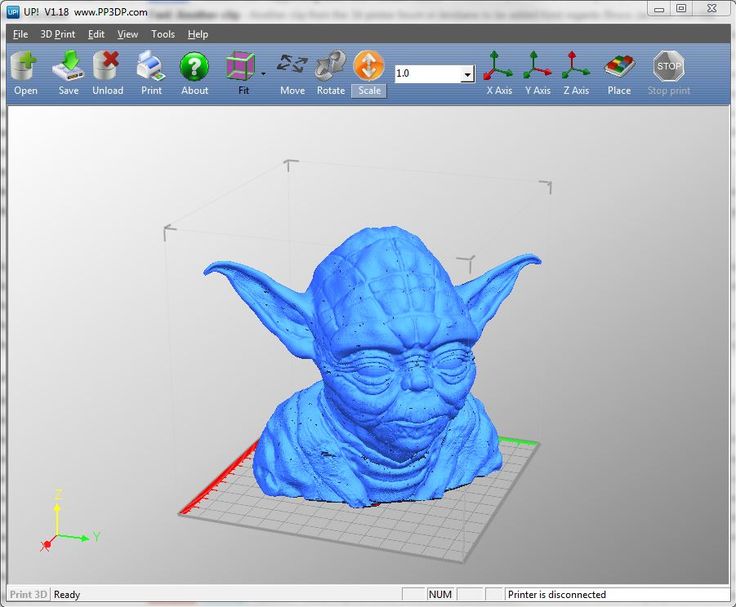 com and Sculpteo profiles.
The MakerBot Replicator 5th Generation Printer Profile does not yet support USB direct printing. You can export files to a USB drive and print them to a local printer.
Yes. Before printing, you can set a cross section to cut off part of the 3D model. Follow these general steps.
- Select the menu item Window > Workspace > 3D to switch to 3D mode.
- Open the 3D object you want to print.
- Select Scene from the 3D panel.
- On the Properties panel, select Cross Section.
- Specify the cross section parameters in the Properties panel.
- Select the menu item 3D > Apply Cross Section to Scene.
- Print the 3D scene.
The desired cross section must be dried before printing.
Yes. Follow these general steps.
- Select a material in the Stage panel.
- In the Properties panel, click the folder icon () next to Emboss/Transparency/Normals and load the texture.
 You can also specify a new texture to apply to the 3D model.
 - When specifying a new texture, save this texture. The texture is applied to the 3D model as a bump map or transparency.
- Print a 3D model.
If your 3D printer has two heads, you can print 3D models in two colors. Pop-up menus for additional heads available are displayed in the Print Properties panel. In the 3D workspace and in the 3D Print Preview window, the model appears in two colors.
Printing a 3D model in two colors From a printing point of view, each layer of a 3D model is treated as a separate 3D object. You can optionally merge two or more layers (3D > Merge 3D Layers).
Related topics
- How to print a 3D object in Photoshop
- 3D painting
- 3D panel enhancements | Photoshop
- Photoshop 3D Documentation
Sign in
To come in
Account Management
Enable 3D Content in PDF Document, Adobe Acrobat and Reader
User Guide Cancel
Search
Last update Sep 30, 2022 10:53:05 AM GMT | Also applies to Acrobat Reader, Adobe Acrobat 2017
- Acrobat User Guide
- Introduction to Acrobat
- Access Acrobat from desktops, mobile devices, and the web
- What's new in Acrobat
- Key combinations
- System requirements
- Workspace
- Workspace basics
- Opening and viewing PDF files
- Opening PDF documents
- Navigating PDF document pages
- View settings PDF
- Customizing PDF viewing modes
- Enable thumbnail preview of PDF files
- Display PDF in browser
- Working with online cloud storage accounts
- Accessing files from Box
- Accessing files from Dropbox
- Accessing files from OneDrive
- Accessing files from SharePoint
- Accessing files from Google Drive
- Acrobat and macOS
- Acrobat notifications
- Grids, guides and measurements in PDF
- Use of Asian text, Cyrillic and left-to-right text in PDF documents
- Workspace basics
- Create PDF Documents
- Overview of the procedure for creating PDF documents
- Create PDF files in Acrobat
- Creating PDF documents with PDFMaker
- Using the Adobe PDF Printer
- Converting web pages to PDF
- Create PDF files with Acrobat Distiller
- Adobe PDF conversion settings
- PDF Fonts
- Editing PDF documents
- Editing text in PDF documents
- Editing images and objects in a PDF document
- Rotate, move, delete and renumber pages PDF
- Edit scanned PDF documents
- Enhance document photos taken with a mobile device camera
- Optimizing PDF documents
- PDF document properties and metadata
- Links and attachments in PDF
- Layers of PDF documents
- Thumbnails and bookmarks in PDF 9 documents0010
- Action Wizard (Acrobat Pro)
- PDF files converted to web pages
- Setting up PDF documents for use in a presentation
- Articles PDF
- Geospatial PDF files
- Applying actions and scripts to PDF files
- Changing the default font for adding text
- Deleting pages from PDF documents
- Scanning and OCR
- Scanning Documents to PDF
- Document Photo Enhancement
- Troubleshooting scanner problems when using Acrobat to scan
- Forms
- PDF Form Basics
- Create forms from scratch in Acrobat
- Create and distribute PDF forms
- Filling out PDF forms
- PDF form field properties
- Filling out and signing PDF forms
- Configuring Buttons to Perform Actions on PDF 9 Forms0010
- Publish interactive web forms PDF
- Fundamentals of working with PDF form fields
- PDF form fields for barcode
- Collecting and Managing PDF Form Data
- Form Inspector
- Help with PDF forms
- Send PDF forms to recipients using email.
 mail or internal server
- Merge files
- Merge or merge files into one PDF file
- Rotate, move, delete and renumber pages PDF
- Add headers, footers, and Bates numbering to PDF documents
- Crop PDF pages
- Adding watermarks to PDF documents
- Adding a background to PDF documents
- Working with PDF Portfolio Files
- Publish and share PDF Portfolio
- PDF portfolio overview
- Creating and customizing a PDF portfolio
- Sharing, editing and commenting
- Share and track PDF documents online
- Mark text when editing
- Preparing to edit a PDF document
- Starting PDF editing process
- Hosting collaborative reviews on SharePoint or Office 365 sites
- Participation in the editing of a PDF document
- Adding comments to PDF documents
- Adding a stamp to a PDF file
- Approval processes
- Comment management | view, add answer, print
- Import and export of comments
- PDF editing tracking and management
- Saving and exporting PDF documents
- Saving PDF
- Converting PDF files to Word format
- Convert PDF document to JPG file
- Converting and exporting PDF documents to other file formats
- File formatting options for exporting to PDF
- Reusing PDF content
- Security
- Enhanced security for PDF documents
- Protecting PDF documents with passwords
- Digital ID Management
- Protecting PDF Documents with Certificates
- Opening protected PDF documents
- Removing sensitive data from PDF documents
- Setting security policies for PDF files
- Selecting the protection method for PDF documents
- Security warnings when opening PDF documents
- Protect PDF files with Adobe Experience Manager
- PDF Protected View
- Overview of security features in Acrobat and PDF files
- JavaScript in PDF files is a security risk
- Attachments as a security risk
- Allow or block links in PDF files
- Electronic signatures
- Signing PDF documents
- Capture a signature on a mobile device and use it in any application
- Sending documents for electronic signatures
- About certificate signing
- Certificate based signatures
- Confirmation of digital signatures
- Trusted list approved by Adobe
- Proxy Management
- Printing
- Basic tasks for printing PDF files
- PDF Brochure & Portfolio Printing
- PDF advanced print settings
- Print to PDF
- Print color PDF documents (Acrobat Pro)
- Printing PDF files using custom sizes
- Accessibility, tagging, and reflow
- Create and test accessibility tools for PDF documents
- Accessibility features in PDF files
- PDF Reading Order tool
- Reading PDF documents with accessibility and reflow features
- Edit document structure in the Content and Tags panels
- Creating Accessible PDF Documents
- Search and indexing
- PDF indexing
- Search in PDF documents
- 3D Models and Media
- Add Audio, Video, and Interactive Objects to PDF Files
- Add 3D models to PDF files (Acrobat Pro)
- Displaying 3D models in PDF files
- Interaction with 3D models
- Measuring 3D objects in PDF files
- Setting up 3D views in PDF files
- Enable 3D content in a PDF document
- Adding multimedia content to PDF documents
- Add comments for 3D layouts in PDF files
- Play video, audio and multimedia formats in PDF files
- Adding comments to videos
- Prepress Tools (Acrobat Pro)
- Overview of prepress tools
- Printing marks and fine lines
- Color separation preview
- Processing transparency
- Color conversion and ink management
- Color Trapping
- Preflight (Acrobat Pro)
- PDF/X-, PDF/A-, and PDF/E compliant files
- Preflight profiles
- Extended Preflight
- Preflight reports
- Viewing preflight results, objects, and resources
- PDF output methods
- Fixing problem areas with the Preflight tool
- Automating Document Analysis with Droplets or Preflight Operations
- Analyzing documents with the Preflight tool
- Additional check with the Preflight tool
- Preflight Libraries
- Preprint variables
- Color Management
- Color Consistency
- Color settings
- Document Color Management
- Working with color profiles
- Basic Color Management
The dynamic nature of 3D creates a potential security vulnerability. Therefore, automatic playback of 3D content in PDF documents is disabled by default.
If you open a PDF document with 3D content, a yellow bar appears at the top with the message " 3D content is disabled. Please enable this feature if you trust this document. »
Autoplay 3D content is disabled by default Enable 3D content in the current document:
Click the Options button and select one of the options:
- Trust this document only now
- Always trust this document
Enable 3D content for all documents:
- Select Edit > Preferences > 3D & Media and select the checkbox Enable 3D content playback .
3D content is integrated into the Trust Framework so that 3D content in trusted documents can be viewed even when 3D is disabled. Use this function as follows:
- Disable 3D content.
- Define trusted files, folders, and hosts as privileged resources in the panel Edit > Preferences > Security (Advanced) > Privileged Places .

Learn more