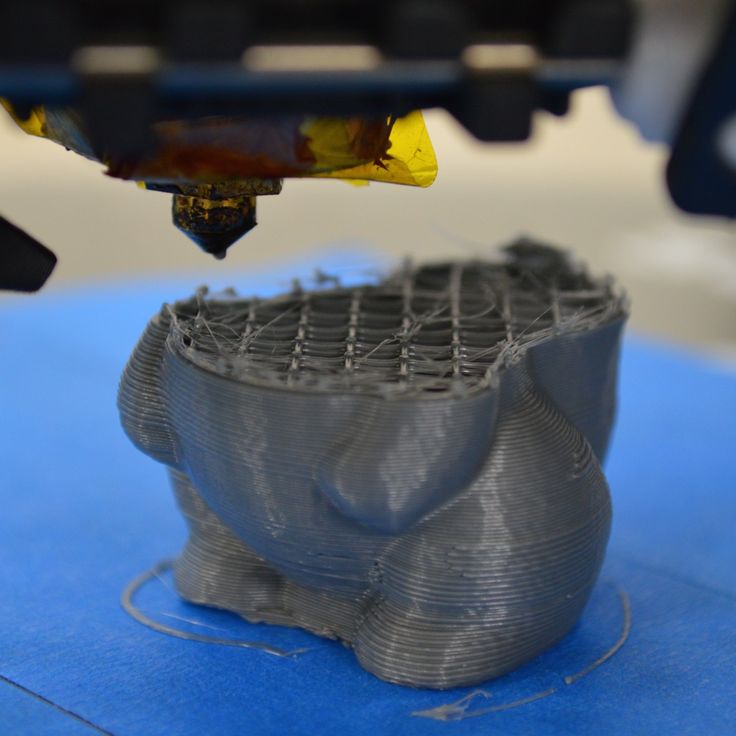
3D printing raft layers
Rafts, Skirts, and Brims Tutorial
Raft
Skirt
Brim
This tutorial will help you understand the differences between rafts, skirts and brims. All three techniques provide a starting point for your 3D printed models, but they have different uses and advantages.
Rafts
A Raft is a horizontal latticework of filament that is located underneath your part. Your 3D printed part will be printed on top of this raft, instead of directly on the build platform surface. Rafts are primarily used with ABS to help with warping and bed adhesion, but they can also be used to help stabilize models with small footprints, or to create a strong foundation on which to build the upper layers of your part. The raft included in Simplify3D has been optimized over years of testing on hundreds of different machines to ensure easy separation and a high-quality surface finish on the bottom of your part. Once the print is complete, the raft effortlessly peels away from the print and can be discarded.
For our example today, we are going to add a raft to the popular “Dodecahedron” model. First, download and import the STL file from here. Then click “Edit Process Settings” in Simplify3D and place a checkmark beside the “Include Raft” option. The software also includes many settings that allow you to customize the raft for faster print times or improved adhesion. To adjust these setting, click on the “Show Advanced” option in the bottom left of this window and then go to the Additions tab. This tab contains the settings for the raft, as well as the skirt and brim which we will discuss shortly. An explanation of the important settings are given below:
- Raft Top Layers – The number of interface layers that are printed at the top of the raft. Your model will be printed on top of these layers, so you usually want at least 2-3 layers to ensure a smooth surface.
- Raft Base Layers – The number of extra-thick layers at the very bottom of the raft.
 These layers are printed slow and thick to ensure a strong bond to the build platform.
 - Raft Offset from Part – How wide the raft will extend beyond the edges of your part
- Separation Distance – This is an important setting that defines the height of the air gap between the raft and your part. Typically, having a gap of at least 0.1mm will help keep the part connected to the raft,
while still allowing for easy separation once the print is complete. - Above Raft Speed – Use this setting to customize the speed of the first layer of your part that is printed on top of the raft surface. Using a slow speed for this layer will also help the part stay attached to the raft during the print.
Adjust any of these settings and then click OK to save your changes. Click “Prepare to Print” to use the realistic pre-print simulation in Simplify3D to view an animated preview of the exact settings that you changed and how they will affect the print. Once you are happy with the changes, you can try running a test print on your 3D printer.
When the print is completed, remove the entire raft and model from the build platform. You can then grab the raft and begin to peel it away from the part, leaving a high-quality surface finish on the bottom of your print. Usually, this can be done by hand, but for extra delicate parts, you may want to use a thin spatula or tweezers to help with the removal. If you find you are having a difficult time removing the raft from the part, you can try increasing the raft separation distance or altering the other settings explained above.
Skirts
A skirt is an outline that surrounds your part but does not touch the part. The skirt is extruded on the print bed before starting to print your model. Skirts serve a useful purpose because they help prime your extruder and establish a smooth flow of filament. Observing the skirt also allows you to detect and adjust any leveling or adhesion issues before the actual model begins printing.
You can customize your skirt by adjusting the settings on the Additions tab. This allows you to adjust the skirt position, the amount of plastic that is primed, and even the extruder that is used for the skirt.
- Skirt Extruder – Choose the extruder that will be used to print the skirt. This allows you to prime different extruders at the start of your print. If you want to prime all of your extruders, select the “All Extruders” option.
- Skirt Layers – How many layers you want to include a skirt. Typically, 1 layer is enough to prime the extruder, but adding a 2nd or 3rd layer may help create a more robust skirt that can be peeled away from the bed easier.
- Skirt Offset from Part – How far away the skirt should be from the edges of your part
- Skirt Outlines – How many loops you want to print around the outline of your model. Increase this value if you need to prime your extruder more by extruding extra filament.

Brims
A Brim is a special type of skirt that is actually attached to the edges of your model. Typically, the brim is printed with a increased number of outlines to create a large ring around your part, similar to the brim of a hat. Brims are often used to hold down the edges of your part, which can prevent warping and help with bed adhesion. The Brim may be a preferred option to the raft (which also helps with adhesion), as the brim can typically be printed much faster and uses far less filament. Once the print is complete, the thin brim can be separated from the solid model and discarded.
Because the Brim is a special type of skirt, it uses many of the same settings explained in the previous section. To setup a Brim in Simplify3D, set the skirt offset to 0mm so that the brim will be touching the edges of your model. Then increase the number of skirt outlines to 5 or more to create a wide ring around your part. You can raise the number of outlines even further if you need to increase the surface area of the brim for extra adhesion. Now when you start your print, the brim will serve as both priming and an adhesion assistant!
After the print is complete, the thin brim should easily peel away from the solid part. If you find that the brim is attached too firmly, you could increase the skirt offset slightly to 0.1 or 0.2mm to add a small gap between the brim and the part.
Now you know 3 new techniques to help improve the foundation of your 3D printed parts! Next time you are struggling with adhesion, priming, or small delicate parts, you will know the exact technique to use.
More Tips to Improve Your Prints
If you want even more tips on how to improve your 3D printed parts, be sure to check out our extensive Print Quality Guide. This guide covers dozens of common issues and provides tips and suggestions for each one, giving you the knowledge you need to succeed.
View the Complete Article Library
What is a 3D Printing Raft, Brim or Skirt - Why and How to Use Them
Get the first layer right, every time
It’s widely agreed in the 3D printing community that a smooth and correct first layer makes or breaks a print. In most instances, getting that first layer to adhere is 90% of the battle.
Well, think of these each playing a part in the secret weapon against how to prevent warping in 3D printing.
We’ve all been there, eagerly watching that first layer going down, checking it looks great and adheres correctly and the filament flows smoothly.
And that’s it: where the 3D printer bed adhesion is where a 3D printing raft, brims, and to an extent – a 3D printed skirt mostly come into play.
Rafts, Brims & Skirts: The Way To Great Adhesion in 3D Printing
You’re aware filament that doesn’t adhere to the bed fully can cause many problems, if not at the start of the print – sometimes lurking until the very end, where you take a near-perfect print off the bed only to realize it’s warped slightly, or the corners have curled up.
It’s a waste of filament, it’s a waste of money and ultimately it’s a waste of your time.
A little extra prep at the beginning of your print, can hugely improve your print’s reliability.
So how does a raft or 3D printing brim dramatically increase 1st layer reliability, we hear you ask? In this article, we’re going to take a look rafts, brims, and their related cousin, skirts – what they are and the best practices for using them.
We’ll also take a look at little-known ways they can prevent other printing problems, such as over or under extrusion and even mid-print cracking. Here we have, in order of left to right: Raft, Brim & Skirt (screenshots courtesy of Simplify3D)
What is a Raft in 3D printing?A 3D printed raft is basically a throwaway horizontal surface that sits under your object, to help with bed adhesion. It’s made up of a predetermined number of layers, with a specific infill percentage, that extends a specific distance away from the sides of your object.
Some materials, like ABS, greatly benefit from the use of a raft. The raft is laid down first to the specified layer depth, then the object is printed on top of the raft.
Don’t worry, a predetermined small distance will exist between the 3D print raft and the object which will aid in the removal of the raft after the object cools. So providing it’s correctly set up for your material (we explain below), popping it off your print later should be easy.
Due to its larger surface area, the raft greatly improves adhesion. It also reduces warping in the object itself, since the edges of the raft are much more likely to warp, leaving the bottom of the object level and square.
A raft can also be used to provide greater stability to objects that have small footprints. It can also give an object a solid foundation. This becomes important when printing larger objects or objects that may tend to be top-heavy.
Rafts can also be used to compensate for any tiny inaccuracies in the build plate calibration or even-out warped heatbeds, scratches or dents.
Here are some terms that you may want to adjust in your 3D slicer when 3D printing rafts to get better results, or just use less filament:
- Separation Distance – This setting is perhaps the most important, it determines the height of the space between the top of the raft and the bottom of your print.
 It’s a balance between ensuring the print is close enough that it adheres to the raft when the print begins and there’s enough air gap to ensure easy removal once the print is finished. Usually 0.1mm is enough, but this may want to be increased with more flexible materials.
 - Above Raft Speed – This is the speed at which the first layer is printed on top of the raft. This layer wants to be slow to aid adhesion.
- Raft Top Layers – This is how many layers on the top of your raft. These will be the surface the bottom of your print will rest on. So you’ll need 2-3 layers to ensure a smooth surface. Increase the layers if you’re getting pillowing on the bottom of your print.
- Raft Base Layer – These are the first, thick and slow printed layers on the base of the raft. It’s important these adhere correctly or the rest of the print likely won’t work.
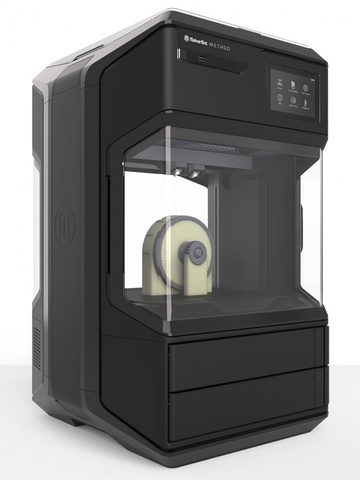
It should be noted that some FDM printers always need to use rafts, while others may never need them. For example, Zortrax printers use a perforated heated build plate. Because the build plate is perforated, a raft must be used every time an object is printed.
On the other hand, printers with solid heated plates can greatly reduce the need for rafting, since the higher temperatures of the build plate surface can improve adhesion significantly with a corresponding reduction in warping.
Cons of using rafts
Rafts can be hard to remove
Some of the cons of using rafts are that in some slicer settings, they can be hard to remove (some more flexible materials can be harder to ‘pop’ away) and that the bottom won’t be that super smooth, glass-like surface you’ll get when printing straight onto the bed surface.
Thrown away after use
And of course, it can upsetting to have to print a raft, that’ll be disposed of straight after use using good filament. But you’ve got to remember, without the raft in some instances that print may have been destined for the rubbish anyway.
3D printing raft removal is best done using similar tools you’d use to get the print off of the bed in the first place.
How to remove a raft from 3D print
Place a thin scraper or wide knife between the base of your print and gently ease up that side, away from the raft. Once one edge of the raft has come away, it’s easier to remove the rest.
Occasionally you may need some 400 grit sandpaper to smooth off the base, if you had a harder time removing the 3D printer raft.
In some instances people find that they can only get a print to stick to the bed when using a raft and not when just printing directly onto the surface. This could be because your default settings for the raft are a slower, thicker first layer with the fans off.
If this is the case, when trying to print without a raft, you may want to try mimic the settings on that first raft layer to aid adhesion.
Wondering the differences between a 3D printing raft vs brim? Read on to find out more.
Think of a brim as a close relative of a raft. As was discussed above, a raft is a stabilizing base that extends completely under a printed object to improve adhesion.
A brim, on the other hand, only extends outward from the perimeter of an object, it has no contact with the object’s underside. So what is a brim in 3D printing? Well, think of the brim of a hat and you’ve got the right idea.
3D printing brim vs raft
Both rafts and brims help with adhesion and both can be used to stabilize objects that have very small contact points with the print surface. However, for smaller or more delicate objects, a brim may be preferable to a raft due to the fact that it’s only contact with an object is along the outside edge in a very thin layer.
Some materials require brims more than others. For example ABS can warp if you’re not using the correct printing settings or bed surface (or just using cheap ABS). So it may be worth it to 3D print brim around ABS parts to aid adhesion.
Read more: the best ABS 3D printers
More so on support structures, that tend to be narrower and have a low surface area on the bed. These can easily pop off the bed, so it’s wise to print supports with brims, just in case.
This is especially true when using a low adhesion support like our Break Away. As the name suggests, it’s formulated to easily snap off your model after printing, leaving a smooth finish under the model and mess of dissolving like you’d need to with PVA or HIPS soluble supports.
This means that removing a brim from this type of object will be easier than removing a raft. This, in turn, means that there is less chance of damaging your smaller object during the removal process. Worth knowing when considering brim 3D printing.
Then again you may just want to sand off the base of the print, if there are any rough sections left over. A deburring tool is also a great way to remove brims.
Skirts are the most common, it’s likely your slicer adds a Skirt to the beginning of each print. A 3D print skirt is nothing more than a brim that doesn’t touch the edges of the object that you’re printing.
Skirts have a couple of uses and are usually just a couple of layers thick. First, they are an excellent way to get a preview of how your equipment is working and how a material is flowing – it’s easy to ensure the material is extruding nicely and laying on the bed correctly before the actual printing of your model starts.
You simply run a skirt that’s only a few outlines wide at a relatively low print speed so that you can get a good look at what’s going on. If the skirt prints cleanly, then you let the print continue. If it doesn’t, you can abort the print and make the necessary adjustments, saving you both time and money.
Skirts can also be useful as thermal barriers. One way is printing them wide over the bed, to insulate it and keep the temp up where your print it.
Or alternatively let’s say that you want to insulate the object that you’re printing from temperature variations caused by room drafts.
For example, printing UV resistant ASA filament (like ABS) is very sensitive to cooling too quickly, and can crack when printing in a drafty environment. The height of the skirt can be adjusted so that it is as tall as your object. The skirt protects the object from drafts, insuring even cooling during printing.
When used this way they can be called a draft / draught shield.
Finally, if your printer has dual extruders, you can use a skirt as tall as your object to prevent stringing and blobbing. The skirt catches any material that may be oozing from the secondary extruder before it moves to the main object. When used this way, they’re referred to as an ooze shield.
Rafts, brims and skirts are an easy way to get better results when you print. Yes, you do use more filament when you print a raft, brim or skirt. You also use more filament when you have to scrap a print job due to a problem that a raft, brim or skirt could prevent.
In short, a couple of ounces of prevention, in the form of a raft brim or skirt, is a good bet when it comes to getting great results from your printing efforts.
Related articles:
- Clogged extruder – how to fix
- 3D printing warping – how to fix
- How to untangle filament
- 3D print not sticking: how to fix
Raft "Rafts", Brim "brims" and Skirt "skirts" - why they are needed and how to use them in 3D printing
Our first layer is the most important
It is widely believed in the 3D printing community that how smoothly and correctly the printing of the first layer went, determines the success or failure of the object as a whole. In most cases, achieving proper adhesion of the first layer to the work surface is 90% winning the battle.
We all know this feeling when you carefully follow how the first layer is laid out, look at how it looks, whether it adheres well, whether the filament flows smoothly .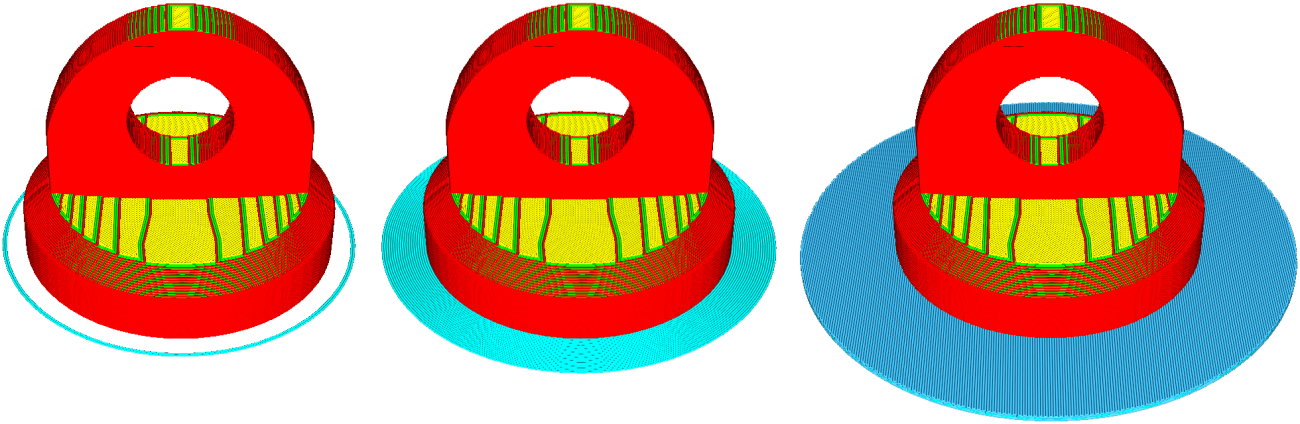 .. And now it's time to invite such tricks to the stage as “ rafts", "fields" and in some way "skirts".
Of course, you know that a filament that does not adhere well to the work surface can cause a lot of problems, and an ambush can happen, if not at the very beginning, then at the very end, when you remove from the work surface, it would seem , a beautifully printed object, but only to see that it is somehow skewed, that its corners are somehow strangely twisted.
It's a waste of filament, a waste of money and finally a waste of your time.
And here you may ask: "So how can "rafts" or "fields" radically improve the quality of the first layer in this way?". In this article, we will look at "rafts", "fields" and their sister, "skirt", what they are and how they are best used.
We'll also talk about lesser-known ways to help you deal with other printing problems, such as over or under extrusion and even internal cracking.
From left to right: "raft", "fields" and "skirt" (Simplify3D screenshot)
What is a "raft" in 3D printing?
Raft A "raft" is essentially a temporary horizontal surface that sits underneath your object.

It consists of a set number of layers with a specific infill percentage and covers an area slightly larger than the base of the printed object.
The main task of the "raft" is to increase the grip on the work table. Some materials such as ABS benefit greatly from the use of a "raft". Then, first, a “raft” consisting of a certain number of layers is laid out on the desktop, and a printed object is already being built on it.
You don't have to worry about how to separate this plot from the printout: there is a small gap between the plot and the object, so if you set the plot parameters correctly (we'll explain how later), with its separation after cooling there will be no problems.
Since the printed area of the raft is larger than the base of the object, the cohesive forces generated are also greater. This also reduces the risk of the object being skewed, because the edges of the raft are more likely to be bent, but the bottom of the printout itself will remain flat.
Raft can also be used to provide more stability for objects with a small footprint. In this case, the "raft" acts as a "normal" base. This technique is also useful when printing large objects or objects that can end up quite heavy.
The "raft" can also compensate for small inaccuracies in the calibration of the desktop and even bumps, scratches and dents in the coating.
Here are a few slicer parameters you can play with to get a quality raft without using too much material to create it.
- Separation Distance. This is perhaps the most important parameter. It defines the width of the gap between the surface of the "raft" and the base of your printout. It is necessary to achieve a balance between ensuring that the printed object is held securely enough on the “raft”, and making it easy to separate it later. Usually 0.1 mm is sufficient, but for more ductile materials this distance can be increased.
- Above Raft Speed.
 We are talking about the speed with which the first layer will be laid out on the surface of the "raft". The speed must be low to ensure good grip.
 - Raft Top Layers. This is the number of layers on the surface of the raft. The base of your object will be in contact with this surface, so you need 2-3 coats to get the surface smooth enough. You can increase the number of layers if you get blistering on the bottom of the printout.
- Raft Base Layer. This is the very first layer of the "raft", it prints slowly. It is important that it sticks well to the desktop, otherwise everything will be pointless.
It should be noted that for some FDM printers the use of "rafts" is always mandatory, and for some it is not required at all. For example, Zortrax printers use a heated perforated work surface. Due to the presence of perforation, the "raft" should be used when printing any objects.
On the other hand, solid surface printers very often do not require a "raft" because the temperature of the desktop is already so high, which contributes to a significantly better adhesion and, accordingly, a reduction in spatial distortion of the printout.
Certain drawbacks of the "rafts" are that with some slicer settings these "rafts" can be difficult to separate, especially from objects made of more plastic materials, and also that the bottom of the object is not as glassy smooth as in the case of a solid working surface.
And, of course, the fact that you have to print some kind of “raft”, which is then immediately thrown away, can be annoying – and the filament was of high quality! But it must be borne in mind that in some cases, without the presence of a "raft", the path to the wastebasket is prepared for the entire printout in general.
It is best to separate the "raft" from the finished object with the same tool as the one with which you separate the printout from the work surface. Slide a thin plate or wide knife between the base of your object and the "raft" and gently lift from one side. Once one end of the "raft" has come off, the rest will come off more easily.
If the separation process was not without difficulty, you may need fine sandpaper, about 400 grit, to sand the base of the printout.
In some cases, it turns out that the only way to make the printed object stick to the desktop is with the help of a “raft”, nothing happens when printing directly onto the surface. This can happen because, at default settings, the raft prints more slowly, has a thicker first layer, and the fans are turned off.
In this situation, you can try to print without a "raft", simulating its settings when printing the first layer, which should increase adhesion.
What is a "margin" or "side track" in 3D printing?
Brim "Fields" can be considered close relatives of "rafts".
As mentioned earlier, a "raft" is a stabilizing base on which the printed object is placed completely in order to improve adhesion.
"Fields" take place only along the perimeter of the object, not in contact with its base. It turns out that "Fields" is like a hat that a person puts on so that a clever thought comes to his head.
Both "rafts" and "fields" promote cohesion, sticking. Any of these techniques can be used to stabilize an object that has very little contact with the work surface. However, for smaller and more fragile objects, "fields" may be preferable, since they are in contact with the object only along the outer edge of a very thin layer.
Margins work better for some materials than others. For example, ABS, if the print settings are inaccurate or there are issues with the work surface, may warp (the same effect is achieved when working with just cheap ABS). Therefore, in order to increase grip, it makes sense to reprint the ABS-parts of the “field”. And even more so in the case of supporting structures, if they are installed closely and low.
The "margins" are easily separated from the work surface, so it's better to print with "margins" just in case of supports. This is especially true for props with weak adhesion. As you might guess, the “fields” are made in such a way that they can be easily broken off from the model after printing is completed, and it would not be necessary to grind or solvent-treat its base, as, for example, in the case of soluble supports made of PVA or HIPS.
In other words, it is easier to separate the "fields" from the object than to separate the "raft" from it. This, in turn, means that there is less chance of damaging the object during detachment.
And if there are any rough spots on the printout, they are very easy to clean up. Margins are also excellently removed with special deburring tools.
What is a "skirt" in 3D printing?
Skirt "Skirts" are more common than the two previous options.
The slicer most likely adds a "skirt" at the start of any printing process. The "skirt" is nothing more than "fields", which, however, do not come into contact with the printed object.
"Skirts" have a couple of uses and are usually a couple of layers thick. Firstly, the “skirt” is good for getting an idea of how the equipment works, how the material flows, i.e. before starting to print the model. it allows you to make sure that everything is fine with extrusion and the filament is laid out on the work surface correctly.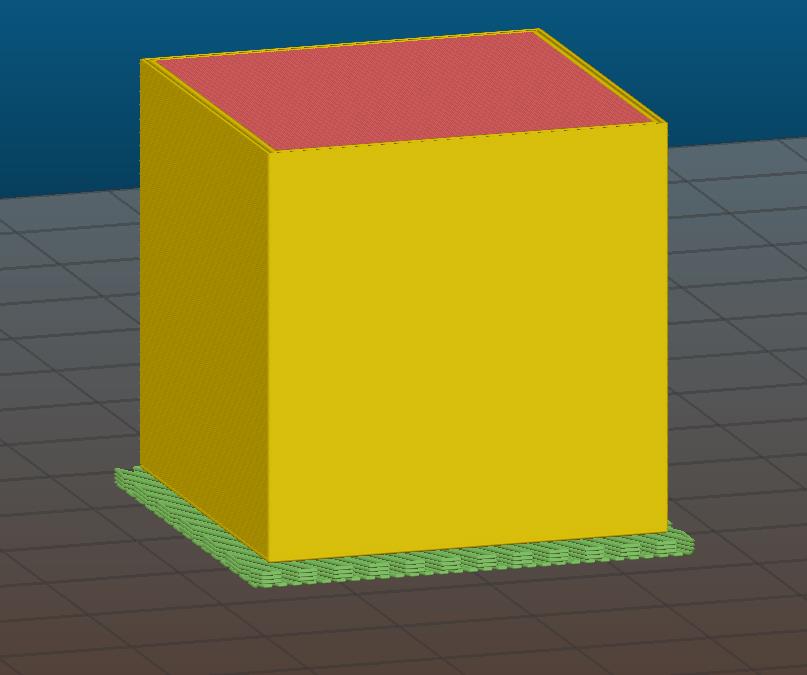
You simply lay out the “skirt” with a few lines at a relatively low speed and, by the way it turned out, make a diagnosis. If the "skirt" is printed clearly, you can continue. If not, it is better to interrupt the process and what needs to be adjusted, thus saving time and money.
"Skirts" can also serve as a temperature barrier. The "skirt" can be laid out over the entire work surface to thermally insulate it, leaving only the place where the higher temperature should be maintained.
Or another option: if, for example, you need to isolate the printed object from temperature fluctuations in a draft.
Rafts, brims and skirts are some of the easiest ways to avoid bad grip and skewed print.
For example, printing with ASA UV-resistant filament (like ABS) is very sensitive to rapid cooling, and if there is a draft during cooling, the part may simply crack.
The height of the “skirt” is also possible, it can even be as high as the object itself.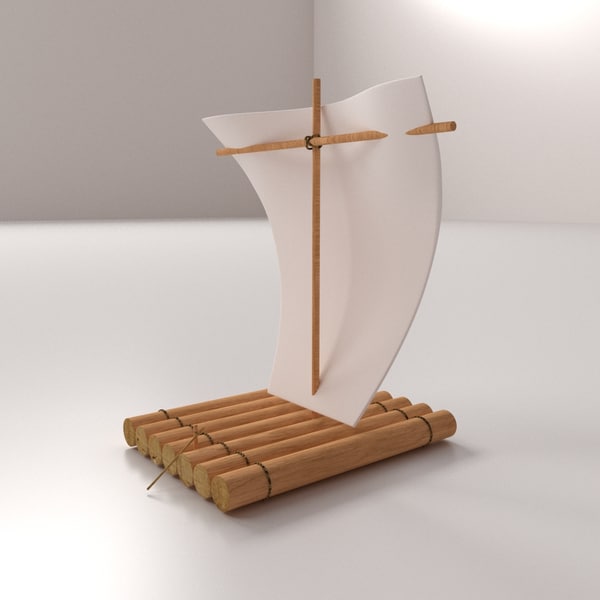 This kind of "skirt" will protect the printout from drafts, ensuring uniform cooling. If a "skirt" is used in this way, it may be called a "draft screen".
Finally, if the printer has a dual extruder, an object-high "skirt" can be used to avoid "spider webs" and "blobs". The "skirt" will catch any material that may be escaping from the second extruder before it travels to the object. Then the "skirt" can be called a "leak shield".
Rafts, brims and skirts are some of the easiest ways to improve print results. Yes, you will have to spend more filament, but you will also have to spend it on unsuccessful printouts, which can be avoided with rafts, fields and skirts.
If you're interested in improving print reliability, you might like our Quality Printing Cheat Sheets, which will come in handy when working with any 3D printer and any material. In them you will certainly find some very useful tips that will improve your printouts, no matter how experienced you are in this matter.
In short, a few supportive preventive measures in the form of "rafts", "fields" or "skirts" give a good chance that your efforts will result in a great result.
Problems with the first layer in 3D printing: how to make it perfect
The first layer of 3D printing plays a huge role in the success of the project. If you follow simple procedures and use the experience of professionals, there will be no problems.
Expert Tips
Printing the first layer with a 3D printer is important because this step forms the base, requiring more plastic. If the starting layer does not adhere well to the work surface, the model may move before it is completed, resulting in scrap. Excessive adhesion should also be avoided, as it will then be difficult to separate the finished object from the table. The first layer should strike a balance between print stability and ease of removal of the model from the desktop plate.
Setting the first layer settings
First you need to properly level the surface to build. Many new printers already have built-in auto leveling technology.
The key to a successful first coat is optimizing your print settings. By adjusting the settings in the slicer, you can ensure that the initial level is successful and the appearance of the rest of the printed product remains unchanged.
Most useful settings:
• Extrusion and bed temperature. Higher heat levels will allow the plastic to melt and adhere better to the plate, so it's worth trying to raise the heat of the nozzle and table by about 5°C each.
• Width of lines of the first layer. Setting this value higher will allow the layers to cling to the platform and hold well, reducing the chance of failure. You can often set this to twice the nozzle size of a 3D printer (which is typically 0.4mm).
• First layer height. A higher level will mitigate the effect of small leveling errors, effectively increasing reliability. Usually the thickness can be increased up to 0. 3 mm using a standard nozzle.
• First layer print speed. A slower build process will give the plastic more time to melt, which will have an effect similar to raising the print temperature. It is worth trying this adjustment if the layer height or line width is increased.
• Auxiliaries for the first layer. The rafts, supports and margins help with adhesion by refilling the nozzle to ensure a smooth flow of plastic. In the case of rafts and boards, they also increase the surface area for better traction.
When the first layer settings are ready to work, care must be taken to care for the plate to "grow" the object.
Cleaning the build platform
The base layer will most likely not stick, and the print will fail.
To avoid these problems, the platform should be wiped down before each print cycle, or at least between several cycles.
The procedure can be performed with isopropyl alcohol (regular rubbing alcohol or IPA) and paper towel. It only takes a couple of seconds, but it will be an excellent preparation for work.
IPA can also be used to clean models when ready, so it's a good idea to keep the liquid in an accessible place.
Choice of materials
Finally, you need to make sure that all available resources are taken into account. This applies to both the filament, which is built, and the print surface of the printer. The following tricks will help you avoid trouble:
• Apply a thin layer of adhesive to the platform to improve adhesion to the table plate. This can be hairspray, blue masking tape, or standard household glue. This will help tough materials stick, and will also act as a spacer for materials that adhere too well, preventing damage to the surface.
• Avoid printing directly on a TPE and PETG board. These filaments are notorious for sticking unnecessarily to the print bed and can rip out pieces of any surface, including PEI, Kapton tape, and even glass.