3D printing infill percentage
Choosing Infill Percentage For 3D Printed Parts — 3DPros
3D printed parts are typically not produced with a solid interior. Instead, the printing process uses a crosshatch or other pattern for interior surfaces. This greatly reduces cost due to reduced material usage and print time, while moderately reducing strength. The density of this pattern is referred to as the infill percentage.
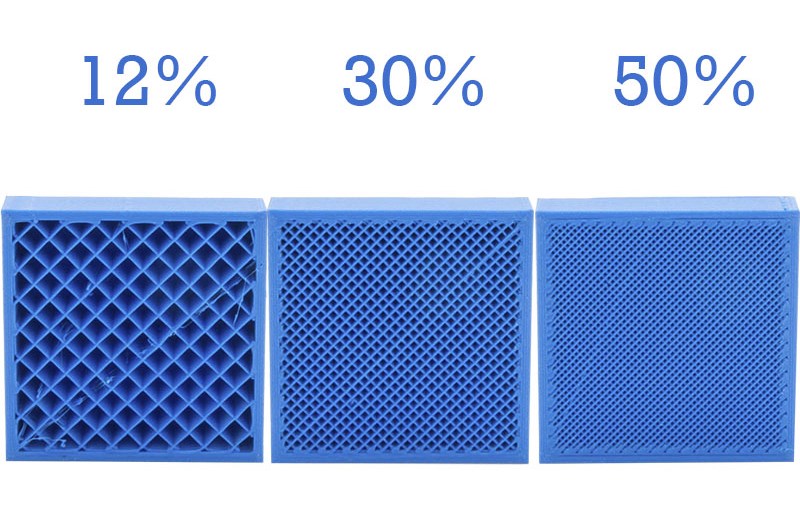
The diagram below shows the appearance of various infill settings on a partially completed model. The exposed pattern would not be visible on a completed print.
Use these recommendations to choose the best infill percentage based on the requirements of your project:
0-20%: Non-functional parts: For pieces that are not functional or do not need to withstand force, such as a display model or presentation prototypes, 10-20% infill is sufficient. In some cases, no infill is a viable option if there are no large flat surfaces on the top of the print.
If there are large flat surfaces on the top of the print, some infill is needed to support those surfaces.
20-40%: Light-use parts: For functional parts which will undergo some force, a moderate level of infill provides nearly the same strength as a solid part at a reduced cost.
40-100% Heavy-use parts: If your parts must withstand significant forces, or strength is the most important factor above cost, a higher infill percentage is the best choice. However, increasing infill percentage beyond 60% has diminishing returns on strength.
The price difference between higher and lower infill settings can vary greatly depending on the geometry of the model. Models with more interior volume will see a significant impact to the cost from changes in infill percentage, whereas thinner parts may see no impact.
Print speed is another factor to consider when choosing an infill percentage for a 3D print. A higher infill percentage will result in a longer print time, especially on models with a large interior volume.
Also, keep in mind that infill is not the only setting that can impact the strength of a printed part. The thickness of the outer shell and the how the part is oriented when printing are also important factors for the strength of the print. If you print your parts through us, we will help you decide on the best settings based on the requirements of your application.
Want to Learn more about buying your own 3D printer?
Our informational site www.crealityexperts.com is a great place to start! We have used Creality brand 3D printers for years and have been very happy with them
Looking to order 3D printed parts?
You can find a local vendor on Treatstock; a site for small 3D printing businesses to list their services. We have worked with them in the past and had great experiences, and we highly recommend them if you are looking to work with a small business
The importance of the type of infill in 3D printing
All users of 3D printers know that 3D printed parts have two distinct zones, the shell and the fill (infill).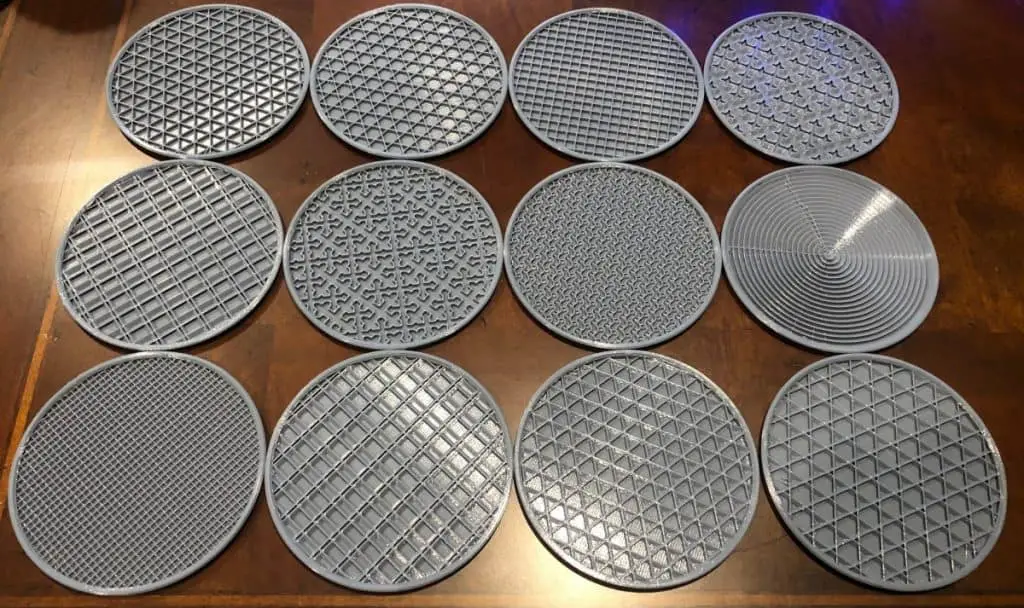 The correct parameterization of these two values influences the mechanical resistance, the finish, the printing time and the cost. The shell are the outer walls of the piece in which both the layers in contact with the printing base and the top layers that attribute the final surface finish are included.
In this article we will focus on the inside part of the piece, the infill. Lamination programsn (Cura3D, Simplify3D, etc) allow us to choose the shape and percentage of infill we want. Next we cite the most important possible configurations.
Infill percentage in 3D printing
The infill the amount of material that occupies the internal part of the piece. Normally, rolling programs allow the percentage of material to be modified from 0% (hollow part) to 100% (totally solid part). Always speaking of the same configuration of layer height and width of the housing, the ideal value of the infill percentage depends on the final application of the piece in question. The most used percentage, which many lamination programs use as standard data, is 20%. With this percentage you can get pieces with medium / high strength, low weight and a very efficient printing time, which transforms into parts with a good resistance / cost ratio.
For non-functional prototypes, models and other objects of simple exposure the recommended infill is 10%. With such a low percentage, the long printing times of complex figures or objects that do not need resistance to any type of stress are reduced. On the contrary, every user is clear that in order to achieve maximum tensile strength they must make their pieces at 100% infill, but this implies higher costs, both in terms of time and material and that the pieces are heavier. Outside of the values already mentioned, we recommend to study each case in detail according to the resistance / printing time taking into account that from 25% to 50% of infill the resistance is increased by 25% and from 50% to 70% of infill resistance is increased by only 10%.
Image 1: Different infill percentages
Our recommendation is to use a 10% fill for figures and objects that do not support loads, 20% for pieces of normal use with medium / low loads, 60% in case you need to make final pieces with a medium resistance and valid to be perforated or screwed, and finally 100% to achieve maximum strength of the material. We want to emphasize that the manufacturing orientation of the parts affects the final resistance, that is, the orientation matters as much as the infill percentage.
Fill type
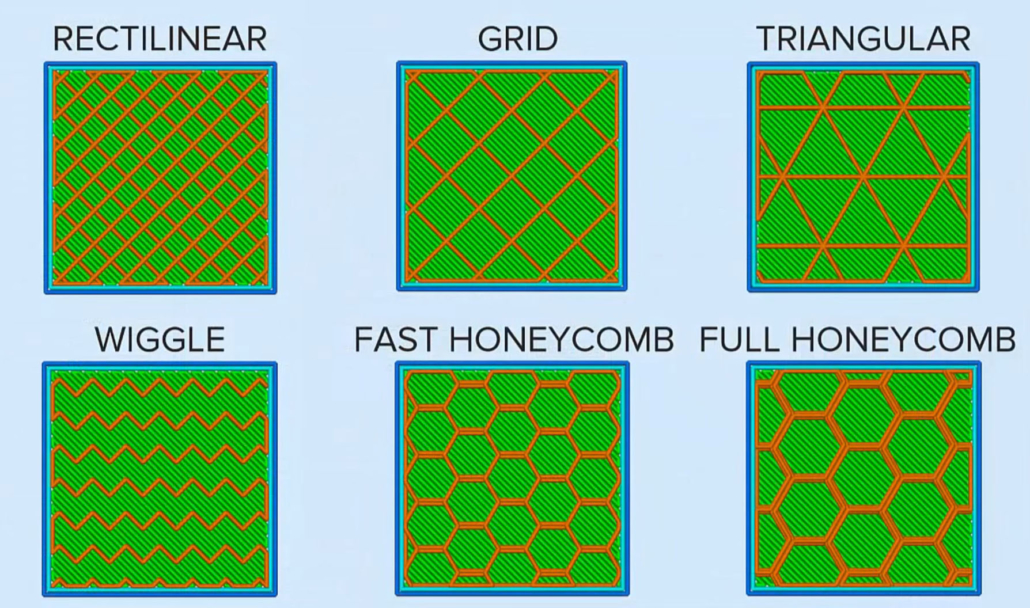
Depending on the lamination software used there are different types of infill, but the four most used (Rectangular, Triangular or Diagonal, Wiggle and Honeycomb) appear in all (Simplify3D, Cura3D, Slic3r, etc).
Rectangular infill
By default, these softwares use rectangular infill, which is logical for having a strong structure in all directions and relatively fast when making perpendicular layers on top of each other.
Triangular infill
The triangular infill is applied, as in the structures of everyday life, to achieve maximum resistance in the direction of the walls, this is due to the decomposition at half of the force applied by being at 45° the lines that form each layer.
Wiggle infill
On the contrary, if our need is to obtain a piece that is as flexible, as compressible and soft as possible, the best infill is the Wiggle. This zigzag infill increases the rebound force and provides sufficient support to ensure the total coating of the top of the piece.
Honeycomb infill (Tri-hexagonal)
Finally, relying on wise nature, the honeycomb infill (bee panel) in hexagonal shape is widely used as a core to give strength to parts made of carbon fiber and other types of fibers. In 3D printing FDM / FFF offers the pieces a great resistance in all directions, greater than the rectangular infill, but with longer printing time.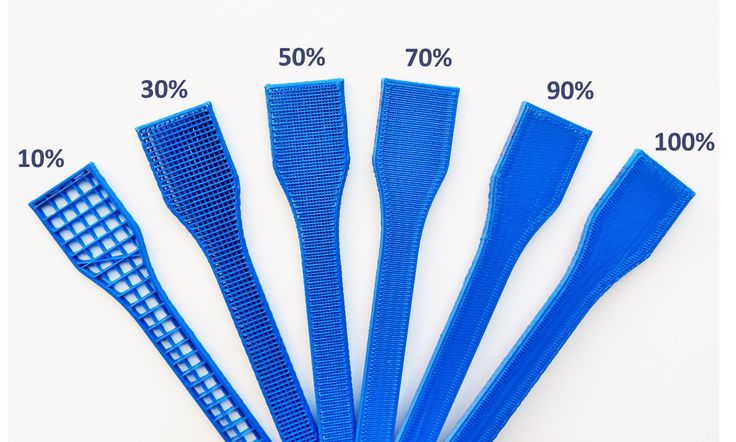
In our view, rectangular filling is strong enough for 90% of 3D printing applications, the remaining 10% being cases where a very specific filling should be used.
Our recommendations for choosing the infill
The correct configuration of the filling is a very important step to obtain the desired resistance in the parts made by FDM / FFF 3D printing. Our recommendation is to use the rectangular infill with a 10% density for non-functional parts, models or prototypes, 20% infill for parts with normal use subjected to low / medium loads and 60% for elements that have to withstand high loads. The type of infill and percentage values must also be adjusted to each type of 3D printer, and, if the material to be used is rigid (PLA, ABS, PETG, Nylon, etc) or flexible (Filaflex TPE or TPU) to get the best possible result.
Do you want to receive articles like this in your email?
Subscribe to our monthly newsletter and you will receive every month in your email the latest news and tips on 3D printing.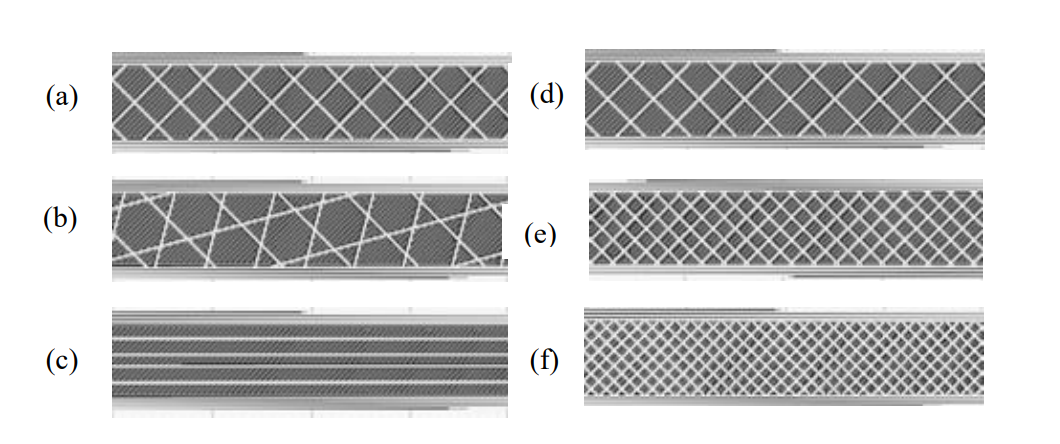
* By registering you accept our privacy policy.
What is infill in 3D printing and how to properly set it up on a 3D printer.
top sellers
-
Bearing 604UU U604ZZ
U-bearing U604ZZ 604UU 4*13*4
35.00 UAH
nine0012 -
Thermal mat for 3D printing 200 x 200 mm
3D printing thermal pad
150.00 UAH
-
Buy epo3d+ 3D printer nine0003
Epo3d+ Ukrainian FDM 3D printer on HIWIN rails. Thanks to reliable...
UAH 35,000.
 00
00 -
ABS granules
ABS granules for extrusion
400.00 UAH nine0009
-
PLA
PLA environmental plastic from Plexiwire. 100% advance payment....
UAH 375.00
-
Buy ABS plastic (ABS) nine0003
ABS plastic from Plexiwire. 100% prepayment. Free shipping...
UAH 220.00
-
Mini motor reducer 12v 100 rpm
high torque mini electric motor.
 Its size...
 150.00 UAH
-
Nozzle for 3D printer 1.75 mm, for E3D and MK8 hotends
3D printer nozzle 1.75 mm 0.2/0.3/0.4/0.5
35.00 UAH
nine0012 -
PETG plastic for 3D printer
PETG plastic from Plexiwire. 100% prepayment. Free...
UAH 360.00
-
SHF-20 shaft support nine0003
SHF-20 shaft support is used for CNC
60.00 UAH
-
A4988 stepper motor driver
35.
 00 UAH nine0005
Buy epo3d 3D printer
Ukrainian epo3d 3D printer built on the basis of modern kinematics...
UAH 18,000.00
All best sellers
Information nine0009
What is infill in 3D printing and how to properly set it up on a 3D printer.
In 3D printing, the internal filling is a very important factor for the strength, structure and weight of the finished model. In this article, we will look at the various forms and types of filling to find out why and for what they are needed.
Purpose of
In addition to sealing function, infill also changes weight and allows
3D printers to reliably print flat horizontal edges over empty space. Without it, 3D models would not have robust structure and stability, and would be incredibly fragile. nine0009
Infill is perhaps one of the most significant factors in 3D printing. It comes in a variety of shapes and patterns, densities and styles. Its optimization can be a difficult task. However, with certain knowledge and settings, it will significantly improve the result.
Styles
Each 3D infill pattern has strengths and weaknesses, and each is applicable in its own way. There are several fairly standard patterns.
Because 3D infill takes up space within an object, it should be chosen for quality improvement, not aesthetics. To do this, it is better to use patterns that include grids, lines, honeycombs, as well as rectilinear or concentric patterns. nine0009
If set correctly, they give enough volume for 3D printing between the gaps. This allows the 3D printer to print on voids more accurately and with fewer errors.
Density
Once you have decided on the look of your drawing, the next step is to set the saturation of your 3D print, which is measured as a percentage.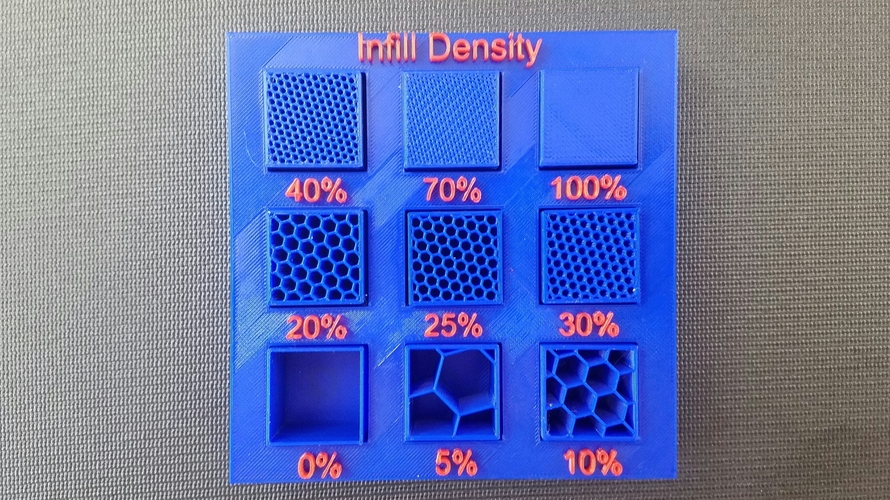 0% is a hollow model and 100% is a solid print. Of course, there are many levels in between, and adjusting this value is incredibly useful. nine0009
One very obvious use is to vary the mass of a 3D product. Higher density makes heavier and harder 3D printing. On the contrary, a lower one will provide a simple and easy result.
Standard 3D infill is 20% to 25%. This strikes a good balance between durability and consumable material. If the composition does not matter, then you can take settings from 10% to 15%.
None of these ranges provide very much support, so don't use them if your subject needs to be rigid. Finally, if design is the main consideration and material consumption is not that important, the best range is 30% to 50%. nine0009
Finally, if you want extra strength, feel free to set it to 100%.
Using the full range of settings and considering all the differences in 3D printers, you need to carefully consider the density to meet your needs.
3D fill examples
"octi" and "archi" in the image are more suitable for circular or rounded objects, while "Hilbert" and "3D honey" are better used for blocky 3D models.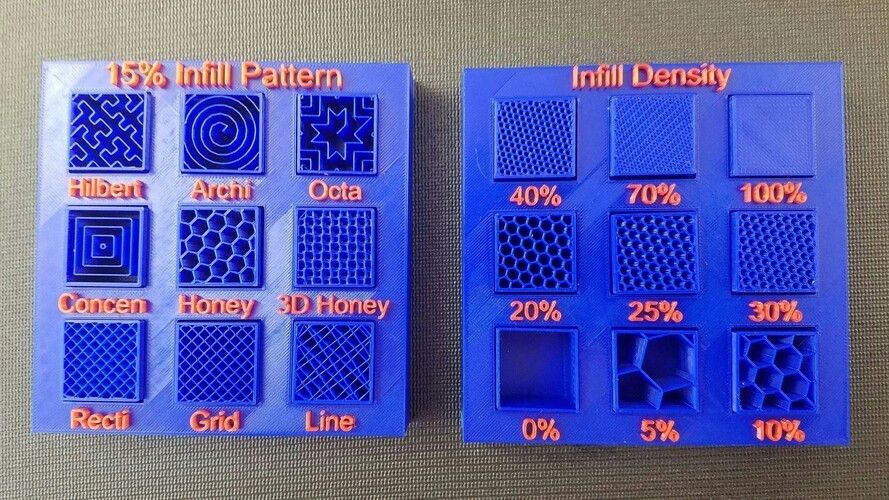 nine0009
what is it and how to do it? Infill Percentage
Internal infill (model infill) is used to achieve strength, structure retention, and a certain weight of the finished printed model. This factor plays a very important role in 3D printing. There are many types of filling and its characteristics. Let's try to figure out what they are for and how to choose them.
Purposes of filling
Filling the model initially has the function of sealing. But at the same time, it also changes the weight. The 3D printer prints flat horizontal edges more accurately over the void. Models without filling do not have a reliable structure, stability. Such models are fragile. nine0009
Thus, infill can be considered the most important factor in 3D printing.
Filling can be of different shapes, weights, styles and even patterns. Infill optimization may seem like a daunting task, but with some knowledge and customization skills, the result will be excellent.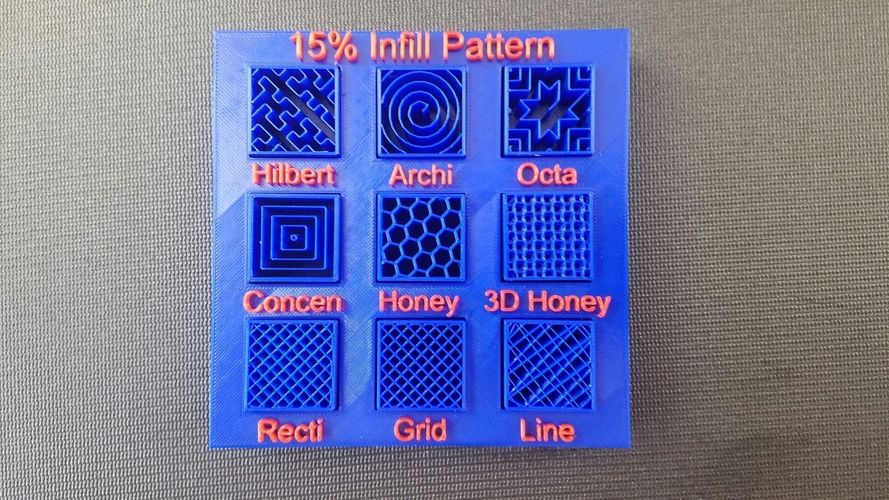
Fill style
Fill can be done in different styles. Each of them has its own advantages and disadvantages. Each variety will be applicable in certain areas. There are several samples that can be considered standard. nine0009
Filling should not be chosen for aesthetic reasons. The fact is that the filling will occupy the internal space of the model, and therefore the key factor should be to improve the quality of the finished model. Patterns that consist of grids, lines, honeycombs, concentric or rectilinear patterns are considered the best. If all settings are set correctly, then the volume between the gaps for 3D printing will be sufficient. As a result, 3D printing on voids will be accurate and less prone to errors. nine0009
Infill density
If you have chosen an infill pattern, you need to decide on the saturation, that is, the density of the infill. This indicator will be measured in%. In this case, the zero value will correspond to a hollow model, and 100% full-bodied, that is, solid 3D printing.