3D printer vacuum cleaner
3D file Vacuum Cleaner・Model to download and 3D print・Cults
Fly sky i6 Transmitter Throttle Centering Pin
€0.85
Ender 5 Hotend Shroud
€1.69
Arduino Humidity and Temperature Sensor Case
€1.69
Mini PCB Drill
€2.26
New Spinner
€0.56
Ender 5 Filament Runout Sensor
€1.70
SD Card Box
€1.62
3D Printed Mini Powerful PCB Cutter
€5.64
Best 3D printer files of the Gadget category
Focus ink pen v1 (Fidget pen)
€2.17
Penvolver - Mechanical Pen Holder
€2. 93
toothpick box
€1.25
flexi puppy
Free
Xiaomi mijia 360° camera mount for OpenRC F1
Free
Protective Cover for Nintendo New 3DS XL
€2.75
Grinder perso
€2.50
Best sellers of the category Gadget
App to create dual text illusion
€3.50
Range Cable
€0.50
Cubone joystick holder
€3.50
Samsung Galaxy s23 ultra case set (3in1)
€2.31
skeeride 2 dual spur gear transmission
€8. 76
76
App to turn your photo into 10 types of decoration
€3.50
Italian hand
€1
Air Vent Phone Holder for Car PRINT-IN-PLACE
€2.50
Owl - Wall Key Holder
€1.90
Survival Arrow Gun
€6.29
VALENTINE'S DAY FLEXI DUCK HEART GIFT BOX
€2.80
App for Cookie Cutters
€3.50
Flexi Duck Print in place Multiparts
€2.80
PiPBOT 1 - Print in Place ROBOT
€4.68
Geared Box Print in Place
€3.50 -25% €2.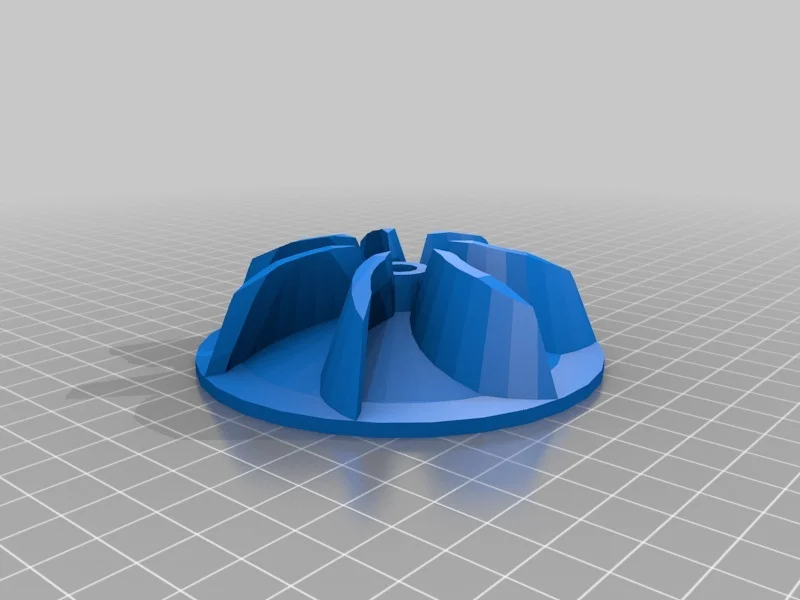 62
62
Candy Gat - The 3D Printable PEZ Gun
€9.36 -50% €4.67
Would you like to support Cults?
You like Cults and you want to help us continue the adventure independently? Please note that we are a small team of 3 people, therefore it is very simple to support us to maintain the activity and create future developments. Here are 4 solutions accessible to all:
ADVERTISING: Disable your banner blocker (AdBlock, …) and click on our banner ads.
AFFILIATION: Make your purchases online by clicking on our affiliate links here Amazon.
DONATE: If you want, you can make a donation via Ko-Fi 💜.
WORD OF MOUTH: Invite your friends to come, discover the platform and the magnificent 3D files shared by the community!
3D Printed Vacuum Cleaner « Fabbaloo
By Kerry Stevenson on July 28th, 2019 in Design
Tags: designoftheweek
A 3D printed vacuum cleaner [Source: Imgur]This week’s selection is the 3D Printed Vacuum Cleaner by Reddit contributor pyrohmstr.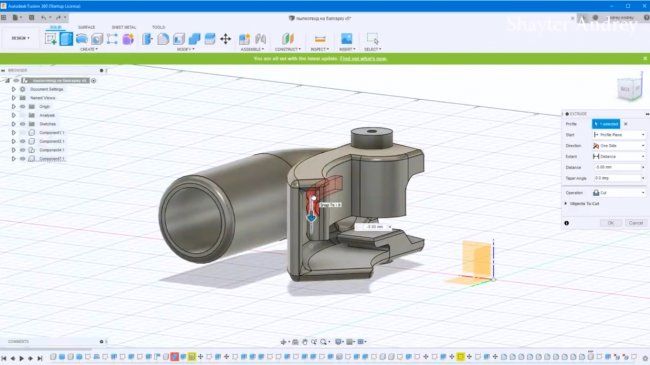
Although this design is not finished, it is so interesting we decided after some discussion to anoint it as Design of the Week. It is just as described: a vacuum cleaner that’s mostly made from 3D printed components.
As you can see in this video, the system actually works:
But according to designer pyrohmstr, it’s not a complete design:
“I also couldn’t find much to go on so I eyeballed it and it happened to work. Maybe someday I’ll do simulations on it to improve it but this whole project was kind of a joke.”
And:
“I have the software for the sim but too much effort. Honestly if you spun a block fast enough it would probably work. If you’re not concerned with efficiency or prolonging your hearing I’d bet that nearly anything would work ok.”
Sure, this is not a perfect design, but it is an interesting design. If you think about it, a vacuum cleaner is just about the most fascinating item to iteratively design. You must design a device that is highly efficient, is able to scoop up debris and do that with a minimum of noise. These factors must be balanced to achieve the best design.
As pyrohmstr says, even a “block” could work, so you can imagine a huge spectrum of potential designs ranging from a simple block all the way to a highly efficient radical design. The idea here is that 3D printing technology allows you to traverse that spectrum by iteratively designing, building and testing new versions.
Eventually you will reach the point where the design meets the requirements or tops out on efficiency.
Impeller used on the 3D printed vacuum cleaner [Source: Imgur]The variations would center around the design of the impeller and structure inside the vacuum chamber. These would require some knowledge of airflow, even with a simulation tool that would show you how well a given design could work.
But what design would you simulate? You’d have to explore the aerodynamics of impellers and fluid motion to devise an ingenious geometry to achieve the most efficient flow.
Designer pyrohmstr has also just dropped the files for this item on Thingiverse, and my hope is that their presence will inspire others to explore this particular problem. A lot could be learned by attempting the design of an efficient vacuum cleaner.
And we’d end up with a ton of vacuum cleaner 3D models on Thingiverse, too.
Via Reddit and Imgur
Design Of The Week: We Love Our Customers!
This week’s selection is the We Love Our Customers Heart by Additive Industries.
Design of the Week: Bionic Sofa
This week’s selection is the smooth and sweeping Bionic Sofa by designer Alex Demin.
Design of the Week: Articulated Poseable Hand
This week’s selection is the easy-to-assemble 3D printed articulated poseable hand, which can be used in a variety of ways.
When Generative Design Backfires – VW’s New Wheels
What looked like twigs proved to be generatively-designed shapes, the output of generative design algorithms available in Autodesk’s Fusion 360, then cast in metal.
150 3D Printed Robots To Be Assembled And Offered To STEM Students
A young engineering student, Danielle Boyer, has developed an inexpensive robot targeted at educators and students, and soon there will be 150 of them heading to institutions.
Design of the Week: Nuclear Power Plant Humidifier
Kerry Stevenson, aka "General Fabb" has written over 8,000 stories on 3D printing at Fabbaloo since he launched the venture in 2007, with an intention to promote and grow the incredible technology of 3D printing across the world. So far, it seems to be working!
View all of Kerry Stevenson's posts.
USB Powered Mini Keyboard Vacuum 3D Printed
My goal was to create a small keyboard vacuum cleaner to deal with the clutter on my desk that I had to deal with after spending hours making things out of plastics, wood and electronic components.
I needed a small and efficient device to clean up this mess, so I decided to design and build my own mini computer vacuum cleaner.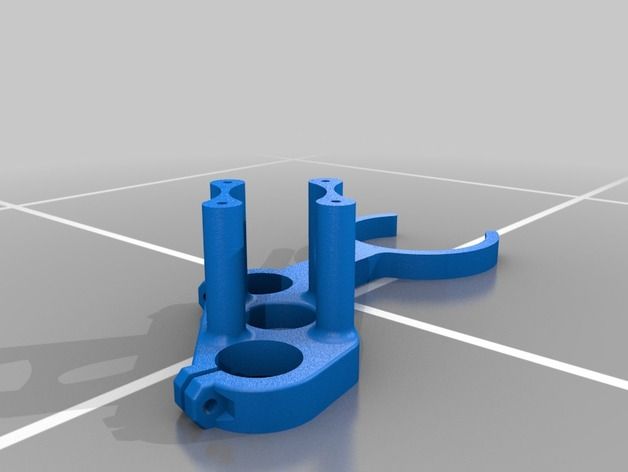
This mini vacuum cleaner is very useful! Now I can easily clean my laptop keyboard, desk, and all the small, fragile items I collect.
Step 1: Materials and Components
Show 3 more images
Step 2: How the vacuum cleaner works
In most vacuum cleaners, dusty air is sucked into the dust bag by a fan driven by an electric motor; it is then filtered and the dust remains in the dust collector while the purified air is thrown out.
In the vacuum cleaner I designed, the dusty air is sent directly to the filter, which traps the dust, and the fan sucks in the cleaned air and sends it to the top of the vacuum cleaner and throws it out.
Now, from theory to practice, make your own printed mini USB vacuum cleaner!
Step 3: Design the turbine
Show 10 more images
Let's start by designing one of the most important parts in a vacuum cleaner: the turbine.
I already had several handheld vacuum turbines in my toolbox, but they didn't fit my purpose. Therefore, in order to design the turbine and other parts, I decided to use the Solidworks software.
Measuring the dimensions of the engine and determining the type of the future turbine are the first steps before which the design in the software will begin.
Once I'm done measuring, I can start drawing the turbine in Solidworks:
- I first sketched out the desired turbine and then shrunk the sketch down to 10mm.

- After that I drew a circle on the top surface and squashed it until the bottom was 2mm thick.
- To strengthen the fan, I expanded the base cylinder by 4mm.
- After that, I extruded the very central part and made a hole to insert the motor axle.
- Finally, to strengthen the turbine, I created a 2mm edge between each blade and base.
Step 4: Remaining parts
Show 6 more images
The rest of the parts are created in the same way - using extrusion, cutting out material areas and grooves.
This mini vacuum cleaner consists of 7 printed parts:
- top cover
- motor holder
- 1st turbine part
- 2nd turbine part
- turbine cover
- filter holder
- dust collector
I'm adding all the .stl files created for printing parts to this instruction. If you want to change the details (use a different motor, different USB cable, etc.) I'll also include the SolidWorks files, so feel free to use those! Files
- top_cover.
 stl
stl - motor_holder.stl
- turbine_part1.stl
- turbine_part2.stl
- turbine_cover.stl
- filter_holder.stl
- dust_tank.stl
- top_cover.SLDPRT
- motor_holder.SLDPRT
- turbine_part1.SLDPRT
- turbine_part2.SLDPRT
- turbine_cover.SLDPRT
- filter_holder.SLDPRT
- dust_tank.SLDPRT
Step 5: You don't have a 3D printer - it's not a problem
If you don't have a 3D printer, it's not a problem!
There are currently online 3D printing services that allow you to find a 3D printer to print your parts! You can also just look for similar organizations in your city.
Step 6: Prepare the 3D printer
Show 6 more images
If you have a 3D printer, it is very important to prepare it for printing. A full printer check can help you avoid many printing problems. The amount of PLA or ABS must be sufficient to print the part, and the heating plate must be active and clean.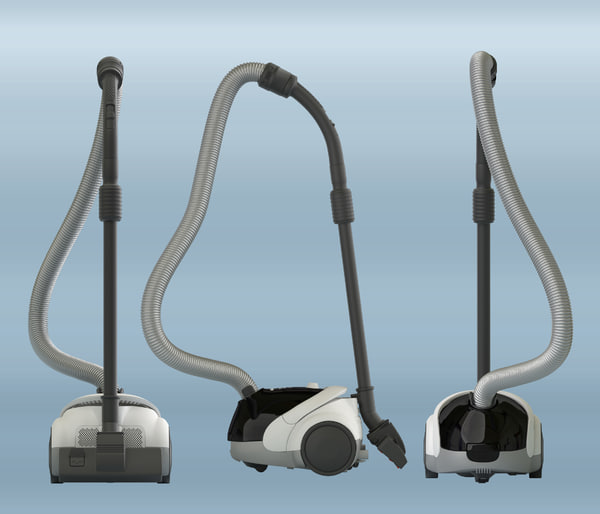 There are many parameters to check!
I don't have my own 3D printer, but I can use a 3D printer owned by an electronics association to which I belong.
Here's a little trick I learned while talking to 3D printers: if you need to print a fragile and thin part (like a turbine), it's very important that the part adheres to the plate. But did you know that ABS and PLA stick very well to each other? When printing with PLA, a thin melted layer of ABS on the heating plate will hold the part to the plate.
To make ABS slurry, mix small pieces of ABS with acetone in a glass bowl. Then apply the solution to the glass plate to be placed on the heating plate.
Step 7: Ready to print
Show 6 more images
Now you can print the parts needed for this project.
I used a homemade Prusa I3 from an electronics association that I belong to. To control the 3D printer, I used the free programs Repetier and Slic3r.
After some trial and error, the 3D printer can print parts with good accuracy.
Step 8: Aligning the parts
Show 4 more images
Before assembling the upper and lower parts of the vacuum cleaner, make sure that all the parts fit together.
The printed parts must align as in a Solidworks assembly. Non-printable parts (eg motor, USB cable, switch) must be placed in the appropriate slots.
If this is not the case, use sandpaper and a scalpel/knife to widen or shrink the printed parts.
Step 9: Assemble the vacuum cleaner top
Show 11 more images
The first step in assembly is to assemble the turbine. Combine turbine_part1 and turbine_part2 and glue both parts together with superglue. Adding super glue to the blades of each propeller makes the propeller much stronger.
Once the turbine is completely glued and assembled, we can focus on powering the vacuum cleaner. The vacuum cleaner uses a DC motor powered by a computer's USB port, which can output a maximum of 5V and 500mA (enough to drive the motor). Cut the IPhone cable at the phone end of the cable.
The USB cable has 4 wires: one green, one white, one red and one black (or colorless). The green and white wires are data, and we are not interested in them. The red wire is connected to 5V and the black wire to ground.
Pass the USB cable through the hole in the motor holder, then cut the white and green wires with wire cutters. Solder the red and black wires, motor and switch in sequence (see diagram). Use heat shrink to strengthen the solder and connections in the circuit.
Then insert the DC motor into its socket in the part of the motor holder and the switch into its socket at the top of the cover. Combine the two pieces and screw them together using 2 screws and a screwdriver.
Then install the pre-assembled turbine on the motor shaft and glue them together. The turbine is then covered with a part of the turbine cover, which is screwed to the engine holder with two screws.
Finally, the USB cable is wrapped around the motor holder part and the USB plug is inserted into its socket on the top of the cover.
Addition: The addition of a capacitor and a diode can greatly improve the safety of the vacuum cleaner by preventing possible current surges that could burn the USB port. I have never had any problems with my vacuum cleaner, but it is recommended to add these two components to avoid any incidents.
Step 10: Assemble the bottom of the vacuum cleaner
Show 11 more images
It's time to make a filter for the mini vacuum cleaner. For this, I used a tea bag: I cut the thread that closes the tea bag and unwrapped it. Pour the tea into a container, later on it will be convenient to check the suction of the vacuum cleaner. Then carefully open the bag.
After that, download and print the filter template file attached to this step: use it to crop the filter properly. Then cut it along the large line of the disk and wind it around the finger with a cone. Insert it into the filter holder part and stick with superglue.
Then glue the smallest disk to the bottom of the filter holder.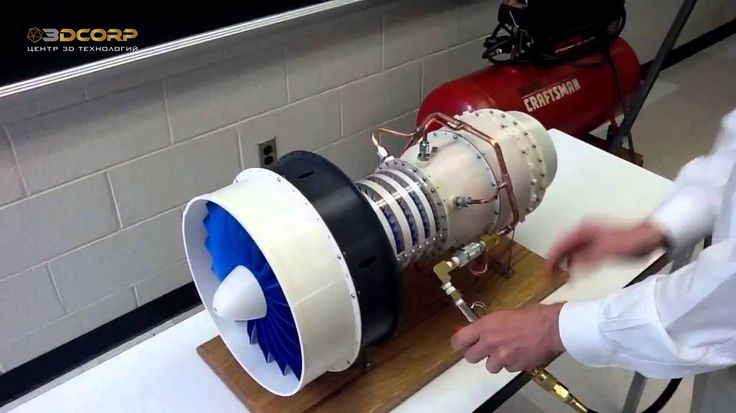 Finally, insert the LEGO holder into the hole in the filter holder, which is screwed to the dust box part with 2 screws.
Files
- filter_pattern.pdf
Step 11: Assemble the Top and Bottom of the Vacuum Cleaner
Use superglue to assemble the top and bottom assembly together.
Finally, add a flexible tube to the LEGO holder, dusty air will be sucked through it. The assembly of the vacuum cleaner is completed!
Step 12: Evaluate your work
To see how the vacuum cleaner works, connect the USB cable to your computer and turn on the power. I tested the suction of a sugar vacuum cleaner: it easily sucks up sugar, leaving the table completely clean.
To empty the tank, 2 screws must be removed. Fortunately, this operation does not happen often: the tank is large and can store a lot of dust.
3D Printed Mini USB Powered Keyboard Vacuum Cleaner
My goal was to create a small keyboard vacuum cleaner to deal with the clutter on my desk that I had to deal with after spending hours made things out of plastic, wood and electronic components.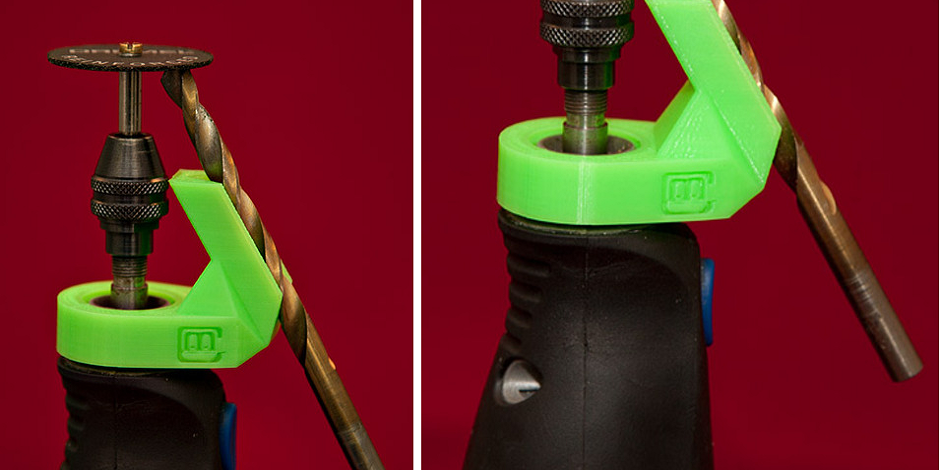
I needed a small and efficient device to clean up this mess, so I decided to design and build my own mini computer vacuum cleaner.
This mini vacuum cleaner is very useful! Now I can easily clean my laptop keyboard, desk, and all the small, fragile items I collect.
Step 1: Materials and Components
Show 3 More Images
For this project, you will need the following parts and tools:0004
- super glue
- screwdriver
- 6 screws (I found them in an old CD drive)
- scalpel / cutter
- pliers
- wire cutters
- sandpaper
- heat shrink (4 mm diameter)
- soldering iron
- solder
- caliper
- 1 RE-140 DC motor (I chose this motor because it is very common and easy to find in old toys. If you decide to use a different type of motor, don't forget to change the SolidWorks files)
- old Apple USB cable (from iPhone 5 or later)
- switch (6*12mm)
- lego braces
- flex tube (I used an old flex tube from the LEGO set)
- tea bag (for filter)
- 3D printer / 3D printing service
Step 2: How the vacuum cleaner works
In most vacuum cleaners, dusty air is sucked into the dust bag by a fan driven by an electric motor; it is then filtered and the dust remains in the dust collector while the purified air is thrown out.
In the vacuum cleaner I designed, the dusty air is sent directly to the filter, which traps the dust, and the fan sucks in the cleaned air and sends it to the top of the vacuum cleaner and throws it out.
Now, from theory to practice, make your own printed mini USB vacuum cleaner!
Step 3: Design the turbine
Show 10 more images
Let's start by designing one of the most important parts in a vacuum cleaner: the turbine.
I already had several handheld vacuum turbines in my toolbox, but they didn't fit my purpose. Therefore, in order to design the turbine and other parts, I decided to use the Solidworks software.
Measuring the dimensions of the engine and determining the type of the future turbine are the first steps before which the design in the software begins.
Once I'm done measuring, I can start drawing the turbine in Solidworks:
- I first sketched out the desired turbine and then shrunk the sketch down to 10mm.

- After that I drew a circle on the top surface and squashed it until the bottom was 2mm thick.
- To strengthen the fan, I expanded the base cylinder by 4mm.
- After that, I extruded the very central part and made a hole to insert the motor axle.
- Finally, to strengthen the turbine, I created a 2mm edge between each blade and base.
Step 4: Remaining parts
Show 6 more images
The rest of the parts are created in the same way - using extrusion, cutting out material areas and grooves.
This mini vacuum cleaner consists of 7 printed parts:
- top cover
- motor holder
- 1st turbine part
- 2nd turbine part
- turbine cover
- filter holder
- dust collector
I'm adding all the .stl files created for printing parts to this instruction. If you want to change the details (use a different motor, different USB cable, etc.) I'll also include the SolidWorks files, so feel free to use those! Files
- top_cover.
 stl
stl - motor_holder.stl
- turbine_part1.stl
- turbine_part2.stl
- turbine_cover.stl
- filter_holder.stl
- dust_tank.stl
- top_cover.SLDPRT
- motor_holder.SLDPRT
- turbine_part1.SLDPRT
- turbine_part2.SLDPRT
- turbine_cover.SLDPRT
- filter_holder.SLDPRT
- dust_tank.SLDPRT
Step 5: You don't have a 3D printer - it's not a problem
If you don't have a 3D printer, it's not a problem!
There are currently online 3D printing services that allow you to find a 3D printer to print your parts! You can also just look for similar organizations in your city.
Step 6: Prepare the 3D printer
Show 6 more images
If you have a 3D printer, it is very important to prepare it for printing. A full printer check can help you avoid many printing problems. The amount of PLA or ABS must be sufficient to print the part, and the heating plate must be active and clean. There are many parameters to check!
I don't have my own 3D printer, but I can use a 3D printer owned by an electronics association to which I belong.
Here's a little trick I learned while talking to 3D printers: if you need to print a fragile and thin part (like a turbine), it's very important that the part adheres to the plate. But did you know that ABS and PLA stick very well to each other? When printing with PLA, a thin melted layer of ABS on the heating plate will hold the part to the plate.
To make ABS slurry, mix small pieces of ABS with acetone in a glass bowl. Then apply the solution to the glass plate to be placed on the heating plate.
Step 7: Ready to print
Show 6 more images
Now you can print the parts needed for this project.
I used a homemade Prusa I3 from an electronics association that I belong to. To control the 3D printer, I used the free programs Repetier and Slic3r.
After some trial and error, the 3D printer can print parts with good accuracy.
Step 8: Aligning the parts
Show 4 more images
Before assembling the upper and lower parts of the vacuum cleaner, make sure that all the parts fit together.
The printed parts must align as in a Solidworks assembly. Non-printable parts (eg motor, USB cable, switch) must be placed in the appropriate slots.
If this is not the case, use sandpaper and a scalpel/knife to widen or shrink the printed parts.
Step 9: Assemble the vacuum cleaner top
Show 11 more images
The first step in assembly is to assemble the turbine. Combine turbine_part1 and turbine_part2 and glue both parts together with superglue. Adding super glue to the blades of each propeller makes the propeller much stronger.
Once the turbine is completely glued and assembled, we can focus on powering the vacuum cleaner. The vacuum cleaner uses a DC motor powered by a computer's USB port, which can output a maximum of 5V and 500mA (enough to drive the motor). Cut the IPhone cable at the phone end of the cable.
The USB cable has 4 wires: one green, one white, one red and one black (or colorless). The green and white wires are data, and we are not interested in them. The red wire is connected to 5V and the black wire to ground.
Pass the USB cable through the hole in the motor holder, then cut the white and green wires with wire cutters. Solder the red and black wires, motor and switch in sequence (see diagram). Use heat shrink to strengthen the solder and connections in the circuit.
Then insert the DC motor into its socket in the part of the motor holder and the switch into its socket at the top of the cover. Combine the two pieces and screw them together using 2 screws and a screwdriver.
Then install the pre-assembled turbine on the motor shaft and glue them together. The turbine is then covered with a part of the turbine cover, which is screwed to the engine holder with two screws.
Finally, the USB cable is wrapped around the motor holder part and the USB plug is inserted into its socket on the top of the cover.
Addition: The addition of a capacitor and a diode can greatly improve the safety of the vacuum cleaner by preventing possible current surges that could burn the USB port. I have never had any problems with my vacuum cleaner, but it is recommended to add these two components to avoid any incidents.
Step 10: Assemble the bottom of the vacuum cleaner
Show 11 more images
It's time to make a filter for the mini vacuum cleaner. For this, I used a tea bag: I cut the thread that closes the tea bag and unwrapped it. Pour the tea into a container, later on it will be convenient to check the suction of the vacuum cleaner. Then carefully open the bag.
After that, download and print the filter template file attached to this step: use it to crop the filter properly. Then cut it along the large line of the disk and wind it around the finger with a cone. Insert it into the filter holder part and stick with superglue.
Then glue the smallest disk to the bottom of the filter holder.