3D printer that can make a gun
7 Best 3D Printers for Guns Frames, Lowers, Receivers, Holsters & More – 3D Printerly
3D printing is rapidly gaining steam as a new method of decentralized manufacturing for the masses. In almost every industry, you can find ways this new technology is changing things. A notable example is the defense industry.
Since an American group named Defense Distributed uploaded the first gun designs on the internet, interest in 3D printed guns has skyrocketed. Gun enthusiasts have been experimenting with this technology to see how they can best apply it.
Unfortunately, this interest hasn’t been limited to gun enthusiasts only. Due to the dangerous nature of guns in the wrong hands, 3D printed guns have become heavily regulated.
Luckily for gun enthusiasts, there are several ways you can print new gun parts or upgrades for guns without running afoul of these regulations. I am here to help you with that.
To help you upgrade and customize your arsenal, I’ve put together some of the best 3D printers for gun components. From beginner-friendly budget machines to high-performance monsters, I have a wide variety of printers for you.
I also wrote an article called the Best Material for 3D Printed Guns – AR15 Lower, Suppressors & More, so check that out if you are interested.
So, let’s get you started on your 3D printing journey.
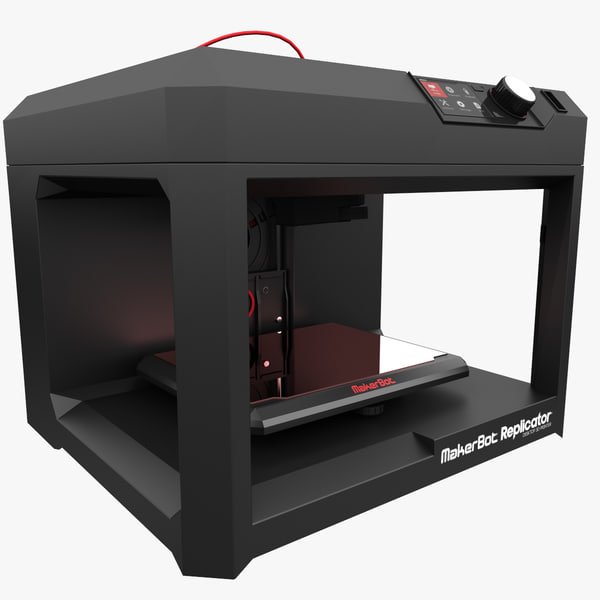
The Ender 3 is one of the most popular 3D printers on the market. The way it balances performance and cost in its designs has revolutionized the desktop 3D printing industry.
Today, even with many different clones and spinoffs on the market, the Ender 3 still retains its title as the budget king. You’ll be able to 3D print some great quality gun receivers, lowers, AR-15 parts, holsters, and even gun stands.
Let’s look at what it’s packing in its latest V2 iteration.
Features of the Ender 3 V2
- Open Build Space
- Carborundum Glass Platform
- High-Quality Meanwell Power Supply
- 3-Inch LCD Color Screen
- XY-Axis Tensioners
- Built-In Storage Compartment
- New Silent Motherboard
- Fully Upgraded Hotend & Fan Duct
- Smart Filament Run Out Detection
- Effortless Filament Feeding
- Print Resume Capabilities
- Quick-Heating Hot Bed
Specifications of the Ender 3 V2
- Build Volume: 220 x 220 x 250mm
- Maximum Printing Speed: 180mm/s
- Layer Height/Print Resolution: 0.
 1mm
1mm - Maximum Extruder Temperature: 255°C
- Maximum Bed Temperature: 100°C
- Filament Diameter: 1.75mm
- Nozzle Diameter: 0.4mm
- Extruder: Single
- Connectivity: MicroSD Card, USB.
- Bed Levelling: Manual
- Build Area: Open
- Compatible Printing Materials: PLA, TPU, PETG
The Ender 3 retains the same open-frame minimalist design found in its predecessors. However, in the V2, a few modern touches have been added to spruce it up.
The V2’s frame is made out of aluminum extrusions for extra stability and durability. Inside its metal base, we have a concealed 350W Meanwell power source and a storage compartment for printing supplies.
Also, on the base, there is a detachable LCD controlled by a scroll wheel. With the LCD, you can access the print settings and other features.
For connectivity, the Ender 3 V2 (Amazon) has both a MicroSD card and USB A ports. Also, included are several new firmware and hardware features like print resume and filament runout detection for long prints.
Stepping up to the print bed, we have a top-notch texture glass print bed. A Meanwell power supply unit in the base heats the print bed. As a result, it can get to temperatures of 60oC in as little as 5 seconds.
Thanks to the fast-heating bed, you can create gun frames for Glocks out of high strength ABS. It also provides a smooth bottom finish to your prints when you pop them off. You may want to use an enclosure for extra temperature stability.
At the top, there are several improvements to the extruder array for greater accuracy and stability. These additions include XY tensioners and a V-guide rail for better movement.
At the extruder, there isn’t any special upgrade. We have the same single nozzle from previous generations fed by a Bowden extruder. Nothing fancy, but it gets the job done.
However, this is where the modular beauty of the Ender 3 shines. You can always upgrade the assembly if you feel you need better quality for your gun parts.
User Experience of the Ender 3 V2
The Ender 3 V2 is a kit printer by nature. What this means is that it comes with some assembly required. Don’t worry though, there is a large user community filled with plenty of resources to help you through it.
The Ender 3 V2 doesn’t have automatic bed leveling. To level it, you’ll have to use the old-fashioned paper method. However, filament loading has gotten easier with the addition of a new infeed knob.
The new LCD screen is bright and responsive. The inclusion of a scroll wheel is disappointing, but the newly redesigned UI makes up for it.
For slicing software, the printer can work with almost any open-source slicing software. A personal favorite of mine is Cura. You can then transfer the prints using the fast USB A port or MicroSD card.
The printing experience on the Ender 3 V2 is good. Prints adhere well to the heated bed and come off easily. The printing operation is also quiet thanks to the new drivers on the motherboard.
As for print quality, we can say it is decent. The print quality won’t wow you like other higher-end models, but it is still very good for the price.
Pros of the Ender 3 V2
- Easy to use for beginners, giving out high performance and much enjoyment
- Relatively cheap and great value for money
- Great support community.
- Design and structure look very aesthetically pleasing
- High precision printing
- 5 minutes to heat up
- The all-metal body gives stability and durability
- Easy to assemble and maintain
- The power supply is integrated underneath the build-plate, unlike the Ender 3.
- It is modular and easy to customize
Cons of the Ender 3 V2
- A bit difficult to assemble
- Open build space is not ideal for minors
- Only one motor on the Z-axis
- Glass beds do tend to be heavier, so it may lead to ringing in prints
- No touchscreen interface like some other modern printers
Final Thoughts
In the V2, the Ender 3 still retains the same magic that made it the king of the budget range. Both beginners and advanced users will be hard-pressed to find a machine that delivers this much value at this price.
Add the Ender 3 V2 to your workbench today.
Second up on our list is a solid mid-range FDM printer, the Artillery Sidewinder X1 V4. This 3D printer is the perfect cross between price and performance.
The printer comes with everything you’d expect in a mid-range, and it still manages to add a few premium features.
Let’s look at what this printer has under the hood.
Features of the Artillery Sidewinder X1 V4
- Rapid Heating Ceramic Glass Print Bed
- Direct Drive Extruder System
- Large Build Volume
- Print Resume Capability After a Power Outage
- Ultra-Quiet Stepper Motor
- Filament Detector Sensor
- LCD-Color Touch Screen
- Safe and Secure, Quality Packaging
- Synchronized Dual Z-Axis System
Specifications of the Artillery Sidewinder X1 V4
- Build Volume: 300 x 300 x 400mm
- Max.
 Printing Speed: 150mm/s
 - Layer Height/Print Resolution: 0.1mm
- Maximum Extruder Temperature: 265°C
- Maximum Bed Temperature: 130°C
- Filament Diameter: 1.75mm
- Nozzle Diameter: 0.4mm
- Extruder: Single
- Control Board – MKS Gen L
- Nozzle Type – Volcano
- Connectivity: USB A, MicroSD card
- Bed Levelling: Manual
- Build Area: Open
- Compatible Printing Materials: PLA / ABS / TPU / Flexible materials
The Artillery Sidewinder X1 V4 (Amazon) is a well-designed printer. The entire printer is built out of high-quality metal, which gives it a sturdy look and premium feel.
Another nice design touch is efficient cable management. The Power supply unit and other electronics are carefully concealed in the base to avoid accidents.
On the extruder, Artillery switches to more efficient ribbon cables to solve the tangled cables problems. Some users have complained about the cable fraying early, but luckily replacements are available in the box.
For interacting with the printer, there’s a colorful LCD screen mounted on the printer’s base. The touchscreen is backed up by an intuitive UI which makes it easier to use.
Connection options on the Sidewinder include both a USB A and a MicroSD card connection. You can connect the printer directly to your PC, or you can preload the slicer files to a MicroSD card or a USB stick.
At the printer’s base, we have an impressive heated ceramic glass bed. The glass bed can reach temperatures of up to 130oC.
At these temperatures, it can print high-strength gun frames for guns out of materials like ABS. With the large bed area, you can also print large lowers and receivers for guns like AR-15s in one piece.
Going up to the extruder array, we have a direct-drive extruder system held up by two sturdy stamped steel gantries. The direct drive extruder makes it possible to reach high temperatures and print with materials like ABS, PLA, TPU, etc.
Check out my other article Best Material for 3D Printed Guns – AR15 Lower, Suppressors & More.
Working in tandem with the extruder, we have a volcano-style hot end. With this hotend, the user can achieve high flow rates leading to high-quality prints in speedy times.
User Experience of the Artillery Sidewinder X1 V4
The unboxing of the Artillery Sidewinder X1 V4 is a pleasant experience. Although the parts come disassembled, putting them together is an easy task. It can be ready to print in roughly an hour.
There is no automatic bed leveling on the X1. To level the bed, users will have to use the trusted paper method which is manual.
On the software side, the printer’s firmware is pretty solid. All features like the UI, print resume function, and filament runout sensor work well without significant bugs.
Also, for transferring prints, the USB A and MicroSD port perform decently with good transfer speeds. Although the X1 V4 doesn’t come with a proprietary slicer, many popular third-party options like Cura work well with it.
When the machine is finally up and running, it produces good quality prints.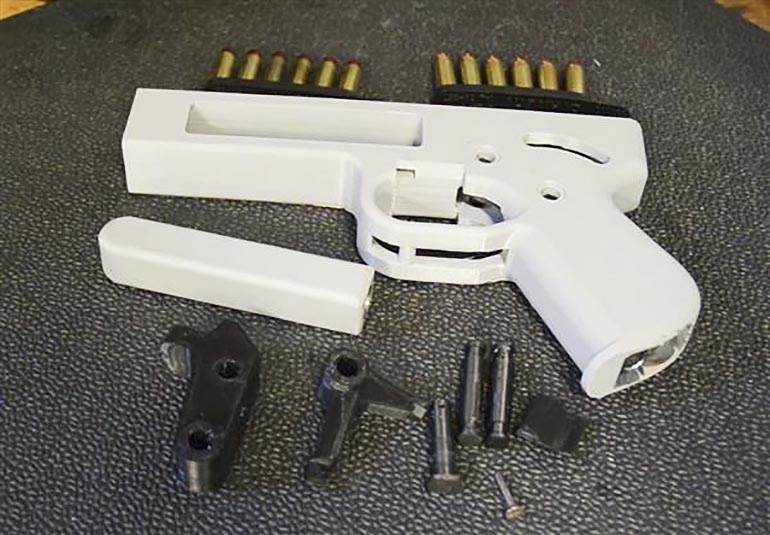 The 3D models come out looking very sharp and detailed. However, there are still a few issues.
First up is the print bed. The heat dissipation over it is not constant. Areas on the outer edges are not heated evenly, so you might want to keep your prints closer to the center.
Also, when printing materials like PETG, it can be hard to get the print settings right. So, first-timers can suffer from print defects like oozing early on.
But all these issues aside, the Artillery Sidewinder X1 still provides a top-notch printing experience.
Pros of the Artillery Sidewinder X1 V4
- Heated glass build plate
- It supported both USB and MicroSD cards for more choice
- Well-organized bunch of ribbon cables for better organization
- Large build volume
- Quiet printing operation
- Has large leveling knobs for easier leveling
- A smooth and firmly placed print bed gives the bottom of your prints a shiny finish.
- Fast heating of the heated bed
- Quiet operation in the steppers
- Easy to assemble
- A helpful community that will guide you through any issues that come up
- Prints reliable, consistently, and at a high quality
- Large build volume for the price
Cons of the Artillery Sidewinder X1 V4
- Uneven heat distribution on the print bed
- Delicate wiring on the heat pad and extruder
- The spool holder is pretty tricky and hard to adjust
- EEPROM save is not supported by the unit
Final Thoughts
The Sidewinder is a great mid-range printer with plenty of value. It is perfect for both beginners and more experienced hobbyists.
Get the Sidewinder X1 V4 for a great price on Amazon today.
Next up, we have another reincarnation of a favorite classic, the Anycubic Mega S. The Mega S is the successor to the popular i3 Mega series.
In the Mega S, Anycubic adds several new features to make it more competitive in today’s saturated budget market.
Let’s take a look at those features.
Features of the Anycubic Mega S
- Full-color Touchscreen
- Large Build Volume
- Power Recovery feature
- Filament Run-Out detection
- Increased Filament Compatibility
- Design and Shape Similar to i3 Mega
- Complete Rigid Solid Metal Frame Structure
- High-Quality Resolution
- Ultrabase Print Bed
- Comes Semi-Assembled
- Titan Extruder
Specifications of the Anycubic Mega S
- Build Volume: 210 x 210 x 205 mm
- Layer Height: 0.1-0.
 4mm
4mm - Feeder System: Bowden drive and geared feeder
- Extruder Type: Single
- Nozzle Size: 0.4 mm
- Max. Extruder Temperature: 275°C
- Max. Bed Temperature: 100°C
- Frame: Aluminum
- Bed Leveling: Manual
- Print Bed: Heated bed with Anycubic Ultrabase
- Display: Full-Color Touch Screen
- Connectivity: SD, USB cable
- Compatible Printing Materials: PLA, ABS, HIPS, PETG, TPU
The Mega S comes with a solid and compact design. The design of the all-metal aluminum frame is simple, and also sturdy thanks to the high-quality build material.
The tidy cable management also contributes to the visual appeal of the Mega S. No stray wires are hanging around as you’d expect from a kit printer. Everything is neatly tucked away, including the power supply.
On the base of the printer, we have a 3.5-inch TFT screen for interacting with the printer. Backing this up is new and improved firmware with new features like print resume and a filament runout sensor.
For connectivity, we have both an SD card and a USB A port for transferring prints. The Anycubic Mega S (Amazon)also supports the Cura, Simplify3D, and Repetier Host for preparing 3D models.
Going to the print area, we have an extra-special print bed. Anycubic includes its patented Ultrabase build plate. There is excellent first-layer adhesion on the bed, and prints pop right off when it’s cool.
The Ultrabase is also heated. The heat is helpful, especially since you’ll usually be making your 3D printed gun parts out of high-strength materials that are prone to warping.
Going up, we have a Titan extruder mounted on the sturdy frame. The Titan extruder feeds a single 0.4m nozzle. It is capable of reaching temperatures of 275oC.
With the Titan extruder, you can create out of a wide selection of materials. These materials include Nylon, PETG, PLA, TPU, etc.
User Experience of the Anycubic Mega S
Putting the Anycubic Mega S is an easy task to do. Most of its parts come pre-assembled, so all you have to do is connect the wires and bolt the frame together.
The Mega S doesn’t have automatic bed leveling, so you’ll have to make do with manual bed leveling. However, filament feeding and loading in considerably easier, thanks to the new spool holder.
On the software side, everything works well and is even better than expected. The touchscreen’s UI has plenty of features, and it’s easy to use.
However, there is a bit of a drawback. The brightness of the touchscreen is not adjustable. So, you’ll have to live with that minor flaw.
When it comes to printing models, the Mega S lives up to the hype. It provides good quality prints at above-average printing speeds.
Although, the printing operation is still quite loud. But overall, the noise isn’t a dealbreaker.
Pros of the Anycubic Mega S
- It is very quick to assemble – takes about a maximum of 20 minutes
- It has a well-built and sturdy aluminum frame which gives a consistent print quality
- Has the exceptional heated print bed
- Amazing print quality and high resolution at just 0.
 05mm or 50 microns
 - Easy to navigate the full-color touch screen
- Comes with a lot of extra accessories
- Has lead screws for Z-axis
- The new extruder heats up quickly
- Easy manual handling and leveling
- Offers modern features at a very low price
Cons of the Anycubic Mega S
- There is no sound insulation
- The motherboard fan is noisy
- The touchscreen’s brightness is not adjustable
Final Thoughts
In the Mega S, Anycubic delivers a high-quality product for a surprisingly low cost. Even a few bugs here and there are not enough to mar a superb budget printing experience.
Get yourself the Anycubic Mega S from Amazon today.
The Qidi Tech X-Plus is the desktop printer of choice for professionals. Sporting a mammoth build space, and a host of other premium features, this printer is primed and ready to suit all your printing needs.
Let’s look at its features.
Features of the Qidi Tech X-Plus
- Large Enclosed Installation Space
- Two Sets of Direct Drive Extruders
- Internal and External Filament Holder
- Quiet Printing (40 dB)
- Air Filtration
- Wi-Fi Connection & Computer Monitoring Interface
- Qidi Tech Build Plate
- 5-inch Color Touch Screen
- Automatic Leveling
- Automatic Shutdown after Printing
- Power Off Resume Function
Specifications of the Qidi Tech X-Plus
- Build Volume: 270 x 200 x 200mm
- Extruder Type: Direct Drive
- Extruder Type: Single nozzle
- Nozzle Size: 0.
 4mm
4mm - Hotend Temperature: 260°C
- Heated Bed Temperature: 100°C
- Print Bed Material: PEI
- Frame: Aluminum
- Bed Leveling: Manual (Assisted)
- Connectivity: USB, Wi-Fi, LAN
- Print Recovery: Yes
- Filament Sensor: Yes
- Filament Materials: PLA, ABS, PETG, Flexibles
- Operating System: Windows, Mac OSX
- File Types: STL, OBJ, AMF
- Frame Dimensions: 710 x 540 x 520mm
- Weight: 23 KG
The Qidi Tech X-Plus (Amazon) has a compact, well-designed build space. Its closed volume is surrounded by a strong plastic shell with acrylic viewports. You can open these ports depending on the material you are printing.
One of the striking features of the Qidi Tech X-Plus is its dual nature. You can configure the printer in many ways, depending on what material you are printing.
An example of this is its dual filament holders. One of the holders is inside the build space because of hygroscopic filaments that require a constant-temperature environment. The other filament holder located on the outside is for more rugged materials.
On the printer’s front panel, we have a large 5-inch touchscreen. The touchscreen is a very nice touch. It is intuitive and has an abundance of useful features.
When it comes to connectivity, the Qidi Tech X-Plus isn’t starved for options. Users can choose between USB A, Wi-fi, and LAN for transferring their prints.
When we go down to the print bed, we see the dual nature of the X-Plus in action again. It features a heated, removable two-sided magnetic plate. Depending on the type of filament the user is printing, they can use either side of the plate.
Thanks to this build plate, you can print large gun frames with high-strength materials like nylon or ABS. All you have to do is turn the plate over, and you can also print with PLA.
The extruder also comes in a dual pack. Qidi provides one extruder for printing less-demanding materials like PLA, PETG, and another one for high-temperature materials like nylon and ABS.
The dual extruders offer users a wide range of materials to use in creating their gun accessories.
User Experience of the Qidi Tech X-Plus
The Qidi Tech X-Plus comes pre-assembled. Setting it up is very easy. All you have to do is to connect it to a socket, load the filament, and level the bed. Once you’re done with the above, you can start printing.
Bed leveling on the X-Plus is manual with software assistance. Qidi calls it one-key bed leveling. With a single press of a button, you can level the print bed.
Qidi is trying to push its proprietary slicer, but the X-Plus is still compatible with other slicers like Cura and Simplify3D. You can use any of these and transfer your print to the printer using any of the connection modes.
The LAN and Wi-fi connections can also come in handy if you’re running a printer farm and need remote monitoring.
Printing operation on the X-Plus is very good. Small touches like the carbon filter make it safe for enclosed spaces, while the closed build volume ensures it makes little noise.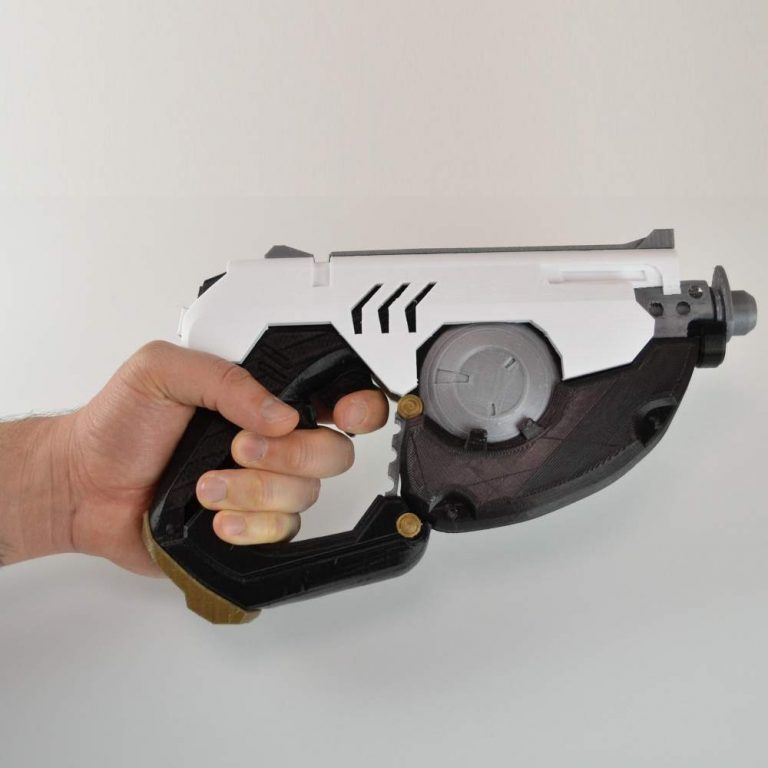
The extruder produces great prints. All the model’s features come out looking sharp and well-defined. Also, it is easy to switch between both extruders.
Pros of the Qidi Tech X-Plus
- A professional 3D printer that is known for its reliability and quality
- Great 3D printer for beginners, intermediate, and expert level
- Amazing track record of helpful customer service
- Very easy to set up and get printing – works out the box nicely
- Has clear instructions, unlike many 3D printers out there
- Made to be sturdy and durable for the long-run
- The flexible print bed makes removing 3D prints a lot easier
Cons of the Qidi Tech X-Plus
- Operation/display can be a little confusing at first, but once you figure it out, it becomes simple.
- A few instances of damaged parts here and there, like a bolt, but customer service quickly fixes these issues.
Final Thoughts
The Qidi Tech X-plus lives up to its high price tag. If you’re looking for a taste of premium, hassle-free printing, then you should get yourself one. Trust us, the X-plus will take your printing experience to the next level.
You can get the Qidi Tech X-Plus for a great price on Amazon today!
The Dremel Digilab 3D20 is an entry-level printer built for educators and beginners in 3D printing. The Digilab’s design prioritizes safety while also making sure users can still get a great printing experience.
Let’s look at some of its features.
Features of the Digilab 3D20
- Enclosed Build Volume
- Good Print Resolution
- Simple & Easy to Maintain Extruder
- 4-Inch Full-Color LCD Touch Screen
- Great Online Support
- Premium Durable Build
- Established Brand With 85 Years of Reliable Quality
- Simple to Use Interface
Specifications of the Digilab 3D20
- Build Volume: 230 x 150 x 140mm
- Printing Speed: 120mm/s
- Layer Height/Print Resolution: 0.
 01mm
01mm - Maximum Extruder Temperature: 230°C
- Maximum Bed Temperature: N/A
- Filament Diameter: 1.75mm
- Nozzle Diameter: 0.4mm
- Extruder: Single
- Connectivity: USB A, MicroSD card
- Bed Levelling: Manual
- Build Area: Closed
- Compatible Printing Materials: PLA
Coming in at 400 x 485 x 355mm, the Digilab is an average-sized 3D printer that won’t take up much space on any desktop. The main build volume is closed off by a plastic shell save for an acrylic door which you cannot open during printing.
On the bottom panel of the printer, we have a 4-inch full-color LCD screen. True to Dremel’s design, the touchscreen is easy to use and very bright.
For connecting to the printer, Dremel provides both USB A and SD card ports on the printer. However, the printer’s software architecture is closed, which means you cannot modify its software.
The Digilab 3D20 (Amazon) supports two main options for slicing and preparing 3D models.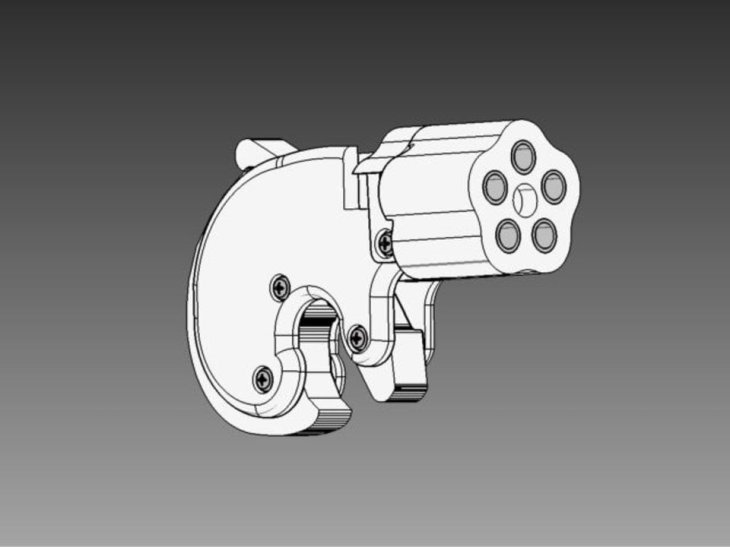 Its own Dremel studio and Simplify3D. However, there is rumored support for other third-party slicers coming soon.
Going down to the printing area, we have a non-heated, non-removable build plate. The absence of a heated plate means Dremel limits users to PLA filaments only.
However, the Dremel Digilab still churns out good 3D gun prints. Even with its limitations, the Dremel will still provide any gun enthusiast with quality frames and other accessories.
User Experience of the Dremel Digilab 3D20
The installation of the Dremel Digilab 3D20 is very easy. It is about as close to plug and play as you can get. All you have to do is to plug it in, and it is ready to print.
Loading the filament in is also easy. Just beware, Dremel limits users to its own proprietary PLA filaments.
Like we mentioned earlier, the touchscreen is very easy to use. It is colorful and intuitive. This enables users to find their way around the printer’s settings with ease.
Printing operation on the Digilab is very smooth. You get decent print quality from the extruder without any of the problems plaguing most budget printers.
However, during printing, the Digilab can get pretty loud. Also, since the build plate is non-detachable, prints can be hard to remove.
Pros of the Dremel Digilab 3D20
- Enclosed build space means better filament compatibility
- Premium and durable build
- Easy to use – bed leveling, operation
- Has its own Dremel Slicer software
- Durable and long-lasting 3D printer
- Great community support
Cons of the Dremel Digilab 3D20
- Relatively expensive
- Can be hard to remove prints from the build plate
- Limited software support
- Only supports SD card connection
- Restricted filament options – listed as just PLA
Final Thoughts
The Dremel Digilab 3D20 is a great machine for introducing 3D printing to beginners. It will provide decent print quality without any hassle. But for more advanced users who have greater requirements, it can be limiting.
Check out the Dremel Digilab 3D20 today from Amazon.
The CR-10 V3 is the latest version of Creality’s super-popular, mid-range CR-10 printers. In this V3 version, Creality adds some new features and upgraded some of the old ones to reinforce its market dominance.
Let’s take a look at the specs of this printer.
Features of the Creality CR-10 V3
- Direct Titan Drive
- Dual Port Cooling Fan
- TMC2208 Ultra-Silent Motherboard
- Filament Breakage Sensor
- Resume Printing Sensor
- 350W Branded Power Supply
- BL-Touch Supported
- UI Navigation
Specifications of the Creality CR-10 V3
- Build Volume: 300 x 300 x 400mm
- Feeder System: Direct Drive
- Extruder Type: Single Nozzle
- Nozzle Size: 0.4mm
- Hot End Temperature: 260°C
- Heated Bed Temperature: 100°C
- Print Bed Material: Carborundum glass platform
- Frame: Metal
- Bed Leveling: Automatic optional
- Connectivity: SD card
- Print Recovery: Yes
- Filament Sensor: Yes
The CR-10 V3’s frame is what we’ve come to expect from Creality, an all-metal open-build design.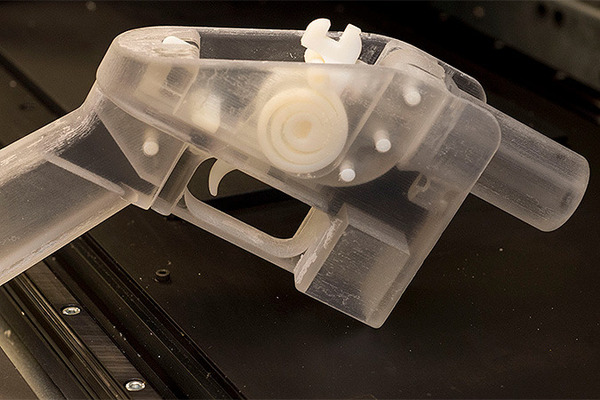 In a slight deviation, the CR-10 adds two cross braces on either side of the printer.
The braces help prevent z-axis wobble due to the large build volume of the printer.
I wrote an article about How to Print & Use Maximum Build Volume in Cura, so check that out for more info.
Separate from the main printer frame, we have the control box. We have a 350W power supply, an LCD screen, and a scroll wheel. The scroll wheel is used with the LCD for controlling the printer.
The CR-10 V3 (Amazon) comes with plenty of new hardware and firmware upgrades. New additions like a filament runout sensor and a new quiet motherboard give the printer a modern touch.
For connection, the CR-10 V3 comes with an SD card port for loading the prints. To slice and prepare the 3D models, you can use several slicing programs, including a personal favorite, Cura.
The print bed on the CR-10 V3 is a heated, Carborundum coated glass plate. The build area of the bed is massive. You can print components for large guns like the AR-15 in one go.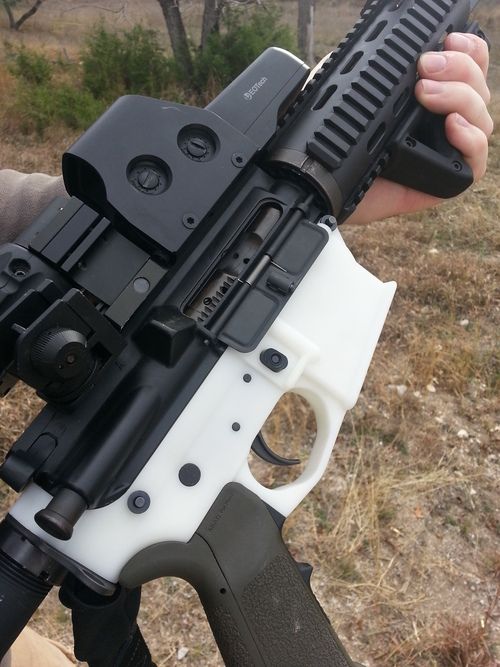
The bed is also heated, which means you can print your gun accessories out of materials like ABS and Nylon with no hassle.
However, the main star of the show is the direct drive extruder. The new Titan extruder opens up a wide range of printing materials. With it, you can expect consistently great print quality even with the large build volume.
User Experience of the Creality CR-10 V3
The CR-10 V3 comes partly assembled so, putting it together is fairly easy. For experienced DIYers, setup should take no longer than 45 minutes. Just make sure you tighten the numerous bolts properly.
There is no automatic bed leveling out of the box. You’ll have to do it yourself manually. However, Creality did leave a space for a BL-Touch sensor if the user wants to upgrade.
The firmware is up to scratch, and all the new features work well. However, the new LCD interface is a bit of a disappointment. The scroll wheel can seem off at times, especially with new printers sporting touchscreens, but overall operation isn’t too bad.
When it comes to printing, there are no complaints with the CR-10. The print bed works well and distributes the heat evenly to avoid warping.
It also heats up fast, and prints pop off cleanly with a smooth bottom finish.
The direct drive extruder also produces high-quality prints consistently without any of the issues seen in budget printers. The printing operation is also quiet thanks to the new motherboard.
Pros of the Creality CR-10 V3
- Easy to assembly and operate
- Quick heating for faster printing
- Parts pop off the print bed after cooling
- Great customer service with Comgrow
- Amazing value compared to other 3D printers out there
Cons of the Creality CR-10 V3
- Not any significant cons!
Final Thoughts
The CR-10 V3 still dominates the mid-range market. Although some of its features are beginning to show their age, this printer still churns out high-quality prints and gun parts consistently without any fuss.
You can find the Creality CR-10 V3 on Amazon for your 3D printing needs.
To round up this list, we are bringing in an excellent mid-range 3D printer, the Prusa i3 Mk3s. The Mk3s is a printer that has gotten industry-wide accolades and may very well be the best in its class.
It provides a superior printing performance backed by cutting-edge hardware. These features have enabled it to remain at the top even after several generations.
Let’s have a look at what makes this printer so special.
Features of the Prusa i3 MK3S
- Fully Automated Bed Leveling
- MISUMI Bearings
- BondTech Drive Gears
- IR Filament Sensor
- Removable Textured Print Sheets
- E3D V6 Hotend
- Power Loss Recovery
- Trinamic 2130 Drivers & Silent Fans
- Open-Source Hardware & Firmware
Specifications of the Prusa i3 MK3S
- Build Volume: 250 x 210 x 210mm
- Layer Height: 0.05 – 0.35mm
- Nozzle: 0.
 4mm
4mm - Nozzle Temperature: 300 °C / 572 °F
- Heatbed Temperature: 120 °C / 248 °F
- Filament Diameter: 1.75 mm
- Supported Materials: PLA, PETG, ASA, ABS, PC (Polycarbonate), PVA, HIPS, PP (Polypropylene), TPU, Nylon, Carbon filled, Woodfill, etc.
- Max Travel Speed: 200+ mm/s
- Extruder: Direct Drive, BondTech gears, E3D V6 hotend
- Print Surface: Removable magnetic steel sheets with different surface finishes
- LCD Screen: Monochromatic LCD
The MK3S+ retains the iconic eye-catching orange and black design from its previous generation. The open build frame is constructed out of metal with a little plastic is very sturdy. All in all, the MK3S+ has a very stable design.
The MK3S+ has a monochromatic screen on its base for interacting with the printer’s menu. You can control the screen with a scroll wheel by its side.
Moving on to the software, the stock firmware on the MK3S+ has plenty of useful features: such as the power recovery feature. It is also open source.
Users that want more out of the firmware can easily upgrade or modify it.
The MK3S+ has both a USB A port and SD card ports for connectivity. For slicing and preparing prints, Prusa includes their PrusaSlicer software in the box. However, users can still use Cura if they want to.
The print bed of the MK3S+ is a removable PEI-coated magnetic steel bed. The steel bed can reach temperatures of up to 120oC. At temperatures like this, it can print high-strength filaments like ABS.
The steel build plate performs exceptionally well. There is excellent first layer adhesion, and you can easily remove the plate and bend it to pop the finished print off.
The newly redesigned extruder produces consistently good prints. Not only can it handle a wide range of materials, but it can also sustain a high flow rate of filament. All this makes the Prusa MK3S+ the premier choice for printing gun frames and other accessories.
User Experience of the Prusa i3 MK3S+
Depending on how much stress you like, the assembly of the Prusa MK3S+ can either be easy or hard.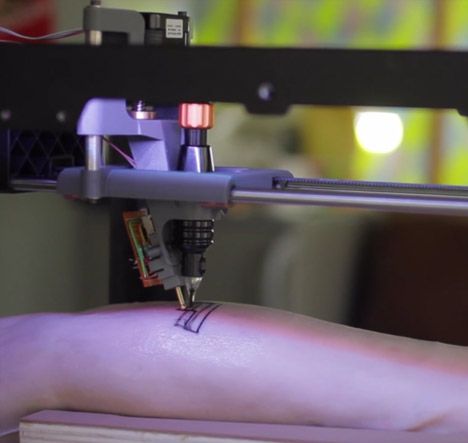 For a slightly higher price, Prusa can ship a fully assembled printer to your doorstep.
However, if you like to do a bit of DIY, you can order the kit version and spend some hours putting it together.
The good news is once you assemble it, the rest of the setup work is easy to do. The MK3S+ has both automatic filament loading and bed leveling. So, getting the printer ready isn’t much of a hassle.
The printer’s LCD is a bit outdated, but it gets the job done. Prusa’s PrusaSlicer is also a competent software program. With it, you can access custom profiles for the MK3S+ that are absent in other slicers.
Once printing starts, the MK3S+ shows its worth, and its quality shines through. The MK3S+ produces excellent high-quality models rapidly and consistently without any hassle.
Its operation is also whisper-quiet thanks to its new motherboard. You can barely hear it printing away, even if you’re in the same room with it.
Pros of the Prusa i3 MK3S+
- Easy to assemble with basic instructions to follow
- Top-level customer support
- One of the largest 3D printing communities (forum & Facebook groups)
- Great compatibility and upgradability
- Quality guarantee with every purchase
- 60-day hassle-free returns
- Produces reliable 3D prints consistently
- Ideal for either beginners and experts
- Has won many awards for the best 3D printer in several categories.
Cons of the Prusa i3 MK3S+
- No touchscreen
- Doesn’t have Wi-Fi inbuilt, but it’s upgradable.
- Fairly pricey – great value as stated by its many users
Final Thoughts
The Mk3S comes with a lot of hype, but when you turn it on it manages to live up to that hype and go even further. If you want the absolute best desktop printing experience, I’d urge you to give the Prusa Mk3S+ a try.
Get the Prusa i3 Mk3S+ directly from their official website today.
There you have it, these are some of the best 3D printers on the market for printing gun frames, lowers, receivers, and other accessories. All you need to do is to get one of them and start printing.
Tips for Printing Gun Lowers, Receivers, and Frames
Before you start printing, there are a few things you need to know to avoid any trouble. Let’s look at them:
Check Local Regulations First
As I mentioned earlier in the article, 3D printing gun is still a bit of a legal gray area. Some states have legislation regulating the creation and the use of 3D printed firearm accessories.
To avoid trouble with the authorities, make sure you are well-versed in these regulations before you start printing.
Check out my article Is It illegal to 3D Print a 3D Printer? – Guns, Knives that goes into more details about this.
Use the Appropriate Filament
Firearms, in general, experience high forces and stress during their service life. The same thing applies to 3D printed guns.
To get a long-lasting firearm and to avoid accidents resulting from misfiring make, sure you use a high-strength filament. Filaments like ABS and PETG can provide the type of strength required for this operation.
Always Take Finishing Seriously
Guns are delicate machinery that work on the tightest of margins. Even slight irregularities in their mechanism can lead to jamming.
To avoid this, make sure all the parts irregularities are appropriately taken care of before you put it to use. You can read more about finishing 3D prints here.
So, good luck and happy printing.
3D printed guns - what kind of gun can be 3D printed and how it works
3D printed weapons raise legal and security issues. Indeed, the 3D printing of weapons is illegal in Europe, Australia, and parts of Asia. Hence, a person could potentially easily turn into a new kind of gun manufacturer with only a desktop 3D printer.
Table of contents
3D printing, a considerable shake-up in the gun industry
The most notable 3D printed firearms
The legal issues of 3D printing untraceable gun parts and 3D printing gun laws
3D printing, a considerable shake-up in the gun industry
Advanced customization and low production costs are among the advantages of 3D printing for making firearms. Note that it is possible to 3D print gun parts such as the magazine or the handle. 3D printing the most important parts like the chamber or the barrel is a challenge.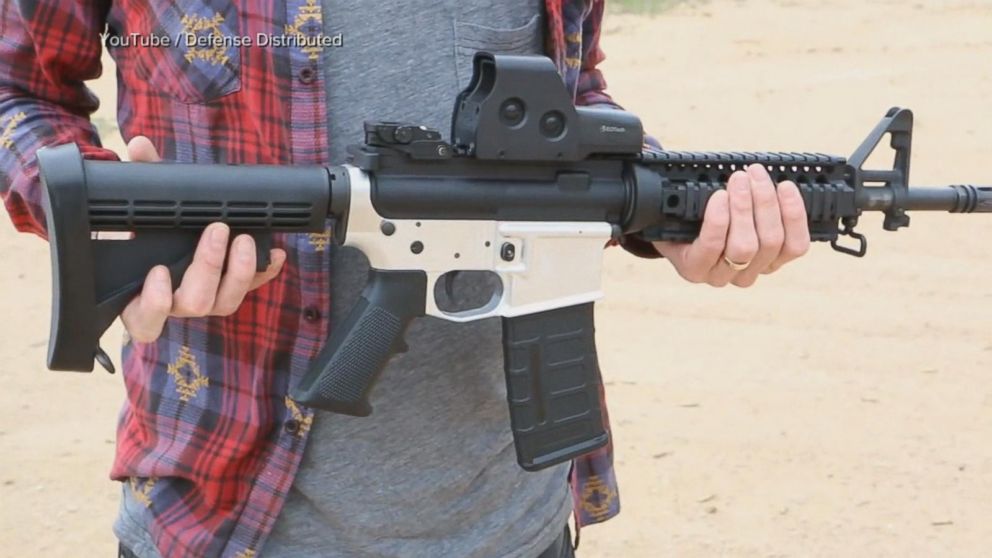
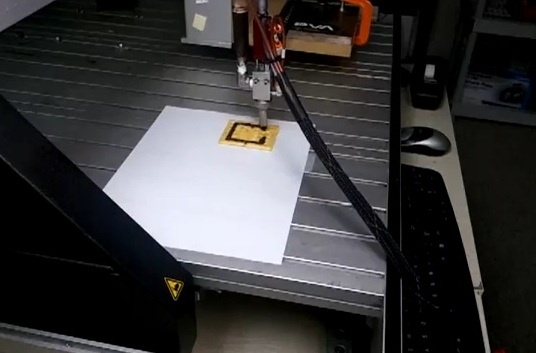
The most credible option for homemaking a gun is by crafting a lower receiver as demonstrated in the Wired video below. The machine capable to turn an aluminum block into a gun part is a lot closer to a milling machine than a 3D printer.
To prove their expertise, some companies like Solid Concepts made metal 3D printed guns. Metal 3D printing technology is far too expensive and complex for individuals nowadays.
The most notable 3D printed firearms
In May 2013, the first 3D-printed gun was test-fired by Cody Wilson. This plastic pistol was produced by internet activists Defense Distributed under the name ‘Liberator’.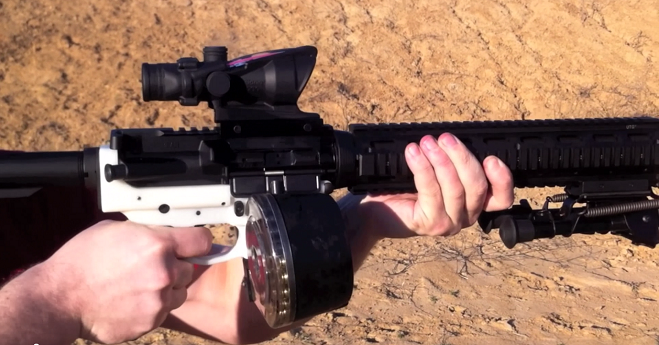
The Liberator .038 is made out of 3D printed ABS, with the exclusion of a single nail used as the firing pin.
Cody Wilson, inventor of the 3D printed gun : “the Liberator”In August 2013, a Canadian man going by the name “Mathew” 3D printed an actual rifle, a Grizzly .22 Caliber Rifle model.
In September 2013, the Hexen organization produces the Reprringer Pepperbox .22 Revolver. The weapon can hold 5 bullets at once in its 3D-printed barrel.
In November 2013 Solid Concepts, now a Stratasys brand, 3D printed an operational metal gun.
The Browning 1911 Metal Replica fired more than 600 bullets without any damage to the gun.
In May 2014, Yoshitomo Imura 3D printed and fired a Zig Zag .38 Revolver. He was later arrested and convicted for owning four 3D-printed plastic pistols at his house.
Seized 3D printed plastic handguns displayed at Kanagawa police station in Yokohama, south of Tokyo, after Yoshitomo Imura’s arrest in 2014.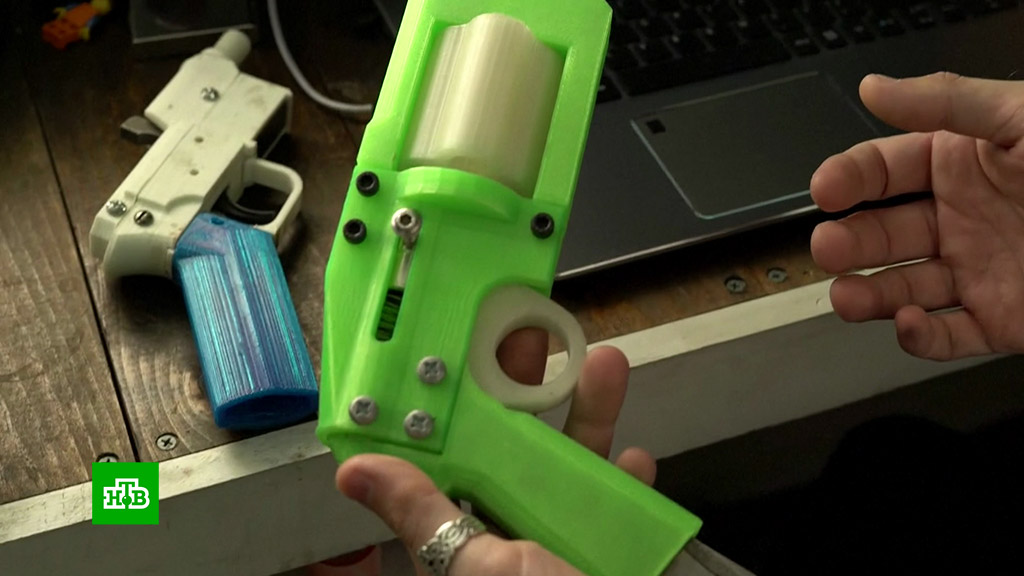
In July 2014, a US citizen nicknamed “Buck O’Fama” 3D printed a receiver for a semi-automatic .22 Ruger Charger pistol.
The Ruger Charger accepts high-capacity mags holding 30 rounds or more. It is capable of shooting a full magazine without issues.
In May 2015, a man nicknamed Derwood, 3D printed the ‘Shuty’, a 9-mm semi-auto based on a combination of parts from a standard AR-15 and a P.A. Luty.
The design for the Shuty combines a metal bolt, an AR fire-control group, and the barrel of a Glock. The magazine, bolt carrier, upper and lower receivers are all 3D printed.
In September 2015, a college student named Chris, 3D printed a semi-automatic revolver called the ‘Yoshee Six Shooter’. The Yoshee Six Shooter is a revolver-style weapon that has multiple barrels and can fire multiple shots without reloading. It includes a 3D printed grip, hammer, spring, barrel, and barrel holder. A metal screw is used as a firing pin to strike the rim of the bullets.
In November 2015, an engineering student called James Patrick has built a 3D printable revolver that uses a rubber band and a nail to fire .22 bullets. The revolver called PM522 Washbear can hold six or eight bullets and can shoot them in a row. This is not the first 3D printed gun made by Patrick who also made a previous model (single shot) called the Songbird.
In January 2016, the now-famous Derwood, 3D printed a new gun of its design, the ‘Shuty MP-1’. This 3D printed gun is a 9 mm semi-automatic pistol made from 95% 3D printed parts.
However, the remaining components and most complex parts of the 3D printed gun are made of metal: store-bought Glock barrel, hammer, firing pin, bolts, and springs. Derwood has been able to shot more than 600 hundred cartridges with his Shuty MP-1.
According to him, the plastic holding the barrel starts to melt after about 18 shots so it is better to let the gun cool off regularly.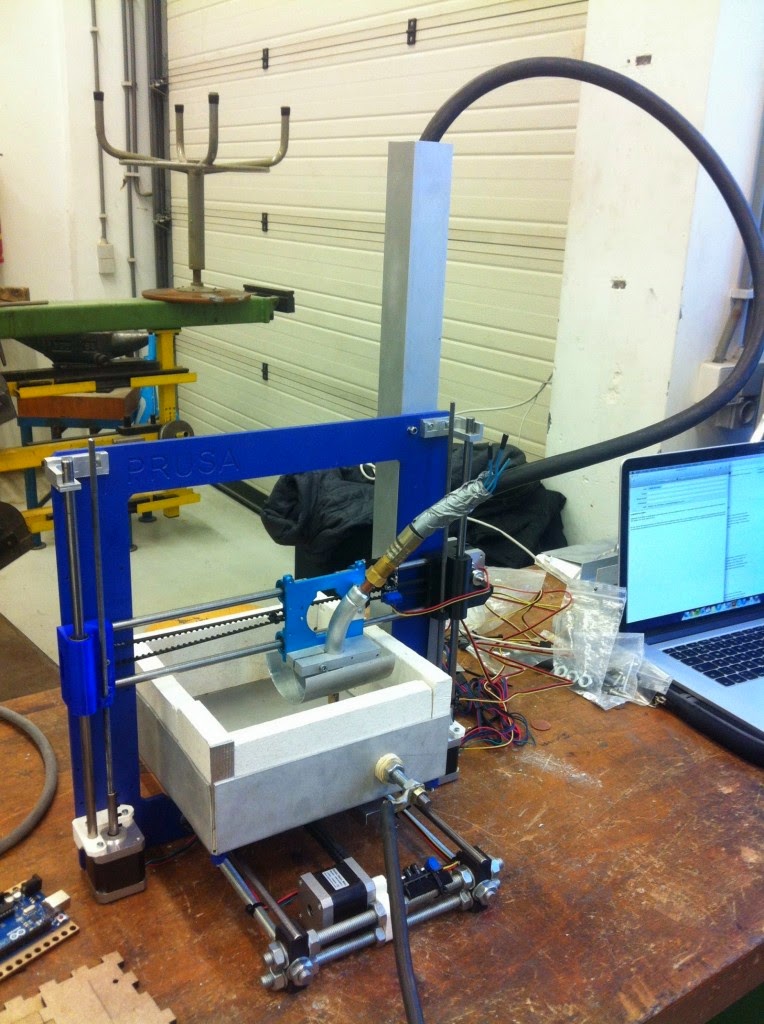
The legal issues of 3D printing untraceable gun parts and 3D printing gun laws
Most gun parts (magazine, pistol grip, upper receiver) can be bought online without any tracking records. But the receiver stands out as one of the most complex and important parts.
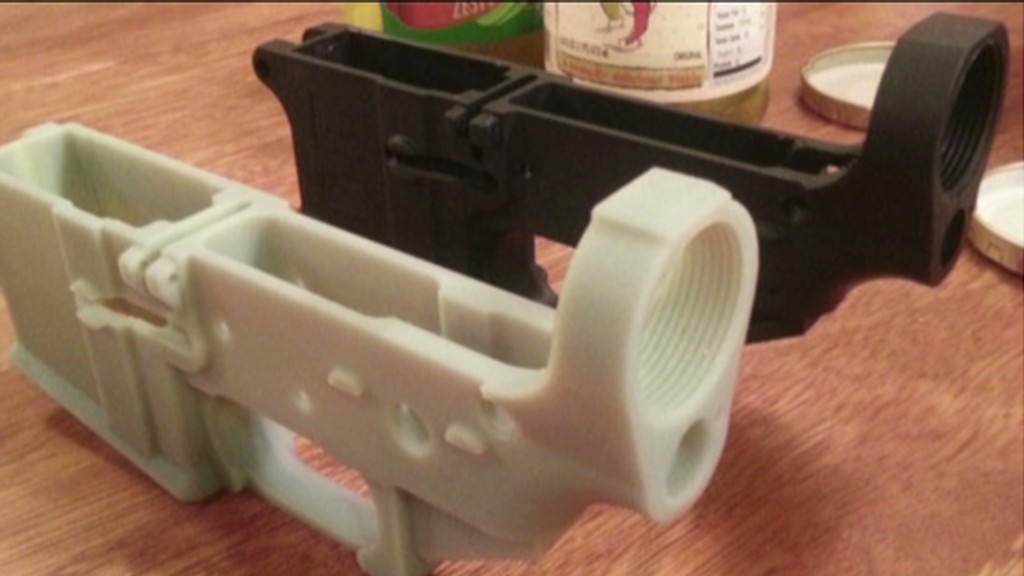
The Ghost Gunner by Defense Distributed is a CNC milling machine capable of making AR-15 lower receivers. The AR-15 is like an AR-10 but uses smaller components for firing 0.223 caliber bullets. Like other CNC mills, the Ghost Gunner uses a digital file to carve objects out of aluminum.
The Ghost Gunner produces an unserialized AR-15 lower receiver from a pre-engineered aluminum part (called 80 percent lower) in a few hours.
As a consequence, the rifle itself is untraceable: it is a ghost gun. Which raises major legal and security issues…
Components of the AR-15 ghost gun made by Andy Greenberg, including the homemade lower receiver.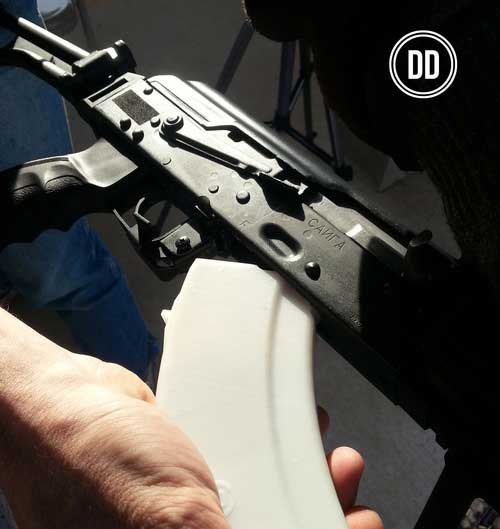 Source: Wired
In 2013, the UK Home Office introduced stricter regulations on 3D printed guns and 3D printed firearms, making it highly illegal to create, buy, or sell them or 3D printed gun parts in Great Britain.
In November 2015, the parliament of the state of New South Wales, Australia, passed one of the strongest prohibition laws against 3D-printed guns. This law called Firearms and Weapons Prohibition Legislation Amendment Bill 2015, intends to penalize both physical and digital possession of 3D printable guns the same way as any illegally owned firearm holder. More information can be found in this 3D printing Industry article.
California passed a law in July 2016 requiring anyone who makes or assembles a homemade firearm to apply for a serial number or “other mark of identification” from the state Department of Justice.
Around Asia, notable laws on 3D printed guns include Singapore, where possession of a 3D printed gun is punishable by death.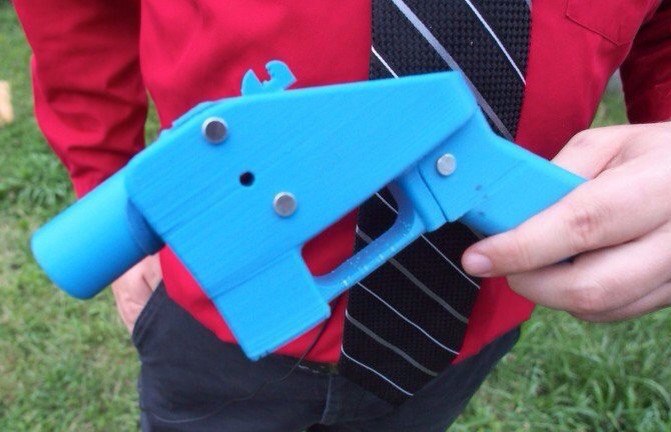
In 2017, China introduced the Chongqing regulation which required manufacturers involved in 3D printing to register with the government to help prevent 3D printing technology from being used to produce illegal items (including blueprints) such as firearms.
As of 1st August 2018, Defense Distributed is again allowed to publish designs for 3D printed guns after the US Department of State agreed to waive its prior 2015 restraint order against Cody Wilson and Defense Distributed. Therefore individuals are allowed to freely publish designs and other technical files about 3D printed guns in the United States.
is it possible to print pneumatic and firearms
Is it possible to make a gun on a 3D printer and is it legal?
Today's 3D printers offer enormous possibilities.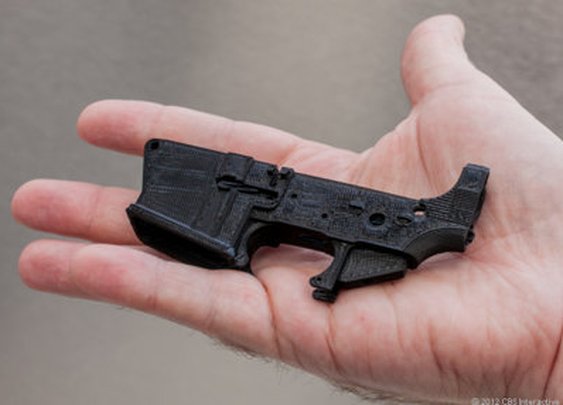 They can print products of almost any complexity. Until quite recently, it was difficult to even imagine that a plastic weapon could shoot. However, it is already possible to make a pistol on a 3D printer, which, although not reliable, still fires live ammunition.
Can firearms be 3D printed?
Back in 2013, a young American gun fighter proved that plastic guns could be 3D printed. He was the first in the world to make a pistol in this way, in which only the striker was made separately from metal. All other parts were printed on an FDM printer.
Today's 3D printers are capable of printing any CAD model, and these models of firearms have been available for over 10 years. If in previous years their printing required professional skills, now almost any user can master them. With a 3D printer and a finished model, it became quite possible to print a gun. Another thing is that such "creativity" is punishable by the laws of most countries.
The evolution of 3D printed weapons
Despite all the prohibitions and restrictions, the evolution of 3D printed firearms is moving at a great speed. The beginning was laid by the single-shot plastic pistol Liberator by American K. Wilson, which appeared in 2013. It had a simple design and was chambered for 380 ACP. Already after 10-12 shots, this weapon became unusable. However, the very possibility of printing firearms served as an impetus for the development of the idea. The author of the first pistol himself founded the Defense Distributed company, which began to actively improve the technology.
One of the ways to increase the durability of weapons was to increase the number of their barrels. At the beginning of 2014, the Japanese Y. Imura makes a 38 caliber Zig Zag pistol. He was able to fire up to 6 shots non-stop. The author of the weapon was recognized as a criminal and convicted.
The next step was the production of a six-shot revolver by J. Patrick in 2015. The PM522 Washbear has been shown in action on YouTube. The weapon was noticeably safer for the shooter compared to previous versions, but still allowed to fire only a few dozen rounds.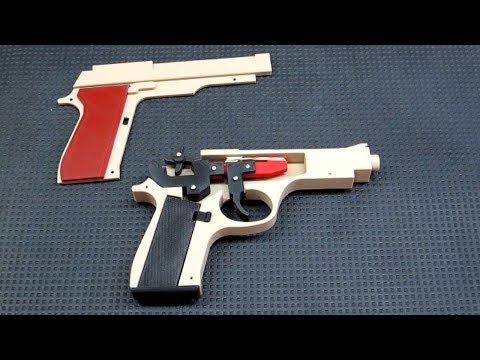
The first semi-automatic pistol for a 9 mm bullet appeared in 2016 under the name Shuty-MP1. It was developed by a handicraft gunsmith who hid under the pseudonym Derwood. It wasn't exactly a plastic weapon. The author used some metal parts from factory pistols - a barrel, a firing pin, a bolt and several springs. This made it possible to ensure a rate of fire of more than 46 rounds / min. However, when changing the store, the plastic case had to be cooled. In 2017, the same master proposed an improved model - Shuty AP-9.
The main contribution to the development of 3D printed weapons technology was made by Defense Distributed, which united a group of like-minded activists. First, these enthusiasts won legal proceedings in the United States and obtained permission to 3D-print weapons, which greatly expanded their capabilities. Secondly, they were able to set up a professional business with product testing and quality control. As a result, in 2018–19 they developed numerous models of a variety of firearms - from pistols to carbines.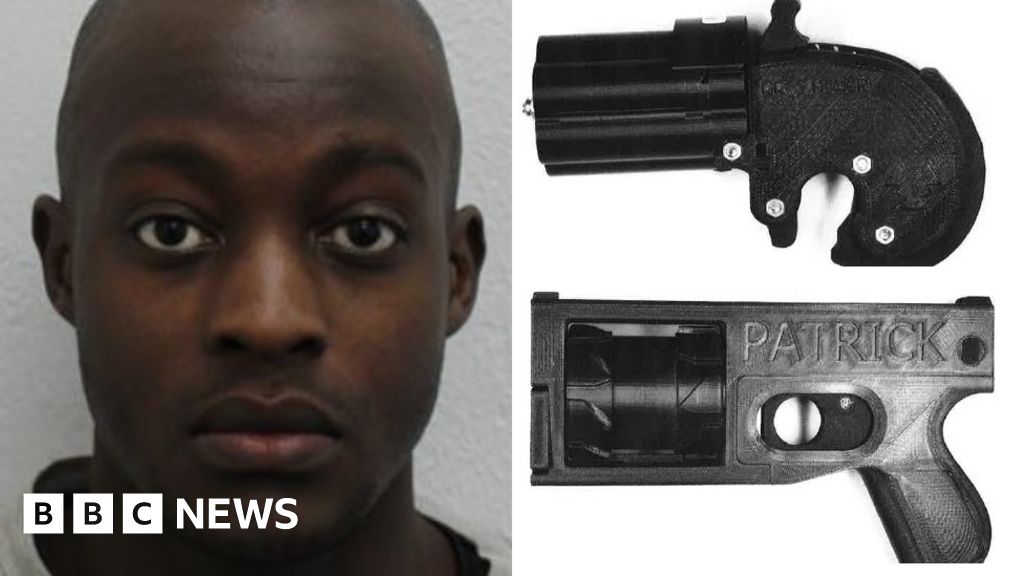 They posted over 30 files for printing original gun parts. Most of them were plastic, and the metal parts were not made from purchased, ready-made elements, but from simple metal profiles (tubes, strips, etc.), which are sold in ordinary hardware stores. This made it possible to exclude the use of parts patented by gunsmiths.
At the moment, the semi-automatic carbine FGC-9, developed on the basis of the Shuty AP-9, has become the pinnacle of "creativity" of Defense Distributed. At the same time, there is not a single factory part in it. The barrel for the 9 mm cartridge is made of steel pipe using electrochemical processing.
Where can I get drawings and what should I look for?
Gun manufacturing bans make it much harder to get blueprints and models of guns for 3D printing. The right to free placement of information was achieved only by Defense Distributed. Their website provides free access to drawings, models and technologies. Other information can be found on the Internet, but they are usually illegal.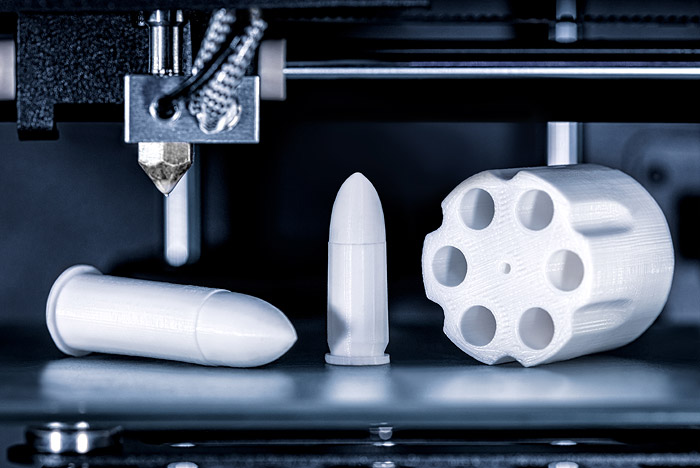
When choosing a model, pay attention to the following information:
- material used;
- cartridge for which the model is designed;
- number of cartridges in the magazine, rate of fire;
- operating time before failure.
It is important to clarify which metal parts will need to be purchased separately, in addition to plastic for printing on a printer.
What does the law say in different countries?
The only country where firearms can be 3D printed is the United States. Gun Control Act 19 applies here68, giving Americans the right to make weapons, but only for personal use. Only one limitation is put forward: it must be determined by metal detectors, that is, it must have a metal element. In virtually all other countries, homemade manufacture and repair of weapons for any purpose is prohibited by law. In Russia, printing it on a 3D printer falls under the Criminal Code of the Russian Federation and is punishable by imprisonment.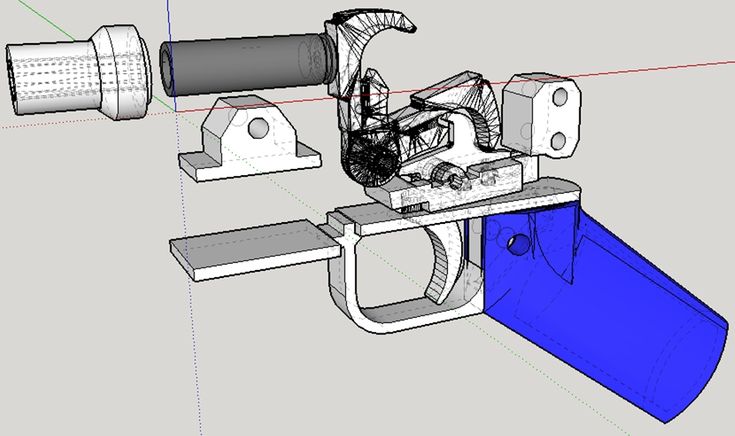
Should we be afraid of plastic weapons?
The question of how dangerous a weapon printed on a printer is becoming increasingly important. Despite all the prohibitions, it is extremely difficult to control the spread of technology around the world. The availability of 3D printers and the increase in their functionality make it possible to master the production of plastic guns at home. How dangerous is such a weapon?
Most experts agree that currently printed weapons are more of an interesting toy. It is quite expensive and is designed to carry out only a few dozen shots. Moreover, such pistols are quite dangerous for the shooter himself with live ammunition, because they can explode in their hands.
However, the danger cannot be underestimated. It is easier and cheaper for a "serious" criminal to buy illegal military weapons than to make them on a printer. At the same time, there may be "enthusiasts" who, for their own interest, can make a pistol and try it out in action.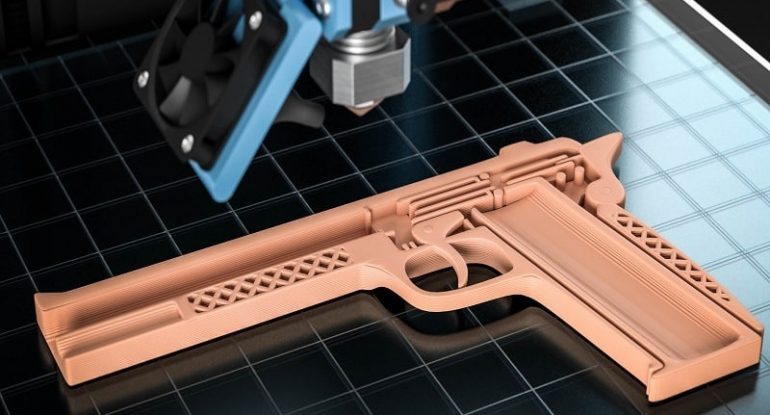 Such inadequate people represent an undoubted danger. In addition, the temptation is great for terrorists. Metal detectors do not detect a plastic gun, which means that it is easier to carry it, for example, on an airplane.
Important! Plastic weapons have a very small resource. At the same time, sometimes just one shot is enough to kill a person.
3D printed firearms have the following advantages:
- the ability to make military weapons at home;
- light weight;
- availability of materials;
- Ability to copy famous weapon models.
Always remember that there are significant disadvantages:
- illegal production;
- high cost of weapons;
- very small resource and limited rate of fire;
- danger to the shooter himself.
Currently, plastic weapons have more disadvantages than advantages, and most importantly, you can get a real prison term for making them.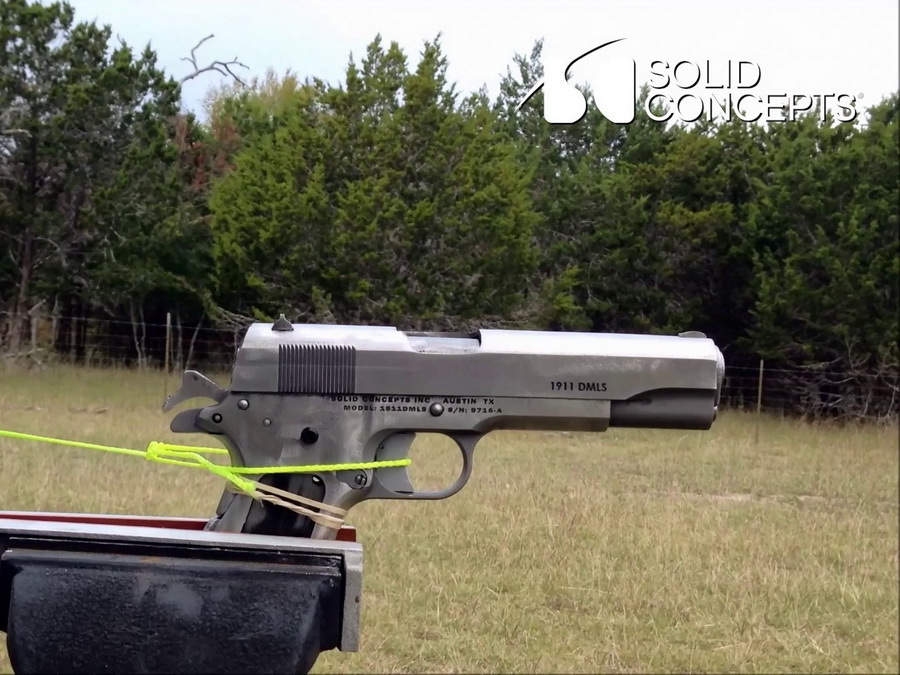
Prospects for printing weapons
The potential for 3D printing of firearms is far from exhausted. The expansion of equipment capabilities and the development of innovative materials indicate that in the near future such weapons may approach military weapons in terms of characteristics. In the future - a significant increase in the resource and the provision of automatic firing.
Significantly increases the reliability of printed pistols and carbines SLS technology using metal powder. Such weapons already differ little from the factory metal models. While it is very expensive, which significantly limits the application. However, over time, the material will become cheaper, which means it will become more affordable.
Printing firearms on a 3D printer has become a reality. Despite its extremely low performance and reliability, interest is growing in it. Experts predict that the printing of weapons will become widespread, and it is impossible to stop such production.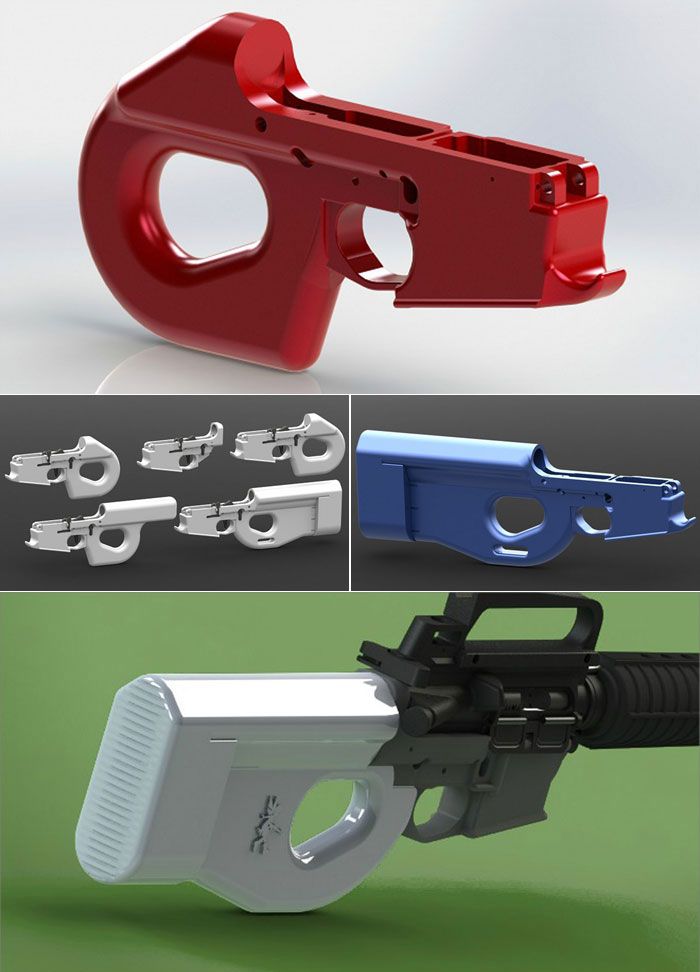 There comes a time when measures should be taken at the legislative level to establish effective control over this process.
- March 21, 2021
- 3660
Get expert advice
3D printer guns are back and unstoppable They anonymously share drawings, tips, and create their own community. And there is no easy way to stop them.
In the United States, a network of supporters of printing weapons on a 3D printer is growing again - but now everything is different. Unlike previous attempts to popularize weapons that can be printed on a 3D printer, this operation is completely decentralized. It has no headquarters, no trademarks and no leader. And the people behind it believe that this state of affairs guarantees the inability of governments to stop them.
"If they want to come after me, they'll have to find me first," says Ivan the Troll, a member of the group.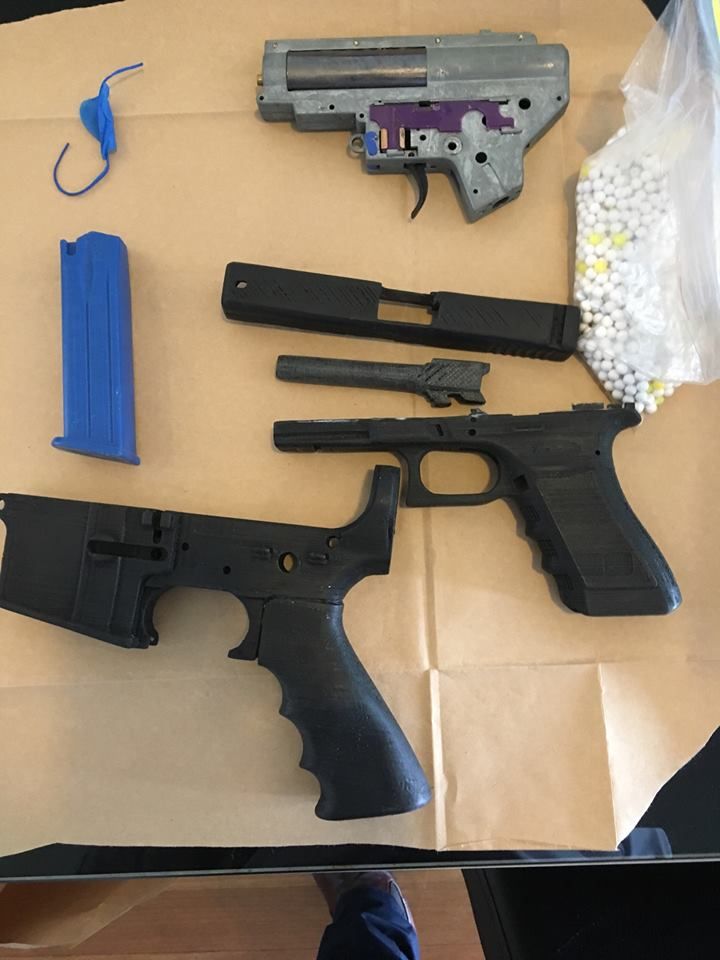 “I am one of many like-minded people doing this work.”
The troll Ivan is known only by his network pseudonym, and is the de facto representative of an underground organization of gunsmiths working on 3D printers. Ivan says he knows at least 100 people actively developing weapon 3D printing technology, and claims that thousands of people are involved in the network. And this loosely connected network spans the entire world.
They communicate on various digital platforms - Signal, Twitter, IRC and Discord. They critique each other's work, trade weapon CAD files, give advice, talk theory, and collaborate on new blueprints. Enthusiasts of printed guns - who share similar ideas and political views on gun control - mostly meet on subreddits and forums dedicated to this topic.
Ivan himself is only a small part of this network. He says he comes from Illinois and is about the age of a "college student," but otherwise keeps quiet about himself to keep his head down. In doing so, he launched some amazing commercials showing new handgun parts he printed out in his garage, including the Glock 17 pistol frame.0003
On the last video [ , the video is deleted from YouTube, but the videos can be found on other hostings / approx. transl. ] shows the Glock 17 resin frame in various stages of production in the workshop. The footage is sounded with fast synthwave music, and passed through a VHS filter for greater aesthetics. By the end of the video, Ivan fires several shots from a ready-made pistol, and the captions that appear at the same time read: "Anyone can do this", "Live free or die", "Let's try to stop this, you dirty etatists." He also uploaded a complete CAD model of the AR-15 assault rifle to a file sharing site. It is clear that Ivan is trying to provoke his detractors to the maximum.
In February of this year, Ivan and his group decided to call themselves "Distributed Deterrence" transl. ], which is an allusion to the name of the company Defense Distributed [distributed protection], which was previously headed by Texas crypto-anarchist Cody Wilson.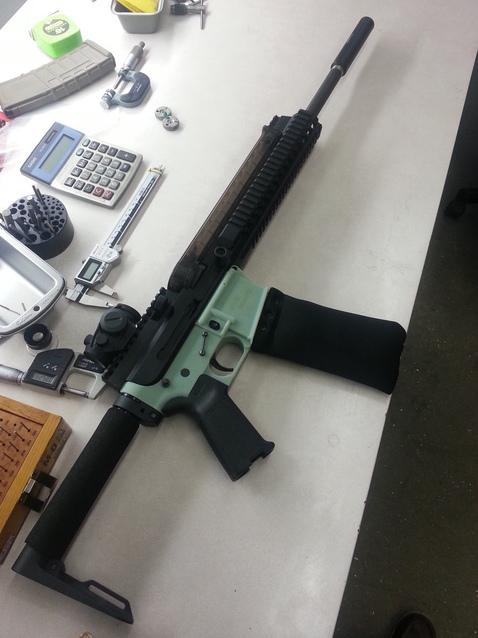
In September 2018, Wilson, aged 30, was arrested and charged with sexually abusing a minor. He allegedly paid $500 for sex with a 16-year-old girl in his hometown of Austin, Texas. Naturally, this arrest took Wilson completely out of the world of 3D printed guns. Many of the people who admired him were either disgusted or realized that his time had passed. He retired from Defense Distributed, which used to be the main driver behind 3D weapon printing, since its inception in 2012. Wilson was released on $150,000 bail, but hasn't been in touch since.
Defense Distributed has many other legal issues. Attorneys in more than 20 US states are currently suing the company - which has filed counterclaims - in an attempt to undo the company's win in court that allowed the company to upload and share 3D weapon blueprints online. All these processes are long and tedious (New York State just passed a law to ban 3D printed weapons).
But for Ivan's group, Deterrence Dispensed, none of that matters.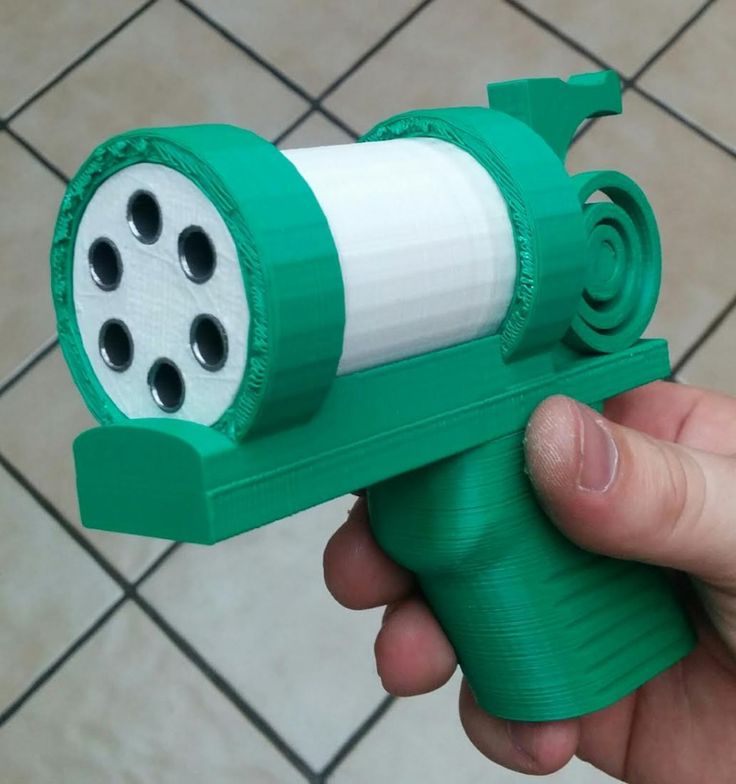 They upload their files singly to services like Spee.ch, a media hosting site powered by the LBRY blockchain, without waiting for anyone's permission. They themselves make blueprints for printing weapons, tweak old ones, and distribute all blueprints from Defense Distributed for free.
“Even if no government forbade me to do this, I think I would still do it,” says Ivan. “Some people enjoy video games, but I like to spend time drawing things in CAD.”
But Ivan doesn't just "draw things" in CAD. He's giving away files for free to help anyone with a decent Fused Deposition Modeling (FDM) 3D printer and certain tools build a working gun. Once the CAD file is downloaded, it is opened in a slicing program that translates the CAD files into instructions that the 3D printer can understand. After the parts are ready, they can be assembled, getting a fully working weapon.
The blueprints that Deterrence Dispensed shares with the world are so good, according to Ivan, that they are not just "working", they are of excellent quality. “Our AR15 model is the best available to the public without a doubt,” says Ivan.
Despite active antagonism with the authorities, Ivan has had no problems with them so far. His Twitter account was permanently shut down by Senator Bob Menendez of New Jersey, but so far, from the point of view of law enforcement and government, all has been quiet.
Ivan considers himself and other radical gun printing groups like FOSSCAD to be hobbyists who want to do something “wrong”. He believes that the problems of 3D printing weapons are overblown. He points out that while printable gun parts can be used to kill people, homemade guns have always existed and are probably more lethal. From his point of view, all this hysteria and backlash is directed to the wrong address.
"Trust me as a gun maker. A semi-automatic shotgun is 100 times easier, faster and cheaper to make than a regular pistol. I can go to Home Depot and buy a shotgun for $8."
In 2019, 156 people have already died in mass shootings in the United States, and in principle, the number of deaths related to weapons is a 20-year high. In March, a terrorist armed with two semi-automatic rifles and two shotguns killed 51 Muslims in Christchurch, New Zealand. Does the US (and the rest of the world) need more weapons in these circumstances, homemade, printed or otherwise? Ivan thinks so.
“The police killed more people last year than were killed in all the mass shootings in the last 10 years,” he says. “We in America live in a society where there is always the risk that a cop will shoot your ass off for nothing. And you don't even have to pose a threat to him. A cop can kill you just because he wants to, and he can get away with it."
He cited numerous examples of policemen shooting at unarmed black Americans, especially Steven Clarke. Clark, 22, was shot and killed by police in his garden with only his cell phone in hand. “I think it’s extremely important that everyone has the opportunity to have a gun,” Ivan continued. “Everyone should have the same legal options as the cops using them to control you.”
However, the facts are undeniable.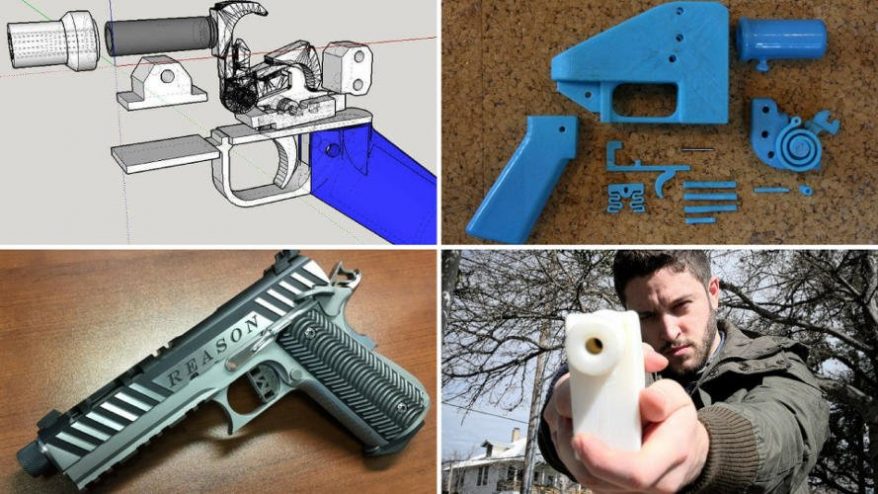 Slightly more than half of deaths from firearms occur in six countries, incl. in the USA. And analysis from Harvard University shows that the more guns there are, the more murders there are.
Opponents of weapons, of course, are not satisfied with the concept of a downloadable pistol. Avery Gardiner, one of the presidents of the Brady Campaign, said that 3D-printed weapons "pose the greatest threat to our security." Following the court ruling in August, Gardiner said, "There is already a wave of dangerous individuals trying to illegally post blueprints on the Internet."
Members of this decentralized 3D printed weapon society are often motivated by a mixture of libertarian views and the pleasure of designing and creating tangible items as a hobby. They upload drawings to the Internet, share them, improve diagrams and make it easier to print, while remaining out of sight. Ivan states that he does this for the love of freedom and radical adherence to the first two amendments to the US Constitution: freedom of speech and freedom to bear arms.