3D printer squeaking
Why Is Your 3D Printer Squeaking? 5 Common Causes – Printing It 3D
3D printers have only become an economical option for crafters in the last few decades. If you are fortunate to own a printer, you’ve probably already encountered a strange sound or two. While some squeaking may be a typical sign of operation, others can be indicators that something is interfering with your printing job.
Squeaking or grinding is usually due to parts rubbing up against one another. Some common causes include poor lubrication in the Z-axis rod, misalignment with the extruder idler gear, poor lubrication with the X-axis idler pulley, an issue with the fan, or problems with the filament feeder.
In this article, I’ll discuss some of these causes as well as ways you can fix these common problems. Let’s get to it!
5 Common Causes of 3D Printer Squeaking
The most common problem with squeaking is usually a poorly lubricated or loose component. Examine your printer thoroughly to ensure nothing’s out of place before trying the suggestions on this list. You may also want to attempt to identify where the squeaking is most likely originating on the printer.
1. A Poorly Lubricated Z-Axis Rod
The Z-axis rod of a 3D printer is the portion that runs along the vertical axis of the project. As the object forms, this rod moves up and down, aligning the layers one above the other. This function is essential for the detail and structure of the project.
In some models, when the threaded Z-axis rod isn’t sufficiently lubricated, it can start sticking and grinding. Lubricating and adjusting the problem is relatively simple. You’ll need some PTFE-based grease to get started.
You can either use a lint-free rag or your fingers. You’ll need to smear the grease into the grooves and along the threads of the rod. Try to spread the oil across as much of the Z-axis rod as you can reach for maximum effect.
As part of this process, check to ensure that the nozzle isn’t grinding along the printer bed. Sometimes, issues with the Z-axis can cause these two surfaces to rub together. If this turns out to be the case, you may need to recalibrate those parameters.
2. The Extruder Idler Gear Is Misaligned
If your printer uses the dual drive system, you may not run into this problem. For printers that utilize the standard single-grip extruder, a misalignment can cause squeaking and grinding.
When the extruder idler gear is misaligned, there could be resistance against the metal casing or other components. As the gear turns, it scrapes away at these surfaces, causing the squeaking sound to erupt. The grinding can also damage various parts of the extruder if not addressed.
To fix the problem, remove the casing and check that the gear set rolls smoothly without resistance. The gears should line up cleanly. If your printer uses a bearing idler wheel, ensure that the wheel isn’t over tightened or stiff, as this can also cause problems in the system.
3. Poor Lubrication in the X-Axis Idler Pulley
The X-axis idler pulley moves the belt across, from left to right. If not well lubricated, there could be sticking and grinding as the pulley battles friction to shift the belt.
To address this problem, take some PTFE-based grease and apply it to the dowel inside the pulley. Move the pulley from left to right to help spread the oil over the full range of the system.
While the rest of the systems don’t usually require lubrication, you may also want to check the timing pulley at the other end as well as the belt that shifts back and forth during printing.
4. A Loose or Misaligned Fan
If the fan is loosened or misaligned, it can grind up against different portions of the printer or even your project itself. A loose fan can also emit a squeaking whine due to dirt and dust finding their way inside.
In this case, you should access the fan and either readjust or tighten the device. The fan should be securely seated and not rub up against the walls or other components. You can play with it a little bit, running the printer to see if minor adjustments help with the noise.
Sometimes the fan may also have a faulty bearing. If the blades seem to be getting stuck or struggling to spin, you can add a tiny bit of oil directly to the bearing to reduce friction.
The bearing of the fan is an important part. If this doesn’t remedy the problem, you may want to contact customer support for your particular model and request a replacement part.
5. Issues With the Filament Feeder
The filament may sometimes cause squeaking sounds in your printer. If bits and pieces of filament get caught in the extruder, they can create resistance and friction. Cleaning the extruder regularly can help prevent this problem.
Other times the filament feeder may be too far away from the printer. As the filament goes back and forth, there’s a tension that rubs the filament against the plastic of the feeder creating friction. That friction emits the squeaking sound.
You can fix this problem by placing the feeder closer to the printer to reduce the tension. Alternatively, you can buy or create a different spool for the feeder. Buying or 3D printing a guide that you can place on the side of your printer can also help direct the filament from a different angle so the thread doesn’t get caught on the plastic.
Final Thoughts
Most of the time, your 3D printer squeaks because of friction between two components. The key is to determine which parts are grinding up against each other and reduce the friction between them. A few common causes of squeaking include:
- Poor lubrication of the Z-axis rod or the X-axis idler pulley.
- Problems with the placement of the filament feeder.
- A sticking or whining printer fan.
- Misalignment with parts of the extruder.
If you’re uncertain about making any of these adjustments yourself, consider contacting a professional to provide further help.
How to Fix Grinding & Squeaking Noise in Y & Z-Axis – Ender 3 – 3D Printerly
3D printers are mechanical machines that have many moving parts, which can unfortunately create grinding noises in some cases.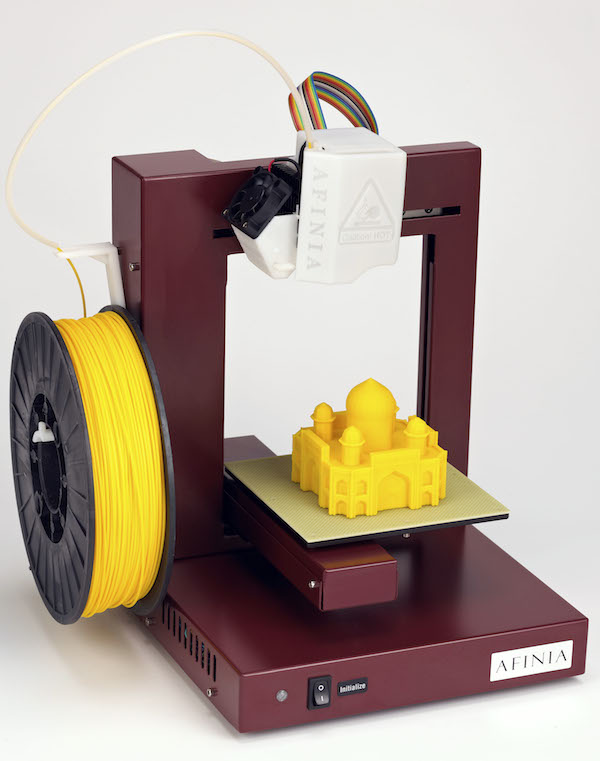 This article will help you to understand why these noises can happen and how to fix them.
To fix grinding or squeaking noises in your Y & Z axis, make sure your stepper plugs are plugged in fully in the motors. Lubricate your moving parts such as the leadscrew and loosen any belts or bolts that are too tight. Ensure your 3D printer isn’t accumulating too much dust and adjust your eccentric nut if too tight.
There’s more information that you’ll want to know about fixing this issue so keep on reading for more.
Why Do Grinding Noises Happen in the Y & Z Axis on a 3D Printer?
There are quite a few reasons why you might get grinding noises in your Y & Z axis, as well as around your 3D printer. Here’s a list of causes that many users have experienced:
- Stepper plugs not seated correctly in motor
- Lack of grease or lubrication in moving parts
- Motor cables damaged or crimped at the ends
- Belts are too tight
- Bolts & screws are too tight
- Issues with motors
- Uneven parts such as extruder idler arm
- Significant accumulation of dust within the 3D printer
How to Fix Grinding Noises in Y & Z Axis on a 3D Printer
- Seat the plugs and cables of the stepper motor properly
- Apply oil or grease to moving parts
- Check any damaged cables and replace them
- Loosen any belts that are too tight
- Loosen any bolts & screws that are too tight
- Change your motor cables around to identify faults in specific motors
- Check the frame of your 3D printer is level as well as other parts
- Clean out any accumulation of dust and debris
Seat the Plugs and Cables of the Stepper Motor Properly
One fix for grinding noises in your 3D printer’s Y & Z axis is to simply push in the plugs/cables into your stepper motors. Sometimes these cables aren’t inserted properly or might get caught on something and slightly come out, leading to grinding noises.
A user who had grinding noises mentioned that one of his stepper plugs wasn’t seated correctly in the motor. One of the motors was moving fine but the other wasn’t turning correctly until the movement of the bed drove it, so after sorting this out, the problem got fixed.
Make sure your cables aren’t loose and are fully inserted into the port.
Check out the video below by clicking the title for the sound a stepper makes when it’s not getting the right signals (it’s pretty loud).
Z axis not moving 🙁 makes a horrible grinding noise and then does not move anymore. z axis is stock parts. The stls are piling up and I can’t print anything D: from ender3
Apply Oil or Grease to Moving Parts
Some people might experience a grinding noise in their 3D printer due to a lack of lubrication in moving parts. One of the key parts you want to lubricate is your leadscrew and any rods on your 3D printer since there is metal to metal contact.
You can use something like DuPoint Teflon Non-Stick Lubricant Aerosol Spray from Amazon or the Super Lube Silicone Grease with PTFE. You should be lubricating your 3D printer around every 3 months for maintenance.
Check the video below for a simple guide on lubricating your 3D printer.
There may be a build up of dirt and grime on your leadscrew which you’ll want to clean up properly.
For some of your linear bearings that ride on the leadscrew, you want to ensure it has a good amount of grease on it, and you might even want to take it apart, lubricate the bearings, then put it back together.
Check Any Damaged Cables and Replace Them
Another fix that has worked for some users is to check any damaged cables that connect to your motor and motherboard, then either fix them or replace them.
One user described how one of his motor cables was badly crimped at the motherboard end, so he soldered the broken wire on the crimp and solved his grinding issues.
The connection between your board and the motors should be satisfactory.
Loosen Any Belts That are too Tight
Your belt could be causing your grinding noise issue, so loosening up any belts that are too tight can be your fix. For example, someone described how their X-axis pulley system was too tight which caused movement issues.
They ended up loosening the belt significantly and it worked to fix the grinding noise. He mentioned that there wasn’t the greatest instruction for tightening his belt so he said it should be just tight enough where there is no slack.
Check out my article called How to Properly Tension Belts on Your 3D Printer for more info.
Loosen Any Bolts & Screws That are too Tight
Many users mentioned that they fixed their grinding noise by loosening up bolts and screws in certain places on their 3D printer. One example on a Prusa is the U-bolts that hold the bed to the bearing. If you overtighten these, they can create a lot of noises while printing.
They should be just tight enough where your bed doesn’t wobble and is loose enough where there isn’t extra pressure on the linear bearing. Even if it’s a little too tight, it can deform your bearing and cause a grinding noise, so make sure you have this right.
Another area where tight bolts can cause a grinding noise is with the leadscrew. On the bracket where the rod or leadscrew goes through, there will be two screws at the top of the bracket. When these are too tight, it can cause a binding in the system leading to a grinding noise.
One user that loosened these two bolts slightly (about one turn) fixed the issue of the grinding noise in their 3D printer.
You should also make sure that other bolts around the printer aren’t loose, so tighten those up. Check that your wheels can move freely and aren’t stuck, creating more pressure on the motor to turn.
Check out the video below by YouTuber NK3D who solves this issue by loosening the screws with an Allen Key to solve this.
The video below is what the user recorded to show the sound.
They got told by Prusa Support to loosen the four screws that hold the fan in place and it actually solved their noise issue.
Change Your Motor Cables Around to Identify Faults in Specific Motors
The issue could be with your motor or motor cables. Many users have described how they switched the cables between two of their motors like the Y & Z ports to identify if the motor cables had an issue.
One user turned the 3D printer off, did the cable switch of the Y & Z axis, turned on the printer, moved the Y position from the control screen, turned the 3D printer off then switched the cables back. This actually fixed their issue of a grinding noise in their 3D printer.
It really depends on what your cause is but this could be your potential fix. Here’s a basic video showing a visual on switching the cables around.
Try to figure out exactly where the grinding sound is coming from. If the Z-axis is working fine for example, then you know the Z motor and Z wire is working, then you can check if it’s coming from the Y motor, Y wire, or if it’s related to the mainboard Y controller.
If you connect the Z-axis wire to the Y-axis stepper motor, then send a command to move the Z-axis, if you notice the issue happens still, then you know the issue is with the motor since we know the Z-axis wire works fine. You’ll probably need a new motor in this instance.
You can get something like the Creality 42-40 Stepper Motors from Amazon.
If you find that the Y-axis motor moves fine without the grinding noise, it means that the problem is either coming from the Y wire or there is an issue with the mainboard-related Y controller.
To check what the specific issue is, you want to open up the mainboard case and swap the wires between Y & Z on the mainboard. This means your Z-wire is connecting the Y motor to the Y port.
You can then control the Y-axis movements on the control screen, and if the Y motor still doesn’t work properly, it means you have a mainboard issue since the Z wire is still okay.
Vice versa, if the Y motor is working properly, it means you have a Y wire issue which you want to look into. The three main things to check is the wires, the motors, and the mainboard which you want to check one after the other.
Sometimes your motor might not be getting enough power so if you have a multi-meter, you can check the potentiometer carefully to see how much output you are getting.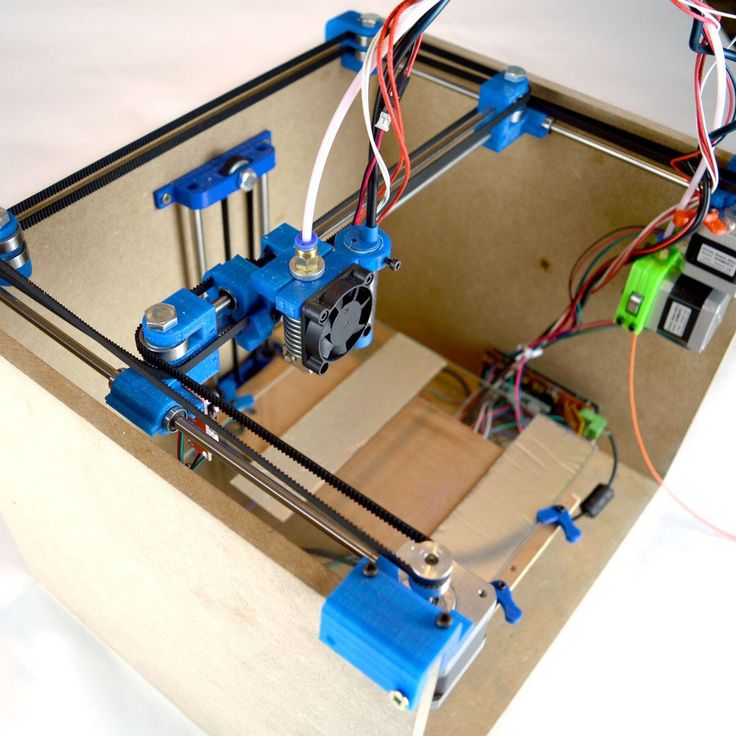 This can be quite dangerous if you haven’t got experience, so be cautious.
Check the Frame of Your 3D Printer is Level as well as Other Parts
Another reason for the grinding noise in your 3D printer could be to do with the hardware, especially the leveling of the frame and other parts.
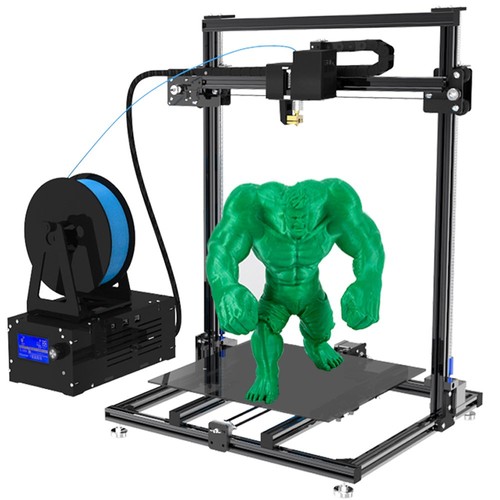
A user who has the Artillery Sidewinder X1 V4 had an issue with their extruder idler arm being higher on one side, creating extra force and pressure which created a grinding noise. They basically balanced the level of the arm and noticed that a lot of the sound was reduced.
After that, they re-adjusted the arm along with putting the belt back on properly and the noise got fixed.
Another thing you want to look into is the frame of the 3D printer, ensuring it is level on both sides.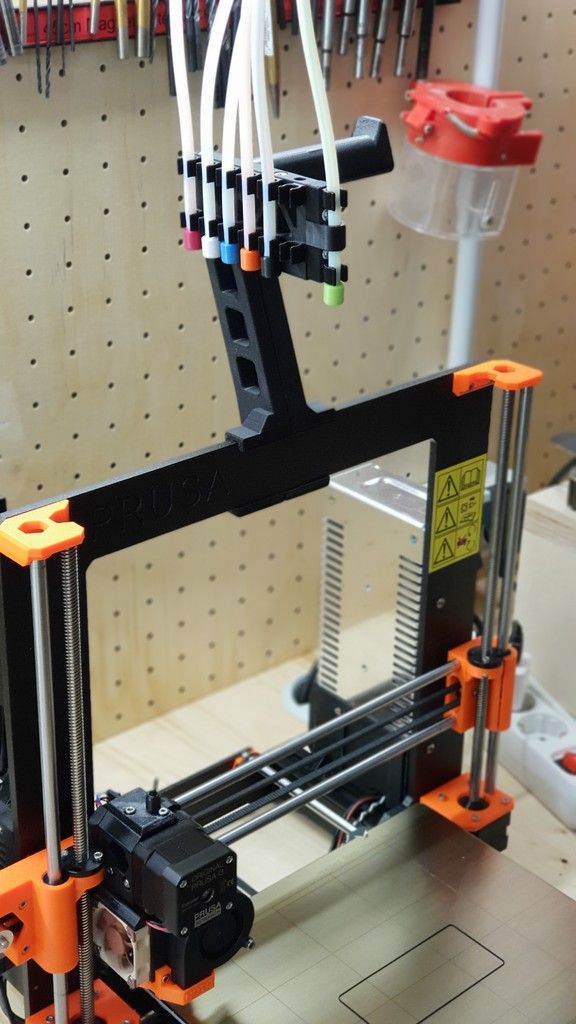
Why Do Screeching Noises Happen in the Y & Z Axis?
- You don’t have a silent mainboard or silent stepper drivers
- Filament had bad curves or bends in the extrusion pathway
- Your printing temperature is too low
- Eccentric nut is creating a tight connection with the frame
- Z-axis is not lubricated well enough
- Not using noise dampeners to reduce sound
- There is loose debris caught in your fan or extruder
- Low current on your stepper motor
- There’s metal-to-metal contact somewhere
- Bad linear bearings
How to Fix Screeching & Squeaking Noises in 3D Printer
- Get a silent mainboard
- Use a filament guide to fix bad filament pathing
- Raise your printing temperature
- Screw in eccentric nuts if they are too tight
- Lubricate the Z-axis so it can move more freely
- Use feet dampeners to reduce noise
- Clean out loose debris from your fan
- Increase the current on your stepper motor
- Adjust any parts where metal rubs against metal
- Replace linear bearings with better ones
Get A Silent Mainboard
One of the key reasons why your 3D printer might have a squeaking or screeching sound is due to the stepper motors running when you don’t have a silent mainboard. This happened to me when I got my first 3D printer which was an Ender 3.
These have quite outdated motherboards that don’t have a silent driver, meaning the stepper motors get really noisy. This one is simply fixed by getting yourself a silent mainboard like the BIGTREETECH SKR Mini E3 V2 with TMC2209 Drivers from Amazon for example.
Use A Filament Guide To Fix Bad Filament Pathing
Another key reason that many users figured out for the squeaking noise in their 3D printers was due to friction from the filament moving through the extruder.
One user mentioned it could be from your filament rubbing on the sides of the extruder tensioner as it feeds through. They said it doesn’t happen constantly, but when they push the filament to the side, it starts to happen again.
A few different things could be happening here. One is where there is added pressure needed to pull the filament through the extruder since the filament is bending at difficult angles, so the stepper motor has more stress, causing these noises.
It could also be due to your printing temperature not being high enough so filament isn’t getting soft enough to extrude nicely.
To fix this, make sure your filament doesn’t have any sharp bends or curves while going into the extruder and through the PTFE tubing to the hotend.
I’d recommend 3D printing a filament guide to help your filament feed through nicely.
Someone else mentioned that it happened when they 3D printed with PLA rather than ABS, so it would have been a friction issue between the extruder and the filament.
After updating their 3D printer’s firmware to Klipper, one user started to have this creaking noise issue. They figured out that it was filament scraping against the edge of their aluminum extruder arm hole.
You can try putting pressure on your extruder lever to see if it quietens the noise, and if it does, you know it’s happening at the extruder.
They had a poorly positioned filament guide (the one to stop filament hitting the leadscrew) which forced their filament in at a weird angle.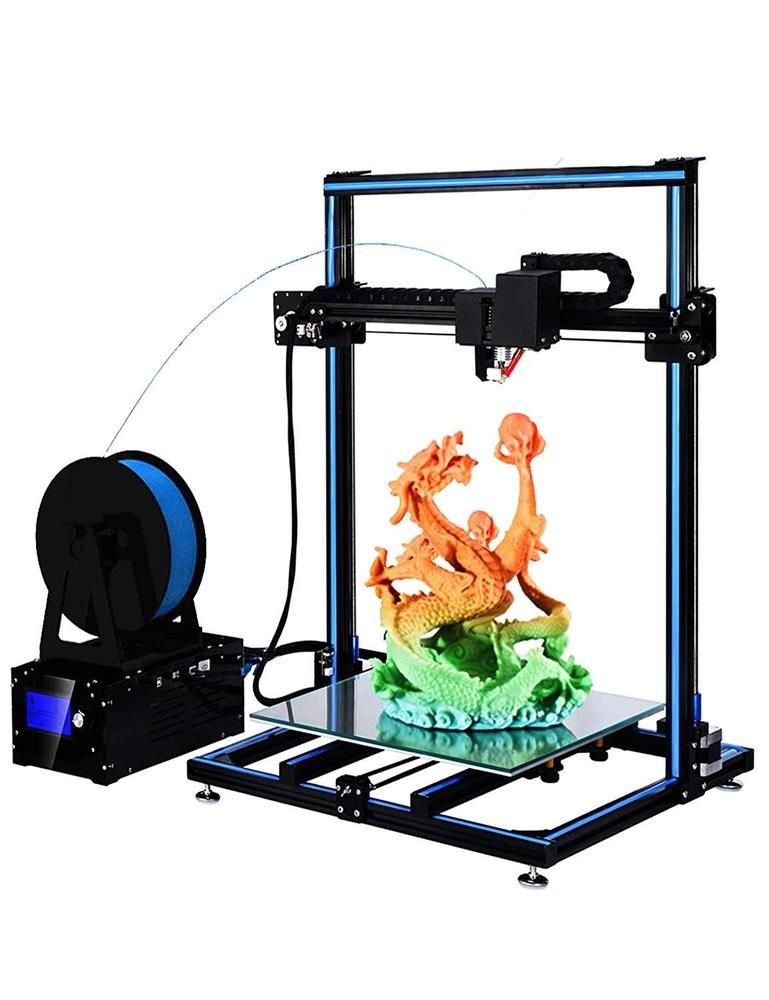
They ended up 3D printing this filament guide instead to fix the issue.
Raise Your Printing Temperature
As previously mentioned, you can potentially fix this noise issue by raising up your printing temperature if your filament extrusion is the cause.
One user who had this issue said that the fix in his case was raising their printing temperature by a few degrees, so this is definitely worth trying since it’s a fairly quick fix.
Screw In Eccentric Nuts If They Are Too Tight
You could be getting your squeaking and screeching noises from the bed moving around on the Y axis.
It may be an issue with the eccentric nuts being too tight which is causing a lot of pressure on the axes when moving around.
Try to manually move all your axis to see if they move freely, trying different heights for the X axis carriage. The video below shows you the experience of someone who had the same issue. They fixed it by adjusting the eccentric nut below the print bed.
Lubricate The Z-Axis So It Can Move More Freely
These noises can definitely happen due to a lack of lubrication, meaning the 3D printer parts can’t move freely. Simply apply some lubricate to the Z-axis leadscrew and move it up and down a few times so the oil or grease can travel throughout.
As previously mentioned, you have two great options:
- DuPoint Teflon Non-Stick Lubricant Aerosol Spray
- Super Lube Silicone Grease with PTFE
Use Feet Dampeners To Reduce Noise
It’s possible to significantly reduce the sounds your 3D printer is making by simply upgrading it with feet dampeners, which can be 3D printed.
Many comments mention that it’s their best inexpensive upgrade they’ve done on their Ender 3, reducing noise significantly. Another person said they were skeptical about them, but after putting it on their 3D printer, it made a massive difference in noise.
Someone was thinking about getting a silent board, but with these, they reconsidered since it helped out so much with the noise.
Clean Out Loose Debris From Your Fan & Extruder Gears
One cause of a squealing sounds could be if the fan catches some loose debris or filament from the print.
One user was experiencing a squeaking noise in their extruder and figured out that it was due to loose pieces of filament being cause in the extruder gears.
Simply clean out loose filament or debris in extruder gears, as well as in the fan. I’ve had some weird noises from my 3D printer’s hotend, only to find out that there was a piece of filament getting caught between the fan blades. After cleaning it out, the noise was gone.
Another user who was doing some cold pulls and ended up indirectly cleaning out pieces of filament from the extruder. After looking at the extruder housing by loosening it up, they found more pieces of filament there which they cleaned. After doing this, the squeaking noises stopped.
Increase The Current On Your Stepper Motor
This fix is quite similar to the bad filament pathway since it increases the load on the stepper motor. When you have a low current travelling through your stepper driver, it can create a screeching noise, though a less common reason.
Again, check out the video below for adjusting your stepper voltage, but be very cautious because doing this can be dangerous if safety precautions aren’t taken.
Adjust Any Parts Where Metal Rubs Against Metal
One user figured out that the squeaking noise from their 3D printer was happening due to a bed adjustment bolt that rubbed against the frame. You want to identify where the sound is coming from then try to resolve it.
They simply adjusted the bolt so that the metal wasn’t rubbing against another metal part, leading to the solving of their noise issue.
Replace Worn Out Fan Bearings & Fan Blades
A less common reason that I found out was from your fan’s bearings being worn out. If you find that this is your issue, simply replace the fan bearings with some new ones and this should solve the problem.
Sometimes you might get a damaged fan blade which will have to be fully replaced.
If you are 3D printing in a fairly dusty place, your fans are more likely to die out quickly, so keep this in mind. Luckily, fans are pretty cheap and simple to replace.
Some people have actually recommended adding some thin sewing machine oil to the fan’s bearing to increase the life of the fan. They mentioned that they have done this as a solution to computer fans for over 10 years.
Replace Linear Bearings with Better Ones
One user who noted the issue of screeching in the linear railings and bearings in the Prusa i3 stated they found that replacing their stock linear bearings with Igus Drylin Bearings did the trick.
They also recommended using white lithium grease, and only a tiny amount on the linear bearings to completely eliminate the possibility of screeching.
3D Printer Review UP! Mini
3D printers have long ceased to be expensive, bulky and noisy devices used only in industrial production, various institutions and large companies. Printing and modeling three-dimensional objects at home no longer requires high costs and in-depth knowledge. There are many types of 3D printers now: self-assembly kits, expensive European and American 3D printers, high-precision 3D printers with a large print area, for jewelers and dentistry, etc. But among all the models available and with stable high print quality, there are not so many. One of them, compact and elegant - 3D printer UP! mini.
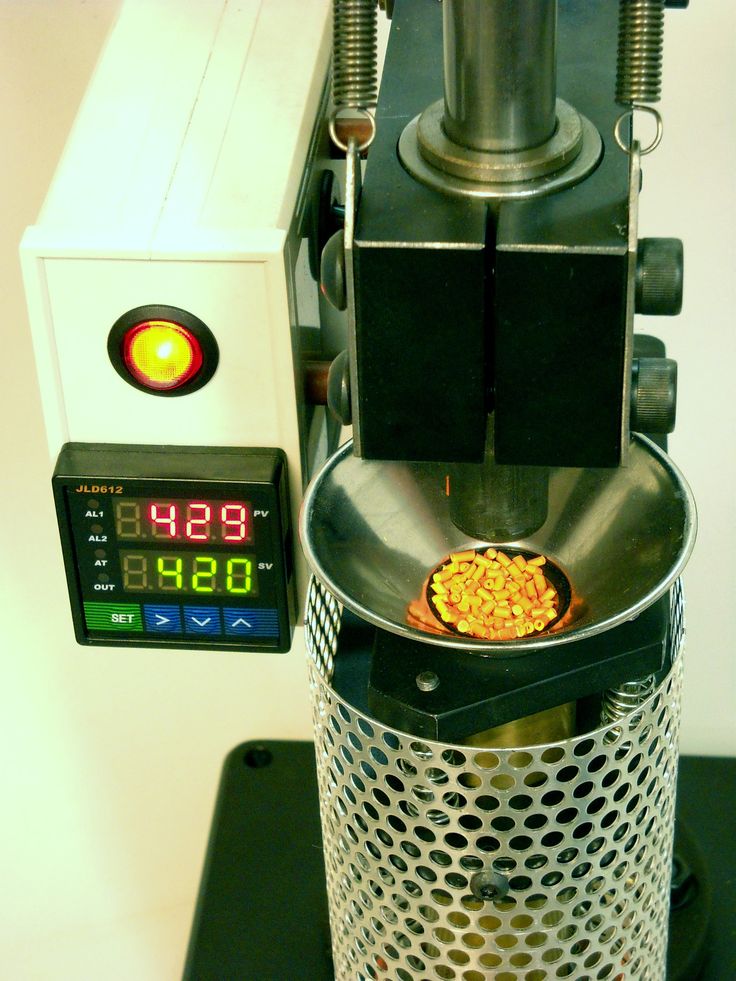
The Mini has been on the market since 2013 and is still one of the best compact 3d printers around. Model UP! Mini - developed by PP3DP. Because Since PP3DP is part of Tiertime, a large Chinese corporation that produces industrial 3D printers, you don’t have to worry about build quality and reliability.![]() Serious production control and the absence of marriage are confirmed by numerous world awards, including the authoritative MAKE magazine for the best printer in the "get it and print" class.
Serious production control and the absence of marriage are confirmed by numerous world awards, including the authoritative MAKE magazine for the best printer in the "get it and print" class.
Design
UP! Mini is a closed chamber 3D printer that has a positive effect on print quality, filters possible unpleasant odors, reduces the noise of moving parts inside the printer, and protects you and your children from burns if you accidentally touch the nozzle or 3D printer platform. With a modern design, UP! The Mini looks more like a coffee machine or something like that, rather than a modern machine that prints three-dimensional models from plastic.
Another advantage of this model is the patented perforated working surface of the platform with Teflon coating. Thanks to it, adhesion increases, stability and a stable position of the printed model increase. You do not need to spend money and time on the purchase of special coatings: adhesive tape, glue, varnish, special film, etc. which are widely used on many 3D printers from other manufacturers.
Getting Started
UP! Mini does not require you to seriously and deeply study the instructions for assembly, configuration and calibration. All you need to start printing is to take the printer out of the box, install the spool of plastic and the build platform, and start printing. Everything you need to run your 3D printer smoothly is included. Together with the device you get: a spare platform, a plastic coil and special tools for setting up and maintaining the device.
Sizes UP! The Mini is only 240 x 340 x 355 mm and weighs 6 kg. As mentioned above, according to these parameters, the device rather resembles an elegant and stylish household appliance that will complement and decorate your interior. With this in mind, you can safely place it anywhere in your home or office.
UP! Mini uses its own software, which any user can understand, the program is simple and intuitive, fully Russified and allows you to change and customize:
- Print speed
- Material type
- Percentage of material filling of the internal cavities of the model
- Scaling and rotation of the model
- The operating temperature of the extruder and platform.
- Size, type of supports and rafts
Or just select the type of plastic and start printing, all other values recommended for this type of plastic, the program will change on its own. All current operating systems are supported - Windows from XP to 8.1, and Mac OS X.
One of the main advantages of the UP 3d printer! Mini - is the presence of the "Pause" function, when during operation you can pause printing, replace the material and continue printing with a different color, which allows you to create bright and multi-colored models.
Getting started
So, you have connected the printer, loaded the model into the program and start printing.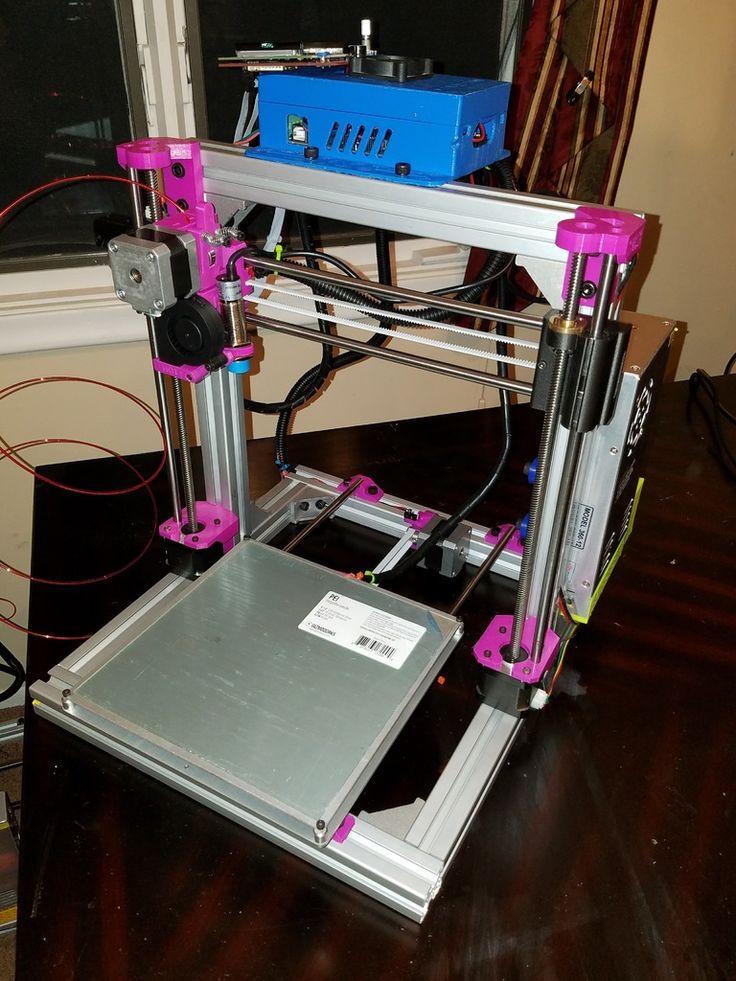 After sending the model for printing, the printer will need some time to load and prepare the virtual model for printing, the extruder and platform heat up, the layers of the model are calculated programmatically. After starting printing, you can safely disconnect the computer from the printer, then the printer will work autonomously.
Worktop size UP! Mini - 120x120x120mm. very good figure for such a small 3d printer. And don't let those numbers scare you, you can always print a large multi-part model. Special programs allow you to divide your virtual model into components already prepared and configured for 3D printing, print, and then glue. We recommend this method due to the fact that when printing on devices with a large print volume, any power outage, power surges, or suddenly running out of plastic will stop the printer and printing, which took several hours, will have to start over.
Maximum print resolution UP! Mini - 200 microns, or 0.2 mm. On our own, we add that due to the special closed design, uniform heating of the surface and the extruder, visually the models look comparable to those produced on 3D printers with a higher resolution (for example, 150 microns) and an open circuit. And do not forget that the higher the resolution, the longer it will take to print. For example, printing a model on printers with a resolution of 20 microns will take 10 times longer.
UP! Mini uses the most common consumables ABS (Acrylonitrile Butadiene Styrene) or PLA (Polyactide). But thanks to the heated bed and high extruder temperature, you can print flexible, engineering and decorative plastics. The printer comes with branded plastic, but you can use third-party plastics without loss of warranty and quality, the only condition is a diameter of 1.75 mm.
When UP! The Mini emits a short, rather loud and unpleasant squeak, but this is where all the unpleasant things from the printer end - both in terms of smell and noise from it, as expected, no problems. The printing process is monitored visually by the color of a single button. The backlight of the button changes color depending on the stage.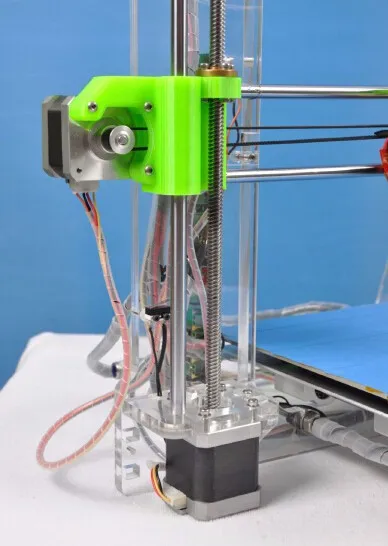 And thanks to the backlight inside the case, you can observe the printing process without opening the printer door.
Output
UP! Mini is a full-fledged and serious device, perfect for both a beginner and an experienced professional. If you don't want to tinker with assembling, setting up, modifying the device, adding additional components, then the UP! Mini just for you. With a closed, safe design, no odors, and low printing noise, the UP! Mini is ideal for educational institutions, or use at home.
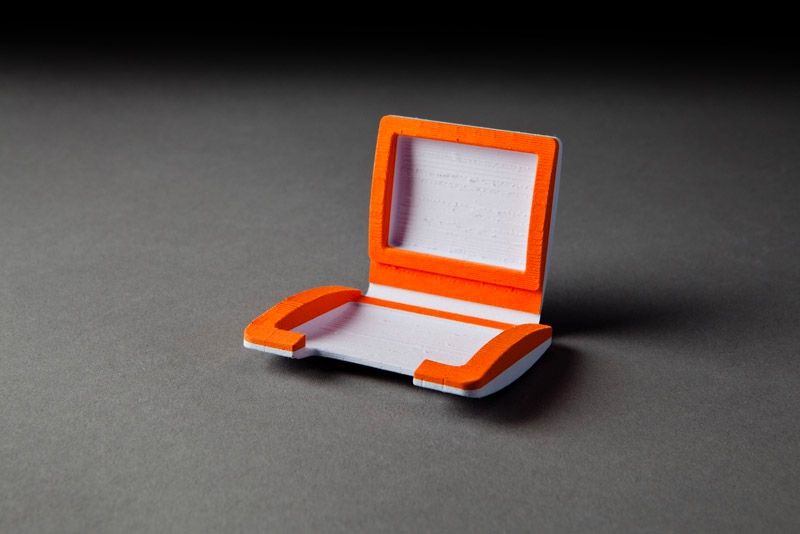
The best 3d printer is a device that quickly builds a given part. The device allows you to create cases for your smartphone, toys, dishes, etc. Suitable for home and business use.
Review of the best budget 3D printers for the home
These are inexpensive models with a minimum set of options. Create elements from different materials using different technologies.
Wanhao Duplicator i3 mini
Compact device with small print area. Can be used immediately after unpacking. To do this, just install the device, perform calibration. Compatible with various operating systems. Quickly creates the given element. Monochrome screen for easy parameter setting. The display shows information about the current process - nozzle temperature, percent complete, etc. Good cooling system.
Features:
- technology - FDM, FFF, PJP;
- design - open chamber;
- raw material - PLA;
- connection - USB, SD;
- speed - 70 mm/s;
- compatible with OS - Windows, MAC, Linux, Unix;
- dimensions - 325x380x240 mm;
- weight - 7 kg;
- price - from 14900 rubles.
Advantages:
- is completely ready for operation;
- easily connects to the operating system;
- securely holds the model;
- Includes glue stick.

Disadvantages:
- freezes periodically;
- poor quality table screw levelers;
- there is no Russian menu.
Creality Ender-3
A device with convenient control, high speed of model creation. Sturdy platform with even heating. Allows you to work without an adhesive coating. Printing can be paused with saving the settings, then resuming the process. Power supply with active cooling.
Characteristics:
- technology - FDM, FFF, PJP;
- design - open chamber;
- raw materials - ABS, PLA, Wood;
- connection - USB, micro SD;
- speed - 180 mm/s;
- dimensions - 440x465x420 mm;
- weight - 6.9 kg;
- price - from 16900 rubles.
Advantages:
- prints well;
- easy operation;
- wear parts;
- compact.
Disadvantages:
- noisy;
- is obsolete and needs to be upgraded.
TEVO Tornado
Repairable and upgradeable. Suitable for use by beginners. Easy control, simple settings. Can be used daily. Creates smooth elements of different dimensions. Large print volume. The titanium extruder ensures the high performance of the printer. Installed on any surface. Well implemented cooling system.
Characteristics:
- technology - FDM, FFF, PJP;
- design - open chamber;
- raw materials - ABS, Flex, PLA, PVA, Wood, PETG;
- connection - USB, SD;
- speed - 150 mm/s;
- compatible with OS - Windows, MAC, Linux, Unix;
- dimensions - 560x620x600 mm;
- weight - 11 kg;
- price - from 31700 rubles.
Advantages:
- quick assembly;
- easy to set up;
- strong, stable frame;
- can create large elements;
- is easy to reflash.
Disadvantages:
- airflow is poorly implemented;
- some accessories are made of plastic;
- The work table has a bad adhesive coating.

XYZPrinting da Vinci Junior Pro
A simple but functional device. Supplied with a memory card containing the software. If there is no suitable output on the computer, the software can be downloaded from the official website of the manufacturer. The backlight of the camera allows you to see the internal components. Ready for use immediately after unpacking. No manual calibration required. The cooling system works well, so the device does not overheat during operation.
Characteristics:
- technology - FDM, FFF, PJP;
- design - open chamber;
- raw material - PLA;
- connection - USB, Card Reader;
- speed - 40 mm/s;
- compatible with OS - Windows, MAC;
- dimensions - 420x430x380 mm;
- weight - 12 kg;
- price - from 38400 rubles.
Advantages:
- easy replacement of cartridges;
- security;
- easy operation;
- compact;
- no assembly required.
Disadvantages:
- limited type, material manufacturers;
- small screen.
Prusa i3 Steel
Easy to set up model. Small size allows you to install it on the desktop. The steel frame ensures accurate printing. Possibility of modernization. A clear step-by-step guide helps to quickly assemble the device. High quality cooling system. The medium print area allows you to make souvenirs, small toys, etc.
Characteristics:
- technology - FDM;
- raw materials - ABS, PLA, PVA, HIPS;
- connection - USB, SD;
- speed - 200 mm/s;
- compatible with OS - Windows, MAC, Linux;
- dimensions - 410x480x450 mm;
- weight - 11 kg;
- price - from 44800 rubles.
Advantages:
- low vibration;
- creates smooth models with a homogeneous structure;
- rich equipment;
- clear instructions;
- ease of use;
- rigid stable frame;
- good airflow.

Disadvantages:
- difficult to fix bar, SD card;
- The work surface takes a long time to heat up.
Geetech A10M
Multi-color maker. The mixer allows you to mix material of different shades to simulate elements with gradients. Can be used by beginners at home. Firmware update via internet. High print speed. The finished part fully complies with the specified parameters. Convenient control panel with source open source. System for resuming an interrupted process.
Characteristics:
- technology - FDM, FFF;
- raw materials - ABS, HIPS, PETG, PLA, PVA, Rubber;
- connection - USB, SD;
- compatible with OS - Windows, MAC, Linux;
- dimensions - 530x470x230 mm;
- weight - 8.8 kg;
- price - from 27000.
Advantages:
- wide platform;
- printing precision;
- ease of use;
- large touch display;
- forms products from different materials.

Disadvantages:
- components fail quickly;
- slow operation.
FlyingBear Ghost 4S
High performance device. Uninterrupted supply of plastic. Connecting to a computer via Wi-Fi. In the event of a power outage, the settings are saved. The process is resumed with the given parameters. Automatically deactivated after completion of work. Forms elements with complex geometry. Smooth surface details. Wear resistant components. The all-metal frame provides stability on the basis.
Characteristics:
- technology - FDM;
- raw materials - PLA, ABS, TPU, Wood, HIPS;
- connection - Wi-Fi, USB, SD;
- speed - 150 mm/s;
- compatible with OS - Windows, MAC;
- dimensions - 392x342x420 mm;
- weight - 15 kg;
- price - from 35000.
Advantages:
- ease of operation;
- large touch screen;
- many functions;
- easy setup.
Drawbacks:
- mediocre assembly;
- Poor blower system.
Anycubic I3 Mega
Compact device suitable for creating flexible elements. The heated work surface allows you to easily remove finished products after cooling. The material feeds smoothly for accurate printing. Can be used immediately after unpacking. Solid, secure platform. Rigid metal frame guarantees stability. Good adhesion of the first layers ensures a clear creation of figures. The touch display displays the set parameters. The screen provides access to settings, real-time operation control. Power failure protection system.
Characteristics:
- technology - FDM/FFF/PJP;
- design - open chamber;
- raw materials - ABS, PLA, Wood, HIPS;
- connection - USB, SD;
- speed - 100 mm/s;
- dimensions - 405x453x410 mm;
- weight - 11 kg;
- price - from 23800 rubles.
Advantages:
- accurate printing;
- works out of the box;
- color screen;
- updated table;
- good adhesion to the substrate;
- easy operation;
- easy setting.

Disadvantages:
- start-up squeak;
- smell of plastic;
- noisy.
Tevo Tarantula Pro
Budget model that works with different materials, including soft ones. Quickly forms an element. Smooth uninterrupted supply of plastic. Wide opportunities for modernization. Original design. Small dimensions, so the installation of the device does not require a lot of space. Suitable for creating large figures. The frame is not strong enough. This suggests that problems may arise during operation. To avoid their appearance, you need to securely fix the device on the countertop.
Characteristics:
- technology - FDM, FFF, PJP;
- design - open chamber;
- raw material - ABS, Flex, Nylon, PLA, PVA, Wood, ASA, HIPS, PETG, PP, SBS, POM;
- connection - USB, USB Type A, SD;
- speed - 150 l/h;
- compatible with OS - Windows, Linux, Unix;
- dimensions - 434x504x333 mm;
- weight - 8.
 5 kg;
5 kg; - price - from 18900 rubles.
Benefits:
- large print area;
- compact;
- powerful power supply;
- quick work;
- uniform platform heating;
- well implemented cooling system.
Drawbacks:
- cheap parts;
- requires installation on a hard surface.
Top of the line models for small and medium businesses
These devices help organizations increase productivity, increase revenue. High speed, advanced functionality.
Zortrax M200
Semi-professional instrument with open housing. Platform with auto-calibration, uniform heating. The built-in Wi-Fi module allows you to connect devices without the use of wires. Large print area. Additional features to improve the product forming process. Automatic deactivation of the device when the material runs out.
Advanced cooling system. The built-in camera allows you to watch the creation of figures from a computer.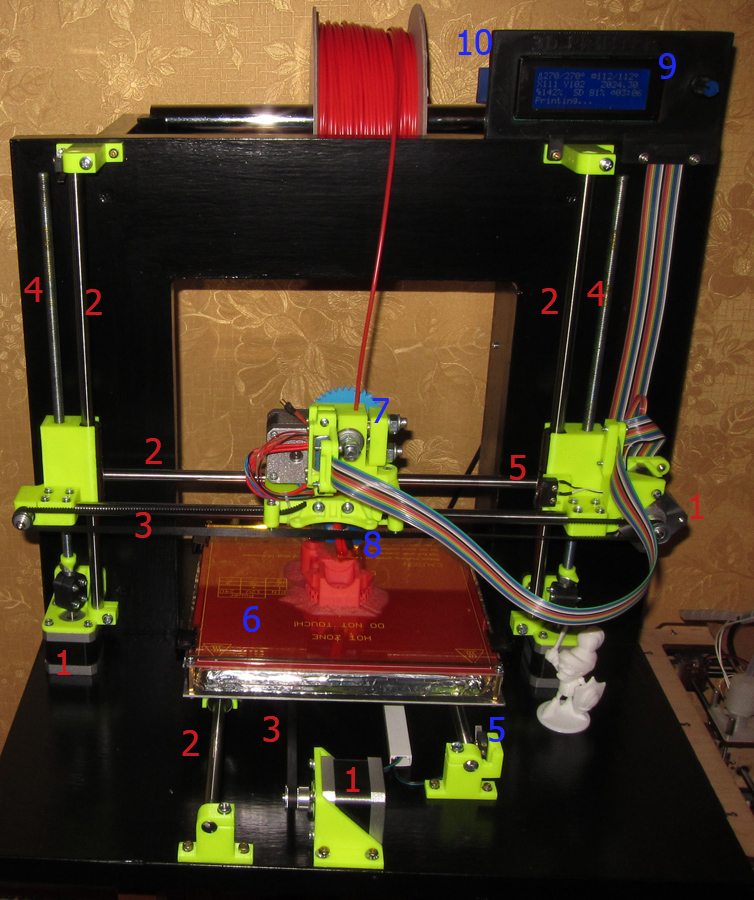 You can use immediately after unpacking. No assembly or calibration required. Automatic firmware update via Wi-Fi allows you to improve the interface.
Characteristics:
- technology - FDM, FFF, PJP;
- raw materials - ABS, PLA, Nylon, PC;
- speed - 100 mm/s;
- compatible with OS - Windows;
- dimensions - 345x360x430 mm;
- weight - 13 kg;
- price - from 138200 rubles.
Advantages:
- is completely ready for operation;
- accurate, fast printing;
- silent operation;
- well implemented cooling system.
Disadvantages:
- problems with the creation of large products;
- parts of poor quality.
Ultimaker 3
Professional, reliable device. Choice of preset, program settings. Automatic material feed. Suitable for creating elements with complex geometry. Built-in camera for monitoring work remotely.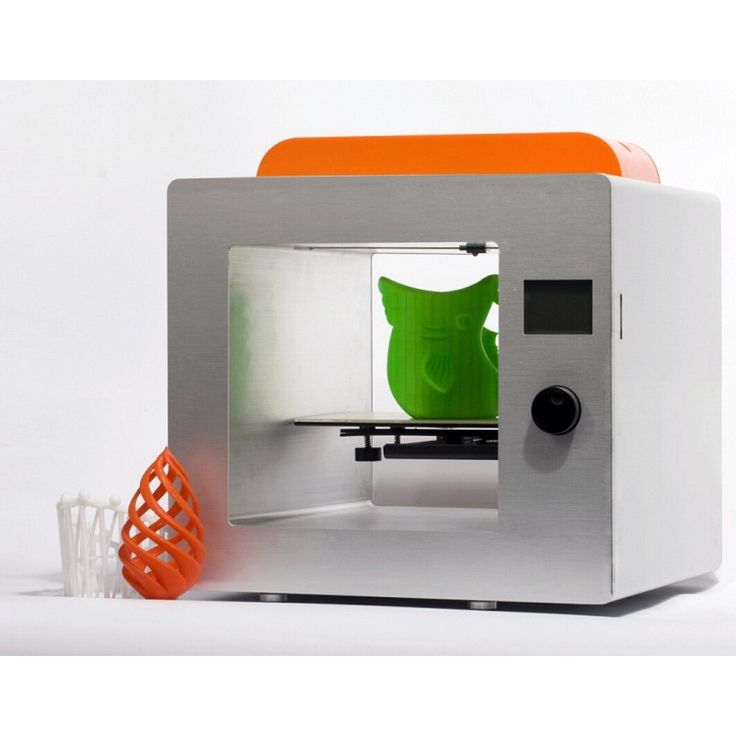 Uniform platform heating. You can work with different materials. Allows you to make shapes with two colors. Automation of the process eliminates the occurrence of errors during operation. Consumables recognition system, selection of suitable settings. No manual calibration required.
Characteristics:
- technology - FDM, FFF, PJP;
- raw material - ABS, PLA, PVA, NEYLON, HIPS, Flex, CPE;
- connection - Wi-Fi, Ethernet;
- compatible with OS - Windows, MAC;
- dimensions - 357x338x338 mm;
- weight - 13 kg;
- price - from 330,000 rubles.
Advantages:
- adjustable;
- the presence of a second switchable nozzle;
- variety of materials;
- white built-in lighting;
- high print volume;
- fast shaping.
Disadvantages:
- motors get very hot;
- balancing difficulty;
- noisy work.
Picaso Designer X Pro
The model is made of reliable, durable, wear-resistant materials.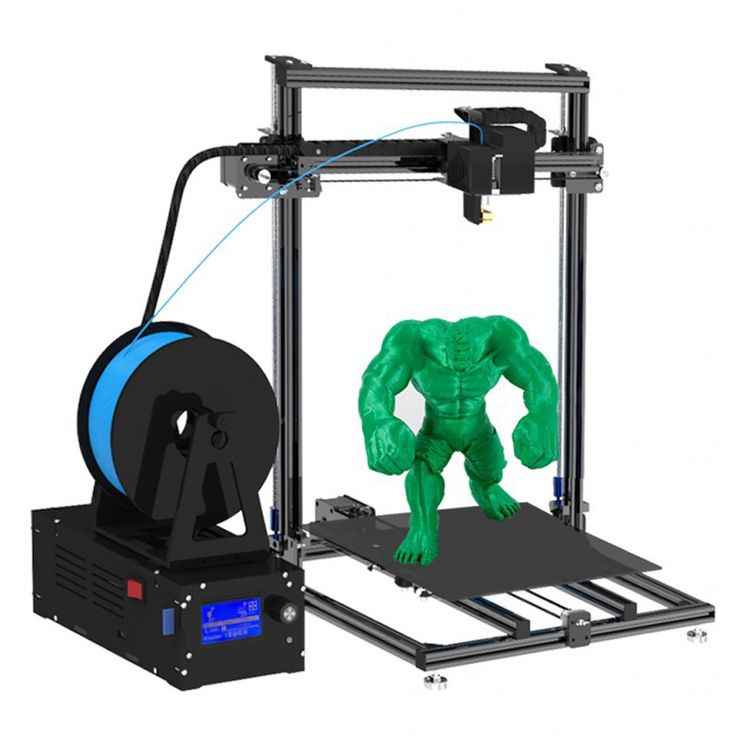 Platform with uniform heating. Creates elements of different thicknesses. Convenient control, setting. Solves problems of any complexity. The process control system allows you to monitor the supply of plastic, the uniformity of the applied layers. The display reports the status of the current job. The device is suitable for the production of industrial parts. Automatic calibration sets up the platform in seconds.
Characteristics:
- technology - FDM;
- raw materials - PLA, ABS, PLA Flexible, PVA, PC, Hips, Nylon, Laywood, FilaFlex, Filamentarno;
- connection - USB, Ethernet, USB Flash;
- speed - 30 cm3/hour;
- compatible with OS - Windows;
- dimensions - 492x390x430 mm;
- weight - 22 kg;
- price - from 149000 rubles.
Advantages:
- printing precision;
- easy calibration;
- easily removable magnetic table;
- directional material feed;
- fast work.
Disadvantages:
- constantly clogs the nozzle;
- when a new layer is formed, a void is formed.
Tevo Nereus
Low cost, easy to use device. Suitable for personal use, custom printing. Wi-Fi module for wireless synchronization with devices. The process can be controlled remotely from a smartphone. Large touch screen for easy setup. Built-in uninterruptible power supply in case of a power outage. Durable aluminum frame provides stability. Open source.
Characteristics:
- technology - FDM;
- raw materials - ABS, HIPS, Nylon, PETG, PLA, PVA, Rubber;
- connection - Wi-Fi;
- speed - 150 mm/s;
- weight - 13 kg;
- price - from 30900 rubles.
Advantages:
- color touch display;
- surface heats up quickly;
- wide print area;
- backlash-free assembly;
- option to restart the process after a power outage.
Weaknesses:
- loud power supply fan;
- "raw" firmware.
Artillery Sidewinder X1
A model that can be used right out of the box. Wide work surface. Almost instant heating of the platform. High positioning accuracy. Wear-resistant materials of increased strength. The table cover is perforated glass with good adhesion to all types of plastics used. After the process is completed, the figures are easily removed from the surface. Powerful, directional material flow.
Characteristics:
- technology - FDM, FFF, PJP;
- design - open chamber;
- raw material - ABS, Flex, Nylon, PLA, Wood, HIPS, PETG, PC;
- connection - USB, SD;
- speed - 150 mm/s;
- compatible with OS - Windows, MAC, Linux, Unix;
- dimensions - 780x250x540 mm;
- weight - 16.5 kg;
- price - 36900 rubles.
Advantages:
- high print speed;
- process control system;
- easy setting;
- touch control.
Disadvantages:
- short USB cable;
- inconvenient port layout;
- noisy fans.
Two Trees Sapphire S
Device with stable aluminum frame. Option to resume operation after a sudden power outage. Fast uniform heating of the platform with three leveling points.
Features:
- technology - FDM;
- raw materials - PLA, ABS, PETG, Wood;
- connection - USB;
- speed - 180 mm/s;
- compatible with OS - Windows;
- dimensions - 450x450x320 mm;
- weight - 12 kg.
Advantages:
- easy assembly;
- Russian language menu;
- user-friendly touch screen;
- forms elements quickly;
- creates parts with complex geometries.
Disadvantages:
- few settings;
- incomprehensible interface;
- inconvenient way of fastening straps;
- Firmware failed.
Elegoo Mars
Compact model with no backlash assembly. Accurate, clear printing at high speed. High resolution color touch screen. Wide plotting area along the XY axis. Compatible with many materials. The smoothing function reduces the effect of stairs on the product.
Features:
- technology - DLP;
- design - closed housing;
- raw material - 405NM UV resin;
- connection - USB;
- weight - 6.8 kg;
- price - from 31500 rubles.
Benefits:
- easy to calibrate;
- ease of use;
- high speed;
- original slicer;
- consumable savings.
Faults:
- noisy fan;
- inconvenient port layout.
The best SLA models for medium and small businesses
Printing using laser stereolithography technology - the formation of elements with high resolution, accuracy, the smallest deviation of parts from the specified parameters. Wide working area. SLA 3D printers are suitable for use at home, in small workshops, and in large-scale production.
WANHAO DUPLICATOR 8
Model with simple, user-friendly controls. The print speed can be adjusted. Material - photopolymer resin. It allows you to create complex geometric shapes with a smooth surface. Cures quickly with LED light. There is a viewing window on the side of the table to monitor the process.
Characteristics:
- design - closed chamber;
- raw material - photopolymer;
- connection - USB, Wi-Fi;
- speed - 30 mm/hour;
- compatible with OS - Windows, MAC, Linux, Unix;
-
price - from 92000 rubles.
- Advantages:
- compact dimensions;
- light weight;
- works fast;
- forms several products at the same time;
- high performance;
- automatic leveling mechanism;
- high capacity resin tank;
- user-friendly touch screen control;
- no special conditions for installation, operation.
Disadvantages:
- no on/off button on the front panel;
- custom design.

Formlabs Form 2
Intuitive instrument. Forms elements with a smooth surface. Stable operation with uniform material feed. Suitable for forming large products. Good cleaning system - foreign particles are regularly removed from the construction, mixing area to create parts with a uniform structure. The platform heats up evenly.
Characteristics:
- technology - SLA;
- design - closed chamber;
- raw material - photopolymer;
- connection - USB, WI-FI, Ethernet;
- compatible with OS - Windows, MAC;
- dimensions - 350x330x520 mm;
- weight - 13 kg;
- price - from 259000.
Advantages:
- convenient touch screen;
- smooth surface of figures;
- automatic material volume control;
- clear print;
- easy operation;
- You can create multiple items at the same time.
Disadvantages:
- defects in the formation of small parts;
- expensive consumables.

B9 Creator
Precision printed model. Wide working area. Suitable for creating products with complex geometry. A high resolution. You can make figures in a thin layer. Flat, smooth surface. Application of material without voids. Suitable for jewelry production. Works with cured epoxy.
Characteristics:
- raw material - liquid photopolymer;
- connection - USB, SD;
- speed - 12-20 mm/hour;
- compatible with OS - Windows, MAC;
- dimensions - 790x470x305 mm;
- weight - 13.5 kg;
- price - from 337250 rubles.
Benefits:
- fast printing;
- finished items match the specified parameters;
- simple design;
- maintainability;
- you can make complex parts.
Disadvantages:
- fine tuning required;
- Solid particles build up in the resin reservoir preventing uniform material flow;
- firmware problems.

Premium 3D printers
High performance expensive models. Extended functionality. Suitable for professional use.
Formlabs Form 3
Laser 3D printer that uses low power stereolithography technology. Quickly creates features with complex geometry. Reproduces the smallest details. Built-in sensors control the process, support printing conditions, notify about changes in the state of the device. Can be used immediately after unpacking. Does not require complex assembly.
Characteristics:
- technology - SLA;
- design - open chamber;
- raw material - liquid photopolymer;
- connection - Wi-Fi, Ethernet, USB;
- dimensions - 405x375x530;
- weight - 17.5 kg;
- price - from 336600 rubles.
Advantages:
- ease of replacement of consumables;
- ease of use;
- automated work;
- free software included in the kit;
- X, Y precision;
- layer thickness can be adjusted;
- wide range of materials;
- maintainability.
Disadvantages:
- print speed dependent on resin viscosity;
- risk of product deformation;
- high price.
Raise3D Pro2
Closed case model for low volume production. Sturdy aluminum frame provides stability. Large print area. Suitable for simultaneous creation of several products at once. Allows you to form complex shapes with fine details. Works at high speed. Convenient touch panel for process settings. Intuitive interface with a wide range of features. Complies with environmental safety standards, therefore suitable for the home. A silicone coating is applied to the surface of the working area, which allows you to remove the finished product without damaging it.
Characteristics:
- technology - FDM;
- design - closed chamber;
- raw materials - ABS, HIPS, Nylon, PETG, PLA, PVA, Rubber;
- connection - LAN, USB, Wi-Fi;
- speed - 30-150 mm/s;
- compatible with OS - Windows, MAC, Linux;
- dimensions - 620x520x760;
- weight - 44 kg;
- price - from 371000.

Learn more