3D printer print quality troubleshooting
Blobs and Zits
Blobs and Zits
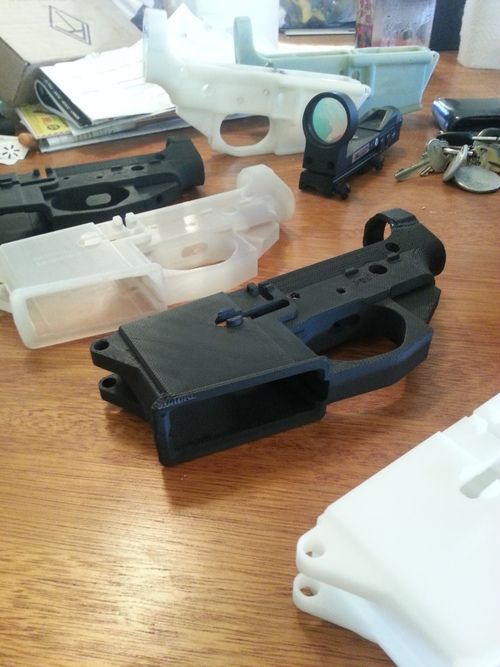
During your 3D print, the extruder must constantly stop and start extruding as it moves to different portions of the build platform. Most extruders are very good at producing a uniform extrusion while they are running, however, each time the extruder is turned off and on again, it can create extra variation. For example, if you look at the outer shell of your 3D print, you may notice a small mark on the surface that represents the location where the extruder started printing that section of plastic. The extruder had to start printing the outer shell of your 3D model at that specific location, and then it eventually returned to that location when the entire shell had been printed. These marks are commonly referred to as blobs or zits. As you can imagine, it is difficult to join two pieces of plastic together without leaving any mark whatsoever, but there are several tools in Simplify3D that can be used to minimize the appearance of these surface blemishes.
Common Solutions
Retraction and coasting settings
If you start to notice small defects on the surface of your print, the best way to diagnose what is causing them is to watch closely as each perimeter of your part is printed. Does the defect appear the moment the extruder starts printing the perimeter? Or does it only appear later when the perimeter is completed and the extruder is coming to a stop? If the defect appears right away at the beginning of the loop, then it’s possible your retraction settings need to be adjusted slightly. Click on “Edit Process Settings” and go to the Extruders tab. Right below the retraction distance, there is a setting labeled “Extra Restart Distance.” This option determines the difference between the retraction distance when the extruder is stopping and the priming distance that is used when the extruder is restarting. If you notice a surface defect right at the beginning of the perimeter, then your extruder is likely priming too much plastic. You can reduce the priming distance by entering a negative value for the extra restart distance. For example, if your retraction distance is 1.0mm, and the extra restart distance is -0.2mm (note the negative sign), then each time your extruder stops, it will retract 1.0mm of plastic. However, each time the extruder has to start extruding again, it will only push 0.8mm of plastic back into the nozzle. Adjust this setting until the defect no longer appears when the extruder initially begins printing the perimeter.
If the defect does not occur until the end of the perimeter when the extruder is coming to a stop, then there is a different setting to adjust. This setting is called coasting. You can find it right below the retraction settings on the Extruder tab. Coasting will turn off your extruder a short distance before the end of the perimeter to relieve the pressure that is built up within the nozzle. Enable this option and increase the value until you no longer notice a defect appearing at the end of each perimeter when the extruder is coming to a stop. Typically, a coasting distance between 0.2-0.5mm is enough to have a noticeable impact.
Avoid unnecessary retractions
The retraction and coasting settings mentioned above can help avoid defects each time the nozzle retracts, however, in some cases, it is better to simply avoid the retractions all together. This way the extruder never has to reverse direction and can continue a nice uniform extrusion. This is particularly important for machines that use a Bowden extruder, as the long distance between the extruder motor and the nozzle makes retractions more troublesome. To adjust the settings that control when a retraction takes place, go to the Advanced tab and look for the “Ooze Control Behavior” section. This section contains many useful settings that can modify the behavior of your 3D printer. As was mentioned in the Stringing or Oozing section, retractions are primarily used to prevent the nozzle from oozing as it moves between different parts of your print. However, if the nozzle is not going to cross an open space, the oozing that occurs will be on the inside of the model and won’t be visible from the outside. For this reason, many printers will have the “Only retract when crossing open spaces” option enabled to avoid unnecessary retractions.
Another related setting can be found in the “Movement Behavior” section. If your printer is only going to retract when crossing open spaces, then it would be beneficial to avoid these open spaces as much as possible. Simplify3D includes an extremely useful feature that can divert the travel path of the extruder to avoid crossing an outline perimeter. If the extruder can avoid crossing the outline by changing the travel path, then a retraction won’t be needed. To use this feature, simply enable the “Avoid crossing outline for travel movement” option.
Non-stationary retractions
Another extremely useful feature in Simplify3D is the ability to perform non-stationary retractions. This is particularly useful for bowden extruders that build up a lot of pressure inside the nozzle while printing. Typically when these types of machines stop extruding, the excess pressure is still likely to create a blob if the extruder is standing still. So Simplify3D has added a unique option that allows you to keep the nozzle moving while it performs its retraction. This means you are less likely to see a stationary blob since the extruder is constant moving during this process. To enable this option, we have to adjust a few settings. First, click “Edit Process Settings” and go to the Extruder tab. Make sure that the “Wipe Nozzle” option is enabled. This will tell the printer to wipe the nozzle at the end of each section when it stops printing. For the “Wipe Distance”, enter a value of 5mm as a good starting point. Next, go to the Advanced tab and enable the option labeled “Perform retraction during wipe movement”. This will prevent a stationary retraction, since the printer has now been instructed to wipe the nozzle while it retracts. This is a very powerful feature and a great option to try if you are still having trouble removing these defects from the surface of your print.
Choose the location of your start points
If you are still seeing some small defects on the surface of your print, Simplify3D also provides an option that can control the location of these points. Click on “Edit Process Settings” and select the Layer tab. In most cases, the locations of these start points are chosen to optimize the printing speed. However, you also have the ability to randomize the placement of the start points or align them to a specific location. For example, if you were printing a statue, you could align all of the start points to be on the backside of the model so that they were not visible from the front. To do this, enable the “Choose start point that is closest to specific location” option and then enter the XY coordinate where you want the start points to be placed.
Related Topics
Lines on the Side of Print
Lines on the Side of Print
The sides of your 3D printed part are composed of hundreds of individual layers. If things are working properly, these layers will appear to be a single, smooth surface. However, if something goes wrong with just one of these layers, it is usually clearly visible from the outside of the print. These improper layers may appear to look like lines or ridges on the sides of your part. Many times the defects will appear to be cyclical, meaning that the lines appear in a repeating pattern (i.e. once every 15 layers). The section below will look at several common causes for these issues.
Common Solutions
Inconsistent extrusion
The most common cause for this issue is poor filament quality. If the filament does not have very tight tolerances, then you will notice this variation on the side walls of your print. For example, if your filament diameter varied by just 5% over the length of the spool, the width of the plastic extruded from the nozzle could change by as much as 0.05mm. This extra extrusion will create a layer that is wider than all the others, which will end up looking like a line on the side of the print. To create a perfectly smooth side wall, your printer needs to be able to produce a very consistent extrusion which requires high-quality plastic. For other possible causes of variation, please read the Inconsistent Extrusion section.
Temperature variation
Most 3D printers use a PID controller to regulate the temperature of the extruder. If this PID controller is not tuned properly, the temperature of the extruder may fluctuate over time. Due to the nature of how PID controllers work, this fluctuation is frequently cyclical, meaning that the temperature will vary with a sine wave pattern. As the temperature gets hotter, the plastic may flow differently than when it is cooler. This will cause the layers of the print to extrude differently, creating visible ridges on the sides of your print. A properly tuned printer should be able to maintain the extruder temperature within +/-2 degrees. During your print, you can use Simplify3D’s machine control panel to monitor the temperature of your extruder. If it is varying by more than 2 degrees, you may need to recalibrate your PID controller. Please consult your printer manufacturer for exact instructions on how to do this.
Mechanical issues
If you know that inconsistent extrusion and temperature variation are not to blame, then there may be a mechanical issue that is causing lines and ridges on the sides of your print. For example, if the print bed wobbles or vibrates while printing, this can cause the nozzle position to vary. This means that some layers may be slightly thicker than others. These thicker layers will produce ridges on the sides of your print. Another common issue is a Z-axis threaded rod that is not being positioned properly. For example, due to backlash issues or poor motor controller micro-stepping settings. Even a small change in the bed position can have a major impact on the quality of each layer that is printed.
Related Topics
12 Common 3D Printing Mistakes Ranked from Easy to Hard. How to avoid them?
1. Underestimation of the importance of the first layer. 2. Don't ask the 3D printing communities for help. 3. Random entanglement of the filament. 4. Fast assembly of your 3D printer. 5. Incorrect table and nozzle height calibration. 6. Using the wrong slicer settings. 7. Using a high % infill to reinforce details instead of walls/shells. 8. Don't use support when needed. 9. Never replace worn parts. 10. Lack of 3D printing monitoring. 11. Neglect of safety rules in 3D printing. 12. Buying a bad 3D printer out of over-enthusiasm. Conclusion.
There is nothing worse than 3D printing for days, weeks, months and years only to find out that you are making common mistakes.
We're sure many of you are familiar with that feeling, which is why we've written this post to get you back on the road to success by outlining some common mistakes to avoid on your 3D printing journey.
Here you will find both small errors that you did not pay attention to before, as well as serious errors that can lead to a complete cessation of 3D printing.
Join our research to identify the most common 3D printing mistakes, as well as simple solutions to fix them quickly.
1. Underestimation of the importance of the first layer.
Too often 3D printing fails in the middle of the process due to poor adhesion of the first layer.
Definitely keep this important factor in mind if you want a successful print.
This is a mistake that is made too often, and it causes people to chase ghosts, trying to figure out what the problem is.
All this time, the reason was the bad first layers, which did not have a strong enough connection with the working platform.
Although your first layer is held at the start of printing, adhesion decreases as the print head moves. It is likely that your print may shift or fall off after a few hours if the first layer was not well extruded.
Solution .
- Make a few test prints ahead of time to see how well the material adheres.
- Use an adhesive such as 3D Printer Varnish or at least a glue stick.
- Increase the flow rate (extrusion multiplier) for the first layer so that the material has a better chance of sticking to the printer bed.
2. Do not seek help from the 3D printing communities.
Every user of a 3D printer has encountered a problem that required some effort to fix. Some people took on entire projects just to solve a 3D printer problem, when the solution was easy to find.
3D printing communities are known for helping people solve their problems, so be sure to check out these free resources. From 3D printing forums to Facebook groups and YouTube surveys of other 3D printer users, the options are endless.
When we first started exploring 3D printing, we noticed that many people mention how helpful other 3D printer users are, so we immediately registered on all kinds of Russian and English resources, Facebook and Reddit communities and joined this space .
In most cases, people will offer the right solution and will be happy to help you try various troubleshooting options.
Not only can they help you with troubleshooting, but they can point you to some fun projects to try, as well as some of the latest innovations in the world of 3D printing.
Solution .
- Join active Facebook groups on 3D printing and your specific 3D printer.
- Subscribe to news feeds of authoritative 3D printing resources.
- Be sure to check out YouTube 3D printing bloggers who post new and interesting content on a regular basis.
- Find groups in Viber and Telegram. This is the fastest way to get an answer to your question.
3. Random entanglement of the filament.
We have read many reviews about 3D printer materials including PLA, ABS, PETG, etc. and some of the negative reviews mention tangled filament.
Unfortunately, in most cases, the thread becomes tangled due to the fault of users.
As a general rule, when the thread is wound onto the spool, there is very little chance of tangling, much more often after you take the spool out of the package.
If you loosen the windings and then rewind the deflated windings onto the spool, you could accidentally wind them unevenly and create an overlap that will ruin your prints.
Solution .
When storing the filament, make sure that the end is securely fastened and cannot be easily loosened.
If there are already tangles on the spool, unwind enough thread and wind it tightly again so that it does not cross over.
If you are still unlucky, and you have purchased plastic of inadequate quality, during the production of which all technological cards were violated, then here is our advice: buy plastic for a 3D printer from trusted brands. The $100 price difference is infinitesimal compared to all sorts of other 3D printing costs.
However, this 100 UAH will save you not only from problems with overlaps, but also provide a stable diameter and color along the entire length, the absence of ovalities and smooth feeding.
4. Quickly assemble your 3D printer.
We were all very excited when we got our first 3D printer and it came to building it, but being overly excited can cause your 3D printer to build too quickly, resulting in poor print results.
This may not be immediately noticeable and you will get good quality prints within a few months.
What can happen gradually is wear due to incorrect assembly.
Ask yourself these questions before starting your first print.
Was your belt tight? Did you properly and securely fasten each wire? Is the Bowden tube installed correctly?
When it comes to a 3D printer, every little detail counts, so don't fall prey to 3D printing problems because of a quick and careless build.
Solution .
Find an authoritative YouTube video tutorial from an experienced 3D printer operator and follow assembly.
There are always a few little tricks they advise you to do for durability and high quality prints.
Even if you have already built your 3D printer, you can fix some things you may have missed.
The correct and high-quality assembly of a 3D printer actually leads to higher quality prints.
See also: How to set up your new 3D printer.
5. Incorrect table and nozzle height calibration.
Of all the layers in your 3D print, the first layer is the most important and it depends a lot on how well you leveled your platform and set your nozzle height.
It's not as easy as uploading a 3D model, sending it to an SD card and starting printing.
The software side of things is important, but the hardware side is just as important.
Many 3D printers come with manual platform calibration, so you have to raise or lower each corner yourself.
Your 3D printer doesn't have a perfect feedback system, which means it can't always check where the print head is.
The best he can do is use the X, Y and Z limit switches to make sure the printhead is 0.00mm in each axis.
What your 3D printer is very good at is extremely precise movements in the X, Y and Z axes, but if the nozzle height is not set properly at the beginning, everything falls apart.
The Z axis is height, so the nozzle must be properly adjusted so that it smoothly extrudes the filament along the surface of the build, neither too high nor too low.
Solution .
- Learn how to manually calibrate the table.
- Once your table is properly calibrated and the nozzle height adjusted, you can expect good prints.
- It might be a good idea for you to invest in an auto leveling system like BLTouch. We at our 3D printing studio in Odessa prefer manual calibration.
6. Using incorrect slicer settings.
The slicer settings you use to print are some of the most important things when it comes to successful 3D printing.
Of the hundreds of setting changes you can make, one wrong setting is enough to ruin your print.
Fortunately, there are printer profiles and default settings that give people a basic starting point for printing.
After a few prints, you will start experimenting with different settings such as temperature, line width, flow rate, and so on.
Some of the misapplied misconfigurations are related to changing materials.
Whether PLA or ABS or PLA of different brands and/or colors, temperature recommendations will vary.
Make sure you set them correctly.
Slicer settings can either help you or break your 3D printing, so use them wisely, preferably with some kind of guide.
In most cases, when you load a model from Thingiverse, for example, designers create a list of settings that generally work well, but don't blindly follow them and be careful.
For example, if you replaced a brass nozzle with a hardened steel nozzle, you would need to slightly increase the nozzle temperature because hardened steel does not conduct heat as well as brass.
Another example is your work surface.
If you have added a glass substrate to your 3D printer, you should increase the table temperature to allow for the extra layer of heat transfer material.
Solution .
- Use calibration models such as speed and temperature towers for each new material.
- Spend a little more time looking at the slicer options to make sure you know what changing a setting will do.
- Repetition is the mother of learning. The more often you type, the faster you will become a pro.
Read also: The best models for 3D printing testing.
7. Using high % infill to reinforce details instead of walls/shells.
For years, most people have tried to reinforce their 3D printed parts with infill. This method definitely does the job, but there is a much more efficient method that has been proven to work much better.
Instead of wasting a lot of material and extra time printing the infill, you should use shells/walls to make the 3D printed part stronger.
In some cases, increasing the percentage of filling does not provide the necessary margin of safety, while increasing the wall thickness makes it possible to produce truly reliable and impact-resistant products.
Solution.
- Instead of adding more infill, add more shells/walls to your prints to make them stronger.
- For a functional 3D printed part requiring strength, about 4-6 walls are recommended.
8. Do not use supports when necessary.
Most people try to avoid the use of auxiliary supports to save time and material, but there are times when their use is necessary.
You can try tilting the prints in a certain way and moving them around the print bed, but sooner or later there will come a point when this approach doesn't work.
Many models are specially designed not to use support for successful printing, which is very convenient.
On the other hand, some designs are too complex to print without support.
3D printers cannot print in the air and large ridges definitely need support structures to extrude the material onto.
Most often you can do without supports on 45° or lower overhangs, but for anything higher it is recommended to use supports.
This is more of a visual skill that, with time and experience, allows you to understand when models need supports and when you can do without them.
Some slicers may not show support in preview, so you'll have to judge for yourself.
Solution.
- Make sure you don't avoid supports when they are needed, because in this case you will just lose overall.
- Use proper part orientation to ensure that your prints use as little backing material as possible.
9. Never replace worn parts.
Although the profile, power supply and stepper motors of your 3D printer are designed to last for several years, other parts are consumables.
These are parts such as belts, nozzles and bearings. Make sure you replace these parts as they wear out.
You may notice a decline in print quality over time, and wear and tear on certain parts can definitely be the cause, so check these consumables and replace them as needed.
If you are printing with materials such as ABS, PA12, PC or glow-in-the-dark plastics, the brass nozzles wear out much faster than when printing with traditional materials.
Switching to a hardened steel nozzle is a good idea if you want to print with abrasive materials.
The disadvantage is that it does not have the same level of thermal conductivity as brass nozzles.
Here is a short list of 3D printer parts that wear out over time:
- Thermal barrier;
- PTFE tube;
- Fans;
- Wires/connectors;
- Thermistors;
- Belts;
- Glass platforms;
- Bearings;
- Heating block;
- Motherboard.
You can buy accessories for 3D printers in the corresponding section of our catalog.
Solution.
- Be aware that some parts will not last forever, so check these parts from time to time and replace them as needed.
- Make sure these components are installed in a way that reduces wear.
- Keep a set of replacement parts on hand in case they fail (nozzles, belts, wiring, PTFE tubing).
- Purchase high quality parts designed for long life.
10. No 3D printing monitoring.
Whether you have a premium or budget 3D printer, any of them can fail. They can fail within the first few minutes when the first layer is not printing well, or a few hours after printing starts.
In our practice, there have been several cases when, when checking our printers after a night shift, we found a mess on the work surface and the printer continued to extrude spaghetti plastic.
Monitoring is not a panacea for all problems, but with its help you can stop the process in time and avoid waste of plastic and electricity.
It is recommended to constantly monitor your 3D printers throughout the printing process to make sure everything is in order.
What we make sure to do is monitor the first coat and then come back 15 minutes later to make sure everything is going according to plan.
After that, checking the printers every hour or so is a good idea to control your prints.
Solution.
- Check the 3D print from time to time to make sure everything goes smoothly.
- Use the camera for remote fingerprint verification with remote power control.
- Be sure to teach others how to stop your 3D printer if necessary.
11. Neglect of safety rules in 3D printing.
Basic precautions are based on burn and fire hazards, mechanical hazards, and injury from tools or melted plastic.
The risk of fire is very rare these days because 3D printers are usually equipped with overheating protection.
Pay attention to burns from the hot nozzle or print bed.
We've also heard stories of injuries from the sharp edges of the printer's scraper.
This can be easily avoided if you are careful in your actions.
Removing supports is not the most pleasant and interesting thing to do, but getting cuts or scratches when cleaning parts is even worse.
It is recommended to check the wiring, bolts, belts and all moving parts from time to time so that a potential malfunction can be detected in the future.
Connectors can sometimes fail, so be sure to check these aspects to ensure the 3D printing process runs smoothly and safely.
Solution.
- Be aware of your surroundings and be safe.
- Do not put your hand too close to the nozzle.
- Do not keep your hand on the platen when taking the print.
- Provide a good ventilation system.
12. Buying a bad 3D printer out of over-enthusiasm.
We are regularly contacted by clients who, on a wave of enthusiasm, bought a cheap 3D printer on Aliexpress or other market place, and this printer does not work.
Spontaneous cheap purchases do not give you time to analyze and compare 3D printer models. In other words, you are making your choice unconsciously.
People have experienced a number of problems, such as the SD card slot not working along with serious difficulties in transferring files over Wi-Fi.
Other options included poorly insulated wires, crooked frames and platforms.
Deformed threaded screws, cheap hot ends, broken parts, poor shipping packaging, poor assembly at the factory are also common when buying cheap "NoName" printers.
You may end up spending most of your time repairing, fixing poor print quality issues, and just getting frustrated with 3D printing.
If you've been one of those unlucky ones, you've probably learned to take your time buying a 3D printer.
One of the most popular manufacturers of inexpensive 3D printers around the world is Creality, and their top product Ender-3 v2.
This 3D printer has been tested many times by users around the world, and its popularity proves to be the perfect combination of price and quality.
Every 3D company is a team that buys parts and builds a printer, but some do it much better than others and more consistently.
Some people who buy a bad printer either give up 3D printing, do a complete costly rebuild, or buy a better 3D printer much later. You might as well start by buying a good 3D printer!
Solution.
Choose a reliable 3D printer with a good reputation and avoid 90% of avoidable problems. We know a lot of stories about people going through the same thing, so save yourself the hassle.
We have never seen anyone call the Ender 3 Pro or the Voxelab Aquila X2 a bad first 3D printer because it really is a very good buy.
Conclusion.
We hope that our tips will help you avoid the most common 3D printing mistakes and you will have a rewarding experience learning your printer settings and producing quality prints.
Happy printing!
3d printer defects: errors, main problems
Causes of Defects in 3D Printing and How to Fix Them
Buying a 3D printer is only half the battle. A beginner printer has a lot to go through. First, he will learn how to set up the device, calibrate the print head, set the necessary parameters, and test different types of filaments. But that's not all. The most unpleasant thing that can appear during operation is printing defects. And they need to be eliminated.
- What are 3D printing defects?
- Classification of defects
What are 3D printing defects?
After the printing process is completed, various defects can be found on the finished model. Most often they are associated with improper distribution of plastic. Defects appear for various reasons. But the main result is always the same - the model is damaged, you need to do the project on a new one. Printing defects cause downtime. Lost time and meters of filament.
Important! Within the framework of this article, defects that occur on FDM printers will be described. These are models of printing devices operating on the technology of hot deposition of plastic.
Sometimes mistakes can be seen right from the start. For example, when printing the first layer of a model. In these and other cases, it is necessary to prevent the defect in time. However, the press all the same should be stopped. But this way you can save material and time. This article will discuss the most common defects, as well as ways to eliminate them. At the end of the article, a comparative classification of faults will be given.
Layer displacement
The second name of this defect is skew. There are several options for the development of events at once. The skew can be slightly noticeable, with a slight deviation along the Z axis. The second option is a strong offset, the model is printed in pieces. In all these cases, the reason lies in the mechanical part of the printer.
Solutions:
- Check tension belts. They should be clearly in the grooves. It is not allowed to fray or stretch the belt. Sometimes it is easier to replace the entire set of belts with a new one.
- Sometimes small misalignments are caused by an incorrectly set pulley. Make a mark with a black marker before printing, after the end of the process, check the result. Calculate the difference.
Tighten the problem area if necessary.
- The printer's Y and X axes are not properly aligned. They are not perpendicular to each other. They need to be set at 90°.
Attention! In rare cases, the problem is electrical. This option must be disassembled separately, armed with a multimeter.
First layer does not stick
The initial layer acts as a foundation. If it "floats", then the whole model will get the wrong geometry. The second and subsequent layers may slightly shift the entire workpiece. The most unpleasant thing is that this defect can be found at the very end of the print.
Solution methods:
- Platform calibration. If the print bed is skewed, there is a good chance that the first layer will not stick. It is best to check platform calibration before starting printing. Many 3D printing programs help to go through this setting in a semi-automatic mode.
- Wrong print nozzle height. Another point worth considering. Most often, the extruder height setting is set through the printer parameters: Edit Process Settings → G-Code. They are located in the main menu of the device.
- The first layer was printed too quickly. The plastic just didn't cure. This setting must be found in the menu of the printing device. Approximate location: Settings → First Layer Speed. It is worth setting the print speed of the first layer 50% lower than the rest.
- Plastic cooling temperature. This option can be found on printers with a cold platform. The filament hits a cold surface, quickly hardens and rebounds. Here you need to experiment with the settings for the melting temperature of the filament or initially take a printer with a heated surface.
Important! Poor adhesion can be caused by covering material placed on top of the platform. Different glue, tape, adhesive tape - all this can repel plastic.
![]()
Pimples on the model
This also includes such defects as “snot”, swells, sagging. All these faults are of approximately the same nature. They are related to the operation of the extruder. As it moves, it should stop, then start working again. Not all devices can lay even layers without defects. This is how the irregularities described above appear.
Solving methods:
- Retract and coast setting. The first parameter is responsible for starting the extruder. In this case, you need to configure the retraction through the device menu: Edit Process Settings → Extruders. Here you need to find the parameter Extra Restart Distance. Try reducing the fill length. When unevenness occurs when the nozzle stops, you need to tighten the roll-on stroke (roll-up movement). This setting is referred to as Coasting. It is in the same section where the retraction is set.
- It is better to avoid retraction and coasting altogether. That is, the filament must be flush with the edge of the nozzle. This parameter is especially critical for Bowden printheads. Another option is to set up retraction. You need to find the Advanced tab. It contains the Ooze Control Behavior setting. This option controls filament leakage and retraction start time.
If minor defects are still present, it is worth pointing out the entry points to the printer. This setting is found in the Edit Process Settings menu on the Layer tab. For example, you can leave small flaws inside the shape, starting printing from the inner layers.
3D printer won't print
This is one of the scariest things for a beginner 3D maker. The device appears to be broken. However, in most cases this is not the case. The printer turned on, but did not start to push through the plastic? There are four reasons for this.
Solutions:
- Plastic does not come out of the extruder due to leakage. This can often be seen in some cheap Chinese models. The filament is preheated in the extruder, it can seep through the hot end. The same effect can be observed after the end of the work. In this case, printing starts 3–4 seconds after the start. Automatic broken geometry of the first layer. To avoid this defect, experienced printers make the so-called skirt. This is a thin circle of filament around the future model. It is printed to bring the printer to life and fill the nozzle with plastic.
- The extruder is too close to the platform. The plastic just gets stuck inside the nozzle. The situation continues on the second layer. Only by the 3rd or 4th layer does the plastic begin to come out. The solution is to adjust the Z-axis height through the G-Code command.
- Sometimes the filament is simply chewed off by the drive gear. This is the part that pushes the thread forward. If a small amount of filament shavings is visible near the printer, it is likely that the gear has worn off the filament.
You need to calibrate this node.
- Clogged extruder. There may be several reasons: ordinary dirt or rubbish, plastic coked inside the extruder, poor cooling of the filament. Mechanical cleaning of the nozzle with special needles or drills will help. They are sold in specialized stores.
Important! Just do not need to clean the nozzle with a screwdriver or other improvised tools. You can completely ruin the extruder.
Prints in the air
Various users experience this problem. The reasons for printing by air are related to setting new plastic settings in the slicer. Sometimes a defect appears due to incorrect setting of the Z axis.
All solutions come down to the fact that the user needs to carefully study the G-code of the printer. Sometimes the reason lies in the lowered Z-axis height settings. You can also see the print step here, perhaps it exceeds the required parameter. In the slicer, you need to check the plastic installation parameters. View the heating temperature of the nozzle and platform. All settings must be checked manually. When importing a profile, the left parameters can be picked up.
Prints in reverse: how to fix
A rare defect that is not always visible at the start of printing. That is, the model comes out normal, but mirrored. Such malfunctions are often found in Chinese kits or noname devices. There are two solutions. One is simple, the other is more difficult.
Methods of solution:
- It is necessary to invert one of the axes: X or Y - it does not matter. But only one. This can be done by flipping the contacts on the power board or on the motor itself.
- Invert axis via device firmware. This method is suitable for advanced users who are familiar with programming skills.
In any case, it's better to first check all the settings in the slicer again, only then go into the electronics of the device.
Layers skipped
The finished model shows that one or more layers have been skipped. This is eloquently evidenced by the gaps in the finished model. In rare cases, this defect is associated with insufficient extrusion. Perhaps there are problems with the capture and supply of the filament. Sometimes the reason lies in the wedging of the Z axis.
Solution methods:
- Check the mechanical part of the printer. If gaps began to appear frequently, you need to arrange an unscheduled maintenance of the device. Examine all shafts. Check that they are level and not misaligned. Power off the printer, try moving the head with your fingers. If resistance is felt, then one of the shafts is not installed correctly.
- Bearing wear. This element may simply wear out. You can see that the printer vibrates slightly. There is an unusual sound when printing. Diagnose a breakdown in the same way as the shaft. Turn off the power and move the extruder with your hands to find the problem part.
Attention! Remember to maintain your printer regularly.
Lubricate the shafts with special oil. For example, for sewing machines. Before lubricating, clean the moving parts from dirt and plastic residues. Just don't overdo the oil. A large amount of lubricant can lead to the opposite effect.
Doesn't print in the center of the bed
Some users are having trouble printing on one side of the bed instead of the center. At the same time, in the slicer, the model is clearly in the center. There may be several solutions here.
Methods of solution:
- Slicer settings are down or incorrectly set. It is necessary to change the characteristics of the kinematics. Set the Delta robot parameter instead of the Cartesian robot. You also need to set the size of the table, equal to the square inscribed in the specified print area. In this case, set the Origin Offset parameter to half the side of the square.
- Try to adjust the position of the X-axis limit switch. In some cases, it is moved a little to the right.
What are the problems with the 3D printer test cube?
This figure is used to check the print quality. Naturally, during the test, she can clearly demonstrate where there are problems. It can be completely different defects. Most often, the test shows bulges and dents on the model.
These defects are caused by overheating and shrinkage. To find out for sure the cause and eliminate these factors, you need to print four cubes in different angles. For some ABS plastics, you need to reduce the temperature, as well as turn on the blower by 5-10%.
3D printing echo
This problem can be described as thin streaks that form when printing layer by layer. That is, the final model does not have a formed and even surface. There is waviness (echo) on the edges. This defect is also called ringing on the walls. Typically, two factors are the cause: print speed and vibration.
Solutions:
- Reduce vibration. Make sure the printer is on a level and stable surface.
Assess the condition of the bearings. Replace them if necessary.
- Inspect the shafts. Clean them of dirt and dust, lubricate with oil.
- Reduce the print speed through the printer settings.
Try changing the typing speed first, then check the mechanics.
Interesting! Even one loose bolt can cause strong vibrations. Check all fasteners. Pull the bolts.
Salmon leather
This defect is somewhat similar to the previous one. Only there are no obvious waves or ripples. The defect manifests itself in the form of a pattern. It is similar to the representation of heights on topographic maps or the structure of salmon skin that is drawn on the walls of the model. In English resources it is called salmon skin. The defect appears due to two reasons: vibrations and incorrect characteristics of the current coming to the motors.
Solutions:
- Remove any vibrations that may occur in the device.
Tighten the bolts and check the frame geometry. You can also slightly reduce the print speed.
- Installation of a special impulse reducer (TL-Smoother) in the circuit between the driver and the axle motor. This solution balances the current indicators. The edges are more even.
Salmon skin defect is common on DRV8825 stepper motor drivers.
Ripple
In this case, we are talking about the partial impact of waves on some parts of the model. The ripples are often of the same nature as the echo. It is also tied to vibrations and the speed of the extruder. However, unlike waves, ripples are especially pronounced at sharp corners, when the nozzle abruptly changes direction.
Methods of solution:
- Reduce the print speed. You need to find the Edit Process Settings menu in the printer settings, and then open the Other tab. Change two settings: Default Printing Speed and X/Y Axis Movement Speed. The first is responsible for the speed of all movements of the nozzle, the second - the speed in the absence of plastic supply.
Sometimes the reason lies in the factory firmware. It initially indicates increased extruder acceleration.
- We remove vibrations. Check the geometry of the device, stretch all the bolts, assess the condition of the shafts and bearings. Lubricate the device if necessary.
We recommend checking the print speed settings first.
Poor filling
If the figure is not filled enough, it means that it will not receive sufficient strength. The model may simply break or crack. Usually the causes of poor coverage lie in the slicer settings or print speed settings.
Solutions:
- Try changing the fill pattern. It is indicated by the Internal Fill Pattern parameter. There are presets in the settings with complicated filling options that give more strength to the finished model: Grid, Triangular and Solid Honeycomb. The printing time will increase, but the strength will also increase.
- Reduce print speed. The fast movement of the print head results in less infill. You need to tweak this parameter through the settings of the device itself or through the slicer parameters.
- Change extrusion width parameter. Some 3D printing programs allow you to set different infill values for individual elements. For example, for the outer layers, set the size to 0.4 mm, for the inner layers - 0.8 mm. These settings can be viewed in the menu Edit Process Settings → Infill. In it you need to find the parameter Infill Extrusion Width. It is shown as a percentage. The higher the number, the thicker the layer.
Attention! When setting the Infill Extrusion Width parameter, make sure that the set value (in percent) is supported by the printing program (slicer).
Plastic is leaking from the extruder threads
This fault can be attributed to local printer failures, although they can create a number of defects in the form of “snot” on the model. Plastic oozes through various slots, flows down the extruder thread, exits the opening of the heating element. There may be several options for solving the problem.
Solutions:
- Check all screw connections. Sometimes a caked piece of plastic gets stuck between them. It creates a gap, the filament flows out.
- Clean and polish the surfaces of the thermal barrier tube and nozzle. Installing a fluoroplastic washer or winding a fum tape can also help.
- Reinforced cold drawing of threaded connections.
Attention! Sometimes the reason lies in a manufacturing defect. Nothing can be done here. Just completely change the extruder.
Plastic does not come out of the nozzle
For some reason, the printer has stopped feeding filament. The device continues to make noise with the engines, but the plastic does not come out of the nozzle. There may be several reasons and solutions for this.
Solution methods:
- The plastic is out. For some printers, the filament spool is covered with a casing. Therefore, it is impossible to immediately understand that the thread is over. Check for material in the spool.
- The thread has broken. There was a gap between the hot end and the extruder. A common cause is with Bowden printheads. Perhaps the problem is with the filament itself. You need to try other material.
- Low plastic melting point set. The thick filament cannot pass through the narrow nozzle opening. Recommended temperature parameters for different types of plastic: PLA - heating t 180 °C, table heating t 60–80 °C; ABS - heating t 240 °C, table heating t 110 °C.
Interesting! Sometimes a clogged nozzle is the cause of interrupted printing. This can happen even during work.
Model delamination
Visually, this defect looks like an accordion. In some places, the layers move away from each other. At the same time, it is clear that this is not a pass, but the absence of sticking of plastic. Layer separation occurs due to incorrect setting of the filament thickness or its melting temperature.
Solving methods:
- Reduce the thickness (height) of the layer. Here you need to follow the rule: the maximum layer thickness should be no more than 80% of the nozzle diameter. Otherwise, the layers will not stick to each other.
- Raise the melting point of plastic. If the height parameter is in order, then you need to look at the temperature settings. For example, the optimum melting temperature of ABS plastic is 220–240 °C, but some users set it to only 190 °C. You can increase the melting temperature in the slicer settings: Edit Process Settings → Temperature.
If standard temperatures are not suitable, try raising the setting by 10 °C. See if the adhesion of the layers improves or not.
3D printer extruder does not heat up
At the same time, the device shows 100% heating power, the set temperature is on the display, but the extruder is cold. In most cases, the cause lies in a break in the wires or in the heating element itself. Ring all circuit elements after the controller. To cut off problems on the heating element, apply 12 V to it. It should start to heat up.
Attention! New printers may encounter a factory extruder defect. This element needs to be changed. There is no point in repairing the item.
Plastic falls in waves
Another name for this defect is “elephant foot”. In this case, the upper layers of the model are pushing against the lower parts, causing a wave effect. It sort of descends from top to bottom, forming a thick layer at the base of the model. This problem is especially common on models of printers with a heated bed.
Methods of solution:
- Find the optimal temperature regime between heating the table and blowing the model. Lower the heating temperature in steps of 5 °C. It is important to find a balance here, when the lower layers have already gained strength, but still retain adhesive properties for the following layers.
- Calibrate the table. Try applying the default settings. If the problem persists, slightly change the Z-axis height settings. Calibrate the new settings on the test cube. This is the base shape that clearly shows how the layers are laid down.
- Chamfer the base. The option is suitable for homemade devices. You need to start with a bevel of 5 mm and 45 °, after which you can make small adjustments.
Wall gaps
Such defects can be found when printing rather thin walls in the model. For example, when the extruder nozzle prints strips up to 0.4 mm thick, and the user needs to make a 1 mm edge. In such places, cracks may appear at the joints of the two layers. Typically, the defect is eliminated through the adjustment of the slicer.
Solution methods:
- We need to find the setting that is responsible for the wall thickness. Usually they are in the menu: Edit Process Settings → Advanced. Here you need to find the Gap Fil parameter.
He is just responsible for overlapping areas and filling the gaps between thin walls. Check the box next to Allow gap fill when necessary. There is also an alternative. Go to the Infill tab and tweak the Outline Overlap parameter.
- Simply adjust the extrusion width. Increase the parameter value if possible. The strip width can be set on the Extruders tab via the Edit Process Settings menu.
Try and experiment to get the best fit.
Web
A special case of filament leakage, when sloppy plastic threads remain between the parts. This happens for the same reasons as influxes. The solution methods are exactly the same:
- Changing the speed and distance of thread retraction. Full instructions are listed above.
- Lower print temperature. Try tweaking this setting to reduce the fluidity of the plastic. Here you need to be careful. Excessive decrease in temperature can lead to a delamination defect.
- A separate solution is to set a parameter in the slicer that launches the print head in a long and winding path over empty space.
The web falls near the model without sticking to its walls. No bridge is formed between the layers. To enable this option, go to the advanced settings of the slicer (Advanced). Check the box next to the Avoid crossing outline for travel movement option.
Interesting! Some 3D makers do not consider a web defect as something serious. They simply cut off the excess filament with a knife after the print is finished.
Extruder does not feed plastic
This problem is in the filament feed mechanism. Or the nozzle is too close to the table.
Solution methods:
- Check the plastic filament. It may have burrs on it. The feed gear has slipped. Check the condition of the thread, you may need to tweak the gear settings a little. Or change the plastic.
- Calibrate the table position. Raise the Z-axis slightly.
Sometimes the extruder will not feed plastic due to a clogged nozzle. It needs to be cleaned up.
Classification of defects
Almost all defects are one way or another related to two reasons: a malfunction of the mechanical part of the printer or incorrect software settings. Based on these parameters, it is possible to make a classification based on the most common problems in printing:
- Wear of nodes and the absence of a normal fastener feed. This parameter affects vibrations, nozzle movement trajectories.
- Poor extruder maintenance. The print head needs to be cleaned from time to time, to remove the sintered filament.
- Inaccurate (wrong) calibration of the platen and nozzle height. Another common mistake that causes a lot of print defects.
- Problems with printer settings. Most often solved through manual setting of parameters or adjustment of the G-code.
- Lost settings in the slicer. This includes: changed parameters, errors or inaccuracies in the firmware.
- Poor quality filament.
The problem may lie in the quality of the plastic. It is necessary to monitor its condition, quantity. If necessary, try to replace the manufacturer, or even switch to another type of filament.
- Electrical problems. To find such a malfunction, you need to arm yourself with a multimeter and ring all the circuits after the controller.
- Factory defect. The problem is solved by replacing a low-quality part.
These are the main printer malfunctions that in one way or another affect its operation, which leads to printing defects. The printer may have several problems at once. They will lead to the appearance of a group of defects. You need to be able to recognize the first signs of breakdown in time and eliminate them.
Important! At least once every two weeks, pay attention to the mechanics of the printer, carry out maintenance on the device. Clean the nodes, lubricate the shafts with oil. Check the platen and extruder calibration.
![]()
Learn more