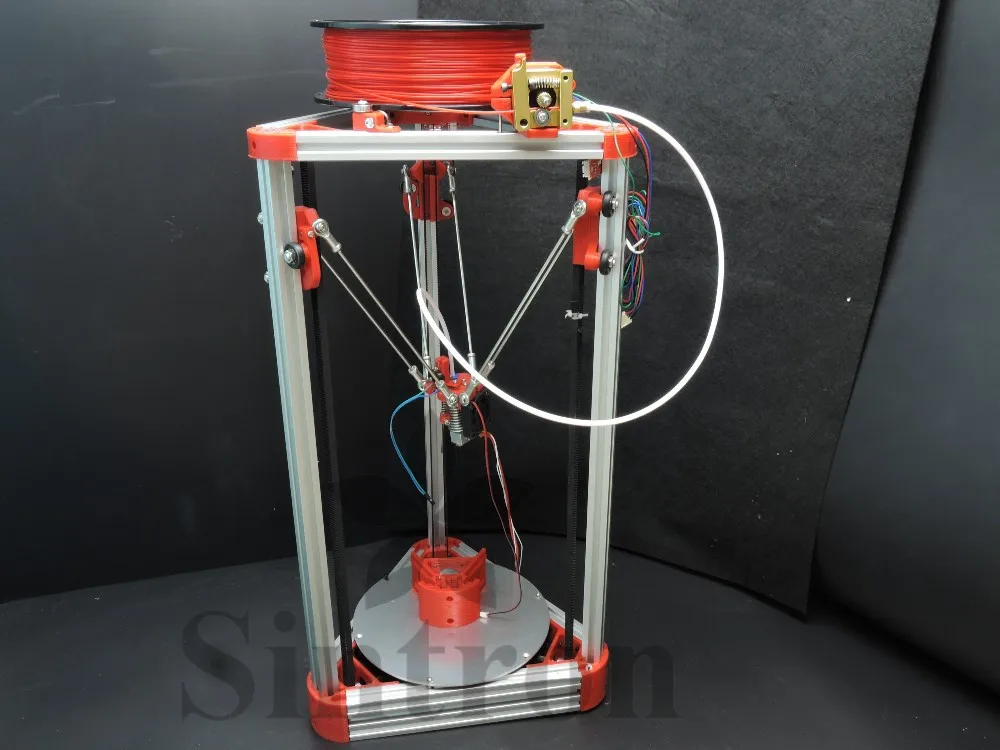
3D printer lens
Creating 3D Printed Lenses and a 3D Printed Camera with Stereolithography
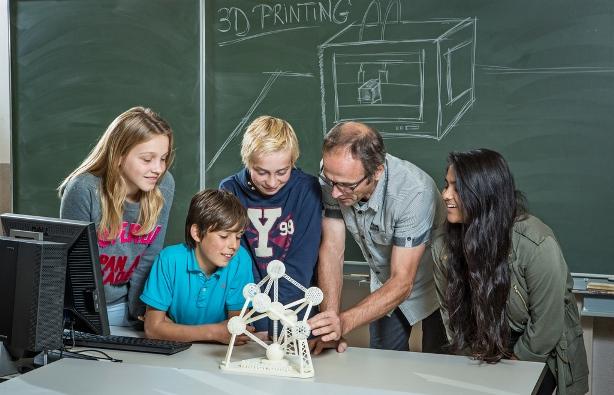
The idea for a fully 3D printed camera—a machine with many complex components—has been floating around Formlabs since we first experimented with creating 3D printed lenses.
Our applications engineer Amos Dudley took on the challenge and created the first fully 3D printed, interchangeable lens camera, produced entirely on a Formlabs SLA 3D printer.
The first fully 3D printed, interchangeable lens camera was produced entirely on a Formlabs SLA 3D printer.
Formlabs Clear Resin and stereolithography (SLA) 3D printing can create transparent objects that, with some post-processing, can be made optically clear. Formlabs' latest SLA 3D printer, the Form 3+, takes clarity one step further by using a flexible resin tank that reduces peel forces, resulting in clearer parts with smooth surface finish.
A camera lens is an exciting test case for the possibility of optically clear prints because the results are so easily seen and measured on film.
Read our guide for a list of finishing methods to create clear 3D printed parts for a variety of applications, from optics to light pipes to fluidics.
Making a functional lens starts with proper lens design. Optical design software helps lens designers predict the behavior of a lens and the constraints the lens will place on a camera.
Professional lens designers use optics packages such as Zemax and Code V, but these programs can cost thousands of dollars. Free, open-source software packages like Optical Ray Tracer are suitable alternatives.
Commercial camera lenses use multiple elements to correct for the optical distortions that commonly affect spherical lenses, such as spherical aberration, coma, and field curvature. For the sake of simplicity, the 3D printed camera is designed around a single spherical lens element.
The lower image shows how a smaller aperture increases focus.
Each side of a spherical lens is a section of a sphere with a given radius. Inserting the refractive index value for Clear Resin (1.5403) into Optical Ray Tracer shows that a symmetrical lens with a spherical radius of 50 mm focuses at approximately 47.5 mm from the center of the lens.
A single objective lens for a camera needs to balance optical power with distortion. A low-power, long focal length lens will have less distortion, but a narrow field of view. It is difficult to aim a camera if the field of view of its lens is too narrow. Reducing the aperture size helps to eliminate some coma distortion, as seen above.
A good compromise between these factors is a focal length of 50 mm, which is wide enough to position a subject within the frame.
The lens is modeled as the intersection of two spheres and a cylinder.
Once the lens is designed, it can be modeled in a CAD program. Since the lens is symmetrical, this is as simple as intersecting two 50 mm spheres at the right distance. The distance defines the radius and thickness of the lens, but doesn’t radically affect the optics. The lens was designed to be 40 mm in diameter with a 2 mm cylindrical edge.
If 3D printing on a Formlabs SLA 3D printer, consider different orientations and resolutions for 3D printing your lenses:
- A lens 3D printed horizontally may have layer line artefacts toward the center of the lens’s axis.
- A lens 3D printed perfectly vertically may be subject to some distortion caused by the additive process.
The clearest lenses were printed at a 30° angle relative to the build platform, with supports placed only along the edge to prevent support marks on important lens surfaces.
Testing different methods of polishing lenses, including hand sanding and machine polishing.
We tried three methods of polishing lenses to optical clarity: manual sanding, automated sanding, and dipping.
We used a range of sandpaper and micromesh pads with grits from 400 to 12000, in increments of 200, and polished lenses to a very smooth finish. This was done slowly and with a lot of care to clean the lens between grit levels and to eliminate scratches from the previous level before moving on to the next.
At around 3000 grit, SLA 3D printed lenses become glossy and very smooth to the touch. By 12000 grit, they are reflective.
To make an optically clear 3D printed lens, all layer lines need to be completely eliminated, which wasn’t possible by hand. Even though the lenses were smooth to the touch, reflections still appeared blurry, and there were still micro-scratches visible when holding the lenses at a shallow angle to the light.
The lens was clear as a magnifying glass, but as a focusing lens it wasn’t accurate enough.
It was hard to control the amount of material sanded off in the early stages of hand sanding, where the bulk of the layer lines were being removed. The next step was to try an automated method for reducing layer lines.
Amos designed and printed a lens polishing machine in hopes of reducing some of the error.
The speed of the lens’s rotation in the lens polishing machine is controlled by an Arduino.
Within the lens machine, the lens is rotated against the inside of a dish with the same spherical radius. The dish also rotates, but off axis to the lens by 45 degrees, and at a different speed.
The lens is connected to a servo motor with a kinematic coupling that combines 3D printed parts, springs, and small rivets. The coupling keeps the lens firmly, but flexibly pressed against the dish and allows it to “wobble” as it rotates. The dish holds a small amount of water and diamond lapping compound as an abrasive, and is made of the same Clear Resin as the lens.
The machine quickly reduced layer lines, but it couldn’t easily be used for the whole process. The dish would have to be replaced between polishing layers so grit wouldn’t be transferred to finer levels of polishing.
Unfinished 3D printed lenses rest on a build platform after being washed in isopropyl alcohol.
While gluing some prints together, Amos noticed that 3D printed lenses became significantly clearer when coated in a viscous material like epoxy, and decided to dip the lenses in liquid resin and then post-cure them under UV light. The viscous resin filled layers and scratches, forming a completely smooth surface.
Resin has a tendency to form bubbles when agitated, such as by dipping a lens, but these can be removed by turning the lens upside down over the resin tank and letting the resin gather and drain from the center.
The layer of resin should be as thin as possible while still eliminating layer lines. The last remaining bubbles were pulled of with a syringe, and the lens was post-cured completely under a UV lamp before dipping the other side.
Three stages of resin-dipped lenses, with the final lens on the left.
Resin-dipped 3D printed lenses are extremely smooth, with clear and sharp surface reflections. This technique can be used for other SLA prints as well to give them an even smoother finish, although it does tend to reduce detail.
The dipping process also alters focal length slightly, so Amos designed and printed a lens testing device. The device has screw threads that allow the lens to move closer and further from the imaging plane by turning the wheel, and experimentally check the focal distance of the lens.
The 3D printed lens tester mounted to a digital camera for instant feedback.
Is it possible to make 3D printed optics and lenses with multiple elements and more functionality? Try 3D printing your own lenses and lens tester, or a whole camera if you’re adventurous!
Download the 3D printed camera .STL files on Pinshape.
Learn more about Amos’s process for designing the entire 3D printed camera on his blog, and see the camera in action in our blog post featuring photos taken by the world’s first 3D printed, interchangeable lens camera.
Curious the see and test 3D printed SLA parts firsthand? Request a free 3D printed sample part to your office.
Request a Free Sample Part
You Can 3D Print and Build This 164mm f/2.5 Lens for Less Than $15
Photographer Felix Steele has created a design for a 3D-printed 164mm f/2.5 lens that has no fasteners or screws, uses affordable glass elements, and can be built at home for less than $15.
Steele created the design as the first major project of his online resource for open-source photography projects called Pixels and Prisms. The build features 23 “significant parts” as well as 15 pegs and is held together with nothing more than glue. Despite the simple design, the lens has a focusing mechanism and a fully adjustable aperture that houses elements in fixed tubes.
“Every photographer has different needs when it comes to lenses — in price, speed, and focal length. The Pixels and Prisms 163mm f/2.5 telephoto lens is a customizable optical system that offers a low-cost, open-source alternative to commercial lenses through 3D-printing,” Steele explains.
“As a photographer, the experience of building this lens was a valuable method of connecting with the principles which underlie much of my work. When a change in lens design affects your depth of field or sharpness, you develop an acute understanding of, and appreciation for, the equipment and techniques that you employ. ”
”
The finished lens features coverage for a full-frame camera with an aperture range between f/2.5 and f/11 via a 12-bladed aperture diaphragm and is made for the EF mount.
“For under $15, Pixels and Prisms is a viable low-weight lens option for travel, portrait, or street photographers, as well as a cost-effective entry point into telephoto photography. The aperture and zoom system can even be modified to work with any lens element, so long as an extender is added to the front of the optic,” he continues.
Stelle says that because of its flexibility, the lens design can serve as a means of providing an accessible way to get to specialized focal lengths — like 600mm — that doesn’t require a large investment. He says he plans to iterate on the design in the future and will be working on making the form factor more convenient as well as improving the optical quality.
“The process of designing and creating this telephoto lens was a three-month endeavor that started with the creation of an optical formula. The print files… are open for you to download — and the following will allow you to source and fit a lens element to go with them,” he explains.
The only parts of the lens that can’t be 3D printed are the glass optics, and for this Steele used Surplus Shed to acquire achromatic (two-part) lenses. He says that eBay is another option, but to make this particular lens builders will need one with a diameter of about 65mm.
“The Surplus Shed website features a focal length alongside each lens, and often, Ebay sellers include similar information. You will need to perform your own measurement for completely reliable results, though,” he says.
“First, balance the lens upright (on its edge) on a table or desk. Then, position a light source on the other side of the room, and direct it towards the lens element. The lens will focus the light at some point above your surface. The exact point is easily located by moving a sheet of paper to and from the lens: a halo will appear that drifts in and out of focus as you move the paper.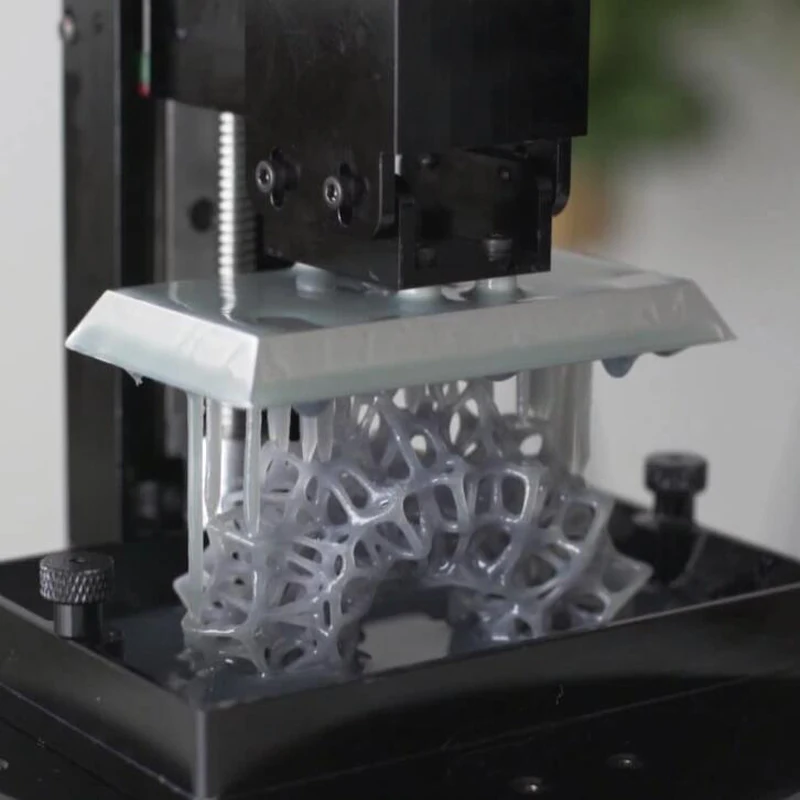 Finally, mark the point of sharpest focus and measure the distance from the lens element. This is your focal length (although I would recommend double-checking your calculation),” he continues.
“The result is a measurement that can be used to create a simple lens casing, to test image clarity and focusing before moving on to the finished project. Shift your lens into focus in front of your camera until you are satisfied by the quality of your element. Alternatively, slide your lens element along a tube of cardboard. Any part that will allow you to test the performance of your lens by making adjustments in distance to the sensor should work here. Once you’re satisfied that you have an acceptable lens, set it aside and begin 3D-printing.”
Steele says that the free online tool Optical Ray Tracer is also helpful in understanding the principles behind the lens.
“The software allows you to free-draw lenses and beams of light, among other functions. It allows you to create loose models of aperture and focal length – but a feature which visualizes the focusing mechanisms that you will be working with is Zoom Lens, a preset stored in their ‘Examples’ library. ”
”
“I chose a sample portfolio of seven images that illustrate the lens’s technical and creative potential and its excellent optical qualities,” he says.
The first is a simple photo of a lawn, which Steele includes with a version that enlarges the middle to showcase the sharpness.
Below are the other sample images Steele captured with the 3D printed lens:
The full build instructions for the 164mm f/2.5 Pixels and Prisms lens are broken into seven parts: the lens mount, the lens barrel, the outer focusing barrel, the inner focusing barrel, the focus ring, the aperture base, the aperture blades, the aperture pegs, and the aperture ring. Afte that, Steele supplies the build order diagram and building tips to make construction as easy as possible.
The 3D print files and all instructions can be found on Pixels and Prims.
Image credits: Felix Steele, Pixels and Prisms
Transparent 3D Printing Guide
Stereolithography (SLA) 3D printing can produce transparent objects that, after some post-processing, become optically transparent.
Formlabs' latest stereolithographic 3D printer, the Form 3, improves model transparency by using an elastic resin reservoir that reduces forces on the model, resulting in smoother, more transparent parts. 3D printing on a Form 3 in Clear Resin is a great way to produce parts that require light transmission and, with the right post-processing techniques, transparency. nine0003
The following processing methods can be used to 3D print transparent parts for a variety of purposes, from optical devices to light guides and liquid elements. Techniques range from quick solutions to obtain sufficient transparency to specialized techniques for creating optically transparent parts.
Clear and transparent 3D models are ideal for creating transparent prototyping elements, showing internal cavities and details, making LED housings or windows. Formlabs and our customers have used Clear Resin to create an optically clear 100% 3D printed camera lens, Times Square Fresnel lens tiles, light guides, prisms, millifluidic devices, and more. nine0003
Formlabs application engineer Amos Dudley designed and 3D printed a lens for a fully 3D printed camera.
Curious to see with your own eyes what a transparent SLA 3D printed part looks like? We will send a free transparent 3D printing sample directly to your office.
Request a Free Sample
We have tested several post-processing methods for 3D printed Clear Resin parts. In this article, we will cover hand sanding, spray clear coating and resin impregnation. Each treatment option requires a different amount of effort, depending on the required degree of transparency and surface quality. nine0003
Application of : Hand sanding and polishing can be effective on simple shaped models with few fine details, but is not suitable for complex shaped models. With this method, it is very difficult to achieve complete optical transparency.
Hand sanding will require you to sand with very fine grit sandpaper, but with some effort you can sand and polish the parts to the transparency level of a magnifying glass.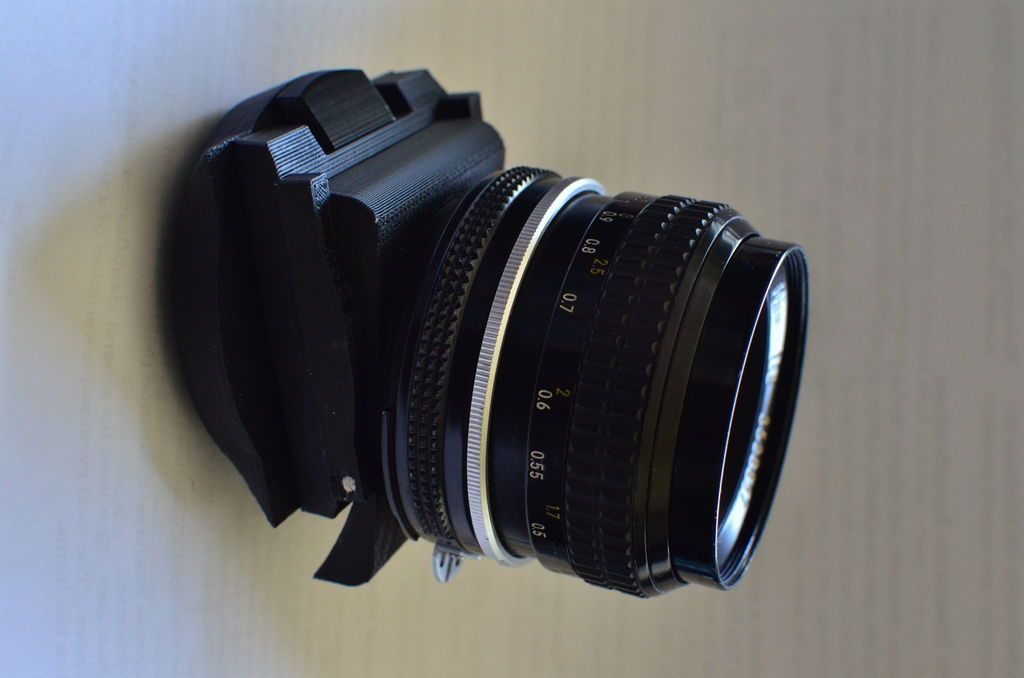 However, it is very difficult to completely remove all the layer lines with manual processing - if you turn the part at a slight angle to the light, you can notice micro-scratches. nine0003
Instruction : Use sandpaper to smooth the surface, then polish the part with acrylic cleaner and a microfiber cloth.
With approximately 3000 grit sandpaper, transparent SLA 3D printed parts become glossy and very smooth to the touch. After sanding with 12.000 grit, they reflect light. Try different sandpapers and abrasive sheets from 400 to 12,000 grit in 200 increments. Before moving on to the next grit step, slowly and carefully clean the lens and remove scratches from the previous level of sanding. nine0003
Our support site offers a simple step-by-step manual sanding guide that includes an acrylic spray finish.
If all you need is translucency, mineral oil will suffice to create a smooth surface and hide light spots.
We have tested various polishing methods for transparent 3D models, from hand sanding and spray coating to resin impregnation.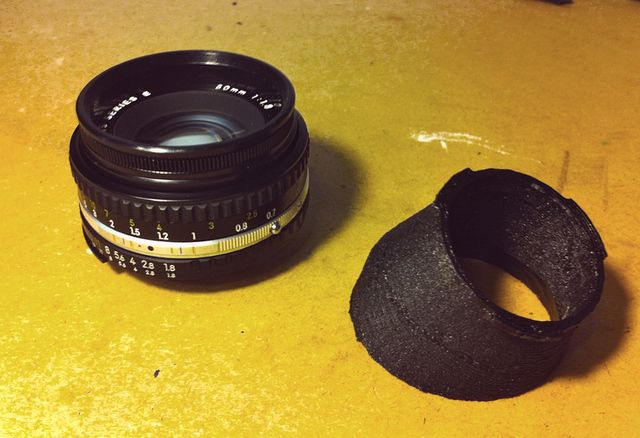 nine0012
Application of : Spray coating is a quick and easy way to improve the transparency of parts without significantly reducing detail. The method is effective for all types of models, since it is possible to spray the coating on complex-shaped parts, which can be difficult to grind and polish.
Clearcoat application helps to hide layer lines and protect parts from UV exposure which can cause yellowing and unintended final cure. If you require a smooth, glass-like surface, hand sand and polish before coating; the more thorough the sanding before applying the clear coat, the better the clearness. This extra step is great for post-processed prototypes that look like completely transparent plastic, such as packaging, bottles, and microfluidic devices. nine0003
Instruction : A variety of aerosols can be used to apply a clear coat, from inexpensive sprays to products that require a separate room and tools.
- General purpose clear aerosol paints: : The selection ranges from good, very inexpensive options like Rustoleum Painter's Touch 2X to affordable high quality aerosols like Spray Max 2k Clear Glamor.

- Automotive sprays : Products such as Lesonal Universal Clear, a high solids acrylic urethane clear coat, give a very good glossy effect. They are designed for air drying and stoving and require a spray gun and free space to spray. A base coat must be applied before applying Lesonal Universal Clear and similar aerosols.
Coat a clean, dry model already rinsed in isopropyl alcohol (IPA). Do not finalize the model before spraying as this may cause yellowing. Air dry the model. Once it is completely dry, apply two to three coats of spray in a dust-free environment. nine0003
For a fee, a coating such as Lesonal Universal Clear can be applied at a workshop. In most cases, bodyshops use a volatile solvent such as naphtha to clean and prepare the surface of the model prior to spraying.
For the Times Square installation, Window to the Heart, Formlabs and Aranda/Lasch spray-coated the tiles with Lesonal Universal Clear in an auto body shop.
Application of : This method is best suited for cases where very high transparency of parts is required and can only be applied to flat or nearly flat surfaces such as lenses or "windows" into the interior of the part.
Resin immersion produces very smooth details with crisp and sharp surface reflections.
The method can be used to increase the smoothness of parts printed with other SLA materials, although it may reduce detail. nine0003
Instruction : Apply Clear Resin to the part using a syringe or by dipping the part into the resin, as desired. The viscous polymer will fill in the delaminations and scratches present on the part, forming a completely smooth surface.
The resin layer should be as thin as possible while still eliminating layer lines. Remove all bubbles with a syringe. Completely cure the part using the appropriate parameters, then repeat the process on the other side, both dipping and final curing.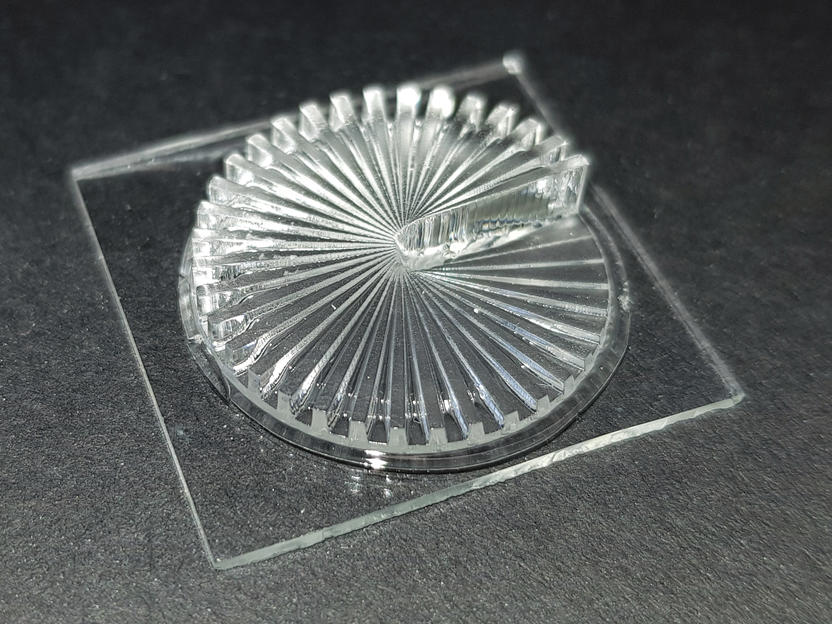 nine0003
Lens subjected to a 3-step polymer immersion procedure, final result on the left.
The polymer immersion process slightly changes the focal length of the lenses. Formlabs Applications Engineer Amos Dudley designed and 3D printed a lens tester to create a fully 3D printed camera.
With the Form 3 Stereolithographic 3D Printer, you can create crisp and fully transparent 3D models at an affordable price with minimal post-processing. nine0003
Check out our white paper, , for a detailed overview of SLA ecosystems and a step-by-step 3D printing workflow.
Would you like to see the resulting quality with your own eyes? Request a free transparent model sample.
Request a sample printed in Clear Resin
20 Amazing Things 3D Printed
If you can print in 2D, can you print in 3D? Well, the technology is already here. You can print 3D objects based on a working template, and they are not only meant to be looked at. They actually work! Manufacturers can provide you with a template from which you can print a broken machine part, say a screw, rather than placing an order and then waiting for a replacement. nine0003
Alternatively, you can replicate an expensive car like a 1960 Aston Martin DB5 in 1:3 scale and then, for example, shoot it down or burn it down for fun, like the makers of the James Bond movie Skyfall did.
3D printing is made possible by fusing layer by layer of durable plastics and metals based on a pattern designed with ARPA (Computer Aided Design). Each layer, about 0.1 mm thick, consists of liquid, powder or whole sheets of material. nine0003
With this technology and a 3D printer, you can design, construct, or 3D print almost anything around you, as long as you have the templates. Just to give you an idea of what you can do with 3D printing, check out these 20 amazing printed masterpieces.
Firearms
In the past, printed firearms broke easily after a few shots.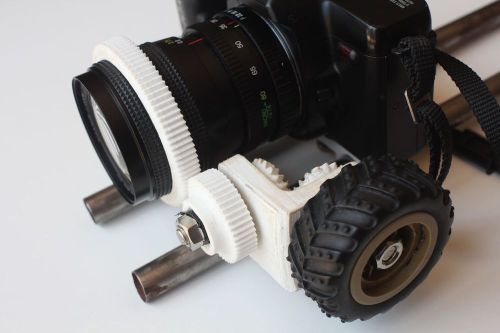 Today, however, the non-profit corporation Defense Distributed is offering users to download the necessary files to print your own firearms if you have a 3D printer at home. nine0003
Here is one of the videos of their semi-automatic and semi-automatic weapons:
Acoustic guitar others know it's possible.
3D printed guitars can be made from plastic complete with a metal sound hole cap and heel. In addition to creating working musical instruments, guitarists can also make exact 3D copies of the guitars of their favorite musicians or idols. nine0003
Homemade Camera Lens
A camera lens is not easy to make, but with 3D printing you can make your own lens and even get some creative and unique results with it.
The creator of this lens (http://www.thingiverse.com/thing:37147) used acrylic to replace glass in the lens, as well as some other parts and mechanisms to bring them together.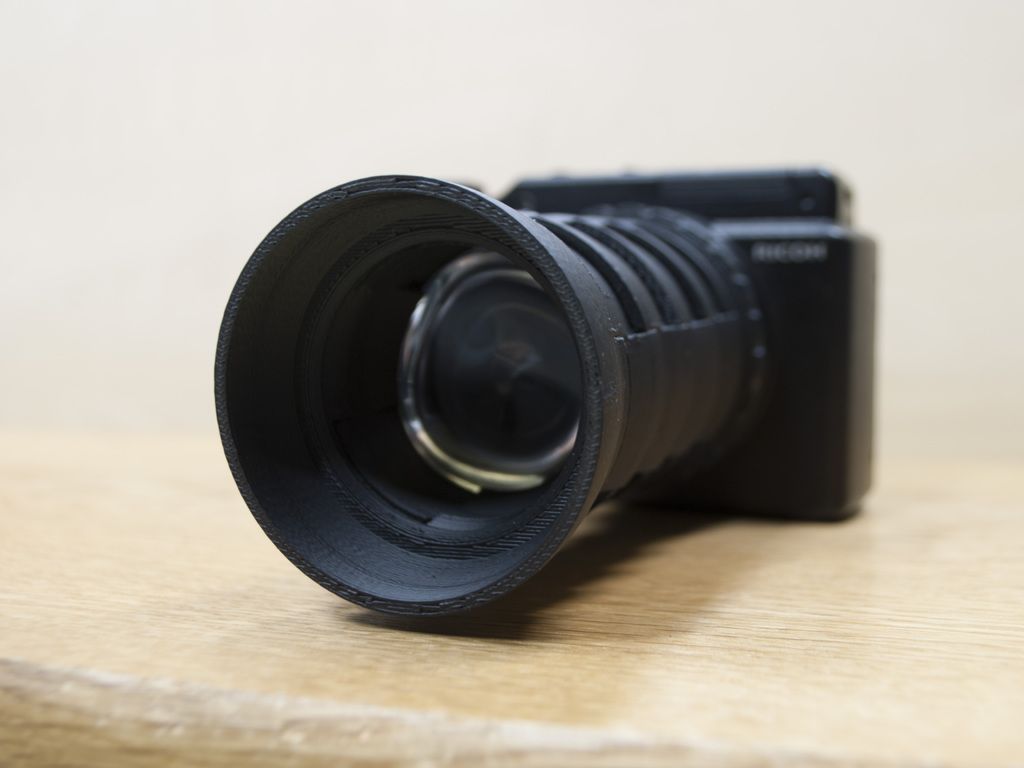 And, most importantly, the lens works! Check out some pictures taken with this lens: http://suzuki11.tumblr.com/
Shakuhachi Flute
This beautiful Japanese flute is 3D printed stainless steel. It comes in a variety of finishes such as gold plated matte or glossy and antique bronze matte (pictured below). The flute is 9.4 inches long and if you look closely you can see a small dragon on it.
You can buy this beautiful musical instrument for $239.95. Just imagine what this technology means for fantasy lovers. nine0003
Simple Loom
If you are going to weave a small amount of fabric, you can create this simple loom with a 3D printer and some plastic. All parts were fastened with bolts. To model this loom, the author used a 3D modeling program called openSCAD.
The lessons of history would be much more interesting if you could see real goods that were sold during a certain period of time. nine0003
Machine model: http://www. thingiverse.com/thing:11374
3D kids drawing figures maybe a sculpture? Well, now you can do it for 99 euros. Thanks to 3D printing, your child's colorful drawing can be turned into a work of art.
Approximately 4" long object can be used to decorate your desktop or home, or as a trophy for your child's artistic talents. http://www.crayoncreatures.com/
3 D- embryo
“3D scanning” of your unborn child takes on a whole new meaning. Instead of a picture of your ultrasound, a Japanese company is offering you the so-called Angel Shape, a 3D print of your embryo for $1,275. A 3D model is created based on the processed image data using BioTexture.
Medical models
When it comes to technology, science has to be involved. Thanks to 3D printing, doctors will have a cheaper alternative to study human anatomy, as well as the ability to introduce more realistic models into surgical practice without the use of cadavers. nine0003
The printing of these medical models is so accurate that surgeons can use them to plan operations before operating on the real patient.
Illuminated shoes
This sneaker has a lot of intricate details and 1 meter of wires to light it up, so it's not a shoe you could wear. It was 3D printed and used for a commercial advertisement for the Onitsuka Tiger. The link says you can buy it for 5879.83 euros and use as a modern sculpture in your home.
In this video you can see how this amazing shoe was made:
Case for your iPhone with card slot
This Janne Kyttanen creation might look like a good iPhone 5 case design, but it's more functional than a normal case. It can also store any two cards.
It is called the "Mondriaan" case, after the artist Piet Mondriaan, who liked the design of horizontal and vertical lines. This case costs 34.9$9 and available in 3 colors.
Wire Storage
If you bring your USB cables or other wires with you and want them to be neatly folded and tangle-free, you can buy this wire storage to help you get rid of from the hassle and save your time.
It can be printed in a wide range of colors and its price ranges from 10 to 20 euros depending on the color and size you choose. nine0003
https://www.shapeways.com/product/E6PH6YKMC/gear-wrap
Infinite Sisu iPad Stand
This stand is inspired by the Finnish concept of determination; The little muscular "man" holding your iPad is pretty hard to ignore. This is definitely a work of art that you can purchase for $161.
You may find it expensive compared to the standard and more well-known stands for smartphones and tablets, but this is the price you have to pay for any work of art. nine0003
Bugdroid according to your design
Fans of the Android operating system and especially its splash logo figurines will also love these 3D crafted figurines, where the most amazing thing is that you can customize and choose different themes that suit you best.
There are 25 standard themes to choose from, priced at $21.99; If you don't find one that's right for you, then there's the option to customize your own Bugdroid for a starting price of $29$.99
Lamp
Your attention is the so-called palm lamp or lamp (Palm Lamp) from the same designer who made the iPhone case in the 10th item of our list. Janne Kyttanen has designed this rather eye-catching piece of art that comes in a wide variety of sizes. This lamp can be used as part of the decor, as a floor or table lamp or even a chandelier.
Kaleidoscope watch
This is a 3D printed watch that consists of two parts: part "A" and part "B". The first part is the purple dial itself, the second is the design part behind the dial.
With the instructions, you can quickly and easily assemble and set them up. Two versions of the watch are available for order: the kaleidoscope watch in white design will cost a total of $51, while the black one will cost $61.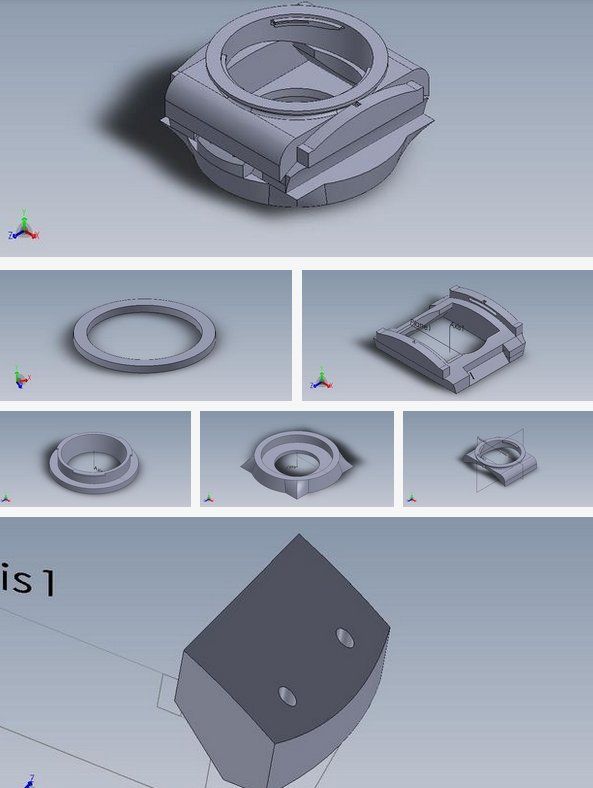
Revolution in 3 D anatomical sculpture prints
This piece of art is the creation of one of the most famous 3D designers Joshua Harker. This sculpture is printed in polyamide, obtained by laser sintering nylon and glass. Follow the link to see more photos of this intricate creation: https://www.kickstarter.com/projects/joshharker/anatomica-di-revolutis
Coffee cups
ceramics. The printing process takes almost a full day, and the One Cup a Day project aims to design and create 30 unique cups in 30 days. You can purchase their creations from this site where prices range from $36 to $77: https://www.cunicode.com/works/one-coffee-cup-a-day/
Pumps
This pair of 3D high heels called "Morphogenesis" was designed by Pauline Van Dongen and made from laser sintered nylon. She collaborated with Freedom Of Creation on the design, which in turn won the Most Creative Collection award at Mittelmoda 2010.
These shoes come in a variety of colors and truly define the future of 3D printed accessories. . nine0003
https://www.3dsystems.com/blog/foc/high-heel-shoes-by-pauline-van-dongen
Fabrics printed with 3 D
Designer Jiri Evenhuise together Janne Kyttanen has worked hard to make needle and thread a thing of the past. In their work, they use software that collects data on the physique of a particular person and instantly creates clothes that will fit exactly on the figure.
This type of production is recyclable, less labour-intensive, reduces production time and is ultimately a more sustainable way to produce clothing. Plus, you can be sure that the clothes you buy online will fit you just as perfectly as gloves. nine0003
http://www.ecouterre.com/are-3d-printed-fabrics-the-future-of-sustainable-textiles/
Bikini N21
flexible and waterproof material with a thickness of 0.7 mm. Manufacturers claim that it is thanks to these qualities that this underwear can be used as a swimsuit and, in fact, it will be the most comfortable to wear in the water.