2D picture to 3d printing
From 2D to 3D. How to turn a picture or a photo into a 3D model?
Many people, who begin with 3D printing, often limit themselves to printing models downloaded from PrusaPrinters and other sites like Thingiverse or MyMiniFactory. There is nothing wrong with that, of course, but the 3D printing options are way wider than that. Once you get into the secrets of creating your own models, you will discover a whole new world.
Before you start exploring advanced 3D modeling programs (we recommend, for example, Fusion 360, Blender, SketchUp or Rhinoceros), you can also enjoy making your own models in an easier way. How about printing a pendant using your favorite sports team’s logo, print an image drawn by your child or turning your family photo into a lithophane? There are several ways to accomplish these task and I will show you two basic ones. Both use applications that are free to use.
3D model from a 2D image
Not every picture makes a nice 3D print, but if you choose well, you can be pleasantly surprised. In general, the less complex a picture is, the better is the resulting model. It is important that the source image has clearly separated colors, and that the transition between them is clearly defined and not gradual. If the image contains tiny details, you can improve the print quality by using a smaller 0.25mm diameter nozzle. You can read everything about nozzles with a different diameter in our previous article. Here are two examples of images we’ve been converting for 3D printing.
First, we scan the image. I guess there is no need to mention that higher DPI is better. For best results, “clean” the scanned image in any graphics editor – focus on cleaning the backgrounds and achieving clear color transitions. And then just open the Selva tool in the browser.
- In the program window, click Upload image and upload the image you want to work with.
- The image has been uploaded, and you can modify it using the two sliders called Threshold (Edit Layer Width) and Height.
 Tweak these values to achieve the desired look.
 - Then save the image, so it can be further edited, using the Download a Standard Quality STL for free button. Of course, you can also use the paid version and download a file in “High quality” at $ 2.5. The paid version allows you to export the file at a higher resolution – this can be useful if your picture has fine lines. However, for the vast majority of objects, standard quality will be sufficient.
We will open the saved file in Tinkercad online app. You also need to sign up for free here in order to edit the objects.
- After logging into Tinkercad, we can start uploading a file by creating a new project, using the “Create new design”
- Then, on the desktop, use the “Import” button to select the file to be edited and confirm the selection by pressing “Choose file”.
- Once we have the file you selected, we check its size.
 Size can be further tweaked by changing the number in the “Scale” field. We will change the scale to 500 for our logo.
 - Once you have an object imported, you can immediately export it as a .stl file and then print it, or use the various Tinkercad features to modify the file to meet your requirements. For example, we added a pad under the object and a loop to create a key tag.
- To make a keychain from a logo, add objects from the right side menu, specifically the square and the hoop, to the workspace. These objects can be edited using white markings on the edges. We stretched the square across the logo area and shrunk it to make the logo visible. Then we created the key strap by moving a resized hoop to the pendant so that only the half of the object is visible.
- Then, we converted the modified file into the .stl format ready for slicing using the “Export” button.
The model is almost ready for 3D printing. We will open this file in PrusaSlicer and then just adjust its size (or add a brim and support if needed). You can also try to use Colorprint to prepare multi-color object. Then you can finally print the model.
Another possibility to convert 2D images to 3D printing is lithophane, sometimes called 3D Photo Print. Lithophane (from French: lithophanie) is an etched or shaped work of art made of a very thin translucent porcelain. The actual image can only be seen clearly when it is illuminated by a backlight. Lithophane represents a three-dimensional image – completely different from two-dimensional engravings and daguerreotypes that are “flat”. Images change their characteristics depending on the light source behind them.
What do you need to do? Just grab a photo or any other picture! Knowledge of 3D software is not needed at all. Creating an STL file can be done with an online app available at http://3dp. rocks/lithophane/.
- In the top bar, click on “Images” and drag the selected photo into the window. We recommend uploading photos with a lower resolution – for example, 500×500. This resolution is sufficient to create a good looking model and the calculation takes much less time.
- After uploading an image, a 3D model should be automatically generated. The last button in the top bar is “Settings” where you can change the model generation settings. To explain the very basics: Under “Settings / Image settings”, is the source image editing. The first slider is also the most important one – Positive Image / Negative Image. Generating a 3D model is based on the principle that each point/pixel is assigned a height coordinate according to the black color amount (black color = 0, white color = 1). In order for the resulting 3D photo to match the original template, we need to convert the image into a negative – you can do that with the first slider.

- We also recommend setting “THINNEST LAYER (MM)” in “Settings / Model settings” to 0.4. Leave the other settings untouched.
- As soon as we have this model ready, download it using the “Download” button.
- Then, open the file in PrusaSlicer. After opening the file, we recommend switching the layer height to 0.10mm. From our experience, it is better to print the object flat on the print bed to prevent any kind of wobble that could happen if you printed the object vertically. You can also use a 0.05mm setting with a 0.25mm nozzle to achieve the best possible print quality.
- Then go to “Print settings” and set “Layers and perimeters” values as follows: Perimeters: 1; Solid layers Top: 1; Solid layers Bottom: 1
- Next step is going to “Infill” where we set the value to 95% Rectilinear
- It is important not to resize the object in PrusaSlicer because that would increase its height on the Z axis and the flow of light through the image would no longer work.
 You can only change the Y and X axes.
This is our tried and tested setup. For the best print results, we recommend selecting a light material color, ideally white, creamy but also silver or even purple. However, the quality of the printed object will always depend on the filament manufacturer, since not every filament will be translucent and not every filament will give you the perfect lithophane result, but feel free to experiment… 🙂
If you already have experience with lithophane printing, you can improve it further by coloring it. Just add colors (e.g. with common markers) to the back and the picture will shine with nice new colors. We are working on a separate article about this topic, so stay tuned. 🙂
How to convert a 2D image to 3D for printing in 3D
If you have a 3D printer or are interested in this world, you most certainly would have wanted to make a personalized key ring, your company logo…
You probably thought it was a task that required advanced knowledge in 3D design, but today we teach you that converting your 2D image to a printable 3D model is easier than you think.
Throughout this article, we will show you one of the best methods to do this conversion, as well as some tools that, although not mandatory part of the process, can help improve the final quality of the 3D model.
📖 What do you want to read?
2D image to 3D using 3D Builder (Windows)
If you are a 3D printing user or work manipulating 3D objects and you are not familiar with 3D Builder you don’t know what you’re missing. This is a program that comes pre-installed on most PCs with Windows 10, but don’t worry if it is not installed on your computer, as we teach you to download it for free.
Install Microsoft 3D Builder
It’s very simple: you just need to open the Microsoft App Store by pressing the Windows key and typing “store”. Once in the store just type in the search engine “3D Builder” and click on the button that says “Install”.
Once we have installed the program, we will have one of the most powerful and simple 3D software on the market. Although it is not a software for modeling itself, with 3D Builder we will be able to create and edit 3D models from simple 2D images in a very simple way. This method, although it may require the installation of a software, is probably the most complete that we know, since it allows us to play around with several parameters to adjust our 3D model to our needs. If you want us to show you what other wonders you can do with this program just leave a comment indicating your interest.
Uploading an image and converting it to 3D
Doing the conversion couldn’t be more intuitive. Start the program and click on the open button indicated in the image:
Uploading an image into Microsoft 3D Builder to transform it into 3DThis menu allows us to load both 3D files in almost any format (stl, obj, 3mf…) and images that we want to convert to 3D models. Afterwards, we click on load image, and then we click on our image file. Once loaded, the interface shown in the photo is displayed before us.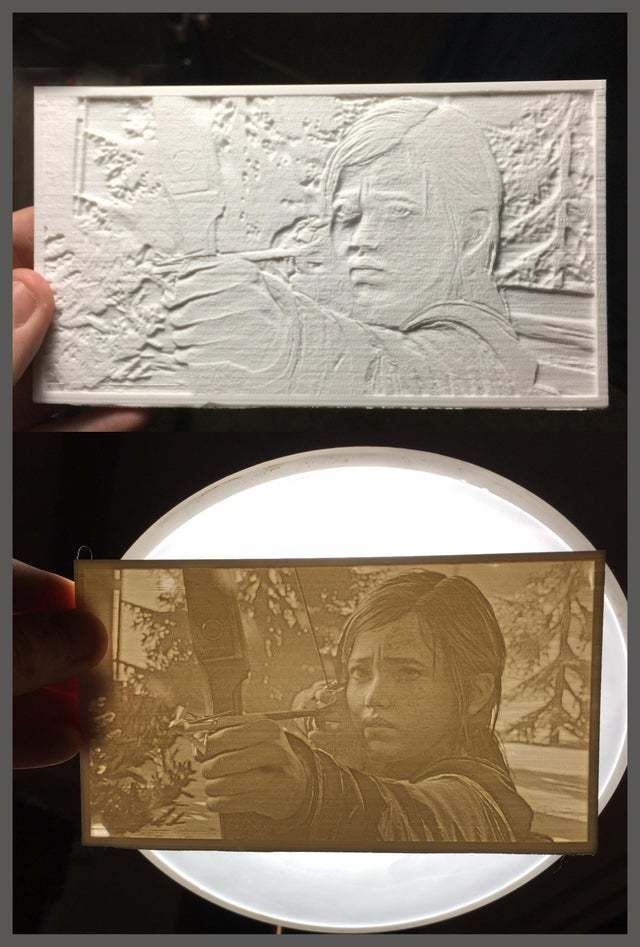 In it we can see several elements, but there are three that are the most important and the ones we are going to explain to you.
Which conversion method to choose
Conversion method selection: this dropdown list includes 4 different options for converting from 2D to 3D but we will only explain the ones we consider most useful. “Contour” sections the image by searching for borders (abrupt color changes) and generates a 3D model based on this. “Height Map” assigns a different height to each color, creating a staggered 3D model. This mode is especially useful to create models and print them in various colors changing the filament. Please leave a comment if you want us to do a tutorial on this because you’re sure to love it.
Level selection and smoothing
Selecting levels and smoothing: these sliders allow us to select both the level of detail we want to preserve and the smoothing we want to apply. The ideal thing is to try different settings depending on your image. In general, adding a bit of smoothing helps if our image is low resolution and the 3D model that is generated has noise, or very sharp peaks and edges.
Activation of image inversion: this switch has the function of creating the image negative, since depending on each specific case we will want the highest parts of our 3D model to be the brightest parts of the image or the darkest.
As you can see, the program is very simple, and you just need to play a little with the parameters we have explained. If you have any doubt do not hesitate to ask in the comments section.
Scale your image to the size you want
Once we have the 3D model generated, we are going to use this same software to scale it to our liking. In our case, we will select the model generated by the “map of heights ” method since we will print it in two colors by pausing and changing the filament. To scale it we only have to click on the scaling icon in the toolbar at the bottom
Before changing any dimension we must make sure that the lock on the right is closed. This means that we want to maintain the aspect ratio of our figure, that is, its proportions. If the lock were open when changing one of the dimensions, the rest would not be changed accordingly and we would end up with a deformed figure. Bearing this in mind, we only have to type in the dimensions we want for our 3D model and we would have it done.
Save the image
In order to export our model we only have to press the button with the three parallel lines in the upper left corner and then click on “Save as”. Usually 3D models for 3D printing are in STL format, but it is an old-fashioned format. Almost all your current laminators such as Cura or Simplify3D support other more modern and efficient formats, so we recommend you try the 3mf format. You will see that your file weighs considerably less (even several times less) than if you had saved it in stl, which is a point to bear in mind if you’re like us and save hundreds and hundreds of your favorite 3D models.
Convert an image to 3D online
Do you prefer to convert a 3D image directly from your browser? No need to download any program, because with Selva3D you can upload an image and transform it into 3D in a moment.
Tip: better use a vector image (Windows, Linux and Mac)
On this occasion, we have converted to 3D a simple image with an acceptable resolution, but this is not always the case. Many times, we find that the image we want to convert to a 3D model is in a very poor resolution, or has been converted to an inadequate format or compressed multiple times, resulting in a pixelated and blurred image. In this case it can be very interesting to convert our image, which will usually be a .jpg or .png file, to .svg.
To make it simple, just keep in mind that an svg file is not a bitmap, but a collection of vectors, and, in practice, is an image with infinite resolution, which you can enlarge as much as you want. For this task you can use online converters like this one or our most recommended option, Inkscape (available for Windows, Linux and Mac).
Vector image files are the method used by graphic design professionals and more experienced users to generate 3D files from flat images. The 2D image saves information about the lines and areas of the area and can be extruded to generate the most accurate 3D model possible. It is a technique that is widely used for logos, posters, signs…
Here is an example of how this process can be done in Inkscape and Blender:
Did you like the article?
We’ve seen that there are multiple methods that allow you to convert your 2D image to a 3D model and we’ve shown you the one we like best. Getting good results depends a lot on the starting image, but if this is of good quality we can achieve a very accurate model in just a couple of minutes.
If you want to materialize your 3D design you can use our 3D service to print it online, just ask for a quote:
On the other hand, there are many ways to transform an image into something three-dimensional, such as lithophanies or velocity painting. If this blog has caught your interest, we will certainly do tutorials on these cool topics if you let us know.
Have you already converted your first image to a 3D model? Leave us a comment sharing your experience!
2D images in 3D model at the touch of a button
News
Last July, MakerBot, the world's largest desktop 3D printer maker, announced the launch of the PrintShop app for iOS. With this app, the user could turn their iPad into a 3D modeling device. And so, at the opening of the 3D Print Week exhibition, which took place in New York last week, MakerBot announced a massive update for PrintShop. nine0003
The main difference between MakerBot PrintShop version 1.5 is the new Shape Maker function, which allows you to convert 2D drawings into 3D 3D models.
“MakerBot PrintShop was created to make 3D printing more accessible, to inspire users to create 3D models,” explains Joy Neal, MakerBot employee.All you have to do is take a pen and paper and draw a picture. And now the magic begins: MakerBot Shape Maker will help you turn a flat and featureless 2D world into a stunning 3D 3D world.” nine0017
However, not only drawings can become the basis for a future 3D model. Also, users can turn their own or downloaded from the Internet photos and simple screenshots from the iPad into three-dimensional models. It remains only to press the button and send the finished model to print. Second business.
“It's a surprisingly simple and straightforward 3D design tool,” says Neil. “It gives us great pleasure to look at models designed and printed with the MakerBot Shape Maker. This app is sure to appeal to students, artists, cartoonists and parents who want to save their child's drawings." nine0017The Shape Maker feature is quite simple. You draw a picture on a piece of paper, then take a photo of it with the device's camera.
Photographs of objects “with simple and clear lines” are also suitable. When the image is on the screen, use the slider to select the part of the picture that we want to print. The application analyzes the image and paints it green as it is processed. At this point, you can also select a background and add some changes. You can now save your model or directly send it to your MakerBot Replicator 3D Printer via WiFi. nine0003
The new Shape Maker feature is a great help for those who want to learn how to model. From the point of view of MakerBot, the PrintShop application is primarily useful for students of art schools, because with its help 2D images take on a physical form in just a matter of hours.
Follow author
Follow
Don't want
3
Article comments nine0003
More interesting articles
17
Subscribe to the author
Subscribe
Don't want
At the end of November, the Almaz-Almaz concern announced the launch of serial production of Dobryn quadrocopters.
..
Read more
12 3MF0003
Read more
84
Subscribe to the author
Subscribe
Don't want
Collaboration 3D
We are pleased to present you our joint development with Speci...
Read more
Read blogs
How to convert an image (JPG/PNG) into a 3D STL model
3DPrintStory 3D printing process How to convert an image (JPG/PNG) to a 3D STL model
3D modeling can be intimidating for a beginner.
And this is one of those cases where creating 3D models from 2D images can be the most appropriate way to get acquainted with the world of 3D printing. Currently, there are several ways to convert JPG and PNG files to STL files in order to get a 3D model from an image. nine0003
But before we get into these methods, let's talk about what they are not. While it is true that 3D models can be created from flat images, the methods described in this article do not allow you to create complete, detailed 3D models. Instead, the proposed options are more suitable for making a flat 2D image three-dimensional, which will still require refinement.
So if you're wondering if you can immediately get a bust of Mona Lisa using her image, the answer is no (so you have to spend time and effort on further post-processing of the resulting 3D model). But this does not mean that the methods below are useless! nine0003
Option 1 - 3D Builder (Windows)
The first and probably the easiest option is to use the 3D Builder application, which is preinstalled on almost any modern Windows computer.
The app has a feature that can convert an image to STL or OBJ file very easily. Note that this option is only for Windows 10 users. Here's how:
- If you don't already have the 3D Builder app on your computer, download it from the Microsoft Store. nine0102
- Once you have downloaded and installed the application, drag the image into the workspace, or click "Add" from the "Insert" menu and select an image.
- Adjust the "Levels" and "Smooth" sliders until the image is crisp and clear. You can also switch between "Contour", "Height Map", "Edge", and "Stamp" settings to add various useful effects.
- When you are happy with the 3D model, click the "Import Image" button. Here you can change the scale using the "Scale" tool at the bottom of the workspace. When scaling, it is recommended to lock the aspect ratio by clicking the lock icon in the same menu. nine0102
Option 2 - Cura
If you don't have a Windows PC, the second option is to use Ultimaker's Cura built-in feature.
The tool is not as powerful as in 3D Builder, but works great. It's also a great option for those who generally use Cura for slicing because you don't have to export and import the model in different applications.
- Download the Ultimaker Cura slicer from the Ultimaker website if you are not already using it. nine0102
- Import an image into Cura by dragging it into the workspace.
- When you have imported an image, a menu with other settings will appear. Here you can change the height, width, thickness, smoothness, and more.
- Finally, you can export it as STL or OBJ by clicking "File" then "Export" or you can cut it directly for 3D printing.
Option 3 - Litophane Converter
Another way to convert an image to a file for 3D printing is to make Litophane. What is lithophane, you ask? Litophane is a three-dimensional object that, due to the difference in thickness, changes the amount of transmitted light. These differences in thickness create dark and light parts of the image that appear to be "embedded" into the object.