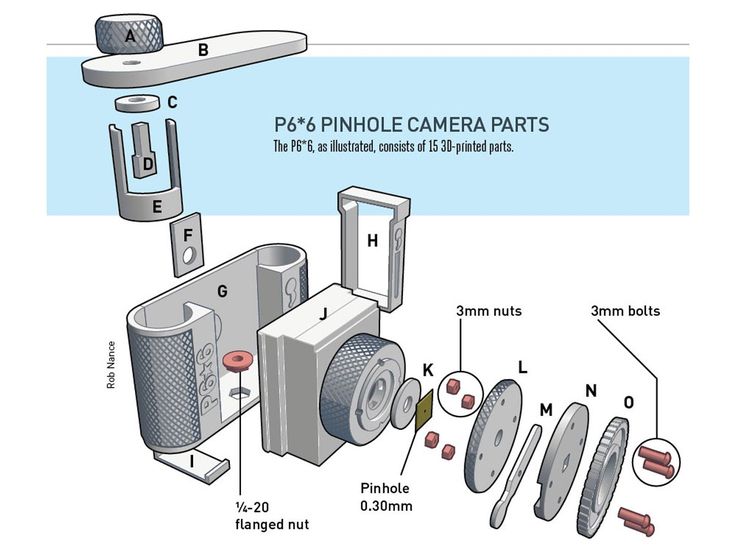
3D printed camera parts
3D-printed Photo gadgets for everyone
Apparently, you can find quite a lot of amateur and professional photographers in the 3D printing community. And a lot of them have already had the idea to use their 3D printer to make various gadgets and accessories that are either expensive or hard to find. You can produce some amazing things that will make it easier to take better photos for everyone. In this article, we are sharing some of our favorite projects and simple tips that will simplify things, save money, and generally let you have more fun.
Camera backpack mounts
There are many accessories that can be mounted on your backpack, for example, a GoPro mount. But you can also print this cool camera mount that can carry even a heavy DSLR camera. This mount is especially useful for wildlife photographers who need their camera always ready and wearing it around your neck the whole day is rather uncomfortable. If your camera is on the heavier side, make sure to test that the printed part is strong enough to hold it (e. g. shake it in the mount above something soft, like a blanket) or secure it with a strap.
Flash OCF grids and diffusers
Another cool improvement for your camera that can be made easier with our printers is a flash diffuser. Lots of photographers often improvise with folded pieces of paper or other, often very creative ways. Thanks to 3D printing you can make effective and professional-looking diffusers. Plus, you can make them cheaply and in no time. Try to experiment a little with transparent filaments and you can achieve some interesting results. We have already covered printing with translucent and transparent materials in great detail in our recent article.
And if you want to improve your photos in an unconventional manner, try to print an OCF grid for your flash that will narrow the source of light. A store-bought product might cost you about 100 USD, however, a 3D printed part will cost you just a few cents.
The Lens Filter Wrench Set
If you use filters during your photoshoots, you might have realized at an occasion that you have tightened them too much.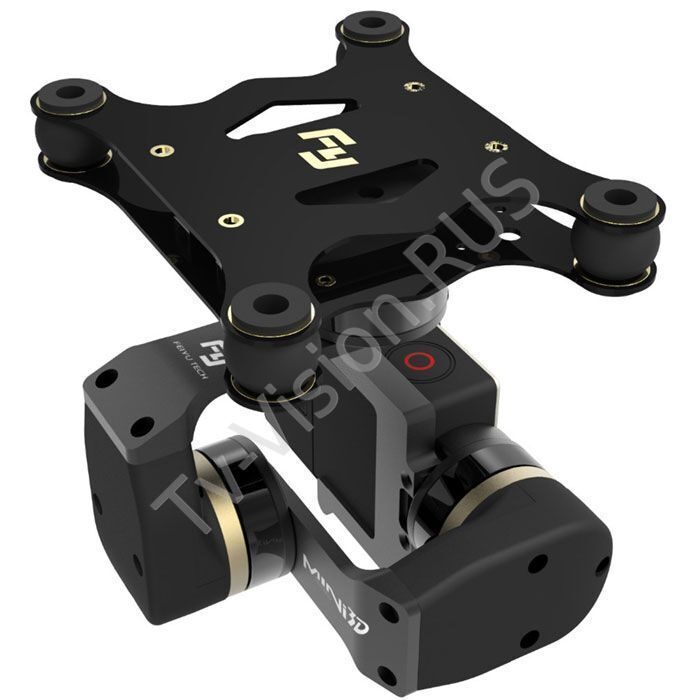 One of our colleagues came up with this amazing idea that solves the problem elegantly. It’s a quick print that requires just a short piece of a filament strand.
Lens hoods
Original lens hoods tend to be very expensive. Again, they can cost you something between dozens and hundreds of USD. However, if you print them, it won’t cost you more than a few bucks, plus you can produce them pretty quickly. Of course, the result won’t be as tough as the original lens hood but that shouldn’t be a problem. After all – you can always print a new one.
Lens Cap Holders
Another cool gadget that will save you some money and stress is this simple lens cap holder. Lens caps are easily lost and it’s an inconvenience and an additional expense to buy them again. Some cameras have lens caps hanging on a short string, but they can sometimes get in the way (in the wind for example). It’s much better to print this holder that can be attached to a strap. Simply put it on your bag to make sure you won’t lose your lens caps again.
Various GoPro mounts
Thanks to 3D printing you can make a whole set of non-standard parts that are not sold by the official manufacturer. Depending on your requirements for toughness, the number of suitable models available online can be pretty high and there’s a lot of projects to choose from. We recommend printing various GoPro mounts with flexible and resilient materials. One of the toughest (but also one of the most difficult) materials is Flexfill 98a. A suitable alternative is PETG, PC Blend, and other filaments designed for printing mechanical parts.
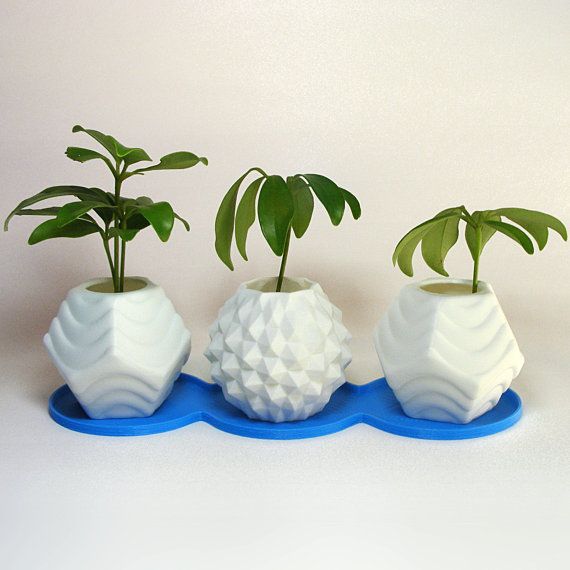
Cases for SD cards, batteries and other equipment
These everyday items are great not only for photographers but for the vast majority of people. You know the situation when you try to find 4 batteries in your backpack, find only three and the last one is somewhere deep in the pocket. To reach it, you need to empty half of your backpack. Well, you can make it a lot easier with our printer: You can make an unlimited amount of various boxes that will save you from backpack chaos. And it doesn’t end with battery boxes. For example, you can print SD card holders, lens filter boxes, or protective cases for your lenses.
Tripods
Several simple tripods can be found at PrusaPrinters.org or Thingiverse. Most of them are made for smartphones but you can also find some models that are able to support the weight of a compact camera or ultrazoom. We found these three tripods to be quite useful – they can be printed quickly and weigh almost nothing:
The first one (black and orange) is obviously the sturdiest and can carry a device bigger than a phone or GoPro camera. The orange ring serves as a locking mechanism for the legs and although it is not strong enough to carry a heavy DSLR camera, it works well for light-weighted cameras. The holes inside the tripod’s legs also make it easy to hang it somewhere.
The second tripod (grey in the middle) is one of the most space-saving photo-stands we were able to find. However, its hinges are rather fragile so it’s made only for the lightest of cameras.
The third version (on the right) needs a few adjustments when sliced. The wing nut size should be increased to 105% to fit properly on the screws. Or, even better, you should use metal bolts and nuts instead of using the printed ones. The rest of this tripod fits tightly and makes a great phone stand. This tripod is compact and it’s easy to hang from the hooks. Unfortunately, this tripod cannot support a full-size camera.
Some of the tripods feature 3D-printed screws for attaching a camera. However, we advise against using plastic screws: If you accidentally break them off with the attached camera, you will have difficulty removing the broken part from the socket. Instead, you should make (or find) such tripods that have a hole for a metal screw. Because screws commonly used to attach a camera come with a specialized thread (compared to standard M5 bolts), you will buy them online or find them in a good hardware store.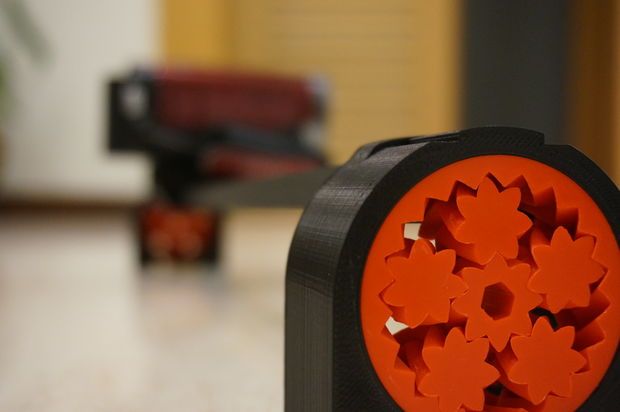
Please keep in mind that 3D printed tripods will never be quite as durable as professional products. Especially, various locking mechanisms and moving parts tend to be more fragile. However, our Original Prusa 3D printers can still produce some really nice, cheap, and compact tripods.
Timelapse slider
Professional time-lapse sliders are usually pretty expensive, large, and heavy. Luckily, we live in a time when a lot of parts (including Arduino and similar computer boards) can be bought for just a few dollars. With these, you can create a professional slider with just a little effort. There are several models available at PrusaPrinters that can help you with that. The slider we use for some of our videos has just a few 3D printed parts but you can make models that are almost entirely 3D-printed. For example, this simple slider needs just a few marbles.
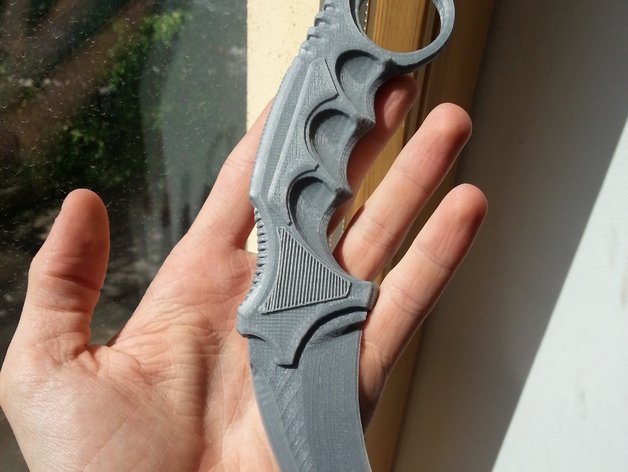
Props
You can find a lot of models online that will help you to make your photos more interesting. For example, you can use this sci-fi-looking artifact that can be used not only for LARP gaming but also as a stylish prop.
A lot of photo gadgets have two main benefits: They don’t require any tiny 3D-printed parts, therefore they are easy to print and often quite tough. Plus, 3D-printed solutions can save a lot of money. No matter whether you are an amateur or professional photographer, we hope this article provided you some inspiration to print something new for your next photo adventure. Just don’t forget to share the result online.
And as always: Happy printing!
3D Printed Camera Accessories - Magigoo
Share this post
One of the most overlooked function of 3D printing, is the fact that you can make certain aspects of your life easier by quickly printing some small accessory. Since one of our colleagues here at the Magigoo offices isan avid photographer, this blog post will focus on a number of 3D Printed Camera Accessories. These accessories have been printed for the sole purpose of convenience, as well as to add some added function to the photography experience.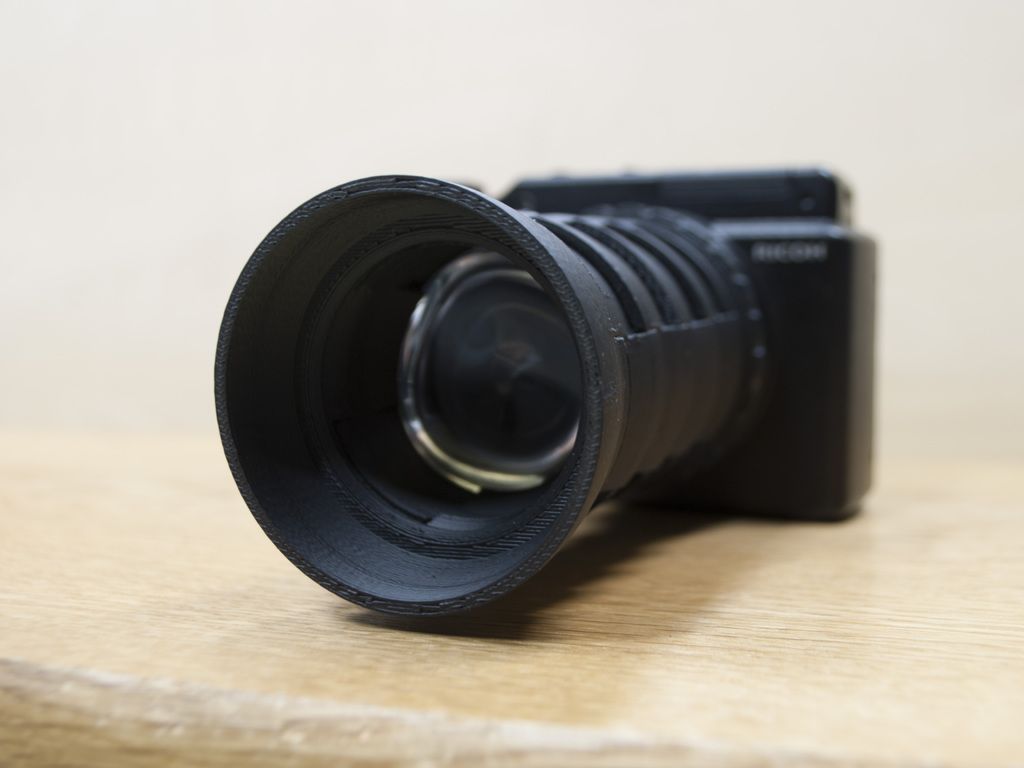
3D Printed Camera Accessories are not new to this office however, and you can read one of our older blog posts to learn about how a set of lens zoom rings were designed and printed.
3D printed zoom and focus lens ringsBokeh Shapers
Photo of Bokeh Shaper
Bokeh Shapers are essentially lens caps with a small shape cut out of them. This small shape produces an out of focus blur effect which replicates the cutout shape into multiple, seemingly illuminated, blurred images in the photo. A version of this can be seen in the image below, where the cutout is that of a star.
via photofocus.comFor our case, the bokeh shaper template was downloaded from Thingiverse, and can be found here. This was then inserted into Fusion 360 and the Magigoo Logo was cutout from the center of it, allowing the following images to be taken.
Umbrella Holder
This accessory has two primary functions; shielding from rain or wind, and shielding from the sun. While shielding from the rain may be an obvious function that one would expect from an umbrella, shielding from the sun may be overlooked at times. The difference between having the sun shining on the camera, and having the sun shielded and the camera in the shade may cause the resulting photo to change drastically.
This model that we have printed was found on Thingiverse, and can be found here. The model was printed using Ultimaker PC on our Ultimaker S3, and was assembled as per the instructions.
Backdrop Holder
The backdrop holder accessory was requested and designed in house, to be used as a Green Screen or White Screen curtain holder for photoshoots. This design includes the main head which allows the tripod head to get inserted in, as well as a long shaft to be inserted into a curtain rod. With two of these printed, and two extendable tripods, the curtain rod can be held up by both ends, at a height of 2 meters or higher.
Film Slide Scanner
Another design that was done in house, was that of the Film Slide Scanner.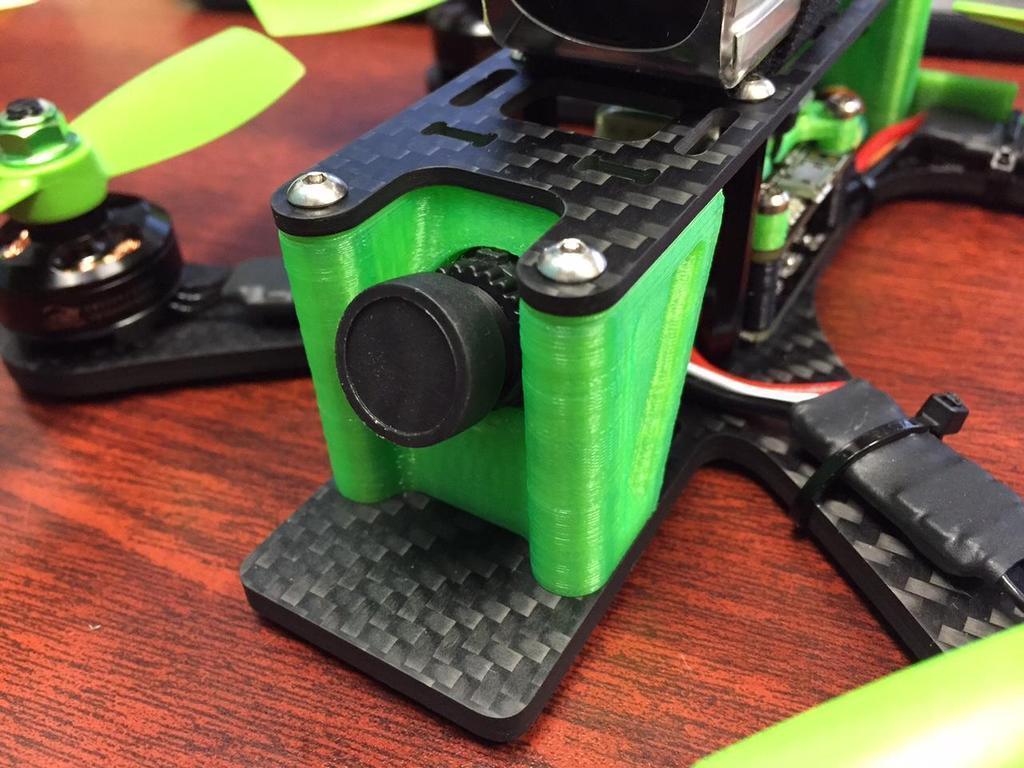 This little device allows one to use a macro lens on a camera to practically ‘scan’ the images on film slides. This design features a glass plate at the bottom, that forces the film slide to flatten before the photo is taken. The back plate, which hosts a bore to allow for the camera to be mounted on can slide in and out of the back side of the film box. This is done in order to allow the user to manually set the distance between the camera and the box, to fine tune the camera’s focus.
Since the photos and ‘scans’ taken will show the negative colours of the true image, these will have to be easily fixed by negating the colours through an editing software.
Flash Mount
The next accessory that has been used around the Magigoo Offices is the Flash Mount. This particular design can be found on Thingiverse, and in our case, was 3D printed using PA-CF filament.
While the print achieved it’s functionality and could hold the flash up well, it was not very suitable to be mounted on tripods or stands. For this reason, a threaded insert was installed into the bottom side of this print. This was done by heating the threaded insert, and sliding it into the slot at the bottom. This makes the print material slightly softer and ends up being partially fused with the threaded insert. Having this addition in place allows it to be screwed onto any suitable threaded mount, with added stability and security. For more information on threaded inserts, watch this video by CNC Kitchen.
Sling Strap Bottom plate
When a small part gets lost or misplaced, it’s much easier and cheaper to print a replacement than to buy a new one. This is what we did when our colleague lost the plate that attaches his camera to his sling strap. We got hold of a spare plate, and redesigned it for 3D printing.
3D Model of the Sling Strap Plate (left) and Plate Rubber (right)The sling strap plate was 3D Printed using Polymaker PolyMax PC, while the rubber section was printed using the flexible filament DSN Arnitel 2045. This allowed our colleague to rapidly produce a couple of extra ones to store just in case he ever misplaces the strap plate again!
Whether creating 3D Printed Camera Accessories or a small design to be used to improve your photography experience 3D Printing is an easy and quick way to solve most of the issues you may come across.
Share this post
Cameradactyl Brancopan is a 3D printed camera you can make yourself
If you've ever wanted to get into photography but have always been hampered by how expensive cameras can be, then Ethan Moses has you covered. If you have your own 3D printer, you only need $40 of filament to make it Patented Panoramic Cameradactyl Brancopan:
https://www.youtube.com/watch?v=wa4fhQ6KMME
Brancopan is not ordinary and cheap analog camera. Nope. Although it is 3D printed, it uses 35mm film and 50-250mm Mamiya press lenses, which puts it on par with some very good low to mid range cameras. And, of course, print it yourself - it's any color option you choose. Take a look at some options:
It has a film feed ratchet to help stop the film at each frame, and a spring-loaded film door latch. Two cold shoes allow you to use the finders and accessories, while the tripod mount and belt eyelets make it much easier to carry.
The best thing about the cell? According to Ethan, the camera's oversized plastic body makes it extremely durable - I'M RED - something a lot of cameras these days can't say for themselves.
As mentioned, you only need a couple of items to make Cameradactyl Brancopan. Apart from the 3D printer and filament, you will need a hex wrench (to assemble it), a whetstone (to cut/cut the pieces) and sandpaper (to smooth everything out). What's amazing about the design is that if you ever break one or more parts, you can simply print out a new part to replace it.
What if you don't have a 3D printer? Well, the camera is designed to print on an FDM printer with a small print bed, so there are plenty of options.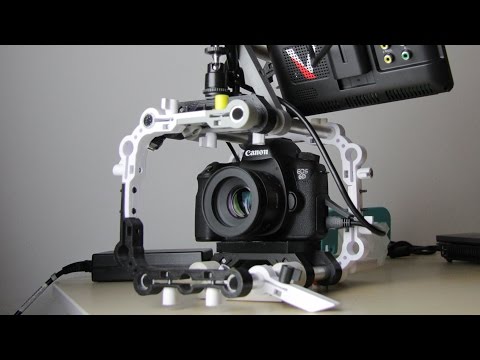 Ethan recommends a few: Creality ender 3, Prusa i3 MK3, or Creality CR-10 depending on your needs and how serious you are about 3D printing.
Ethan wants to make Brancopan's designs accessible so he can focus his efforts on creating new camera designs rather than creating his past work for others.
He launched a Kickstarter campaign that achieved its goal with the support of 783 people. Supporters have been given access to the STL files as well as three videos detailing the printing, assembly and use of Brancopan. The campaign ended on January 10, but the rest of the world will receive the files and videos on May 1, 2020.
But don't worry. If you're interested in 3D printed cameras and 3D printed camera accessories, you can check out the Cameradactyl store where you'll find an absolute array of camera virtues, including the Cameradactyl Homunculus 69 which has some of the same features as Brancopan.
This post contains affiliate links that help support SolidSmack with a small commission earned from the sale, at no additional cost to you!
An 18 year old student converted a film camera to a digital one using 3D printed parts
There are two types of people in the world of photography: those who only use film cameras and those who have fully embraced the glitz and glamor of digital photography.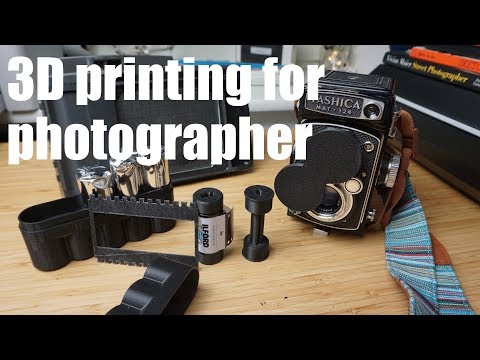 Recently, however, an 18-year-old physics student found a way to combine the best of both worlds.
Ollie Baker from Brighton, UK successfully converted a 1970s Konica Auto S3 into a digital camera using Sony NEX-5 parts and 3D printed parts he designed himself. It is not only the end result that is striking, but the process of transformation itself.
Now called the FrankenCamera, the idea came about last year when Baker was awarded a generous amount by the Arkwrite Scholarship Fund, one of the UK's most prestigious scholarship schemes. Ollie decided to invest in his personal project to "digitize" traditional film cameras.
He chose the Konica Auto S3 analog camera, originally released in 1973 and known for its excellent rangefinder. In those days, she was considered one of the best. According to Baker, the Konica was the ideal choice because of its fixed 38mm f1.8 lens with non-contact internal leaf shutter. And the rangefinder mechanism allowed the camera to be small, unlike SLR cameras, which require a fairly large mirror.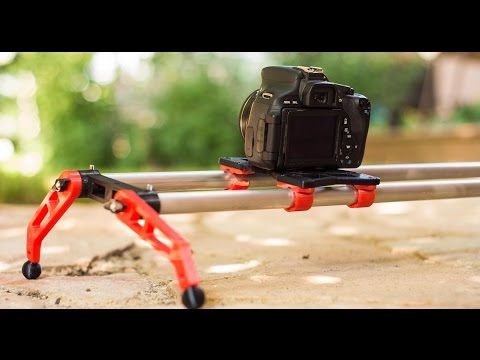 One of the downsides of Konica is that there is no built-in diopter adjustment for eyeglass wearers, but Baker cut one of his lenses out of old glasses and inserted it into the viewfinder as a diopter adjustment to solve the problem.
For a digital camera that needs to be dismantled and integrated into the Konica frame, Baker needed a balance between image quality, cost and size. Ultimately, he chose the Sony NEX-5, a small SLRless camera. Since Sony was only being used as a "donor", he decided which parts would be absolutely necessary, narrowing down the list to the board, sensor, SD card slot, battery slot and screen. In addition, Baker had to use a motor and connecting teeth to adjust the shutter to avoid annoying "camera errors" on the screen.
The design process followed and Baker created a completely 3D printed new back to house the digital components and attach them to the film camera. To do this, he used Solidworks CAD software, as well as a caliper to take measurements. The top of this new part contains the screen and buttons, while the bottom contains the SD card slot, sensor, motor, screws, and battery. The main board is in the middle.
Baker originally intended to use his school 3D printer, but the detail quality was poor. So he sent his files to the SLS company in London for printing. After some adjustments, Baker got a strong, precise and flexible nylon print that fit perfectly with the original camera, with a hinge at one end and a clasp at the other that matched Konica's own locking mechanism. All it took was a small piece of black leatherette to match the design of the Konica 19.70 years.
Photo of Baker's first 3D print
Photo of the second and final 3D print of the back
CAD file design, wiring and soldering, to ON/OFF mechanism design and trigger replacement. But the grandest thing is that the camera does not just work, but takes good pictures. As the videos show, the FrankenCamera works just like the original Konica, including a bright flash.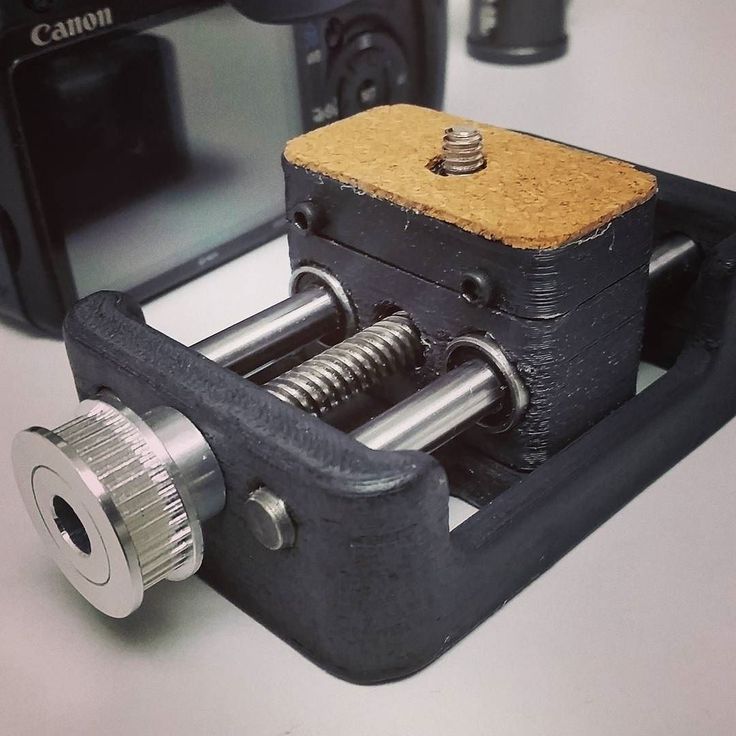 The only difference is the digital image sensor, the high screen resolution, and the SD card instead of the old-fashioned film. As you can see from the photos below, the results are incredibly convincing.
Then there was what happens to almost all postings on the Internet, Baker got negative comments: "Why ruin a wonderful Konica camera?" He was even accused of forgery (which he took as a compliment). However, the young creator claims that his goal was not to make a commercial product. Rather, he wanted to realize his personal vision by creating something new, interesting and, above all, exciting. We have to say that he hit the nail on the head.
Following the successful completion of the Konica project, Baker launched a Kickstarter campaign to fund the FrankenCamera II, a lightweight and reverse digital conversion based on the Leica M3. This campaign quickly reached its financial goal and the final product is expected to arrive in August 2015. In the meantime, those interested in purchasing a 3D print and instructions for digitizing their own film camera can visit his website for more details on the camera's features and functionality.