3D print zits
Blobs and Zits
Blobs and Zits
During your 3D print, the extruder must constantly stop and start extruding as it moves to different portions of the build platform. Most extruders are very good at producing a uniform extrusion while they are running, however, each time the extruder is turned off and on again, it can create extra variation. For example, if you look at the outer shell of your 3D print, you may notice a small mark on the surface that represents the location where the extruder started printing that section of plastic. The extruder had to start printing the outer shell of your 3D model at that specific location, and then it eventually returned to that location when the entire shell had been printed. These marks are commonly referred to as blobs or zits. As you can imagine, it is difficult to join two pieces of plastic together without leaving any mark whatsoever, but there are several tools in Simplify3D that can be used to minimize the appearance of these surface blemishes.
Common Solutions
Retraction and coasting settings
If you start to notice small defects on the surface of your print, the best way to diagnose what is causing them is to watch closely as each perimeter of your part is printed. Does the defect appear the moment the extruder starts printing the perimeter? Or does it only appear later when the perimeter is completed and the extruder is coming to a stop? If the defect appears right away at the beginning of the loop, then it’s possible your retraction settings need to be adjusted slightly. Click on “Edit Process Settings” and go to the Extruders tab. Right below the retraction distance, there is a setting labeled “Extra Restart Distance.” This option determines the difference between the retraction distance when the extruder is stopping and the priming distance that is used when the extruder is restarting. If you notice a surface defect right at the beginning of the perimeter, then your extruder is likely priming too much plastic.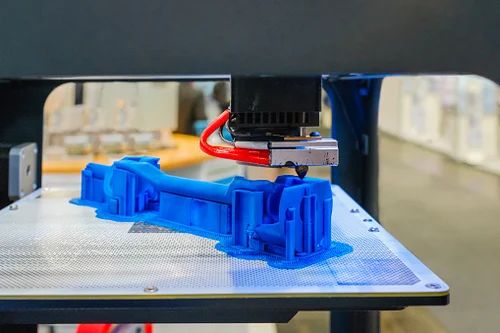 You can reduce the priming distance by entering a negative value for the extra restart distance. For example, if your retraction distance is 1.0mm, and the extra restart distance is -0.2mm (note the negative sign), then each time your extruder stops, it will retract 1.0mm of plastic. However, each time the extruder has to start extruding again, it will only push 0.8mm of plastic back into the nozzle. Adjust this setting until the defect no longer appears when the extruder initially begins printing the perimeter.
If the defect does not occur until the end of the perimeter when the extruder is coming to a stop, then there is a different setting to adjust. This setting is called coasting. You can find it right below the retraction settings on the Extruder tab. Coasting will turn off your extruder a short distance before the end of the perimeter to relieve the pressure that is built up within the nozzle. Enable this option and increase the value until you no longer notice a defect appearing at the end of each perimeter when the extruder is coming to a stop. Typically, a coasting distance between 0.2-0.5mm is enough to have a noticeable impact.
Avoid unnecessary retractions
The retraction and coasting settings mentioned above can help avoid defects each time the nozzle retracts, however, in some cases, it is better to simply avoid the retractions all together. This way the extruder never has to reverse direction and can continue a nice uniform extrusion. This is particularly important for machines that use a Bowden extruder, as the long distance between the extruder motor and the nozzle makes retractions more troublesome. To adjust the settings that control when a retraction takes place, go to the Advanced tab and look for the “Ooze Control Behavior” section. This section contains many useful settings that can modify the behavior of your 3D printer. As was mentioned in the Stringing or Oozing section, retractions are primarily used to prevent the nozzle from oozing as it moves between different parts of your print. However, if the nozzle is not going to cross an open space, the oozing that occurs will be on the inside of the model and won’t be visible from the outside. For this reason, many printers will have the “Only retract when crossing open spaces” option enabled to avoid unnecessary retractions.
Another related setting can be found in the “Movement Behavior” section. If your printer is only going to retract when crossing open spaces, then it would be beneficial to avoid these open spaces as much as possible. Simplify3D includes an extremely useful feature that can divert the travel path of the extruder to avoid crossing an outline perimeter. If the extruder can avoid crossing the outline by changing the travel path, then a retraction won’t be needed. To use this feature, simply enable the “Avoid crossing outline for travel movement” option.
Non-stationary retractions
Another extremely useful feature in Simplify3D is the ability to perform non-stationary retractions. This is particularly useful for bowden extruders that build up a lot of pressure inside the nozzle while printing. Typically when these types of machines stop extruding, the excess pressure is still likely to create a blob if the extruder is standing still. So Simplify3D has added a unique option that allows you to keep the nozzle moving while it performs its retraction. This means you are less likely to see a stationary blob since the extruder is constant moving during this process. To enable this option, we have to adjust a few settings. First, click “Edit Process Settings” and go to the Extruder tab. Make sure that the “Wipe Nozzle” option is enabled. This will tell the printer to wipe the nozzle at the end of each section when it stops printing. For the “Wipe Distance”, enter a value of 5mm as a good starting point. Next, go to the Advanced tab and enable the option labeled “Perform retraction during wipe movement”. This will prevent a stationary retraction, since the printer has now been instructed to wipe the nozzle while it retracts. This is a very powerful feature and a great option to try if you are still having trouble removing these defects from the surface of your print.
Choose the location of your start points
If you are still seeing some small defects on the surface of your print, Simplify3D also provides an option that can control the location of these points. Click on “Edit Process Settings” and select the Layer tab. In most cases, the locations of these start points are chosen to optimize the printing speed. However, you also have the ability to randomize the placement of the start points or align them to a specific location. For example, if you were printing a statue, you could align all of the start points to be on the backside of the model so that they were not visible from the front. To do this, enable the “Choose start point that is closest to specific location” option and then enter the XY coordinate where you want the start points to be placed.
Related Topics
How to Fix 3D Prints Zits and Blobs?
Not every problem in 3D printing will cause a catastrophic failure of your project. In some cases, the error manifests as minor blemishes and imperfections. 3D print zits are a typical example. You might still end up with a relatively solid 3D print, but it’s not going to look as good as you likely would have envisioned.
Undoubtedly 3d print zits and blobs are the cases. These are surface imperfections created by unwanted variations in filament extrusion. The good news is that you can likely avoid these defects by changing a few slicer settings.
Contents(show)
What Are Zits On 3D Prints?Blobs or zits typically take the form of small bumps on the outer surface of 3d print. Upon closer inspection, you may notice that a single chunk or zit is exclusive to just a single layer. This should already clue you in the root cause of blobs and zits.
Another feature is that the blobs and zits are distributed almost uniformly across the entire outer surface. It implies that the surface defect is not just a one-off problem. There is likely a systemic problem in your 3d printer or slicer that is causing a reasonably consistent error.
There can be several possible causes for blobs or zits in your 3D print. However, all of them will result in inconsistent extrusion. Regardless, print quality will undoubtedly suffer when 3D printing blobs and zits are left uncontrolled.
What Causes Zits On My 3D Print?
As with most 3d printing issues, there can be several different but related causes for 3d print blobs.
Too much filament
In a way, blobs and zits are the opposite of layer gaps in 3d print. They represent spots where too much filament are extruded. If zits and blobs have become a common problem, you can try to keep a close on your 3D printer while it runs and identify when and where they occur.
Do zits and blobs appear at the point where a layer starts or stops? This means that there are short bursts of extra filament when the extruder starts or stops a layer. If this is the case, you likely need to refine your retraction settings.
Pressure is too high on the extruder
Too much pressure on the extruder will make it more likely to end up with excess filament in unwanted spots. This extra pressure can cause by several factors, including improper printing temperature, speed, and retraction setting.
Printing speed is too high
Printing at very high speed or extrusion multiplier settings can be a significant cause of blobs and zits. Higher print speed means that filament is delivered faster to the extruder and hot end. This causes undue pressure on the extruder and makes it harder to control the flow of molten filament.
The optimal printing speed will vary based on the 3d filament type you are working with and other settings such as the printing temperature. We suggest setting a default printing speed according to manufacturer recommendations and adjusting if necessary.
Retraction, coasting, and wiping settings
Retraction plays a massive role in potentially avoiding blobs and zits. However, unnecessary retraction can also cause them. The key here is to strike the perfect balance and to take advantage of coasting and wiping features.
The prevailing good practice to avoid zits and blobs is to retract only when necessary. Having no retraction is ideal because it ensures that there is constant and continuous extrusion of filament. However, your model may have significant gaps that the extruder needs to cross. In this case, enabling non-stationary extrusion will help avoid blobs at points where extrusion stops.
Avoiding retraction is even more critical if your 3d printer has a Bowden extruder. In a Bowden setup, retraction is made more complex by the extra distance between the extruder and nozzle. This makes retraction more disruptive if you aim to make extrusion as smooth and consistent as possible. Direct extruders are less problematic but still may not retract perfectly.
If retraction is necessary, make sure to dial in the optimal settings. The retraction distance defines how far the filament will pull back. Anywhere between 1 to 5 millimeters can work. The optimal location can vary based on your filament type and 3d printer settings. We recommend starting at the minimum set and increasing by 0.5-millimeter increments.
Retraction speed refers to how quickly the filament will be pulled back by the extruder. Too slow, and there may still be enough pressure in the extruder nozzle to cause blobs, zits, or string. Too fast, and there may be a delay when the printer needs to start to extrude again. The minimum retraction speed should be around 20 millimeters per second but can be increased up to 100 millimeters per second. It’s a good practice to start at the minimum value and increase by 20 mm/s increments.
Coasting is another feature worth exploring. When coasting is enabled, extrusion stops just before a layer is finished. This means that any built-up pressure in the extruder will cause the filament to ooze out so that you do not end up with zits where the layer terminates.
Wiping is only a slight variation to coasting that has the same goal. Instead of releasing built-up pressure on an empty spot, wiping adds to the filament that has already extruded.
Wiping is worth considering if you’re worried about seeing under-extrusion at the endpoints of a layer. Coasting and wiping settings can be refined to control the volume of filament that will be extruded solely by the built-up pressure in the nozzle.
Printing temperature is too high
An excessive printing temperature makes your filament behave more like a fluid. The melted plastic can more easily ooze out of the nozzle and cause 3D print zits or blobs.
You can consider reducing your printing temperature by increments of 5 C. This will make the melted filament less fluid and less prone to oozing out. However, shallow printing temperatures can also cause problems related to layer adhesion. You will likely also have to adjust the printing speed to account for the lower nozzle temperature.
Extruder pathing
Extruder pathing refers to controlling where the nozzle travels when doing an empty run. It helps to eliminate unnecessary retraction. If you can not stop it, you can reduce the number of times that the filament needs to retract. Improper extruder pathing will result in heavy retraction and a higher likelihood of zits and blobs.
Some slicers offer an option to “Retract only when crossing open spaces,” although the exact wording may vary from one slicer software to another. When this feature is enabled, retraction is no longer done when the print head movement crosses through internal spaces. This is less problematic as any zits, blobs, or strings will not be visible from the outside.
Simplify3D offers an alternative with the “Avoid outlines for travel movement” feature. When this feature is enabled, the travel path of the nozzle will be automatically altered so that it will never cross the outline perimeter of the print. If this is possible with your model, this means that you can finish the entire 3D print without having to use filament retraction. This powerful feature can help avoid zits and blobs among other extrusion-related issues.
How To Prevents Zits On 3D Prints?
The reasons listed above should already give you an idea of the measures you can take to avoid 3D print zits and blobs. Aside from changing a few 3D slicer settings, hardware tweaks can also influence print quality.
Clean your nozzle
Any dirt or residual filament on your nozzle can cause extrusion issues. This may not be apparent initially but will most certainly cause quality issues down the road.
In the case of 3d printing zits, any solid residue left inside the nozzle contributes to increasing the pressure of the extruder nozzle. It will more likely for the melted plastic to ooze out of the nozzle and create zits and blobs.
The best practice is to set regular schedules for cleaning your extruder nozzle. The easiest way to do this is to brush the interior of the nozzle with a metal-bristled brush. In case of heavy fouling, you may have to soak the nozzle in acetone for a couple of hours. It’s necessary if the filament residues in the nozzle have been burnt and solidified.
Keep your filament dry
Printing with filament saturated with moisture is probably one of the worst things you can do. Not only are you going to end up with lots of quality issues, but you can cause damage to the internal components of your extruder.
Detecting wet filament is easy. As wet filament enters the heating block, the moisture in the filament will start to boil and evaporate. This will create prominent popping and hissing sounds. You can expect many of your layers to have gaps or a pock-marked surface in terms of print quality because of the space that the moisture leaves as it evaporates.
Within the heating block, the evaporation of the moisture is more likely to cause your filament to form residues. As the residual filament builds up, it can cause clogs to increase the pressure in the extruder nozzle. A clogged nozzle will be very hard to achieve uniform extrusion and make 3d print zits and blobs more likely to form.
Printing with wet filament is so problematic that you’re better off stopping the print and starting over again.
To ensure that you’re printing with dry filament, always keep your filament in an airtight container with some desiccant. If necessary, you may dry your filament in a special filament desiccator. Drying the filament in an oven is also an option, but only if your range has reliable temperature controls.
Do a test print
Even with the best-laid plans, there are still many things that can go wrong with your 3d print. If you’re working on a massive project, it can lead to lots of wasted filament. If you’re unsure about your settings, the prudent thing to do would be to do a test print.
The ideal test print is a model that is small but has lots of different types of details. Some in the community refer to these test models as “torture tests.” Think of it as a calibration print before you go and spend an entire day printing your actual model.
The most popular torture test by far is the classic Benchy. This is a good choice for a test model if you’re dealing with zits and blobs as it has a relatively large smooth, and curved surface.
A test print should consume less than 20 grams’ worth of filament and print within an hour or less. Consider it an investment in your time and filament material that will keep you from wasting more of them down the road.
How To Remove Zits On 3D Prints?
Ideally, it would help tweak your 3d printer settings to avoid 3D print zits and blobs altogether. However, minor defects after printing can still be salvaged. Post-processing is a natural part of the 3D printing process.
The best and most straightforward method to deal with zits and blobs is to sand them smooth. Sanding removes any of the excess plastic on the 3d print, leaving a more unblemished surface. You can use different types of sandpaper with progressively increasing grit numbers. You can also set the Z-seam so that the seam position is at a less visible area.
Aside from eliminating zits and blobs, sanding will also remove visible traces of layer lines. This will leave you with an overall improved aesthetic. Polishing and painting generally result in vastly enhanced 3d print surfaces.
Summary
In the context of 3D printing defects, blobs and zits are pretty low in the hierarchy. They generally do not cause a 3d print to fail and can be remedied with some post-processing. However, they can still be a headache if you’re aiming to make your 3D print look as perfect as possible.
Zits and blobs can usually be traced to improper 3d printer settings that cause issues in extrusion. Fortunately, this also means that you should fix the problem with some changes in your slicer software settings. Dealing with zits and blobs is relatively easy after some experience with printing.
Need Any Services? Contact Us Now!
Blisters, runs, snot and blemishes
During 3D printing, the extruder has to constantly stop and start pushing the filament as it moves from one position to another. Most extruders do a very good job of extruding evenly during the move, however every time the extruder is turned off and then back on, there will be slight fluctuations. For example, if you look closely at the outer surface of your 3D print, you may notice a small mark, and this is exactly where the extruder started working with a particular piece of plastic. The extruder, on the other hand, had to start printing the shell of your 3D model from somewhere, and then, when the shell prints, it returns to this starting point. This kind of marks are usually called streaks or snot. As you can easily guess, connecting two parts that have sagging can be problematic. Luckily, many 3D printing programs have a simple tool to help you minimize these kinds of cosmetic imperfections.
Retract and coast settings
If you start noticing small defects on the printed surface, the best way to make a diagnosis is to take a closer look at each of the printed perimeters. Does this defect appear at the moment when the perimeter printing starts? Or does it appear later, when the perimeter is completed and the extruder has stopped? If the defect appears at the very beginning of the cycle, you may need to slightly adjust the retraction. Go to Edit Process Settings → Extruders. Just below the retract distance is a setting labeled Extra Restart Distance. It's about the difference between the distance the filament is pulled in when the extruder stops and the length it fills up before continuing again. If you find a surface defect at the beginning of the perimeter, there is likely too much plastic left in the extruder before the outline starts to print. In this case, you need to reduce the padding length by entering a negative value in the Extra Restart Distance field. For example, if the retract distance was 1.0mm and the Extra Restart Distance is set to -0.2mm (notice the minus), then each time the extruder stops it will retract 1.0mm of plastic. But every time it starts working again, only 0.8 mm of plastic filament will be fed into the nozzle. Adjust this setting until the defect disappears when you start extruding the perimeter.
If the defect does not appear until the end of the perimeter printing, when the extruder stops, another parameter must be taken care of. It's called Coasting. "Coasting motion". Its value is set, as a rule, directly under the retraction settings in the Extruder tab. It allows you to turn off the extruder a few moments before it reaches the end of the perimeter, which allows you to release pressure inside the nozzle. Enable this option and increase the value until the defects at the end of each perimeter when the extruder stops are gone. Usually 0.2-0.5 mm of coasting will give a noticeable result.
Avoid Unnecessary Retraction
The retraction and coast settings mentioned above can help avoid defects when the nozzle is retracted, but sometimes it is much better to just try to avoid this movement of the print head. In other words, to make sure that the extruder would never change the direction of its movement to the opposite and continue to work calmly and evenly. This is especially important for printers with Bowden extruders, as the large distance between their motor and nozzle makes retraction more problematic. To configure the setting that determines when retraction is enabled, you need to go to the Advanced tab and find the Ooze Control Behavior section there, which translates roughly as "leak control actions." This section contains many useful settings that can be used to change the appropriate behavior of your 3D printer. As mentioned earlier, in the section on hairs and webs, Stringing or Oozing, retraction is set mainly to prevent the nozzle from leaking at the moment when it moves from one part of the object to another without printing. If the nozzle does not cross open spaces, everything that flows out of it will remain inside the printed model and will not be visible from the outside. Therefore, many print management programs, in order to avoid excessive retraction, have a checkmark that indicates that the filament should be retracted only over open spaces - Only retract when crossing open spaces.
Another useful item lives in the Movement Behavior section. If the printer is configured to only draw in filament over open spaces, it will be extremely beneficial to avoid such spaces at all costs. Some 3D printing control programs have this useful feature that allows you to change the path of the extruder, minimizing the number of cases of perimeter overshoot. If this succeeds, the need for retraction generally disappears. This option is called Avoid crossing outline for travel movement. "avoid going beyond the boundaries of the contour when moving."
Non-stationary retraction
Another very useful feature that some 3D printing software has is non-stationary retraction. It is especially useful for Bowden extruders, which generate high pressure in their nozzles during printing. Typically, when these printers are finished, the excess pressure in the stalled extruder can cause plastic clumps to form in the extruder. For this situation, some 3D printing programs have an option that allows you to enable the nozzle to retract the filament as it moves. This reduces the chance of plastic clumps in the resting extruder because the retraction is done on the fly. To enable this option, you must first configure a few settings. To get started, go to Edit Process Settings → Extruders. Make sure Wipe Nozzle is on. This will mean that the printer will clean the nozzle at the end of each piece of the model when it stops the printing process. Set the Wipe Distance to 5mm to begin with. Next, go to Advanced and turn on Perform retraction during wipe movement - “retraction during wipe”. This will block stationary retraction as the printer is now told to clear the nozzles in reverse. This is a very powerful option and there is a very good chance that it will help you get rid of surface defects.
Select where to start printing
If minor defects still remain, it is possible to tell the printer where it is acceptable to leave such dots. This can be done in the Edit Process Settings menu, in the Layer tab. In most cases, the print start location is chosen in such a way as to optimize speed. You can also choose to randomize this start point, randomize it, or specify a specific position. For example, if you are printing a statue, you can instruct the printing to always start from the back of the figure, so nothing can be seen from the front. To do this, enable the Choose start point that is closest to specific location option, and printing will start as close as possible to the specified point, the coordinates of which must be specified.
3d printer defects: errors, main problems
Causes of Defects in 3D Printing and How to Fix Them
Buying a 3D printer is only half the battle. A beginner printer has a lot to go through. First, he will learn how to set up the device, calibrate the print head, set the necessary parameters, and test different types of filaments. But that's not all. The most unpleasant thing that can appear during operation is printing defects. And they need to be eliminated.
- What are 3D printing defects?
- Classification of defects
What are 3D printing defects?
After the printing process is completed, various defects can be found on the finished model. Most often they are associated with improper distribution of plastic. Defects appear for various reasons. But the main result is always the same - the model is damaged, you need to do the project on a new one. Printing defects cause downtime. Lost time and meters of filament.
Important! Within the framework of this article, defects that occur on FDM printers will be described. These are models of printing devices operating on the technology of hot deposition of plastic.
Sometimes mistakes can be seen right from the start. For example, when printing the first layer of a model. In these and other cases, it is necessary to prevent the defect in time. However, the press all the same should be stopped. But this way you can save material and time. This article will discuss the most common defects, as well as ways to eliminate them. At the end of the article, a comparative classification of faults will be given.
Layer displacement
The second name of this defect is skew. There are several options for the development of events at once. The skew can be slightly noticeable, with a slight deviation along the Z axis. The second option is a strong offset, the model is printed in pieces. In all these cases, the reason lies in the mechanical part of the printer.
Solutions:
- Check tension belts. They should be clearly in the grooves. It is not allowed to fray or stretch the belt. Sometimes it is easier to replace the entire set of belts with a new one.
- Sometimes small misalignments are caused by an incorrectly set pulley. Make a mark with a black marker before printing, after the end of the process, check the result. Calculate the difference. Tighten the problem area if necessary.
- The printer's Y and X axes are not properly aligned. They are not perpendicular to each other. They need to be set at 90°.
Attention! In rare cases, the problem is electrical. This option must be disassembled separately, armed with a multimeter.
The first layer does not stick
The initial layer acts as a foundation. If it "floats", then the whole model will get the wrong geometry. The second and subsequent layers may slightly shift the entire workpiece. The most unpleasant thing is that this defect can be found at the very end of the print.
Solution methods:
- Platform calibration. If the print bed is skewed, there is a good chance that the first layer will not stick. It is best to check platform calibration before starting printing. Many 3D printing programs help to go through this setting in a semi-automatic mode.
- Wrong print nozzle height. Another point worth considering. Most often, the extruder height setting is set through the printer parameters: Edit Process Settings → G-Code. They are located in the main menu of the device.
- The first layer was printed too quickly.
 The plastic just didn't cure. This setting must be found in the menu of the printing device. Approximate location: Settings → First Layer Speed. It is worth setting the print speed of the first layer 50% lower than the rest.
 - Plastic cooling temperature. This option can be found on printers with a cold platform. The filament hits a cold surface, quickly hardens and rebounds. Here you need to experiment with the settings for the melting temperature of the filament or initially take a printer with a heated surface.
Important! Poor adhesion can be caused by covering material placed over the platform. Different glue, tape, adhesive tape - all this can repel plastic.
Pimples on the model
This also includes such defects as “snot”, swells, sagging. All these faults are of approximately the same nature. They are related to the operation of the extruder. As it moves, it should stop, then start working again. Not all devices can lay even layers without defects. This is how the irregularities described above appear.
Solving methods:
- Retract and coast setting. The first parameter is responsible for starting the extruder. In this case, you need to configure the retraction through the device menu: Edit Process Settings → Extruders. Here you need to find the parameter Extra Restart Distance. Try reducing the fill length. When unevenness occurs when the nozzle stops, you need to tighten the roll-on stroke (roll-up movement). This setting is referred to as Coasting. It is in the same section where the retraction is set.
- It is better to avoid retraction and coasting altogether. That is, the filament must be flush with the edge of the nozzle. This parameter is especially critical for Bowden printheads. Another option is to set up retraction. You need to find the Advanced tab.
 It contains the Ooze Control Behavior setting. This option controls filament leakage and retraction start time.
If minor defects are still present, it is worth pointing out the entry points to the printer. This setting is found in the Edit Process Settings menu on the Layer tab. For example, you can leave small flaws inside the shape, starting printing from the inner layers.
3D printer won't print
This is one of the scariest things for a beginner 3D maker. The device appears to be broken. However, in most cases this is not the case. The printer turned on, but did not start to push through the plastic? There are four reasons for this.
Solutions:
- Plastic does not come out of the extruder due to leakage. This can often be seen in some cheap Chinese models. The filament is preheated in the extruder, it can seep through the hot end. The same effect can be observed after the end of the work.
 In this case, printing starts 3–4 seconds after the start. Automatic broken geometry of the first layer. To avoid this defect, experienced printers make the so-called skirt. This is a thin circle of filament around the future model. It is printed to bring the printer to life and fill the nozzle with plastic.
 - The extruder is too close to the platform. The plastic just gets stuck inside the nozzle. The situation continues on the second layer. Only by the 3rd or 4th layer does the plastic begin to come out. The solution is to adjust the Z-axis height through the G-Code command.
- Sometimes the filament is simply chewed off by the drive gear. This is the part that pushes the thread forward. If a small amount of filament shavings is visible near the printer, it is likely that the gear has worn off the filament. You need to calibrate this node.
- Clogged extruder. There may be several reasons: ordinary dirt or rubbish, plastic coked inside the extruder, poor cooling of the filament.
 Mechanical cleaning of the nozzle with special needles or drills will help. They are sold in specialized stores.
Important! Just do not need to clean the nozzle with a screwdriver or other improvised tools. You can completely ruin the extruder.
Prints in the air
Various users are experiencing the same problem. The reasons for printing by air are related to setting new plastic settings in the slicer. Sometimes a defect appears due to incorrect setting of the Z axis.
All solutions come down to the fact that the user needs to carefully study the G-code of the printer. Sometimes the reason lies in the lowered Z-axis height settings. You can also see the print step here, perhaps it exceeds the required parameter. In the slicer, you need to check the plastic installation parameters. View the heating temperature of the nozzle and platform. All settings must be checked manually. When importing a profile, the left parameters can be picked up.
Prints in reverse: how to fix
A rare defect that is not always visible at the start of printing. That is, the model comes out normal, but mirrored. Such malfunctions are often found in Chinese kits or noname devices. There are two solutions. One is simple, the other is more difficult.
Methods of solution:
- It is necessary to invert one of the axes: X or Y - it does not matter. But only one. This can be done by flipping the contacts on the power board or on the motor itself.
- Invert axis via device firmware. This method is suitable for advanced users who are familiar with programming skills.
In any case, it's better to first check all the settings in the slicer again, and only then go into the electronics of the device.
Layers skipped
The finished model shows that one or more layers have been skipped. This is eloquently evidenced by the gaps in the finished model. In rare cases, this defect is associated with insufficient extrusion. Perhaps there are problems with the capture and supply of the filament. Sometimes the reason lies in the wedging of the Z axis.
Solution methods:
- Check the mechanical part of the printer. If gaps began to appear frequently, you need to arrange an unscheduled maintenance of the device. Examine all shafts. Check that they are level and not misaligned. Power off the printer, try moving the head with your fingers. If resistance is felt, then one of the shafts is not installed correctly.
- Bearing wear. This element may simply wear out. You can see that the printer vibrates slightly. There is an unusual sound when printing. Diagnose a breakdown in the same way as the shaft. Turn off the power and move the extruder with your hands to find the problem part.
Attention! Remember to maintain your printer regularly. Lubricate the shafts with special oil. For example, for sewing machines. Before lubricating, clean the moving parts from dirt and plastic residues.
Just don't overdo the oil. A large amount of lubricant can lead to the opposite effect.
Doesn't print in the center of the bed
Some users are having trouble printing on one side of the bed instead of the center of the bed. At the same time, in the slicer, the model is clearly in the center. There may be several solutions here.
Methods of solution:
- Slicer settings are down or incorrectly set. It is necessary to change the characteristics of the kinematics. Set the Delta robot parameter instead of the Cartesian robot. You also need to set the size of the table, equal to the square inscribed in the specified print area. In this case, set the Origin Offset parameter to half the side of the square.
- Try to adjust the position of the X-axis limit switch. In some cases, it is moved a little to the right.
What are the problems with the 3D printer test cube?
This figure is used to check the print quality. Naturally, during the test, she can clearly demonstrate where there are problems. It can be completely different defects. Most often, the test shows bulges and dents on the model.
Such defects result from overheating and shrinkage. To find out for sure the cause and eliminate these factors, you need to print four cubes in different angles. For some ABS plastics, you need to reduce the temperature, as well as turn on the blower by 5-10%.
3D printing echo
This problem can be described as thin stripes that form when printing layer by layer. That is, the final model does not have a formed and even surface. There is waviness (echo) on the edges. This defect is also called ringing on the walls. Typically, two factors are the cause: print speed and vibration.
Solutions:
- Reduce vibration. Make sure the printer is on a level and stable surface. Assess the condition of the bearings. Replace them if necessary.
- Inspect the shafts.
 Clean them of dirt and dust, lubricate with oil.
 - Reduce the print speed through the printer settings.
Try changing the typing speed first, then check the mechanics.
Interesting! Even a single loose bolt can cause strong vibrations. Check all fasteners. Pull the bolts.
Salmon leather
This defect is somewhat similar to the previous one. Only there are no obvious waves or ripples. The defect manifests itself in the form of a pattern. It is similar to the representation of heights on topographic maps or the structure of salmon skin that is drawn on the walls of the model. In English resources it is called salmon skin. The defect appears due to two reasons: vibrations and incorrect characteristics of the current coming to the motors.
Solutions:
- Remove any vibrations that may occur in the device. Tighten the bolts and check the frame geometry. You can also slightly reduce the print speed.

- Installation of a special impulse reducer (TL-Smoother) in the circuit between the driver and the axle motor. This solution balances the current indicators. The edges are more even.
Salmon skin defect is common on DRV8825 stepper motor drivers.
Ripple
In this case, we are talking about the partial impact of waves on some parts of the model. The ripples are often of the same nature as the echo. It is also tied to vibrations and the speed of the extruder. However, unlike waves, ripples are especially pronounced at sharp corners, when the nozzle abruptly changes direction.
Methods of solution:
- Reduce the print speed. You need to find the Edit Process Settings menu in the printer settings, and then open the Other tab. Change two settings: Default Printing Speed and X/Y Axis Movement Speed. The first is responsible for the speed of all movements of the nozzle, the second - the speed in the absence of plastic supply.
 Sometimes the reason lies in the factory firmware. It initially indicates increased extruder acceleration.
 - We remove vibrations. Check the geometry of the device, stretch all the bolts, assess the condition of the shafts and bearings. Lubricate the device if necessary.
We recommend checking the print speed settings first.
Poor filling
If the figure is not filled enough, it means that it will not receive sufficient strength. The model may simply break or crack. Usually the causes of poor coverage lie in the slicer settings or print speed settings.
Solution methods:
- Try changing the fill pattern. It is indicated by the Internal Fill Pattern parameter. There are presets in the settings with complicated filling options that give more strength to the finished model: Grid, Triangular and Solid Honeycomb. The printing time will increase, but the strength will also increase.

- Reduce print speed. The fast movement of the print head results in less infill. You need to tweak this parameter through the settings of the device itself or through the slicer parameters.
- Change extrusion width parameter. Some 3D printing programs allow you to set different infill values for individual elements. For example, for the outer layers, set the size to 0.4 mm, for the inner layers - 0.8 mm. These settings can be viewed in the menu Edit Process Settings → Infill. In it you need to find the parameter Infill Extrusion Width. It is shown as a percentage. The higher the number, the thicker the layer.
Attention! When setting the Infill Extrusion Width parameter, make sure that the set value (in percent) is supported by the printing program (slicer).
Plastic is leaking from the extruder threads
This fault can be attributed to local printer failures, although they can create a number of defects in the form of “snot” on the model. Plastic oozes through various slots, flows down the extruder thread, exits the opening of the heating element. There may be several options for solving the problem.
Solutions:
- Check all screw connections. Sometimes a caked piece of plastic gets stuck between them. It creates a gap, the filament flows out.
- Clean and polish the surfaces of the thermal barrier tube and nozzle. Installing a fluoroplastic washer or winding a fum tape can also help.
- Reinforced cold drawing of threaded connections.
Attention! Sometimes the reason lies in a manufacturing defect. Nothing can be done here. Just completely change the extruder.
Plastic does not come out of the nozzle
For some reason, the printer stopped feeding filament. The device continues to make noise with the engines, but the plastic does not come out of the nozzle. There may be several reasons and solutions for this.
Solving methods:
- The plastic is out. For some printers, the filament spool is covered with a casing. Therefore, it is impossible to immediately understand that the thread is over. Check for material in the spool.
- The thread has broken. There was a gap between the hot end and the extruder. A common cause is with Bowden printheads. Perhaps the problem is with the filament itself. You need to try other material.
- Low plastic melting point set. The thick filament cannot pass through the narrow nozzle opening. Recommended temperature parameters for different types of plastic: PLA - heating t 180 °C, table heating t 60–80 °C; ABS - heating t 240 °C, table heating t 110 °C.
Interesting! Sometimes a clogged nozzle is the cause of interrupted printing. This can happen even during work.
Model delamination
Visually, this defect looks like an accordion. In some places, the layers move away from each other. At the same time, it is clear that this is not a pass, but the absence of sticking of plastic. Layer separation occurs due to incorrect setting of the filament thickness or its melting temperature.
Solving methods:
- Reduce layer thickness (height). Here you need to follow the rule: the maximum layer thickness should be no more than 80% of the nozzle diameter. Otherwise, the layers will not stick to each other.
- Raise the melting point of plastic. If the height parameter is in order, then you need to look at the temperature settings. For example, the optimum melting temperature of ABS plastic is 220–240 °C, but some users set it to only 190 °C. You can increase the melting temperature in the slicer settings: Edit Process Settings → Temperature.
If standard temperatures are not suitable, try raising the setting by 10 °C. See if the adhesion of the layers improves or not.
3D printer extruder does not heat up
At the same time, the device shows 100% heating power, the set temperature is on the display, but the extruder is cold. In most cases, the cause lies in a break in the wires or in the heating element itself. Ring all circuit elements after the controller. To cut off problems on the heating element, apply 12 V to it. It should start to heat up.
Attention! Newer printers may encounter factory extruder defects. This element needs to be changed. There is no point in repairing the item.
Plastic falls in waves
Another name for this defect is “elephant foot”. In this case, the upper layers of the model are pushing against the lower parts, causing a wave effect. It sort of descends from top to bottom, forming a thick layer at the base of the model. This problem is especially common on models of printers with a heated bed.
Methods of solution:
- Find the optimal temperature regime between heating the table and blowing the model. Lower the heating temperature in steps of 5 °C. It is important to find a balance here, when the lower layers have already gained strength, but still retain adhesive properties for the following layers.

- Calibrate the table. Try applying the default settings. If the problem persists, slightly change the Z-axis height settings. Calibrate the new settings on the test cube. This is the base shape that clearly shows how the layers are laid down.
- Chamfer the base. The option is suitable for homemade devices. You need to start with a bevel of 5 mm and 45 °, after which you can make small adjustments.
Wall gaps
Such defects can be found when printing rather thin walls in the model. For example, when the extruder nozzle prints strips up to 0.4 mm thick, and the user needs to make a 1 mm edge. In such places, cracks may appear at the joints of the two layers. Typically, the defect is eliminated through the adjustment of the slicer.
Solution methods:
- We need to find the setting that is responsible for the wall thickness. Usually they are in the menu: Edit Process Settings → Advanced. Here you need to find the Gap Fil parameter.
 He is just responsible for overlapping areas and filling the gaps between thin walls. Check the box next to Allow gap fill when necessary. There is also an alternative. Go to the Infill tab and tweak the Outline Overlap parameter.
 - Simply adjust the extrusion width. Increase the parameter value if possible. The strip width can be set on the Extruders tab via the Edit Process Settings menu.
Try and experiment to get the best fit.
Web
A special case of filament leakage, when sloppy plastic threads remain between the parts. This happens for the same reasons as influxes. The solution methods are exactly the same:
- Changing the speed and distance of thread retraction. Full instructions are listed above.
- Lower print temperature. Try tweaking this setting to reduce the fluidity of the plastic. Here you need to be careful. Excessive decrease in temperature can lead to a delamination defect.
- A separate solution is to set a parameter in the slicer that launches the print head in a long and winding path over empty space.
 The web falls near the model without sticking to its walls. No bridge is formed between the layers. To enable this option, go to the advanced settings of the slicer (Advanced). Check the box next to the Avoid crossing outline for travel movement option.
Interesting! Some 3D makers do not consider a web defect as something serious. They simply cut off the excess filament with a knife after the print is finished.
Extruder does not feed plastic
This problem is in the filament feed mechanism. Or the nozzle is too close to the table.
Solution methods:
- Check the plastic filament. It may have burrs on it. The feed gear has slipped. Check the condition of the thread, you may need to tweak the gear settings a little. Or change the plastic.
- Calibrate the table position. Raise the Z-axis slightly.
Sometimes the extruder will not feed plastic due to a clogged nozzle. It needs to be cleaned up.
Classification of defects
Almost all defects are one way or another related to two reasons: a malfunction of the mechanical part of the printer or incorrect software settings. Based on these parameters, it is possible to make a classification based on the most common problems in printing:
- Wear of nodes and the absence of a normal fastener feed. This parameter affects vibrations, nozzle movement trajectories.
- Poor extruder maintenance. The print head needs to be cleaned from time to time, to remove the sintered filament.
- Inaccurate (wrong) calibration of the platen and nozzle height. Another common mistake that causes a lot of print defects.
- Problems with printer settings. Most often solved through manual setting of parameters or adjustment of the G-code.
- Broken settings in the slicer. This includes: changed parameters, errors or inaccuracies in the firmware.
- Poor quality filament.
 The problem may lie in the quality of the plastic. It is necessary to monitor its condition, quantity. If necessary, try to replace the manufacturer, or even switch to another type of filament.
 - Electrical problems. To find such a malfunction, you need to arm yourself with a multimeter and ring all the circuits after the controller.
- Factory defect. The problem is solved by replacing a low-quality part.
These are the main printer malfunctions that in one way or another affect its operation, leading to printing defects. The printer may have several problems at once. They will lead to the appearance of a group of defects. You need to be able to recognize the first signs of breakdown in time and eliminate them.
Important! At least once every two weeks, pay attention to the mechanics of the printer, carry out maintenance on the device. Clean the nodes, lubricate the shafts with oil. Check the platen and extruder calibration.

Learn more