3D print ringing
3D Printing – Ghosting/Ringing/Echoing/Rippling – How To Solve – 3D Printerly
Ghosting is a problem that you’ve probably experienced if you own a 3D printer. This problem fortunately has some fairly easy solutions which I’ve described in details for all you out there, so keep reading and let’s get this issue fixed!
If you are interested in seeing some of the best tools and accessories for your 3D printers, you can find them easily by clicking here (Amazon).
What is Ghosting/Ringing/Echoing/Rippling?Ghosting, also known as ringing, echoing and rippling, is the presence of surface defects in prints due to vibrations in your 3D printer, induced from rapid changes of speed and direction. Ghosting is something that causes the surface of your model to display echoes/duplicates of previous features.
You are likely to be seeing a repetition of lines or features across the exterior of a printed object, especially when light is reflecting off your print at a certain angle.
3D printing has many industry-specific terms. Ghosting is also known as ringing, echoing, rippling, shadow and waves.
Ghosting sometimes can only affect certain parts of your prints. So some areas of your prints look perfect, while others look bad. It’s especially prominent in prints that have wording engraved, or a logo embossed into it.
What Causes Ghosting?The causes of ghosting are pretty well known so I’ll explain it as simply as I can.
Ghosting is caused by something called resonance (vibrations). When 3D printing, your machine moves large objects at a fairly high speed.
The main causes of ghosting are:
- Over the top printing speeds
- High acceleration and jerk settings
- Momentum from heavy components
- Insufficient frame rigidity
- Rapid and sharp angle changes
- Precise details such as wording or logos
- Resonant frequencies from quick movements
Your extruder, metal parts, fans and all sorts can get heavy, and coupled with the fast movements result in something called moments of inertia.
Different combinations of movements, speeds and directional change, with the weight of your printer’s components can result in ‘loose movements’.
When there are quick directional changes with your 3D printer, these movements can cause bends and flexes in the frame. If intense enough, the vibrations are likely to leave you with imperfections on your prints, ghosting.
These type of imperfections are sometimes referred to as ‘artifacts’.
As we know, 3D printers have to be precise in the way they build up an object layer by layer, so this resonance caused by quick movements can have the effect of creating inaccuracies in your prints.
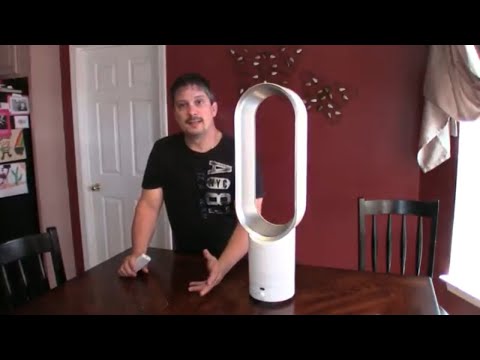
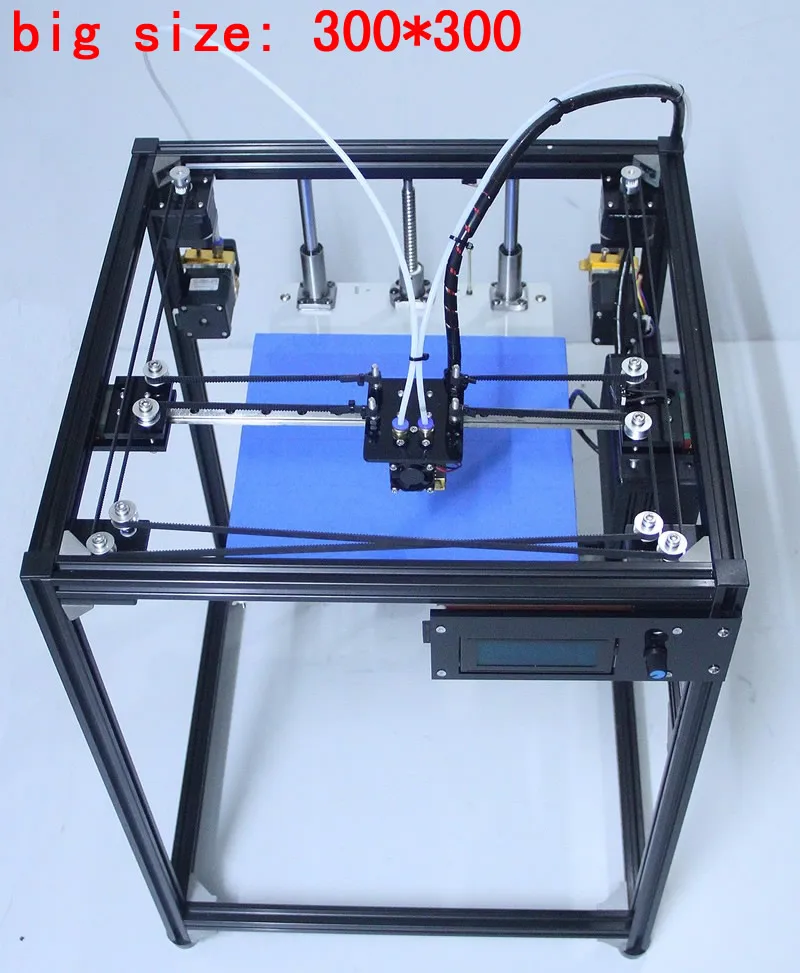
The occurrence of ghosting will be more prominent with 3D printers that have a cantilever design such as the one in the video below:
These are less rigid and so are more prone to vibration from the moments of inertia. When you use a 3D printer which has good rigidity, it can deaden the vibrations effectively.
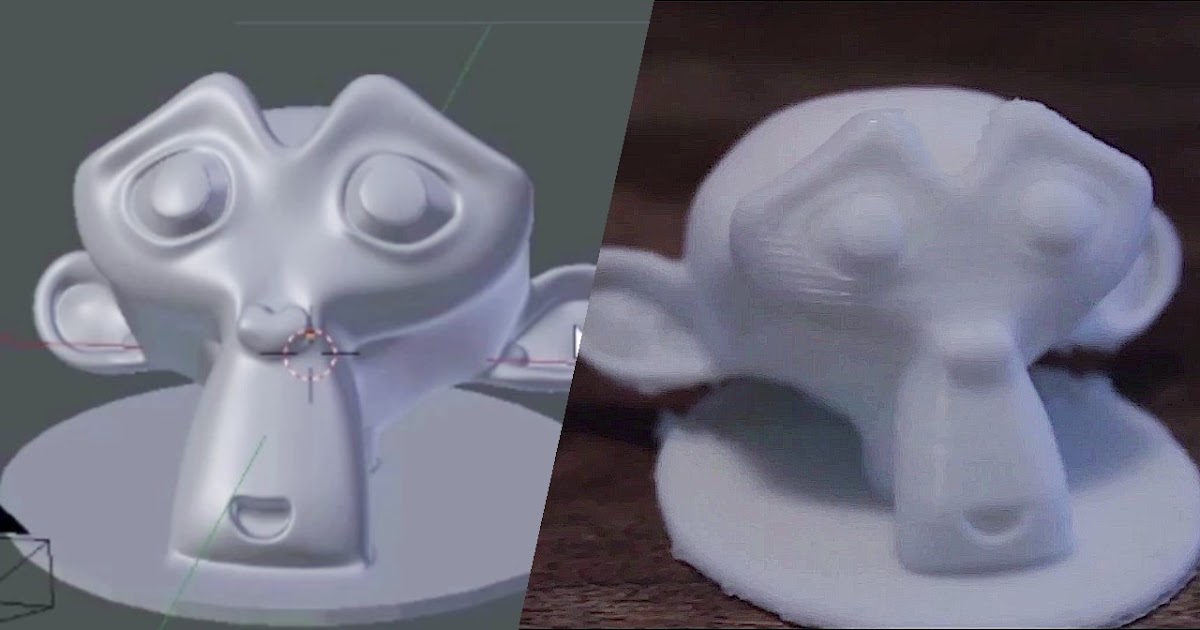
Test for Ghosting
Download this Ghosting Test from Thingiverse to find out whether you are experiencing ghosting.
- Test both PLA and ABS at varied temperatures
- The hotter the extrusion, the more liquid it will be so the vibration blemishes will be more prominent
- Mind the X and Y orientation when slicing – you should have the labels correspond to the actual X and Y axes.
Easy Solutions to Solve Ghosting Problems
Reduce Your Printing Speed
This is usually the easiest and safest option to try because the only real consequence here are slower prints.
Less speed simply means a lower moment of inertia. Think of a high-speed car crash vs bumping into a car in a parking lot.
As previously mentioned, when your prints have sudden angles they have an increased likelihood to cause vibrations because the sudden movements that the printer will have to execute. When you have sharp angles mixed with a high print speed, it results in your print head having trouble slowing down.
Sudden printer movements can generate intense vibrations and 3D printer ringing. The faster you print, the more sudden are direction and speed changes, translating to more severe ringing.
A problem can arise with reducing printing speed, however, due to the same directional changes. When the nozzle comes to these sharp angles, they tend to spend more time slowing down and speeding up in that specific area, leading to over-extrusion and bulging.
Increase Rigidity/Solid Base
You will be able to tell using your observations if this is one of the issues that are affecting you. It’s good practice to try and grab hold of components and see if they wobble.
Make your 3D printer strong and more stable using a few techniques:
- You can add braces to help triangulate the frame
- Add shock mounting which is adding a dampening material such as foam or rubber around your 3D printer.
- Use a firm/solid base such as good quality table or counter.
- Put an Anti-Vibration Pad under your 3D printer.
If you use a flimsy table as a surface foundation to print on, you will worsen the vibrations.
Another thing you can do is put stiffer springs on your bed to reduce the bounce. The Marketty Light-Load Compression Springs (highly rated on Amazon) work great for the Ender 3 and most other 3D printers out there.
The stock springs that come with your 3D printer aren’t usually the greatest quality, so this is a very useful upgrade.
Having more rigid rods/rails can help out if you’ve identified your printer’s rigidity as the main issue. Also make sure your hotend is fitted tightly to the carriage.
Using many of these techniques together should do an adequate job of absorbing vibrations, and you will have an added bonus of making your 3D printer quieter in many cases.
Lighten your Printer’s Moving Weight
Making the moving parts of your printer lighter works by making it require less energy to move, and disperses less energy when moving around the print bed. On a similar front, you can make your non-moving parts heavier so it takes more energy to vibrate in the first place.
Sometimes having your filament mounted on top of your printer can increase the occurrence of ghosting. A quick fix here is placing your filament on a separate spool holder.
This isn’t always an option but if you can invest in a lighter extruder this will definitely help with the issue of ghosting. Some people have dual extruder printers but don’t use both extruders, so removing one of them will help lighten the moving weight.
The video below nicely illustrates how different component weight affects the occurrence of ghosting. It’s done by changing the rods (carbon fiber, aluminum, and steel) and using the ghosting test to observe differences.
Adjust your Acceleration and Jerk Settings
Acceleration is how fast the speed changes, while jerk is how fast the acceleration changes. Acceleration and jerk settings are basically what makes your printer move when it’s in a still position.
Reducing your acceleration settings reduces the speed, and in turn, lowers the inertia as well as any potential wiggle.
When your jerk setting is too high, inertia will be a problem because your print head will make quicker sudden movements in new directions. Lowering your jerk settings gives your print head more time to settle down.
On the opposite side, a jerk setting too low will make your nozzle stay in areas for too long, resulting in details becoming obscure as it takes too long to change directions.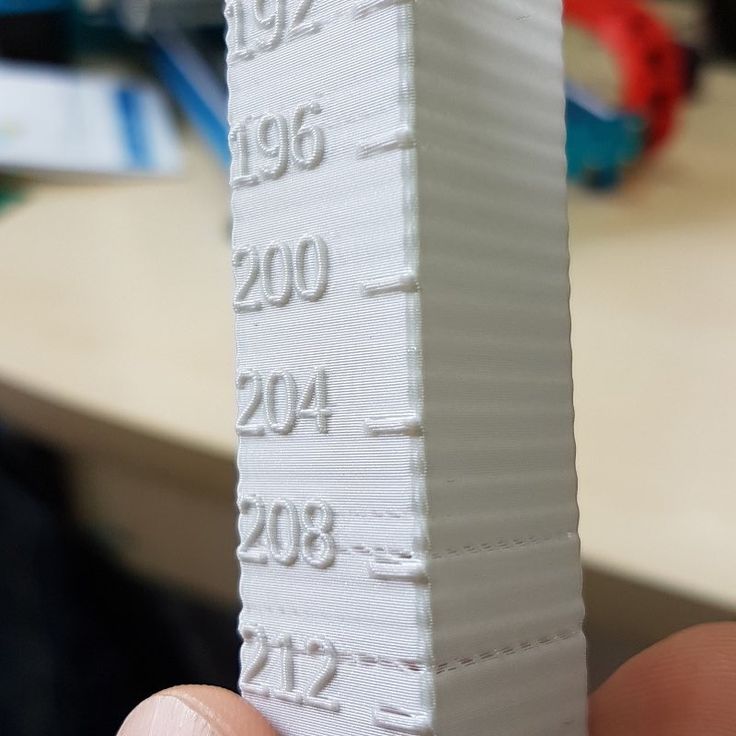
Changing these settings can result in your problem being solved, but if done incorrectly, it can lead to over-extrusion at the sharp corners, similar to reducing the printing speed.
It involves changing the settings in your firmware. Changing things in your firmware without a good understanding of what it does can create more issues.
If your 3D printer has extreme acceleration curves, it can jerk around and create ghosting artifacts, so reducing the acceleration settings is a possible solution.
Tighten Up Loose Belts
When your printer’s motion systems are slack, you have a higher likelihood of experiencing excess vibrations.
The belt of your printer is a usual culprit for this happening. When the belt is loose, it loses precision with printer movements so it can have an effect on resonance. The amount of stretch from a loose belt will allow the print head to move around.
If you experience ghosting with your printer, check if your belts are tight, and produces a low/deep sound when plucked. If you find your belts are loose, simply tighten them using a guide specific to your printer.
It’s similar to having a rubber band, when it’s loose, it’s very springy, but when you pull it tight, it keeps things together.
Final Thoughts on Solving Ghosting
Eliminating ghosting can be difficult because there are many possible culprits of why it occurs. When you identify the issue, things become a lot easier to solve. It is mostly a balancing act, and it can take a bit of trial and error to see what works best for you and your 3D printer.
It can take a combination of these solutions, but once you solve the issue it will greatly improve the quality of your prints!
So eliminating ringing is mostly a balancing act, and you mostly just have to experiment to see what works best for you. Start by making sure your belts are properly tensioned.
Check for loose components such as bolts, belts rods, then start reducing printing speeds. If printing times get too high, then you can adjust jerk and acceleration settings to see if you can improve printing times without sacrificing on quality. Putting your printer on a solid, rigid surface should help out a lot with this issue.
If you found this article useful and would like to read more about 3D printer troubleshooting & other info check out my article on How Loud Are 3D Printers: Tips to Reduce Noise or The 25 Best 3D Printer Upgrades You Can Get Done.
If you love great quality 3D prints, you’ll love the AMX3d Pro Grade 3D Printer Tool Kit from Amazon. It is a staple set of 3D printing tools that gives you everything you need to remove, clean & finish your 3D prints.
It gives you the ability to:
- Easily clean your 3D prints – 25-piece kit with 13 knife blades and 3 handles, long tweezers, needle nose pliers, and glue stick.
- Simply remove 3D prints – stop damaging your 3D prints by using one of the 3 specialized removal tools.
- Perfectly finish your 3D prints – the 3-piece, 6-tool precision scraper/pick/knife blade combo can get into small crevices to get a great finish.
- Become a 3D printing pro!
3D Print Ghosting & Ringing: All 5 Issues Fixed
Few things are as frustrating as ringing and ghosting – which ruin your print with unsightly lines and circles that affect your print’s finish and make models look cheap and poorly designed.
Much like how you want to avoid layers and lines when painting a wall, you’ll want to avoid ghosting in 3D printing. If you find unwanted lines and rings in your models, then you’ll know just how much of a pain they can be, and how hard they are to look at.
In this article we’ll look at exactly this ‘ghosting’ is, its causes, and how to fix them. So don’t worry, just follow our advice here and you’ll have perfectly smooth prints in no time.
Table Of Contents
- Ringing and Ghosting in 3D Printing: Causes, Fixes & Prevention Tips
- What Does Ghosting Mean in 3D Printing?
- What Causes Ghosting in 3D Printing?
- Loose Frame
- Bad Printer Support
- Unstable Build Plate
- Printing Too Fast
- Inefficient Design
- How do You Fix Ghosting on a 3D Printer?
- Tighten Your Printer’s Frame
- Be Careful Where You Put Your Printer
- Make Sure Your Build Plate is Secure
- Lower Your Print Speed
- Reduce Jerking
- How to Prevent Ghosting in 3D Printing
- Plan Ahead
- Tighten Your Printer Regularly
- Replace Worn Parts
- Avoid ‘Stick Slip’
- Use Stepper Dampers
Ringing and Ghosting in 3D Printing: Causes, Fixes & Prevention Tips
The main causes of ghosting in 3D prints are:
- Loose Frame
- Bad Printer Support
- Unstable Build Plate
- Printing Too Fast
- Inefficient Design
Here how you can fix ghosting in 3D printing:
- Tighten Your Printer’s Frame
- Be Careful Where You Put Your Printer
- Make Sure Your Build Plate is Secure
- Lower Your Print Speed
- Reduce Jerking
Prevent ghosting in your 3D prints with these techniques:
- Plan Ahead
- Tighten Your Printer Regularly
- Replace Worn Parts
- Avoid ‘Stick Slip’
- Use Stepper Dampers
Ghosting, also known as ringing, is a 3D printing issue that creates an unwanted rippling effect on the surface of your print. These ripples and rings affect the quality of the model’s look, often ruining the print’s overall aesthetic.
There are a few reasons for ghosting in 3D printing, and we’re going to look at them here. If you’ve found these ripples on your print, then be sure to look at each issue we’ll discuss to find what could be causing it for you and how to fix them.
What Causes Ghosting in 3D Printing?The most common cause of ghosting in 3D printing is vibration. If your printer’s frame or build plate is loose or unstable, then the printer will vibrate and shake too much while printing – and filament won’t be evenly dispersed enough to create a smooth surface.
We’ll also cover settings issues that could be causing these unwanted ripples below.
Loose Frame3D printers are designed to be sturdy and rigid and stay that way while printing. If any part of your printer’s frame is loose, then the printer will vibrate while operational, leading to a ghosting effect.
These vibrations may be difficult to spot with the naked eye, so the problem could be a loose frame even if you don’t seem to notice any movement.
Bad Printer SupportVibrations are a common problem for 3D printers set on less-than-ideal surfaces. If your 3D printer vibrates at all and is also set on a wobbly surface, then the problem will be exacerbated to the point of ghosting.
Unstable Build PlateBuild plates are also supposed to stay put while printing. If the plate moves around even slightly while printing, then the filament will be unevenly dispersed, leading to ghosting.
Much like your printer frame, this movement may be indiscernible at a glance. So this could still be your issue even if you don’t seem to notice while your printer is working.
Printing Too FastSource: RedditPrinting too fast is a common cause of many 3D printer issues. Overly fast printing can make you printer’s nozzle vibrate too much while extruding, shaking filament and distributing it unevenly.
A rarer but still notable cause for unwanted vibrations is an inefficient design. If your model requires too many sudden direction changes while printing, the jerkiness of these changes can cause vibrations and lead to unwanted rippling.
This could also be due to acceleration settings. If set too fast, these settings will also cause unnecessary jerking that will print ripples onto your model’s surface.
How do You Fix Ghosting on a 3D Printer?The key to fixing ghosting issues in 3D printing is to minimize vibrations. You can do this be shoring up your printer’s frame, better securing your build plate, ensuring your printer is on a stable surface, or fixing your acceleration and print speed settings to print more smoothly.
Here are a few ways you can fix ghosting issues in 3D printing:
Tighten Your Printer’s FrameThe main cause for vibrations, and thus ghosting, is loose parts in your 3D printer frame. Simply tightening the screws and rods that connect your printer together will ensure the frame is sturdy and stop it from vibrating too much while printing.
It’s also worth checking to make sure your extruder is fastened tightly, too, as the vibrating problems could also be coming from a loose nozzle.
Be Careful Where You Put Your PrinterIf your printer is on an unstable surface then it will worsen your printer’s vibrations. Keeping your 3D printer on an even, stable surface will help reduce these vibrations and lessen the chance of ghosting.
For the best results, keep your printer on a thin layer of soft, shock-absorbing material like a rubber mat, which will help keep your printer steady at its base.
Make Sure Your Build Plate is SecureSource: RedditLike shoring up your printer’s frame, it’s a good idea to make sure your build surface is attached as well as possible. You may need to replace the springs or supports if they’ve become worn, so be sure to check this regularly.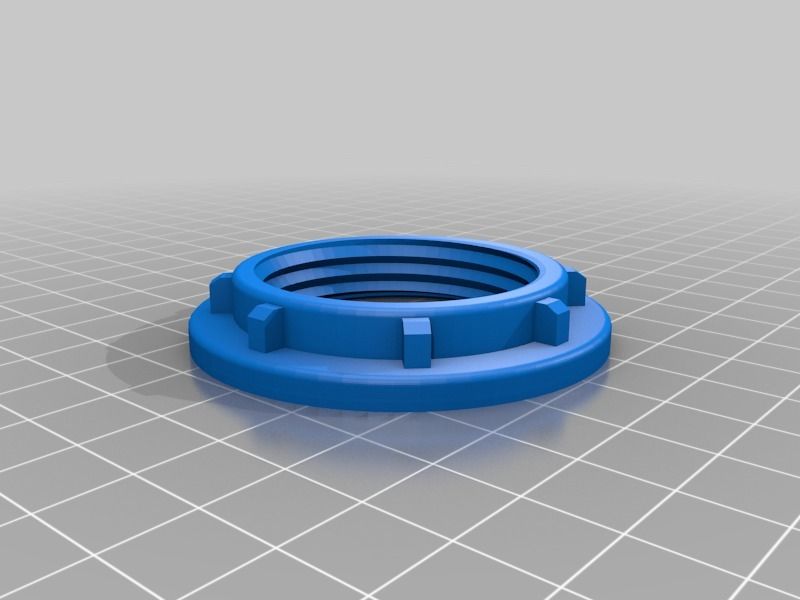
A good rule of thumb is to print slower for higher quality results. Lowering your print speed will help reduce vibrations and will let your extruder layer the filament more evenly.
Printing slower may not also alleviate ghosting issues, but could also leave you with better prints overall. When in doubt, always check the settings recommended by your filament manufacturer and stick to the lower end of the speed scale if you’re running into issues.
Reduce JerkingSource: RedditJerking happens when the extruder needs to change direction quickly to accurately print a model. This can be reduced by altering the starting point of the extruder, or by tweaking your design to have fewer turning points overall.
You may also find that your acceleration settings are too high. Overly fast acceleration will increase jerky movements that lead to a rippling effect if overused. Simply lowering these settings could work wonders in preventing ghosting in your models.
The best way to solve the issue of 3D printer ghosting and ringing is to prevent the issues entirely. Sitting your 3D printer on a rubber surface, regularly shoring up your frame’s joints, and replacing worn parts where necessary are all great prevention methods.
Strong vibrations will not only cause ghosting and ringing in your prints, but will also damage your printer over time. Parts and pieces that rub together unnecessarily and wear down faster, which can be expensive to replace or even become dangerously unstable in the long run.
With that in mind, here are some ways you can prevent ghosting in 3D printing and even protect your 3D printer by reducing vibrations.
Plan AheadWe’ve already discussed keeping your printer on a shock-absorbing surface, but it’s better to do that before you notice a problem or at least before it gets too bad.
Making sure your 3D printer is on a stable surface like a sturdy desk is a good start, and using a rubber mat for shock absorption will help greatly in keeping your printer still while it works.
Another great way to reduce vibrations is to get into the habit of giving your machine a regular once-over. Tightening any bolts and screws that have become loose over time will make sure your printer stays as still as possible while it prints and helps prevent ghosting entirely.
The frequency with which you should perform these checks depends on how often you use your 3D printer. In general, it’s good to tighten everything up every 5-10 prints to keep things running smoothly.
Replace Worn PartsRods and beams that have become worn, rusted, or otherwise damaged over time will grind together and vibrate your printer too much, leading to ghosting.Source: Reddit
Checking these parts for wear and tear will help you catch these problems early, and it’s a good idea to replace them whenever necessary. Sometimes, you may just need to wipe down these parts or free them from debris that may have been caught, causing them to move against each other with too much friction and vibrate too much.
If you find these parts are becoming damaged far too quickly or often, then you may need to check with your manufacturer to make sure there are no underlying faults in the hardware.
Avoid ‘Stick Slip’If your printer is halting or stuttering, or even just making an unpleasant grinding noise, then there’s a chance that your rods and bearings are misaligned. This causes random jerkiness that stutters and shifts while printing instead of being a smooth motion.
If you assembled your printer yourself and notice these faults almost immediately, then you may need to dis- and re-assemble your printer, taking care that everything is aligned correctly.
If it’s a relatively new problem, then some of your 3D printer parts may have become misshapen or bent, and will need to be replaced.
Use Stepper DampersStepper dampers are multi-purpose shock absorbers used to reduce resonance in moving machinery. They’re commonly seen in speaker systems to make sure the vibrations don’t affect the sound quality or damage the inner workings of the machine. A stepper damper installed on a Creality CR 10 3D printer. Source: Instructables
These dampers effectively offer a rubber buffer between moving parts that doesn’t actively affect their function by reducing movement.
If you’ve ever had a problem with your 3D printer being too loud, then you’ve likely come across stepper dampers before, as they reduce the noise made from the uncovered motor. But they serve a secondary purpose in reducing vibrations and will keep your printer running steadily as it works to help create smoother, ripple-free models.
Related posts:
- Gaps and Holes In Your 3D Print? Here’s How To Fix EVERY Cause
- Prevent Blobs and Zits Ruining Your 3D Print’s Aesthetic
- Causes And Fixing 3D Printed Circles Not Coming Out Round?
- What Causes Poor Quality Bridging & HowTo Fix Them
How to eliminate ringing when printing with a 3D printer
top sellers
-
Bearing 604UU U604ZZ
U-bearing U604ZZ 604UU 4*13*4
35.
 00 UAH
 -
Thermal mat for 3D printing 200 x 200 mm
3D printing thermal pad
150.00 UAH
-
Buy epo3d+ 3D printer
Epo3d+ Ukrainian FDM 3D printer on HIWIN rails. Thanks to reliable...
UAH 35,000.00
-
ABS granules
ABS granules for extrusion
400.00 UAH
-
PLA
PLA environmental plastic from Plexiwire.
 100% advance payment....
 UAH 375.00
-
Buy ABS plastic (ABS)
ABS plastic from Plexiwire. 100% prepayment. Free shipping...
UAH 220.00
-
Mini motor reducer 12v 100 rpm
high torque mini electric motor. Its size...
150.00 UAH
-
Nozzle for 3D printer 1.75 mm, for E3D and MK8 hotends
3D printer nozzle 1.75 mm 0.2/0.3/0.4/0.5
35.00 UAH
-
PETG plastic for 3D printer
PETG plastic from Plexiwire.
 100% prepayment. Free...
 UAH 360.00
-
SHF-20 shaft support
SHF-20 shaft support is used for CNC
60.00 UAH
-
A4988 stepper motor driver
35.00 UAH
-
Buy epo3d 3D printer
Ukrainian epo3d 3D printer built on the basis of modern kinematics...
UAH 18,000.00
All best sellers
Information
How to Eliminate "Ringing" when Printing with a 3D Printer
Ringing, also sometimes referred to as haloing or rippling, is when lines appear to repeat on the surface of a product when printed on a 3D printer. This usually does not affect the technical characteristics of the model, but can significantly spoil its appearance.
What causes it?
This defect is caused by vibrations. When moving parts, such as the print head, change direction or pace abruptly, individual parts of the 3D printer resonate, which creates bumps.
1. Tighten the straps
Carelessness in the 3D printer's motion system increases the chance of oscillation. This is especially true of the straps that help move the head. If they are too weakened, they cannot accurately perform their functions.
So check your belts first. They should be tightly stretched, when touched, make low sounds. If you find they are too loose, follow the manufacturer's instructions and tighten them up.
2. Decrease speed
Rapid movement of the print head may cause strong vibration and ringing of the 3D printer. The faster the speed, the faster the direction changes occur, resulting in stronger ripples. Try typing slower, longer is better, but better quality.
3. Find a hard surface
If you want to reduce shaking, the 3D printer must be placed on a hard, level surface. Whether it's a table or a cabinet, the printer must stand completely on it and not move, even while running at fast speeds. If the stand is not rigid, any jitter from the printer will increase.
Many choose "shock absorbers" or "printer feet", they can really help, but you need to make the right choice. Be careful too soft or springy coating will only impair performance. The coasters should not be very soft and slow down the movement, not bounce. Rubber mat is a good choice.
Trust your senses: if you hear a resonance or see a tremble, you need a better base.
These three basic tips will likely help you significantly reduce, if not eliminate, 3D printer problems. If our advice helped solve your problem, we will be very happy.
Happy printing!
Problems, defects, 3D printing errors and solutions
Often during the operation of a 3D printer, problems may arise due to which defects appear on the finished model. Or instead of a neat product, plastic noodles suddenly appear on the table.
In fact, the causes of defects can be conditionally divided into 2 types - these are physical and software.
Physical ones are those that arise due to problems with the mechanics or any other causes that can be eliminated physically. These include problems with printer mechanisms (belt tension, backlash), clogged or deformed nozzle, incorrect table geometry, etc.
Software - these are defects that occur due to incorrect slicer settings or, less often, errors in the printer firmware. For example, incorrectly selected print speed, retract settings, incorrectly selected temperature for plastic, etc.
Very rarely, the problem may lie in the wrong or “flying” printer firmware (although usually the printer simply will not start then), overheating of some boards during printing, etc. These are rather special cases, so we will not consider them.
Model peels off or does not stick to the build plate
This is the most common 3D printing problem. Every 3D printer has had a case when the first layer treacherously rolls, clinging to the extruder, or the most offensive - when it tears off a partially printed model from the table. The first layer must stick tightly otherwise nothing will be printed.
Gap between table and nozzle 9 too large0166
This is the most common reason. You just need to set the correct gap between the table and the nozzle.
Modern printers often use an auto-calibration (auto-leveling) table system or an auxiliary table leveling program. To calibrate such printers, use the instructions. If there is no manual, it can be downloaded from the manufacturer's website.
If you have a simple printer without auto-calibration, a self-assembly or KIT kit, use a probe or a piece of paper folded in half to calibrate. The probe should be slightly pressed against the table by the nozzle. Before calibration, the table and extruder must be heated. Align the table surface over each adjustment screw (there may be 3 or 4) in turn, and only then check the center point.
If you're having trouble getting your table surface perfectly level, try raft printing. Raft is a thick substrate in several layers that is printed under the model. It will help smooth out the slight curvature of the table.
A small cheat sheet to determine the correct gap on the first layer
Plastic with poor adhesion
Some types of plastic, due to various reasons, such as large shrinkage, do not adhere well to the surface of the printing platform. In this case, try using stickers or special 3D adhesives to improve adhesion between the table and the first layer of plastic.
In the early days of 3D printing, there were experiments with different homemade 3D adhesive recipes. ABS diluted in acetone, BF glue, sugar syrup and even beer. Some experiments have been successful. Until now, some enthusiasts use some types of hairspray or glue sticks as 3D glue. But still they are inferior in their properties to industrial 3D adhesives.
Some types of high temperature plastics with a high percentage of shrinkage (ABS, Nylon, etc.) may peel off the table during printing. This is due to uneven cooling and “compression” of the model (the lower layers have already cooled down, but the upper ones have not yet). For such plastics, it is imperative to use a 3D printer with a heated table and a closed case.
Plastic temperature too low
The hotter the plastic is when it exits the nozzle, the better it will adhere to the print bed. It is better to print the first 5-10 layers at a higher temperature (+ 5-10 degrees) and turn off the blower fan.
Wrong first layer settings (speed and thickness)
A thicker layer sticks easier, so the standard first layer is 0.3mm thick. With an increase in print speed, the heating block may simply not have time to heat the plastic to the desired temperature and it will stick to the table worse. Before printing, check the speed and thickness settings of the first layer in the slicer.
A lot depends on how the 3D printer prints the first layer. Try to control the printing of the first layer and only then leave the printer to work alone.
Plastic does not choke from nozzle
The printer has already begun to print, but the print table remains empty. Or part of the model did not print.
Clogged nozzle
In 3D printing, a nozzle is a consumable. The nozzles are clogged or worn out (frequency depends on the type of plastic). The simplest thing is to replace the nozzle. But if there was no spare at hand, you can try to clean the old one. To do this, there is a whole set of thin needles. Or you can heat a clogged nozzle above the melting point of the plastic and “burn out” the blockage. But later it is still better to replace the nozzle.
Low temperature nozzle
You need to increase the temperature of the extruder in the slicer settings or check the thermistor and heating block. Sometimes the thermistor may not read the temperature correctly due to a malfunction or incorrect 3D printer firmware settings.
If the problem occurs after replacing the thermistor - contact the manufacturer or read articles about PID tuning.
Empty extruder
As the extruder heats up, plastic begins to ooze out of the nozzle. Because of this, the extruder may start printing half empty. Because of this, part of the first layer is not printed. You can push the plastic manually by simply pushing the bar into the nozzle. Or solve this problem programmatically - in the slicer, add a contour print around the model (one line).
Some manufacturers and 3D enthusiasts add a line print on the edge of the table at the beginning of each GCode. This is done so that there is plastic in the nozzle by the time the model is printed.
Feed mechanism does not push through plastic
The plastic pushes the feed mechanism to the extruder - a motor with a special pulley put on the shaft. If for some reason the plastic is not pushed through (nozzle clogged, extruder temperature low, etc.), then the pulley “gnaws” through the bar. You need to push the plastic bar with your hands or cut off the damaged piece.
Elephant foot
The first layers of the model are wider and protrude beyond the boundaries of the model. This is due to the fact that the upper layers put pressure on the first ones that have not yet cooled down and flatten them.
High table temperature
Due to the too high temperature of the table, the lower layers remain soft for a long time. Try lowering the table temperature. It is better to reduce gradually (in increments of 5 degrees). You can try to turn on the blower when printing the first layers.
Small gap between nozzle and platen
If, when printing the first layer, the nozzle is too close to the table, then excess plastic will be forced out. After a few coats, this will not be as noticeable, but can lead to the effect of an “elephant's foot”.
Plastic re-extrusion
When too much material is squeezed out of the nozzle, the walls of the model are not smooth, but bumpy, with sagging.
The solution is software - in the settings of the slicer, you need to set the material feed rate (fluidity) to a lower value. The average value is 95-98%.
It is worth checking the diameter of the rod. If its size is greater than 1.75, then the plastic will be squeezed out more than necessary.
Plastic underextrusion
The plastic is squeezed out too little, because of this, gaps may appear between the layer. The finished model will be fragile and fragile.
Wrong thread diameter
Check the filament diameter in the slicer settings. Sometimes, instead of the popular 1.75, the default is 2.85.
Incorrect feed rate settings
Check the fluidity settings in the slicer. The average should be 95-98%.
Clogged nozzle
Something could get into the nozzle and partially block the exit of the plastic. Visually, the plastic will choke from the nozzle, but in a smaller amount than necessary for printing.
Hairiness or cobwebs on finished model
Thin threads of plastic protrude from the outer wall of the model (most often on one side). The defect appears due to the flow of plastic from the nozzle during idle movement.
Insufficient retract
A retract is a slight pull of a plastic filament from an extruder. Due to the retract when the extruder is idle (from layer to layer or from model to model), heated plastic does not drip from the nozzle. For some flowable plastics (eg PETG) the speed and amount of retraction must be increased.
"Hairiness" can be easily removed by grinding or cutting off the threads with a sharp scalpel.
High temperature extruder
The higher the extruder temperature, the more fluid the plastic becomes. It is important to find a balance so that the plastic is not too liquid and sticks well in layers.
In the selection of the optimal extruder temperature, a test model - a tower - helps a lot. It clearly shows how plastic behaves when printed at different temperatures.
.
Temperature test
Top "perforated" or uneven
The top of the model is bumpy or with holes. The problem may arise if the top of the model is flat. For example, like a cube.
Insufficient airflow
When printing the top plane (cover), the plastic does not have time to cool down and remains too liquid. Because of this, the threads are torn and holes are formed. Increase the fan speed on the last layers.
Few top layers
The top of the print may be too thin and deform as a result. Check slicer settings. The number of upper layers is not recommended to be set less than 6.
Low percentage of filling
If the infill percentage is too low, then the top layer will simply have nothing to rely on. Increase the fill percentage in the slicer settings.
Model deformation
Some parts of the model seem to have melted in some places or on one side. The problem most often occurs when printing with PLA plastic. The defect appears due to the fact that the plastic does not have time to cool and deforms.
Insufficient airflow model
Turn the fans on to maximum. If their power is not enough (in some printers, the fan is located only on one side), you can put a regular desktop fan and direct it to the 3D printer table.
Small model
Small models are difficult to blow well. Try to print small items alongside larger ones, or place several identical models in different corners of the table. So the plastic will have more time to cool.
Layer offset
Layers shift along the x or y axis during printing.
Print head jam
Turn off the printer and try to move the extruder along the x and y axes with your hands. The extruder must move freely. If there are jams, check the mechanics of the printer. Bearing wear or the curvature of the shafts may be to blame.
Electronics overheating
Sometimes electronics problems can be to blame for misaligned layers. The most common cause is overheating of the drivers or too low current exposed to them.
Table top is loose
This is most often seen in 3D printers with glass. During printing, the nozzle may hit the model and move the glass slightly. Before printing, check if the glass or other printing surface is well fixed on the heating table.
Skip layers
Small holes are visible on the print, or the shell of the model is not continuous.
Teflon tube deformed
There are 2 types of thermal barriers - all-metal and with a Teflon tube. If overheated, the Teflon tube may deform. Plastic will pass through it, but in a smaller amount.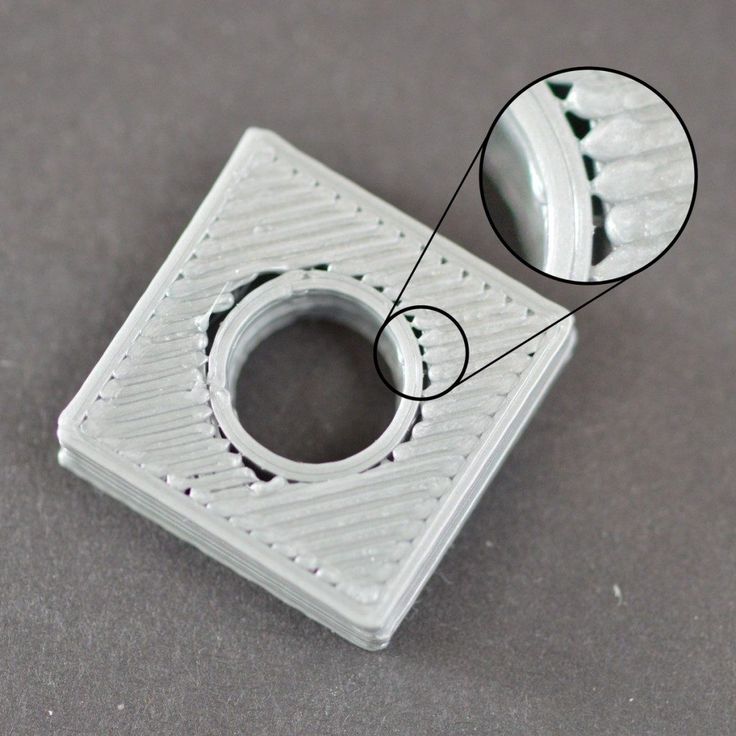
Low extruder temperature or high print speed
If the extruder is not heated enough, then the plastic will not be liquid enough and simply will not have time to be forced through the nozzle. The higher the print speed, the higher the extruder temperature should be.
Sometimes the outer walls print well, but the infill is “torn”. In this case, slow down the infill print speed in the slicer.
Model bundle
Cracks form on the surface of the printout during or after printing. Cracks can be large or very small. Most often, this problem occurs with plastics with a high percentage of shrinkage - ABS or Nylon.
Sudden temperature difference (if model delaminates during printing)
With a sharp temperature difference (for example, a draft), part of the model cools down faster. This leads to uneven shrinkage and incorrect distribution of internal stress. For plastics with low shrinkage, this is not critical. But if the shrinkage percentage is more than a few percent, the model may burst in layers.
For printing with such plastics, it is recommended to use a printer with a closed housing. If this is not possible, try to avoid drafts and sudden temperature changes in the room where the 3D printer prints as much as possible.
Print temperature
Due to too low printing temperatures, the layers may not “stick” well to each other. Raise the print temperature in the slicer settings.
Hardening (if the model cracks after printing)
Sometimes cracks appear on the model a few days after printing. This is due to uneven distribution of internal stress after cooling. You can try to “harden” the finished product.
For hardening, the model is placed, for example, in an oven, and heated to the softening temperature of the plastic. After that, the heating is turned off and the oven is left to cool slowly with the model inside. Due to this, the stress inside the print is distributed more evenly. But accuracy is very important in this method - if you make a little mistake with the temperature, the finished product can “float”.
Ringing
In places where the extruder changed direction, ripples are visible. Most often it looks like a shadow around the “sharp” protruding elements of the model.
Mechanical problems
Sometimes the problem occurs due to extruder play. Check if the extruder mount to the rails is loose. Be sure to check the tension of all belts.
High print speed or high accelerations
Moving the extruder too fast can cause vibrations that cause ripples on the wall of the model. The lighter the weight of the extruder, the less noticeable the ripples will be. To get rid of ringing, simply reduce the print speed in the slicer settings.
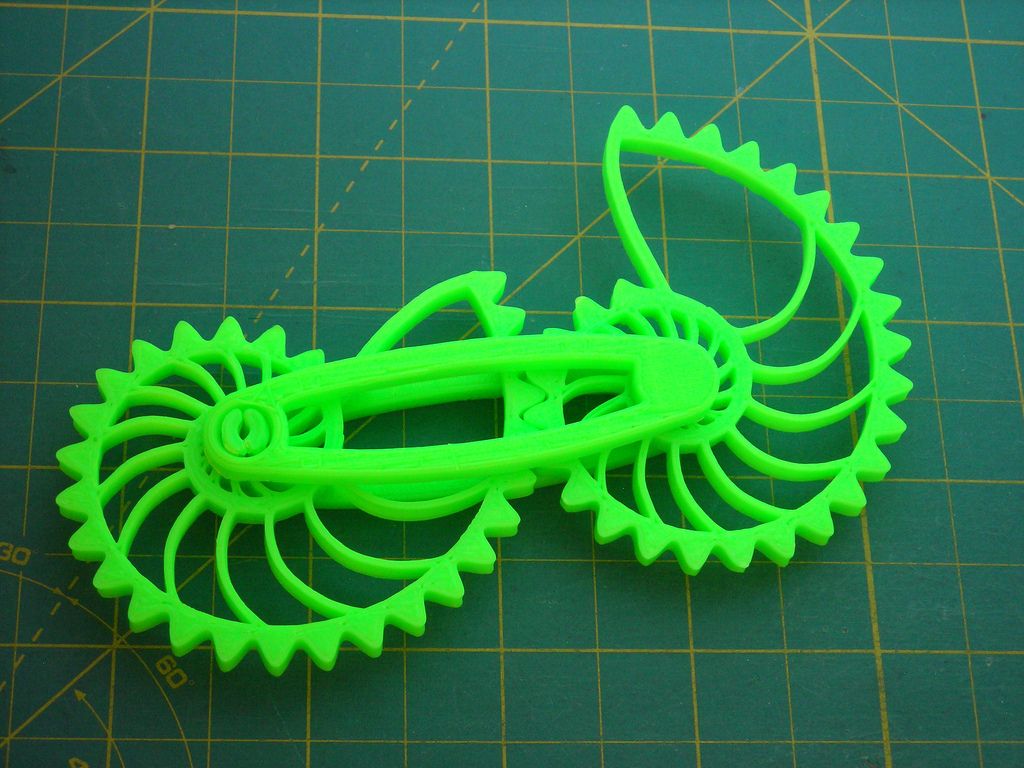
Slits for thin-walled models (not solid shell)
The thin wall of the model is not solid, but consists of two thin walls with a narrow gap between them. This problem is often faced by fans of printing "cutting" for baking.
Left model with wall defect, right without
Wall thickness and nozzle diameter mismatch
If the wall thickness is 1 mm, and the nozzle diameter is 0.4, it turns out that for a solid wall, 2 nozzle passes are few, and 3 are already many. The result will depend on the slicer algorithm, but most often you will get 2 walls with a thin slot in the middle (the slicer cannot change the wall thickness). The solution to the problem may be a slight refinement of the 3D model or the use of a different slicer.
Algorithms for calculating 3D models are constantly being improved and refined, and now this problem is less common.
When modeling, take into account not only the thickness of the nozzle, but also the percentage of “overlapping” of lines on each other. If you have a nozzle with a diameter of 0.4 - make the wall in your model not 0.
8, but 0.7 - 0.75.
Wrong model geometry
When instead of a circle you get an oval, and instead of a square you get a semblance of a rhombus.
The main reason is malfunctions in the mechanics of the printer. Be sure to check:
Belts
Check belt tension in x and y. Over time, belts stretch and may need to be tightened or replaced. Each 3D printer has its own way of tightening the belt. If the belts are slightly stretched, you can tighten them with the help of a "spring".
Loose pulleys, etc.
Check if all bolts and nuts are tight. Are there backlashes. Pay special attention to tightening the pulleys located on the motors along the x and y axes.
Sagging of some parts of the model
Some parts are not printed, broken, or instead of a neat surface, a swollen plastic snot is obtained.
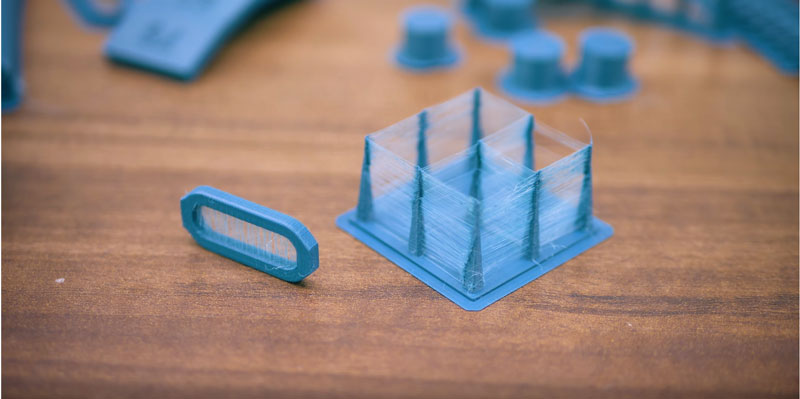
No support for overhangs
A 3D printer cannot print in the air, so if there are overhanging elements in the model, you need to set supports - supports.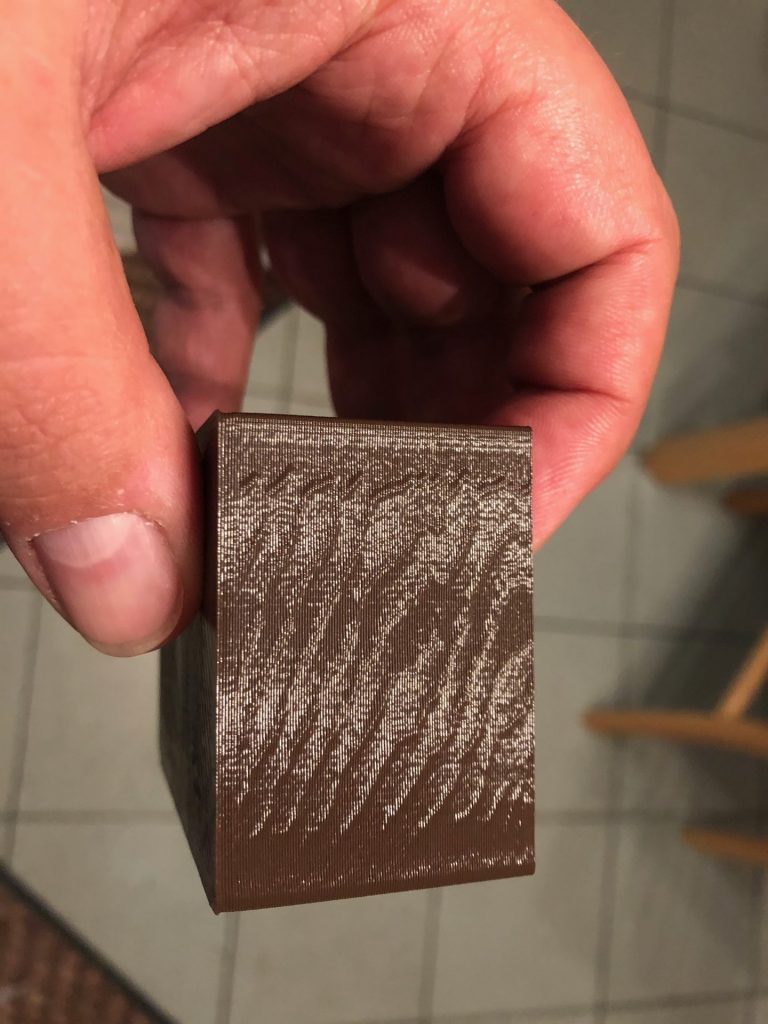 The slicer can set the necessary support itself, you need to check the appropriate box in the settings.
When printing with soluble support, you can set the gap between the model and support - 0. This will make the surface smoother. If the support material and the model are the same, you need to add a small gap. Otherwise, it will be difficult to separate the support from the model.
Split model
Sometimes the supports can take more plastic than the model. In this case, to save material and time, it will be more convenient to cut the model. If you have more than one 3D printer, then the model will print several times faster.
When cutting the model, you can leave grooves or mortgages so that the pieces of the model are connected without displacement.
Totals
In this article, we talked about the most popular 3D printing defects and how to solve them. Don't be intimidated by such a long list.