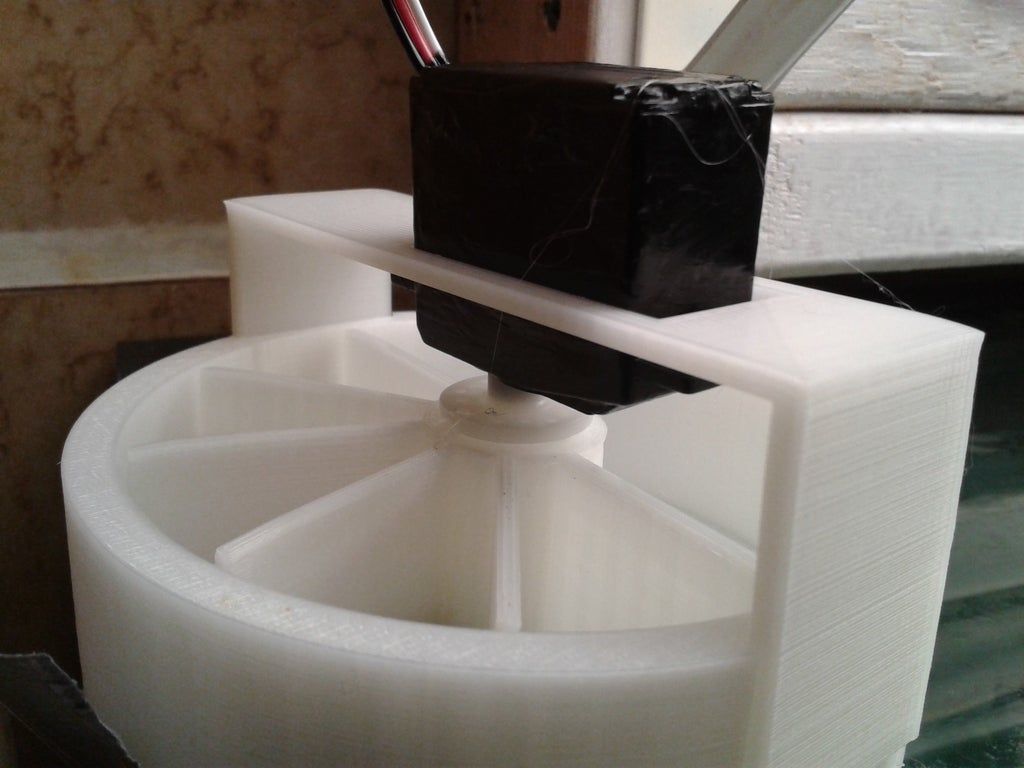
3D print bullet feeder
My OpenBulletFeeder Build | The Hebrew Hammer
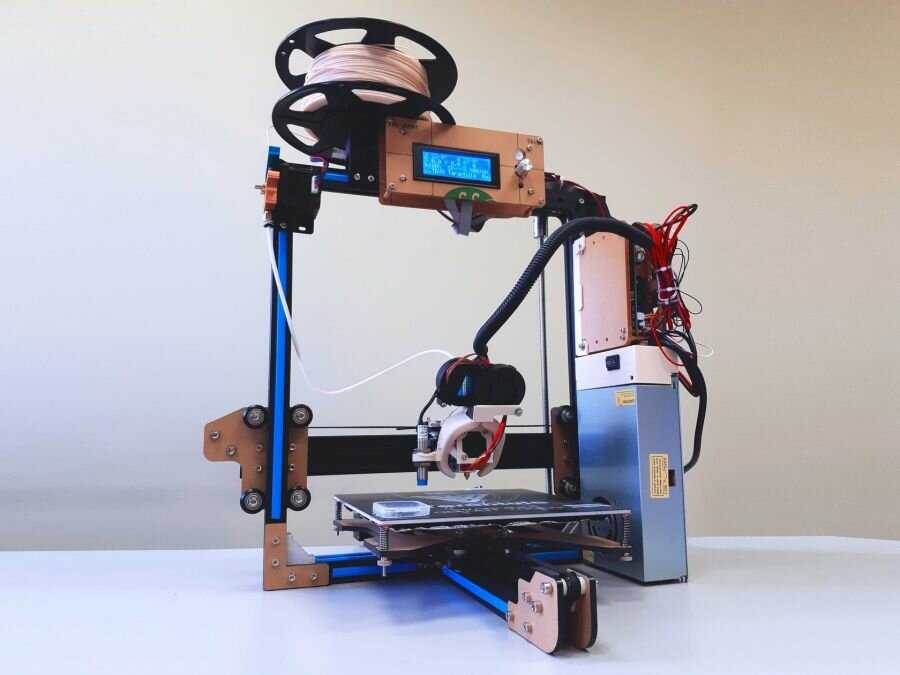
As you’ve noticed from some of my AARs, I am increasingly relying on reloads to see myself through classes and matches, especially with 9mm. I have a pretty good setup for reloading 9mm – a Dillon 650XL with case feeder and a DAA primer filler. But one thing I was missing was a bullet feeder.
DAA makes a perfectly good bulletfeeder, but it also costs almost $500. After being cooped up at home for so long, I wanted a project, so I decided to build the OpenBulletFeeder by AmmoMike83 as found on Thingiverse. This involved substantial 3D printing and wiring. Since this is a slightly complex project, I thought I would go through how I went about it.
The first thing I had to figure out was what parts I needed. The Thingiverse description does not necessarily do a great job of explaining how to figure this out, so I’ll narrow it down:
- You need to decide on what caliber you are dropping. This will impact the collator plate, spring tube size, spring housing, drop tube diameter, and what bullet feeder die you need.
- You need to figure out what “stop” mechanism you’re using to tell the bullet feeder to stop running when there are bullets in the top of the drop tube. You have a choice between a light barrier, small switch, and large switch. This obviously impacts the drop tube and your wiring choices.
- You need to decide on a motor, as this affects the choice of your base.
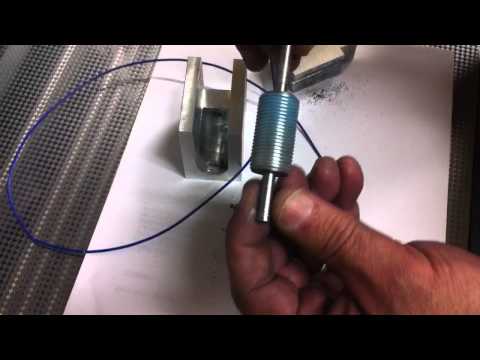
I went with the JGY370 @ 10RPM (270 degree rotation), light barrier, and 9mm (large spring, 10mm drop tube). In retrospect, I would STRONGLY recommend trying the small switch first, because the wiring to use the light barrier is obnoxiously difficult if you’re not used to doing this kind of thing. The switch is far easier to wire up. (There are wiring diagrams in the OBF files directory, and you should probably take a look.)
Here is a very short list of parts I used, hopefully semi-complete:
- bf_v3_base_Wh220_JGY370_270degrees.stl
- bf_v2_collator_plate_9mmLuger.stl
- bf_v2_adj_turning_plate_double_slide.
 stl
stl - bf_v2_flipper_v2.stl
- bf_v2_drop_tube_light_barrier_10mm.stl
- bf_v2_spring_housing_large_v2.stl
- bf_v2_mount_hang_Wh220.stl
- Control_Box_Cover.stl
- Control_Box.stl
- Control_Box_Bottom.stl
- Connector_JGY370_Shaft_Plate_OpenBulletFeeder
- WGGE WG-026 10 Pieces and 5 Colors Test Lead Set & Alligator Clips,20.5 inches (1 PACK) (connected the motor with these – soldering would have been better, but I don’t know how to solder)
- XFasten Double Sided Tape, Removable, 1.5-Inch by 15-Yards, Single Roll, Double Sided Adhesive Tape for Arts and Crafts, Woodworking, and Holding Down Carpets – Residue-Free (used this to mount my boards into my box)
- uxcell Photosensitive Sensor Module Light Intensity Detection with Wire DC 12V (the wiring is not obvious on this, you will have to play around)
- 12V 2A Power Supply AC Adapter, AC 100-240V to DC 12 Volt Transformers, 2.1mm X 5.5mm Wall Plug (12 Volt – 2amp – 2pack) (this worked pretty well for me – superglued the connector into the housing)
- Bringsmart JGY-370 12V 10rpm DC Worm Gear Motor 12 Volt High Torque Engine Mini Turbine Worm 6-24V Reducer Electric Motor Self-locking for DIY Mini Geared Motor (JGY-370 12V 10rpm) (10 RPM VERSION!!!)
- LAOMAO 1 Pack (20 Bulbs) 5mm 12V DC White LED Pre-Wired Round Top Bulb Lamp For DIY Car Boat Toys Parties (5mm, White) (these things are a little trashy, but they’re bright and cheap)
- VIGRUE M2 M3 M4 M5 Stainless Steel Screws and Nuts Flat Washers 1080 Pcs Hex Button Head Cap Assortment with 4 Wrenches
- Various #6×1/2 and #6×3/4 sheet metal screws
- Heavy Duty Toggle Switch 20/15A 125/277V, 2 HP with Waterproof Rubber Boot UL cUL Certified (this was maybe a little too heavy duty, but it worked)
- XLX 2PCS Mini PWM DC Motor Governor 1.
 8V 3V 5V 6V 12V 2A 1803BKW Adjustable Speed Light Temperature Controller Regulation Switch Current limiting Ultra small LED dimmer with Speed Control Knob
 - Various wires and crimp connectors
- Mr.BulletFeeder by DAA Die Assembly Only Caliber: 9/38S (I could have 3D printed a die, but this seemed easier)
- Mr.Bulletfeeder output spring and extension adaptor Size: Large (this is how you get the spring tube)
- Mr.BulletFeeder by DAA Powder Funnel – Dillon Caliber: 9/38S (while, strictly speaking, not part of this build, it is de facto a necessity to make the bullet feed die work correctly)
- Ballpoint pen spring for the flipper arm
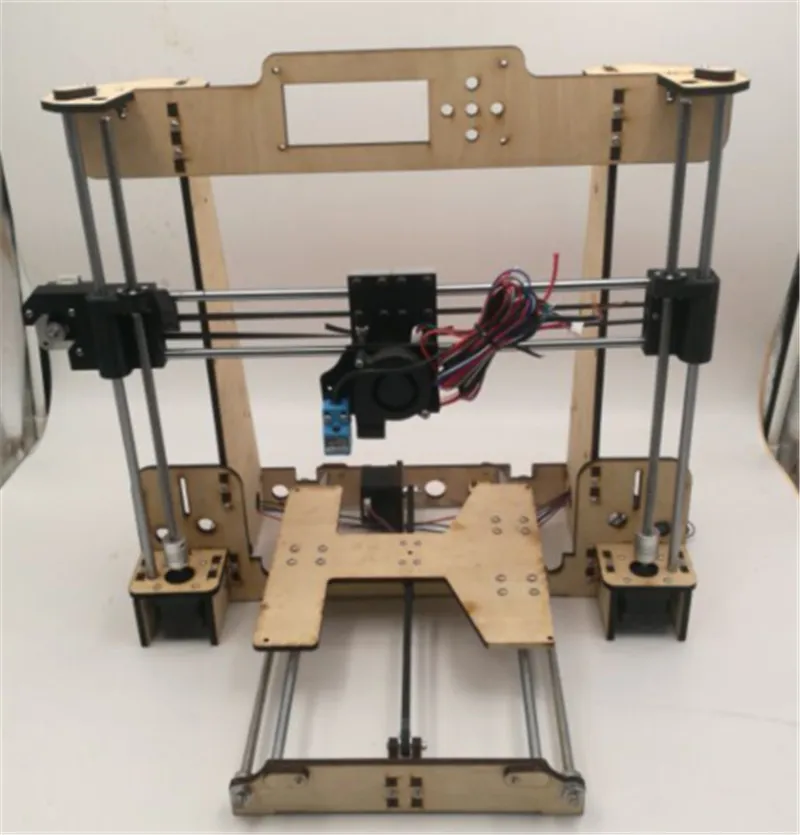
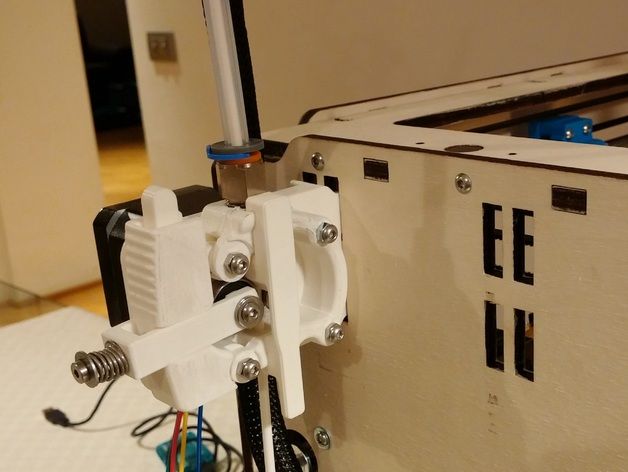
To print everything, I bought an Ender 3 Pro from Microcenter for $200. I have another 3D printer, but it’s simply not big enough to print some of the parts needed for this printer. On the positive side, the Ender 3 Pro (or V2, if you want to spend more money) is phenomenal for the price and not that difficult to assemble.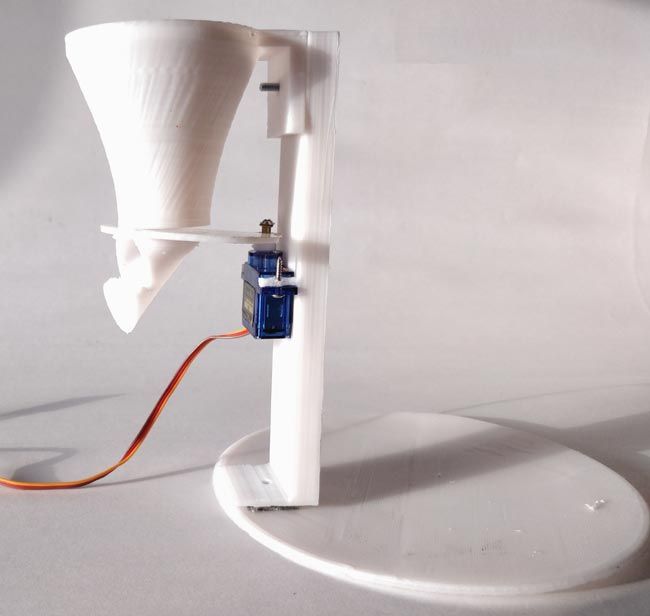 I used the profile in Simplify3D and cranked out the parts in PLA with essentially zero tuning.
I started with the given sample configuration to figure out what parts I needed to print. Unfortunately, the Thingiverse sample configuration is incomplete; you will also need to print the large spring housing (or small spring housing if you’re doing < .35 rifle rounds).
Print time is long. Using my default Simplify3D settings, it took about 72 hours to get everything printed (albeit I printed a few parts I didn’t wind up using, so it could be shorter for other people). You can’t really rush these prints; the collator and base are pretty big, and the tolerances are tight enough in a couple places that you want your printer dialed in appropriately. I used PLA for everything, which seems perfectly adequate for the stresses involved.
The next issue I ran into was finding a rotor to turn the collator using the motor. No interface is mentioned for this, so you’re left with trying to hack something together. There is, nicely enough, a rotor you can print that works perfectly. It’s not the strongest design in the world, so you do need to make sure it’s aligned correctly with the motor rod’s flat side when installing it.
Another missing piece of information: the spring to use for the flipper arm. It turns out you can just raid the spring out of a ballpoint pen, and it works perfectly. I originally tried to use a spring that was WAY too strong, and the motor did not have enough torque to overcome it.
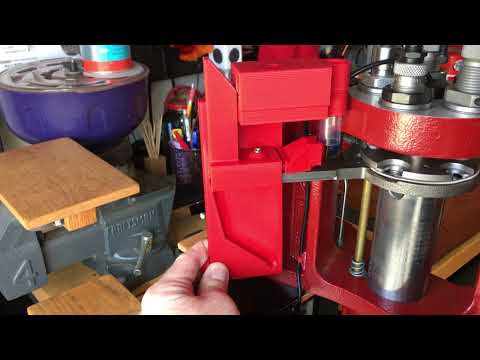
For an electronics box, I used this design. It wasn’t amazing for what I needed, but I drilled in enough holes to get the wires where they needed to go. I would strongly suggest biasing your wiring so that you have a LOT of wire length to go to the motor, because you will be somewhat limited in how far your optical sensor can run to the drop tube.
OK, so once you’ve got everything 3D printed and assembled, you have a new problem: making it work. You need to give the OBF a decent amount of backwards tilt to avoid bullets falling out of it (and on top of you and/or your press). However, if you’re having problems with the bullets not feeding base down, all you need to do is adjust the double slider turning plate is adjusted by pulling it outwards slightly. (There is another design on Thingiverse that supposedly does a much better job with flat nose bullets if you’re using those.)
The DAA bulletfeed die also needs careful installation… you basically load it up with bullets, pull the press lever to get the plate with a case as high as it will go, and then screw the die down until it JUST releases a bullet on the case. It took me a couple tries to get it dialed in, but once you do, it’s pretty reliable. The powder funnel that DAA sells is a must; once you get the powder feeder tuned, the bullets stick into the case with just the right amount of depth so that they don’t get tossed around by the plate movement on the press.
Does this project sound like a lot of work? Yes, because it was. This was definitely not a quick project for me. But… take a look at this video and tell me if it wasn’t worth it.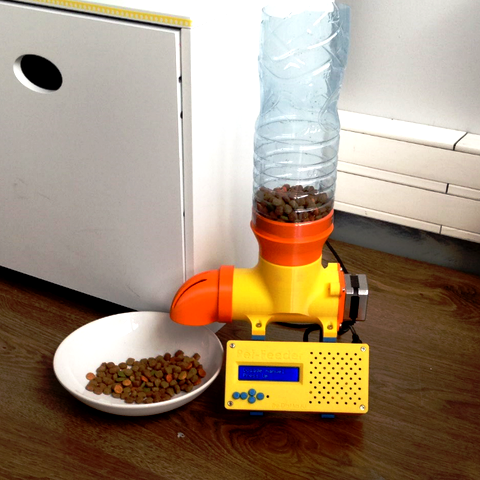
I’d guess I probably saved a couple hundred bucks or more over the DAA bullet feeder, and I DEFINITELY learned quite a lot doing this project. So, on the whole, I’d say it was a great experience, and kudos to AmmoMike83 for allowing free distribution of such a useful tool.
If you like the bullet feeder but aren’t up to making your own, “Karl Bibb” on Facebook sells his own somewhat-modified versions that are well-regarded for ~$200. He also sells a case feeder variant.
ETA (9/15/2020): Made a very slight change and used the bf_v2_mount_hang_Wh220.stl one-piece hanger instead of the three piece hanger. The three piece hanger is nice because it’s easily adjustable, but the one-piece is a lot more sturdy and not super hard to adjust either (you basically screw it into the case feeder a bit at the appropriate angle). This significantly cuts project costs, too.
Like this:
Like Loading...
3D Printed Bullet Feeder Tutorial and price breakdown
In reloading, especially when talking about pistol calibers, speed is everything.
If your shooting rate is high, automatization pays back really fast. But the initial investment sometimes is way too high.
Depends on the brand, but you can go from a single stage press and a set of dies for around 100-120€ total, to several thousands for a progressive press with full automation.
In this post I’ll share a 3D project for a bullet feeder I found online and what I used to make it fully functional.
Original 3D project with all corresponding files from “Ammo Mike” can be found in the vide description here.
Let’s talk first about the electronic part as the entire 3d model pack should be based on it:
1. DC motor – if you can’t find the exact model mentioned in the info link, then you need to find a replacement and most important – you need to change the base stl file.
The perfect motor is around 4 to 8 rpm as per my observation. Faster will result failures or inconsistency, slower are fine, but they could be too slow if you have auto-drive for example.
Another thing to consider is the voltage – I chose 24V DC motor, 5rpm. The reason is simple – the original Dillon case feeder is also 24V with 1A power supply. So I got my motor with 2A power supply in addition and connected both case and bullet feeder with one power source.
2. On/Off switch, this is pretty straight forward, just get some you like. (optional)
3. Micro snap action switch – this is a tricky one, you need to get as light as possible, since the bullet is 7-8g, it should be able to “click” it. Also it could need a modification, by simply adding a longer lever if the original is too short. Note that you need a normally-closed (NC) option. So when the lever is not forced to click, the circuit should be closed.
4. Male + female DC connector pair (optonal)
5. Power supply – max current depends on the motor, I got 24DC 2A just in case and also because I used it to power the case feeder as well.
6. Spring – the one that connects the bullet collator with the die.
Also you’ll need a bullet dropper die. I used the Dillon one, but you can try whatever you have, also there are very nice 3d bullet feeder dies projects out there.
Once you got all you need, it’s time to modify the base stl file in order to mount your motor correctly.
I often see a requests in places like ThingiVerse for the original files. However, you can also directly edit the STL file without any problem and this is what I did, then my motor was mounted perfectly. You can find how from this Fusion 360 tutorial:
Once you have the base modified, it’s pretty straight forward process.
Just print out all needed parts.
Since there are some variations of the files (larger/smaller springs, different diameters etc), the author added a separate folder with the 9mm setup.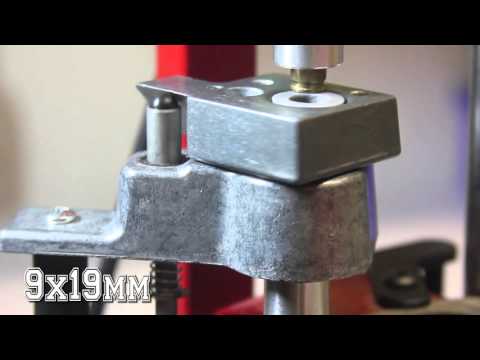 However, I found that the included drop tube file was with too small diameter, so I printed out the 10mm one, which did the job: bf_v2_drop_tube_switch_small_id10mm_large_spring.stl
You can do this without the optional parts I mentioned above. However, it will look and feel much better if you add the On/Off switch + the DC connector.
Also you can see from the images that I made a motor cover, where I placed the optional parts as well. It really depends on what parts you’ll get as the model needs to be created based on them.
Here is a price breakdown for the entire project:
– DC Motor – 15€
– Power Supply – 12€
– Spring – 1.3€
– Micro switch, on/off button, dc connectors, a little wire – 4€
– PLA material 250-300g – around 7-8€
So in total it’s around 40€.
I must say it works perfectly and I already did ~1k rounds with the XL750.
I tested with both FMJ and Copper Plated 9mm bullets.
I’ll be happy to help if you have some questions about the models, wiring etc.
Currently I’m working on a case feeder project, which should be ready soon and I’ll put a separate post about it. Stay tuned. 🙂
Post Views: 513
STL File 8.8cm Cartridge & Case 3D Printing・3D Printed Model Download・Cults
M1919A4 BROWNING CA.30 AMERICAN MACHINE GUN TRIPOD 3D PRINT 1/35 AND 1/16
6,49 €
M1919A4 BROWNING CA.30 AMERICAN MACHINE GUN 3D PRINT 1/35 AND 1/16
11.49 €
M2 Browning Cal.50 American heavy machine gun 3D printed 1/35 and 1/16
€14.99
3D print of German late type fire extinguisher
3.99 €
Panzer III&IV Winter Tracks 3d-print
5.99 €
Panzer III & Panzer IV mid.
 prod tracks 3D PRINT MODEL
 5,49 €
T-34 Wafer tracks 3d printing
€6.49
Tank jack for Panzer I/II/III/IV 3d print
1.49 €
TIGER I. MIDDLE AND LATE TRACKS 3D PRINT MODEL
5,99 €
Late Type Panzer IV Tracks 3d printed
6.49 €
M2 Browning Cal.50 American heavy machine gun 3D printed 1/35 and 1/16
€14.99
3D PRINT MODEL of the tank Panther Ausf.A/G
4,99 €
Best 3D Printer Files in the Miscellaneous Category
Replica LKT 81 RC model 1/10
30 €
Ninja Pumpkin
Free
STAR WARS CUSTOM SOLDIER HELMET
€12.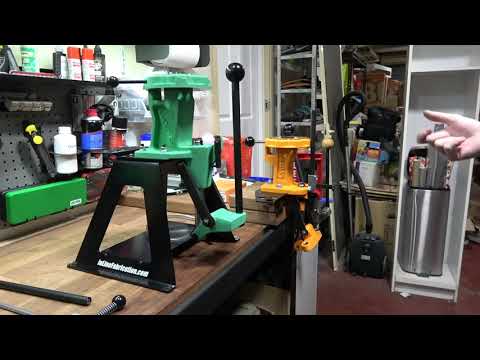 50
50
Happy Crocodile Print-in-place
1,40 €
WALL MOUNT FOR 3 GARNET 40 MM
2 €
Business Card Holder
Free
Adjustable mask wearer (Remix)
Free
nine0003 halloween cards holderFree
Bestsellers in Miscellaneous category
Adderini - 3D printed repeating slingbow / crossbow pistol
12.50 €
Gremlin rail 640 mm FPV
0,94 €
flexible volute
2 €
nine0003 CHRISTMAS TREE v21,50 €
Predator-inspired movable mask
6. 20 €
20 €
ItsLitho "Swirl" lithophane personalized Christmas ball
1,90 €
Giarados - articulated sea serpent
1,50 €
Charizard - pokemon with flexible articulation (seal in place, without supports)
3 €
Chainsaw Man - Denji
€17.88 -fifty% 8.94 €
Addams Thing
1.99 €
TING Addams
8.47 €
Christmas House
6.87 €
ItsLitho "Creamy" personalized Lithophane Christmas ball
1,90 €
Eeveelution articulated mega pack
10 €
5 gnomes (without support)
€2. -10% 2.24€ 49
49
ItsLitho "Drop" personalized lithophane Christmas ball
1,90 €
Do you want to support Cults?
Do you like Cults and want to help us continue our journey on our own ? Please note that we are a small team of 3 people, so support us in maintaining the activities of and creating future developments is very simple. Here are 4 solutions available to everyone:
-
AD: Disable your AdBlock banner blocker and click on our banner ads.
-
AFFILIATION: Shop online with our affiliate links here Amazon.
-
DONATIONS: If you want, you can donate via PayPal here.
-
* INVITE FRIENDS: * Invite your friends, discover the platform and great 3D files shared by the community! nine0006
Is it possible to print airguns and firearms
Is it possible to make a gun on a 3D printer and is it legal?
Today's 3D printers offer a lot of possibilities. They can print products of almost any complexity. Until quite recently, it was difficult to even imagine that a plastic weapon could shoot. However, it is already possible to make a pistol on a 3D printer, which, although not reliable, still fires live ammunition. nine0006
Can firearms be 3D printed?
Back in 2013, a young American activist for the free sale and distribution of weapons proved that plastic weapons can be printed on a 3D printer. He was the first in the world to make a pistol in this way, in which only the striker was made separately from metal. All other parts were printed on an FDM printer.
Today's 3D printers are capable of printing any CAD model, and these models of firearms have been available for over 10 years. If in previous years their printing required professional skills, now almost any user can master them. With a 3D printer and a finished model, it became quite possible to print a gun. Another thing is that such "creativity" is punishable by the laws of most countries. nine0006
The evolution of 3D printed weapons
Despite all the prohibitions and restrictions, the evolution of 3D printed firearms is moving at a great speed. The beginning was laid by the single-shot plastic pistol Liberator by American K. Wilson, which appeared in 2013. It had a simple design and was chambered for 380 ACP. Already after 10-12 shots, this weapon became unusable. However, the very possibility of printing firearms served as an impetus for the development of the idea. The author of the first pistol himself founded the Defense Distributed company, which began to actively improve the technology. nine0006
One of the ways to increase the durability of weapons was to increase the number of their barrels. At the beginning of 2014, the Japanese Y. Imura makes a 38 caliber Zig Zag pistol. He was able to fire up to 6 shots non-stop. The author of the weapon was recognized as a criminal and convicted.
The next step was the production of a six-shot revolver by J. Patrick in 2015. The PM522 Washbear has been shown in action on YouTube. The weapon was noticeably safer for the shooter compared to previous versions, but still allowed to fire only a few dozen rounds. nine0006
The first 9mm semi-automatic pistol appeared in 2016 under the name Shuty-MP1. It was developed by a handicraft gunsmith who hid under the pseudonym Derwood. It wasn't exactly a plastic weapon. The author used some metal parts from factory pistols - a barrel, a firing pin, a bolt and several springs. This made it possible to ensure a rate of fire of more than 46 rounds / min. However, when changing the store, the plastic case had to be cooled. In 2017, the same master proposed an improved model - Shuty AP-9.
The main contribution to the development of 3D printed weapons technology was made by Defense Distributed, which brought together a group of like-minded activists. First, these enthusiasts won legal proceedings in the United States and obtained permission to 3D-print weapons, which greatly expanded their capabilities.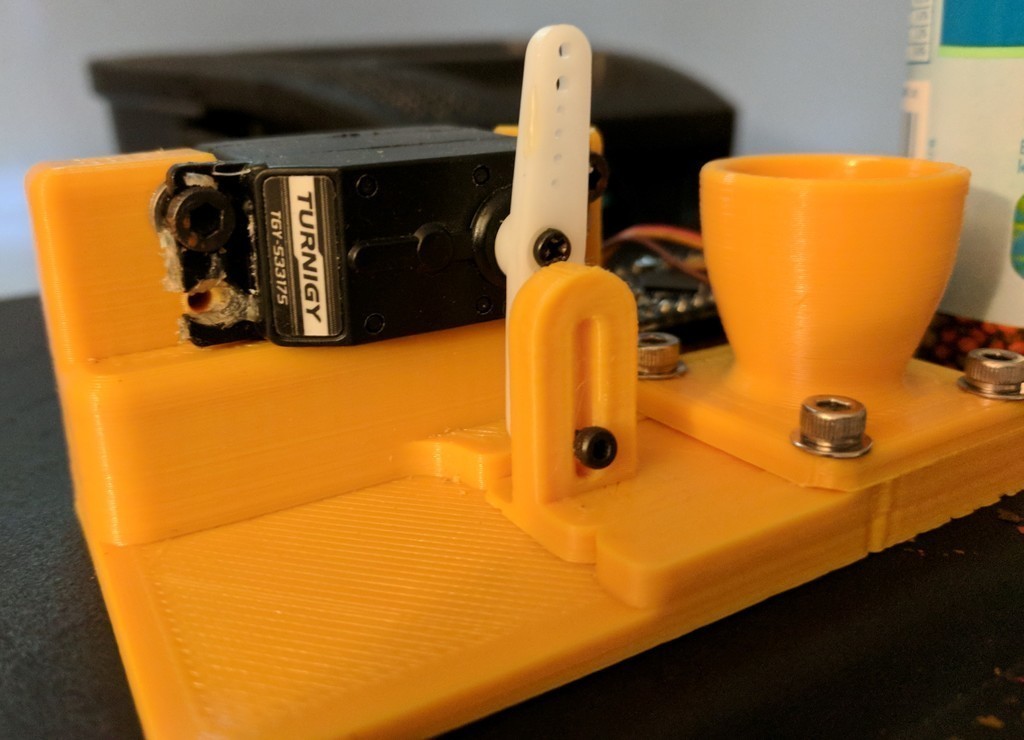 Secondly, they were able to set up a professional business with product testing and quality control. As a result, in 2018–19 they developed numerous models of a variety of firearms - from pistols to carbines. They posted over 30 files for printing original gun parts. Most of them were plastic, and the metal parts were not made from purchased, ready-made elements, but from simple metal profiles (tubes, strips, etc.), which are sold in ordinary hardware stores. This made it possible to exclude the use of parts patented by gunsmiths. nine0006
At the moment, the semi-automatic carbine FGC-9, developed on the basis of the Shuty AP-9, has become the pinnacle of "creativity" of Defense Distributed. At the same time, there is not a single factory part in it. The barrel for the 9 mm cartridge is made of steel pipe using electrochemical processing.
Where can I get drawings and what should I look for?
Gun manufacturing bans make it much more difficult to get blueprints and models of guns for 3D printing.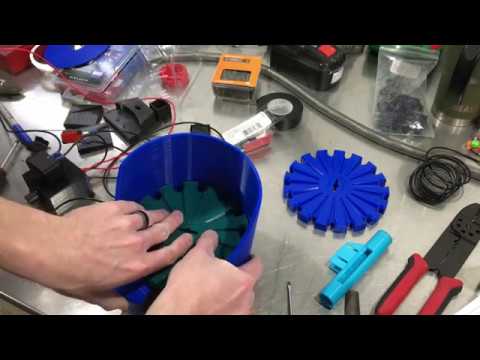 The right to free placement of information was achieved only by Defense Distributed. Their website provides free access to drawings, models and technologies. Other information can be found on the Internet, but they are usually illegal. nine0006
When choosing a model, pay attention to the following information:
- material used;
- cartridge for which the model is designed;
- number of cartridges in the magazine, rate of fire;
- duration of operation before failure.
It is important to clarify which metal parts will need to be purchased separately, in addition to plastic for printing on a printer.
What does the law say in different countries?
The only country where firearms can be 3D printed is the United States. Gun Control Act 19 applies here68, giving Americans the right to make weapons, but only for personal use. Only one limitation is put forward: it must be determined by metal detectors, that is, it must have a metal element. In virtually all other countries, homemade manufacture and repair of weapons for any purpose is prohibited by law. In Russia, printing it on a 3D printer falls under the Criminal Code of the Russian Federation and is punishable by imprisonment.
Should we be afraid of plastic weapons?
The question of how dangerous a weapon printed on a printer is becoming increasingly important. Despite all the prohibitions, it is extremely difficult to control the spread of technology around the world. The availability of 3D printers and the increase in their functionality make it possible to master the production of plastic guns at home. How dangerous is such a weapon? nine0006
Most experts agree that currently printed weapons are more of an interesting toy. It is quite expensive and is designed to carry out only a few dozen shots. Moreover, such pistols are quite dangerous for the shooter himself with live ammunition, because they can explode in their hands.
However, the danger cannot be underestimated. It is easier and cheaper for a "serious" criminal to buy illegal military weapons than to make them on a printer. At the same time, there may be "enthusiasts" who, for their own interest, can make a pistol and try it out in action. Such inadequate people represent an undoubted danger. In addition, the temptation is great for terrorists. Metal detectors do not detect a plastic gun, which means that it is easier to carry it, for example, on an airplane. nine0006
Important! Plastic weapons have a very small resource. At the same time, sometimes just one shot is enough to kill a person.
3D printed firearms have the following advantages:
- the ability to make military weapons at home;
- light weight;
- availability of materials;
- Ability to copy famous weapon models.
Always remember that there are significant disadvantages:
- illegal manufacture;
- high cost of weapons;
- very small resource and limited rate of fire;
- danger to the shooter himself.
Currently, plastic weapons have more disadvantages than advantages, and most importantly, you can get a real prison term for making them.
Prospects for printing weapons
The development potential of 3D printing of firearms is far from exhausted. The expansion of equipment capabilities and the development of innovative materials indicate that in the near future such weapons may approach military weapons in terms of characteristics. In the future - a significant increase in the resource and the provision of automatic firing. nine0006
Significantly improves the reliability of printed pistols and carbines SLS technology using metal powder. Such weapons already differ little from the factory metal models. While it is very expensive, which significantly limits the application. However, over time, the material will become cheaper, which means it will become more affordable.
Printing firearms on a 3D printer has become a reality. Despite its extremely low performance and reliability, interest is growing in it.