Samsung 3d scanner review
Best free 3D scanning apps for smartphones in 2022 (iOS/Android)
3D scanning apps (a.k.a. 3D scanner apps) are a fun way to learn about 3D scanning. In this article, we cover the best 3D scanning apps in 2022 and explain how they work.
Last update April 28, 2022
We removed apps that don't exist anymore and added KIRI Engine, a new app that we recently had the opportunity to review.
Table of contents
What is a 3D scanner app?
The 5 best 3D scanning apps for smartphones (free)
Photogrammetry 3D scanning technology
3D scanning using a smartphone (iOS or Android)
KIRI Engine
Qlone
Scandy Pro
Canvas
itSeez3D
3DF Zephyr
3DSizeME
Bevel
Trnio
iPhone 3D scanning apps
Differences between 3D photo and 3D scanning apps
3D Creator by Sony
123D Catch
Trimensional
Seene
Pixelio
3Dignite Scanner
EORA 3D
Conclusion
FAQ
What is a 3D scanner app?
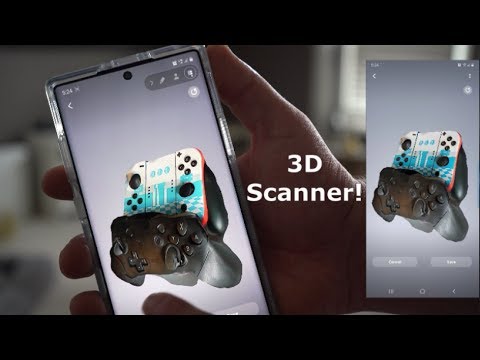
A 3D scanner app or 3D scanning app can turn almost any smartphone into a pocket-sized 3D scanner. Most of these apps are based on photogrammetry, a 3D scanning technology that creates 3D models out of 2D photos. You take pictures of an object from different angles and then the app’s algorithms “stitch” the images together.
With a 3D scanning app, you can 3D scan objects and rooms, and even people (3D body scanning). You can use a 3D scanner app to create 3D objects for augmented reality. It’s also possible to create 3D models for 3D printing.
Here is a scan we did with a 3D scanning application (KIRI Engine):
Of course, 3D scanner apps for smartphones are less accurate than actual 3D scanners. However, they are a great, affordable way to learn more about 3D scanning without investing in complex hardware.
In this article, we provide a comprehensive list of the best 3D scanner apps for iPhone and Android smartphones.
The 5 best 3D scanning apps for smartphones (free)
Expand to see more specs
How do 3D scanning apps work?
Photogrammetry 3D scanning technology
By definition, photogrammetry is “the science of making measurements from photographs”. Put simply, you take photos of a 3D object, and then the software stitches the pictures together. With this technology, the final 3D scan features color and texture.
3D scanning using a smartphone (iOS or Android)
You need to take several pictures of the object from different angles (usually 360° around the object) with your phone. 3D scanning apps generally provide you with tips and guidance to help you properly take the pictures.
The app then processes these pictures and aligns them together to form a 3D model. The 3D model is then available for export or editing using additional 3D software. In some cases, users may also print their 3D models with a 3D printer.
3D scanner apps overview (iOS and Android)
In this section, we give some more context and information about each 3D scanning app from our selection.
KIRI Engine is a free 3D scanning app for Android and iOS smartphones. All the processing happens on KIRI’s servers, not your phone, so the only thing you need is a recent smartphone with a decent camera.
The free version of KIRI Engine has a 70-photo limit, which is enough for most simple scans. It’s excellent for makers, students, and anyone who wants to try 3D scanning or do the occasional scan (for small or simple objects).
Read our in-depth KIRI Engine review article for more information about this app.
Contact manufacturer Add to comparison
To use Qlone, you need to print a special black and white paper mat. The mat looks like a QR code and is used by the app as a marker.
Qlone offers a useful guiding system. A grey dome surrounds the object you’re scanning and lets you know which angle you need to capture next. The app generates the results locally (without going through a cloud platform) and almost in real time.
Users can easily share 3D scans via social media apps such as Facebook and WhatsApp.
Contact manufacturer Get a quote Add to comparison
Scandy Pro for iOS is a free 3D scanning app that turns your iPhone into a full-color 3D scanner. Within the app, you can edit your scans with various tools. This app is available for iPhone X/XS, iPhone XS Max and iPhone XR.
The 3D scans are easy to export in PLY, OBJ, and STL formats. You can also upload them directly to Sketchfab. In the free version, you get a free mesh save every week. If you need to save more scans, you can purchase single saves or get a subscription for unlimited saves. The Scandy Pro app is free and receives frequent updates.
Scandy developers also offer their Cappy app, which allows you to capture small 3D scans for augmented reality. You can’t export the scans though!
Contact manufacturer Get a quote Add to comparison
This free 3D scanner app is ideal for professionals such as designers, architects, real estate agents, and more.
Canvas is easy to use– you only need to walk around the room while holding up your iPad. The app creates your 3D model in real time, and provides exact floor-plan measurements.
Canvas allows you to save your scans on your iPad or e-mail them to friends or colleagues. This 3D scanning app also offers a Scan To CAD service for $29.95 per scan.
Contact manufacturer Get a quote Add to comparison
This 3D scanner app offers quality 3D scans by processing the photos on its cloud platform. itSeez3D is able to capture people in 3D, a process known as 3D body scanning.
itSeez3D offers unlimited scanning, but exports cost $7 each. The two paid versions of itSeez3D offer a limited amount of free exports and other benefits. The “Scale Up” package at $250/month lets you export up to 1,200 models per year.
This application requires an Occipital Structure Sensor to operate.
Contact manufacturer Get a quote Add to comparison
3D scanning with a smartphone: special mentions
3DF Zephyr, a 3D scanning software for PC, enables you to create 3D scans from your smartphone pics. You can then export the 3D scans in common 3D file formats.
3DSizeME is a 3D body scanning app developed by TechMed3D, a Canadian company. This free 3D scanning app works with a Structure Sensor and targets medical clinics and professionals. The 3DSizeME app provides precise body measurements.
TechMed3D can customize the app to specific professional needs and use cases.
Bevel launched on Kickstarter on July 28th, 2015 and was successfully funded only two weeks later. Bevel, a small dongle-like device, officially started shipping in April 2017 after almost 2 years of development. The app hasn’t received any updates since late 2017 but is still available.
Trnio, developed in 2013, is one of the first 3D scanning apps to be released. This app used to be free but is now priced at $4.99. It is only available for iOS.
iPhone 3D scanning apps
The iPhone TrueDepth sensor has made it possible to develop a variety of selfie 3D scanning apps. Some interesting iPhone 3D scanning apps include:
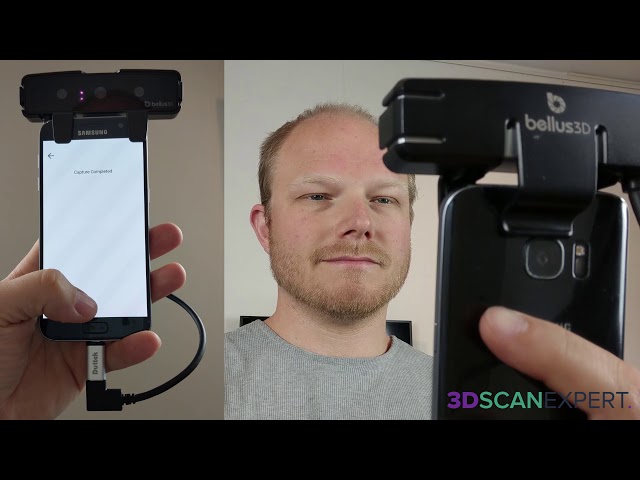
- Bellus3D: the app itself is free, but you need to pay in order to export your scans.
 For three days of unlimited 3D scan exports, the price is $7.99. For more accurate 3D scans, users may opt for the Bellus3D Face Camera add-on (see on Amazon).
 - Heges: like Bellus3D, the app is free to download. However, the in-app option to export 3D scans costs $2.99.
- 3D Scanner Pro: this iPhone 3D scanning app by Laan Labs targets professional use cases (real estate, architecture, etc.).
What is 3D photo or spatial photography?
Spatial photography is a hybrid between capturing a video and taking photographs. 3D photos combine the perspective of a panoramic photo and the 3D features of a video.
Differences between 3D photo and 3D scanning apps
3D photos are similar to 3D scans, at least in the way they are seen, but they are still both different:
- 3D photos can only be stored and accessed through a specific viewing app
- Spatial photography photos can’t be 3D printed
- 3D scans can be edited
- You can’t export 3D photos to external software such as Sketchfab
Discontinued 3D scanner apps
A number of 3D scan apps have come and gone. We list them here so you know what’s been going on!
3D Creator by Sony
The “3D Creator” 3D scanning app by Sony is no longer available on the Play Store. It seems to have been discontinued for a while.
123D Catch
123D Catch, which was once the most famous 3D scanning mobile app, was discontinued in April 2017. 123D Catch was compatible with iOS, Android, and Windows smartphones.
Trimensional
Although Trimensional is still available on the App Store, it hasn’t been updated since late 2014.
Seene
Seene is a 3D scanning app for smartphones that has been acquired by Snapchat.
Pixelio
PIXELIO is a portable turntable that uses 123D catch, a 3D scanning app that was discontinued in April 2017. The creators of PIXELIO have yet to deliver on their promise.
3Dignite Scanner
This app was supposed to let you export 3D scans to the VR world (and to Minecraft).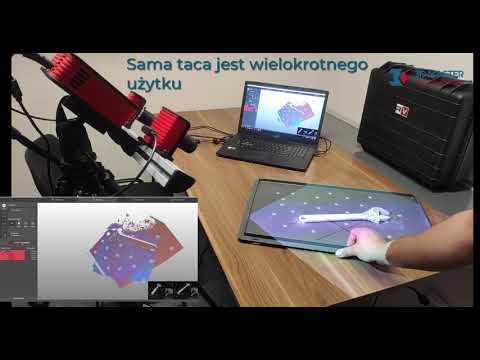 However, the company seems to be inactive since 2017.
EORA 3D
EORA 3D is an Australian Kickstarter project that launched in October 2015. Their website has disappeared and they are no longer providing support for their product.
Conclusion
In this article, we provide a comprehensive overview of 3D scanning apps for smartphones. The market is still too small to create a ranking or leave out certain 3D scanning apps.
These apps and their accessories are able to create decent 3D models. However, they don’t offer the high quality that actual 3D scanners do. 3D scanning apps are a great solution for beginners, hobbyists and even professionals that don’t require much precision.
FAQ
Can 3D printers scan objects?
3D printers can scan objects if they are in a 2-in-1 printer scanner combo. Very few of these machines exist.
How do 3D scanners work?
3D scanners capture 3D data of a given space or object. To do so, the scanner can use a laser, structured light, a photo camera, or a touch probe.
What is the best 3D laser scanner?
The best 3D laser scanner is the one that best fits your needs.
Is there an app to create 3D models?
There are various apps available to create 3D models, as seen in this article. You can create a model by 3D scanning an object with your phone. You can also find thousands of pre-made models on STL file websites.
Full review of the Revopoint POP, a cost-effective 3D scanner ($549)
Who is Revopoint?
Revopoint started out in 2014 as a group of doctorate researchers digging into 3D capture technologies for face recognition and machine vision. They raised several million dollars in 2015 and 2017, enough to fund the launch of their first product, the Fingo S-1 Android tablet 3D scanner.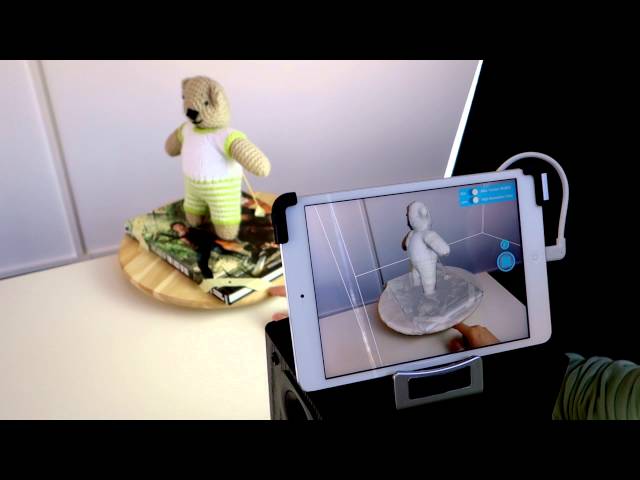
The team, operating out of China’s tech hardware capital Shenzhen, then founded Revopoint 3D Technologies Inc. to tackle the international 3D scanner market. And tackle the market it has, raising an astounding $2.2M via a Kickstarter campaign for the launch of the POP 3D scanner.
The POP 3D scanner. Source: AniwaaEnter the POP 3D scanner
Revopoint’s POP is an affordable, 2-in-1 3D scanner that uses structured infrared light (eye-safe) to 3D map the surface of an object or person, and an RGB camera to capture colors and textures. The same operating principle is behind Apple’s iPhone face recognition system and the Microsoft Kinect.
The Revopoint POP is an affordable 3D scanner for beginners and hobbyists, available at around $600. Revopoint, a manufacturer based in Shenzhen, raised over $2M on Kickstarter to launch the POP.
Buy on Revopoint Add to comparison
The POP can be used as a desktop 3D scanner with a tripod and automatic turntable, or as a handheld 3D scanner– either while connected to a PC, or to a smartphone with the HandyScan app for iOS/Android (and a power bank depending on your smartphone).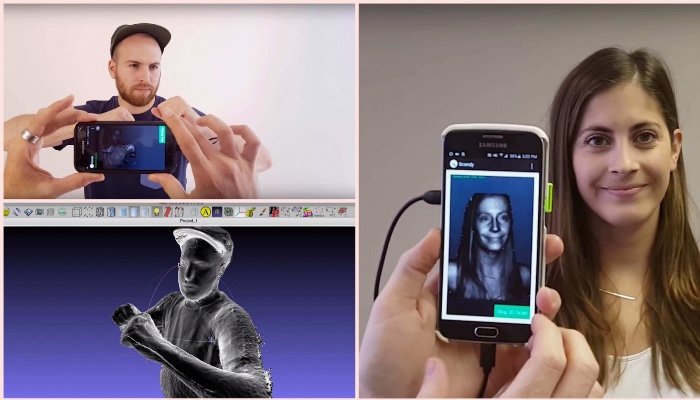
Its $549 starting price may seem hefty for those unfamiliar with the 3D scanner market, but it appears to be quite a steal when put into perspective with the usual $1,000 starting prices (for the very most entry-level options).
Different packages are available:
| POP 3D Scanner | POP “Starter Kit“ | POP “Advanced Kit“ |
| – POP 3D Scanner | – POP 3D scanner – Automatic turntable – Phone holder | – POP 3D scanner – Automatic turntable – Phone holder – Mobile kit (power bank and cables) |
| $549 / €549 | $619 / €669 | $688 / €698 |
The main promises of Revopoint with the POP 3D scanner are portability, speed, and ease of use. How does the Revopoint POP live up to those claims?
Before we dig into the full review, here’s our quick summary of the POP’s pros and cons.
Pros
- Lightweight
- Good price-performance ratio on simple objects
- Versatile format: 2-in-1 desktop and handheld scanner
Cons
- Highly sensitive: the scanner often loses track of the object
- Limited software functionalities and UX, with frequent freezing problems
- Requires a Wi-Fi hotspot for smartphone scanning
Unboxing
After the Revopoint team confirmed the POP had been shipped (seemingly from a French Amazon warehouse), it quickly arrived just two days later at my office in Troyes.
The POP package– the “Starter Kit” at $619– I received came with:
- POP 3D scanner
- Automatic turntable
- Tripod and attachable smartphone holder
- 2 USB (A and C) to Micro USB B cables to connect to the scanner
- Small sample statue
- Set of markers
- Slab of Blu-Tack
- Pair of black rubber gloves
- Black plastic table cover
- USB key with Revopoint’s HandyScan software and instructions PDF
The POP, the tripod, and the USB cables were nested inside a dedicated box with foam cutouts. Everything else was separately packed next to that box inside a larger, Revopoint-branded cardboard box.
The POP scanner is composed of two infrared cameras for geometry acquisition and one RGB camera for color acquisition. The device itself is quite simple, with a straightforward design and just one Micro USB B 3.0 port (practical!). It’s also very lightweight at only 23 grams. There is a small LED light that is blue when the scanner is connecting to a PC or phone and green once it is connected.
In terms of manufacturing quality, the casing is made of basic black plastic, and the tripod isn’t extremely robust or stable, but I wouldn’t expect much more with a sub-$600 budget.
A backside view of the POP 3D scanner. Source: AniwaaSoftware and computer requirements
The Revopoint POP scanner comes with a proprietary software called HandyScan, a familiar name in the 3D scanning world (a nod to Creaform’s flagship product?).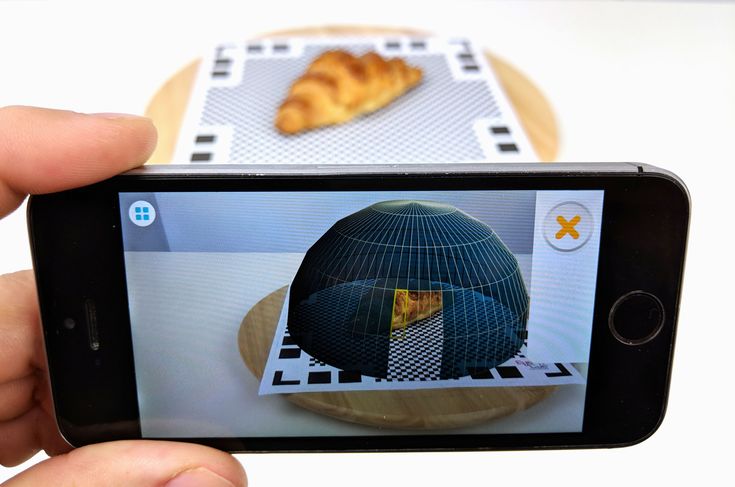
You can download the software from Revopoint’s site or use the included USB key. I downloaded the software from their site to be sure I had the latest version. It’s a fast download, and installation is done in no time, whether on macOS or Windows. The file size is 116MB for Windows and just 47.5MB for Mac.
Revopoint doesn’t indicate much on their site in terms of minimum PC requirements, simply stating that:
- Windows computers must run on Windows 8 and up with at least 4GB of RAM
- Apple computers must run on macOS 10.15 and up and with at least 4GB of RAM
- Android devices must run on Android 6.0 and up with at least 4GB of RAM
- and iOS (iPhone 7 and up) devices are only compatible via a Wi-Fi connection
Note that with most smartphones, the POP needs to be tethered to a power bank (not included in the standard package) in order to work. Some recent smartphones can however be directly tethered to the POP and used as a power bank (e.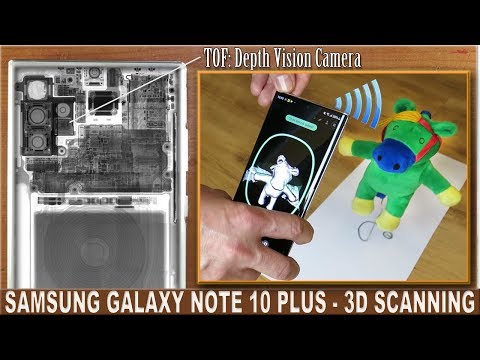 g. HTC U11, Huawei Mate 20, Huawei Mate 30, Huawei Mate 40, Xiaomi Mi 10).
I used both a Windows laptop and a Macbook for this review, with the following specifications:
- HP Pavilion Gaming 15-dk0082nf on Windows 10
- Intel i5
- 8Go RAM
- NVIDIA GeForce GTX 1650
- MacBook Pro 2020 on macOS 11.1
- Apple M1 chip (Intel i7 equivalent)
- 8Go RAM
I also did some quick tests with a Xiaomi Note 9 smartphone and an iPhone 12. The results weren’t very conclusive, so I focused this review on results obtained from the Windows setup as it worked the best.
Getting started and workflow
Software
While installing the software is easy and fast, connecting the 3D scanner– and keeping the connection going– is something else.
It takes several long minutes before the scanner is detected and its camera previews are displayed. At first, I thought it was due to the Wi-Fi hotspot setup as I was using my Macbook, but the delay was the same when I used a tethered USB connection to the Windows computer.
However, I did find that the software and the scanning process ran more smoothly on Windows than they did on macOS via the Wi-Fi connection. I actually stopped using the POP with my Macbook altogether after a few tries, as the cameras tended to freeze every few minutes.
Note: Just before publishing this review, Revopoint released a software update for Mac users to be able to use the POP via a USB connection. I downloaded it, and the software detected the POP and its cameras almost instantly. To my disappointment, minutes later, the cameras froze, and after multiple attempts to reconnect (a wash-rinse-repeat routine: quit software, unplug, replug, relaunch software), I abandoned the idea of using the POP with my Mac until future updates have fixed the problems (Revopoint continuously updates their software).
Even on Windows, freezing happened at the very least once per scanning session. This is quite frustrating, especially when you’re almost done scanning your object. You can download the acquired data and re-import it to continue your scan, if the software is still responding.
And, sometimes, instead of freezing, the software just lost the (tethered) connection with the scanner. Rebooting the software, simultaneously replugging in the scanner, and waiting another few minutes for its detection usually worked fine, though twice the software didn’t re-detect the scanner at all.
Both of those times, the scanner was quite warm after several hours of scanning, so I asked Revopoint if slight overheating may have been the cause. They told me it didn’t have anything to do with the issues and recommended I use a high-end PC, which was already the case (8GB RAM in both configurations vs the recommended minimum of 4GB). Their site states that “the Revopoint POP 3D scanner does not require a strong CPU or GPU from the connected PC/Phone/Pad”.
Revopoint later suggested that the issues I encountered could be due to a faulty USB cable.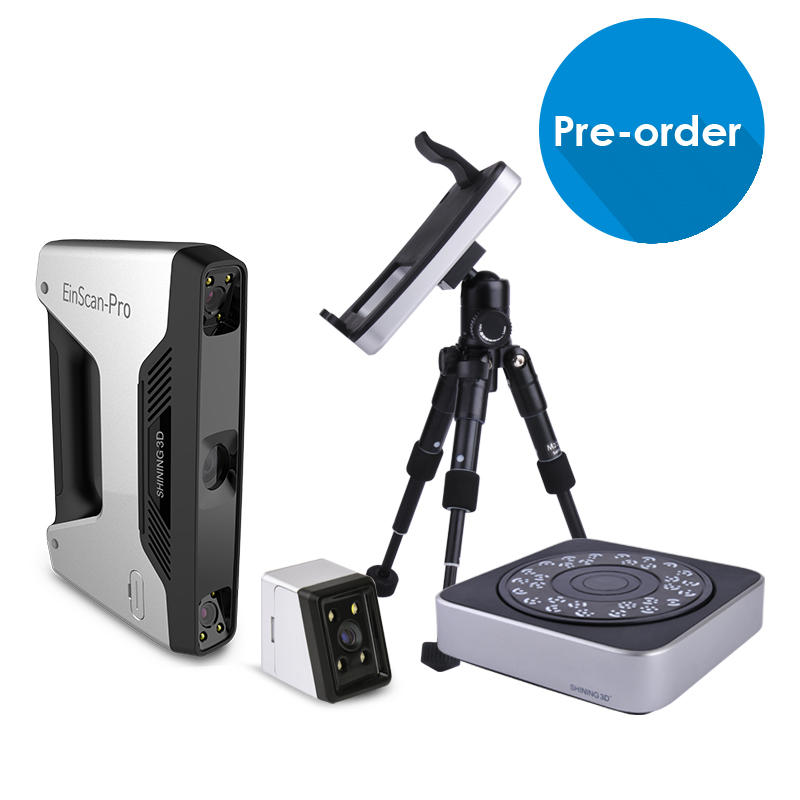 Having tried both of the included cables (USB-A and USB-C), I was skeptical but ordered a brand new Micro USB B to USB-C cable from Amazon to see if it would help. Coincidence or not, it worked great for the first half-hour, but then the scanner got disconnected again; the cable doesn’t seem to be the root cause.
Freezing and connection issues aside, the software itself is relatively straightforward and easy to use, given that there are few options and features. This minimalist side of the software can please beginners like me who only need the basics, but can disappoint advanced users who are used to more fleshed-out solutions.
Lastly, and even if this isn’t a major issue, the software could use some work in terms of languages; the translations in English and French were quite poor.
Acquisition modes
Several different scanning modes are available via the software:
- Feature, for standard or detailed objects (or “Generic” in the French software version)
- Marker, when it is necessary to use markers (large objects that must be scanned by sections, or objects that are too simple)
- Black, for dark objects
- Face, for face 3D scanning
- Body, for body 3D scanning
Depending on the object I was scanning, I used different modes.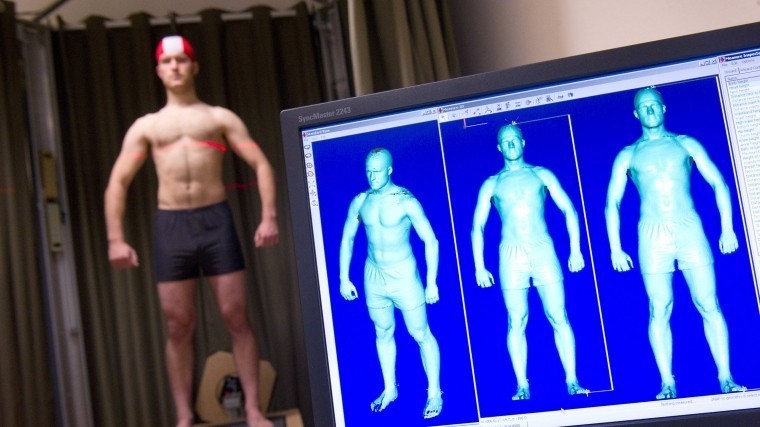 The modes worked well with most of the objects I tried, except on objects that were too shiny or too small (like a miniature violin).
Scanning with the automatic turntable
Using an automatic turntable is one of the most efficient ways to 3D scan small objects, so I was happy to see that Revopoint included one in the test package. The turntable is included in the “Starter Kit” ($619) and in the “Advanced Kit” ($688).
The automatic turntable setup. Source: AniwaaHowever, it is important to note that it’s a semi-automatic turntable; the turntable isn’t connected to the software in any way and only has one manual on/off switch, with only one fast-ish speed. On the upside, setup is easy: you just need to plug in the power cable and switch the turntable on.
The Revopoint team mentioned that the turntable’s speed was too fast and that it could sometimes make the POP lose track of the object it was scanning. I found that despite its fast speed, the turntable works quite well with the POP, and makes it easy to quickly scan small, simple objects like the sample statue that came with it.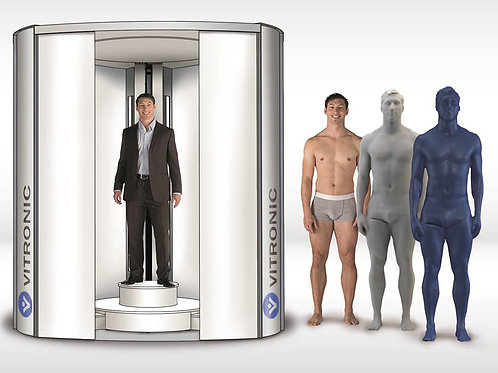
Note: After this review was published, Revopoint mentioned that a new turntable is coming and that it is slower than the one I received for testing.
However, for more complex or larger objects, like a shoe, it would almost have been easier to have a fully manual turntable to turn the object around little by little. The included turntable cannot be moved manually. Turning the switch on and off every few seconds is a possibility, but it isn’t very practical either.
Freehand scanning
Once you get the hang of it, ie. scanning very slowly, the handheld mode can deliver great results.
I mainly used it for the face 3D scanning mode, and during the first few tries, I encountered a few realignment problems, or the dreaded “lose track” prompt. Revopoint suggested I scan much slower, which helped a little bit.
A quick face scan. Source: AniwaaFor the next scans, I tried to slowly grab as much data as I could in a limited amount of time before the scanner had the chance to lose track, freeze, or disconnect, and managed to get a decent face scan.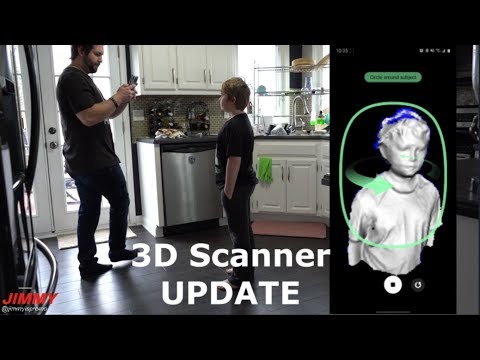 I didn’t dig into this mode as much as I would have liked, as I didn’t have many large, compatible objects to scan.
Some reviews I have read or watched show good results with the handheld mode, namely in this YouTube review by Phil Nolan. He was able to scan an entire statue outdoors with the POP (though not without facing a few minor obstacles).
Smartphone 3D scanning
I barely used the POP in smartphone mode for several reasons. First, as mentioned above, I had very few uses for the scanner in handheld mode. Second, it’s a bit of a hassle, as you have to rename your smartphone’s Wi-Fi hotspot to “POP” and change the password to an easy but weak “1234678”.
Edit: Revopoint adds that it is actually possible to change the Wi-Fi settings directly within the software by going to “About” and then “Wifi: setting”. This was not mentioned in the user manual nor in the instruction video. After searching to see where I had missed this information, I found it by scrolling through an old thread on their user forum.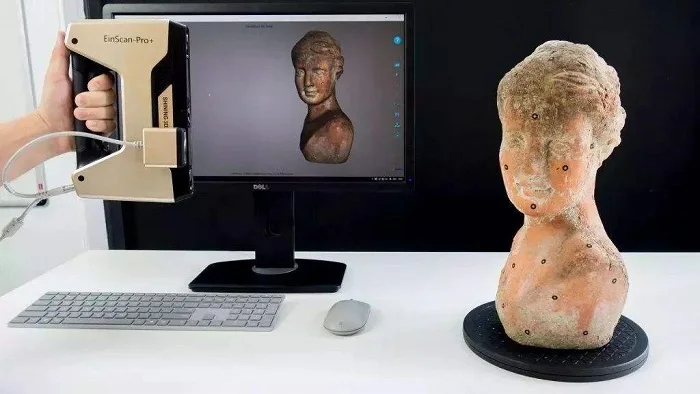 I think Revopoint should make this info more official somewhere on their site or user manual.
Lastly, the POP also needs a power bank to work with the phones I had (iPhone 12 and Xiaomi Note 9), which wasn’t included in the “Starter Kit” package I received. I was able to borrow one from my neighbor but, therefore, didn’t spend that much time testing it with a smartphone. More recent Android smartphones can be used as a power bank if their connector is USB 3.0.
3D scanning results
Shoe
A shoe is a good object to use in a 3D scanner review as there are multiple textures and colors. The POP did a pretty good job in the end, but I had to retry this several times, as the HandyScan software had trouble realigning the scans. I used the standard “Feature” scanning mode here.
The shoe and the scan. Source: AniwaaProcessing the scan took about 90 seconds, plus an additional 90 seconds to fill in the holes, and another minute or so to apply the texture map.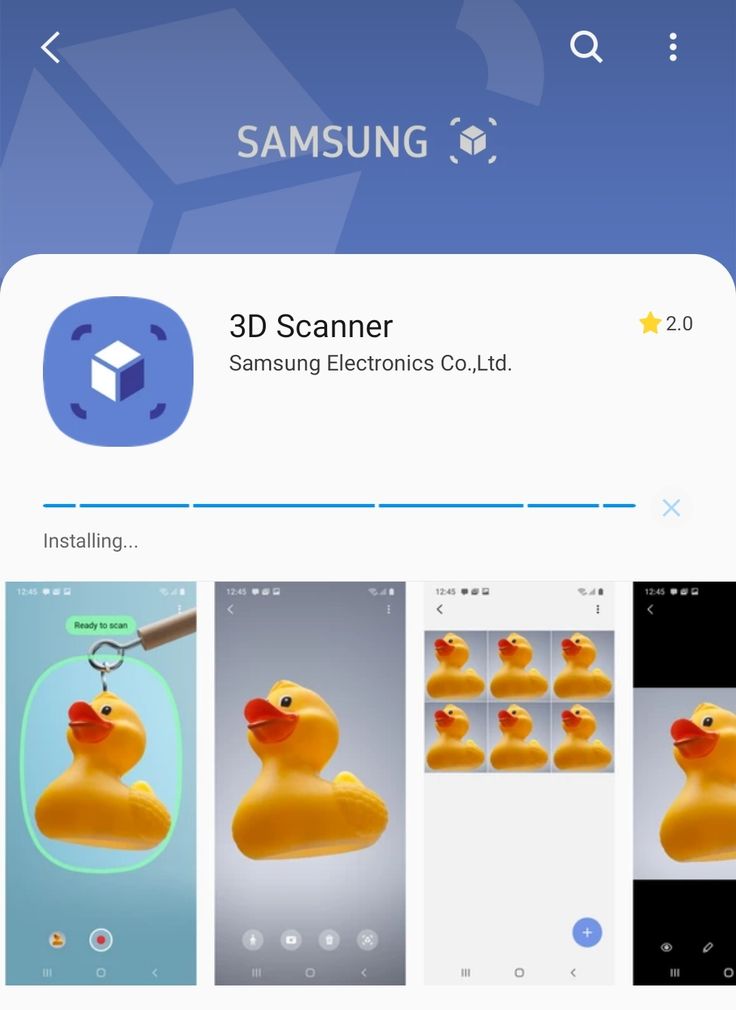 Without the time lost on the first tries, it’s a pretty fast process.
Fruit
I tried scanning a pear and an apple as they were a perfect fit in terms of size and colors. This also took several tries due to realignment issues. Again, I used the standard Feature mode.
The color acquisition didn’t turn out that good, especially in comparison with the great results I got with the yellow shoe, but the models were pretty accurate.
Face scan
I scanned myself with the POP in handheld mode (and “Face” scanning mode) and, again, it took me several tries before getting a decent scan. You can see one of the first fails below:
My evil digital twin! Source: AniwaaAlthough my dark hair wasn’t captured (no surprise there), the final result is quite nice for a scanner at this price:
The result after several tries. Source: AniwaaWith further scanning and model editing, it would be possible to obtain even better results.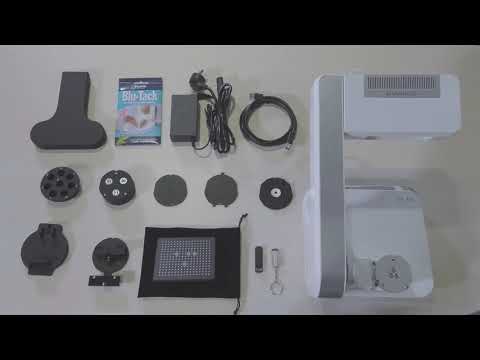
Mug 3D scan with scanning spray
Having some scanning spray with me, I wanted to try to scan a dark object and went for a big black mug. As you can see in the image below, the POP was almost completely unable to detect the mug at first (in regular “Feature mode”).
The bare mug, without spray. Source: AniwaaIn “Black” scanning mode, the scanner is able to detect some parts of the mug, but with a lot of noise (i.e. unwanted scan data from objects that aren’t the mug). I played around with the gain and brightness a bit but did not find the optimal balance:
After coating it with a thin layer of AESUB vanishing 3D scanning spray, the mug magically appeared in “Feature” mode:
The mug with AESUB scanning spray.Unfortunately, I didn’t manage to get a good 3D scan of this mug, as its geometry was too simple and the scanner wasn’t able to keep track. Each time I scanned it I got a multi-handled mug– interesting for the fun of it but not usable.
Edit: The Revopoint team later told me I should have placed markers on the mug (and therefore use “Marker” mode) to compensate for the lack of geometry. They sent me a video showing a successful marker-mode scan of a white mug.
Scans from other users
There are many POP users out there that have published some great scans on Sketchfab and on the Revopoint forum.
Conclusion
As a first-time 3D scanner user, I was quite excited to try the POP out for myself. It wasn’t simple, and I was happy to have the theoretical knowledge and experience I’ve gained over the past few years from researching for Aniwaa and editing Pierre-Antoine’s (our 3D scanning expert) reviews.
If there were only two things I could take away from that experience, it would be that (1) 3D scanners really do have a hard time with shiny, dark, and transparent surfaces, and that (2) software is 90% of the job and experience.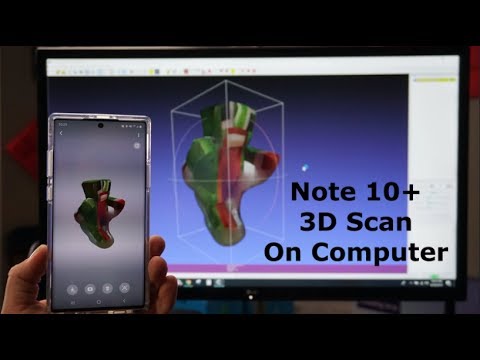
Now, during my tests with the Revopoint, I found that anything that was black or even remotely shiny (like a red, metal stapler) was almost invisible to the POP’s sensors- which is completely normal for a 3D scanner, especially at this price.
However, using a vanishing scanning spray like AESUB can help overcome this challenge completely. Scanning spray basically casts a very thin layer of white, matte material onto the surface, which can transform potentially any dark or shiny object into an easy scan.
For objects that perfectly fit the POP’s capabilities– like the small, white, matte statuette that was included– the results can rival more expensive entry-level scanners. It can also do a good job on larger objects like the shoe I scanned, but requires patience and tinkering.
Regarding Revopoint’s promises, which are portability, speed, and ease of use, the 3D scanner itself holds all three.
On the software side, however, Revopoint still has a long way to go before 3D scanning newcomers can fully adopt the technology.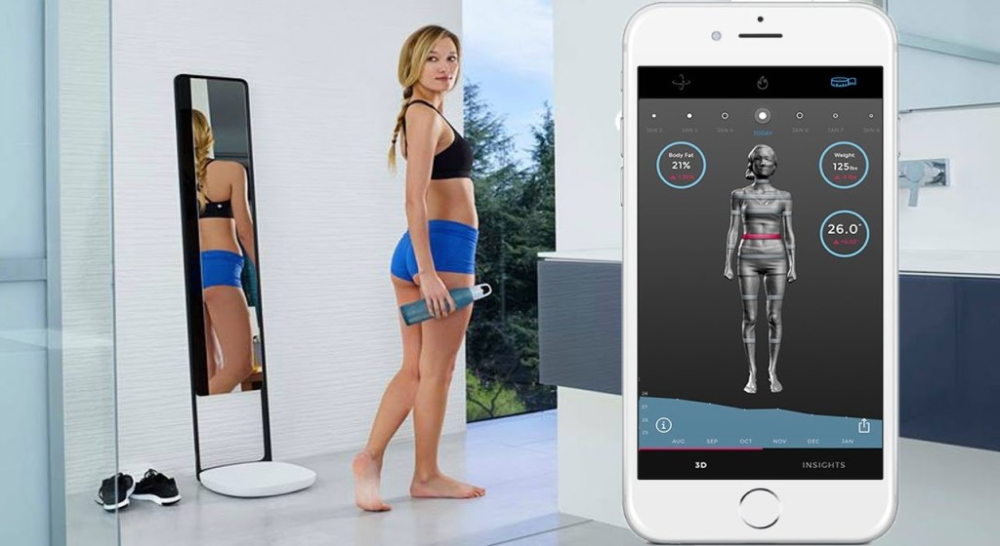 The freezing and connectivity issues, lack of functionality, unfinished feel, and poor translations altogether accounted for, in my case as a beginner (in practice), much frustration.
That said, the software is still in its infancy, and the Revopoint team has been enthusiastic about continuous improvement, whether in my direct interactions with them or on the Revopoint user forum.
TL;DR: The POP has great potential and can offer good results, but the Revopoint team needs to step up their software game. I am looking forward to future updates and will keep using the POP personally to see how it evolves over the following months.
Turn your smartphone into a 3D scanner
Contents
-
- Built-in 3D scanner: a new trend in the smartphone market
- Complete your smartphone with a 3D scanner yourself
- Plug-in 3D sensors
- The unique capabilities of 3D scanning are increasingly being used in a variety of fields, from industrial production and architecture to medicine and the film industry.
- Contact models are devices based on the principle of direct contact of the device with the scanned object.
- The non-contact scanners (active and passive) are rightfully called the most promising solution, since such devices are able to provide 3D visualization of models located in places that are difficult to reach for direct contact. In particular, the use of non-contact 3D scanners has become widespread in the modern jewelry industry.
- Minimum volume: 30 x 30 x 30 mm.
- Maximum volume: 700 x 700 x 700 m (SE) / 1200 x 1200 x 1200 mm (SP).
- Camera resolution: 1.
 3 MP.
3 MP. - Export file format: ASC, STL, PLY, OBJ.
- Market price: $1199 (SE) / $2299 (SP).
- Resolution: 640 × 480.
- Focal length: 3-6mm.
- Focus range: 0.5m - 3.0m.
- Market price: $1441.
- Maximum resolution: 0.1 mm.
- Market price: $2995.
 This encourages manufacturers to launch more and more advanced 3D scanners on the market, the variety of which can be divided into two large groups.
 Perhaps the only drawback of these devices is their high cost.
High-end 3D scanning equipment costs tens of thousands of dollars today, and not every fan of 3D printing is able to buy a 3D scanner for personal or professional use. Gadgets that have already become familiar to everyone came to the rescue - digital cameras, as well as the most ordinary smartphones.
Built-in 3D scanner: a new trend in the smartphone market
Naturally, manufacturers could not ignore this circumstance, and for this reason, more and more well-known brands of mobile technology are presenting new smartphones with a built-in scanner to the consumer's judgment.
So, Apple equipped its iPhone with a compact 3D scanner with an IR transmitter, as well as a receiver that allows you to model objects in three-dimensional space in real time, simply by measuring the distance between each of the thousands of projected microdots and the transmitter itself. Interestingly, 3D printing enthusiasts can use such a device even in a completely dark room. The issue of the company's release of proprietary specialized software for 3D modeling is still open.
Keeps up with its permanent competitor and Samsung. So, the South Korean manufacturer equipped the new Galaxy S9 and S9 + smartphones with an unparalleled front camera and IR sensors for 3D scanning.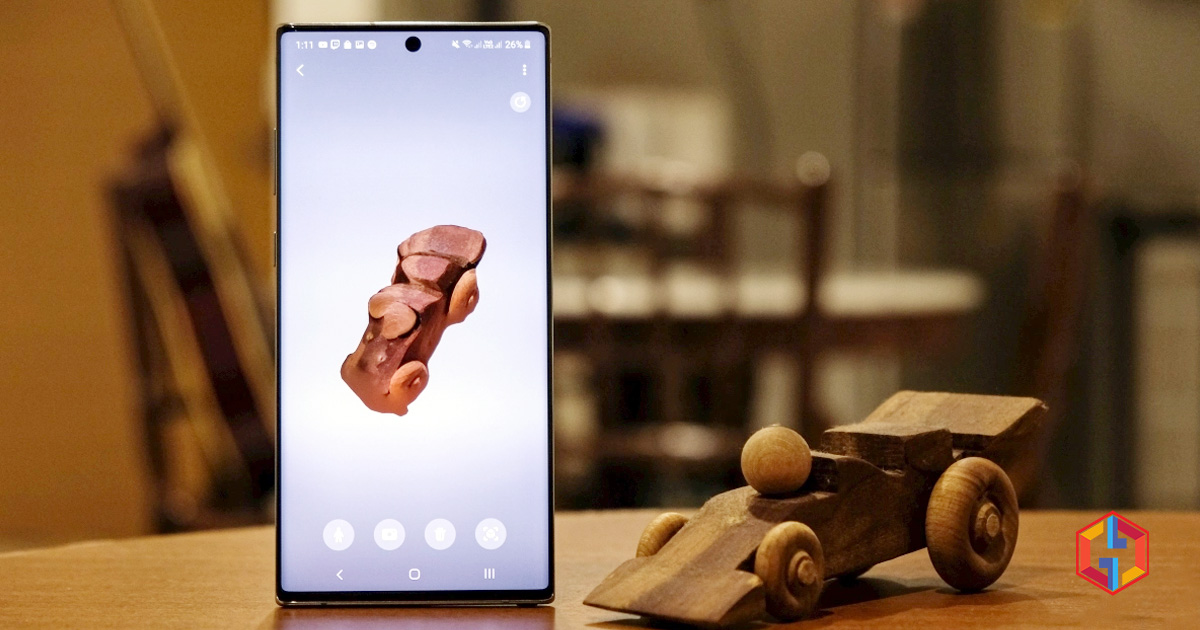 The company's plans include the development and release of specialized modeling software to the global soft market.
The next model of interest to 3D printer owners is one of Lenovo's latest smartphones. The PHAB2 Pro has gained massive popularity not only because of Google Tango's super augmented reality function, but also because of the built-in 3D scanner, which operates at a speed of 250,000 samples per second.
Of course, these three smartphone models are far from the only devices that will interest users who are not yet able to buy a 3D scanner for professional use. In addition, there are several more interesting solutions on the market, each of which can be called a rather promising specimen.
Complete your smartphone with a 3D scanner yourself
By the way, most ordinary smartphones can be equipped with a module for scanning objects in three-dimensional space. To do this, simply install the shareware application Qlone - 3D Scanning & AR Solution from the developer EyeCue Vision. The software product is designed for 3D printing and allows you to scan objects, saving them in various formats (STL, PLY, etc.). 3D printer.
Connectable 3D sensors
Finally, the last way to get a low-cost scanning device, which we will mention in today's mini-review, is to buy Scandy Pro, a third-party ToF sensor that connects to a smartphone, as well as a mobile application of the same name. The system allows you to scan objects with an accuracy of up to 0.3 mm, then process them in CAD (CAD) programs and directly send them to print directly from the device.
iPhone owners can also purchase the ultra-compact and relatively inexpensive plug-in mini Eora 3D scanner, which is controlled via regular Bluetooth and can scan objects up to 200 mm in size.
Overview of Popular and Reliable 3D Scanners (Part 1)
The 3D scanning market offers users a wide range of hardware and software at various levels and prices. To find the right model, you can use our list of the most popular and sold scanners at the moment. In this article, we will look at 3D scanners (mostly stationary models) that are most trusted by users and makers.
#1: Shining 3D EinScan SE/SP Stationary Scanner
This machine can work with two scanning technologies: EinScan-SE and EinScan-SP. The model is perfect for both beginners and professionals. With it, the user can easily create a CAD model for printing. It can also be used to obtain a detailed and very accurate scan of large objects. The machine is equipped with an automatic scan function and a fixed scan mode. Technical parameters:
#2 IIID Scan Prime Sense Stationary Scanner
Practical, handy, intuitive and easy to use. After finishing the scanning process, the user can edit the scanned images and merge them to create a high quality 3D model. The kit includes a built-in infrastructure projector. The frame rate is 30-60 frames per second. Technical parameters:
#3 Next Engine 3D Scan HD
The perfect combination of portability and superb quality scanning. The device belongs to high class devices. The work uses an electro-optical system with a laser array. Perfect for professionals. Technical parameters:
#4: Shining 3D EinScan Pro/Pro +
Handheld Scanner A multi-functional unit that can scan objects of any size.