Reddit best 3d printer 2023
Reddit - Dive into anything
Welcome back to another purchase megathread!
This thread is meant to conglomerate purchase advice for both newcomers and people looking for additional machines. Keeping this discussion to one thread means less searching should anyone have questions that may already have been answered here, as well as more visibility to inquiries in general, as comments made here will be visible for the entire month stuck to the top of the sub, and then added to the Purchase Advice Collection (Reddit Collections are still broken on mobile view, enable "view in desktop mode").
Please be sure to skim through this thread for posts with similar requirements to your own first, as recommendations relevant to your situation may have already been posted, and may even include answers to follow up questions you might have wished to ask.
If you are new to 3D printing, and are unsure of what to ask, try to include the following in your posts as a minimum:
Your budget, set at a numeric amount.
Saying "cheap," or "money is not a problem" is not an answer people can do much with. 3D printers can cost $100, they can cost $10,000,000, and anywhere in between. A rough idea of what you're looking for is essential to figuring out anything else.
Your country of residence.
If you are willing to build the printer from a kit, and what your level of experience is with electronic maintenance and construction if so.
What you wish to do with the printer.
Any extenuating circumstances that would restrict you from using machines that would otherwise fit your needs (limited space for the printer, enclosure requirement, must be purchased through educational intermediary, etc).
While this is by no means an exhaustive list of what can be included in your posts, these questions should help paint enough of a picture to get started. Don't be afraid to ask more questions, and never worry about asking too many. The people posting in this thread are here because they want to give advice, and any questions you have answered may be useful to others later on, when they read through this thread looking for answers of their own.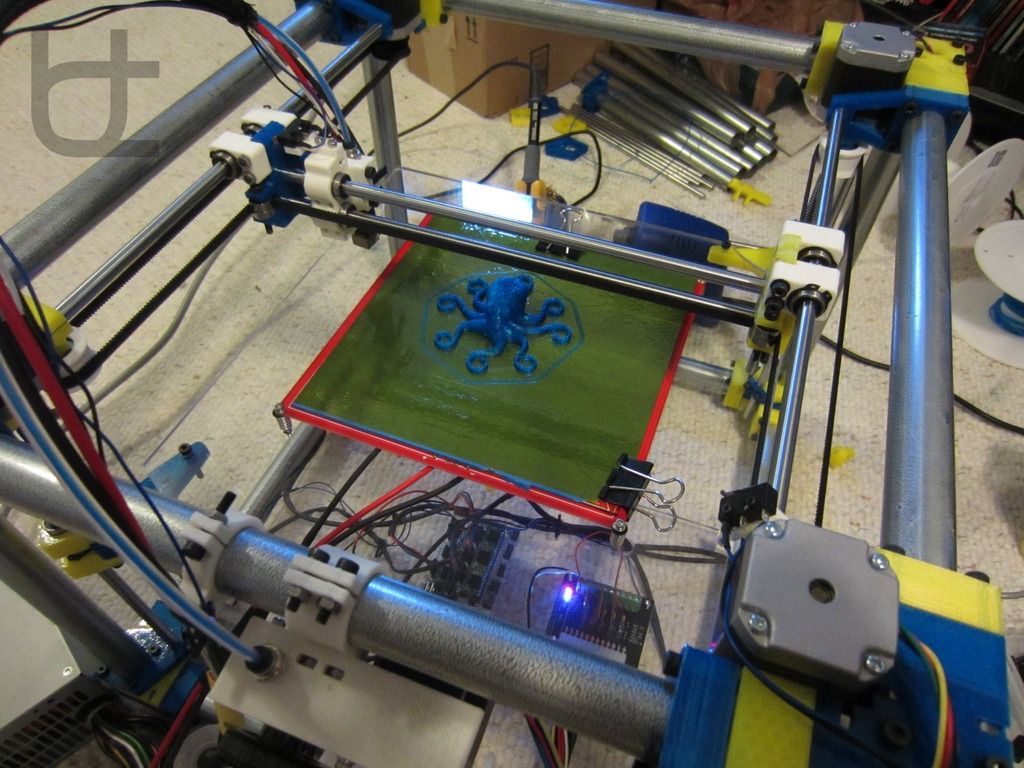 Everyone here was new once, so chances are whoever is replying to you has a good idea of how you feel currently.
Reddit User and Regular u/richie225 is also constantly maintaining his extensive personal recommendations list which is worth a read: Generic FDM Printer recommendations.
Additionally, a quick word on print quality: Most FDM/FFF (that is, filament based) printers are capable of approximately the same tolerances and print appearance, as the biggest limiting factor is in the nature of extruded plastic. Asking if a machine has "good prints," or saying "I don't expect the best quality for $xxx" isn't actually relevant for the most part with regards to these machines. Should you need additional detail and higher tolerances, you may want to explore SLA, DLP, and other photoresin options, as those do offer an increase in overall quality. If you are interested in resin machines, make sure you are aware of how to use them safely.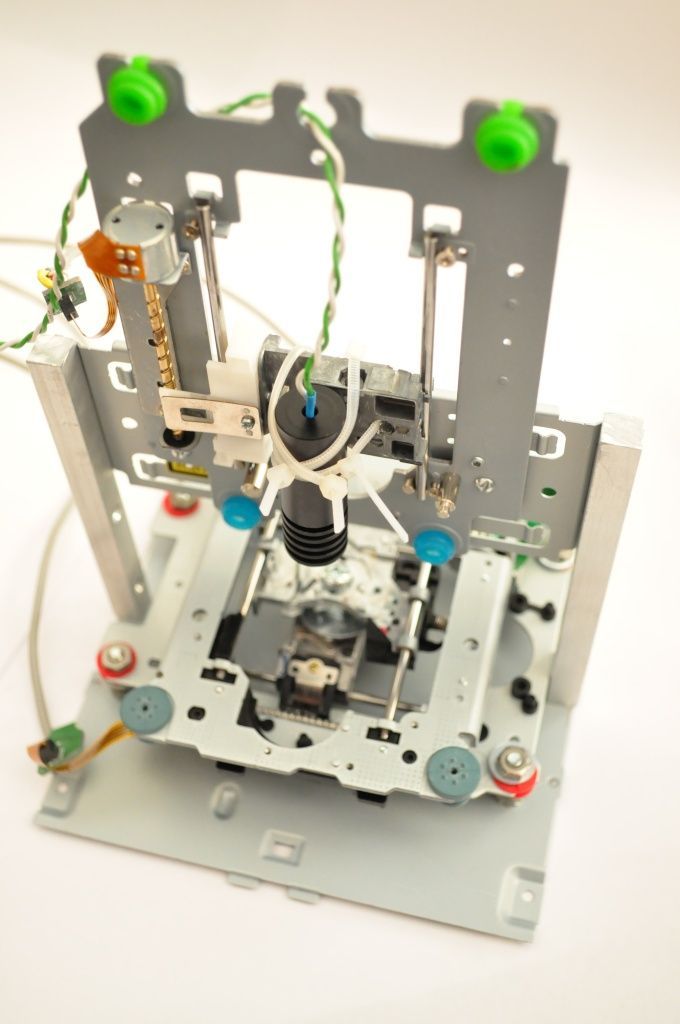 For these safety reasons we don't usually recommend a resin printer as someone's first printer.
As always, if you're a newcomer to this community, welcome. If you're a regular, welcome back.
The Best Cheap 3D Printers for 2023
While we'd hesitate to call 3D printing a mature technology, you might say it has reached its teenage years. Through their first decade-and-change, 3D printers have come down in price, grown easier to set up and operate, and become more reliable. And you may pay less than you expect: Many once-high-end features have migrated down to inexpensive models.
PC Labs has been reviewing 3D printers since 2013. Today, the state of 3D printing is strong, but that wasn’t always the case. For the first several years, it was often an adventure getting one of these printers up and running, let alone successfully through our testing regimen. Issues with filament-based—aka fused filament fabrication (FFF) or fused deposition modeling (FDM)—printers were abundant.
Filament feeders had to be coaxed into delivering filament from the spool to the extruder. Print beds had to be manually aligned. The extruder or hot end had to be positioned just right to minimize the gap between the nozzle and the build plate (the flat surface on which the object is printed). Objects frequently stuck to the build plate, and required careful, sometimes unsuccessful, efforts to pry them off. These and other issues required painstaking effort to resolve, often combined with calls to tech support.
Not so much anymore. While they can still be rebellious at times, 3D printers have grown up a lot, and achieving the 3D printer basics has gotten a lot less likely to end in a shouting match over small things. And they've gotten a lot more affordable, too, for curious DIY-ers and hobbyists to try.
If you're in the market for a beginner or low-cost 3D printer, it's important to know how lower-end models differ. Read on for mini-reviews of the top budget 3D printers we've tested. After that, we go into more detail on understanding the 3D printer specs and tech relevant to beginning buyers. Ready to take the plunge? Read on.
Deeper Dive: Our Top Tested Picks
Original Prusa Mini
Best Overall Budget 3D Printer
4.5 Outstanding
Bottom Line:
It requires assembly and calibration care (plus shipping from the Czech Republic), but the Original Prusa Mini is a compact, open-frame 3D printer that consistently produces superb-quality output for a great price.
PROS
- Top-notch object quality
- Supports a variety of filament types
- Useful, professionally printed user guide
- Great support resources
- Versatile, user-friendly software
CONS
- First-layer calibration can be tricky
- Only includes starter packets of filament
- Requires monitoring if young children or pets are around
| Sold By | List Price | Price | |
|---|---|---|---|
| Prusa Research | $399.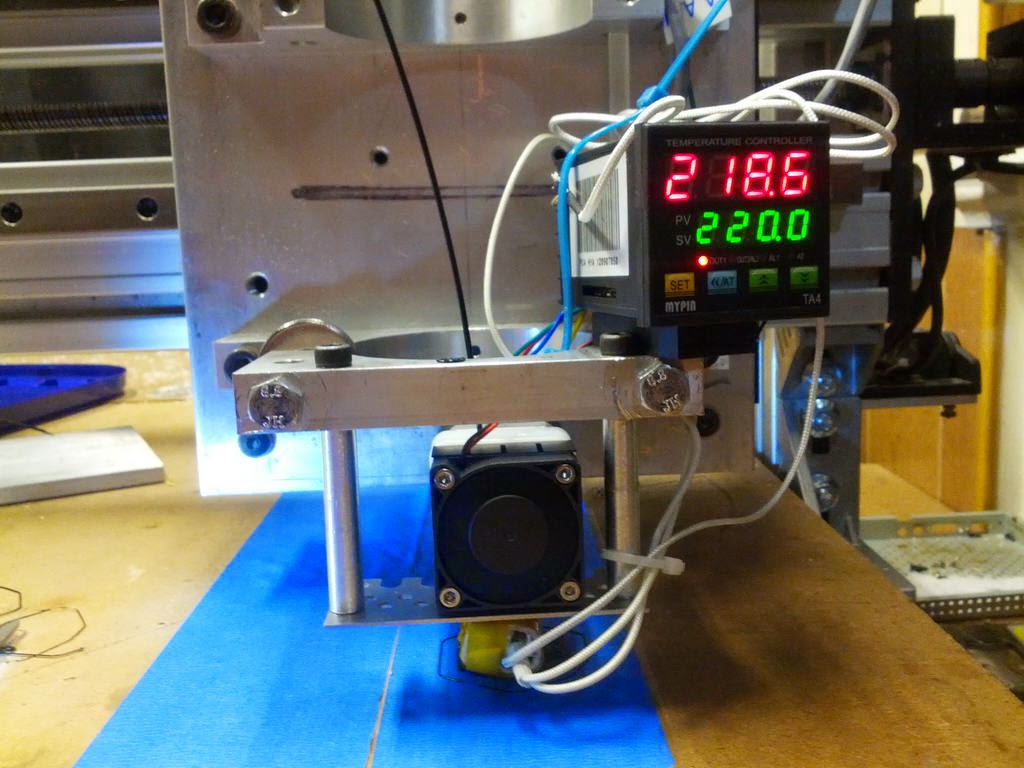 00 00 | $399.00 | See It (Opens in a new window) |
Read Our Original Prusa Mini Review
XYZprinting da Vinci Mini
Best Budget 3D Printer for Schools, Community Centers
4.0 Excellent
Bottom Line:
The XYZprinting da Vinci Mini is a consumer-oriented 3D printer that provides a winning combination of low price, ease of setup and use, solid print quality, and smooth, misprint-free operation.
PROS
- Very low price.
- Reasonably priced filament.
- Good print quality.
- No misprints in testing.
- Easy setup and operation.
- Quiet.
- Prints over a USB or Wi-Fi connection.
CONS
- Occasional problems in trying to launch prints.
- Removing printed objects from the print bed is sometimes tricky.
| Sold By | List Price | Price | |
|---|---|---|---|
| Amazon | $199. 95 95 | $199.95 | See It (Opens in a new window) |
| Walmart | $199.95 | $199.95 | See It (Opens in a new window) |
Read Our XYZprinting da Vinci Mini Review
Toybox 3D Printer
Best Budget 3D Printer for Children
4.0 Excellent
Bottom Line:
The Toybox 3D Printer works well as a model designed for children, offering reliable printing from a browser or mobile device and a few thousand toys to print, plus creative options to output drawings or photos. Just bear in mind the tiny build area.
PROS
- Reliable, misprint-free printing
- Easy setup
- One-touch operation
- Well-composed help resources
- Access to more than 2,000 printable toys and projects
- Lets you create your own printable designs
CONS
- Tiny build area
- Not ideal for importing 3D files created elsewhere
| Sold By | List Price | Price | |
|---|---|---|---|
| Amazon | $299. 00 00 | $299.00 | See It (Opens in a new window) |
| Toybox Labs | $379.00 | $299.00 | See It (Opens in a new window) |
Read Our Toybox 3D Printer Review
Monoprice Mini Delta V2 3D Printer
Best Budget 3D Printer for Beginners, Non-Techies
4.0 Excellent
Bottom Line:
3D printing gurus will be intrigued by the Monoprice Mini Delta V2's use of the delta rather than Cartesian coordinate system, but beginners will just enjoy its low price, ease of use, and speedy printing.
PROS
- Sub-$200 price
- Quick, nearly misprint-free printing
- Easy setup and operation
- Sturdy steel-and-aluminum frame
- Supports multiple filament types
CONS
- Tiny build area
- So-so print quality
- Mere one-year warranty
| Sold By | List Price | Price | |
|---|---|---|---|
| Amazon | $323. 98 98 | $323.98 | See It (Opens in a new window) |
Read Our Monoprice Mini Delta V2 3D Printer Review
Anycubic i3 Mega S
Best Budget 3D Printer With an Open Design, Big Build Area
3.5 Good
Bottom Line:
The Anycubic i3 Mega S, an inexpensive open-frame 3D printer, produced decent-quality prints in our testing. To get the most out of it, though, may require precise calibration.
PROS
- Modestly priced
- Large build area for an inexpensive printer
- Supports a variety of filament types
- Generally solid print quality
- Uses well-known Cura software
CONS
- Finicky print-platform alignment
- Supported coils of filament are small
- Poorly placed spool holder
| Sold By | List Price | Price | |
|---|---|---|---|
| Amazon | $229. 98 98 | $229.98 | Check Stock (Opens in a new window) |
| AnyCubic | $279.00 | $279.00 | Check Stock (Opens in a new window) |
Read Our Anycubic i3 Mega S Review
Anycubic Vyper
Best Budget 3D Printer for the Biggest Build Area Possible
3.5 Good
Bottom Line:
Anycubic's modestly priced Vyper whips up large 3D prints on its open-frame design, and provides automatic print-bed leveling. Just know that some minor assembly is required—and printed objects may require a bit of cleanup.
PROS
- Relatively large build area
- Automatic bed leveling
- Simple assembly
CONS
- Short (one-year) warranty
- Includes only a small starter filament coil
- Using Cura software with the Vyper requires tweaking a couple of settings
- Test prints showed some "hairy" filament residue
| Sold By | List Price | Price | |
|---|---|---|---|
| Amazon | $339. 99 99 | $339.99 | See It (Opens in a new window) |
| AnyCubic | $369.00 | $319.00 | See It (Opens in a new window) |
Read Our Anycubic Vyper Review
Creality Ender-3 V2
Best Budget 3D Printer for Tinkerers and DIY Types
3.5 Good
Bottom Line:
Hands-on tweaking defines Creality's budget-price Ender-3 V2, an open-frame 3D printer that you build from a kit. It produces generally above-par prints, but its print bed can be tricky to keep leveled.
PROS
- Inexpensive
- Slightly above-average print quality
- Good-size build area for its price
- Supports several filament types
CONS
- Manual print-bed leveling can be tricky
- Setup instructions could be deeper, more legible
- Questionable quality control on some parts
| Sold By | List Price | Price | |
|---|---|---|---|
| Amazon | $299. 00 00 | $246.00 | See It (Opens in a new window) |
Read Our Creality Ender-3 V2 Review
Flashforge Finder 3D Printer
Best 3D Printer for the Very Tightest Budgets
3.5 Good
Bottom Line:
The Flashforge Finder 3D Printer is moderately priced and offers good print quality, but it proved tricky to get up and running in our tests.
PROS
- Quiet.
- Good print quality.
- Connects via USB 2.0 cable, USB thumb drive, or Wi-Fi.
- Reasonably priced.
CONS
- Some objects pulled off the platform during testing.
- Poor documentation.
- Modest build volume.
- Limited to printing with polylactic acid filament (PLA).
| Sold By | List Price | Price | |
|---|---|---|---|
| Amazon | $259.90 | $259.90 | Check Stock (Opens in a new window) |
Read Our Flashforge Finder 3D Printer Review
Polaroid PlaySmart 3D Printer
Best Budget 3D Printer for Dabbling in Small Objects
3. 5 Good
Bottom Line:
The Polaroid PlaySmart 3D Printer is a compact, stylish 3D printer with above-par overall print quality, but, alas, a tiny build area for the money.
PROS
- Small, lightweight for a desktop 3D printer.
- Easy to set up and use.
- Supports PLA, PETG, and wood composite filaments.
- Multiple-color support.
- Wi-Fi camera monitors print jobs.
- Prints from USB drives, SD cards, or mobile devices.
CONS
- High price for its capabilities.
- Small build area.
- Too-brief warranty.
| Sold By | List Price | Price | |
|---|---|---|---|
| Amazon | $699.00 | $699.00 | See It (Opens in a new window) |
Read Our Polaroid PlaySmart 3D Printer Review
XYZprinting da Vinci Jr. 1.0 A Pro
Best Budget 3D Printer With Closed Design, Roomy Build Area
3. 5 Good
Bottom Line:
The XYZprinting da Vinci Jr. 1.0 A Pro is a moderately priced closed-frame 3D printer with a large build volume and overall good performance, but a potentially balky filament-feeding system.
PROS
- Spacious build area
- Works with third-party filaments
- Self-leveling print bed
CONS
- Build plate is not heated
- Limited to PLA- and PETG-based filaments
- Guide tube is prone to detaching
| Sold By | List Price | Price | |
|---|---|---|---|
| Amazon | $299.95 | $199.95 | See It (Opens in a new window) |
| Best Buy | $449.95 | $449.95 | Check Stock (Opens in a new window) |
Read Our XYZprinting da Vinci Jr. 1.0 A Pro Review
Monoprice Voxel 3D Printer
Best Budget 3D Printer for Cheap Filament
3. 0 Average
Bottom Line:
The Monoprice Voxel is an under-$400 3D printer that's easy to set up and use. It exhibits generally good print quality, but it was unable to print two of our test objects.
PROS
- Easy to set up and use.
- Budget price for printer and filament spools.
- Supports PLA, ABS, and several composite filament types.
- Versatile software.
- Prints over Ethernet or Wi-Fi, or from a USB thumb drive.
CONS
- Frequent misprints on certain test objects.
- Slightly balky touch screen.
| Sold By | List Price | Price | |
|---|---|---|---|
| Amazon | $449.99 | $369.26 | See It (Opens in a new window) |
| Walmart | $429.99 | $369.26 | See It (Opens in a new window) |
Read Our Monoprice Voxel 3D Printer Review
Buying Guide: The Best Cheap 3D Printers for 2023
How to Buy a Cheap 3D Printer
The biggest changes to 3D printers over the last few years have come to the cheaper models. Nowadays, many of those classic, ornery 3D-printing issues have been resolved (most of the time, anyway), even for consumer and bargain-priced 3D printers. Automatic print-bed leveling is the norm, and you can usually remove 3D-printed objects from heated and/or flexible build plates with a minimum of coaxing. And most 3D printer manufacturers have either developed and refined their own software, or have adapted an open-source printing platform such as Cura(Opens in a new window).
(Credit: Zlata Ivleva)
What separates more expensive 3D printers from cheap ones ("cheap" defined as $500 or less, for the purposes of this article) is often a select group of features. These include the build volume, the type of frame, the varieties of supported filament, the software, and the connectivity mix. Let's run through those in turn.
What's the Right Build Volume for a 3D Printer?
A 3D printer’s build volume is the maximum dimensions (HWD) of a part that it can print. (We say “a part” because a 3D-printed object can consist of multiple parts that are printed, then glued or otherwise pieced together.) While the smallest build volume of any 3D printer we have tested is 3.9 by 3.9 by 4.9 inches, we consider any build volume smaller than 6 by 6 by 6 inches to be small, any between that and 10 by 10 by 10 inches as medium, and any printer with at least one build dimension of more than 10 inches as having a large build volume.
(Credit: Molly Flores)
As a general rule, inexpensive 3D printers have small build volumes, while more expensive ones have larger build volumes. This depends in part on the type of printer. Closed-frame 3D printers—and most semi-open models, which have a rigid top, base, and sides but are open in front and, often, back—tend to have small build volumes, while open-frame printers, lacking as rigid a physical structure, often have relatively large build volumes for the price. You'll want to weigh the build volume against the kinds of objects you will print.
Should I Get an Open-Frame or Closed-Frame 3D Printer?
Which brings us to the frame "form factor" question: open-frame versus closed-frame. Closed-frame 3D printers are boxlike devices, with a rigid base, walls (with a see-through door in front), and top. Among their advantages? They muffle the operating noise, as well as reduce the odor from melted filament (which is potentially an issue with ABS plastic), and they provide some protection for people or pets who might inadvertently touch the hot extruder. A downside: They tend to have smaller build volumes than open-frame 3D printers, which have fewer (often, no) walls to constrict them.
(Credit: Zlata Ivleva)
Low-cost 3D printers include both open-frame and closed-frame models, as well as a few stereolithography printers. If a relatively large build volume is a priority, you’re likely to get more bang for the buck with an open-frame model. Open-frames do have some clear downsides by definition: They tend to be noisy, emit odors when certain plastics are melted, and provide little protection for someone who might touch the hot extruder.
(Credit: Molly Flores)
Also, recognize some potential negatives of open frames, depending on the model. Some require assembly, being essentially kits, and most require more setup care than a closed-frame printer, plus more maintenance to keep them running smoothly. Still, these very traits should not deter—and may even appeal to—hobbyists and DIY folks.
What Should I Look for in 3D Printer Software and Connectivity?
Gone are the days when tinkerers had to cobble together several different programs to get a 3D printer to run. Manufacturers either include their own 3D printing program or modify an existing platform such as the open-source Cura.
3D printing software performs three main functions: processing an object file (resizing, moving, rotating, and in some cases duplicating it), slicing it (into virtual layers, based on your chosen resolution), and printing it. These are almost universally combined into a seamless process. Some high-end printers have software that supports a wider range of settings you can tweak, but even the basic suites work at least reasonably well.
More likely to vary among the cheaper set is the array of connection options from model to model. Nearly all have a USB Type-A port to fit a thumb drive for printing from document files. Most also have a USB Type-B port for connecting directly to a computer, and some offer Wi-Fi, too (or as an alternative), while a handful let you connect via Ethernet to share the printer across a local network.
Some printers support storing 3D files on an SD or microSD card (which may also contain the printer’s system files). Most 3D printer manufacturers (even the discount ones) have a mobile app to launch and monitor print jobs, and a few provide access to cloud services from which you can print.
While high-end 3D printers tend to have an abundance of connection choices, discount models vary widely in their choices. Some are generous and some are basic, so it pays to assess what a given model offers.
What Should I Look for in Filament Support?
Filament support tends to be a key area that separates the cheaper models from the higher-end ones. (See our guide to understanding 3D printing filaments for more particulars.) Inexpensive 3D printers tend to support a limited number of plastic filament types, some of them only PLA and/or ABS.
Recommended by Our Editors
3D Printing: What You Need to Know
3D Printer Filaments Explained
(Credit: Molly Flores)
PLA (polylactic acid) is a biodegradable, plant-based polymer, while ABS (acrylonitrile butadiene styrene) is the same tough plastic that Legos are made from. Objects printed from ABS are durable and nontoxic, though the material can be tricky to work with. ABS can emit an acrid, unpleasant odor during printing, and the bottom corners of objects being printed with it have a tendency to curl upward a bit, especially if you are using a non-heated print bed. This can lead to unsightly prints, and/or prints prematurely pulling off the build plate, ruining them.
Many entry-level and low-price 3D printers stick exclusively to PLA. If you want to experiment with a larger variety of filaments—which include water-soluble filament, wood- and metal-laced composites, and both tough and flexible varieties—you may have to pay more, although a few discount models support a wide range of materials.
Should I Consider a 3D Printing Pen Instead?
Although they aren’t printers per se, inexpensive 3D pens are close kin to 3D printers—using the same filament types and a similar extrusion system—and we include them in the 3D printing category. Rather than tracing out a programmed pattern, you use the 3D pen much like a normal pen, except that you draw with molten plastic. You can trace a pattern or draw freehand, and even draw in three dimensions as the plastic quickly solidifies and hardens once extruded.
(Credit: 3Doodler)
Most 3D pens cost less than $100, and some cost $50 or less. At a glance, 3D pens may appear to be toys, but some artists and craftspeople have taken to them, as it is possible to make quite complicated and beautiful objects with them. If your aim in 3D printing is something closer to freehand design and free expression than computer-centric, structured, and repeatable output, you might give one a try.
So, What Is the Best Cheap 3D Printer to Buy?
Buying a budget 3D printer needn’t mean a world of sacrifice. Plenty of capable and reliable models sell at less than $500, and while they may not be as feature-rich as their more expensive cousins, there's no sense in paying for things you don’t need.
Many casual 3D-printing experimenters will be fine with printing over a USB cable or from a thumb drive, and sticking to PLA may be the best choice for a starter 3D printer. If you focus just on the features you want, you may be pleasantly surprised at what you find. Below, check out a spec breakdown of the best under-$500 3D printers we have reviewed, paralleling our picks above. Also, for a look at the broader market, see our guide to our favorite 3D printers overall.
Budget 3D printer as a designer.
 We replace the extruder with a metal one and get a profit / Sudo Null IT News As it turned out, this is more than enough to get a comparable print quality. You don’t even have to replace the regular plastic extruder - it has its advantages, but we wanted adventure and we found them in full.
 Along the way, we fixed a few more shortcomings with our Ender 3 v2 printer, so now we can print quite complex models for our own pleasure.
The all-metal extruder looks great, and it works in general too ... "but there is a caveat."
Introduction
In a filament 3D printer, the extruder pulls a rod of plastic through it and provides the print head with filament to work with. The stock extruder is plastic and seems rather flimsy, so we ordered an all-metal extruder that has excellent reviews and is highly recommended on the forums. Installing it is a matter of a couple of minutes, you just need to follow the assembly instructions or videos on YouTube, but then the surprises begin. As it turned out, the plastic extruder does not conduct heat well and the filament in it is less prone to overheating when the engine is heated, but sometimes it also melts during long printing - which, of course, needs to be corrected.
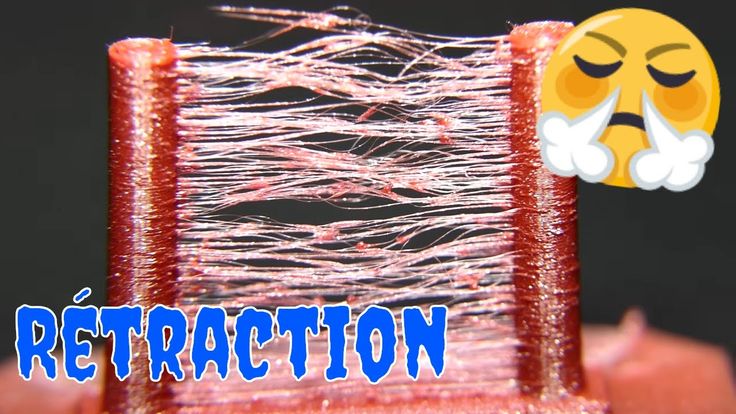
On the Internet, you can find a lot of things about grinding and melting the filament, in short, the recommended solution is to reduce the number of filament scrolls and their speed. Well, this method works - by specifying in the slicer the number of retractions (return movements of the filament, usually preceding the idle stroke of the nozzle) 10 pieces, the stepper motor heats up much less, the extruder does not overheat and the filament does not melt or break. But the print quality suffers from this, and even very much, so that the entire printed model turns out to be simply entangled in thin threads of plastic - since we forbade it to be pulled back when moving the nozzle, it continues to stretch with each movement. The obvious decision to put a heat-insulating gasket between the stepper motor housing and the extruder turned out to be almost impossible - the bolts are not long enough. Yes, the bolts can be replaced, but for continuous printing for many hours and even days, no spacers will help, since the gear wheel for scrolling the filament is mounted directly on the stepper motor shaft. The standard plastic extruder itself works as a thermal insulator between the motor and the filament, but the gear wheel on the stepper motor shaft heats up and grinds the filament, not scrolls it. Unless in the case of a plastic extruder (only the gear wheel heats up), the filament can be pulled back, and with a metal one (both the gear wheel and the metal wheel heat up), the filament breaks completely and the Bowden tube has to be unscrewed to pull it out. As a result, the owners of a plastic extruder discuss the problem of grinding the filament, and the owners of a metal extruder discuss melting and breaking. We do not like both problems, so we will look for a complete solution.
For the test, we made pucks from 0.1 mm thick writing paper and the filament began to melt not after 20 minutes of printing, but only after 40, so we were able to print several test models without limiting the number of filament retractions (rectactions) and the result was much better. For example, this model can be printed after the manipulations:
Since we had to constantly pull out the Bowden tube due to problems with overheating of the filament in the new metal extruder, we quickly finished its fastening in the fitting, so that it became loose (usually this problem occurs only after a few months of use). In the image below, the green arrow points to the problem area:
This was solved by shortening the tube by a few millimeters so that it was clamped in a slightly different place. Since the length of the installed tube is a couple of centimeters longer than necessary for the free movement of the carriage, this operation can be repeated several more times. Now it’s clear why Bowden tube is sold 1 or 2 meters long, although it only needs about 40 centimeters - obviously, the tube will have to be replaced regularly (you can still supply with some margin and cut it, but too long a tube will require more effort to pull the filament and thereby slowing down and worsening printing).
If the tube in the fitting moves noticeably, fix it. The stock blue clip, shown in the first photo in the "Problem(s)" section, secures the tube a little, but only a little. For high-quality fastening, you can either use a disposable plastic clamp or print the clip yourself. The 2x thick Ender 3 Bowden Tube Clip secures the tube securely, and the retraction distance can now be reduced by 1-2mm. In the photo, a piece of white tape glued near the fitting allows you to accurately verify that there are no longitudinal movements of the tube:
As it turned out, there was no “silver bullet” and it took several solutions to fix all the problems found. If you wish, you can get by with the first two points of the following, which do not require the purchase of spare parts, but only printer settings.
Adjusting the extruder force
When comparing a metal extruder with a plastic one, it turned out that in the latter the pressure spring for the filament is much weaker and the filament does not fray so quickly with it, so we moved the spring of the old extruder to the new one. It helped, but only partially. Then we also removed the clamping sleeve, which additionally compresses the spring of the metal extruder, and now the filament began to be pulled more accurately, and during the retraction process, plastic filings stopped pouring from it. We found it a bit strange that the metal extruder squeezes the filament so much more. This is probably done for stiffer types of filament (like ABS), but this does not work with our soft PLA.
In the picture, the green arrows show the spring, which must be taken from the regular plastic extruder, and the sleeve, which is better to remove completely to avoid scattering of sawdust from the filament and the frayed Bowden tube:
motors overheat, the simplest solution is to reduce the operating current by using the reference voltage regulator (VREF) of the stepper motor drivers. Our printer motherboard has TMC 2208 drivers, for which, according to the specification, the maximum current per phase is calculated as Vref * 0.
 71. It took us several iterations to find the minimum required current at which the extruder motor does not skip steps due to lack of torque. At the same time, we slightly reduced the current of all other motors to eliminate their excessive heating. Earlier, I published an article about stepper motor control without a driver and with a driver Making a Fischertechnik-compatible stepper motor control module based on the A49 driver88 (DRV8825), so we remember well how skipping motor steps sounds (hint - at some points during operation, distinct clicks are heard).
 In the picture of the printer motherboard, the tuning resistors of the stepper motors are marked with the letters X, Y, Z, E. in order not to short anything with a screwdriver on the motherboard:
The second probe of the multimeter ("ground") is conveniently attached to the SD card slot, in the photo below marked with a white sticker with the inscription "T8" (this is how the type of stepper motor drivers is coded, the designations on which are not visible under the radiators; on the Internet You can find these codes for different versions of the motherboard):
Below are the recommended motor reference voltages according to the Y-axis drive voltage Help, measured nominal values on our printer and adjusted values for reference voltages and temperatures:
| Motor | Creality VREF, V | Measured VREF, V | Tuned VREF, V | Initial temperature, °C | Final temperature, °C |
|---|---|---|---|---|---|
| X | 1. 18 - 1.2 18 - 1.2 | 1.19 | 1.1 | 60+ | 45 |
| Y | 0.99 - 1.01 | 1.0 | 0.9 | 60+ | 50 |
| Z | 1.18 - 1.2 | 1.19 | 1.1 | 60+ | 45 |
| E | 1.38 - 1.4 | 1.39 | 1.2 | 50+ | 40 |
We keep records of temperatures in 5°C increments and round up from several measurements, since the values vary depending on the printed model and it is difficult to obtain greater accuracy without constant monitoring, which is of no practical interest. The initial temperature values were obtained by the time the filament melted and printing was stopped.
As a result, the temperature of the motors has dropped noticeably during long-term operation. According to the datasheets found for our engines (they are all installed differently), X, Y, Z have a maximum current of 0. 84A and E - 1A, that is, the manufacturer has set the maximum allowable currents for three engines and set the extruder current with a small tolerance (obviously, to reduce its heating). Now it is clear why the engines get very hot in the original configuration. The Y motor moves the heavy desktop and the load on it is greater, because it heats up more than the others, but there is no room for a more powerful engine (the far left desktop level adjustment wheel interferes).
The printer claims a maximum print speed of 180mm/s, but at the moment we are using PLA plastic with a print speed of up to 60mm/s, so it is not yet possible to test the maximum speed. Perhaps in the future we will check this using proprietary PLA filament with a possible print speed of up to 250 - 300 mm / s.
Replacing the filament holder sleeve
It is easy to see that the standard sleeve without bearings turns with difficulty even when using a one kilogram spool (2.5 kg spools are also sold):
The obvious improvement is to replace this bushing with the bearings. On aliexpress, the required bushing “3D printer Filament Holder 608ZZ Bearing” cost about $ 5 with delivery:
bushings, so there was no point in doing it.
After replacing the core, the entire printer stopped shaking when turning the filament spool. We did not measure the temperature of the extruder motor, since the expected effect is the stability of its operation.
Add Filament Feed Guide
Smooth Filament Feed Guide from holder to extruder provides a semi-circular kink-free wire path around the spool and extruder. First, as a temporary workaround, we tried moving the spool holder to the left on the top rail of the frame, placing the spool above the extruder, which helped a little with filament creases, but unnecessarily unbalanced the entire printer. As a result, we printed out such a guide 2020 / Ender 3 Filament Guide, while for reliable installation on the top profile of the Ender 3 v2, we had to increase the size of the mount to 103% of the original:
Of course, a noticeable decrease in the temperature of the extruder cannot be achieved in this way, but a smoother supply of the filament and more stable operation of the extruder are visually noticeable.
We install radiators on motors
Passive cooling of motors is a useful addition when the current and load of the motors have already been adjusted. Moreover, since we plan to operate the printer in a case in the future, an additional heat sink will not be superfluous, so we ordered three “3D Printer Aluminum Motor Heatsink Nema17” radiators for aliexpress with a total cost of about $ 2 with delivery. The photo shows radiators on the motors of the extruder and the vertical axis:
Measurements showed a decrease in the temperature of the Y engine by 5 ° C, although the radiator is glued to it on the side (it will not fit on the end of the motor, because it will interfere with the movement of the desktop), we did not find a difference for other engines.
Results
Now the temperature of all motors during continuous operation does not exceed 45°C, and the extruder motor even 40°C. This result suits us more than - approximately the same air temperature is expected when the printer is operated inside the case, and it makes no sense to try to lower the temperature of the engines even more.
It is finally possible to print models for many hours without fear of overheating and fraying of the filament. To begin with, we successfully printed a smaller model of the Articulated Snake v8, which requires a lot of retractions in a row, but now this is not a problem at all:
two of them. We did not immediately notice, but the filament sawdust previously “bitten” by the extruder was fairly stuffed into the vertical axis nut located directly next to the extruder. This resulted in printing artifacts that were not immediately identifiable. So after fixing the filament chafing problem, you need to remove and clean the vertical axis and its mounting nut (and re-lubricate them, of course). It is also very likely that it was precisely because of the shaking of the filament spool that the well-aligned and perfectly tightened printer frame on the left was skewed during assembly - exactly where the filament spool stood on top of the frame, and the vertical axis began to get stuck in places due to skew during rotation. These two consequences resulted in printing artifacts in the form of separate horizontal lines. The mechanics of their appearance is very simple - when the axis gets stuck a little during rotation, it is not visually noticeable, but when printing some layers, the nozzle rises somewhat less than necessary relative to the previous layer, so that the printed filament does not fit into the resulting gap and is squeezed out. Well, I shouldn't have put the spool so far from the center of the frame, but without it, the soft PLA sometimes just broke on the way to the extruder, so I had to get out temporarily.
Conclusion
Now the printer works without a time limit and the choice of models available for printing on it has become huge. Moreover, as we found out, the problems found existed before the replacement of the extruder, so they would have to be solved anyway.
Since we have already encountered the "self-looseness" of the printer, which is quite expected for an "open frame" design, we immediately ordered corners to fix the frame. Putting the corners is a matter of minutes, but very Chinese "right" corners in the mounting system of the vertical axis and the extruder suggest that we still have to tinker. What do you expect from a designer?
See also
- My articles on Habré
- Working with GIS and GEO data on LinkedIn
- Geological models and code on GitHub
- YouTube channel with geological models
- Geological models in virtual/augmented reality (VR/AR)
- PyGMTSAR InSAR Docker images on DockerHub
"In short, I bought an Ender 3 Pro"
11 857 views
Since the question about choosing a 3D printer was once again raised at the DTF, I decided that it makes sense to finish and publish a review that has been gathering dust for me for a long time - especially since 3D printing still has some connection with the gaming theme - from creating props to cosplay, and to print miniatures for board games and parts/enclosures for handheld consoles.
Introduction
Initially, this review was written for a more specialized resource, and I believe that in this case it would be right to say a few words about what 3d printers are in general - to indicate the choice space.
Today, home 3D printers fall into two main categories - FDM printers and SLA printers. Other methods are used in industry, but we are not very interested in them.
I practically do not understand SLA printing, so I will only say that this type of printing is based on the fact that some substances (the so-called photopolymer resins) can change their structure, passing from a liquid to a solid state, under the influence of ultraviolet radiation, the source of which can be a laser or a DLP projector. Printers of this type “bake” the form inside the photopolymer resin contained, during printing, in a kind of bath at the bottom of the printer. Interestingly, the resin is needed only where it is necessary to print, so the resin layer for printing does not have to cover the entire model - and the printed part, as it were, "grows" from the liquid layer - as it is printed "upside down", moving up along with the printing table . This method is very high-precision, recommended for printing detailed miniatures, but relatively expensive in terms of consumables, despite the fact that printers of this type are relatively inexpensive and easy to set up, although they are quite demanding in maintenance and have a number of nuances in the work and post-processing of models.
In the photo above you can see a desktop SLA printer and an example of the miniature printing process.
Ender 3 - FDM printer. FDM stands for Fused Deposition Modeling and, in fact, is the simplest and most straightforward application of the principle of successive layers of material, usually plastic, fed into the heating element in the form of a flexible filament. The technique was patented back in 1989, and with the expiration of the patent it became possible to use this principle for small and inexpensive amateur devices. (At the same time, the development of microelectronics and a serious reduction in the cost of microcontrollers helped). The first open source 3D printer project was the RepRap project, and these printers are very similar to today's budget models. Another distinguishing feature was the ability to print many parts for new printers on existing ones.
One of the first budget open source FDM printers.
A little later, engineer and inventor Joseph Prusa, who collaborated on the Riprap project, came up with a model of a printer with a movable table. This model is known, among other things, as "prusa" - a scheme in which the X-axis is a movable table, i.e. in one of the directions on the plane, it is not the printhead that moves, but the model itself. Also, such printers are called Cartesian. This is the cheapest and easiest to manufacture scheme, the disadvantage of which is, in fact, the movement of a heavy table along with the model, vibrations and inertia and, accordingly, a relatively low maximum print speed. But due to simplicity, low cost and general reliability, most modern budget printers are implemented on the Prusa scheme.
One of the first Prusa printers. Budget Chinese clones are within easy reach.
Of course, the Prusa scheme is not the only option for an FDM printer. so-called. "cubes" or core XY are based on the movement of the print head (hot end) along the X / Y axes with the movement of the table down along the Z axis, which makes the design larger and more complex, but greatly increases the accuracy and possible printing speed. In addition, the design of these printers makes it quite easy to install solid walls and doors, which helps to establish and maintain an important temperature regime when printing with many plastics. The disadvantage is the price, size, and great complexity. But at the same time, most serious printers in workshops and print farms are cubes. For example, Alex Corvin does not recognize movetable printers at all.
Cube - Core XY. As you print, the table moves down.
"Delta" is a version of a 3D printer in which the printing element (hot end) moves along all three axes in a rather original way - with the help of movable rods, and the table is stationary. The circuit is quite complicated to set up and troubleshoot, and unfortunately, budget delta models rarely work as they should right out of the box.
Printer selection.
Like everyone who chooses the first printer under the pressure of a complete lack of knowledge and the presence of budget restrictions (not too hard, but still) I hesitated and chose for quite some time.
At the same time, the purpose of the purchase was quite specific - my wife and I have a small art school, and on its basis a number of creative circles dealing with various aspects of creativity and design. The printer was supposed to become the production base of these circles. It was supposed to print copies of gypsum and bones (skulls) for drawing and various devices for printing (etching) and making frames and bindings. In addition, some experiments with architectural morphology were supposed - prototyping of three-dimensional puzzles and toys.
Since I had no experience in 3d printing, I was looking for a printer, as they say, "for a beginner", although with some reservations - in my anamnesis I have a second-class electrician's crust, service as an armaments master in the air force and study at Faculty of Architecture, where there was an excellent locksmith, carpentry and machine tools. Therefore, once - there were tools in the house and two - in terms of working with equipment, I'm like a raccoon - "dumb, but with dexterous hands."
The experience of fiddling with microcontrollers told me that if you are supposed to be messing with technology (and what you have to mess with anyway, I realized pretty quickly), then it's better to take the device with the largest community. At the same time, the experience of purchasing equipment for creative work suggested that one should look not at reviews, as such, but at what people with approximately the same needs print. And that led me to two YouTube channels that run puzzles and 3D print them, among other things. Those. the printers they use are able to print parts with the quality and accuracy I need, even after fine-tuning.
Video from Alexey Yakushechkin, which finally convinced me to take the ender.
All this determined the two finalists - the original Prusa mini and Ender 3 pro. Both are common compact movetable printers, each with their own merits. Prusa mini attracted with the quality of parts and assembly of components and a very high maximum resolution for an FDM printer - about 50 microns. The disadvantages were the price (almost twice as much), the small printable area, and the very long production and delivery times. Ender 3 - attracted by the price, a huge community of enthusiasts, inexpensive spare parts and a pretty decent print area for its size.
Yes, already at that time they were not very new designs, but they were not outdated either then or now - since their mechanical scheme is a kind of absolute cheapness and simplicity, and so far there are no fundamental improvements to it, and are not expected.
* A small note - I started writing the article a long time ago, so today these printers are supplied in a different configuration - many of the shortcomings of the ender have been corrected in new versions, I believe that the Prusas have not stood still.
SLA printers were dropped, both because of the high cost and limited choice of plastics themselves, and because I needed sufficiently large and durable parts.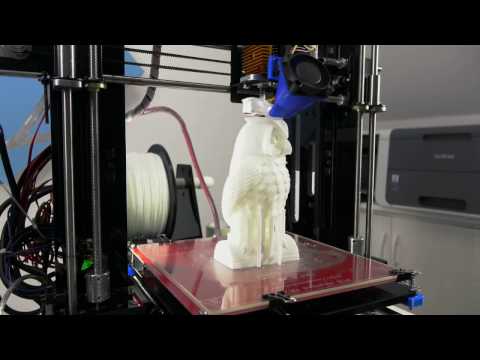 High-quality cubes and deltas fell somewhat out of my then budget, and low-quality ones - I had no illusions about my ability to rebuild and fine-tune something more complicated than the Prusian scheme. And the cubes also fell out of the wishes in terms of size - the printer was required to be relatively compact.
In the end, the price, discounts on 11.11 (Chinese Black Friday) and delivery time (Prusa at that time was delivered within two and a half to three months from the date of order) had their say - I ordered Ender 3 Pro.
Ender 3 hobby out of the box.
The assembly of the printer took about an hour, after which, to my surprise, the printer quite cheerfully printed the first boat-benchy. Benchy came out with minor flaws, most of which, as I now understand, did not come from problems with the mechanics, but from poor print settings (G-code, unconfigured retracts (retracting excess plastic from the nozzle), speeds, blowing mode and temperature from the bulldozer ). But I decided that the printer needed mechanical adjustment and began to fix what was not broken - with a natural result. The next Benchy was swept across the table like a Titanic across the Atlantic. A careful review of the manuals on YouTube, reassembly and tightening of the printer took several more hours. It should be noted that the photos and videos in the reviews do not convey this, but the assembled Ender 3 is very small, and takes up unexpectedly little space on the table with a quite decent print area of 23 by 23 centimeters.
A squadron of calibration boats from the time of repairs and experiments.
In the end, in terms of mechanics, I had two common congenital ailments of the ender and both were classically present in full: a crooked table - was cured later by purchasing an ultrabase - something like glass with a special coating. (ordinary glass can also be used, but it can also be curved - window glass, as it turned out, has pretty decent curvature tolerances according to GOST) and a light wedge of the Z axis - was later cured by an adjustable motor mount printed on the printer. This is basically one of the amazing features of 3D printers - they can print parts for themselves.
That is, on the one hand, this printer still prints out of the box. On the other hand, if you are not mentally prepared for the adventures of the body and spirit, troubleshooting and smoking manuals - look (attentively) towards more expensive printers, for example, Prusa mini. My old friend bought a prusha almost at the same time as me and ... just prints, not having the slightest idea what is happening inside the printer. On the third hand, in the case of an ender, there are a lot of manuals, all problems have been solved long ago, the printer device is utterly simple, and any unit can be disassembled and assembled in a matter of minutes. So it really is the perfect budget printer for someone new to printing but with some technical experience.
Dwarfs for the board game Dungeoneer. The height of the figurines is larger - about two centimeters.
When you buy an Ender 3, be prepared to buy yourself a new tech hobby. And not only because the printer will require improvements. Because of its cheapness and simplicity, the ender is ideal for change and experimentation. In the first month, I dismantled / assembled / changed literally every part of the printer, with the exception, perhaps, of the power supply. The 8-bit motherboard from the manufacturer was almost immediately replaced by Skr mini e3 (a more advanced 32-bit controller and quiet motor drivers) - the printer immediately became quieter and the "pimples" on the model disappeared due to the original controller's slight hangs on complex curves . By the way, replacing the board turned out to be a very simple process that takes about fifteen minutes, five of which are to warm up and tear off the hot melt adhesive on the connectors of the native board. (Yes, the Chinese rulers got hot glue on the connectors.) The table springs were replaced - this is a directly necessary upgrade, now it became necessary to change the table adjustment only after replacing / cleaning the hotend or nozzle.
 Actually, the hotend itself - instead of the native one, a micro swiss clone from Trianglelabs was installed. And what should have been done right away, but who knew (by the way, they don’t talk about this in the reviews) - the hotend radiator fan was changed (the stock one is really bad, incredibly, I would even say crappy) to a more powerful one.
It is worth noting that all really needed replacements cost forty dollars, the most expensive part - a new hot end, is not at least somewhat mandatory for normal printing. The next logical step, the printer began to build itself - a part was added to blow the model instead of the stock one, clips for wires and my first "author's" refinement - a separator for supplying a filament thread (plastic for printing) and a Z-axis screw - to prevent grease from sticking to plastic.
I don't want to talk in detail about the 3D printing process as such, and what is needed for it - this information is easy to find on the net. I can only say that the renderer, like many other printers, reads models converted to command set format from a micro-SD card that is plugged into a slot on the printer's motherboard - so far, budget printers cannot simply be connected to a computer and send files to them. In practice, this is a small CNC machine that requires certain skills. But at the same time, this is a simple and fairly safe machine, which is easy to master within a couple of weeks.
Like all inexpensive FDM printers, the Ender has a rather low print resolution - the minimum layer that makes sense in practice is about 100 microns (a tenth of a millimeter). To save time, I usually print at a resolution of 120-150 microns, which gives fairly detailed models and clean surfaces with quite acceptable print times - from half an hour for very small models, up to 9-12 hours for relatively large parts.
Conclusion.
Almost everything I say below applies equally to the original ender 3 and its later modifications, as well as to a huge number of models similar to it, such as Voxelab Aquila S2 or Anycubic Vyper. Whether the printer prints well right out of the box depends to some extent on luck. But, even if not, it is really easy to modify to a good condition.
Am I satisfied with my purchase? Definitely. Although more advanced and interesting models have appeared on the market, I can still recommend the ender to other beginner enthusiasts of DIY and making their own models - as the best budget option. At the same time, if you are willing to spend more than $ 250 - today, in 2023, better options are available, with a lot of improvements and improvements right out of the box. (Including why I don’t want to list in detail what I would advise you to buy in addition for the printer in the first place - with a high probability, today you will buy a more advanced modification than my modification, so I can’t be sure that this node is not already finalized in stock.)
In any case, such a printer will give you the opportunity to print a lot of interesting and useful little things at home, from simple figurines for board games and souvenirs to plastic parts or accessories for home, DIY, or workshop. And when you see a small machine on your table from which you can get the right toy or part, you feel that the future seems to have come after all.
Above - a drawing guide (David's eye) and a small etching machine for our art school - the printer regularly fulfills its main purpose =)
For example, it became possible to "download from the Internet" a board game - such popular board games as Ktulhu Dice and Zombie Dice have ready-made 3d models, as well as a number of tactical games. With some skill and the right fuss with the settings, you can also print miniatures, but this requires long hours of experimentation and fine tuning of speeds and temperatures.
With skill, you can achieve very high accuracy of models. Photo - fatdragongames.com
Consumable - plastic for printing is very cheap in relation to the number of things that can be printed from one kilogram spool. ABS plastic is considered the cheapest, but it is toxic and requires safety precautions, and I do not print with it. I also use inexpensive PLA and PETG plastics.
Parts and upgrades for the ender are also extremely cheap - which allows you to experiment without fear of messing up and messing up.
What can be perceived as both an advantage and a disadvantage - buying a budget 3D printer, you are almost certainly buying yourself a new technical hobby. And not only because improvements will definitely be needed - it is quite possible that they will not be needed. But a 3D printer is an excellent constructor, with which you want to fiddle and improve, trying to get the maximum quality.
A small set of links to interesting and useful -
Dmitry Sorkin's channel and the "getting started" playlist is the best set of recommendations for beginner printers from one of the best (if not the best) 3D printing specialist.
For concept and inspiration, see ender 3 video from 3D Printed Tabletop channel. Actually, the name speaks for itself - the channel is engaged in 3D printing for desktops.
The Maker's Muse channel is a great source of inspiration and ideas for the DIYer.
recommendations from this video helped me out a couple of times on the eve of the holidays.