Osirix 3d printing
How to Create 3D Printable Models from Medical Scans in 30 Minutes Using Free Software: Osirix, Blender, and Meshmixer - 3D Printing in Medicine
UPDATED TUTORIAL: A Ridiculously Easily Way to Convert CT Scans to 3D Printable Bone STL Models for Free in Minutes
Hello, it's Dr. Mike here again with another tutorial and video on medical 3D printing. In this tutorial we're going to learn how to take a DICOM-based medical imaging scan, such as a CT scan, and convert into an STL file in preparation for 3D printing. We will use the free, open-source software program Osirix to do this. Once the file is converted into STL format, we will use the free software packages Blender and Meshmixer to prepare the file for 3D bioprinting. If mastered, this material should easily allow you to make a high-quality 3D printed medical model in less than 30 minutes using free software. Expensive, proprietary software is not needed. This tutorial is designed primarily for Macintosh users since Osirix is a Macintosh-only program. If you use Windows or Linux, please stay tuned for my upcoming tutorial on using free, open-source 3D Slicer to create medical and anatomic models.
If you haven't already done so, please see my tutorial on selecting the best medical scan to create a 3D printed model. If you start your 3D printed model project with the wrong kind of scan, your model will not turn out well. Selecting the right kind of scan is critically important and will save you a lot of frustration. Take a few minutes to look over this brief tutorial. It will be well worth your time.
Before you start, DOWNLOAD THE FILE PACK that accompanies this video so you can follow along on your own computer. When you finish the tutorial, you will have your very own 3D printable skull STL file. Download is free for members, and registration for membership is also free and only takes a minute.
Video 1: The video version of this tutorial. It takes you from start to finish in 30 minutes. The written version here has more detail though.
A Few Brief Definitions
What is Osirix?
Osirix is a Macintosh-only software package for reading medical imaging scans (Figure 1). There are several versions. There is an FDA-approved version designed for doctors reading scans in clinics and hospitals, a 64-bit version for research and other nonclinical activities, and a free, 32-bit version. The main difference between the free 32-bit version and the paid 64-bit version is the 64-bit version can open very large imaging studies, such as MRI exams with thousands of images. The 32-bit version is limited to about 500 images. Additionally, there is a performance boost with the paid versions. If you are just getting into 3D bioprinting, the free, 32-bit version is a great place to start. It can be downloaded at the Osirix website here.
Figure 1: An example of Osirix being used to read a CT scan.
What is DICOM?
DICOM stands for Digital Imaging and Communications in Medicine. It is the standard file format for most medical imaging scans, such as Computed Tomography (CT), Magnetic Residence Imaging (MRI), ultrasound, and x-ray imaging studies.
What is STL?
STL, or STereoLithography format , is an engineering file format created by 3D Systems for use with Computer Aided Design software (CAD). The file format is primarily used in engineering, and has become the standard file format for 3D printing.
The Problem with 3D Printing Anatomic Structures
The major problem with trying to 3D print anatomic structures from medical scans is that the medical scan data is in DICOM format and 3D printers require files in STL format. The two formats are incompatible. There are very expensive, proprietary software packages that can perform the conversion between DICOM and STL. A little-known secret is that this can also be done using free, open-source software. Osirix is the best solution for Macintosh. 3D Slicer is the best solution for Windows and Linux. I will discuss 3D Slicer in an upcoming tutorial.
If you haven't already, please download the DICOM data set we will be using in this tutorial. This data set is from a high quality CT scan of the brain and skull. It has been anonymized and has been put in the public domain for research by the US National Cancer Institute. Also included with the download packet are other files we will use for this tutorial, including the final STL file of the skull. The download is free for members, and registration for membership is also free and only takes a minute.
From the Macintosh Finder navigate to the folder with the downloaded tutorial file pack and double-click on the file TCGA-06-5410 sharp. zip.
zip.
Opening the CT scan with Osirix
Open Osirix. From the File menu, click Import, Import Files. Click Open. (Figure 2)
Figure 2: Importing the CT scan into Osirix
Navigate to the folder that contains your DICOM data set. Click the Open button.
Osirix will ask you if you want to copy the DICOM files into the Osirix database, or only copy the links to these files. Click "Copy Files."
Osirix will begin to copy the files into the database. A progress bar will be shown on the lower left-hand corner. When the data is imported you'll see a small orange circle with a "+" in it. This orange circle will eventually go away when Osirix is finished analyzing the study, but you can open the study and work with it while Osirix does some cleanup postprocessing. Left click on the study.
You will see an icon with a label "FIDUCIALS 1. 0 SPO cor, 216 Images." This is a CT scan of the head with coronal slices at 1 mm intervals. Double-click on this icon, Figure 3.
Figure 3: The study when opened
Osirix will remind you that you're not supposed to be using it for diagnostic scan reading on real patients unless you are using the more expensive FDA approved version, Osirix MD we're just using it to create a 3D model, so click "I agree."
At this point, the study will load. Use the mouse wheel or the bar on the top of the screen to scroll.
You can see that this is a pretty decent CT scan of the head for 3D printing. There is not much artifact from metallic dental implants because the maxilla and mandible have been cut off.
Segmenting the bony skull and creating a new series
We can measure the density of the bony structures using the Region Of Interest or ROI tool. This measures the Hounsfield density, or CT density, of the target area. Select the oval tool from the drop-down menu, Figure 4.
Figure 4: The ROI tool.
Choose a region of bone using the oval tool. You will see that information about this region is displayed. What we are interested in is the mean density, which in this case is 1753.194, Figure 5.
Figure 5: Density measurement using ROI tool. The mean density is 1753.194, as shown in maroon field.
Use the ROI tool to select another region in the brain. You will see that the mean attenuation, or density, is much less, in this case 1059.137, Figure 6.
Figure 6: Density measurement of the brain tissue.
Finally, use the oval tool to choose an area in the air adjacent to the head. You can see that the mean attenuation of this region is 38. 514, Figure 7.
Figure 7: Density measurement of air.
In this scan the Hounsfield attenuation numbers have been shifted. In a typical scan, air measures about -1000, soft tissue between 30 and 70, and bone typically greater than 300. In this scan those numbers have been increased by 1000. Since we were thorough enough to check the Hounsfield attenuation before moving on, we can easily correct for this shift.
Under ROI menu select Grow Region 2D/3D Segmentation, Figure 8.
Figure 8: The Grow Region tool
In the Segmentation Parameters window that pops up, set the following:
Lower Threshold 1150
Upper Threshold 3000.
Generate a new series with:
Inside pixels 1000
Outside pixels 0
Be sure to check the checkbox next to the Set Inside Pixels, and Set Outside Pixels fields, Figure 9.
Figure 9: Setting up the Segmentation Parameters window.
Next, make sure you select a starting point for the algorithm. Left click on one of the skull bones. Green crosshairs will show. All of the bone that is contiguous with point you clicked will now be highlighted in green, Figure 10.
Figure 10: Setting the starting point for segmentation. The target region turns green.
Click the Compute button
Osirix will generate a new series with the bones being a single white color with a value of 1000, and everything else being a black color with a value of zero, Figure 11. Creating a separate series just for 3D printing purposes is the secret to getting good 3D models from Osirix. Trying to generate a 3D surface model directly from the 3D Surface Rendering function underneath the 3D Viewer menu is tempting to use, however it will not work well for generating STL files. This is not obvious, and the source of much frustration for beginners trying to use Osirix for 3D printing.
Figure 11: The new bitmapped series shown on right of screen. This series has only two colors, black and white. It is idea for conversion to and STL surface model.
Generating an STL file from the new bitmapped series
Now we are ready to create our 3D surface model. Make sure that your new bitmapped series is highlighted. Click on the 3D viewer menu and select 3D Surface Rendering, Figure 12. Leave the settings set to their default values. Click OK as shown in Figure 13.
Figure 12: Selecting 3D Surface Rendering
Figure 13: Setting 3D surface rendering settings
Osirix will then think for a few moments as it prepares the surface. You can see that a relatively good approximation of the skull has been generated. Use of the left mouse button to rotate the 3D model.
Next were going to export the 3D surface model to an STL file. Click Export 3D-SR and choose Export as STL as show in Figure 14. Type the file name "skull file." Click Save.
Figure 14: Exporting model to STL file format.
Cleaning up the 3D model in Blender
You can see from the 3D rendering that there are many small islands of material that have been included with the STL file. Also, the skull has a very pixelated appearance. It does not have the smooth surface that would be expected on a real skull. In order to fix these problems, we're going to do a little postprocessing in Blender, a free open-source 3D software program.
If you don't already have Blender on your computer, you can download it free from blender.org. Blender is available for Windows, Macintosh, and Linux. Select your operating system, preferred installation method, and download mirror.
Once Blender is installed on your computer, open it. In the default scene there will be a cube. We don't need this. Right click on the cube to select it. Then delete it using the delete key on a full keyboard or the X key on a laptop keyboard. Blender will ask you to confirm you want to delete the object. Click Delete as shown in Figure 15.
Figure 15: Deleting the default cube.
Next, we are going to import the skull STL file. From the File menu select Import, STL, as shown in Figure 16. Navigate to the skull STL file you saved from Osirix, and double-click it. Blender will think for a few seconds and then return to what appears to be an empty scene, as shown in Figure 17. Where is your skull? To find your skull, use the mouse scroll wheel to zoom out. If you zoom out far enough you will see the skull. The skull appears to be gigantic, as shown in Figure 18. This is because the default unit of measurement in the skull is 1 mm. In Blender, an arbitrary unit of measurement called a "blender unit" is used. When the skull was imported, 1 mm of real size was translated into 1 blender unit. Thus the skull appears to be hundreds of blender units large, and appears very big.
Figure 16: Importing the STL file into Blender
Figure 17: The "empty" scene. Where is the skull?
Figure 18: Zoom out and the skull appears!
The skull is also offset from the origin. We are going to correct that. Make sure that the skull is still selected by right clicking on it. If it is selected it will have a orange halo. In the lower left corner of the window click on the Object menu. Select Transform, Geometry to Origin as shown in Figure 19. The skull is now centered on the middle of the scene.
Figure 19: Centering the skull in the scene.
Deleting Unwanted Mesh Islands
First, let's get rid of the extra mesh islands. There is a menu in the lower left-hand corner of the window that says Object Mode. Click on this and go to Edit Mode, as shown in Figure 20.
Figure 20: Entering Edit mode in Blender.
Now we are in Edit Mode. In this mode we can edit individual edges and vertices of the model. Right now the entire model is selected because everything is orange. In edit mode you can select vertices, edges, or faces. This is controlled by the small panel of buttons on the bottom toolbar. Make sure that the leftmost or vertex selection mode is highlighted and then right click on a single vertex on the model, as shown in Figure 21. That vertex should become orange and everything else should become gray, because only that single vertex is now selected, Figure 22.
Figure 21: Vertex selection mode
Figure 22: Select a single vertex by right clicking on it.
Under the Select menu, click Linked, as shown in Figure 23. Alternatively, you can hit Control-L. This selects every vertex that is connected to the initial vertex you selected. All the parts of the model that are contiguous with that first selection are now highlighted in orange. You can see that the many mesh islands we wish to get rid of are not selected.
Figure 23: Selecting all linked vertices.
We are next going to invert the selection. Do this by again clicking on the Select menu and choosing Inverse, Figure 24. Alternatively, you can hit Control-I. Now, instead of the skull being selected, all of the unwanted mesh islands are selected, as shown in Figure 25. Now we can delete them. Hit the delete key, or alternatively the X key. Blender asks you what you want to delete. Click Vertices, Figure 26. Now all of those unwanted mesh islands have been deleted.
Figure 24: Inverting the selection.
Figure 25: The result after inverting the selection. Only the unwanted mesh islands are selected!
Figure 26: Deleting the unwanted mesh islands.
Repairing Open Mesh Holes
We can see that on the top of the skull there is a large hole where the skull was cut off by the scanner. Because the bone surface was cut off, Osirix left a gaping defect, Figure 27. Before 3D printing, this will have to be corrected. This is what is called a manifold mesh defect. It is an area where the surface of the model is not intact. A 3D printer will not know what to do with this, such as whether it should be filled in or left hollow. Fortunately, it is relatively easy to correct.
Figure 27: A large open mesh hole at the top of the skull.
Using the Select menu in the lower left-hand corner, click on Non-Manifold. This will select all of the non-manifold mesh defects in your model. You can see that the edge of our large hole at the top of the skull has been selected and turned orange. This confirms that this defect has to be fixed.
Unselect by hitting the A key. Then, go to Edge select mode by clicking on the Edge Select button along the lower toolbar. Holding down the Alt key, right-click on one of the edges of the target defect, in this case the top of the skull. That familiar orange ring has formed. Your selection should look like Figure 28. Let's fill in this hole by creating a new face. Hit the F key. This creates a new face to close this hole, Figure 29.
Figure 28: The edge of the hole is selected, as indicated by the orange color.
Figure 29: The hole when filled with a new face.
Due to the innumerable polygons along the edges, the face is actually quite a complex polygon itself. Let's convert it to a simpler geometry. With the face still selected hit Control T. You can alternatively go to the Mesh menu and select Faces, Triangulate Faces as shown in Figure 30. This will convert the complicated face into simpler triangles. As you can see, some of these triangles are quite large relative to the other triangles along the skull surface. These large triangles may become apparent when smoothing algorithms are applied or 3D printing is performed. Let's reduce their size. Hit the W key and then select Subdivide Smooth, as shown in Figure 31. The triangles are now subdivided. Let's repeat that operation again so that they are even smaller. Hit the W key and again select Subdivide Smooth.
Figure 30: Converting all faces into triangles.
]
Figure 31: Subdividing and smoothing the selected faces.
Smoothing the Model Surface
Next let's get rid of that pixelated appearance of the model surface. First, we need to convert all of the polygons in the model to triangles. The smoothing algorithms just work better with triangles. Staying in Edit mode, hit the A key. The A key toggles between selecting all and unselecting all. If you need to, hit the A key a second time until the entire model is orange, thus indicating that it is selected. Hit Control-T, or alternatively use the Mesh menu, Faces, Trangulate Faces. This will convert any remaining complex polygons to triangles.
Go back to Object mode by hitting the tab button or selecting Object Mode from the bottom toolbar. We are now going to apply a smoothing function, called a modifier, to the skull. Along the right of the screen you'll see a series of icons, one of which is a wrench, as shown in Figure 32. Click on that. This brings up the modifier panel, a series of tools that Blender uses to manipulate digital objects. Click on the Add Modifier button and select the Smooth modifier. Do not select the Laplacian Smooth modifier. That is different. We just want the regular Smooth modifier, as shown in Figure 33. Leaving the Factor value at 0.5, increase the Repeat factor until you are satisfied with the surface appearance of your model. For me, a factor of 20 seemed to work, Figure 34. At this point the modifier is only temporary, and has not been applied to the model. Click on the Apply button. Now the smoothing function has been applied to the model.
Figure 32: The Modifiers toolbar on the right.
Figure 33: The Smooth modifier
Figure 34: Setting the Smooth modifier to repeat 20 times.
Rotating and Adjusting the Model Orientation
When the model was originally exported from Osirix and opened in Blender, it was at a strange orientation. We can correct to this easily. Click on the View menu from the left portion of the lower now bar and select Front. This orients the model from the frontal view, and you can see that in this orientation we are looking at the top of the skull. To correct this, we will rotate the model along the X axis. First, make sure that the cursor is inside the model window. Then, Hit the R key and then the X key, and type "180." This will rotate the model on the X axis by 180°. Hit the return key to confirm the modification. Don't worry if the skull isn't facing the correct way right now, we will fix that later.
Now we are ready to export our cleaned up skull model. Go to the File menu, click Export, STL. Navigate to your desired folder and save your STL file. Since I corrected several defects in this mesh file, I called the file "skull file corrected.stl"
Performing a Final Inspection Using Meshmixer
If you haven't already done so, go to the Autodesk Meshmixer website at http://www.meshmixer.com/download.html and download and install Meshmixer. The software is free. Once installed open the program and select Import. Navigate to your STL file and double-click it. Meshmixer has a variety of nice features, and one of them is a mesh correction function. Once your file is open click on the Analysis button along the left nav bar. Click on Inspector as shown in Figure 35. Meshmixer will now analyze the STL file for obvious mesh defects. Anything that is detected will be highlighted by red, pink, or blue lines. You can see that our skull model appears to be defect free. Click on the done button and quit Meshmixer.
Figure 35: Running the inspector tool in MeshMixer
Your STL file of the skull is now ready for 3D printing!
Conclusion
In this tutorial you have learned how to take a DICOM data set from a CT scan and use it to create a 3D printable STL file using free software. First we used the Osirix to segment a CT scan and convert it to an STL file. Then we performed cleanup operations on the STL file using the Blender and Meshmixer, both free programs. For additional information on how to select an appropriate CT or MRI scan for 3D printing please see my previous tutorial. If you want to learn more about using Blender to fix more extensive defects in bone models, you can view to other tutorials I have created:
- 3D Printing of Bones from CT Scans: A Tutorial on Quickly Correcting Extensive Mesh Errors using Blender and MeshMixer
- Preparing CT Scans for 3D Printing. Cleaning and Repairing STL Files from Bones using Blender, an advanced tutorial
A variety of useful tutorials for 3D printing is available on the Tutorials page. If you are planning on attending the 2015 Radiological Society of North America (RSNA) meeting in Chicago this November, look for my hands-on course "3D Printing and 3D Modeling with Free and Open-Source Software." I will give more tips and tricks for creating great 3D printed medical models using freeware.
I hope you find this tutorial helpful in creating your own medical and anatomic models for 3D printing. Please stay tuned for my next tutorial on using the free, open-source program 3D Slicer to create medical 3D models on Windows and Linux platforms.
If you are creating your own 3D printed medical models, please share your models with the Embodi3D community in the File Vault. If you have questions or comments, please leave a comment below or start a discussion thread in the Forums.
Sample free downloads
A Collection of Free Downloadable STL Skulls for you to 3D print yourself.
3D printable human heart in stackable slices, shows amazing internal anatomy.
A Collection of Spine STL files to download and 3D print.
Follow Embodi3D on social media
Twitter | Facebook | LinkedIn | YouTube | Google+
OsiriX DICOM Viewer | OsiriX MD
What’s new in OsiriX
- Optimized for macOS 13 Ventura
- Compiled for Intel and Apple Silicon processors (all M1 and M2 models)
- And more…
Requirements
- OsiriX can only be installed on an Apple Mac
- OsiriX can only run on Apple’s Operating Systems (from macOS 10.12 to macOS 13)
- OsiriX requires at least 6GB of RAM
3D Post-Processing
OsiriX MD offers all the modern post-processing techniques, such as MPR (Multiplanar Reconstruction), 3D Rendering (MIP, Volume Rendering and Surface Rendering).
OsiriX MD supports curved planar reconstruction (3D-MPR) to follow organs such as aorta or bronchi.
You can export 3D reconstructions images as movies, and archive them on your PACS.
See the main differences between OsiriX MD and OsiriX Lite
| OsiriX MD | OsiriX Lite | |
|---|---|---|
| FDA-Cleared | ||
| CE IIa Labeled | ||
| Medical usage | “NOT FOR MEDICAL USAGE” | |
| User Manual Plugin | ||
| Performances | Up to 80% faster | Standard |
| Email support | ||
| Pixmeo Website Account | ||
| Open 500+ images series | ||
| 2D Images Viewer | ||
| 3D MPR | Demo | |
| 3D Curved MPR | Demo | |
| 3D Rendering | Demo | |
| Local Database | Demo | |
| Web Server | Demo | |
| Web Server user limit | Unlimited | 2 nodes max |
| DICOM Services | Demo | |
| DICOM Nodes limit | Unlimited | 2 nodes max |
| DICOM Editing | ||
| Bonjour Protocol | Demo | |
| CD Creation | Demo | |
| PET-CT Display | Demo | |
| 32-bit Pixel Pipeline | Demo | |
| 11-bit Monitor Support | ||
| JPEG2000 DICOM | Demo | |
| Perpetual License | ||
| Other | Demo |
| Test | Results | OsiriX MD | ||||||
|---|---|---|---|---|---|---|---|---|
| 3D Growing Region to segment the colonic lumen Colonic CT 1mm/1mm, 965 images MacPro, 8 cores, 2.  8 GHz, 6GB 8 GHz, 6GB |
| 4.4× faster | ||||||
| Bone Removing Segmentation in 3D Volume Rendering CTA Lower Limbs 1mm/1mm, 1020 images iMac, 2.8 GHz, 4GB |
| 3.9× faster | ||||||
| Bone Removing Segmentation in 3D Volume Rendering CTA Lower Limbs 1mm/1mm, 1020 images MacPro, 8 cores, 2.8 GHz, 6GB |
| 4. 2× 2×faster | ||||||
| 360 Rotation in 3D Volume Rendering Thoracic CT 1mm/1mm, 760 images iMac, 2.8 GHz, 4GB |
| 1.6× faster | ||||||
| Loading a large series CTA, multiple series MacPro, 8 cores, 2.8 GHz, 6GB |
| 4.6× more images | ||||||
| Loading a large series CTA, multiple series iMac, 2.8 GHz, 4GB |
| 2. 3× 3×more images |
Performances comparisons
| Test | OsiriX Lite | OsiriX MD | |
|---|---|---|---|
| 3D Region Growing Segmentation 3D Region Growing to segment the colonic lumen. Colonic CT 1mm/1mm, 965 images. MacPro, 8 cores, 2.8 GHz, 6GB. | 22 sec | 5 sec | 4.4× faster |
| 3D VR Bone Removal Segmentation Bone Removing Segmentation in 3D Volume Rendering. CTA Lower Limbs 1mm/1mm, 1020 images. iMac, 2.8 GHz, 4GB. | 128 sec | 31 sec | 3.9× faster |
| 3D VR Bone Removal Segmentation Bone Removing Segmentation in 3D Volume Rendering. CTA Lower Limbs 1mm/1mm, 1020 images. MacPro, 8 cores, 2.8 GHz, 6GB. | 38 sec | 9 sec | 4.2× faster |
| 3D Volume Rendering 360° Rotation in 3D Volume Rendering. | 138 sec | 85 sec | 1.6× faster |
| Loading a large series Loading a large series. CTA, multiple series. MacPro, 8 cores, 2.8 GHz, 6GB. | 1’400 img | 6’500 img | 4.6× more images |
| Loading a large series Loading a large series. CTA, multiple series. iMac, 2.8 GHz, 4GB. | 1’400 img | 3’200 img | 2.3× more images |
 Thoracic CT 1mm/1mm, 760 images. iMac, 2.8 GHz, 4GB.
OsiriX MD ANVISA (Brazil only)
For the Brazilian market, an ANVISA version is available. Our Brazilian partner XirisA can provide information and support. Contact XirisA .
Buy OsiriX MD ANVISA (Brazil only)
Again about 3D and medicine
Recently, I have been seeing more and more information about the use of 3D modeling / printing in medicine. Yes, the trend of increasing introduction of 3D into medicine is obvious, but at the same time, it affects its various areas very unevenly. Working in one of the major clinics, I would also like to give the community a short insight into what is currently happening on one of the fronts.
I'll probably start with a brief historical background. In 2007, when I finally got to some clinical work after the torments of training, 3D modeling / reconstruction of organs and vessels was already well known to radiologists. At the same time, everyone was absolutely indifferent to her: well, it’s beautiful, well, some surgeons like to look, young / inexperienced mostly, it’s not necessary for a diagnosis at all. Well, I was young / inexperienced :). I ended up in the department of intracranial vascular surgery and I was directly fascinated by 3D reconstructions of the circle of Willis, all these pathological vascular bypasses, aneurysms. 3D reconstructions were performed in situ with direct angiography of vessels in the operating room and periodically dropped from radiologists on disks with CT and MRI angiography attached to the main series of images. At the same time, the majority of doctors usually ignored disks with images in general, only films were viewed on a negatoscope. So, from time to time, patients came without films, and the disks more and more often had a “raw” vascular series without mip or vr processing. I had to stomp to the radiologists at the station and ask them to process the images, all this was pretty annoying. They have no time, I catch them, ask. Thus, very quickly, I began to actively look for options to rid myself of this obligation.
That was the era of viewing images in merge efilm workstation, almost the only more/less professional viewer for dicom series for win at that time. In some primitive form, it allowed making 3D volumetric images. This, by the way, was very reminiscent of the processing that you people do here in 3dslicer and invesalius. However, these programs have now grown a little, but in terms of usability, honestly, they haven’t improved much. And then, and now the whale (blue) of household viewing was Osirix. Reconstruction in osiriks:
But there was one problem with him, he is, was and apparently will be only for mac. The absence of farm computers in the department could not stop me. After reading the Internet for a week, I assembled a hackintosh from the hardware available in the department for the next week, and the era of searching for a free radiologist is finally over! If anyone is currently working on a Mac, I recommend looking at https://horosproject.org/. This is a free fork of Osirix, in no way inferior to the features of the paid version. By the way, Osiriks already knew how to export the selected structures to obj, although this was implemented very inconveniently. But I wanted something of my own, screw. So it was in 2009Zioterm was found in 2009. Zioterm reconstruction:
He provided everything that was necessary at a quite decent speed of reconstruction. There was only one moment with him. For the program to work, it had to connect online somewhere and report that it was launched. Offline computers flew by. Then ziosoft gave up on their product for the people, focused on some complex stations, which, if only they were bought for the whole clinic, the program stopped running. Well, a holy place is never empty. First, with posts on Habré, then with a personal visit, Inobitec entered our lives. A team of young and ambitious Voronezh programmers https://inobitec.com/ implemented not just two necessary viewing options: Maximum intensity projection (MIP) and voxel Volume Rendering (VR) (who wants more about this, I was once asked to review https ://youtu.be/zCXaLE3qhUk), the guys went further. They stuffed the program with a bunch of handy tools for segmenting anything from dicom into printable meshes. Allocation by trashholds, by intervals, by volume. Voxel addition, subtraction. Fusion of different modalities MRI + CT + AG, the conclusion of all this is again in a mesh. They use ply as their output meshes, which seems right to me. The format is more compact, blender/meshmixer understands it, saves vertex colors out of the box, convert to stl with one click.
So far, all this has mostly been related to the reconstruction of blood vessels, however, at some point I realized that with inobitec (I have a pro license) and a blender, I can simulate any operating situation using dicom series without getting up from my chair in staff. A couple of examples.
In some cases, the surgical target (which must be found and destroyed :)) is very small or geometrically complex. In such cases, they use neuronavigation, upload images to the navigator and, almost like in Yandex, follow the prompts. Only now the coordinates of the structures change during the operation: the tumor is removed, the cerebrospinal fluid flows out. But!, the anatomy does not change. 3D processing allows, for example, to make a reconstruction of the cerebral cortex, using it to fully understand the localization of the formation and adhere to this unmistakable roadmap. Example:
A 3D reconstruction of a richly vascularized tumor sometimes makes it possible to understand that intraoperative bleeding can be avoided by having only one vessel under control https://youtu. be/srBM23fuZ8w If someone is suddenly interested in more videos, I have:
https://www.youtube.com/user/higet1/videos https://t.me/neuro3d Total.
In terms of viewing images in 3D before the operation, I can say this now: at the moment, it is very rare for anyone in our department not to look at the reconstruction in advance. Probably, only if there is an emergency operation, the patient went to the operating room and is content with what he has.
About printing for preoperative anatomy study: not much point. It's not even about the price. To print for a long time, the output from this is not much larger than to look at the screen.
Seal for implantation is mainly bone. It is possible to print a custom-shaped implant from peek, pekk or titanium, or make a mold for an intraoperative flap from pmma. Modeling the bones of the skull convex in my experience, for example, requires a fairly basic knowledge of 3D modeling. Qualitative modeling of a defect is mirrored - easily in an hour.
3D printed anatomical models for preoperative planning and enhanced patient consent
Introduction
3D printed models are becoming increasingly useful tools in the modern practice of personalized, precision medicine. As case histories become more complex and treatments become truly unique, visual and tactile anatomical models can improve understanding and communication in the process of creating a solution for a particular patient.
Health care professionals, institutions and organizations around the world use 3D printed anatomical models as reference tools for preoperative planning, intraoperative imaging and calibration or pre-positioning of medical equipment for routine and high complexity procedures, which has been documented in hundreds of publications1. Physicians often save time preparing and performing surgeries, resulting in significant reductions in operating costs while reducing patient risk, anxiety, and recovery time.
This guide provides practical step-by-step guidance for physicians and technologists to move from patient scans to 3D printed models by learning how to set up a CT/MRI scan, segment datasets, and convert files to 3D printable format.
“The unique advantage of image-based 3D printing is the ability to demonstrate anatomical spatial relationships with sub-millimeter accuracy.”
Jeffrey D. Hirsch, MD
Associate Professor, Director of Public Radiology, Department of Diagnostic Radiology University of Maryland Medicine
Formlabs-printed anatomy models are already being used by several subspecialists in surgery, including but not limited to orthopedic, cardiothoracic, vascular surgery, oral and maxillofacial surgery, oncology, plastic and reconstructive surgery, urology and pediatrics. This handbook provides an overview of the steps that can be applied to any Digital Imaging and Communications in Medicine (DICOM) dataset, which is the standard format for storing images in any modern Image Archiving and Communication Systems (PACS)
WHAT YOU NEED FOR IN-HOUSE 3D PRINTING
CT or MRI scan and associated DICOM file
- Recommended slice thickness: 0.
 25mm-1.25mm2
Computer with imaging software for segmentation or using an outsourced segmentation service
Form 2 3D printer and resin, e.g.:
- Orthopedic white resin or OMFS
- Transparent polymer for cardiovascular or urological surgery
- SG Dental Resin for Surgical Guides (for approved applications only)
Form Wash and Form Cure for 3D post-processing (recommended for medical models)
Applications and benefits of 3D printed anatomical models medicine. Please consider your intended use, local regulations, medical imaging approvals, material specifications, biocompatibility requirements, protected medical information, and institutional standards before 3D printing or using anatomical models
Depending on your institution, anatomical models may be used for patient or pathological purposes:
- Preoperative planning and intraoperative reference models for surgeons
- Device calibration (e.
 g. mandibular plates) and surgical instrument design*
 - Molds for implant material or prostheses*
- Teaching and simulation laboratories
- Patient Education and Enhanced Informed Consent
* May be regulated and/or require institutional approval
Numerous published case studies and ongoing efforts have demonstrated the potential of 3D printing in clinical settings. Public use cases include preoperative planning3, intraoperative use4, patient-centric instrument kits5, customized implants6, bone cement molds or polymethyl methacrylate (PMMA) implants8, prostheses9and trays
These use cases have demonstrated success in a variety of fields and surgical specialties, including orthopedic, cardiac, oral and maxillofacial (OMFS), vascular, neurological, cardiothoracic, musculoskeletal, plastic and reconstructive surgery, oncology, pediatrics, interventional radiology, etc.
“While I would like to think that my brain can reconstruct a 3D interpretation from a 2D CT scan, I was surprised by the relative inaccuracy of the approach I have used for 20 years. 3D models are invaluable in planning, especially when using the daVinci robot.”
Dr. Ronald Hrebinko
Urologist and Associate Professor of Urology
University of Pittsburgh School of Medicine
3D printed models can also provide significant learning benefits for residents, fellows and students10. Individual models are particularly attractive when compared to the cost of cadaveric specimens and animal testing and the associated requirements for laboratory space, surgical instruments, and disposal
5 leading medical disciplines on the use of 3D printing technology
Chepelev et al.
Image obtained from http://www.materialise.com/en/blog/3d-printing-us-hospitals
Explore our collection of research publications, to learn more about how Formlabs printers and supplies are being used in healthcare.
The widespread use of advanced imaging in radiology has become a key factor in diagnosis and communication between physicians. While these visualizations have traditionally been used in the 2D plane as CT or MRI scans as DICOM files, software developers have recently created tools to reconstruct diagnostic images as 3D anatomical imaging.
3D printed models are a natural extension of these various 3D rendering options and offer many additional benefits such as tactile feedback and other tangible information that visualizations cannot provide.
When a patient's severe foot deformity could not be fully represented with 2D images, surgeons used a 3D printed model to plan how to correct gait with preoperative equipment and work with clinical staff and receptionists.
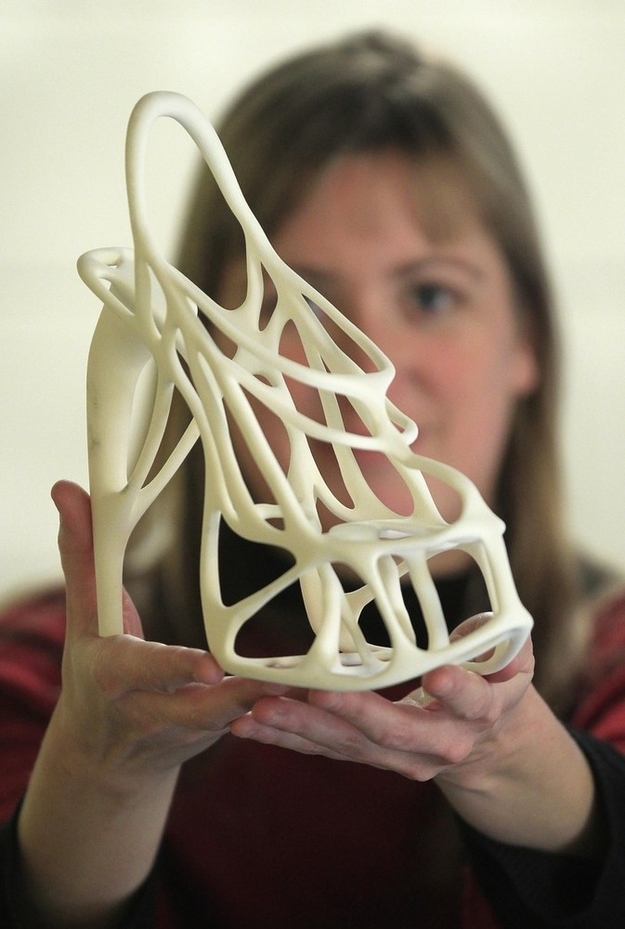
For example, research on a custom 3D printed model allowed a UK orthopedic surgeon to find a solution with a lower risk of abnormal injury to a boy's forearm
“Access to the model has changed standard CT-indicated therapy from a four-hour complex osteotomy to a simple, much less invasive 30-minute soft tissue procedure,” says Dr. Michael Eames
A successful operation was completed in just 30 minutes — reduction of more than three hours from the originally scheduled time in the operating room, saving the hospital an estimated $5,500. Subsequently, the patient spent less time on post-operative care and recovered more quickly
Workflows from scan to 3D model
Creating 3D printed files and 3D printed models requires special considerations and minor changes in the medical imaging workflow
The tailored workflow can be divided into three steps: image acquisition, image segmentation and 3D printing
IMAGE ACQUISITION
Image acquisition is the first step and is already integrated into the workflow. The most common imaging techniques suitable for 3D printing are CT and MRI. In general, 3D models can be printed from any volumetric image dataset (slices) with sufficient contrast to differentiate tissues.
Cone-beam CT is also widely used for dental and otolaryngological imaging of teeth, but contrast can be worse than conventional CT, making segmentation more difficult. See recommendations for setting up patient scans for 3D models in the second part of this booklet
IMAGE SEGMENTATION
The main goal of this step is to reduce the complexity of the original image while leaving the necessary characteristics unchanged and isolated. Once the radiographer has received the DICOM, they must perform Regions of Interest (ROI) processing, which will be rendered as a 3D printed object. The process of identifying and separating tissues and other areas of interest is called segmentation. Depending on the complexity of the model, it is performed by a radiologist-technician under the guidance of a radiologist or directly by a radiologist. Once the segmentation is completed, it is reviewed by the surgeon for final approval13
A number of commercial and open source software products can be used for the segmentation process (see the list at the end of this section). Before choosing a software solution, consider your intended use, regulatory requirements in your area, and recommendations at your institution.
ROI segmentation steps can include automatic methods (eg thresholding, edge detection and region enlargement) or manual selection and adjustments. Thresholding uses parameters that can be identified and associated with a particular ROI, such as bones with higher Hounsfield values relative to their surroundings.
Thresholds may need to be dynamic and include more sophisticated algorithms to account for factors such as CT noise and beam hardening that can create artifacts and other unwanted results.
Another option is to use the growth region to automate segmentation, where the algorithm assigns voxels as belonging to one part or another based on similarity or difference to surrounding voxels. This may require additional adjustments and clarifications.
After segmentation is complete, convert the segmented objects to a file type that can be used by the 3D printer. This file type is usually an STL or OBJ file format.
After conversion, make any necessary physical adjustments that are more common in 3D modeling, such as smoothing surfaces, filling holes, and fixing other minor features. These adjustments can be made by a specialist in various CAD or CAM programs and should always include review by a physician to ensure that the result is clinically useful.
Once the radiographer has received DICOM, they must determine the regions of interest (ROI) that will be displayed as a 3D printed object. Source: ITK-Snap
In-house 3D printing enables healthcare providers to rapidly create high resolution medical models.
3D PRINT
Once the final file is ready, it can be exported and sent to the 3D printer for production. There are several key factors to consider when choosing the right 3D printing technology, including: the cost of the printer, software, and materials; print speed, accuracy and resolution; ease of use and access to customer service; the type of printed materials, including biocompatibility and sterilization for certain uses.
After printing, parts should be rinsed with isopropyl alcohol (IPA) to remove excess resin and, depending on the material and application, post-cured in a curing chamber. All biocompatible resins require post-cure prior to use, while standard Formlabs resins such as White and Clear Resin increase post-cure strength and stability.
Learn more about print options
Visit our Software Support and Resources pages for more information on how to set up files for printing and learn more about specifications such as internal supports and minimum wall thickness
POTENTIAL FIELD 3D PRINTING SOFTWARE AND HARDWARE
Note: Each section requires only one kind of software that completes the workflow steps. This list is for ease of reference and research and does not constitute an endorsement of any particular software or vendor. If you require anatomical models without segmentation or printing in situ, specialized service providers offer conversion, segmentation and/or printing services for a fee (e.g. Anatomage, Armor Bionics, Axial3D and Materialize)
Check your local regulations and intended use before choosing a software solution.
Transform + Segmentation
| Materialise Mimics* | ITK-SNAP |
| 3D Slicer | 4DICOM |
| Axial3D | Seg3D |
| Osirix | Embodi3D (DICOM - STL conversion, no segmentation) |
| Ossa 3D | Vitrea Vital Images |
| Anatomage Medical Design Studio |
Pre-Editing + File Management, Smoothing & Identification
| Blender | Materialize 3matic | Autodesk Mesh Mixer |
Support Generation + Print Orientation
| Formlabs PreForm | Materialize e-Stage Note: Cardiac cases may require advanced removal of supports from within the valves (PreForm video tutorial) |
Printer
| Formlabs Form 2 or Form Cell system | Formlabs Fuse 1 |
Post-print
| Formlabs finishing kit | Form Wash and Form Cure |
Ultrasonic cleaner (e. g. GT Sonic) g. GT Sonic) | CUREBox CB-4051 |
* Formlabs and Materialize have partnered to offer a comprehensive package of services in the US, Europe and Japan. Mimics inPrint is a specialized software solution for creating accurate virtual anatomical models from medical images and preparing files for 3D printing. Integrated into Clinical Environments (PACS), Mimics inPrint includes predefined workflows with direct link to Formlabs 3D printers.
Patient Scan Setup for 3D Models
Some conventional medical imaging scans cannot be converted to high quality 3D models for clear and accurate anatomical structures. Plain radiographs (X-rays) and ultrasounds are not commonly used for 3D printing and these imaging techniques are not recommended.
The most commonly used imaging modalities for evaluating internal structures are computed tomography and MRI imaging. These rendering methods generate a DICOM file. DICOM is a standard for storing and transmitting medical images and can be thought of as a series of slices.
DICOM images cannot be edited in 3D design software or sent directly to a printer. To convert a DICOM file to a format suitable for 3D printing, such as an STL or OBJ file, separate software is required to calculate the surface area of interest. This surface will become a 3D model.
Almost any DICOM file with sufficiently fine detail (such as thin slices) can be converted to a format that supports 3D printing of the structure of interest.
The following articles may be helpful in preparing, printing and post-processing anatomy models:
Design models for print support
Design features and geometric recommendations
Post-curing printing
Post-processing basics
Criteria for creating a printable scan
The first consideration when converting a CT or MRI to a 3D model is what needs to be shown; bones, vessels, and whole organs are all modeled differently. A model with outdated structures not only detracts from the focus of the model, but it will also be harder to produce. Scanning at the right specifications makes it easy to create a 3D printable model. The main features are intravenous contrast and slice thickness.
For 3D models of bone structures, low contrast images are likely to be sufficient for accurate and detailed printing. Models containing solid organs, tumors, or vascular structures almost always require contrast magnification scans
Introductory contrast information
The CT brightness change allows the segmentation software to highlight different structures, allowing you to print an area or organ of interest. Some structures, such as bones, are inherently bright on CT scans. This makes it easier to 3D print when started from a non-contrast CT. However, intravenous
(IV) contrast is needed when you want to 3D print a blood vessel, tumor, or most organs. A contrast agent is injected into the patient just before the scan.![]() With IV contrast, blood vessels (arteries and veins) and solid organs (such as the liver, kidneys, spleen, heart, and brain) become brighter when scanned, allowing the segmentation software to accurately separate them from surrounding tissues. See images below for a comparison of non-contrast and contrast-enhanced CT scans of the abdomen.
With IV contrast, blood vessels (arteries and veins) and solid organs (such as the liver, kidneys, spleen, heart, and brain) become brighter when scanned, allowing the segmentation software to accurately separate them from surrounding tissues. See images below for a comparison of non-contrast and contrast-enhanced CT scans of the abdomen.
The effect of intravenous contrast is shown with two axial (transverse) CT scans of the upper abdomen. On a right scan, the aorta is enhanced, whereas on a left scan, the aorta appears very similar to the adjacent soft tissue. The contrast allows you to isolate the desired structures in post-processing. Source: Embodi 3D
In addition to enhancing contrast, slice thickness and resolution are equally important for planning when creating a 3D model. Most clinically useful scans were obtained at adequate resolution for 3D printing. However, if you try to 3D print an anatomical model while scanning with thick sections, your
model will have a rough surface. According to numerous sources, when creating a model for 3D printing, it is very important to use scans with slices less than 1.25 mm.
Two CT scans of the chest. The image on the left shows a frontal view constructed from 5 mm thick slices, while the high resolution scan shows a similar view of the chest using only 1 mm thick slices. Thick slices in the left image create rough textures that will result in a lower quality print. Source: Embodi 3D
The thickness of sections obtained from CT or MRI scans are converted directly into details generated from 3D scans. Depending on the focus object, areas of the image should be reconstructed with isotropic voxels of 1.25 mm or less15. According to a Mayo Clinic presentation in March 2016, 1 to 5 mm slices can be used for large structures, while 0.75 mm can be used for thin bone16. Thicker regions may degrade model accuracy, while very thin regions (e.g. <0.25 mm) may require extensive segmentation and STL enhancement, especially in the presence of image artifact. Cardiac models show sufficient accuracy with 0.5 mm patches, but thinner targets may be required for thin objects such as the inferior wall of the orbit17. Generally, thicker areas can create fuzzy or less accurate prints. However, unnecessarily thin areas can lead to significantly more work in the post-processing step.
Regulatory Issues
Please check local regulations, material data, patient information, and institutional requirements before 3D printing or using anatomical models. If you work in the US, please refer to the latest FDA presentation which outlines its guidance document18 Please note that these documents and recommendations are subject to change. Make sure you are using the latest guidelines.
Formlabs is the industry's leading manufacturer of 3D printers and materials used by healthcare providers to support the practice of medicine
Conclusion
Barriers to the transition to personalized precision medicine are fast disappearing. The advent of affordable, professional-grade 3D printers has enabled healthcare providers to produce anatomy models for specific patients and specialties with inspiring results. In some cases, the initial cost of a high quality printer has been covered by the time saved in the operating room after the surgeon used the 3D printed model to prepare for one complex procedure.19
“Medicine is not a one-size-fits-all solution, and when a tool like desktop 3D printing comes along that allows you to create personalized medical solutions, there is no doubt that it needs to be used to its full potential.”
Todd Goldstein
Instructor, Institute for Medical Research. Feinstein Director, 3D Printing Lab, Northwell Ventures, Northwell Health
Understanding the workflow required to integrate 3D printing is key to success.
This tutorial covers everything you need to get started, popular workflows, and tools and techniques to ease the transition from patient scanning to 3D printing
Contact us to learn more about 3D printing in Your institution and join the community of innovators in precision medicine
LINKS
- Chepelev, Leonid, Andreas Giannopoulos, Anji Tan, Dimitrios Mitsouras, and Frank J.
 Rybicki Medical 3D Printing: Terminology Standardization Techniques and Report Trends 3D- printing in medicine 3, no. 1 (2017) doi:101186/s41205-017-0012-5
 - Mitsworth, Dimitris, Peter Lacouras, Amir Imanzade, Andreas A Giannopoulos, Tianrun Kai, Kanako K. Kumamaru, Elizabeth George, et al. "3D Medical Printing for the Radiologist" RadioGraphics 35, no. 7 (November 2015): 1965–88 https ://doi.org/101148/rg2015140320
- Kerr, William, Philip Rowe, and Steven Gareth Pierce "Accurate 3D Bone Reconstruction Using Ultrasonic Synthetic Aperture Techniques for Robotic Knee Arthroplasty" Computerized Medical Imaging and Graphics 58 (June 2017): 23–32 https://doi org/101016/j compmedimag 201703 002
- Chen, Xing, Jesse K Possel, Katherine Waconne, Ann F van Ham, P. Christian Klink, and Peter R. Roelfsema "3D printing and modeling of customized implants and surgical guides for lower primates" Journal of Neuroscience Methods 286 (July 2017 ): 38–55 https://doi org/101016/jjneumeth 201705 013
- Wong, K.
 S., S.M. Kumta, N. V. Geel and J. Demol "One-stage reconstruction with a 3D printed, biomechanically assessed custom implant after complex resection of pelvic tumors" Computer Surgery 20, no. 1 (January 2, 2015): 14–23 https:// doi org/10 3109/1092908820151076039
 - Tan, Eddie T.W., Ji Ming Lin, and Shri Kumar Dinesh “Creating Acrylic Patient Cranioplasty Implants with an Inexpensive 3D Printer” Journal of Neurosurgery 124, no. 5 (May 2016): 1531–37 https://doi org/10 3171/2015 5 jns15119
- Tan, Eddie T.W., Ji Ming Lin, and Shri Kumar Dinesh “Creating Acrylic Patient Cranioplasty Implants with an Inexpensive 3D Printer” Journal of Neurosurgery 124, no. 5 (May 2016): 1531–37 https://doi org/10 3171/2015 5 jns15119
- Abdel Hei, Joe, Tarek Smyra, and Ronald Moussa "Customized Implants with Polymethylmethacrylate Cranioplasty Using 3D Polylactic Acid Printing Plates: Technical Note with 2 Illustrative Examples" World Neurosurgery 105 (September 2017): 971–979 e1 https http://doi.
 org/101016/j wneu 201705 00
 - Keith, Jelleten, Gerwyn Smith, and Paul Bredveld, 3D Printed Upper Limb Prosthesis: A Review of Disability and Rehabilitation: Rehabilitation Techniques 12, no. 3 (February 2, 2017): 300–314 https://doi org/ 101080/1748310720161253117
- Azer, Sami A. and Sara Azer “3D Anatomical Models and Impact on Learning: A Review of Quality in the Literature” Health Professions Education 2, no. 2 (December 2016): 80–98 https://doi org/101016 /j hpe 2016 05 002
- Planning with a Custom Surgical Model Reduces OR Time by 88 Percent Formlabs Accessed November 22, 2017 https://formlabs com/preoperative-planning-with-custom-3d-printed-surgical-model-reduces-theater-time/
- Christensen, Andy "Medical Imaging Software" 3D printing | Wohlers Associates Accessed November 22, 2017 http://www.wohlersassociates com/
- Matsumoto, Jane S., Jonathan M. Morris, Thomas Foley, Eric E. Williamson, Shuai Leng, Ciarán P McGay, Joel L. Kuhlmann, Linda E.
 Nesberg, and Terry J. Vrtiska 3D Physical Modeling: Applications and Experiences in Mayo Clinic RadioGraphics 35, No. 7 (2015): 1989-2006 doi:101148/rg 2015140260
 - Kikinis R, Pieper SD, Vosburg K (2014) 3D Slicer: a platform for subject image analysis, visualization and clinical support. Intraoperative image processing. Imaging Therapy, Ferenc A. Jolez, Editor 3 (19): 277-289 ISBN : 978-1-4614-7656-6 (Print) 978-1-4614-7657-3 (Online) https://www slicerorg/wiki/ CitingSlicer
- Mitsworth, Dimitris, Peter Lacouras, Amir Imanzade, Andreas A Giannopoulos, Tianrun Kai, Kanako K. Kumamaru, Elizabeth George, et al. "3D Medical Printing for the Radiologist" RadioGraphics 35, no. 7 (November 2015): 1965–88 https ://doi.org/101148/rg2015140320
- TJ Vrtiska, MD, Jane Matsumoto, MD, Jay Morris, MD, Imaging: The Role of the Radiologist. A Key First Step” Mayo Clinic (March 4, 2016)
- Mitsworth, Dimitris, Peter Lacouras, Amir Imanzade, Andreas A Giannopoulos, Tianrun Kai, Kanako K.
 Kumamaru, Elizabeth George, et al. "3D Medical Printing for the Radiologist" RadioGraphics 35, no. 7 (November 2015): 1965–88 https ://doi.org/101148/rg2015140320
 - Nooshin Kiarashi, Ph.D., FDA/CDRH/Department of Radiological Medicine, "FDA Current Practice and Regulations, FDA/CDRH-RSNA SIG Joint Meeting on Custom 3D Printed Anatomical Models", excerpted from https://www fda gov/ downloads/MedicalDevices/NewsEvents/WorkshopsConferences/ UCM575723 pdf
- Preoperative-planning-with-custom-3d-printed-surgical-model-reduces-theater-time by 88 percent Formlabs Accessed November 22, 2017
ADDITIONAL RESOURCES AND LINKS
1531–37 https://doi org/10 3171/2015 5 jns15119 Kikinis R., Pieper S. D., Vosburg K. (2014) 3D Slicer: a platform for object-based image analysis , imaging and clinical support. Intraoperative image processing. Imaging Therapy, Ferenc A. Jolez, Editor 3 (19): 277-289 ISBN : 978-1-4614-7656-6 (Print) 978-1-4614-7657-3 (Online)
Rybicki F. Christensen, A. (05/12/2017) Recommendations for Medical 3D print: Patient safety. Retrieved Nov 03, 2017 from https://www 3printrcom/ guidelines-medical-3d-printing-patient- safety-3345869/ (n d ) http://www conceptualiz com/resources html
Biomedical Modeling, Inc Materials (16.10 .2013) Biomodeling process: From 2D to 3D https://www slideshare net/Biomedical_Modeling_Inc/the- biomodeling-process-from-2d-to-3d-27259255
Choosing the Best Medical Imaging Scan for 3D Printed Medical Models (December 27, 2016) https://www embodi3d com/blogs/entry/183-choosing-the-best-medical-imaging-scan-to- create-a-3d-printed-medical-model/
Documentation/4 6/Training (n d ) https://www slicerorg/wiki/ Documentation/4.6/Training
Top recommendations for medical 3D printing: Patient safety — first task (n d ) http://wwwmaterialise com/en/blog/patient-safety-3D-printing
G , & I (10/20/2017) How to convert medical scan data into a 3D printable model (also, Dinosaurs!) http://www instructables com/id/How-to- convert-medical-scan-data- into-a-3D-printab/
How to add supports for 3D models (April 20, 2016) https://www youtube com/watch?v=84EXccjijtM
Tutorial: Preparing data for 3D printing using 3D Slicer (01/08/2014) https://wwwyoutube.