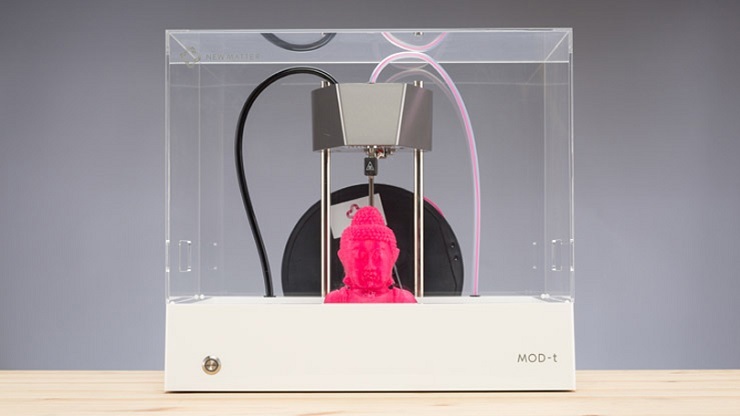
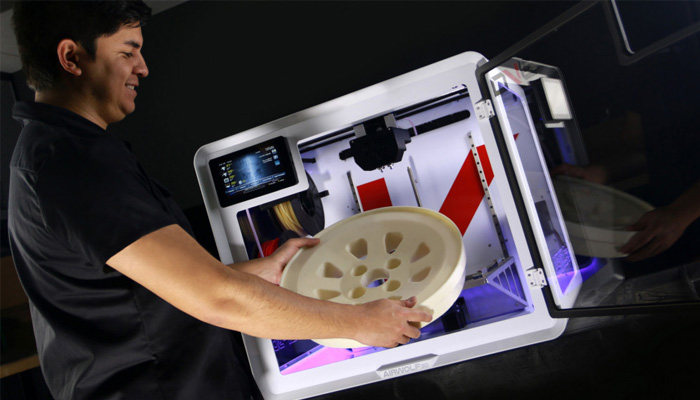
As more entry-level 3D printers geared towards the novice flood the market, it can be troublesome to differentiate the good from the bad. Among these is the NewMatter MOD-t 3D printer, a marvel of minimalist design touted as one the most user-friendly printers on the market today.
In the wake of the blistering success of its crowdfunding run on Indiegogo, which raised over $650,000, NewMatter brought the MOD-t to market in 2016. Does it stand up to the lofty promises of its designers, notably unmatched ease of use and simplicity, all for less than $400-$500?
Table of ContentsShow
Design
The MOD-t oozes elegant simplicity, from the removable clear glass panels to the streamlined Apple-inspired forms of the encased extruder shell. NewMatter employed the design prowess of technology design studio Frog Design to conjure up the sharp, clean, and sleek white look, and it shows. The MOD-t is easy of the eye, rivaling the look of pricier models such as the Ultimaker 2 +.
The most amusing aspect of this focus on design is that it carries over to functionality as we found out when assembling and setting up. NewMatter has intentionally gone out of its way to make the MOD-t as friendly and functional as possible. Simplicity is such a core tenet of the design that the MOD-t doesn’t have a control panel or LCD. The only interactive element is a backlit button on the bottom left of the unit used to trigger, pause, or stop prints.
The build area is a modest 150mm x 100mm x 125mm that, considering we are looking at a pre-assembled unit for less than $500, is reasonable and more than suitable for first-timers to cut their teeth with small print projects.
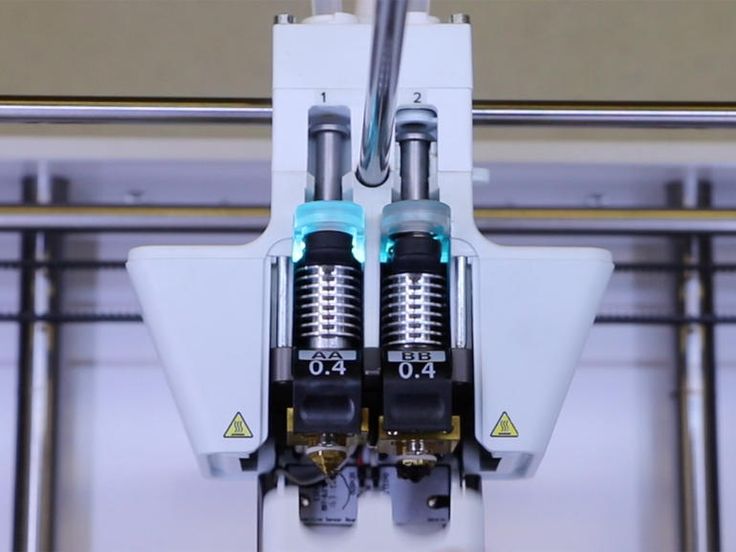
The layer resolution options are surprisingly varied for such a small unit, with the ability to trigger faster prints at 0. 4mm (400 microns), down to a reasonably accurate 0.05mm (50 microns) on the slowest speed setting. The MOD-t boasts a max speed of 80 mm per second.
The nozzle is a fairly standard 0.4 mm hot end that accepts the common 1.75 mm filament. Material wise, the MOD-t only supports PLA, but at this price point, we can’t argue with this lack of versatility. NewMatter does, however, get points for not marketing the printer as compatible with other materials, only for users to find out this isn’t the case – a practice that unfortunately plagues kit printers in this price range.
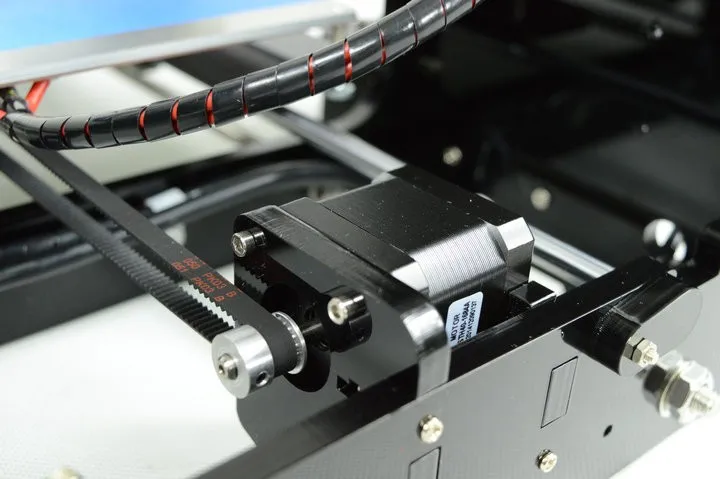
The MOD-t internal workings diverge from the standardized Cartesian fused filament fabrication build and incorporate a rather novel axis control system. Doing away with the tried and trusted multiple motor/belt setup to move the extruder and build plate on the three axes, NewMatter has perfected a set of servomechanisms that run two horizontal and perpendicular geared pinion rods.
The build plate sits on the pinions via grooves or teeth that lie underneath and catch the gears. The build plate isn’t held in place and instead lays on top of the pinions. As the gears and teeth interact, the build plate is latched and moves on the Y and X axes. The Z-axis is assured by two vertical perpendicular pinions holding the extruder that act in the same way.
The pinion design isn’t so much to reinvent the 3D printing wheel, but rather to cut costs due to the inherent need for fewer, and less complicated elements. A much simpler design lowers production costs and allows NewMatter to ship the MOD-t at such a competitive price point.
The build plate is sadly not heated but is equipped with a removable flexible plastic surface plate to aid stability and the removal of prints by bending the plastic to ease them off.
Where the allure of the MOD-t trails off is connectivity, not so much in the sense of the options (standard USB or Wi-Fi), but the constriction of having to be online to ready and launch a print job, because the MOD-t works with NewMatter’s proprietary browser-based printing app.
In itself, the idea is excellent. It means anyone – using any OS – can dive in and start printing without any problems. Mac or Linux? No problem. The app then safeguards a library of prints either downloaded or purchased from the NewMatter website or uploaded by the user, triggered for printing in just a few short steps.
The app is intuitive and sticks to a format we’re all used to thanks to the pervasiveness of smartphone and apps. Hobbyist lingo or technical considerations won’t dumbfound novices nor will the simple interface of the app.
As mentioned above the app is ideal for beginners and allows a certain amount of limited flexibility for those wanting to venture a little deeper into the specifics of 3D printing. From the app, you can tweak the layer resolution, resize the print object, upload and share print files. But anything more, and the app falls short.
To cater for this, NewMatter also provides the Printer Tool desktop software where the user can upload a . gcode file and apply all manner of parameters such as adding or removing supports, tweaking the extrusion speed and a selection of other custom settings.
Assembly
From unboxing to launching that first test print, NewMatter has once again aimed for simplicity. The MOD-t ships well-packaged and adheres to the efficient and straightforward ethos down to the accessory boxes placed in a modular fashion to protect the printer.
As for what’s in the box, the MOD-t is a veritable treasure chest of accessories: printer, wire brush, scraper, clippers, USB cord, kettle lead, filament spool holder, filament spool, PSU, and build plate.
From here, all that needs assembling is the build tray, which involves placing the surface plate onto the build plate and sliding it into place. It couldn’t be easier. The next step is loading the filament into the printer via either the MOD-t browser or MOD-t Printer Tool desktop software (you’ll need to connect your PC via USB to establish a Wi-Fi connection, but from there onward you can use the printer wirelessly). Attach the spool holder to the back of the printer, pop on the filament and feed it into the device.
From here, we had to feed the filament until it popped out of the other end of the spoil tube. Initiate the feeding process of the app, which heats the hot end, then load the filament into the hole at the top of the extruder carriage.
The above steps are easy enough that, with the helping hand of NewMatter’s succinct introduction guide of the browser app, are within the means of even the most unversed newbie. The build plate is also self-calibrated by the printer, so no user-led calibration process to tackle.
Printing
Overall, the MOD-t produces quality prints if you stick to the curated selection from the NewMatter app. We were hard pressed to find much wrong with the results. The mistakes are minimal, and the printing process is slow, but not unbearable. Thanks to the glass casing, the noise is relatively low for a printer of this caliber.
From loading up a print via the app to launching it with a simple touch of the button on the device, by way of bending the flexible surface plate to remove a finished print, the process was easy and intuitive.
Where the print quality starts to tread shaky ground is when more detail is required, or put otherwise when you opt for print jobs that aren’t part of the NewMatter store. Most of our tests with outside prints ended up with mild to severe imperfections, and in a few cases in that all too familiar mess of scrawled filament.
The root of the problem is the build plate, which as we mentioned above isn’t attached or clipped into the pinions. Instead, the natural friction of the gears is what keeps it in place; the natural vibrations of the printing process shift the plate in small increments.
Support
NewMatter offers a rich library of support articles and video walkthroughs covering setup to navigating the browser app. It’s cheery and unassuming, perfect for a daunted beginner.
Beyond this, there’s no support whatsoever as NewMatter shut down in early 2018 taking the web app, crucial to the MOD-t’s functionality with it.
Users can still make use of the MOD-t Printer Tool desktop software and upload . gcode files made with third-party software to generate prints, but that’s it.
Verdict
For someone who wants to explore and discover the world of 3D printing, the MOD-t is great. The price tag is reasonable, the curated library designs varied enough to keep interest, and the ease of use is unmatched.
However, the MOD-t suffers from its own simplicity especially in the wake of the company shutting its doors. The core idea of using the web app to initiate, manage, and shop for print designs mean the MOD-t is all but redundant for first-timers.
The MOD-t has, therefore, only become a viable option as a unit for seasoned makers who know how to create .gcode files and who want a well-designed entry-level printer. Beginners will struggle too much with the MOD-t without the helping hand of NewMatter to guide them.
Tips & Tricks | New Matter's MOD-t (Updated 4/21/2020) – Blog
Update: April 21, 2020:
The MOD-t 3D printer is no longer manufactured and its parent company, New Matter, no longer offers support for troubleshooting, hardware, or software issues. The steps laid out in this blog post – while previously accurate – are no longer viable. We recommend the LulzBot 3D printers, MakerBot 3D printers, Glowforge 3D laser printers, and also some other alternatives for the classroom or makerspace curriculum.
Unfortunately, the MOD-t 3D printer is no longer made but, with Cura, it’s possible to keep using it.
1. Do not update the Cura software once it has been downloaded. 2. Version 15.04.6 of Cura is slightly older, but this version works best with the MOD-t. 3. Within your downloaded Cura software, you can connect your printer. 4. By providing the custom information of your 3D printer, printing will become possible. 5. Students can drag .STL or 3D design files and print on the MOD-t with Cura.
The way students or makers can continue using a MOD-t printer involves downloading a special software called Cura. In order to use the Cura Software on your computer and get it to work with the MOD-t, students can simply download version 15.04.6 of Cura software from June 7, 2016. DO NOT update the software after downloading it. This version works best with the MOD-t and newer versions will not work as smoothly. Instructions for doing this simply are also below.
Click and download version 15.04.6 of Cura from the link above (highlighted in the above image). Install the software using the instructions that come up on your screen. DO NOT UPDATE the software for any reason. Upon install or startup of the Cura software, you will also see the window pictured below, which prompts you to update your Cura software – always click “No.”
Once Cura is installed and you are able to open the software, you will see a menu on the left side of the window that looks like the image below. Go to the top left-hand corner and select “Machine,” then “Add new Machine” in the drop-down menu.
Once you click “Add new Machine,” you should see a window pop up that looks like the window below.
Click “Next” and you will then see a screen with several printer options. Select “other” as shown below.
After Selecting “Other,” click “Next” on the “Select Your Machine” screen and you should then be brought to the next screen pictured below
On the “Other Machine Information” screen, select “custom” and click “Next.”
Basically, after Selecting Next on the screen above, you'll see the custom configuration screen pictured below. In the screen below, enter and select the following values as pictured:
Name: Choose Name
Y: 150
X: 100
Z: 125
Nozzle: 0.4
Bed Center: 0,0,0
*Enter all values in the fields reflected in image below.
Next, click “finish” and now you have completed the first main step of matching the Cura Software Printing bed to the mod-T print bed size. Then, you must go to File, “open profile,” and select the “Cura profile.” You can download the Cura profile from the link listed below and saved to your desktop.
Once the profile has been saved to your desktop, you will be able to open it by selecting “Open profile” and selecting “Mod T profile” from your computer hard drive. (The default name is “MOD-t_NM Cura Profile 151020. Ini””).
Once you have selected and opened the profile, you are ready to start!
Creating a Cura Profile:
Navigate to the GitHub page.
Download the text from this site into a text or .INI document.
After Configuration
Once you configure your MOD-t printer and Cura, you will be able to begin printing and designing with Cura. You will be able to drag. STL or 3D design files into the Cura window and begin to work on them! After you are done with your file design, you can save the file as a G-code and print it using the New Matter Software on your desktop computer via the Wi-Fi or wired connection.
Once the G-code file saves from Cura on your computer: Open New Matter Printer Utility. Then, go to settings in the New Matter window. Select “Advanced Mode” and Click “Print file." After clicking “Print file,” select the saved G-code document you would like to print, then follow the on-screen instructions and wait for the printer to load the file!
We certainly hope this was helpful and appreciate you checking out this variation to our Tips & Tricks series. Also, be sure to check back next week as our Eduporium Experiment series resumes with a look at the Monk Makes Rover!
NEW MATTER MOD-t 3D Printer User Manual
NEW MATTER MOD-t 3D Printer User Manual
INTRODUCTION
Congratulations on your purchase of your new MOD-tTM 3D printer! We are excited to welcome you to the New Matter community and help guide you on your 3D printing journey. To start printing, go to www.newmatter. com/setup where you will complete the setup process. For questions or comments: Web: support.newmatter.com Phone: (866) 949-8722 Email: [email protected] Social media: @newmatterhelp We look forward to hearing from you!
IMPORTANT INFORMATION ABOUT YOUR MOD-T
You should visit www.newmatter.com/setup after re-viewing this manual for your MOD-t.
Your main portal for controlling MOD-t via Wi-Fi: store.newmatter.com.
Always print with a clear cover for best results and for your safety. nine0022
Always start printing with a clean print tray properly mounted on the X and Y axis gear arms.
Log in to store.newmatter.com to explore our curated library of 3D designs.
All information provided in this manual can be found on the Internet at www.newmatter.com/setup.
Technical support is always ready to help. Visit support.newmatter.com or see the following page for more information. nine0022
NEW SUBSTANCE ECOSYSTEM
Your MOD-t 3D Printer Once you have everything set up, MOD-t will be able to print designs from our store via Wi-Fi.
New Materia Shop New Materia Shop is a portal to your MOD-t. Here you can shop online or print your own. files over Wi-Fi.
MOD-t Utility MOD-t Utility configures Wi-Fi settings and updates printer firmware via USB. The app also supports MOD-t offline control, including filament loading/unloading and G-code printing. file are prepared using properly configured third party applications. nine0013
NEW MATERIAL STORE
3D Design Marketplace Browse our catalog and download designs that are great for home, school or office.
Your print queue and control panel Once logged into your New Matter account, manage your 3D print jobs and track activity on your MOD-t.
New Materia Store Stock up on consumables and accessories to keep doing great things! nine0013 New Matter Support Get help with your MOD-t and learn more about 3D printing.
WHAT'S IN THE BOX?
After unpacking the MOD-t, make sure you have all the accessories. Then, using a Mac OSX (10.7+) or Windows (7+) computer, navigate to www.newmatter.com/setup where you will complete the installation process.
MOD-t primary interface. Requires Wi-Fi and supports desktop and mobile browsers including Chrome, Firefox, and Safari. Uses WebGL for rendering. Microsoft Internet Explorer and Edge browsers are not currently supported.
MOD-t Utility
Configures MOD-t wireless network settings and updates printer firmware via USB. Additionally provides a standalone interface to MOD-t. Supports G-code printing file prepared using properly configured third party applications. nine0021 Multifunctional button
Food tourniquet
Direct pipe for thread
gears of the axis X and Y
Assembly of
Carrket
Hot end / extruder Extruder 9000 9000 mod-T.
Filament input port
USB port
Power port
Spool holder inserts
Z axis gear
Z axis drive screw
Z axis guide rods
PREPARE MOD-T
CREATE A TRAY ASSEMBLY See newmatter.com/setup for detailed and visual instructions
Assemble the build tray base and print surface plate.
Align the tabs on the surface plate with the slots in the metal plate on the base of the collection tray.
Press down the print surface plate with both hands and slide the tabs into place.
Place the assembly tray in the MOD-t so that its teeth engage the gears. The easiest way to correctly place the collection tray is to align it with the inner side wall. MOD-t will automatically find and center the build tray at the start of a print job. nine0013 WARNING: Do not force the print tray or apply excessive force to the gear rods.
LOADING FILAM See newmatter.com/setup for detailed and visual instructions Click the Load Filament or Unload Filament button on the Print Queue Control Panel in the New Matter Store or the MOD-t Utility app. This will prepare the MOD-t for loading or unloading the thread and will guide you through the entire process.
Thread load
Start by removing the thread guide tube from the top of the carriage.
Pass the thread through the thread inlet on the back of the MOD-t.
Push the thread through the guide tube until it protrudes from the end of the guide tube about 2 or 3 inches.
Start the filament loading process through the spool control panel on the New Matter Store or the MOD-t Utility app and wait for the Hot End MOD-t to reach the appropriate temperature. nine0022
When prompted, insert the filament into the extruder by hand until the MOD-t slowly pulls the filament in on its own. Note: This process may require you to force the filament into the extruder inlet.
Once the printer pulls in the filament, press the filament guide tube firmly against the extruder inlet and make sure it is completely sealed.
When the filament begins to extrude from the hot end, press the button on the front panel to stop extrusion. Be sure to remove excess filament with the supplied wire brush. Never remove the filament directly from the hot end by hand. nine0022
UNLOADING THE FILING See newmatter. com/setup for detailed and visual instructions
Start by removing the transparent thread guide tube from the top of the carriage. The filament will remain in the car.
Initiate the filament unloading process from the spooler control panel in the New Matter store or the MOD-t Utility app. Once the hot end of the MOD-t reaches the appropriate temperature, the MOD-t will start unloading. You will be prompted to delete the thread after the upload is complete. Don't try to delete the thread manually while MOD-t is unloading. nine0022
Cut the thread so you have a clean cut for the next load.
PREPARING THE TRAY FOR PRINTING THE DESIGN See newmatter.com/setup for detailed and visual instructions.
Wipe the print surface plate to remove dirt and/or oil. Be sure to use microfiber towels or non-abrasive wipes and non-oil based cleaners. nine0022
If the build tray is not yet assembled, attach the print surface plate to the base of the build tray.
Place the assembly tray in the MOD-t so that its teeth mesh with the pinion pins. An easy way to properly position the build tray is to align it with one of the 4 edges of the print bay where the build tray is located. MOD-t will automatically find and center the build tray at the start of a print job. WARNING: Do not force the print tray or apply excessive force to the gear rods. nine0022
USING THE MOD-t 3D PRINTER
PRINTING A DESIGN FROM THE NEW MATERIAL STORE See newmatter.com/setup for detailed and visual instructions
Go to store.newmatter.com. and sign in to your New Matter account. Click the Design tab to start browsing.
Choose a design.
a. Free designs. i. Click Print Now (or Add to Library to print later). II. Select your MOD-t from the drop down list. nine0013 iii. Click Print.
b. Design to buy. i. Click Buy This Design. II. If you haven't already done so, enter your billing information. iii. Click "Confirm Purchase" iv. Click Print.
Monitor your progress from the print queue or continue shopping. Sheet music:
Some designs have several parts. Choose which part to print first.
Click 9 to access print settings0013 The print quality settings are Good, Best, and Best. Print with or without stands by selecting the On switch. / Off
If you have multiple mods associated with your account, you will select who to send the print job to using the drop-down menu.
If your MOD-t is disabled or printing another job, you can add designs to your print queue later.
PRINT DESIGN FROM EXTERNAL SOURCE See newmatter.com/setup for detailed and visual instructions.
To your Library.
Press "Download" button.
Press "Select File". Select the .STL or .OBJ file you want to print.
Rotate and scale if desired.
Click "Next." Choose a name, description and tags (optional) for your design. Press "Save."
Find it in your Library and select it. Press "Print now".
START PRINTING See newmatter.com/setup for detailed and visual instructions.
After pressing the Print Now button, the LED on the button on the front panel will flash rapidly. After making sure that the clean assembly tray is in place and the transparent cover is closed, press the button on the front panel. nine0022
As soon as the string file appears, transfer completed, MOD-t will start calibrating and printing.
PAUSE / CANCEL PRINTING See newmatter.com/setup for detailed and visual instructions
Go to the print queue in the New Materials Store. The design currently being printed is at the top of the print queue.
To pause printing, click or firmly press the button on the front panel. This option will temporarily stop the current printing and allow the user to continue when it is ready. Filament can be loaded and unloaded while printing is paused. Press to resume printing. nine0022
After pausing printing, cancel the job by pressing or holding the button on the front panel for 10 seconds. Any of these options will interrupt the current print job.
REMOVING THE PRINTED DESIGN FROM MOD-t See newmatter.com/setup for detailed and visual instructions
Remove the assembly tray from the MOD-t.
Remove the print surface plate from the base of the build tray.
Bend the print surface plate to release the design. nine0022
Remove supports from the print, if any. Enjoy your new printed design.
a. Please note that thin, flat structures are more difficult to remove and may require a scraper. Bending works for thicker prints.
b. The scraper comes with an orange plastic blade. We recommend using a metal razor for best results. As with any sharp object, handle it with care and keep it out of the reach of children. nine0022
MOD-t MAINTENANCE
PRINT SURFACE MAINTENANCE The print surface plate is a consumable part of your MOD-t and can be easily replaced if necessary. For best results, always start your print job with a clean print surface. Keeping the printing surface plate clean and free of oils is important for print adhesion. It is recommended to clean the printable surface every 3-5 builds with a residue-free cleaner based on citrus and oils. To remove the print shadow left by your previous builds, use the wire brush (included with your MOD-t) to gently sand the surface. Be sure to clean the print surface plate after brushing to remove debris. We recommend that you periodically replace the printable surface plate when the builds no longer adhere properly to the surface. nine0013 UPDATING THE LATEST FIRMWARE See support.newmatter.com for detailed and visual instructions The New Matter store will tell you when it's time to update your MOD-t firmware. Connect the USB to the MOD-t and run the MOD-t Utility to update, following its prompts to complete the process.
CLEANING THE MOD-t ACRYLIC COVER DO NOT Use window cleaners with ammonia (such as WindexTM or 409TM), gasoline, denatured alcohol, carbon tetrachloride or acetone. These chemicals will damage the acrylic. Instead, use a mild solution of soap or detergent and water. Instead of paper towels, it is also recommended to use a lint-free cotton or microfiber cloth, which may cause minor scratches on the cover. nine0005
COMPLIANCE AND SAFETY WARNINGS
COMPLIANCE FCC This equipment has been tested and found to comply with the limits for a Class B digital device, pursuant to Part 15 of the FCC Rules. These limits are designed to provide reasonable protection against harmful interference in a residential installation. This equipment generates, uses and can radiate radio frequency energy and, if not installed and used in accordance with the instructions, may cause harmful interference to radio communications. However, there is no guarantee that interference will not occur in a particular installation. If this equipment does cause harmful interference to radio or television reception, which can be determined by turning the equipment off and on, the user is encouraged to try to correct the interference by one or more of the following measures:
Reorient or relocate the receiving antenna.
Increase the distance between the equipment and the receiver.
Connect the equipment into an outlet on a circuit different from that to which the receiver is connected. · Consult the dealer or an experienced radio/TV technician for help.
SAFETY PRECAUTIONS
WARNING! HOT SURFACE WITHIN THIS SYMBOL, IEC 60417-5041 The MOD-t 3D printer heats the nozzle to high temperatures during operation. Do not touch the Hot End nozzle and make sure the clear cover is in place while printing. Allow the MOD-t to cool for a few minutes before removing the finished printed object. nine0013 RISK OF ELECTRIC SHOCK Use the power adapter and AC cord supplied with the MOD-t 3D printer. Use of other power adapters may damage the MOD-t and present a risk of fire. FIRE HAZARD DO NOT place flammable materials or flammable liquids near the MOD-t when it is on or while the MOD-t is printing. ADULTS SUPERVISION REQUIRED Small MOD-t equipment or printed parts may pose a choking hazard to children. For users under the age of 18, adult supervision is highly recommended. nine0005
USER AGREEMENT
DISCLAIMER Before using the MOD-t 3D Printer, you agree to read the MOD-t User Manual, which contains (a) Compliance Notice, (b) Safety Warnings, (c) Warranty Terms, Policy repair/return and (d) instructions for using MOD-t to provide an understanding of the scope of MOD-t operations. As such, New Matter is not responsible for any injury that may result from the use of MOD-t. In addition, New Matter shall not be liable for any damages, including, but not limited to, loss of expected profits, business, and opportunities due to product performance, repairs, and business interruptions. nine0013 WARRANTY TERMS This section defines the warranty replacement policy for New Matter products that are determined to be defective by a New Matter technical support representative during the 90-day warranty period. Similarly to a new one, a replacement will be shipped prior to receipt of the original defective device by the buyer if the terms of the New Matter warranty are met. Warranty replacement requests must be handled by New Matter Technical Support. In order to receive a replacement under warranty, the customer must allow the technical support representative to complete a complete diagnostic checklist. Once these conditions are met and the device is found to be defective, the technical support representative will initiate the process of returning new material. nine0013 WARRANTY TERMS
A warranty replacement will only be issued for a product determined to be defective by New Matter Technical Support during the 90-day warranty period.
Original invoice/order confirmation/serial number confirmation may be required to verify warranty status.
Technical Support will request a credit card number before sending any replacement device. If payment information is already stored by New Matter Store, we may use your previous payment information. Your card will not be charged until the defective block is returned to New Matter. nine0022
How a new block will be shipped before the original defective block is received. The failed unit will be properly packaged in a replacement unit's packaging and returned to New Matter.
If the failed unit is not returned to New Matter within 30 days, New Matter reserves the right to both deactivate the serial number of the failed MOD-t and charge the customer the form of payment received during the warranty process at the full retail price. MOD-T.
New Matter will pay all shipping costs associated with shipping the replacement unit and returning the defective unit. nine0022
It is the customer's responsibility to ensure that the defective device is packaged in accordance with the instructions. The customer is responsible for all damage caused by improperly packaged devices.
After receiving, inspecting, and testing the returned device, if it is found not to be covered under warranty replacement (e.g., physical damage, problems with the device not originally reported to technical support, misuse, etc.) amp, along with the device, etc. New Matter reserves the right to charge a form of payment received by technical support prior to the commencement of the warranty process to pay for shipping, repair, and/or retail cost of the new device.0022
WARRANTY INFORMATION
MOD-t 3D PRINTER LIMITED WARRANTY (NORTH AMERICA) New Matter, Inc. (“New Matter”) warrants this MOD-t 3D Printer (“Product”) to be free from manufacturing defects in materials and workmanship for a period of 90 days (“Warranty Period”) from the date of purchase by the original end user purchaser. If your Product is defective in materials or workmanship during the Warranty Period, New Matter, at its option, will repair or replace the Product as provided in this Statement of Limited Warranty (“Warranty”). Keep your original sales receipt to confirm the start of the warranty period. nine0013 When New Matter authorizes the exchange of the defective device, New Matter will send you a replacement Product, freight prepaid, with packaging to return the defective device(s). You are responsible for securely packaging the defective device using the packaging provided by New Matter and returning it within seven (7) days of receipt. New Matter requires credit card information for all warranty exchanges to secure your obligation to return a defective item. In the event that you fail to securely ship and return the defective device, you will be charged the retail price of the Product. New Matter can only ship replacement products to US and Canadian addresses (excluding Puerto Rico and US properties). nine0013 This warranty only applies to Products purchased and used only in North America and operated under normal conditions of installation and use. Use of this Product in continuous production or similar high-duty applications is not considered normal use and damage, maintenance or repairs resulting from such use are not covered by this Warranty. This warranty is non-transferable and does not apply to resold products. The warranty does not cover any damage or failure of the Product that New Matter believes is caused by any cause other than manufacturing defects in materials or workmanship, including but not limited to: (i) improper assembly, installation, operation or maintenance; (ii) use in an environment or for a purpose for which the Product was not designed; (iii) negligence, abuse, accident or other physical damage; (iv) unauthorized repairs or modifications; (v) use of any parts not provided by New Matter, or use with components not intended or recommended for use with the Product, including the use of threads outside of specification; (vi) wear, cosmetic damage or maintenance work; and (vii) all causes beyond the control of the New Matter, including power surges, fire, floods, wind, freezing, power outages, general corrosion, biological contamination, unusual atmospheric conditions, or other unforeseen causes. Warranty claims cannot be made if the serial number on the Product has been altered, removed or cannot be verified. nine0013 The term "Product" does not include attachments, software, media, applications, programs or non-branded parts and peripherals. Although not covered by this Warranty, suppliers or publishers may provide you with their own warranties. Refurbished or refurbished Products are not covered under warranty service. This warranty does not cover the cost of materials or services required for reprinting. No person or company is authorized to make any warranties other than those provided herein. nine0013 If New Matter cannot reproduce the claimed defect, you may be responsible for shipping and replacement costs. Any replacement product may be new or near new, provided that it has functionality at least equal to that of the product being replaced. Products may contain remanufactured parts, components or materials equivalent to new in performance. All returned Products and parts become the property of New Matter.
TO THE MAXIMUM EXTENT PERMITTED BY LAW, THIS LIMITED WARRANTY INDICATES YOUR SOLE AND EXCLUSIVE REMEDY WITH RESPECT TO THE PRODUCT AND IS IN LIEU OF ALL OTHER WARRANTIES, REPRESENTATIONS, OBLIGATIONS AND IMPLIED OTHER SUBLIMITS. NEW QUESTION DISCLAIMS ALL OTHER WARRANTIES, INCLUDING WITHOUT LIMITATION ANY IMPLIED WARRANTIES OR CONDITIONS OF QUALITY, MERCHANTABILITY, FITNESS FOR A PARTICULAR PURPOSE, OR NON-INFRINGEMENT. SOME LAWS DO NOT ALLOW THE EXCLUSION OF IMPLIED WARRANTIES. IF THESE LAWS APPLY, ALL EXPRESS AND IMPLIED WARRANTIES ARE LIMITED TO THE DURATION OF THE WARRANTY SET FORTH ABOVE. IN NO EVENT WILL New Matter BE LIABLE FOR ANY SPECIAL, INDIRECT, INCIDENTAL, PUNITIVE OR CONSEQUENTIAL DAMAGES, LOSS OR EXPENSES, INCLUDING LOSS PROFITS, LOSS SAVINGS OR OTHER ECONOMIC LOSS. In the case of failure of the above funds or in relation to any other claims for any other theories of recovery, the general responsibility of the New Matter, if any, for losses, losses or otherwise, associated with the product, is limited to the amount that you paid for the product that has evaluated LOSSES. nine0013 To obtain warranty support, you must contact New Matter during the warranty period. See page 5 for technical support contact information.
RETURN AND REPAIR POLICY
DEFECT ON ARRIVAL This section defines the replacement policy for new MOD-t 3D printers that are found to be defective upon arrival by a New Matter technical support representative. To obtain a replacement for a failed device upon arrival, New Matter Technical Support must be contacted and the customer must be able to complete a diagnostic checklist. Once these conditions are met and the MOD-t is found to be defective, a replacement device will be shipped before the original is received from the buyer. All replacement requests must be handled by New Matter Technical Support. If a device is sent back to New Matter without first contacting Technical Support, New Matter does not guarantee the return of a replacement device. nine0005
ARRIVAL DEFECT
Defective upon arrival replacements will only be issued for a new product that is determined to be defective by New Matter Technical Support right out of the box during installation.
Original invoice/order confirmation/serial number confirmation may be required to verify warranty status.
Technical Support will request a credit card number before sending any replacement device. If payment information is already stored by the New Matter Store, we may use the previous payment information. The customer's credit card will not be charged until the defective unit is returned to New Matter. nine0022
A replacement unit will be shipped before the original defective unit is received. The failed unit must be properly packaged in the replacement unit's packaging and returned to New Matter.
If the failed unit is not returned to New Matter within 30 days, New Matter reserves the right to both deactivate the serial number of the failed MOD-t and charge the customer the form of payment received during the warranty process at the full retail price. MOD-T.
The customer is responsible for ensuring that the defective device is packaged in accordance with the instructions. The customer is responsible for all damage caused by improperly packaged devices.
The replacement unit will be covered by a new full product warranty. · New Matter will pay all shipping costs for shipping the replacement. and return of the defective unit.
CUSTOMER SUPPORT
report this ad
Your MOD-t 3D printer comes with 90-day limited warranty. If you would like to return or replace your MOD-t, please contact New Matter Technical Support. On our online support page, you can find answers to frequently asked questions, how-to videos, articles, forums, and chat (Monday, Friday, 9:66 p.m. PT). New Matter Technical Support is available to help you get the most out of your MOD-t and New Matter Store. We are available through several channels: support.newmatter.com 24 hours a day, 7 days a week 1-866-949-8722 [email protected] @newmatterhelp Live chat enabled support.newmatter. com Monday Friday 9:06 AM PT Please visit www.newmatter.com/warranty for full warranty and returns information.
Documents / Resources
NEW MATTER MOD-t 3D Printer [pdf] User Manual MOD-t 3D Printer
Recommendations
newmatter.com/warranty
newmatter.com/setup
newmatter.com
newmatter.com/setup
Posted inNEW ACTIVITYTags: 3D printer MOD-t, NEW ACTIVITY
MOD-t 3D printer New Matter09 Home » 3D printers » MOD-t 3D printer New Matter
$299.99
Best price on: amazon.com
Buy Now
MOD-t 3D printer New Matter
$299. 99 nine0005
BUY
Inexpensive thread nine0005
Abundant cartridges
Extremely cost effective
Easy to use
Ecofreindly
Explore your creativity and love for technology with the New Matter MOD-t 3D printer. Designed for the non-technical, this incredible Wi-Fi connected printer only takes minutes to set up and start using as it requires no assembly. The MOD-t 3d printer is also low maintenance despite offering very consistent quality. The ability to print directly from your smartphone, tablet, or computer, the accompanying web interface is as easy as it is smooth. Ideal for families, the MO-t 3D printer is equipped with a transparent cover so you can watch every step of your project being done while staying a safe distance from hot or moving parts. As easy as it is to use, the MO-t 3D printer also looks sleek and stylish on any desktop or countertop. nine0013 Ashley HTTP://www.facebook.com/reksa.yelhsa Tweets by AshleyAske
Ready out of the box: Comes with 1 free spool of filament and all the tools you'll need
Wi-Fi enabled: Select, set up, and wirelessly print from your phone, tablet, or desktop computer
Quiet and secure: UL certified for security and comes with a transparent cover to protect prints
Pla printing, biodegradable, available in array of colors
Supported by real people: Contact us by phone, Email.

 4mm (400 microns), down to a reasonably accurate 0.05mm (50 microns) on the slowest speed setting. The MOD-t boasts a max speed of 80 mm per second.
 The build plate isn’t held in place and instead lays on top of the pinions. As the gears and teeth interact, the build plate is latched and moves on the Y and X axes. The Z-axis is assured by two vertical perpendicular pinions holding the extruder that act in the same way.
 gcode file and apply all manner of parameters such as adding or removing supports, tweaking the extrusion speed and a selection of other custom settings.
 Attach the spool holder to the back of the printer, pop on the filament and feed it into the device.
 gcode files made with third-party software to generate prints, but that’s it.
 The steps laid out in this blog post – while previously accurate – are no longer viable. We recommend the LulzBot 3D printers, MakerBot 3D printers, Glowforge 3D laser printers, and also some other alternatives for the classroom or makerspace curriculum.
 In order to use the Cura Software on your computer and get it to work with the MOD-t, students can simply download version 15.04.6 of Cura software from June 7, 2016. DO NOT update the software after downloading it. This version works best with the MOD-t and newer versions will not work as smoothly. Instructions for doing this simply are also below.
 Then, you must go to File, “open profile,” and select the “Cura profile.” You can download the Cura profile from the link listed below and saved to your desktop.
 com/setup where you will complete the setup process. For questions or comments:
 com/setup for detailed and visual instructions


 nine0013 UPDATING THE LATEST FIRMWARE
  These limits are designed to provide reasonable protection against harmful interference in a residential installation. This equipment generates, uses and can radiate radio frequency energy and, if not installed and used in accordance with the instructions, may cause harmful interference to radio communications. However, there is no guarantee that interference will not occur in a particular installation. If this equipment does cause harmful interference to radio or television reception, which can be determined by turning the equipment off and on, the user is encouraged to try to correct the interference by one or more of the following measures:
  Do not touch the Hot End nozzle and make sure the clear cover is in place while printing. Allow the MOD-t to cool for a few minutes before removing the finished printed object. nine0013 RISK OF ELECTRIC SHOCK
  As such, New Matter is not responsible for any injury that may result from the use of MOD-t. In addition, New Matter shall not be liable for any damages, including, but not limited to, loss of expected profits, business, and opportunities due to product performance, repairs, and business interruptions. nine0013 WARRANTY TERMS
  nine0013 WARRANTY TERMS
  MOD-T.
 nine0013 This warranty only applies to Products purchased and used only in North America and operated under normal conditions of installation and use. Use of this Product in continuous production or similar high-duty applications is not considered normal use and damage, maintenance or repairs resulting from such use are not covered by this Warranty. This warranty is non-transferable and does not apply to resold products. The warranty does not cover any damage or failure of the Product that New Matter believes is caused by any cause other than manufacturing defects in materials or workmanship, including but not limited to: (i) improper assembly, installation, operation or maintenance; (ii) use in an environment or for a purpose for which the Product was not designed; (iii) negligence, abuse, accident or other physical damage; (iv) unauthorized repairs or modifications; (v) use of any parts not provided by New Matter, or use with components not intended or recommended for use with the Product, including the use of threads outside of specification; (vi) wear, cosmetic damage or maintenance work; and (vii) all causes beyond the control of the New Matter, including power surges, fire, floods, wind, freezing, power outages, general corrosion, biological contamination, unusual atmospheric conditions, or other unforeseen causes.
 Warranty claims cannot be made if the serial number on the Product has been altered, removed or cannot be verified. nine0013 The term "Product" does not include attachments, software, media, applications, programs or non-branded parts and peripherals. Although not covered by this Warranty, suppliers or publishers may provide you with their own warranties. Refurbished or refurbished Products are not covered under warranty service. This warranty does not cover the cost of materials or services required for reprinting. No person or company is authorized to make any warranties other than those provided herein. nine0013 If New Matter cannot reproduce the claimed defect, you may be responsible for shipping and replacement costs. Any replacement product may be new or near new, provided that it has functionality at least equal to that of the product being replaced. Products may contain remanufactured parts, components or materials equivalent to new in performance. All returned Products and parts become the property of New Matter.
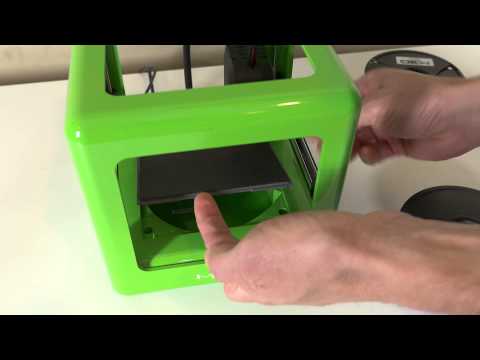
 nine0013 To obtain warranty support, you must contact New Matter during the warranty period. See page 5 for technical support contact information.
 The customer is responsible for all damage caused by improperly packaged devices.
  com
com  99 nine0005
  The ability to print directly from your smartphone, tablet, or computer, the accompanying web interface is as easy as it is smooth. Ideal for families, the MO-t 3D printer is equipped with a transparent cover so you can watch every step of your project being done while staying a safe distance from hot or moving parts. As easy as it is to use, the MO-t 3D printer also looks sleek and stylish on any desktop or countertop. nine0013 Ashley