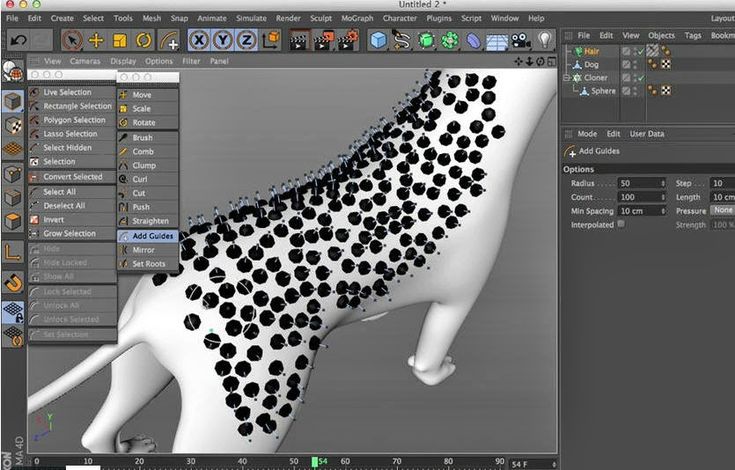
How to paint on 3d printed objects
How to Prime and Paint 3D Printed Parts (With Video)
Primer
Primer is a special type of paint that adheres strongly to the part and provides a uniform surface for paint to bond with. Different primers have different uses. A spray-on primer is the best way to paint your printed parts because it quickly covers a surface with an even coating. Brush-on primers are available, but they are tricky to work with and better for fine touch ups. For best results, choose a primer and paint that are plastic compatible and from the same brand. We like Krylon and Montana (though both are thick formulas), but nothing really compares to Tamiya brand model paint - it goes on extremely thinly and evenly, preserving delicate surface details.
Rotary Tool
Because sometimes you want to sand fast. With interchangeable bits, rotary tools offer a variety of options for sanding and polishing parts. Drum sanding bits quickly sand down supports, while steel wire brushes smooth surface marks. Rotary tools are rough, so you will still need sandpaper for a smooth finish. There are plenty of great brands: Dremel and Craftsman are popular in the states, Proxxon in Europe. To avoid scorching your part, turn down the RPMs to the minimum (usually 500-1000) and use a light touch.
Hand Files
Not as clumsy or as random as a palm sander. A more elegant tool…for a more civilized age.
One of the most simple yet effective tools, a hand file removes supports and sands down surfaces. Using a firm grip, you can remove marks with more control than with a rotary tool. Keep a wire brush on hand and clean the file’s teeth often (otherwise plastic and resin will gum up teeth). Like a rotary tool, a hand file will leave a rough surface, so it’s best for removing the larger support marks.
Sand Paper
The most unglamourous tool in the shop, sandpaper has come light years in the last decade with the release of flexible sanding sheets. Available at home improvement stores, flexible sanding sheets last 15 times longer than paper ones. They don’t curl, puncture or crease.., and they hey can be used wet, which reduces dust and prevents buildup in the sanding tooth. Because they flex, they can easily reach small interior spaces and rounded surfaces.
Dust Removal
Even after wet sanding, some dust will remain. Remove buildup with water and a soft scrub brush (an old toothbrush works). For serious cleanup, an inexpensive sonicator can quickly remove fine particles caught in corners and cracks of a surface. If you work in an area with hard water, using deionized or distilled water will prevent spotting between painting.
Tack Cloth
Tack cloth is a soft, slightly sticky cotton cloth designed to remove remaining dust and leave a clean surface for painting. Let your model dry before using the tack cloth — the waxy surface does not work well with water.
Painting Block, Dowels & Drill
This simple trick will save you grief in the spray booth (we were excited when we saw this technique in a modelmaking how-to video by Adam Savage).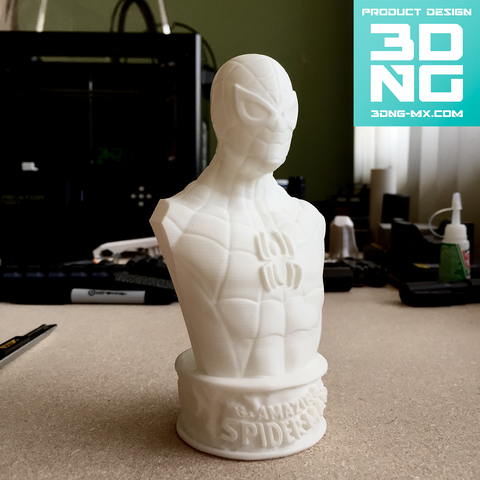 By mounting your 3D print on a dowel (often you can use a preexisting hole in the part), you can quickly maneuver while spraying, allowing you to get to all sides and into the nooks and crannies of the part without creating any fingerprints. When you want to add an even coat to all sides of your model, this is pretty essential. We recommend ordering a variety of size of dowels. To minimize the hole size on a part, start with a small size and work your way up until the model feels firmly seated. Drill a corresponding hole in a block of wood or MDF and insert the part with the dowel - now you can keep the model hands free while spraying.
Safety Equipment
Spraypainting means working with airborne particulates and solvents, both of which pose health hazards. Remember to use a NIOSH approved respirator and work in a well ventilated workspace. While painting, wear nitrile gloves to avoid spraying paint on your hands and and also protect your model from fingerprints.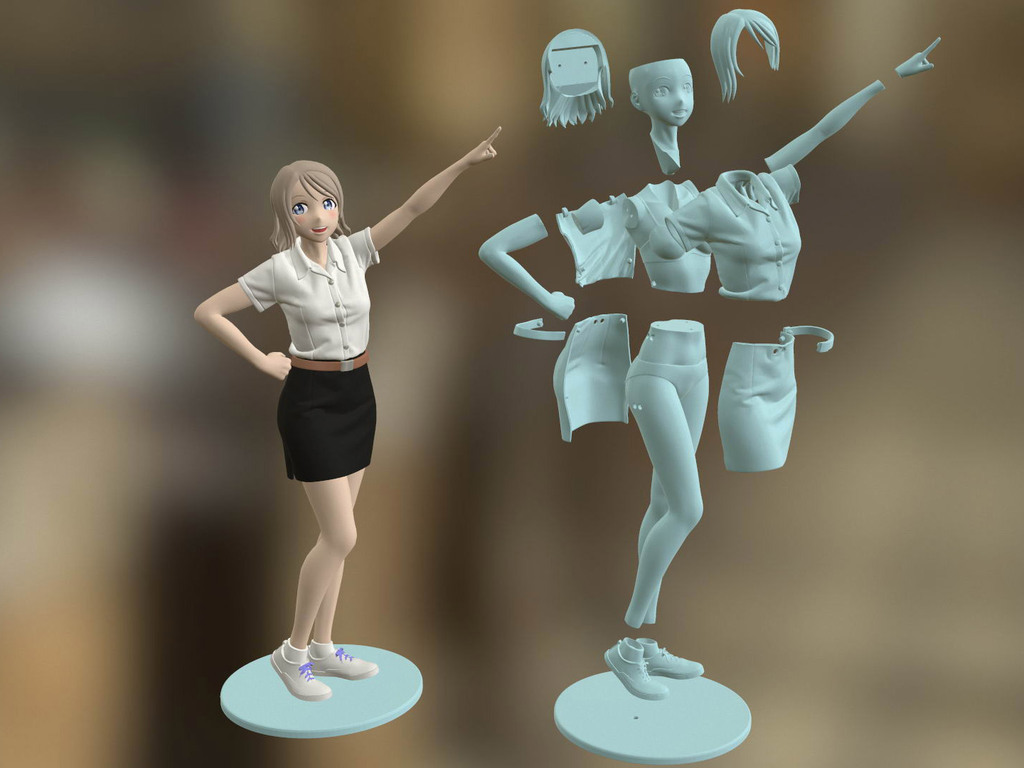
Ultimate Guide to Painting 3D Prints
Download the full Guide
as a PDF!
The simple post-processing techniques presented in this guide are an excellent way for professionals to create low-cost silicone molds, threaded inserts for enclosures, vacuum formed parts, and more.
If you’re an engineer or product designer creating concept models, a prop or set designer, artist, or an educator looking to add incorporate a bit more creativity into your classroom 3D printing activities, painting your models can be a great solution.
In this tutorial, we’ll show you how to create a nearly automotive quality paint job on any of your 3D printed objects.
Working time will vary depending on your model. Including drying time, the process shown took us about 6 hours from start to finish.
SUPPLIES
3D Print
Rubbing alcohol
Paper towels
Spray primer/filler
Spray paint
Hanging cord
80, 120, 240, 220, 1000 grit sandpaper
Needlenose pliers
Bondo
Sanding block & sandpaper
Gloves
Eye protection
Respiratory Mask
Need some of these products? We've curated an Amazon wish list for you.
STEP 1: PREPARE & PRINT MODEL
When preparing models for painting in MakerBot Print, keep in mind how your print settings will affect the quality of your paint job.
Consider: Print settings, print orientation, number of build plates
Surfaces printed in the Z axis will have the smoothest surface finish.
Printing models in 100 micron layer resolution will result in a slightly smoother surface finish, but will take significantly longer.
If possible, avoid placing support material in places you intend to paint as they will require more post processing to remove completely.
Supplies used: Needle-nose pliers or flush cutters
After you remove your print from the build plate of your printer, you will need to remove any raft or support material.
A. Remove prints from the build plate
B. Remove rafts
C. Remove large pieces of support
D. Approach smaller pieces and fine details
Supplies used: Sanding block, electric sander, 80,120, 240, 400, & 1000 grit sandpaper, Cyanoacrylate glue (super glue), Bondo
For the highest quality paint surface, an optional next step is to sand your model.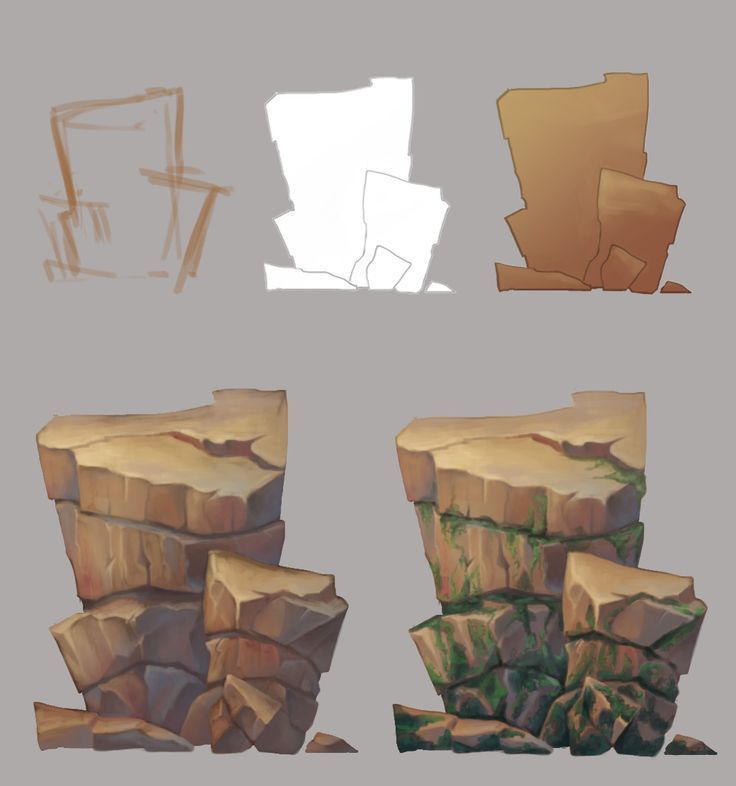
Make sure to wear eye protection, gloves, and a respiratory mask.
A. Dry sand the model using 80-240 grit sandpaper
B. Wet sand the model using 400 & 1000 grit sandpaper
C. Glue the parts of your model together
D. Apply filler to any gaps or blemish in your model and sand once dry
Find more detailed information here on gluing and sanding.
The 2021 Guide to 3D Printing Materials
Learn about polymers, composites, and metals all available for 3D Printing!
Supplies used: Hanging cord
Once your model is ready for painting - hang it in an open, dust free space with plenty of ventilation. This will allow you to paint all surfaces evenly without having to handle the model while paint is drying.
A. Tie hanging cord around the model
B. Hang the model in an open room with a tarp
STEP 5: PRIMER/FILLER
Whether you have chosen to sand your model and apply filler or you are simply painting a rough PLA model printed at high resolution, a few layers of primer/filler will fill any small surface imperfections before painting.
Primer filler is a high build spray filler that comes in aerosol form and can be purchased at most local hardware stores.
Before spraying remember to wear gloves, eye protection, and a respiratory mask.
BE SURE TO:
Shake well before use
Use wide strokes beginning and ending in space outside of the model
Hold the can 10-12 inches from the model
Paint in thin layers using a misting technique
AVOID:
Painting in thick layers
Holding the can in any spot for a long time
Holding the can too close to the model
Once you’ve sprayed 2-3 layers of primer/filler, allow your model to dry for 30-40 minutes.
STEP 7: SAND
A. Lightly sand your model with 1000 grit sandpaper (dry). This will smooth the surface of the model as the primer filler tends to create a rough surface texture similar to sandpaper.
B. Evaluate for quality.
C. If there are still surface imperfections you would like to smooth, continue to apply consecutive layers of primer/filler, and sand.
Once you are happy with the model surface, move on to painting.
STEP 8: PAINT
When choosing paint, you typically have a large degree of freedom as to which color and type of paint you use. Make sure to pick something that adheres well to plastic.
A. Choose a paint
B. Test for color in an inconspicuous location before painting the entire model
C. Let the paint sit overnight to cure
TIP:
Typically the paint will be dry to touch within an hour or so, and ready to polish within 24-48 hours.
If you’d like to protect the surface of your painted model, you can also apply a thin clear coat at this point.
In the end, you’re left with a beautiful painted model ready for approval presentation, enhanced for sets or galleries, optimized for better classroom learning, or simply improved for better innovation.
Here you can see just how far we have come.
Visit one of our other applications pages for tips on how to take your print even further.
We recommend that you visit our pages on:
Gluing
Sanding
Inserts
Last but not least, remember to share your work with us on Thingiverse and social media @MakerBot.
We can’t wait to see what you make!
Hair Dryer Shell
Ferro
10/2/2015
https://grabcad.com/library/hair-dryer-shell-1
Powered by MakerBot Learning.
Printing 3D Objects in Photoshop
User's Guide Cancel
Search
Last update Dec 13, 2021 08:23:10 PM GMT
- Photoshop User Guide
- Introduction to Photoshop
- Dream about it. Do it.
- What's New in Photoshop
- Editing the first photo
- Create documents
- Photoshop | FAQ
- Photoshop system requirements
- Transferring presets, operations and settings
- Introduction to Photoshop
- Photoshop and other Adobe products and services
- Working with Illustrator artwork in Photoshop
- Working with Photoshop files in InDesign
- Substance 3D Materials for Photoshop
- Photoshop and Adobe Stock
- Working with the built-in Capture extension in Photoshop nine0009 Creative Cloud Libraries
- Creative Cloud Libraries in Photoshop
- Working in Photoshop using the Touch Bar
- Net and guides
- Create transactions
- Cancellation and transaction history
- Photoshop on iPad | General questions
- Introduction to the working environment
- System requirements | Photoshop on iPad
- Create, open and export documents
- Adding photos
- Working with layers
- Drawing and painting with brushes
- Selecting areas and adding masks
- Retouch compositions
- Working with Adjustment Layers
- Adjusting the key of a composition using the Curves layer
- Applying transform operations
- Trim and rotate compositions
- Rotate, pan, zoom and restore canvas nine0009 Working with text layers
- Frequently Asked Questions | Photoshop Web App Beta
- Working environment overview
- System requirements | Photoshop 9 Web App Beta0010
- Keyboard shortcuts | Photoshop Web Application Beta
- Supported file formats | Photoshop Web Application Beta
- Opening and working with cloud documents
- Collaboration with stakeholders
- Limited editing options for cloud documents
- Photoshop Cloud Documents | Frequently Asked Questions
- Photoshop Cloud Documents | Workflow Questions
- Work with and manage cloud documents in Photoshop
- Cloud storage update for Photoshop
- Unable to create or save cloud document
- Troubleshooting Photoshop cloud documents
- Collection of cloud document synchronization logs
- Sharing and editing cloud documents
- File sharing and commenting in the application
- Working environment basics
- Learn faster with the What's New panel in Photoshop
- Create documents
- Working in Photoshop using the Touch Bar
- Tool gallery
- Performance settings
- Using tools
- Touch gestures
- Touch gestures and customizable workspaces
- Technology overview versions
- Metadata and comments
- Default key combinations
- Touch gestures and customizable workspaces
- Putting Photoshop images into other applications
- Installations
- Default key combinations
- Rulers
- Show or hide non-printing auxiliaries
- Specifying columns for the image
- Cancellation and transaction history
- Panels and menus
- File storage
- Positioning of elements with referencing
- Positioning with the ruler tool
- Setting sets
- Customizing keyboard shortcuts
- Net and guides
- Photoshop for design
- Artboards
- View on device
- Copy CSS from layers
- Splitting web pages into fragments
- HTML options for snippets
- Changing the arrangement of fragments
- Working with web graphics
- Create web photo galleries
- Resizing images
- Working with raster and vector images
- Image size and resolution
- Importing images from cameras and scanners
- Creating, opening and importing images
- Image viewer
- "Invalid JPEG marker" error | Opening images
- Viewing multiple images
- Customize color palettes and color swatches
- HDR images
- Image color matching
- Converting between color modes
- Color modes
- Erase sub-images
- Blend Modes
- Choice of colors
- Making changes to indexed color tables
- Image information
- Distortion filters not available
- Color details
- Color and monochrome corrections with channels
- Selecting colors in the Color and Swatches panels
- Sample
- Color mode (or picture mode)
- Shade
- Add color mode change to operation
- Add swatches from HTML CSS and SVG files
- Bit depth and settings
- Understanding Layers
- Reversible editing
- Create and manage layers and groups
- Selecting, grouping and linking layers
- Putting images into frames
- Opacity and layering
- Layer masks
- Application of smart filters
- Layer compositions
- Move, arrange and lock layers
- Layer masking with vector masks
- Manage layers and groups
- Effects and Layer Styles
- Editing layer masks
- Extract resources
- Display layers with clipping masks
- Generation of graphic resources from layers
- Working with Smart Objects
- Blend Modes
- Combining several fragments into one image
- Combining images with Auto Layer
- Alignment and distribution of layers
- Copy CSS from layers
- Load selections based on layer boundaries or layer masks
- See-through to show the contents of other layers
- Layer
- Mixing
- Composite images
- Background
- Select and Mask workspace
- Quick area selection
- Getting Started with Selections
- Selecting with the Marquee Toolbox
- Selection with the Lasso tools
- Selecting a color range in the image
- Pixel highlight setting
- Convert between contours and selection boundaries
- Channel Basics
- Moving, copying and deleting selected pixels
- Creating a temporary quick mask
- Save selections and alpha channel masks
- Selecting focus areas in an image
- Duplication, splitting and merging of channels
- Channel calculation
- Extraction
- Bounding box
- Perspective distortion
- Blur reduction due to camera movement
- Healing Brush Tool Examples
- Export color lookup tables
- Image sharpening and blurring
- Introduction to color grading
- Applying the Brightness/Contrast setting
- Shadow and Highlight Detail Correction
- "Levels" correction
- Hue and saturation correction
- Juiciness correction
- Adjusting the color saturation in image areas
- Quick tone correction
- Applying special color effects to images
- Image enhancement with color balance correction
- HDR images
- View histograms and pixel values
- Image color matching
- Crop and straighten photographs
- Converting a color image to black and white
- Adjustment and fill layers
- Curves correction
- Blend Modes
- Target Imaging for Press
- Color and tone correction with Levels and Curves eyedroppers
- HDR Exposure and Toning Compensation
- Filter
- Blur
- Lighten or darken image areas
- Selective color correction
- Changing object colors
- Camera Raw system requirements
- What's New in Camera Raw
- Introduction to Camera Raw
- Creating panoramas
- Supported lenses
- Camera Raw 9 Vignetting, Grain, and Haze Removal0010
- Default key combinations
- Automatic perspective correction in Camera Raw
- Reversible editing in Camera Raw
- Camera Raw Radial Filter Tool
- Manage Camera Raw Settings
- Processing, saving and opening images in Camera Raw
- Improving Images with Camera Raw's Improved Spot Remover
- Rotating, cropping and modifying images nine0009 Camera Raw color correction
- Removing objects from photos using Content-Aware Fill
- Content-aware patching and relocation
- Retouching and fixing photos
- Image Distortion and Noise Correction
- Basic troubleshooting steps to solve most problems
- Object transformation
- Crop, rotate and canvas adjustment
- Crop and straighten photographs
- Creating and editing panoramic images
- Deforming images, shapes and contours
- Perspective
- Using the Liquify filter
- Content-aware scale
- Transforming images, shapes and paths
- Deformation
- Transformation
- Panorama
- Drawing symmetrical ornaments
- Options for drawing a rectangle and changing the stroke
- Drawing details
- Drawing and editing shapes
- Paint tools
- Creating and modifying brushes
- Blend Modes
- Adding color to contours
- Edit contours
- Painting with mix brush
- Brush Presets
- Gradients
- Gradient interpolation
- Fill and stroke selections, layers, and paths
- Drawing with the pen tool group
- Making patterns
- Creating a pattern with the Pattern Builder filter
- Loop control
- Managing pattern libraries and presets
- Drawing with pen tablet
- Creating textured brushes
- Adding dynamic elements to brushes
- Gradient
- Draw stylized strokes with the Artistic Archive Brush
- Drawing with pattern
- Synchronizing presets across multiple devices
- Adding and editing text
- Universal text editor
- Working with OpenType SVG Fonts
- Character formatting
- Paragraph formatting
- Creating text effects
- Text editing
- Leading and letter spacing
- Font for Arabic and Hebrew
- Fonts
- Troubleshooting fonts
- Asian text
- Create text nine0009 Text Engine error when using Photoshop's Type tool | Windows 8
- Video editing in Photoshop
- Editing video and animation layers
- Introduction to video and animation
- Video and animation preview
- Drawing frames in video layers
- Import video files and image sequences
- Create frame animations
- Creative Cloud 3D Animation (Preview)
- Create timeline animations
- Creating images for videos
- Using the Liquify filter
- Using Blur Gallery group effects
- Filter basics
- Filter effects guide
- Adding lighting effects
- Using the Adaptive Wide Angle filter
- Oil Paint Filter
- Effects and Layer Styles
- Application of specific filters
- Image area feathering
- Saving files in Photoshop
- Export files to Photoshop
- Supported file formats
- Saving files in other graphic formats
- Moving projects between Photoshop and Illustrator
- Saving and exporting video and animation
- Saving PDF files nine0009 Digimarc copyright protection
- Printing 3D objects
- Printing with Photoshop
- Printing and color management
- Checklists and PDF presentations
- Print photos in a new image layout
- Spot color printing
- Duplexes
- Printing images on a printing press
- Photoshop Color Enhancement
- Printing troubleshooting | Photoshop
- Create activities
- Creation of data-driven images
- Scenarios
- File batch processing
- Operation playback and management
- Adding conditional operations
- About actions and the Actions panel
- Recording tools in operations
- Add color mode change to operation
- Photoshop UI Development Kit for Plugins and Scripts
- Understanding Color Management
- Accurate color assurance
- Color settings
- Working with color profiles
- Color management of documents for viewing on the web
- Color management for printing documents
- Color management of imported images
- Perform proofing
- Learn more about content credentials
- Identity and origin of NFT tokens
- Connecting accounts for creative attribution
- 3D in Photoshop | Common questions about deprecated 3D features
- Creative Cloud 3D Animation (Preview)
- Printing 3D objects
- 3D drawing
- 3D Panel Enhancement | Photoshop
- 3D Concepts and Tools
- Rendering and saving 3D objects
- Creating 3D objects and animations
- Image stacks
- 3D graphics workflow
- Measurements
- DICOM files
- Photoshop and MATLAB
- Image object count
- Combining and transforming 3D objects
- Editing 3D textures
- HDR Exposure and Toning Compensation
- 3D panel settings
Photoshop allows you to print any compatible 3D model without worrying about the limitations of a 3D printer. When preparing to print, Photoshop automatically renders 3D models impenetrable. Photoshop also generates the necessary support structures—platforms and bases—to help you achieve successful 3D printing results.
Preparing 3D objects for printing
- Select the menu item Window > Workspace > 3D to switch to 3D mode. nine0010
- Open the 3D model in Photoshop. If necessary, resize the 3D model while opening the file.
- Select menu item 3D > 3D Print Settings.
- In the 3D Printing Preferences panel, choose whether to use a printer connected to your computer via USB (local printer) or online 3D printing services such as Shapeways.com or Sculpteo.
You can now print 3D models as 3MF (3D Manufacturing Format) files. When specifying 3D printing options, select 9 for option0848 Print to is set to Local and Printer is set to 3MF File. When you send a 3D object to print, Photoshop creates a 3MF file. On Windows computers, Photoshop also launches the Microsoft 3D Builder application to further process the 3MF file.
To update the list of supported printers or online profiles, select Get Latest Printers from the Send to Print To pop-up menu.
- Select a local printer or Shapeways.com print profile. nine0010
View estimated prices for printing 3D models using available Shapeways.com profiles by selecting Printer > Estimated Price.
- Select the print volume units from inches, centimeters, millimeters, or pixels. This unit will serve to measure the dimensions of the volume of the printer as well as the dimensions of the printing plate.
A. 3D model B. Printing plate C. Printer volume overlay nine0003
- Select the 3D Printing Detail Level—Low, Medium, or Fine. The time it takes to print a 3D object depends on the level of detail selected.
- If you do not want to see the bounds of the 3D model's print volume, clear the Show Printer Volume Overlay check box.
- Set the Scene Size options to the appropriate size for the 3D printed object. When you change one value (X, Y, or Z), the other two values are scaled proportionally. When resizing the Stage Volume, notice that the print plate under the 3D model resizes accordingly. nine0010
You can scroll through the Scene Volume settings by clicking the size label (X, Y, or Z) and dragging the cursor left or right. By holding down the Shift key, you can scroll through the values faster.
- Select Scale by printer volume if you want to automatically resize the 3D model so that it takes up the entire available printer volume on the selected printer.
- If the 3D model includes normal maps, bump maps, or transparency maps, you can ignore these types of maps when printing the model. Notice how the 3D model changes in real time as you change the Surface Detail settings.
 nine0010
 - Optionally, you can exclude the support structures of the 3D object (platforms and bases) from printing. Use this option with caution as printing a 3D model without the necessary support structures may produce unsatisfactory results.
- If your printer supports multiple materials, select the material you want to use to print this 3D object.
(Experimental) Enable multitone printing for the MakerBot Replicator 2x 9 printer0036
You can enable an experimental feature that allows you to print continuous tones with your MakerBot Replicator 2x 3D printer.
Requirement: Enable experimental Photoshop features
Experimental features must be enabled in Photoshop before using multitone printing:
- Select Preferences > Experimental Features.
- Select the Enable multitone printing check box. nine0010
- Click OK.
- Restart Photoshop.
Experimental features not yet fully tested. They should be used with caution.
Choose a multi-tone surface material
- Select the MakerBot Replicator 2x printer in the 3D Printing Settings panel.
- In the Material field, select Multitone Surface. If you don't see this option, make sure the experimental Multitone 3D Printing feature is enabled. nine0010
- Set other parameters according to the generated 3D model.
- To view and print a 3D object, select 3D > 3D Print.
Preview and print 3D object
After setting the 3D printing options, follow these steps.
- Click the Start Print icon () or select the menu item 3D > 3D Print. Photoshop will combine the 3D elements of the scene and prepare it for the printing process. nine0036
- If you choose to print with a Shapeways.com profile, Photoshop will display a message that the actual print cost may differ from the estimated cost displayed. Click OK.
- In the preview window that opens, you can use the 3D camera tools to rotate, scale, or move the 3D object.
Rotate the 3D camera.
3D camera rotation.
Move the 3D camera.
3D camera slide. nine0003
Return to the home position of the 3D camera.
- If necessary, select the Show restoration check box. Photoshop displays various restoration colors such as Original mesh, Thickened walls, and Hole closed.
- You can also turn on Ray Tracing Preview. Viewing ray tracing allows you to more accurately reproduce the printed material. nine0010
- If you want to export the 3D printing settings to an STL file, click the Export button and save the file to the desired folder on your computer. This STL file can be sent to a network service server or moved to an SD card for printing with your own printer.

- View a summary of the 3D print object and click the Print button.
You can cancel the current 3D printing process using the menu item 3D > Cancel 3D printing. nine0036
3D printing utilities
Photoshop provides interactive step-by-step utilities that you can use to set up, calibrate, and maintain your 3D printer. These utilities can only be used when the 3D printer is turned on and connected to a computer.
- Select the menu item 3D > 3D Printer Utilities.
- Select the utilities you want to run.
Print plate calibration nine0003
Helps in leveling the printing plate. This utility includes the following general steps:
- Requires you to remove all residual print materials from the 3D printer.
- Initializes the print head.
- Allows you to adjust the amount of gap between the platen and the printhead at nine nozzle positions.
You can use this utility in wizard mode or manual mode.
Download Thread nine0003
Helps load filament into a Fused Deposition Modeling (FDM) 3D printer. To facilitate filament loading, Photoshop starts the head heating process and the filament loading mechanism.
Remove thread
Helps remove the filament from the FDM 3D printer. To facilitate the removal of the filament, Photoshop starts the head heating process and the filament loading mechanism.
Replace thread nine0003
Helps to replace the old filament in the FDM 3D printer with a new one. To make changing filament easier, Photoshop starts the head heating process and the filament loading mechanism.
- Follow the instructions on the screen.
Pack objects on the base plane
Sometimes you may want to print multiple instances of an object on the same panel. Do the following.
- Select the required objects in the 3D panel. nine0009 Select 3D > Pack Objects on Ground Plane.
- Start printing objects.
FAQ
Photoshop currently supports the following 3D printers:
- MakerBot Replicator 2
- MakerBot Replicator 2x
- ZCorp Full Color
- Mcor Iris
- MakerBot Replicator 5th Generation
Photoshop also supports several Shapeways.com and Sculpteo profiles. nine0003
The MakerBot Replicator 5th Generation Printer Profile does not yet support USB direct printing. You can export files to a USB drive and print them to a local printer.
Yes. Before printing, you can set a cross section to cut off part of the 3D model. Follow these general steps.
- Select the menu item Window > Workspace > 3D to switch to 3D mode.
- Open the 3D object you want to print. nine0010
- Select Scene in the 3D panel.
- On the Properties panel, select Cross Section.
- Specify the cross section parameters in the Properties panel.
- Select the menu item 3D > Apply Cross Section to Scene.
- Print the 3D scene.
The desired cross section must be dried before printing.
Yes. Follow these general steps. nine0003
- Select a material in the Stage panel.
- In the Properties panel, click the folder icon () next to Emboss/Transparency/Normals and load the texture. You can also specify a new texture to apply to the 3D model.
- When specifying a new texture, save this texture. The texture is applied to the 3D model as a bump map or transparency.
- Print a 3D model.
 Pop-up menus for additional heads available are displayed in the Print Properties panel. In the 3D workspace and in the 3D Print Preview window, the model appears in two colors. Printing a 3D model in two colors
 From a printing point of view, each layer of a 3D model is treated as a separate 3D object. You can optionally merge two or more layers (3D > Merge 3D Layers). nine0036
Related topics
- How to print a 3D object in Photoshop
- 3D painting
- 3D panel enhancements | Photoshop
- Photoshop 3D Documentation
Sign in
To come in
Account Management
FDM 3D printing guide for beginners. Understanding Basic Terms
Getting started with 3D printers doesn't have to be intimidating. We have created this simple 3D printing guide for beginners to help all beginners understand the basic terms. nine0003
3D printing is a very general term. The media, especially mainstream marketing, portray 3D printing as the magical technology of the future, capable of reproducing complex objects.
But this approach makes it difficult to understand what 3D printing is from a technical point of view.
In reality, there are many different 3D printing technologies, but the most common for beginners is layer-by-layer modeling (FDM or FFF), which is the focus of this article. nine0003
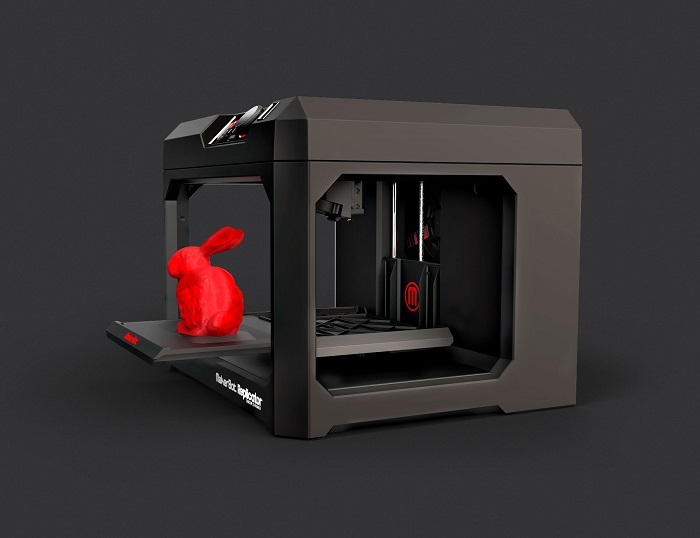
Ender 3 V2 is one of the most popular hobbyist 3D printers.
FDM prints parts using thermoplastic, which is basically a filament of material that can melt, cool, and solidify. Details are built by stacking layers on top of each other.
This technology was created because people needed a way to quickly prototype parts. Even today, rapid prototyping is one of the biggest advantages of FDM and 3D printing in general. Not surprisingly, 3D printing is also gradually becoming a powerful manufacturing solution. nine0003
Before we get into the details of how FDM works, there is one more thing worth mentioning. If you have done some research on FDM, you may have noticed that some sources use the term "FFF" instead of FDM when referring to the technology. This is because FDM is a term originally patented by Stratasys and FFF is a non-proprietary generic abbreviation. Remember, this is the same technology, only the names are different. Today, most people use the term FDM. nine0003
FDM 3D printing. How it works?
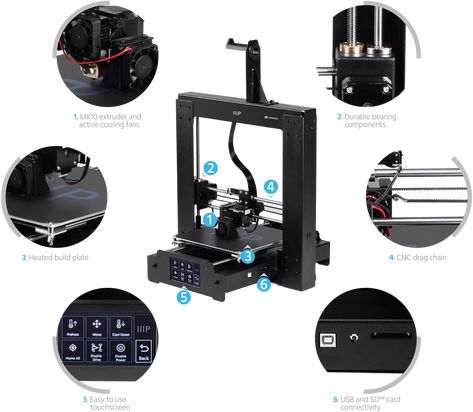
- 3D printer control interface
- 3D printing plastic (filament)
- Extruder
- Hotend (hot end)
- Fan (cooler)
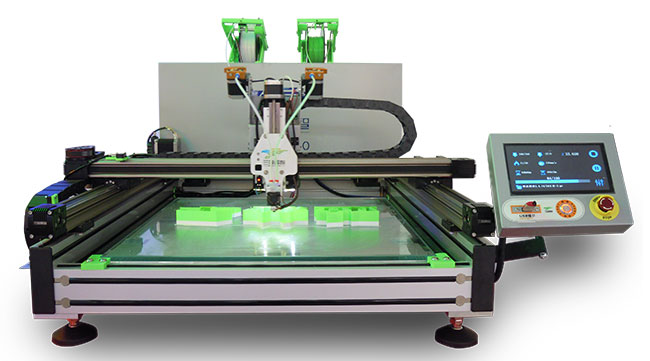
- Print platform (table)
- 3D printing
The easiest way to understand how FDM works is to study the details of an FDM 3D printer. However, before we get into the specifics, it's worth mentioning that most 3D printers can move in three axes: X, Y, and Z. The X and Y axes are responsible for moving left, right, forward, and backward, while the Z is responsible for vertical movement.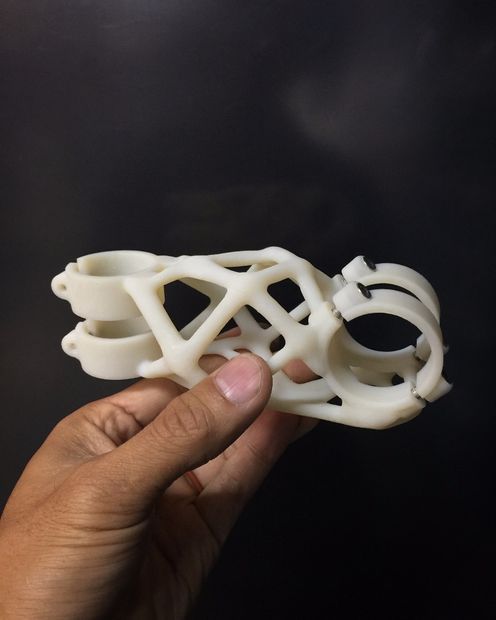 nine0003
Now let's look at the main components of a 3D printer:
Control interface : Some modern 3D printers have a touch screen that is used to control the 3D printer. On older printers, a simple LCD with physical scrolling and a click wheel may be present instead of a touch interface. Depending on the model, an SD card slot and a USB port may also be present.
Print Bed : The bed or table of a 3D printer is essentially the surface on which parts are made. Platforms are most often made with heating to improve the adhesion of the part, but more on that later. nine0003
Extruder(s) : The extruder is the component responsible for melting and progressively depositing the plastic filament to build the model.
The extruder actually consists of two subcomponents: hot and cold. The hot end or hot end contains a heater and nozzle that actually melts the filament, while the cold end consists of a motor, drive gears and other small components that push the filament into the hot end to melt. nine0003
There is a heatsink and a fan between the hot and cold ends because it is necessary that the cold end stays cold to avoid jamming.
In addition to the heatsink fan, there is usually at least one other fan designed to cool the molten filament after it exits the extruder - this is commonly referred to as the parts cooling fan.
Print head : one or more extruders are installed on the print head (standard 3D printers have one extruder). At the top of the print head is a tube that feeds filament into the print head. nine0003
How a 3D printer prints.
The process starts when you send the 3D model file to the printer. After starting a print job, the nozzle starts to heat up. When the nozzle reaches the temperature required to melt the filament, the extruder draws the filament into the hot end in preparation for deposition modeling.
The printer is now ready to 3D print the part. The print head descends onto the build surface (platform) and begins to fuse the filament, which cools and solidifies shortly after exiting the nozzle thanks to the part cooling fans.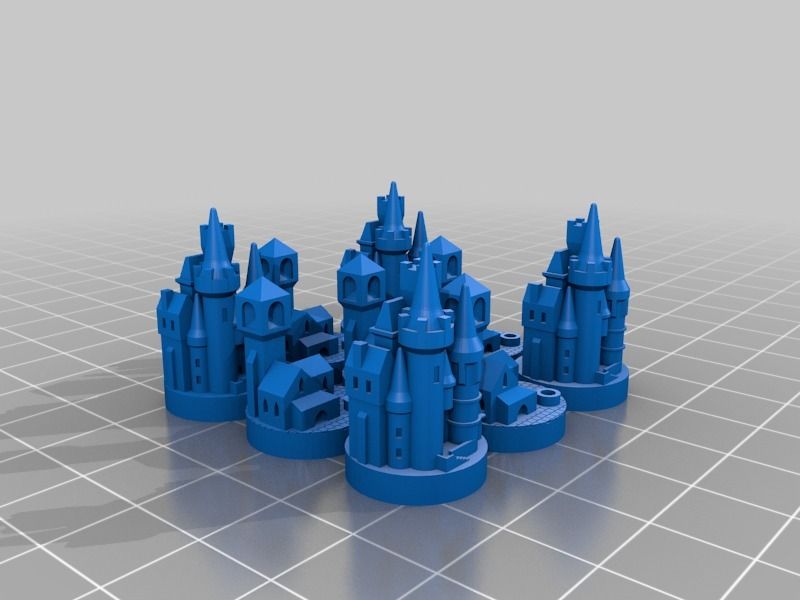 nine0003
Plastic is applied one layer at a time, and after one layer is completed, the printhead moves up the Z-axis a short distance and the process is repeated until the part is completed.
Create, download and purchase 3D models.
Naturally, if you want to 3D print a part, you must have a 3D model of that part. 3D models are created using 3D modeling software commonly referred to as CAD (computer-aided design) software. Here are some examples of popular 3D modeling software:
- Autodesk's Fusion 360 (Free for non-commercial use)
- Blender (free of charge)
- ZBrush (paid, but free trial available)
However, most newcomers to 3D printing do not have the skills required to use such software. If so, don't worry because there are other solutions.
First, there are simpler CAD software options like Tinkercad, a program that almost anyone can use without any prior experience. This is an online application developed by Autodesk, one of the leading developers of CAD software. nine0003
File downloads
With so many people having access to 3D printers in recent years, several sites have become repositories for 3D models.
Some of the most popular are:
- Thingiverse (free)
- MyMiniFactory (many free, some paid)
- Cults3D (free and paid)
- CGTrader (some free and most paid)
- PrusaPrinters (all free) nine1005
- PLA
- ABS
- PETG
- Flexible (TPU, TPE)
- Nylon
- With additives (wood, metal, etc.)
- Polycarbonate (PC)
- HIPS
- PVA
So anyone can get their hands on a model without any modeling skills.
Model preparation.
3D models must be prepared for 3D printing using special software that translates the model into machine instructions. This is done using slicing software, also called a slicer. 3D models are imported into a slicer, which then actually "cuts" the model into layers. The resulting files consist of a G-code, which is essentially a long list of instructions that a 3D printer follows to build a model. nine0003
G-code is the "language" of 3D printers and CNC machines. These files contain important parameters needed to create a model, such as print speed and temperature, wall thickness, infill percentage, layer height, and many others. In other words, 3D printing is impossible without G-code files!
Supports (support structures)
Another of the main functions of the slicer is the generation of support structures (supports). In particular, supports are needed for parts with attachments.
9The 0002 Slicer allows you to choose where to place the supports and how tight you want them to be. Some slicers even offer users the ability to select different types of support structures for easier removal or strength.Printer preparation.
Before you start printing on a 3D printer, there are a few mandatory steps to take:
Plastic loading: The extruder must be ready to extrude the filament before printing begins. The loading process begins with heating the hot end to the melt temperature, and then the filament is directly loaded into the heated extruder.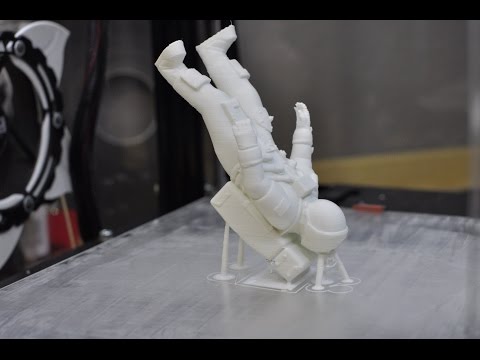 nine0003
Platform Leveling: In order for the printer to successfully print an object, the table must be as level as possible.
Depending on the printer, platform calibration can be performed manually, semi-automatically or automatically.
Platform leveling is very important because, for example, if the nozzle is too far from the table, the first and most important layer will not adhere to the surface, resulting in you not being able to print your object.
Materials for FDM 3D printing. nine0833
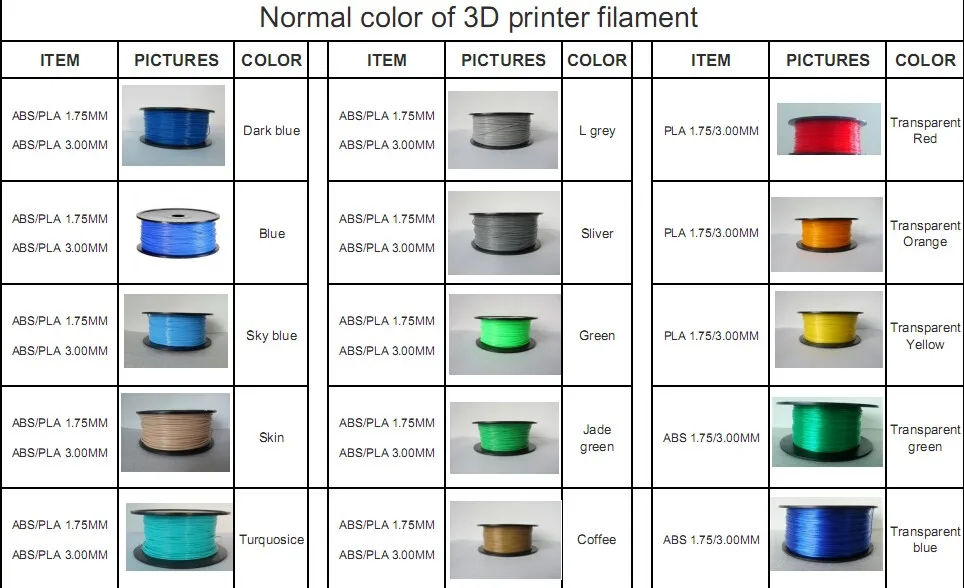
As we already mentioned, FDM 3D printers use spools of plastic as part material. Filament is basically a thermoplastic specifically designed to melt and cool while maintaining its structural integrity.
3D printing filaments usually come in two diameters: 1.75mm and 3mm (or 2.85mm). Most 3D printers use 1.75 diameter plastic, which is why the variety of types and shades of 1.75 filament significantly exceeds 2.85. nine0003
We recommend that before you buy a 3D printer, be sure to clarify which filament it works with.
Converting the extruder from 2.85 to 1.75 is possible, but requires fiddling, time and additional accessories.
One of the best things about FDM 3D printers is that they can handle a wide range of plastics.
Here are just a few of the different types that are used in FDM 3D printing:
Standard:
Engineering:
For supports:
Among other things, FDM filament is one of the cheapest materials used in the world of 3D printing.
Post-processing of printed products.
Post-processing is the final steps you must take to complete your object. nine0003
Below we have listed some of the post-processing steps for a 3D printed part. You don't necessarily need to complete each of these steps.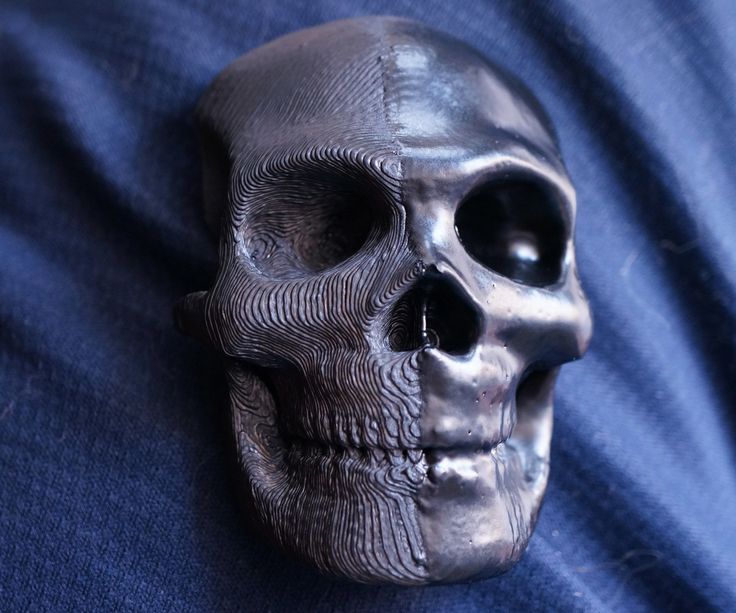
Most often, post-processing is completed at the stage of removal of supports.
Support Removal : After printing, the support structures are mechanically removed by simply breaking them off. As a result, you can see marks left on the surface of the part.
If you have bought a 3D printer with two extruders, you can use special soluble plastics to print supports. In this case, you just need to place the object in water if you printed with PLA+PVA or in limonene if you printed with ABS+HIPS. nine0003
Sanding : Your part may have imperfections (for example, after removing supports). In this case, grinding comes into play. Light sanding of 3D printed parts can make the surface smoother.
Coloring : You will often print in one color. To add more colors, details or protection, you can paint your model!
Polishing or Smoothing : Epoxy is one way to smooth the surface of a printed part.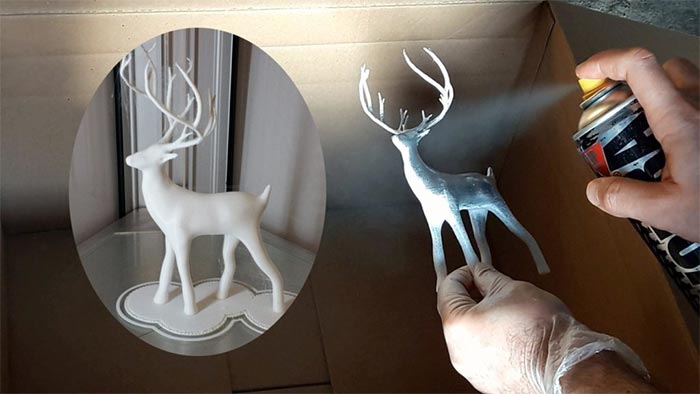 For ABS, an acetone steam bath is often used. Under the influence of acetone vapors, ABS begins to dissolve and, if this process is stopped in time, you will get a smooth and glossy part. nine0003
Gluing : If you want to print a large 3D model that won't fit in your printer's build chamber, you can print the part in two or more parts and then glue them together.
Common 3D printer problems.
Let's discuss some of the most common problems beginners may encounter when using a 3D printer.
Warp : This problem occurs due to temperature differences during the 3D printing process. 3D Print Delamination - 5 Tips and Tricks to Avoid Delamination. nine0003
Plastic bleed (snot) : Thin extra filaments of plastic on your model may be caused by incorrect temperature or retraction settings. Some types of plastic, such as PETG, are more prone to free flow from the nozzle.
Nozzle Clog : Nozzle clogging is one of the most annoying problems of FDM 3D printers.