
How to get 3d prints off bed
3D Print Stuck to Bed: What to do?
While we often hear about first layer adhesion problems, with 3D prints becoming unstuck during the printing process and warping, there is another side to the adhesion issue. We’re talking about what happens when a 3D print sticks too well to the print surface and can’t be removed.
If you’ve never experienced this problem: that’s great. But since you’re here, reading this blog topic, it’s safe to assume you’ve probably encountered this problem and have struggled to remove a model from your 3D printer. Notably, this common 3D printing problem can have more serious consequences than poor bed adhesion because you risk damaging not only the 3D printed part but also your 3D printer build plate.
Too much adhesion is particularly common with PETG (polyethylene terephthalate glycol), a popular thermoplastic filament used in FDM 3D printing. The material has many benefits, including strength, good first layer adhesion, and resistance to warping. [1] In certain scenarios, however, these benefits can have their downsides. For example, PETG can create strong bonds to certain print surfaces—particularly glass beds—making it very difficult to remove once the printing process is complete.
In other cases, you will be able to remove your 3D print, but bits of filament might remain stuck on the print surface. It is important to remove filament residue before starting a new print job, because it can damage your build plate and ruin the accuracy and quality of future prints.
Fortunately, there are a number of tried and true tactics for removing a stubborn 3D print that isn’t coming off the print surface. Let’s take a look at some of these methods, how they work, and when to use them.
Recommended reading: How PETG melting point influences 3D printing
How to Safely Remove a 3D print
Put some pressure on it
If your 3D print isn’t easily coming off your print bed, the first step is to use some force. Get a grip on your 3D print and pull it away from the print surface while simultaneously steadying the print bed. If that doesn’t work, try twisting the part gently away from the print bed.
Be wary of using too much force: if you force the 3D print off, it can damage the print plate and even break it. At the same time, if your 3D print has delicate features, pulling at it forcefully risks damaging the print itself. In other words, use your judgment when using force to remove your print from the bed. If it still isn’t coming unstuck, move on to the next tip.
Use a Flat Blade or Spatula
If trying to remove the print by force didn’t work, you can try lifting the printed model off the print bed using a flat blade or tool, such as a spatula or paint scraper. The idea is to wedge the flat tool between the printed part and the build plate, and gently use leverage to break the bond between the part and the build plate. Alternatively, use a combination of tools to break the adhesion by placing a thin spatula or putty knife at the edge of the print and gently tapping the scraper with a small rubber mallet or butter knife. [2]
[2]
There are also risks associated with this removal method, particularly if you are using a sharp object such as a blade or razor. To safely remove the print, proceed with caution and always—always!—point the tool away from you. It is also important to avoid scraping the build plate with any back and forth motion, because this can scratch and ultimately damage your print bed.
If using a spatula or blade to remove a 3D print, always point the tool away from you for safety.
Heat Up the Print Bed
If your 3D printer has a heated print bed, you can try turning up the heat temporarily to soften the base layers and weaken the bond. When filament hardens, it contracts, when it is heated it expands. By turning on the heated bed after your 3D print has fully cooled, it will cause the base layers to expand slightly, which will change the bond between the build surface and the printed model. In some cases, the expansion will cause the print to pop off the build surface on its own. This is because the print surface will expand at a different rate than the printed filament.
If you are attempting this method, remember that you don’t want to melt or warp your 3D print, simply make the plastic expand a bit to break the bond. It is therefore recommended not to exceed a bed temperature of 70°C. If you don’t have a heated print bed, you can recreate the effect with a hairdryer placed under the build plate.
If the print doesn’t pop off with the heat, softening the base layers of a print will at least make it easier to insert a flat blade or spatula under the print and pry it off the build plate.
Cool Down the Print Bed
It may seem counterintuitive after reading the previous suggestion, but you can also encourage the removal of a model from your 3D printer by applying cold. The principle is effectively the same: cooling your print and print bed down will cause them to contract at different rates, which can break the bond between them.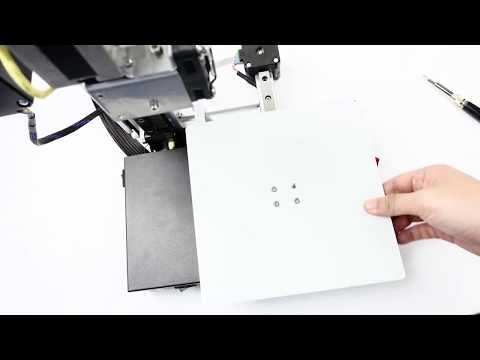
First, let your 3D print cool fully to room temperature—this is important because the contrast from hot to cold can be too much for some build surfaces, such as glass. Once they have cooled, remove the build plate with the print still attached and place it somewhere cold, such as your freezer or fridge. If it’s cold outside, you can place it outdoors for a few minutes. As the filament and build surface cool, the contraction of the materials should dislodge the 3D print, making it easy to remove by hand.
Alternatively, you can apply compressed air to the base of the print, which will cool the plastic and have a similar result. If you don’t have space to put your print bed into your fridge or freezer, you can also try running the print under cold water once it has cooled or placing a cold gel pack—the kind used to treat muscle injuries—under the print bed to create the temperature change.
The cold method is particularly effective for ABS, because the thermoplastic contracts quickly in cold temperatures.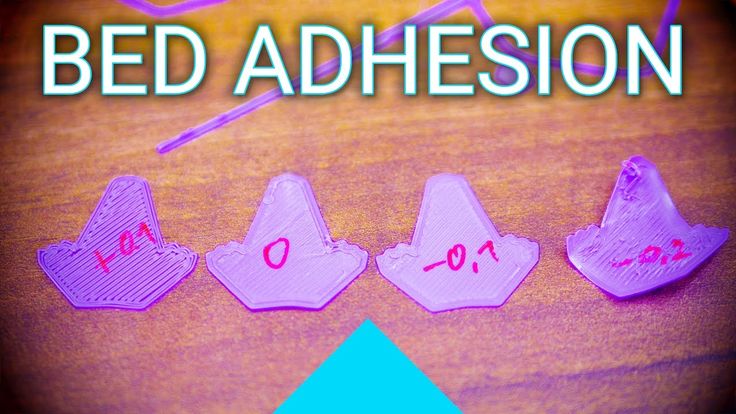 (The same reason that ABS is warp prone can actually facilitate part removal.)
Use Dental Floss
Dental floss isn’t only for removing plaque from your teeth, it can also be used to safely remove 3D prints from the print bed. Dental floss is both fine and exceptionally strong, making it suitable for getting in between the first layer of your print and the printer bed. It’s also a great option because you don’t need to buy any specialized tools: simply grab your tooth floss from your bathroom cabinet and get to work.
To use this method for part removal, cut a generous length of dental floss and place it around the base of your 3D print. From there, pull the floss back and forth so that it starts to move underneath your 3D print. Think of it as a very fine saw. Repeating this rapid pulling motion should dislodge the 3D print without damaging the part or the print bed. If you don’t have dental floss handy, another type of fine, strong string or wire should work just as well.
Dental floss is an effective tool for removing parts from the print bed.
Use a Solvent
If you’ve used a bed adhesive, such as a glue stick or hairspray, or your filament has simply bonded too well to the print surface, you can always apply a solvent to help weaken the bond. Isopropyl alcohol (also known as IPA) is a common household solvent that will soften and (with prolonged exposure) dissolve many thermoplastic filaments. Acetone is another option. Applying a small amount around the edges of your print or lightly spraying the printed object with an IPA solution will help to break the bond and make removal possible.
After applying the solvent, wait a few minutes and you should be able to remove the 3D printed part by hand or using a flat tool. With this method it is important to use the alcohol sparingly, as too much can start to dissolve layers of your print or damage the print bed. Some makers recommend using a combination of alcohol and water.
How to Prevent a 3D Print from Getting Stuck
Now that we’ve looked at how to remove a 3D print from the print bed when it is stuck, it is also important to cover preventative strategies to prevent it from happening again.
Use Tape or Bed Adhesive
Typically, adhesive agents like stick glue, hairspray, or blue painter’s tape are used to improve bed adhesion. These substances create a grippier surface on an otherwise smooth build platform, which helps to promote good adhesion. Considering this, it might seem counterintuitive to use the same materials to help with part removal. However, these materials also work to create a kind of buffer between the 3D print and the build plate.
In other words, using a bed adhesive will create a layer between the thermoplastic and the build plate, which can protect the latter in the part removal process. If you use glue stick or a dedicated 3D printer adhesive, use water to wash away the glue and easily remove the printed part. Kapton tape is another popular option, particularly for ABS, as it protects the build plate and has a broad surface area.
Use a Flexible Build Plate
While glass build plates are common in FDM 3D printing and have many benefits, such as stiffness, smoothness, and durability, they can adhere too well to certain prints, particularly those made from PETG. If quick and easy part removal is a priority, there are other bed surface materials that may be more beneficial. Flexible build plates, for instance, are ideal for part removal: they are designed to be removed from the build platform and flexed so that the 3D print simply pops off.
Spring steel smooth PEI—essentially a spring steel build plate coated in PEI—is a common flexible build plate material. These build plates, such as the BuildTak FlexPlate, can be easily attached to magnetic build platforms and just as easily removed. The build plate has a degree of flexibility, enabling makers to remove their prints by bending the build plate. We should note that it is possible that PETG will bond to the PEI coating of the build plate, so if you are using this particularly adhesive filament, it might still be a good idea to use a release agent, or bring the print bed up to about 70°C for safe removal.
Recommended reading: How to clean 3D printer beds: Glass, PEI, adhesive
Calibrate Your 3D Printer
Proper 3D printer calibration and bed leveling are important parts of achieving a successful build: they can make or break first layer adhesion. For instance, if the bed isn’t level the first layers will bond unevenly to the print bed, which can cause warping or part removal issues. If your 3D printer has automatic bed leveling and calibration, make sure to use it before each print job.
For manual bed leveling, move the nozzle to each corner of the print bed and place a sheet of paper between the nozzle and the bed surface. Lower the nozzle until you feel slight resistance when you try to move the paper. If you are using tape or another build plate, be sure to account for it in the Z-offset. Ultimately, it’s important to ensure that your extruder and nozzle are the optimal distance from your build surface so that the first layers are not too squished, which can lead to adhesion problems.
Recommended reading: 3D Print Not Sticking to Print Bed? Here’s the Solution
Key Takeaways
In the end, bed adhesion is a key consideration when it comes to FDM 3D printing. On the one hand, you don’t want bad adhesion, which results in warped parts. On the other hand, you don’t want adhesion to be too strong, because this can damage the print as well as the 3D printer bed surface. To wrap things up, here is a summary of what we discussed:
You should be particularly careful about strong adhesion with PETG filament.
Tools like putty knives or spatulas can be used to gently pry 3D prints off the build plate, however caution must be taken to avoid damaging the build surface or injuring yourself.
Changing the temperature of the print surface (whether cold or hot) can encourage the adhesion bond to weaken and help your 3D print pop off the bed.
Using a solvent, such as IPA, can soften the base of your 3D print and help you lift it off the bed.
Using a flexible build plate can facilitate part removal, as can using an adhesive layer, such as Kapton tape or glue.
Finally, properly calibrating your 3D printer and using the right settings will improve the overall print process and quality.
References
[1] https://www.twi-global.com/technical-knowledge/faqs/what-is-petg
[2] https://www.youtube.com/watch?v=VCCbzCvtRzU
6 Easiest Ways How To Remove 3D Prints From Print Bed – PLA & More – 3D Printerly
You’ve finished your 3D print and come back to a lovely looking model, but there’s one problem, it’s stuck down a little too well. Many people have faced this problem, including myself.
Fortunately, there are some easy ways to help remove 3D prints from your print bed, whether made of PLA, ABS, PETG or Nylon.
The easiest way to remove 3D prints stuck on your 3D print bed is to heat up the bed temperature to 70°C then use a good quality scraper to get under the print and lift it off. You can use liquid solutions to weaken the bond between the print bed and the plastic to help remove 3D prints.
There are some details that I will describe in the rest of this article to help you remove 3D prints from your bed, as well as help you prevent it happening in the future. Keep on reading to get clued-up on some useful info.
Easiest Ways to Remove Finished 3D Prints Stuck to Bed
The method in the video below works for several people, which is a simple combination of 50% water & 50% alcohol sprayed on the troublesome 3D print.
If it doesn’t work, rest assured, there are many other methods and techniques that will solve your issue, as well as preventative measures so it doesn’t happen again.
When 3D prints stick down to the bed too much, you run the risk of actually ruining your build platform.
I remember watching one video of Joel Telling (3D Printing Nerd) breaking the glass bed of a $38,000 3D printer because the PETG literally bonded with the glass and couldn’t be separated.
There are several ways to remove stuck 3D prints, but we will list down some for you which we find the easiest and most convenient.
Apply Some Force
The most tried method of removing 3D prints from the build surface is to just use a little force, whether that is slightly pulling, twisting, bending, or just grabbing the 3D print.
In most situations, if you have a respectable setup, this should work fine, but if you are reading this article, it might not have worked so well!
Firstly, before trying to remove the print, let the print bed cool down for a considerable amount of time then try removing it manually by applying some force.
You can also use some kind of rubber mallet to dislodge the 3D print, just enough to weaken the adhesion. After it has weakened, you should be able to apply that same force and remove your print from the print bed.
Use a Scraping Tool
Next up would be using some tools, such as the spatula that usually comes with your 3D printer.
A little bit of pressure set underneath your 3D print, with additional force in multiple directions is usually enough to remove a 3D print from your print bed.
I’d use my spatula, with my hand on the 3D model itself, then wiggle it side-to-side, diagonally, then up and down, until the adhesion weakens and the part pops off.
Disclaimer: With any sharp print removal tool, watch where you put your hands! If you slip, you want to make sure your hand is not in the direction of force.
Now, not all scraping tools and spatulas are created equal, so that stock one that comes with the 3D printer isn’t always the best.
Getting yourself a proper print removal kit from Amazon is a great idea if you are having issues removing prints. I’d recommend the Reptor Premium 3D Print Removal Tool Kit.
It comes with long knife with a beveled front edge, allowing for gentle sliding underneath prints, as well as a smaller offset spatula with a black ergonomic rubber grip and safe rounded edges.
They are made of stiff, hardened stainless steel blades which are flexible, but not flimsy. It can remove larger prints with ease and is very highly rated on Amazon at 4.8/5.0 stars at time of writing.
Reviews show amazing customer service and top functionality to remove prints smoothly without scraping your bed surface, the perfect tool for 3D printer users.
Use Dental Floss
Usually, a small force is sufficient to dislodge it however if that’s not possible, use a piece of dental floss.
Simply hold the dental floss between your hands and place it at the back of your print, close to the bottom, then slowly pull it towards you. Many people have had success using this method.
Heat your Print Bed
You can also reheat your print bed to about 70°C, at times heat can also make the print pop off. Using temperature changes to manipulate the print is a great method since we know these print materials react to heat.
Higher heat can soften the material enough to decrease adhesion to the print bed.
Freeze the Print Bed Along With Your Stuck Print
By spraying compressed air onto your stuck prints, you can make them easily pop off due to temperature changes also.
Placing your print and bed in the freezer also causes the plastic to contract a bit resulting in the print bed loosening its grip on the print.
This isn’t a common method because once you do the proper preparation, prints should come off fairly easily in the future.
Dissolve the Adhesive Using Alcohol
Another way of removing stuck prints from the base is to dissolve adhesive with the help of isopropyl alcohol. Put the solution near the print’s base and allow it to sit for 15 minutes.
Using a putty knife you can then easily pop the stuck print off the edges.
You can also use hot water to melt the adhesive as an alternative, but make sure it’s not boiling so it doesn’t bring the print material to its glass transition temperature, which could deform the print.
How Do You Remove a Stuck PLA Print?
To allow the easy removal of a stuck PLA print, it’s best to heat the heat bed around 70°C which results in PLA getting soft. As the adhesive will be weakened, you can remove your prints off the glass bed.
Since PLA has a low level of heat resistance, heat is going to be one of the better methods to remove a stuck PLA print.
You may also use a high quality spatula or a putty knife to help twist the print from the sides and allow it to detach completely.
Dissolving adhesive using alcohol won’t work for PLA. PLA has a lower glass temperature, and hence it is best to heat it up and remove prints.
This method has been popular among users because of its effectiveness and speed.
Check out my article on How to 3D Print PLA Successfully.
How to Remove ABS Prints on a 3D Print Bed?
Many people have trouble removing ABS prints due to reasons such as a glass print bed expanding and shrinking which creates tension on the interface layer.
If your ABS print is really stuck down to the print bed, an ideal way to detach ABS prints is by refrigerating or freezing them.
Place your print bed along with the prints in the freezer for some time. The freezing air will cause plastic to contract and this result will loosen the grip on your stuck print.
The glass surface expands and shrinks according to the ABS under specific temperature.
Allowing the glass bed to cool will shrink it, and create tension on interface layer that can then be exploited using a thin scraper.
Moreover, putting the bed along with the print into the refrigerator increases the tension to a certain point at which the bonding eventually breaks.
This results in the print popping free in several areas and even sometimes completely- easing the removal.
When your ABS print finishes, another good idea is to turn on the fan to cool it down quickly. This has the effect of quick contraction, resulting in prints popping off.
A good preventative measure to stop ABS prints sticking to the print bed is to use an ABS & acetone slurry mix on the print bed beforehand, along with some cheap tape. If the print is a smaller one, you probably won’t need the tape.
Simple glue stick is still widely used today because it works so well also. It’s easily cleaned and helps most prints stick to the bed, as well as with removal afterwards.
Check out my article on How to 3D Print ABS Successfully.
How to Remove PETG Print From Print Bed?
PETG prints stick too much to the print bed at times or the build surface, preventing easy removal and even at times come off in bits when removed.
You should opt in to using glue stick or hairspray to help remove PETG prints from the print bed. Another tip is to avoid printing directly on build surfaces like BuildTak, PEI, or even glass.
You would much rather 3D prints come off along with the adhesive, rather than with pieces of the build surface.
Here is the video of the glass print bed which got ripped off along with a finished 3D print!
Check out my article on How to 3D Print PETG Successfully.
How to Prevent 3D Prints Sticking to Print Bed Too Much
Rather than have to deal with the problem of a print stuck down too much to your print bed, you should take a preventative approach to tackle this problem.
Using the right build platform is one of the most essential tools you can implement to make 3D prints easy to remove from the print bed.
Flexible, magnetic build plates can easily be removed from the 3D printer, then ‘flexed’ to pop off 3D prints.
Several users who have the flexible build surfaces love just how easy it makes remove 3D prints. A great flexible build surface you can get from Amazon is the Creality Ultra Flexible Magnetic Build Surface.
If you have a glass build plate rather than the flexible one, many people will use materials such as blue painter’s tape, Kapton tape, or apply glue stick to the print bed (also prevents warping).
Borosilicate glass is a build surface designed to not shatter easily, as opposed to tempered glass, which is similar to car windshield glass.
You can get a good borosilicate glass bed on Amazon for a good price. The Dcreate Borosilicate Glass Print Platform is highly rated and gets the job done for several 3D printer users.
How to Remove 3D Print From Ender 3 Bed
When looking at removing 3D prints from an Ender 3 bed, there isn’t really much difference compared to the information above. You want to follow the process of having a good bed, good adhesive substance, high quality scraping tool, and good quality filament.
When a 3D print has finished on your Ender 3, you should be able to either pop it off with the flex build plate, or scrape it off with a print removal tool like a spatula or even a thin blade.
Larger prints can be harder to remove from the print bed, so you can also incorporate the water and alcohol spray mixture to try and weaken the bond between your print and the print bed.
If your 3D print is stuck down a little too hard, either heat up the bed and try remove it again, or put the build plate along with the print in the freezer to make use of temperature change to weaken the adhesion.
How to Remove a Resin 3D Print From Build Plate
You should use a thin, sharp razor or blade to insert underneath your resin 3D print, then insert a palette knife or spatula underneath this and wiggle it around. This method is one of the most common ways to remove a resin 3D print because it is so effective.
The video below shows this method working.
Other things you can try is when printing with rafts, to give it quite a high rim with a small angle, so a print removal tool can slide underneath and use a lever motion to remove the resin print.
Adding angles to the base of miniature prints makes removing them a lot easier.
Again, make sure your hand is not in the direction of the print removal tool so there aren’t any injuries to yourself.
A rotating motion under a resin 3D print on your build surface is usually enough to remove the print.
Some people have found luck after adjusting their base height, finding a sweet spot to where you get good adhesion, while not being a struggle to remove the print.
A good process that people follow is to clean the aluminum build surface with IPA (isopropyl alcohol) then use 220-grit sandpaper to sand the aluminum in small circles.
Wipe off the sticky gray film that comes off with a paper towel and continue this process until the gray film stop appearing. Clean the surface one more time with IPA, let it dry, then sand the surface until you only see dust coming off.
After this, do one final cleaning with IPA and your printing surface should give you amazing adhesion, while being able to remove the prints with ease after printing.
How Do You Clean a Magnetic Build Plate?
It’s best to clean your magnetic build plate with the help of 91% isopropyl alcohol. This will not only act as an effective disinfectant but also a good cleaner. Wipe the surface clean and dry preferably using a lint-free piece of cloth.
If you don’t prefer using alcohol, you can also clean the build plate using dishwashing soap/liquid and hot water.
For ease, you can make up this cleaning solution in some spray bottle. You can then spray it as per requirement and wipe the surface dry using a lint-free piece of cloth.
How Long Should I Let 3D Prints Cool Between Prints?
For some reason people think they should wait a certain amount of time to let their prints cool between prints, but realistically you don’t have to wait at all.
As soon as I notice my 3D print has finished, I work towards removing that print, doing a quick clean of the bed, and getting on with the next 3D print.
Prints are usually easier to remove when you catch the finishing moments of the print, but using the techniques in this article, you should easily be able to remove prints after they have cool down.
It may be a little harder when it cools down on a glass bed, depending on whether you used some substances on the print platform beforehand.
In other cases, prints can be removed easier when they have cooled down, so it really depends on your build platform, printing materials and adhesive substance. After you get into a routine, you can dial in your process to make life easier.
The contraction of the plastic after cooling down might be enough to pop off the print from the print bed without having you to move it.
Conclusion
The aforementioned hacks are quite promising when it comes to removing your stuck prints from the print bed. The tips are totally flexible and you can easily decide which one best matches your printing needs and requirements.
Cleaning the 3D printer table. Tips and Tricks.
3D printing is a very unstable process, I think everyone who is at least slightly familiar with plastic filament printing technology will agree with this. Unpleasant crashes in the 3D printer can occur for various reasons, and one of the most common reasons is the detachment of the model being grown from the desktop surface. And as a rule, this happens in the middle of printing, when you are already convinced of the stability of the press and are distracted by another activity. It is precisely for this reason that ensuring good adhesion of the first layer to the platform is very important for the successful completion of 3D printing.
Today there are many ways to improve the adhesion of the first layer to the bed. A lot of articles and recommendations have been written about this, so we will not talk about them. It is worth noting one of the simplest methods - is keeping the desktop of a 3D printer clean . Regular and thorough cleaning of the platform will not only improve adhesion, but will make printed models more beautiful and smooth.
In this article we will look at the best way to clean the 3D printer table, using the example of popular coatings:
Remember to be careful when using the methods below, as spilled liquid may damage the 3D printer. We recommend removing the bed from the printer before cleaning (if possible).
PEI sheet surface cleaning
Recently, PEI sheet has become a very popular material for improving adhesion in 3D printers. It provides excellent adhesion to various materials, and when it cools down, the printed model lags behind it very easily. The sheets are very simple and not fussy to use, and most often it does not require additional application of glue or adhesive tape.
Unfortunately, in order to achieve maximum efficiency, the PEI surface also requires regular and high-quality cleaning. If PEI is touched frequently, it can develop greasy spots that reduce adhesion to the material. Rough cleaning can also damage the surface and reduce sticking. Regular cleaning and maintenance of PEI will ensure that your models do not come off.
How to clean the surface of PEI
To clean this surface, we recommend using isopropyl alcohol (Chemical pure, odorless) with a concentration of more than 70%. You can use it with a smell, but it is very caustic and unpleasant, the room will need to be ventilated.
Wait for the platform to cool, then liberally soak a dry cloth or paper towel with alcohol and wipe the surface. This will remove a significant portion of the fats and oils from the bed.
Acetone is also good at dissolving plastic residues on the surface. In the same way, liberally moisten the cloth with liquid, then gently wipe the surface of the 3D printer desktop. We strongly recommend doing this work in a well-ventilated area, as acetone is highly flammable and its vapors can penetrate the electronics of the device
If you have been using PEI sheet for quite a long time, and visually its resource has been significantly used up, then we recommend using fine grit sandpaper (1500+). With gentle, circular motions, sand the surface until light scratches and depressions are removed.
When should I clean?
Most manufacturers recommend cleaning the surface with isopropyl alcohol every 2 to 3 prints. After a few months of use, sand the surface and wipe thoroughly with acetone. If it is no longer possible to restore the surface by the listed methods, then replace it with a new sheet from PEI. The lifespan of such material varies depending on the brand and frequency of use of the 3D printer.
Glass Surface Cleaning
Glass is another very common 3D printer desktop material. Much more durable than PEI and similar surfaces. The glass plates provide a smooth and level surface at the bottom of the model.
This surface is usually used in combination with other aids (eg glue stick or hairspray) to improve the adhesion of the first coat. Such products are especially popular on tables that are not equipped with heating. Therefore, regular cleaning of the glass is necessary to prevent adhesive or varnish from sticking.
How to clean the glass platform
The easiest way to clean a glass plate is to use a scraper or a non-metal spatula. If the table is heated, then heat it until the material remains soft, after which they should be easily removed with a scraper.
Be careful when scraping. Depending on the scraper, the blade can be very sharp, so be careful not to scratch the surface. We recommend that you put your hand on the handle of the scraper, and with the other hand press down on its middle, so that the greatest force is directed downwards.
If this does not work, try wiping the glass with warm soapy water. Although simple, this method is very effective for removing hairspray, glue, and other adhesives. Keep in mind that this method is only recommended if the 3D printer allows you to remove the platform. Spilled water can seriously damage the heating element, power supply or other electronics of the device.
Dirt can also be removed with specialized cleaning agents. For example, wet alcohol wipes, window cleaner, isopropyl alcohol will also effectively wash away adhesive residue and restore the glass surface. However, do not take too strong cleaners. Such substances can severely damage the surface or even the 3D printer. In order to be sure to select a cleaning agent for your particular 3D printer, it is best to contact its manufacturer. Most often, they willingly make contact with users and willingly give advice.
When to clean the glass surface
Again, this will depend on how often you use the printer. We recommend cleaning the surface after each print to prevent buildup of glue or varnish. Such a procedure will not take much time, but the print will be more stable, and the resulting prints will have a beautiful and even surface. Once the models stop sticking (usually after a month), try washing the surface with soap and water. After about two to four months, you will have to resort to isopropyl alcohol or other specialty drugs. substances.
Cleaning adhesive tapes
Adhesive tape is another proven way to increase adhesion to the print platform. Today, this method is more common on 3D printers without the function of heating the desktop. Masking tape is the most common remedy, but so are Kapton and others.
One of the reasons for the popularity of such linens is their ease of use and relatively inexpensive cost. They are easy to stick to the surface and are available at almost any hardware store. However, there are also disadvantages: the tape quite often peels off when the printed model is removed, so it must be reapplied regularly.
How to clean?
Unfortunately masking tape is one of the most difficult to clean due to its fragility. however, we have found that gentle scraping is one of the most effective ways to clean it. With light pressure, evenly scrape off the remaining plastic thread from the surface, being careful not to tear it.
If the tape does break during cleaning, replace this area with a new strip. The main thing is not to overdo it and do not apply a thick layer, this can adversely affect the quality of the print. If the tape is full of holes and looks like Swiss cheese, then it needs to be completely replaced. Strip and scrape the old tape from the surface. Then wash the platform with warm soapy water to remove adhesive residue.
Once the old tape has been removed and the surface has been thoroughly washed, apply a new layer of masking tape or Kapton. Squeeze out any air bubbles if necessary.
When should I clean?
Masking tape wears out quickly and needs to be replaced much more frequently than PEi for example. We recommend lightly scraping off any plastic that has stuck to it after each print. Depending on the frequency of printing, you will need to change such a surface daily, weekly or once a month.
6 easy steps to upgrade your 3D printer bed・Cults
Layer alignment is an essential part of successful printing. It's one of the first things you do when buying a 3D printer, and one of the first things you should look out for if you're having issues with your prints. Over the life of your printer, you may need to align your plate several times, so don't be discouraged or discouraged if you feel like you'll have to do this over and over again. This is fine. This is fine. Even the most experienced manufacturers spend a lot of time leveling the bed of a new printer, so it's best to treat this as a regular, essential maintenance.
- 1) The print does not stick to the substrate: It is very important to have a good first coat to get a good print. For a good first coat, you need good adhesion to the substrate. If the gap between the nozzle and bed is too large, the filament will be difficult to stick to the bed and will start to rise. Even if the first layer sticks, but the bed is not even, you will run into problems in the later stages of printing (which is even more annoying!), and all the print will come off the bed.
- 2) Gaps in the initial layer or layers that are too thin: Uneven extrusion and problems with the consistency of the first layer can be caused by a number of different reasons, including an uneven layer.
When your printer is running normally, the filament is pushed out at a constant speed due to the pressure of the filament pushing it forward. The resistance to pushing out of this plastic is called "back pressure". When the space between the nozzle and the printed layer changes from place to place, the space into which the filament must flow changes, thereby changing the flow resistance of the filament. This change in pressure can cause extruder seizure, uneven extrusion, and gaps in layers.
- 3) Plastic collects around the head when printing the first few layers: If the space between the nozzle and the layer is too small, you will get spots or filament that will collect on the surface. Later in the printing process, the print may come off the bed or be completely skewed.
For beginners leveling the bed for the first time, the goal is to ensure that the distance from the nozzle to the build plate is the same at all points. This guarantees a smooth and uniform print. Most plug and play printers have a step-by-step guide built into the printer to help you manually level the build plate. If you have a DIY printer or a printer that doesn't have a built-in tutorial, you'll have to go through a few steps before you can start printing. Each printer is built a little differently, so these instructions may vary slightly, but the general bed upgrade technique is the same for most printers.
Pro tip : Before leveling the bed, heat it up to the temperature at which you will be typing. If you are printing with ABS, set the settings for ABS. Also make sure your surface is the same as the one you will be printing on. If you are printing with tape or buildtack, make sure you apply them before you level the bed. Aluminum beds expand and contract as they heat up and cool down, so if you want your bed to be level, it's best to do so when the bed is in the same state as when it was printed - JAT.MN
Step 1: Find an index card or sheet of paper as thick as a regular 8. 5 x 11 sheet of paper.
Step 2: Each printer will have bolts or spring handles that control the movement of the glass plate. Using an Allan wrench (or by hand if your printer has handles to allow this), tighten these bolts into the corners of the printer.
Step 3: The primary sensor used to properly position the hot end from the build plate is the Z-axis end stop. For new printers, make sure the end stop cables are secure and remove any tape from the end stops. Move the print head to the center of the plate and place the fork under the nozzle. Adjust the end stop on the Z-Axis until you feel a slight resistance when trying to move the card under the nozzle. This means that you can still move the paper back and forth, but there is some resistance in the nozzle. If you can easily move the paper and there is no resistance, then the nozzle is too far from the mounting plate. If the paper does not move at all, then the nozzle is too close and you need to set the build plate a little lower.
Step 4: Move the paper and nozzle head to all corners of the printer and make sure there is no resistance underneath.
Step 5: You can now start micro-adjusting the corners of your printer by adjusting the bed height with the screws at the corners of the bed. Start at one corner and position the print head as close to the bolt as possible and place the paper under the nozzle. Using a hex wrench, adjust the bed until there is slight paper resistance in the nozzle. Repeat this step for all corners of your bed.
Step 6: After you have leveled all the corners with the bolts, repeat this process one more time, maybe a third time. You will find that when you make adjustments to corners, other corners are affected as well, so it may take several times to get an accurate result. Each time you repeat this process, your adjustments should get smaller and smaller. When you almost succeed, you will know that you have done your best!
If you want to watch a video tutorial, then this one is very descriptive: