How to 3d print different colors
How to Make Multicolor Prints with an FDM 3D Printer
(Image credit: Tom's Hardware)The best 3D printers, even inexpensive models like the Creality Ender 3 Pro, are able to make highly detailed models, but most can only output in one color at a time. In this guide, we’re going to explore a few different ways you can print parts in multiple colors using an FDM 3D printer that only has a single nozzle. The three techniques we’ll explore are the ‘Pause and Swap’ method of swapping filament spools, printing objects in multiple pieces, and using rainbow filament to create parts with a satisfying color transition. You can also paint your model after printing, but that will be a whole other article.
If you’ve never prepared a model for 3D printing before, you can read about the process and get comfortable with customizing slicer settings by reading our guide on how to make your first 3D print. If you’re already comfortable with changing slicer settings like infill, print speed, and others, read on to learn how to create multicolor prints with a single-extruder FDM 3D printer.
What You’ll Need
- 3D Printer: In this article, we’ll be using the Creality Ender 3 Pro FDM 3D printer,but just about any FDM 3D printer will do (SLA (aka resin) models are a different story).
- Filament: PLA is an easy-to-use low cost material, and in this article we’ll be using PLA filament from Begonova, Eryone, and others. To create rainbow parts, we’ll be using the TTYT3D Rainbow PLA.
- Slicer App: We’ll be using Ultimaker Cura to prepare files for the Creality Ender 3 Pro, but other slicer apps like PrusaSlicer and Simplify3D have a similar workflow. The settings should be similar, but they may be in different menus.
Getting the Software for Multicolor 3D Printing
(Image credit: Tinkercad)We’ll be using Tinkercad to create a multicolor part, but you can use any design program you already know. Tinkercad is available as a free in-browser program, and you can create an account by visiting their site.
Most slicer apps have the ability to add a ‘Pause’ command at a specified point in a print, but you may need to reference the documentation to find where the command is located. The process for adding a pause in Ultimaker Cura is well documented, and we’ll go over the basics in this article to help guide you through if you’re not not familiar with this feature.
1. Create a Tinkercad account on the Tinkercad site. If you’re interested in creating 3D models and programming pauses into your prints, Tinkercad is a great place to get started because you can define the height of a model and design with multicolor printing in mind.
2. Download the slicer software for your 3D printer. We’ll be using Ultimaker Cura, a free app, with the Creality Ender 3 Pro but other slicer apps for FDM 3D printers such as PrusaSlicer, Simplify3D, FlashPrint and others will have similar workflows.
Method 1: Pausing and Swapping Filament
(Image credit: Tom's Hardware)One of the fastest ways to create a multicolor 3D print from a single extruder machine is to use the “Pause and Swap” method. This process involves pausing the printer in the middle of a print, switching the filament spool to one with a different color, and resuming the print. This is an easy way to get a two color part, and the easiest way to do it is just pausing the printer when it hits the right layer. If you want more control over the process, you can also program a pause at a certain layer or height.
In this section, we’ll cover the process of creating a model that’s designed for multicolor printing and the process of programming a pause using Ultimaker Cura for the Creality Ender 3 Pro, one of the best 3D printers for beginners. This process can be used on many different slicer apps (including PrusaSlicer, Simplify3D, etc.) so the principles are similar regardless of which app you’re using.
1. Open Tinkercad and import the Twitter logo SVG. Tinkercad will automatically convert the SVG vector graphic to a solid model, which we’ll use as the starting point for our model.
2. Use the ruler tool to scale the model to a printable size. We’re going to be printing this part of the model in a different color, so we’re going to scale this model to 2mm thick.
(Image credit: Tinkercad)3. Use the Text tool to add text to your model and set the thickness to 2mm. By keeping this thickness as 2mm, we know that it will print at a consistent height on top of the base of the model.
(Image credit: Tinkercad)4. Create a base for your model and set the thickness to 5mm. Once the base has been created, use the Move tool to bring your text up 5mm so it can be placed directly on top of the base of the model.
Image 1 of 2
(Image credit: Tinkercad)(Image credit: Tinkercad)5. Align your models by using the Align tool so that the models are centered on the X and Y axes and make sure the top of the model is offset from the platform by 5mm. This will create a model that will easily accommodate changing filament colors.
6. Export the .stl from Tinkercad and import it into Cura to prepare the model for the slicing process. Cura has the ability to pause the printer at a set layer, which will give us the ability to swap out the filament and change colors.
(Image credit: Ultimaker)7. Select ‘Extensions’ - ‘Post Processing’ - ‘Modify Gcode’ and add a ‘Pause at Height’. Because we know the base of this model is 5mm tall (25 layers at .2mm layers) and we want to pause and change colors before starting the next layer, we’ll use layer 26 as our target.
(Image credit: Ultimaker)8. Slice the model using your default settings and export the 3D printable .gcode. You can go through the model at this point and confirm that the raised text will change color by multiplying the layer height (.2mm) by the number of layers before the change (25) which gives us 5mm.
9. Load the first color in your 3D printer and start the print. Since we want this part to have a white base with blue text, we’ll start the print with white filament loaded.
(Image credit: Tom's Hardware)10. Remove the first color of filament and load the second when the print pauses. Some printers will retract the material automatically when paused, and others will require the filament to be pulled out and replaced manually. Once the second color of filament is loaded, resume the print.
(Image credit: Tom's Hardware)11. Remove your model and check the layer swap. The model should have swapped colors at the correct layer, and you should have a two color print that came from a single extruder 3D printer. You can also make a model like this by pausing and swapping the filament manually, but the downside is you need to be near the printer to pause it when it reaches the proper layer.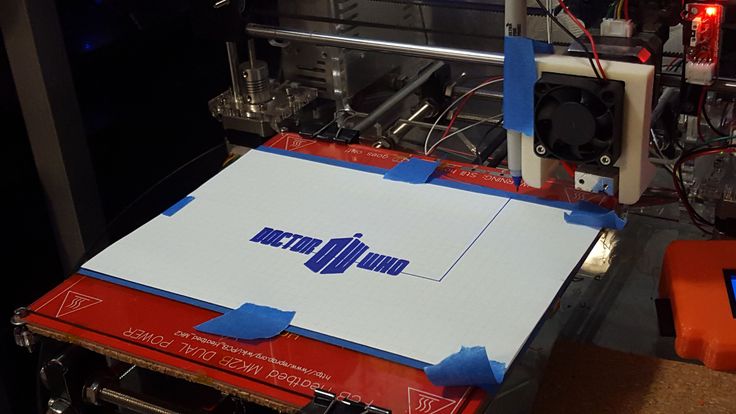
Method 2: Using Multiple Parts for Multicolor 3D Prints
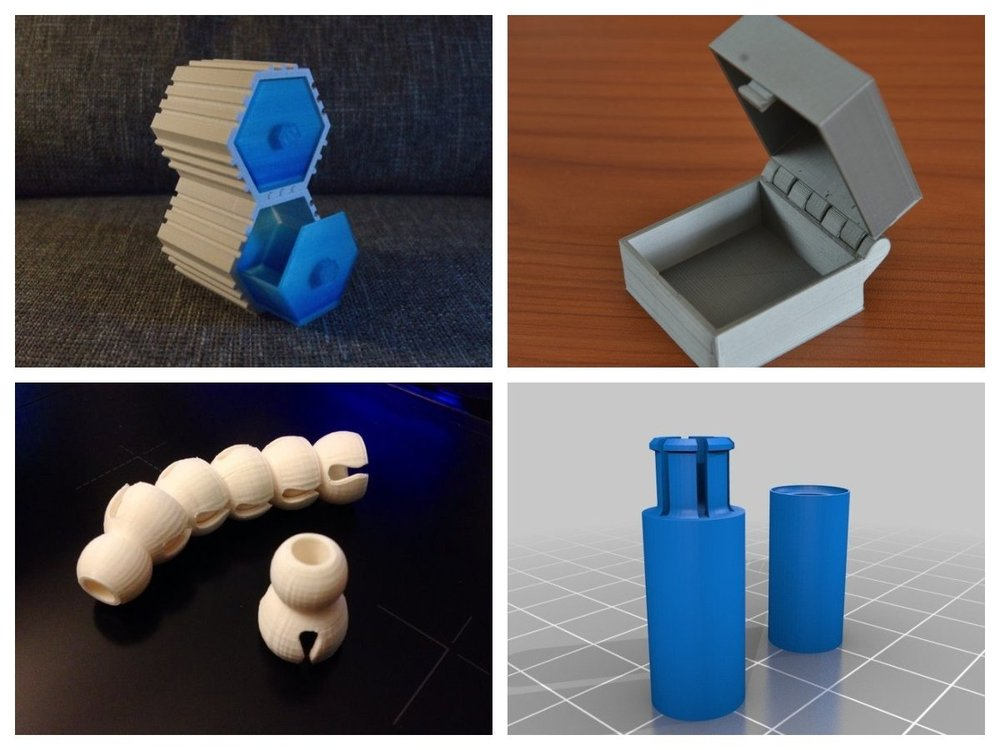
Printing models that are composed of multiple parts is a simple and fun way to create colorful parts that couldn’t be printed in a single pass. To highlight this method of printing we’ll be using the Screwless Cube Gear, designed by emmett and hosted on Thingiverse. This model is designed to be printed as three separate trays and is ideal for making a colorful, functional, and engaging 3D print.
(Image credit: Tom's Hardware)1. Choose the colors you are going to use and split the full model into different trays. Each tray will print with a different color, so select colors that you think would have good contrast. We’re going to print the center block and pins of the rotating gear in blue, then print out two sets of gears; one in white, and one in black.
Image 1 of 2
(Image credit: Ultimaker)(Image credit: Ultimaker)2. Print each tray, using a different color each time. After printing the cube center and pins, we swapped the filament from blue to white before printing out the gears.
Image 1 of 3
(Image credit: Tom's Hardware)(Image credit: Tom's Hardware)(Image credit: Tom's Hardware)3. Assemble the model by using the pins to snap each corner of the cube gear into the center block. PLA plastic tends to be stiff, so you may need to squeeze the edges of the pins to loosen them before inserting them into the corners.
(Image credit: Tom's Hardware)4. Rotate the cube and admire the finished product. The gears of the cube should rotate freely around the center block; if they are stiff you can add a small amount of silicone lubricant to reduce friction.
(Image credit: Tom's Hardware)Method 3: Using Rainbow Filament for Multicolor 3D Prints
Printing with rainbow (or any other multicolored material) is the easiest way to create a multicolored part, but the colors that print out will vary depending on what type of material you’re using. If you’re interested in making colorful and fun prints, rainbow PLA is a great choice of material to use.
In this section, we’ll be using TTYT3D brand rainbow PLA , which is available on Amazon and doesn’t cost much more than a standard spool of PLA material.
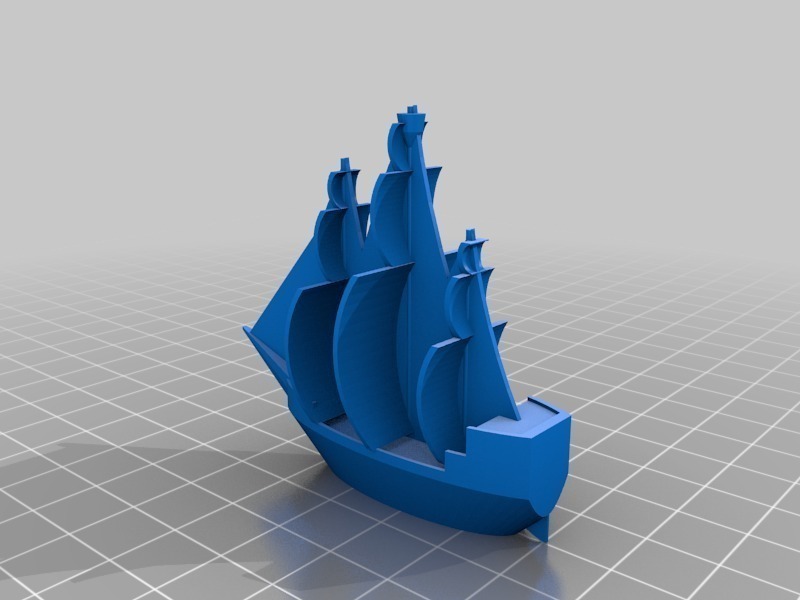
(Image credit: Tom's Hardware)1. Prepare a model for 3D printing in your slicer program. You’ll get the most dramatic color transitions by making large, dense models because the spool transitions through colors as it prints. For this section, we’ll be printing the Plunderbuss Pete model with a high infill amount to use more material and create faster transitions throughout the model. Export the sliced file, save to an SD card, and insert the card into your 3D printer (or use Wi-Fi if your printer supports that).
Image 1 of 2
(Image credit: Tom's Hardware)(Image credit: Tom's Hardware)2. Load the rainbow PLA material into the printer.
(Image credit: Tom's Hardware)3.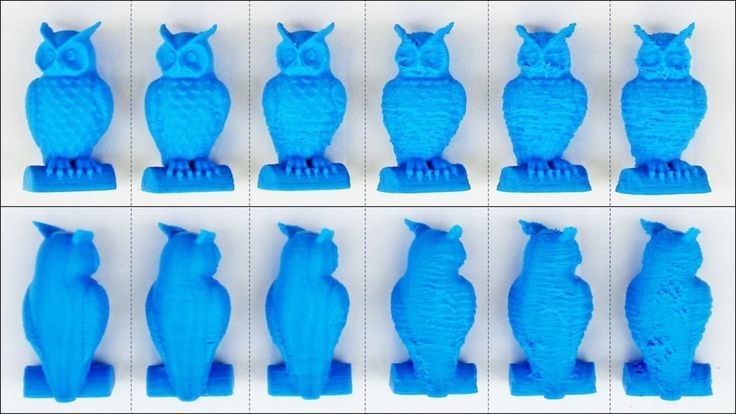 Start the print and watch the colors change as the print progresses.
4. Remove your model from the bed once the print has completed. Since the model is printed using only a single spool of material, there’s no need to pause the print, change filament, or do any post-processing.
Image 1 of 3
(Image credit: Tom's Hardware)(Image credit: Tom's Hardware)(Image credit: Tom's Hardware)Want to learn more about 3D printing? Be sure to read our Best 3D Printers Guide to see which machines we recommend in 2021 and learn a little more about the differences between printer types. If you’re interested in a fun project, you can follow our guide to create a 3D selfie by scanning your face and making a 3D printed copy.
Andrew Sink first used a 3D printer in 2012, and has been enthusiastically involved in the 3D printing industry ever since. Having printed everything from a scan of his own brain to a peanut butter and jelly sandwich, he continues to dive ever more deeply into the endless applications of additive technology.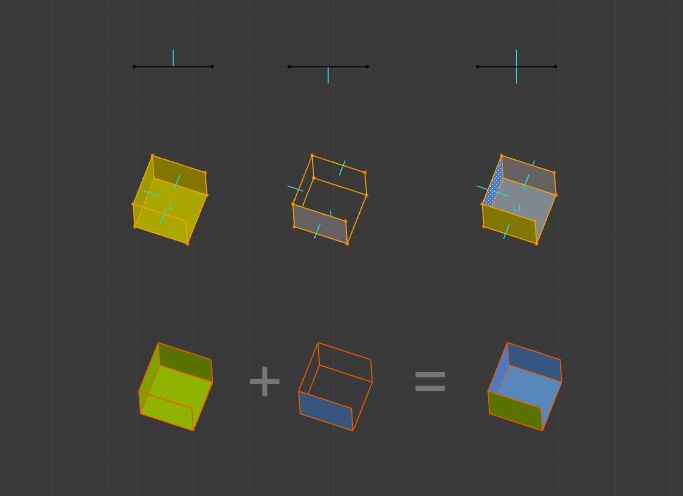 He is always working on new experiments, designs, and reviews and sharing his results on Tom's Hardware, YouTube, and more.
Topics
3D Printing
How to 3D Print in Multiple Colors with Just One Extruder
3D Insider is ad supported and earns money from clicks, commissions from sales, and other ways.
Oftentimes, owning a single-extruder 3D printer feels like you’re missing out on a lot of things. You can’t use HIPS or PVA for support structures, and cannot automatically print multi-colored designs. However, dual-extruder 3D printers can cost quite a bit more.
There still is a way for your 3D prints to have multiple colors – it’s just going to take a bit of extra work. If you don’t mind the extra effort, then check out this guide on how you can 3D print multiple-color models with just a single extruder.
Printing in parts
The simplest way to create a multi-colored print is to separate your 3D model into parts and print these parts separately. This method certainly isn’t for everybody, as you may need advanced 3D modeling skills to pull this off. If you’re just downloading free OBJ files online, you might not even be able to manipulate those freely. Printing in parts is ideal for 3D models that you’ve come up with yourself.
Take note that there will still be limitations to this method. Once all parts have been assembled, you’re going to need to assemble them and glue them together. This may not be possible if your model has odd angles, or if it’s just too complicated.
This may seem like a rudimentary approach to making multicolored 3D prints, but the results are usually good with a bit of creativity and careful planning. If you’re planning to do polishing or post-processing of a multi-part model, it’s best done before assembly.
Use a multicolored filament
Using a multicolored filament is quite an unconventional approach to 3D printing, if only because it lacks any predictability. It involves using a filament that has a spectrum of colors – such as this Rainbow PLA Filament from DO3D.
There are also ways to make your own multicolored filament either by dyeing a white filament or fusing together several filaments of different colors. How much work you want to do is up to you, but there’s always the options of simply buying the multicolored filament.
Printing with multicolored filament results in a model with zones that transition smoothly from one color to another. As we’ve mentioned, this will be an innately unpredictable process. There’s no way to know in which color every single part of the model will be printed.
Instead of treating this unpredictability as a negative, this is actually one of the best things about this method. If you 3D printed the same model ten times using multicolored filament, they will all come out looking different. This element of surprise and variability makes this method novel and unique. You also don’t need any special method or equipment, aside from the multicolored filament itself.
Filament swapping
The most commonly practiced method in the 3D printing community to print in multiple colors with a single extruder is called filament swapping. It involves pausing the print mid-way and swapping one filament for another. It will take a lot of work as you’ll need to actively monitor and step in every now and then during 3D printing.
There are several approaches to this method. You can either do the pausing of the print manually or include the commands in the model’s G-Code. The latter is a lot more convenient but will require that you know how to write and manipulate G-Code commands. The manual method is still viable if you’re willing to do the work.
The number of times that you’ll need to swap another filament will depend on how complex your design is. Although the method may seem simple, it can be very tedious for models that have to be printed in a lot of colors. You can optimize this process by orienting your model in the slicer software such that color transitions occur neatly on layer boundaries. This may not always be possible.
Manual method
To do manual filament swapping, simply pause the print at the point where you want a color change. Manually raise the nozzle using your 3D printer software by about 20 mm. Retract the filament from the extruder and swap in the new filament.
Extrude the new filament, making sure that all traces of the old filament have been removed. Catch the scrap filament with some cardboard you have lying around. You can then lower the nozzle to the original position and resume printing. Repeat this process as many times as necessary.
Semi-automatic method
If you know how to mess around with G-Code, then you can make this method so much easier. Once your slicer software has generated the G-Code for your model, use the layer preview to identify the layers in which you want to do a filament swap. Write these down as you’ll be referring to this list multiple times.
With the layers identified, you can go ahead and look for the layers in the G-Code and insert a pause (M600) command. It would be best to couple this with a Z20 command, which raises the nozzle by 20 mm. Do this for every layer that requires a filament swap.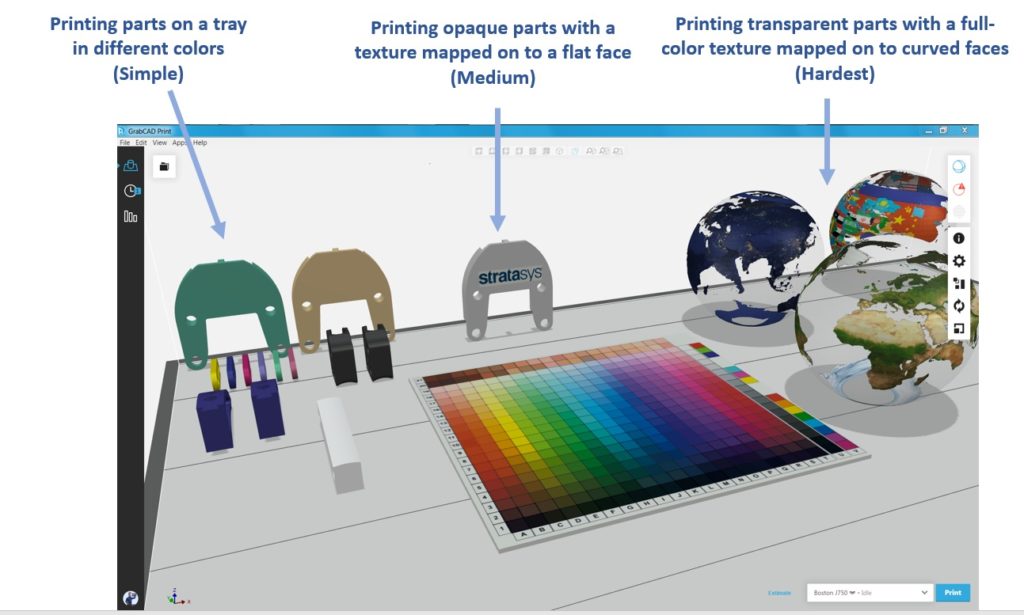 Make sure to run the layer preview again, just to make sure that the G-Code is functioning as expected.
With the G-Code edits in place, your printer should now know to automatically pause when you need to swap in a new filament. The actual swapping step is still manual, of course, but this method is a lot less tedious and prone to error.
Although filament swapping may also seem like a rudimentary method, a lot of 3D printing professionals practice it. It’s the most common method for overcoming the limitations of the number of extruders in a 3D printer – after all, most 3D printers are limited to just one or two. There is a lot of skill needed to pull off filament swapping, but the results are certainly worth the effort.
Filament splicing
Sometimes, splitting up the colors of a model into distinct layers is virtually impossible. Should this be the case, you can augment a single-extruder 3D printer with an accessory with up to four different filaments. This is the idea behind filament splicing – a method that allows for fully automated filament swapping.
The key to this method is the Palette accessory. The Pallete works by accommodating up to four different filament spools. Inside the Palette is a mechanism that cuts, heats, and splices together any combination of two filaments from the selection. This process is very quick and can be automated using the CANVAS hub. The spliced filament is then fed to the 3D printer as a single, uninterrupted strand.
A great thing about Palette is that they have been in the business for quite some time. The latest model, the Palette 2S Pro, is an extremely streamlined product with a host of quality-of-life features. It’s easy to use, requires no calibration, has tool-free maintenance, and comes with intuitive software. It’s also a really good-looking product and its modern minimalist aesthetics should fit quite well in any workstation.
There is a catch, however – the Palette filament splicer is quite expensive. In fact, you can buy a dual-extruder 3D printer for several hundred dollars cheaper than the Palette 2S Pro. This certainly puts into question the wisdom of investing in a Palette accessory.
Other technologies: PolyJet printing
This may already be outside the subject scope of this article but is still worth mentioning because of how interesting the technology is. One of the most advanced ways to 3D print in multiple colors is via the Multi-Color Polyjet method on the Stratasys J750 printer.
The Polyjet method uses photopolymer resin as raw material. This liquid resin is deposited on a build plate through very small droplets and cured by a flash of UV light. What is unique about Multi-Color Polyjet is that it allows the droplets to be colored before deposition. The result is a full-color 3D print with vibrant hues and an excellent level of detail.
Being able to create multi-colored objects using a PolyJet method may just be the peak of multi-colored 3D printing technology. PolyJet is already a superior technology, capable of reproducing highly detailed models using a rapid and reliable method. Combined with a multi-color option, it’s going to be tough for any other 3D printing method to present a compelling alternative.
The biggest downside, as you would expect, is that you can’t just buy a PolyJet printer. This type of printer is ridiculously expensive and typically only used in businesses or corporations. Instead, you can see the output of Multi-Color Polyjet yourself by having a model printed through a third-party service.
Final thoughts
Most people who are curious about 3D printing start with a simple, single-extruder 3D printer. While this is good enough for practicing, printing with a single color only can feel lackluster after some time.
However, you don’t need necessarily need to upgrade to a dual-extruder model just to print multi-colored models. With a bit of creativity (and a lot of tenacity), you can “hack” your way to multi-colored print with just your humble single-extruder printer.
Warning; 3D printers should never be left unattended. They can pose a firesafety hazard.
Multi-color printing with one exturder
3D printing
Good afternoon fellow 3D printer owners!
I have 2 3D printers - one at work - PrintBox3D One, the second at home - Geeetech Acrylic Prusa I3 pro B, both with one extruder and, accordingly, with the ability to print with only one filament at a time. But here the other day I was asked to make a keychain model according to the picture, in a couple of hours the model was ready, it remains to print. I really wanted to surprise customers by printing a colored keychain, I thought for a long time how to do this until I remembered that I have a change filament function on my home printer when printing from a memory card.
And so, we started - the base is printed from PLA, letters HIPS. (translucent keychain with red letters). I waited until the extruder began to output the first layer of letters, and pressed the change filament, the printer head moved to table 0 and about 5 mm higher than the current one, made a negative filament retraction. I started changing the plastic and accidentally moved the carriage to the side .... I moved it back by eye, but I didn’t expect anything good ... and rightly so, the carriage began to smear past the desired position.
How then to change? if all engines are turned off after switching on the replacement? everything turned out to be simple - I won’t say that I quickly came to this, otherwise I wouldn’t write this article - after replacing the filament, as soon as the carriage goes to the place of printing, press Pause print, in the pause menu we find the section Prepare -> Move Axis-> 1.0, and raise our carriage above the model at least a couple of mm, so as not to spoil the model - do not forget to remember the height at which the print was carried out. After that, in the Prepare menu, click Autohome. The printer head has gone to 0:0. Excellent! now again we go to Prepare ->Move Axis->0,1 and set the Z position to the print height we need. If the height was 5.15, and we have a step of 0. 1, then we set 5.1 and press ResumePrint, the head itself returns to the moment of printing. I don't know why, but the printer only remembers the X and Y coordinates of the extruder position when paused.
Here is a photo of my first experiment with printing in different colors. Transparent - PLA rest HIPS.
On the first model (first row, left) you can see a black melting - I blunted it a bit with the extruder retracting along the Z axis in a pause. No processing has been done. For those who want to simplify the replacement procedure by changing the G-code:
M83 ;Set extruder to relative coordinate system
G1 E-50.000000 F6000 retract (F6000)
G1 Z6.050000 F300 ;Raise along the Z axis to a height of 6.05 with a speed of 300
G1 X190.000000 Y190.000000 F9000 ;retract to position 190:190 with a speed of 9000
G1 Z15 300
M84 E0 ; turn off all motors and turn off the extruder
M0 ; Pause and wait for the button to be pressed on the LCD displays
G1 E50. 000000 F200 ; load new 50mm filament at a speed of 200
G10 ; move to a height 1 mm higher than the desired
G1 X112.284000 Y124.871000 F9000 ; go to the coordinates where we left off
M82 ;Set extruder to absolute coordinates
These changes in the code are not for everyone, but for those who understand what to do - I think this excerpt will help. In the Cura slicer, these changes are inserted by the automatic script PostProcessingPlugin-> modify G-code
There is another option for multi-color printing - we split the G-code into layers, and print one by one, changing the filament. This is how the right model is printed in the first row in the photo.
After experimenting for a week, I got quite good at it:
Loading
11/08/2022
1499
9
Subscribe to the author
Subscribe
Don't want
0003
Read more
Leoluch
Loading
09/07/2015
358873
347
Subscribe to the author
Subscribe
Don't want
Good afternoon, dear visitors of the portal.
Today I decided not to leave in art...
Read more
302
Follow author
Subscribe
Don't want
Hello dear community!
If the experiment was successful, then something is wrong here...
Read more
Single extruder 3D printer in color
top sellers
-
Bearing 604UU U604ZZ
U-bearing U604ZZ 604UU 4*13*4
35.00 UAH
-
Thermal mat for 3D printing 200 x 200 mm
3D printing thermal pad
UAH 150.
 00
00 -
Buy epo3d+ 3D printer
Epo3d+ Ukrainian FDM 3D printer on HIWIN rails. Thanks to reliable...
UAH 35,000.00
-
ABS granules
ABS granules for extrusion
400.00 UAH
-
PLA
PLA environmental plastic from Plexiwire. 100% advance payment....
UAH 375.00
-
Buy ABS plastic (ABS)
ABS plastic from Plexiwire.
 100% prepayment. Free shipping...
 UAH 220.00
-
Mini motor reducer 12v 100 rpm
high torque mini electric motor. Its size is...
UAH 150.00
-
Nozzle for 3D printer 1.75 mm, for E3D and MK8 hotends
Nozzle for 3D printer 1.75 mm 0.2/0.3/0.4/0.5
35.00 UAH
-
PETG plastic for 3D printer
PETG plastic from Plexiwire. 100% prepayment. Free...
UAH 360.00
-
SHF-20 shaft support
SHF-20 shaft support is used for CNC
60.
 00 UAH
 -
A4988 stepper motor driver
35.00 UAH
-
Buy epo3d 3D printer
Ukrainian epo3d 3D printer built on the basis of modern kinematics...
UAH 18,000.00
All best sellers
Categories
Information
Single extruder 3D printer in color
Until recently, multi-color 3D printers were high-end printers that were beyond the reach of the average consumer. Now there are various options for creating colorful 3D models.
Let's take a look at direct color 3D printing, where the color comes from multicolored filaments used in a single nozzle FDM printer.
This article is about color printing with a single extruder by assigning multiple tasks to the software. The resulting G-code will give tasks to the printer, start with a single colored thread, and then pause at a certain layer height. At this point, the new filament is replaced and the print job is resumed. This method allows anyone with a standard single extruder printer to create a multicolor object.
If changing filament during printing seems tedious, you can install an external device Mosiac Manufacturing, Prusa MMU 2.0 or a device with a large print head standing on Micro, Crane Quad.
But if you do not have such multi-color devices, but you need to complete the task, you will have to resort to manual color replacement.
3D printing with layering a certain color at a certain height can be used in the production of: logos, board games, patches, badges, key chains, etc.
How to set print pauses in Gcode to replace thread in Simplify3D and CURA
This short guide will help the user without knowing Gcode to easily insert pauses into the code using standard slicers.
Simplify3D
this piece of code will do all the magic:
G91; Set to relative position
G1 Z20 F5000; Raise the nozzle (lower the table) 20mm along the Z-axis at a speed of 5000mm/min.
G90; Return to absolute position
M0; Pause and wait for user input to continue printing
At this point, change the thread with a different color.
In Simplify3D we will use the Process > Scripts > Post-Processing setting to inject the above Gcode (no comments) something like this:
{ REPLACE "; layer 3, Z=" " nG91 nG1 Z20 F5000 nG90 nM0 n; layer 3, Z = "}
Of course, you will need to choose a layer number for the pause (more on that in a moment). Also note that the " n " parts of the code just create a newline in GCode.
Switching to the slicer preview of your model will make this part easier. In Simplify3D, it's a matter of dragging the slider at the bottom of the preview screen (or entering the layer number).
CURA
These settings will give you complete control over print pause:
• Pause Height / Layer: The height or layer number where you want to pause printing.
• X and Y Parking Printhead: Moves the nozzle to the specified coordinates when printing is paused.
• Head Movement Z : Raises the nozzle (lowers the table) during pause, bringing it to the specified value.
• Retraction: parameters for retraction during the pause period.
• Extrusion amount and speed : The amount of material to be extruded when reloading new filament.
• Repeat Layers: You can repeat all previously completed layers to increase adhesion.
• Standby temperature: Nozzle temperature in pause mode.
Slic3r
Locate the Custom G-code section on the Printer Settings tab.
Scroll down to the After layer change G-code heading and paste the following code:
; LAYER: [layer_num], Z HEIGHT: [layer_z]
{if layer_num == 45}M600 ; Color change {endif}
If you want to do more filament swaps, just duplicate the last line like this:
{if layer_num == 45}M600 ; Color change 1 {endif}
{if layer_num == 65}M600 ; Color change 2 {endif}
{if layer_num == 85}M600 ; Color change 3 {endif}
Gcode Edits
If you're a bit versed in G-code and you're interested, then this method is for you.
Select the desired saved file with *.gcode extension. Open with a simple text editor - for example Notepad (Notepad) and start editing.
To do this, we determine on which layers it is planned to replace the color or material. Press Ctrl-F (search by text) and enter in the search window “layer 10” where for example the number 10 is the layer where the replacement takes place and click “Find”. After the line “layer 10”, paste the previously copied text with the code.
G91; Set to relative mode
G1 Z10; Lower table (raise print head) 10 mm
G90; Return to absolute mode
G1 X0 Y0; Zero (Home) X & Y
M0 Press to reset; Pause and wait
G91; Set to relative mode
G1 Z-10; Go back 10 mm
G90; Return to absolute mode
After executing these commands, the 3D printer will return to the last location it was in when the print was saved.
Team M600
This method, like the previous one, allows you to manually insert the M600 command into the G-code.
The advantage over the above is that you insert only one line with the M600 command into the code, and the printer itself rolls back the head to a safe place, ejects the filament and then loads it, and continues printing from the interrupted place.
If this command was not activated in your printer during firmware, the device will ignore it.
Plastic change
The easiest but time-consuming way is to manually change colors on a 3D printer.
You must be near the printer and closely observe the printing process. In order to have time to change the plastic at the right time.
Most 3D printers have this feature for changing the filament.
Select the menu to change the plastic, and then follow the instructions shown on the display.
And so we showed how you can upgrade a 3D printer and make it color.