Good quality 3d printers
Prusa MK3S+ 3D Printer Review: The Heavyweight Champ Continues to Dominate
Tom's Hardware Verdict
The Prusa MK3S+ continues to hold its own in a market saturated with low-cost competitors.
Pros
- +
+ PrusaSlicer provides best-in-class model slicing
- +
+ Flexible build platform sets the standard
- +
+ Automatic bed leveling
- +
+ Stealth Mode enables a nearly silent printing experience
Why you can trust Tom's Hardware Our expert reviewers spend hours testing and comparing products and services so you can choose the best for you. Find out more about how we test.
There are few 3D printers with as many industry accolades as the Prusa i3 MK3S+, and after spending some time with this printer, it’s easy to see why it’s one of the best 3D printers currently on the market. With a price tag of $999 for an assembled machine or $750 for a DIY kit, the price point of the MK3S+ is towards the high end for an open format consumer 3D printer, but the features of this machine and the ecosystem created by Prusa (they make their own hardware, software, filament, and more) have made the MK3S+ a formidable machine for anyone interested in taking their 3D printing game to the next level.
The features of the MK3S+ (silent stepper drivers, power-panic, etc.), noteworthy when originally launched, have largely become standard on lower-cost machines and may not seem particularly impressive on a spec sheet. However, clever software implementation and well-written documentation have created a machine that provides a best-in-class printing experience. For instance, the auto-leveling SuperPINDA probe of the MK3S+ maps the build platform for surface distortions, but the printer firmware is capable of storing multiple Z-offsets so you can switch build platforms without having to recalibrate every time.
The MK3S+ is a visually distinct machine; and the Prusa team has kept their black and orange color scheme for their smaller printer, the Prusa Mini+. The bright orange printed parts on the MK3S+ have created instant brand-recognition for the Prusa line of printers, and Prusa has doubled down on this by reinforcing their branding across their machine. In fact, you can find the word ‘Prusa’ printed, engraved, or etched into the MK3S+ in 25 places, 29 if you’re using a spool of their Prusa Polymers Prusament PLA material.
Specifications
Swipe to scroll horizontally
| Machine Footprint | 16.5 x 16.5 x 15 inches (42.0cm x 42.0cm x 38.0cm) |
| Build Volume | 9.84 x 8.3 x 8.3 inches (250mm x 210mm x 210mm) |
| Material | 1.75mm PLA, ABS, ASA, PETG |
| Extruder Type | Direct Drive |
| Nozzle | .4mm |
| Build Platform | Magnetic Heatbed with removable PEI spring steel sheets |
| Power Supply | 240 Watts |
| Connectivity | USB, SD Card |
| Interface | 3.4-inch Mono LCD and click wheel |
| Filament Run-Out Sensor | Yes |
Included with Prusa MK3S+
The fully assembled Prusa MK3S+ ships with all of the accessories required to make your first print, and also includes enough spare parts to replace almost every fastener on the machine. The fully assembled MK3S+ also includes a bag of Haribo Goldbears, a signature addition from the Prusa team.
Image 1 of 2
(Image credit: Tom's Hardware)(Image credit: Tom's Hardware)The Prusa MK3S+ includes a full spool of silver PLA material, screwdriver, a metal part scraper, a glue stick (for adhesion), an isopropyl alcohol wipe, lubricant for the linear rails, power and USB cables, a sheet of stickers, a printed handbook, and a diagnostic printout that confirms the functionality of the mechanical and electrical systems.
Image 1 of 2
(Image credit: Tom's Hardware)(Image credit: Tom's Hardware)The usefulness of the handbook is hard to overstate. When you’re starting out with your first 3D printer, it can be difficult to pinpoint the cause of problems such as loss-of-extrusion, poor layer adhesion, or a clogged extruder. The included handbook is full of detailed photographs, troubleshooting workflows, and solutions to common problems. This is an invaluable resource for beginners, amateurs, and experts alike, and it’s clear to me that Prusa has set the standard for technical documentation.
Setting up the Prusa MK3S+
(Image credit: Tom's Hardware)The Prusa MK3S+ ships with a completed print attached to the build platform. This print features a serpentine line with 90 degree angles, curves, and a solid block in the center with the Prusa logo facing upwards. This print serves to confirm that the printer is functional and has been properly assembled and calibrated. I was able to easily remove the print from the build platform by bending the steel sheet and carefully removing it.
(Image credit: Tom's Hardware)After powering on, the printer automatically runs through an initial setup process. This process involves calibrating the Z axis by running it all the way to the top of the printer, running the mesh bed leveling process to set the Z offsets, and loading the filament. This entire process only took me a few minutes, and the high level of automation involved means that the only thing I needed to do was insert the filament into the extruder after it had heated up.
You might be surprised to find that the Prusa MK3S+ is based on the RepRap i3 (third iteration) frame, originally released in September of 2012. Despite this nearly decade-old release date, the MK3S+ is full of modern advancements and enough innovative features to still be a top contender in the prosumer 3D printer market.
Image 1 of 2
(Image credit: Tom's Hardware)(Image credit: Tom's Hardware)The bright orange color makes the 3D printed parts on the MK3S+ easy to spot. The brackets mounted to the printer are printed in-house by Prusa using their own Prusament PETG filament. These brackets are robust and sturdy, and the uniform appearance between the printed parts give the printer a professional appearance. This version of the MK3S+ shipped with orange printed brackets, but the printer is also available in an all-black variant. A large selling point of the MK3S+ is the open-source nature of the machine, which means the printed parts are all available to download if you want to download, modify, or print them out yourself.
The monochrome LCD interface and click-wheel on the MK3S+ is one of the few less-than-impressive features on this machine; it feels dated and the UI navigation can be a little clunky. This stands in contrast with printers like the Anycubic Vyper, a sub-$400 machine that features a bright and responsive color touchscreen that shows detailed print statistics during printing. This monochrome display was industry standard when the original 8-bit i3-style of printers was introduced, but it feels outdated when compared to recent printers with color touchscreens.
(Image credit: Tom's Hardware)The MK3S+ uses a filament spool holder that mounts directly to the frame of the printer. The T-shaped holder is able to hold two spools simultaneously, which is ideal if you plan on swapping between multiple colors to produce a multicolor 3D print. The direct-drive extruder on the MK3S+ feeds filament straight down into the hot end, so mounting the filament directly above the extruder gives the filament a straight path between the spool and the extruder.
At the heart of the MK3S+ is the 8-bit Einsy RAMBo board, housed in a 3D printed enclosure mounted to the frame of the machine. This board is equipped with Trinamic 2130 silent stepper drivers, user-replaceable fuses, and the cable management is clean and professional.
The features made possible by this board (power-panic, live-Z adjust, silent steppers) were all major leaps when originally introduced, but many of these features have made their way down to less expensive FDM 3D printers like the Elegoo Neptune 2. The interface feels sorely in need of an update, and the addition of a color touchscreen and a 32-bit board (such as the one equipped on the Prusa Mini+) would refresh this platform.
(Image credit: Tom's Hardware)The attention to detail on the Prusa MK3S+ is clear, and a perfect example of this is the wire management across the machine. Current-carrying wires are attached to the extruder module with zip ties that act as a strain-relief to prevent the wires from fatiguing and separating. The wires from the power supply are tucked neatly under the frame of the machine, out of sight and reach from users to prevent accidentally unplugging them during printing.
What Makes the Prusa MK3S+ Different?
It can be hard to understand why the Prusa MK3S+ costs so much more than a printer like the Creality Ender 3 Pro, which seems to have similar specs on paper. To understand why this machine is so much more expensive, we need to take a closer look at the individual components of the MK3S+.
(Image credit: Tom's Hardware)Critical to the success of the MK3S+ is its custom-made Delta 240 Watt power supply, mounted to the frame of the machine. This unit supplies 24V power to the bed with a max current of 10 Amps, which provides fast and reliable heating for printing high temperature materials like PETG and ASA. Less expensive machines typically use lower wattage power supplies, such as the 150W power supply used by the Flashforge Adventurer 3 Lite, which take longer to heat and can have difficulty maintaining a higher temperature.
The 24V heated bed is able to reliably hit 100C, which is more than enough to allow high temperature materials like PETG and ASA to adhere to the build platform without delaminating. The magnetic build platform is firmly held in place without any clips or latches and can easily be removed once it cools to room temperature. PETG in particular is easy to remove from the textured surface of the textured spring steel sheet, and the MK3S+ build platform is best-in-class for high-temperature adhesion.
Image 1 of 2
(Image credit: Tom's Hardware)(Image credit: Tom's Hardware)The MK3S+ is equipped with a genuine E3D hot end, and it has the holographic sticker to prove it (seriously). E3D manufactures every component in the hot end from the nozzle to the heatbreak which means you are very unlikely to run into the type of manufacturing defects that occasionally pop up on less expensive printers (incorrectly drilled nozzles, degraded PTFE tube liner, etc. ) In addition, this nozzle is rated for a max temperature of 300C (572F), which is easily hot enough to extrude most common thermoplastics and even some higher-temperature engineering-grade materials like Nylon and Polycarbonate.
Image 1 of 2
(Image credit: Tom's Hardware)(Image credit: Tom's Hardware)The printed parts on the MK3S+ are a perfect example of a company applying its in-depth knowledge of a subject to its product. The printed brackets found on the MK3S+ have been printed in PETG, and the outward-facing textured surface shows the level of quality you can expect from using a textured sheet.
In addition, I appreciate that Prusa has applied DFAM (Design for Additive Manufacturing) principles to these parts. These DFAM principles include concepts like printing hexagons instead of circles for relief holes, which print without requiring support material, and printing brackets perpendicular to their intended load to create mechanically tough parts.
(Image credit: Tom's Hardware)The Prusa MK3S+ comes equipped with a SuperPINDA probe which is used for hands-free leveling of the build platform. The SuperPINDA (which stands for Super Prusa INDuction Autoleveling sensor) operates by detecting the proximity of the probe to the build platform and storing that information in firmware. The MK3S+ isn’t the first printer to use a probe for bed leveling, but the software implementation in PrusaSlicer means that after the printer has been set up, you can print without spending much time thinking about calibration.
Compared to the manual bed leveling process of a printer like the Creality Ender 3 Pro, the MK3S+ is faster, easier to use, and requires less trial and error. PrusaSlicer includes a “G80” command in the start G-code (the instructions the printer reads when making a part), and this command performs a ‘Mesh Bed Leveling’ which probes the bed in a 3x3 grid to create a mesh surface that is used for calibration. This mesh surface causes the Z-axis motors to undulate over uneven areas while the print head remains perpendicular in the X/Y axis. During my testing, I didn’t need to run a single non-print calibration on the printer after the initial mesh bed leveling.
Build Platforms on Prusa MK3S+
(Image credit: Tom's Hardware)Removing a printed part from the build platform of a 3D printer can be a challenging experience if the printer isn’t calibrated correctly. The Prusa MK3S+ attempts to solve this problem by using a removable build platform that is held in place magnetically and can be flexed to remove parts after the platform has cooled. I’ve tried many different types of build surfaces, and the smooth PEI sheet used by Prusa is by far one of the easiest to print on, remove parts from, and clean.
(Image credit: Tom's Hardware)Prusa also offers a textured steel build platform for the MK3S+ that has a gritty surface which can give printed parts a more uniform appearance. In fact, the signature textured look of the printed parts on the MK3S+ come from this build platform.
Parts printed on a smooth build platform will have a smooth bottom surface, which looks visually distinct from the striations on the sides of the part. By using a textured sheet, I was able to make prints that have a textured appearance on the bottom as well as the sides. This sheet is ideal for printing with PETG; the high print temperature of the material requires a textured surface to stick to, but also needs a surface that it can easily detach from.
Printing on the Prusa MK3S+
(Image credit: Tom's Hardware)The sample prints on the included SD card with the Prusa MK3S+ are a refreshing change from the sample parts that are typically included with low-cost 3D printers. The MK3S+ includes 16 pre-sliced parts that have been prepared for PLA with the total print time included in the file name. The sample prints vary in time from 23 minutes (a simple block with the word PRUSA on it) to almost 14 hours (a castle printed at .1mm layer height), and have all been prepared using sensible settings for the machine and highlight various features (variable layer height, multicolor printing, and fine .1mm layer resolution).
Image 1 of 2
(Image credit: Tom's Hardware)(Image credit: Tom's Hardware)One of my favorite sample parts is the planetary gear bearing that prints in a single print. I printed this model using the Prusament Jet Black PLA material, and after removing it from the build platform I was able to easily spin the gear freely. This part really highlights the ability of the MK3S+ to produce parts with functional strength and purpose in addition to parts designed with aesthetics in mind.
(Image credit: Tom's Hardware)Another stand-out sample print included with the MK3S+ is the dragon model titled Adalinda the Singing Serpent by Loubie3D. This model takes a little longer to print (about 8 hours), but the final print is another favorite of mine. Because this model was sliced by Prusa for the MK3S+ printer, the sample print comes out with a high level of detail and no unexpected settings that can cause problems (too many exterior shells, no retraction, etc. ) like the sample prints included with other FDM 3D printers.
Printing with PrusaSlicer on the Prusa MK3S+
(Image credit: Prusa)Prusa has developed its own in-house slicer for the Prusa MK3S+, called PrusaSlicer. PrusaSlicer is a fork of the confusing-to-pronounce Slic3r app, which is also a free and open-source app. Prusa has invested a considerable amount of time and effort in PrusaSlicer, and this has translated into one of the most powerful 3D printing slicer apps available for desktop 3D printers on the market.
(Image credit: Prusa)The current version of PrusaSlicer (2.3.3) includes profiles for printers by Prusa, Creality, Lulzbot, and more, and also includes a library of material profiles. In addition to these profiles, PrusaSlicer also includes multiple print setting profiles, which range from ultra-high detail at 0.05mm layer height to a draft mode which offers .3mm layers fast print speed at the expense of reduced quality.
Slicing Models in PrusaSlicer for the Prusa MK3S+
(Image credit: Prusa)PrusaSlicer is a feature-rich program with a simplified interface that is accessible to beginners, experts, and everyone in between. I’ve spent a lot of time in the PrusaSlicer settings, and I appreciate how much work Prusa has put into making almost every parameter of the printing process addressable without creating an overwhelming interface.
The settings are broken down into three primary categories: Print Settings, Filament Settings, and Printer Settings. Print Settings generally focuses on the speed / quality of the print, Filament Settings is used to determine temperature and extrusion parameters, and Printer Settings is used for global parameters and determining start / stop instructions.
(Image credit: Prusa)The primary interface offers three settings: Simple, Advanced, and Expert. Simple offers a stripped-down experience with only a few parameters able to be adjusted, while Advanced and Expert allow you to adjust the print on a more granular level.
PrusaSlicer Quality Settings for the Prusa MK3S+ / PLA
(Image credit: Prusa)Swipe to scroll horizontally
| Material | Prusa Basic PLA, Silver |
| Layer Height | 0.20 mm |
| Infill Percentage | 15%, Gyroid |
| Print Speed | 45mm/second |
| Extruder Temperature | 215 degrees Celsius (419 degrees Fahrenheit) |
| Heated Bed Temp | 60 degrees Celsius (140 degrees Fahrenheit) |
| Print Time | 1 Hour, 34 Minutes |
There are few prints that are better at testing out a printer than the 3DBenchy, so I used the included spool of silver Prusa PLA to print this model out using the default . 2mm Quality PrusaSlicer settings. I was impressed with the overall quality of the Benchy, and even with a highly-reflective material like a silver PLA which can highlight defects from uneven layers, the layers looked even and consistent throughout.
Image 1 of 2
(Image credit: Tom's Hardware)(Image credit: Tom's Hardware)The Benchy boat model is designed to highlight various features of a printer (such as the ability to print steep overhangs, small features, etc.), and a quick examination of the model shows that the MK3S+ performed very well and didn’t have any of the common defects typically seen on this model.
PrusaSlicer Spiral Vase Settings for the Prusa MK3S+ / PLA
(Image credit: Prusa)Swipe to scroll horizontally
| Material | Prusament PLA, Galaxy Purple |
| Layer Height | 0.20mm |
| Infill Percentage | 0% |
| Print Speed | 60mm/second |
| Extruder Temperature | 215 degrees Celsius (419 degrees Fahrenheit) |
| Heated Bed Temp | 60 degrees Celsius (140 degrees Fahrenheit) |
| Print Time | 3 Hours, 9 Minutes |
Slicing a model using the ‘Spiral Vase’ mode in PrusaSlicer will automatically create a model that is composed of a single continuously rising helical contour, which allows models to be printed a fraction of the time it would normally take to print using multiple layers. This mode is ideal for printing objects like vases or enclosures that only require a single contour as opposed to multiple contours and an infill structure. I printed the Curved Honeycomb Vase by eggnot to highlight this printing mode.
The Prusament Galaxy Purple is a favorite color of mine due to the glitter additive in the filament. This additive creates layer lines that are evenly blended and have a textured appearance. Combining this material with the Spiral Vase mode produces parts that look almost conventionally manufactured, with layer lines that are difficult to see. This model printed in just over 3 hours in Spiral Vase mode, as opposed to over 13 hours if it had been printed using conventional settings.
PrusaSlicer Speed Settings for the Prusa MK3S+ / PETG
(Image credit: Prusa)Swipe to scroll horizontally
| Material | Prusament PETG, Chalky Blue |
| Layer Height | 0. 2mm 2mm |
| Infill Percentage | 15%, Grid |
| Print Speed | 60mm/second |
| Extruder Temperature | 250 degrees Celsius (482 degrees Fahrenheit) |
| Heated Bed Temp | 90 degrees Celsius (194 degrees Fahrenheit) |
| Print Time | 4 Hours, 5 Minutes |
Image 1 of 2
(Image credit: Tom's Hardware)(Image credit: Tom's Hardware)PETG is a material that offers increased mechanical toughness, heat resistance, and flexibility when compared with parts printed with PLA. Prusa has taken advantage of these material properties by printing many of the components on the MK3S+ with PETG, which creates a rigid part that is able to withstand mechanical stress. PETG is also notoriously difficult to print with due to the high level of stringing that can occur when printing multiple parts simultaneously, but I didn’t have any issues when printing with the Prusament PETG material on the MK3S+.
Image 1 of 2
(Image credit: Tom's Hardware)(Image credit: Tom's Hardware)I used the default settings in PrusaSlicer to print the clamp model provided by Prusa that was designed specifically for PETG. This model features a functional thread, a flexible ball-and-socket joint, and can be tensioned without snapping the body of the clamp. The part printed in multiple pieces without stringing, and I was able to easily assemble it and verify functionality without damaging the clamp. If printed in a more brittle material (like PLA), I would expect the clamp to crack at a transition point on the body, but the PETG was able to hold tension without deforming or breaking.
PrusaSlicer 3MF Import for the Prusa MK3S+ / PLA
(Image credit: Prusa)Swipe to scroll horizontally
| Material | Prusa Basic PLA, Silver |
| Layer Height | 0. 20mm 20mm |
| Infill Percentage | 15%, Grid |
| Print Speed | 60mm/second |
| Extruder Temperature | 215 degrees Celsius (419 degrees Fahrenheit) |
| Heated Bed Temp | 60 degrees Celsius (140 degrees Fahrenheit) |
| Print Time | 2 Hours, 17 Minutes |
PrusaPrinters (the online file repository created and maintained by Prusa) offers the unique ability to share 3D printable files that have been pre-sliced and prepared for the MK3S+ with detailed print statistics available from the site. A perfect example of this is the Bag Clip by Andrei; a cam-driven bag clip that highlights the type of design freedom offered by a 3D printer.
This model has been uploaded as a .3MF file that contains all of the information required to print, such as slicer settings, nozzle and bed temperature, and custom support structures (visibile in the screenshot above. ) 3MF is an increasingly popular alternative to the STL file, which doesn’t contain much information aside from the raw geometry of a model.
This part printed flawlessly on the first try, and the provided .3MF (or .gcode) allows a user to send this file to anyone else with the same printer and material and feel confident that the part will be indistinguishable in appearance and performance. I’ve always thought of a 3D printer as the replicator from the Michael Crichton novel Timeline, which is able to produce identical objects at various locations by converting them into digital information. However, the success of a part is frequently beholden to the settings selected by a user for fabrication, so the ability to share the fabrication plans is one step closer to being able to send a physical product as a form of digital data.
(Image credit: Tom's Hardware)At a price-point of $999 for an assembled printer (or $749 for a kit), the Prusa MK3S+ is a machine that doesn’t compromise on user experience and is absolutely one of the best 3D printers currently on the market. The MK3S+ has a professional and neat appearance, but the 8-bit monochrome LCD user interface might be a challenge for some users to get past, given the steep price. Interface aside, the prosumer features of the MK3S+ make it a stand-out machine for anyone who is looking for a reliable machine to produce functional parts without worrying about spending a lot of time tinkering.
If you are looking for a less expensive machine outside of the Prusa ecosystem, the Elegoo Neptune 2 (currently on Amazon for $180) offers similar printing size and features (with the notable exception of automatic bed leveling) at a fraction of the price but without the same level of robust support and documentation provided by the MK3S+ or any of the name-brand components like the E3D hotend. If you want the Prusa experience but are looking to spend a little less money, the Prusa Mini+ (available from Prusa for $399 assembled, $349 for a kit) is an excellent place to start.
Andrew Sink first used a 3D printer in 2012, and has been enthusiastically involved in the 3D printing industry ever since. Having printed everything from a scan of his own brain to a peanut butter and jelly sandwich, he continues to dive ever more deeply into the endless applications of additive technology. He is always working on new experiments, designs, and reviews and sharing his results on Tom's Hardware, YouTube, and more.
The Best Cheap 3D Printers for 2022
While we'd hesitate to call 3D printing a mature technology, you might say it has reached its teenage years. Through their first decade-and-change, 3D printers have come down in price, grown easier to set up and operate, and become more reliable. And you may pay less than you expect: Many once-high-end features have migrated down to inexpensive models.
PC Labs has been reviewing 3D printers since 2013. Today, the state of 3D printing is strong, but that wasn’t always the case. For the first several years, it was often an adventure getting one of these printers up and running, let alone successfully through our testing regimen. Issues with filament-based—aka fused filament fabrication (FFF) or fused deposition modeling (FDM)—printers were abundant.
Filament feeders had to be coaxed into delivering filament from the spool to the extruder. Print beds had to be manually aligned. The extruder or hot end had to be positioned just right to minimize the gap between the nozzle and the build plate (the flat surface on which the object is printed). Objects frequently stuck to the build plate, and required careful, sometimes unsuccessful, efforts to pry them off. These and other issues required painstaking effort to resolve, often combined with calls to tech support.
Not so much anymore. While they can still be rebellious at times, 3D printers have grown up a lot, and achieving the 3D printer basics has gotten a lot less likely to end in a shouting match over small things. And they've gotten a lot more affordable, too, for curious DIY-ers and hobbyists to try.
If you're in the market for a beginner or low-cost 3D printer, it's important to know how lower-end models differ.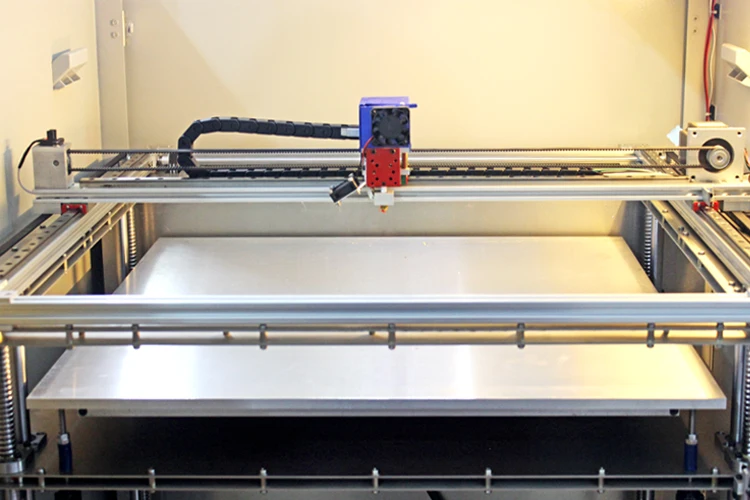 Read on for mini-reviews of the top budget 3D printers we've tested. After that, we go into more detail on understanding the 3D printer specs and tech relevant to beginning buyers. Ready to take the plunge? Read on.
Original Prusa Mini
Best Overall Budget 3D Printer
4.5 Outstanding
Bottom Line:
It requires assembly and calibration care (plus shipping from the Czech Republic), but the Original Prusa Mini is a compact, open-frame 3D printer that consistently produces superb-quality output for a great price.
PROS
- Top-notch object quality
- Supports a variety of filament types
- Useful, professionally printed user guide
- Great support resources
- Versatile, user-friendly software
CONS
- First-layer calibration can be tricky
- Only includes starter packets of filament
- Requires monitoring if young children or pets are around
| Sold By | List Price | Price | |
|---|---|---|---|
| Prusa Research | $399. 00 00 | $399.00 | See It (Opens in a new window) |
Read Our Original Prusa Mini Review
XYZprinting da Vinci Mini
Best Budget 3D Printer for Schools, Community Centers
4.0 Excellent
Bottom Line:
The XYZprinting da Vinci Mini is a consumer-oriented 3D printer that provides a winning combination of low price, ease of setup and use, solid print quality, and smooth, misprint-free operation.
PROS
- Very low price.
- Reasonably priced filament.
- Good print quality.
- No misprints in testing.
- Easy setup and operation.
- Quiet.
- Prints over a USB or Wi-Fi connection.
CONS
- Occasional problems in trying to launch prints.
- Removing printed objects from the print bed is sometimes tricky.
| Sold By | List Price | Price | |
|---|---|---|---|
| Walmart | $199. 95 95 | $199.95 | See It (Opens in a new window) |
| Amazon | $199.95 | $199.95 | See It (Opens in a new window) |
Read Our XYZprinting da Vinci Mini Review
Toybox 3D Printer
Best Budget 3D Printer for Children
4.0 Excellent
Bottom Line:
The Toybox 3D Printer works well as a model designed for children, offering reliable printing from a browser or mobile device and a few thousand toys to print, plus creative options to output drawings or photos. Just bear in mind the tiny build area.
PROS
- Reliable, misprint-free printing
- Easy setup
- One-touch operation
- Well-composed help resources
- Access to more than 2,000 printable toys and projects
- Lets you create your own printable designs
CONS
- Tiny build area
- Not ideal for importing 3D files created elsewhere
| Sold By | List Price | Price | |
|---|---|---|---|
| Amazon | $299.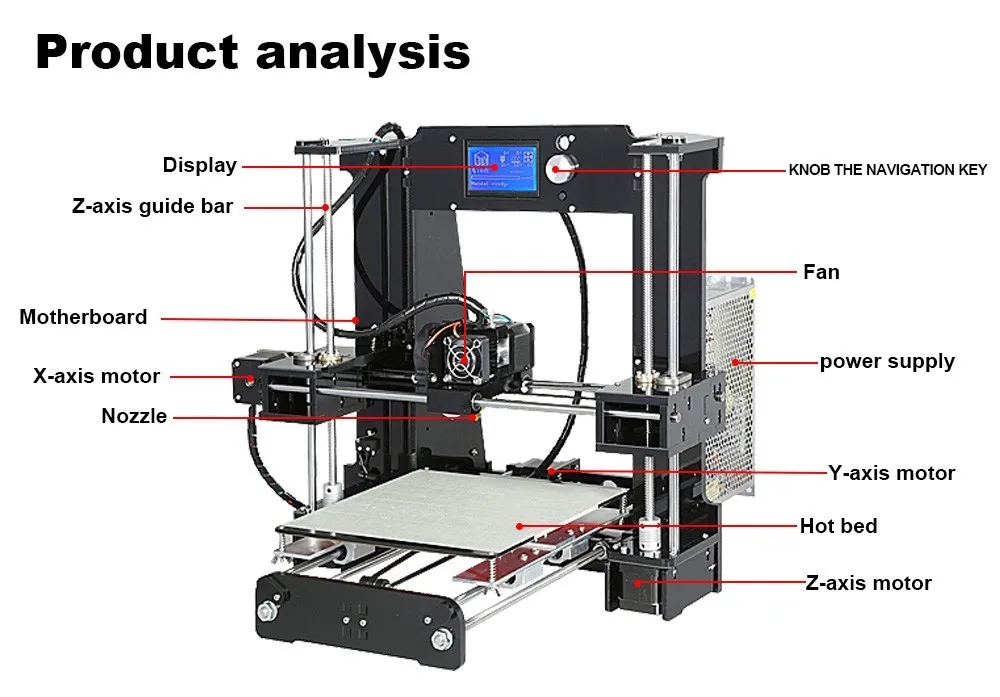 00 00 | $299.00 | See It (Opens in a new window) |
| Toybox Labs | $379.00 | $299.00 | See It (Opens in a new window) |
Read Our Toybox 3D Printer Review
Monoprice Mini Delta V2 3D Printer
Best Budget 3D Printer for Beginners, Non-Techies
4.0 Excellent
Bottom Line:
3D printing gurus will be intrigued by the Monoprice Mini Delta V2's use of the delta rather than Cartesian coordinate system, but beginners will just enjoy its low price, ease of use, and speedy printing.
PROS
- Sub-$200 price
- Quick, nearly misprint-free printing
- Easy setup and operation
- Sturdy steel-and-aluminum frame
- Supports multiple filament types
CONS
- Tiny build area
- So-so print quality
- Mere one-year warranty
| Sold By | List Price | Price | |
|---|---|---|---|
| Amazon | $179. 99 99 | $179.99 | See It (Opens in a new window) |
Read Our Monoprice Mini Delta V2 3D Printer Review
Anycubic i3 Mega S
Best Budget 3D Printer With an Open Design, Big Build Area
3.5 Good
Bottom Line:
The Anycubic i3 Mega S, an inexpensive open-frame 3D printer, produced decent-quality prints in our testing. To get the most out of it, though, may require precise calibration.
PROS
- Modestly priced
- Large build area for an inexpensive printer
- Supports a variety of filament types
- Generally solid print quality
- Uses well-known Cura software
CONS
- Finicky print-platform alignment
- Supported coils of filament are small
- Poorly placed spool holder
| Sold By | List Price | Price | |
|---|---|---|---|
| Amazon | $229.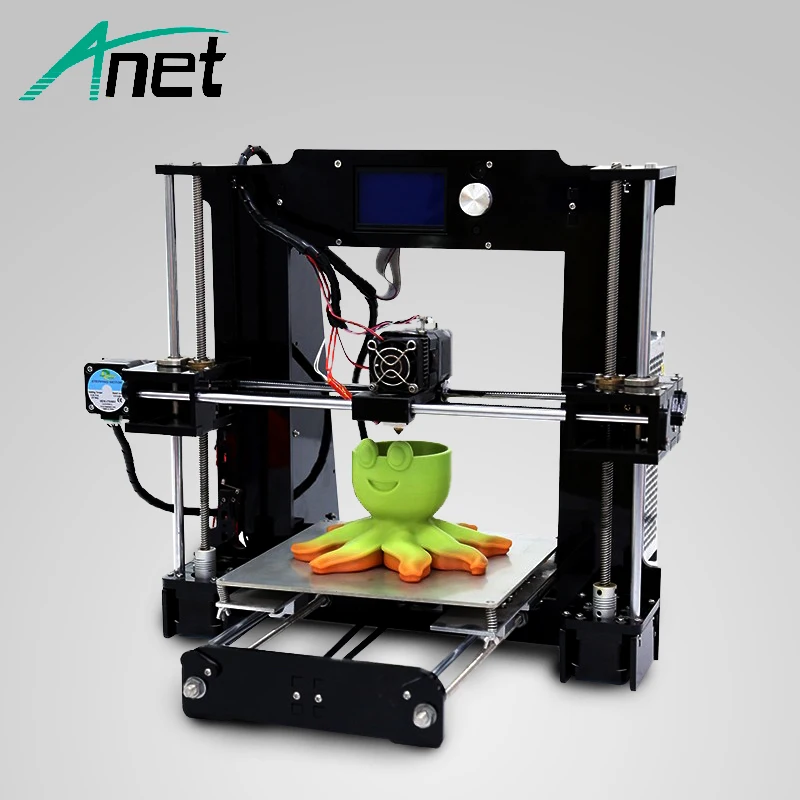 98 98 | $229.98 | Check Stock (Opens in a new window) |
| AnyCubic | $279.00 | $279.00 | Check Stock (Opens in a new window) |
Read Our Anycubic i3 Mega S Review
Anycubic Vyper
Best Budget 3D Printer for the Biggest Build Area Possible
3.5 Good
Bottom Line:
Anycubic's modestly priced Vyper whips up large 3D prints on its open-frame design, and provides automatic print-bed leveling. Just know that some minor assembly is required—and printed objects may require a bit of cleanup.
PROS
- Relatively large build area
- Automatic bed leveling
- Simple assembly
CONS
- Short (one-year) warranty
- Includes only a small starter filament coil
- Using Cura software with the Vyper requires tweaking a couple of settings
- Test prints showed some "hairy" filament residue
| Sold By | List Price | Price | |
|---|---|---|---|
| Amazon | $429. 99 99 | $429.99 | See It (Opens in a new window) |
| AnyCubic | $369.00 | $319.00 | See It (Opens in a new window) |
Read Our Anycubic Vyper Review
Creality Ender-3 V2
Best Budget 3D Printer for Tinkerers and DIY Types
3.5 Good
Bottom Line:
Hands-on tweaking defines Creality's budget-price Ender-3 V2, an open-frame 3D printer that you build from a kit. It produces generally above-par prints, but its print bed can be tricky to keep leveled.
PROS
- Inexpensive
- Slightly above-average print quality
- Good-size build area for its price
- Supports several filament types
CONS
- Manual print-bed leveling can be tricky
- Setup instructions could be deeper, more legible
- Questionable quality control on some parts
| Sold By | List Price | Price | |
|---|---|---|---|
| Amazon | $299. 00 00 | $246.00 | See It (Opens in a new window) |
Read Our Creality Ender-3 V2 Review
Flashforge Finder 3D Printer
Best 3D Printer for the Very Tightest Budgets
3.5 Good
Bottom Line:
The Flashforge Finder 3D Printer is moderately priced and offers good print quality, but it proved tricky to get up and running in our tests.
PROS
- Quiet.
- Good print quality.
- Connects via USB 2.0 cable, USB thumb drive, or Wi-Fi.
- Reasonably priced.
CONS
- Some objects pulled off the platform during testing.
- Poor documentation.
- Modest build volume.
- Limited to printing with polylactic acid filament (PLA).
| Sold By | List Price | Price | |
|---|---|---|---|
| Amazon | $729.00 | $729.00 | Check Stock (Opens in a new window) |
Read Our Flashforge Finder 3D Printer Review
Polaroid PlaySmart 3D Printer
Best Budget 3D Printer for Dabbling in Small Objects
3. 5 Good
Bottom Line:
The Polaroid PlaySmart 3D Printer is a compact, stylish 3D printer with above-par overall print quality, but, alas, a tiny build area for the money.
PROS
- Small, lightweight for a desktop 3D printer.
- Easy to set up and use.
- Supports PLA, PETG, and wood composite filaments.
- Multiple-color support.
- Wi-Fi camera monitors print jobs.
- Prints from USB drives, SD cards, or mobile devices.
CONS
- High price for its capabilities.
- Small build area.
- Too-brief warranty.
| Sold By | List Price | Price | |
|---|---|---|---|
| Amazon | $699.00 | $699.00 | See It (Opens in a new window) |
Read Our Polaroid PlaySmart 3D Printer Review
XYZprinting da Vinci Jr. 1.0 A Pro
Best Budget 3D Printer With Closed Design, Roomy Build Area
3. 5 Good
Bottom Line:
The XYZprinting da Vinci Jr. 1.0 A Pro is a moderately priced closed-frame 3D printer with a large build volume and overall good performance, but a potentially balky filament-feeding system.
PROS
- Spacious build area
- Works with third-party filaments
- Self-leveling print bed
CONS
- Build plate is not heated
- Limited to PLA- and PETG-based filaments
- Guide tube is prone to detaching
| Sold By | List Price | Price | |
|---|---|---|---|
| Amazon | $299.95 | $199.95 | See It (Opens in a new window) |
| Best Buy | $449.95 | $449.95 | Check Stock (Opens in a new window) |
Read Our XYZprinting da Vinci Jr. 1.0 A Pro Review
Monoprice Voxel 3D Printer
Best Budget 3D Printer for Cheap Filament
3. 0 Average
Bottom Line:
The Monoprice Voxel is an under-$400 3D printer that's easy to set up and use. It exhibits generally good print quality, but it was unable to print two of our test objects.
PROS
- Easy to set up and use.
- Budget price for printer and filament spools.
- Supports PLA, ABS, and several composite filament types.
- Versatile software.
- Prints over Ethernet or Wi-Fi, or from a USB thumb drive.
CONS
- Frequent misprints on certain test objects.
- Slightly balky touch screen.
| Sold By | List Price | Price | |
|---|---|---|---|
| Amazon | $449.99 | $369.26 | See It (Opens in a new window) |
| Walmart | $429.99 | $369.26 | See It (Opens in a new window) |
Read Our Monoprice Voxel 3D Printer Review
Buying Guide: The Best Cheap 3D Printers for 2022
How to Buy a Cheap 3D Printer
The biggest changes to 3D printers over the last few years have come to the cheaper models.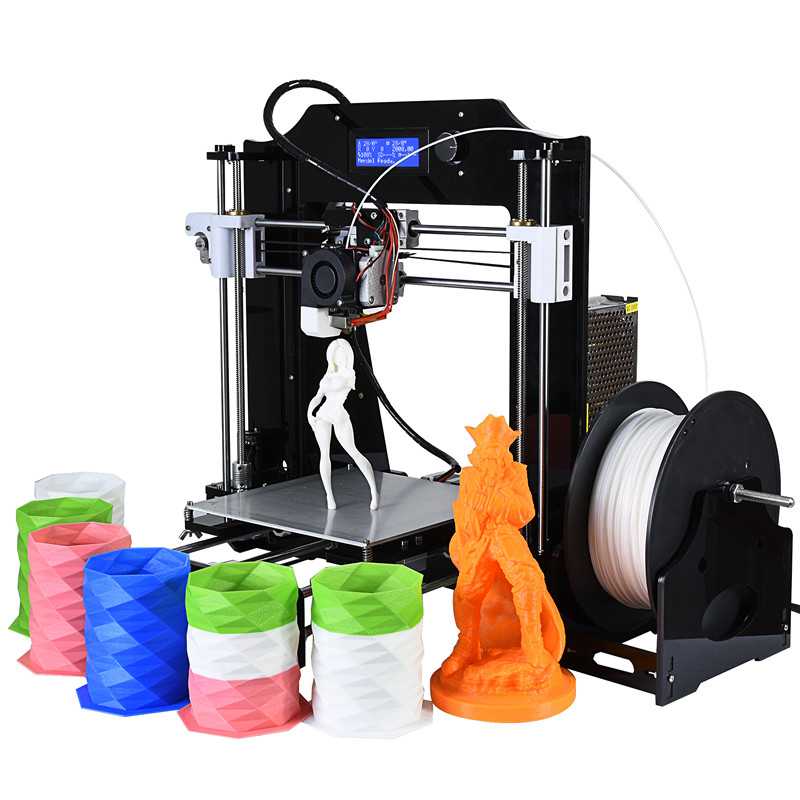 Nowadays, many of those classic, ornery 3D-printing issues have been resolved (most of the time, anyway), even for consumer and bargain-priced 3D printers. Automatic print-bed leveling is the norm, and you can usually remove 3D-printed objects from heated and/or flexible build plates with a minimum of coaxing. And most 3D printer manufacturers have either developed and refined their own software, or have adapted an open-source printing platform such as Cura(Opens in a new window).
(Credit: Zlata Ivleva)
What separates more expensive 3D printers from cheap ones ("cheap" defined as $500 or less, for the purposes of this article) is often a select group of features. These include the build volume, the type of frame, the varieties of supported filament, the software, and the connectivity mix. Let's run through those in turn.
What's the Right Build Volume for a 3D Printer?
A 3D printer’s build volume is the maximum dimensions (HWD) of a part that it can print. (We say “a part” because a 3D-printed object can consist of multiple parts that are printed, then glued or otherwise pieced together.) While the smallest build volume of any 3D printer we have tested is 3.9 by 3.9 by 4.9 inches, we consider any build volume smaller than 6 by 6 by 6 inches to be small, any between that and 10 by 10 by 10 inches as medium, and any printer with at least one build dimension of more than 10 inches as having a large build volume.
(Credit: Molly Flores)
As a general rule, inexpensive 3D printers have small build volumes, while more expensive ones have larger build volumes. This depends in part on the type of printer. Closed-frame 3D printers—and most semi-open models, which have a rigid top, base, and sides but are open in front and, often, back—tend to have small build volumes, while open-frame printers, lacking as rigid a physical structure, often have relatively large build volumes for the price. You'll want to weigh the build volume against the kinds of objects you will print.
Should I Get an Open-Frame or Closed-Frame 3D Printer?
Which brings us to the frame "form factor" question: open-frame versus closed-frame. Closed-frame 3D printers are boxlike devices, with a rigid base, walls (with a see-through door in front), and top. Among their advantages? They muffle the operating noise, as well as reduce the odor from melted filament (which is potentially an issue with ABS plastic), and they provide some protection for people or pets who might inadvertently touch the hot extruder. A downside: They tend to have smaller build volumes than open-frame 3D printers, which have fewer (often, no) walls to constrict them.
(Credit: Zlata Ivleva)
Low-cost 3D printers include both open-frame and closed-frame models, as well as a few stereolithography printers. If a relatively large build volume is a priority, you’re likely to get more bang for the buck with an open-frame model. Open-frames do have some clear downsides by definition: They tend to be noisy, emit odors when certain plastics are melted, and provide little protection for someone who might touch the hot extruder.
(Credit: Molly Flores)
Also, recognize some potential negatives of open frames, depending on the model. Some require assembly, being essentially kits, and most require more setup care than a closed-frame printer, plus more maintenance to keep them running smoothly. Still, these very traits should not deter—and may even appeal to—hobbyists and DIY folks.
What Should I Look for in 3D Printer Software and Connectivity?
Gone are the days when tinkerers had to cobble together several different programs to get a 3D printer to run. Manufacturers either include their own 3D printing program or modify an existing platform such as the open-source Cura.
3D printing software performs three main functions: processing an object file (resizing, moving, rotating, and in some cases duplicating it), slicing it (into virtual layers, based on your chosen resolution), and printing it. These are almost universally combined into a seamless process. Some high-end printers have software that supports a wider range of settings you can tweak, but even the basic suites work at least reasonably well.
More likely to vary among the cheaper set is the array of connection options from model to model. Nearly all have a USB Type-A port to fit a thumb drive for printing from document files. Most also have a USB Type-B port for connecting directly to a computer, and some offer Wi-Fi, too (or as an alternative), while a handful let you connect via Ethernet to share the printer across a local network.
Some printers support storing 3D files on an SD or microSD card (which may also contain the printer’s system files). Most 3D printer manufacturers (even the discount ones) have a mobile app to launch and monitor print jobs, and a few provide access to cloud services from which you can print.
While high-end 3D printers tend to have an abundance of connection choices, discount models vary widely in their choices. Some are generous and some are basic, so it pays to assess what a given model offers.
What Should I Look for in Filament Support?
Filament support tends to be a key area that separates the cheaper models from the higher-end ones. (See our guide to understanding 3D printing filaments for more particulars.) Inexpensive 3D printers tend to support a limited number of plastic filament types, some of them only PLA and/or ABS.
Recommended by Our Editors
3D Printing: What You Need to Know
3D Printer Filaments Explained
(Credit: Molly Flores)
PLA (polylactic acid) is a biodegradable, plant-based polymer, while ABS (acrylonitrile butadiene styrene) is the same tough plastic that Legos are made from. Objects printed from ABS are durable and nontoxic, though the material can be tricky to work with. ABS can emit an acrid, unpleasant odor during printing, and the bottom corners of objects being printed with it have a tendency to curl upward a bit, especially if you are using a non-heated print bed. This can lead to unsightly prints, and/or prints prematurely pulling off the build plate, ruining them.
Many entry-level and low-price 3D printers stick exclusively to PLA. If you want to experiment with a larger variety of filaments—which include water-soluble filament, wood- and metal-laced composites, and both tough and flexible varieties—you may have to pay more, although a few discount models support a wide range of materials.
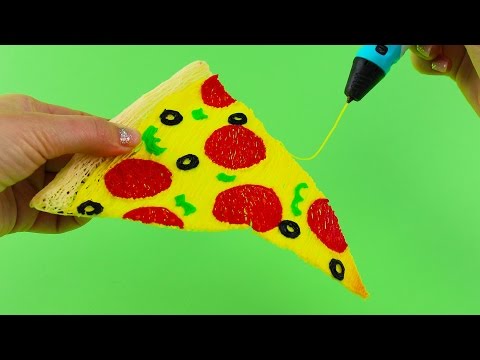
Should I Consider a 3D Printing Pen Instead?
Although they aren’t printers per se, inexpensive 3D pens are close kin to 3D printers—using the same filament types and a similar extrusion system—and we include them in the 3D printing category. Rather than tracing out a programmed pattern, you use the 3D pen much like a normal pen, except that you draw with molten plastic. You can trace a pattern or draw freehand, and even draw in three dimensions as the plastic quickly solidifies and hardens once extruded.
(Credit: 3Doodler)
Most 3D pens cost less than $100, and some cost $50 or less. At a glance, 3D pens may appear to be toys, but some artists and craftspeople have taken to them, as it is possible to make quite complicated and beautiful objects with them. If your aim in 3D printing is something closer to freehand design and free expression than computer-centric, structured, and repeatable output, you might give one a try.
So, What Is the Best Cheap 3D Printer to Buy?
Buying a budget 3D printer needn’t mean a world of sacrifice. Plenty of capable and reliable models sell at less than $500, and while they may not be as feature-rich as their more expensive cousins, there's no sense in paying for things you don’t need.
Many casual 3D-printing experimenters will be fine with printing over a USB cable or from a thumb drive, and sticking to PLA may be the best choice for a starter 3D printer. If you focus just on the features you want, you may be pleasantly surprised at what you find. Below, check out a spec breakdown of the best under-$500 3D printers we have reviewed, paralleling our picks above. Also, for a look at the broader market, see our guide to our favorite 3D printers overall.
Which 3D printer to choose for home and hobby use
A few years ago, 3D printers were bulky industrial machines, but now 3D printing is becoming more accessible for home use. When buying their first printer, many are disappointed. This may be due to the unsatisfactory quality of the resulting models or the complex setup and maintenance of the 3D printer.
In the reviews that are found on the Internet, printers are often shown after a lot of upgrades or a long selection of settings for printing. This is not at all the result that a beginner who first got acquainted with 3D printing will get. nine0003
In order not to be disappointed, before buying, you need to understand which model is suitable for your tasks. First of all, it is worth deciding what the printer will be used for. What is the main property that finished products should have? What is more important, the physical properties of the model or the ideal surface and detail? Not only the model depends on this, but also the technology by which the 3D printer will work.
Which technology to choose? FDM or LCD?
If you need to make a small detailed figurine with a perfectly smooth surface, you should pay attention to models that work on LCD technology (LCD works on a principle similar to DLP - Digital Light Processing or “digital light processing”). nine0003
LCD prints using a photopolymer resin that cures under UV light. This makes it possible to produce without deformation, even small and thin products that cannot be manufactured using FDM technology.
Resin model
Now on sale there are many photopolymer resins with different properties. A few years ago the choice was not great. Basically, finished products were not strong enough for use in functional models. Now engineering resins have begun to appear on sale. Products from them are not inferior in strength to models made using FDM technology from ABS or even nylon. nine0022If it is necessary to produce large products with different properties, or the tasks will be very diverse, then the choice is with FDM technology. But it is important to understand that finished products will not have a perfectly smooth surface. Of course, you can polish the model, but this is additional time and labor costs.
FDM technology builds a model using molten plastic filament, which is fed from the print head.
The print head (extruder) “grows” the model layer by layer on the printing table. nine0003
FDM Models
FDM technology became widespread much earlier than DLP. Thanks to this, a wide variety of 3D printers and consumables for them has appeared. You can find many decorative plastics that mimic various materials, or engineering plastics for making functional models or mock-ups.
Choosing an LCD printer
Photopolymer printers work on one of 3 technologies - DLP, LCD or SLA. nine0003
As home printers, devices based on LCD technology are usually used due to their availability and low price.
Printer design
SLA technology appeared the very first among photopolymer printers. With the help of a point-focused beam, the desired areas of the resin are gradually illuminated. This is repeated layer by layer.
How SLA 9 works0018
Since the surface of the model is perfectly smooth, SLA has become used in the jewelry and dental industries.
Pros:
Cons:
DLP technology appeared later than SLA, but it is very similar to it. The main difference is that the light source is not a focused beam, but a projector. This made it possible to illuminate the entire layer at once, which significantly accelerated the production of models. The quality of the surface was slightly inferior to SLA, but modern DLP printers, in terms of the quality of models, are almost as good as SLA technology. nine0003
How DLP works
Pros:
Faster production of models due to the illumination of the entire layer
Consumables are slightly cheaper than SLA
High surface quality (although may be inferior to SLA)
Cons:
LCD technology is the youngest of all. The DLP principle is taken as a basis, but an LCD display is used as a matrix or illumination pattern.
LEDs are used as a source of UV light in LCD technology. Thanks to inexpensive components, we managed to get a simple, but high-quality and affordable photopolymer printer.
How the LCD printer works
Pros:
small cost
Cheap parts
Cons:
Low accuracy compared to SLA and DLP (for jewelers and dentists, the quality of LSD prints may not be enough, although more and more accurate models appear with the development of technology) nine0003
Possible stray light
The quality of models may decrease at the edges of the printable area (this can be corrected programmatically)
Resins that are used as a consumable for photopolymer printing can smell strongly and unpleasantly during operation. Try to use the printer in a well-ventilated area, or choose a printer with a sealed cabinet and filter.
nine0003
When choosing an LCD printer, pay special attention to the rigidity and positioning accuracy of the platform along the Z axis. If there are poor quality guides along the Z axis or even a slight play, then the surface quality of the finished model may turn out to be sloppy or the model will turn out to be unevenly striped.
Rating of the best LCD 3D printers for home
Anycubic Photon Mono
This is an LCD printer with a matrix that allows you to increase the speed and accuracy of printing. Anycubic Photon Mono will be a good helper for hobbyists and modellers. nine0003
Anycubic Photon Mono SE
Anycubic Photon Mono SE has an unusual parallel light source. This minimizes distortion at the edges of the printable area. You can effectively use the entire working area of the machine and produce many small models at a time.
Phrozen Sonic Mini 4K
Model with high resolution LCD display and large print area.
The monochrome display transmits UV rays better and allows you to print much faster than similar devices with a conventional display. The manufacturer claims a screen life of more than 2000 hours. Phrozen Sonic mini 4k is suitable for almost any task. nine0003
Wanhao GR1
Wanhao GR1 has high precision and large print area (140x78x200mm). The manufacturer tried to reduce distortion at the edges of the display, this allows you to make the most of the entire work area. High precision and large print area make Wanhao GR1 not only for hobby use, but also for production.
Anycubic Photon Zero
Small and very budgetary LCD device. Its resolution and small working area (total 97x54x150 mm) is enough for printing small miniatures, figurines or small engineering models. Anycubic Photon Zero is a good choice for beginners who want to get into photopolymer printing without spending a lot of money.
Choosing an FDM printer
If you plan to produce large and diverse functional models or experiment, a 3D printer that prints using FDM technology is an excellent choice.
First, decide on the size of the printable area and the properties that the finished model should have. After all, some materials require a closed chamber or good airflow to work. nine0019
Some printer models can be “upgraded” in the future. For example, if necessary, buy spare parts for a closed case, put a nozzle of a different diameter, or change the thermal barrier to an all-metal one. But not all manufacturers provide for the possibility of such upgrades.
Printer design
Despite the same principle of operation, there are several different mechanics, which have their pros and cons. nine0003
Kinematics “Prusa” (Prusa)
Perhaps the most popular kinematics among home FDM devices. Mainly due to its simplicity and low cost. The main feature is the table that moves along the Y axis, while the extruder moves along the rest of the axes. Because of this, such kinematics was nicknamed “dragstol”.
Prusa kinematics
nine0056 Pros:
Cons:
Slow print speeds.
A massive table with a model is forced to constantly move along the Y axis, because of this, print quality will be worse at high speeds.
Some models have design flaws (for example, insufficient frame rigidity), they can be fixed, but for this you have to be a little inventor. Or find a ready-made solution on the Internet. nine0003
This category also includes 3D printers with console kinematics. The same prusa, only halved. Because of this, the frame is less rigid, but the printer itself is more compact.
Kinematics Ultimaker
The extruder moves along the X-Y axes, and the table only along the Z axis. All motors are trying to be fixed on the body to lighten the weight of moving mechanisms, thanks to which it is possible to achieve high print quality at high speeds. nine0003
Ultimaker kinematic diagram
Pros:
Cons:
H-BOT or Core-XY
These are 2 similar but more complex kinematics - the table moves only along the Z axis, and the extruder along the X-Y.
But to move the extruder, 1 or 2 long belts and 2 stepper motors work in concert.
Example Core-XY kinematics
Pros:
High print quality
High print speeds without loss of quality.
Can be easily closed completely
Cons:
nine0056 MakerBot Kinematics
Similar to Ultimaker kinematics, but one of the motors is located on the Y or X axis carriage.
Pros:
Cons:
Delta
Deltas do not have the usual XYZ axes. There are 3 columns in the deltas, along which the carriages move, and the position of the extruder in space is calculated using a complex formula. The table is usually statically fixed to the body. nine0003
Delta printer example
Pros:
Cons:
Nuances of choosing an FDM 3D printer
In addition to kinematics, when choosing a printer, it is important to consider some design features.

One or two extruders?
Two extruders can be used for dual color printing, but most commonly the second extruder is used for solvent support printing. If you need to print complex parts with internal cavities, then you should choose a dual extruder printer. nine0003
Closed or open printer?
Printing of functional models and parts uses plastic, which usually requires a closed chamber. If you plan to print functional prototypes or various models, you should look at printers with a closed chamber.
Bowden or direct?
There are 2 types of material supply to the print head of the printer - bowden and direct. nine0003
In a bowden, the feed mechanism motor is located on the printer body. This allows you to reduce the weight of the extruder and print at higher speeds without losing quality. But because of the long tube, printing with very soft plastics can be problematic.
Bowden feed pattern
In direct feeding, the motor and feed mechanism are located on the extruder. This increases the weight of the print head, but allows you to print with any kind of plastics. nine0003
Direct feeding scheme
Heated table or not?
The heating of the table improves the adhesion of the first layer of the model. And engineering plastics cannot be printed without a heated table.
Many manufacturers add useful additional features. They do not affect the quality of the print, but save time and nerves. The most useful additional functions are the filament presence sensor and remembering the print location after a power outage. nine0003
Filament sensor.
It will automatically pause printing if the plastic runs out. When there is a little plastic left on the spool, this feature will allow you not to stand over the guard printer until the old spool runs out in order to have time to push in a new bar “on the go”.

Power outage protection.
Remembering where to print when the power goes out can save you a lot of nerves when printing large models. You won't have to worry that after a power outage, you will have to run the model again for many hours or cut and reprint a piece of the model. It is especially disappointing to throw away a complex underprinted model with supports due to a one-minute outage. nine0003
There are also many extras. features that make using the printer more comfortable. For example, automatic calibration, touch screen, Wi-Fi and others.
Rating of the best FDM 3D printers for home
Anycubic Mega Zero 2.0
Inexpensive model with Pryusha kinematics. Good for getting started with 3D printing without a big investment. Despite the low cost, Anycubic Mega Zero 2.0 has a heated table and a resume function after a power outage. Thanks to direct feed, printing with soft materials should not be difficult.
nine0003
Creality3D Ender 3 Pro
A very popular device due to its low price. But despite this, the Ender 3 Pro has a heated table and a decent print area. Can be sold assembled or as a DIY kit.
Flash Forge Finder
Small home appliance intended for children or educational institutions. The Finder doesn't have a heated table, but it does have a calibration assistant, a Wi-Fi module, and other additional features that make getting to know it a lot easier. All moving and heated elements are hidden as much as possible in the case so that the child cannot get burned. nine0003
Wanhao Duplicator 6 Plus
Wanhao Duplicator 6 Plus was based on Ultimaker kinematics, but instead of bowden feed, they made direct. Because of this, it will not be possible to print super fast, without quality loss, but there will be no problems with printing with soft types of plastics. There are 2 trim levels - with a closed case and without.
Flashforge Dreamer
The Dreamer is a closed body dual extruder printer with MakerBot kinematics. Thanks to this, he can cope with printing models of any complexity. Using a second extruder for soluble support, models with complex geometries can be produced. A good choice for engineers and those who like to experiment with different materials. nine0003
FlyingBear Ghost 5
Most commonly sold as a kit (assembly kit). Assembly usually does not cause any great difficulties, even for people far from electronics or mechanics. Flying Bear is equipped with a filament sensor, a function to resume printing after a power outage and Wi-Fi connectivity.
The Flying Bear makes a great first printer for the novice user who is ready to build their own printer. nine0003
Totals
In order for the printer not to become a useless toy, you should clearly understand what it is for.
For a fan of miniatures or detailed figurines, a photopolymer printer is a good choice.
A small work area is more than offset by the detail that cannot be obtained using other technologies.
For an engineer or a fan of experiments, an FDM machine with a closed chamber and two extruders is well suited. This will allow you not to limit yourself in the choice of plastics and comfortably experiment with any materials. nine0003
For a beginner who has not yet decided whether he needs 3D printing, you can opt for inexpensive machines with squishy kinematics. Due to their great popularity, you can find a lot of upgrades and reviews on them. In the future, it will be possible to modify the printer for specific tasks or change it to a more suitable model.
For a child, safety is paramount. As the first children's printer, models without a heated bed are suitable, in which the main emphasis is on printing with safe PLA plastic. Or models in which all moving and heating mechanisms are hidden in the case. nine0003
A 3D printer is a handy tool, and whether it brings joy or frustration depends on the user.

top 10 rating according to the KP version
A 3D printer opens up incredible opportunities for a person. The first prototype of such a device was born back in 1984. The idea of the invention belongs to the American Charles Hull, he received a patent for it only two years after development. The printer was a rather massive industrial installation and, despite many inaccuracies and shortcomings in operation, the technology was used. nine0003
Hal co-founded 3dsystems, a leader in industrial 3D printers. However, this material is not dedicated to these large machines. 3D printing is becoming more and more part of everyday life. Thus, the technology is used to create unique toys, various models, figurines, packaging, clothes, shoes and jewelry. For these purposes, it is not at all necessary to purchase a large-sized printer. You can get by with a small device. It has a compact size, and its technology is completely identical to the industrial one. Heated plastic is fed through the nozzle (spout) of the device, which is laid out on the surface in accordance with the drawing specified in the program.
And if earlier such a device was a luxury that only a few can afford, today a 3D printer is available to everyone. nine0003
Top-10 rating according to KP
1. Creality3D Ender 3
Creality3D Ender 3. Photo: market-yandex.ruOur rating opens with a model from the world's largest manufacturer of 3D printers. The Ender 3 features an elegant and thoughtful design, excellent print quality and a wide build area. Manufacturers have provided a good arrangement of wires that do not get confused during operation. The small control unit of the device is located to the right of the work surface. The gadget prints perfectly with various types of plastic. In particular, we are talking about varieties of ABS, PLA, TPU and PETG. The scope of this printer is quite wide. It can be used to produce minifigures, do artistic modeling, and make small prototypes of parts and functional elements. nine
Working space depth 220 mm Features heated table, display, active cooling, no -change, Micro SD Press speed (extruder speed) 904LNumber of extruders 1 Pros and cons
Ability to use different types of plastics, high quality parts, reliable design
A small display that displays only basic information
2.
FlashForge Adventurer 3 FlashForge Adventurer 3. Photo: market-yandex.ru
The model from the Chinese developer FlashForge took the second position in our rating. The device is equipped with a Wi-Fi receiver, a removable heated pad for printing. In addition, manufacturers have provided a built-in webcam, a closed case and a color touch-screen display. The latter, although it does not support the Russian language, is intuitively understandable. The ergonomics of the device is provided by the filament sensor: if the printer runs out of plastic, it automatically goes into standby mode and does not idle. nine0003
Despite the rather wide functionality, this model is hardly suitable for an experienced printer or a small production due to the small area of the working space, high price
3. FlyingBear Ghost 5
FlyingBear Ghost 5. Photo: market-yandex.ru from FlyingBear is ideal for semi-professional use. Uniform supply of filament (plastic) provides good opportunities for creating three-dimensional figures with a fairly high resolution.High productivity is achieved thanks to the transparent Dual Drive extruder with BMG double drive. The gadget has a body closed on three sides. Its walls are made of heat-resistant non-toxic ABS plastic. This protection prevents the accumulation of dust on the working parts of the device, which greatly facilitates the maintenance of the printer. The device is controlled using a 3.5-inch color TFT display. nine0481
X, Y 0.01 mm Positioning accuracy Z 0.002 mm Pros and cons
Short power cord, inaccuracies in the Russian-language menu, weak airflow system.
4. Anet N4
Anet N4. Photo: market-yandex.ruThe budget model from the Chinese manufacturer Anet N4 is equipped with all the necessary functions for a small domestic production. The base of the device is made of cast aluminum alloy. The weight of the gadget does not exceed 9kg. A transparent tinted hood protects the work surface from external sources of ultraviolet radiation.
It can be removed to remove the finished product and clean the printer. Also, manufacturers have provided a removable resin bath and a working platform, which greatly facilitates the use of the device.
Key Features
Print Technology LCD Applications Home/DIY Professional 30 mm/h Pros and cons
Ability to use photopolymer resins from any manufacturer, high polymer curing speed
Small work surface, slightly inferior to competitors in some parameters
Photon Scu0bic4 Anycubic4 Anycu043 5. S. Photo: market-yandex.ruIn the middle of our rating is the Anycubic Photon S model. It is equipped with an advanced optical system and a large working camera. The device has a matrix light source that provides a uniform luminous flux over the entire plane of the desktop. This allows a very high curing speed of the layers to be achieved. In addition, the printer has an original function that allows you to simultaneously print eight identical models.
According to the developers, the target audience for this device are orthodontists and jewelers. Most parts of the device are made of plastic. This factor significantly reduces the weight of the device and makes it convenient to transport. nine0481
Pros and cons
Low price, easy and convenient to use
Lack of protection for the work surface, poor quality of spare parts
8. Wanhao Duplicator i3 Mini
Duplicator Mini i3. Photo: market-yandex.ruMiniature 3D printer does not look like other devices. However, this feature does not affect its technical characteristics. The plastic spool is located on the right side of the bracket. Wanhao branded coating is pasted over the table. There is no platform heating, so it is recommended to use PLA plastic for printing. The manufacturer clearly states in the manual that the printer is designed to work only with PLA material and nothing else. The body of the gadget is made of sheet steel.
The memory card slot and all printer control elements - a monochrome liquid crystal display, a universal knob-button and a Reset micro-button - are placed on the front panel of the printer. nine0484
Positioning accuracy Z 0.004 mm PLASS AND MINSS
Good price
LOOD WITTURE and Protection of the working surface, high probability of problems with a working peasant
9. Arntiller.
Artillery Genius. Photo: market-yandex.ruThe base of the device consists of an aluminum case, in which all the electronics are hidden. An aluminum portal is also attached to it. The latter is also a guide for the moving parts of the printer. At the top of the portal is a plastic jumper to which the spool holder and filament sensor are attached. As for the control screen, its functionality is seriously curtailed. However, it is sufficient for simple tasks, but it is impossible to configure the printer. nine0481
1 Pros and cons
Spacious work surface, robust housing
Little functionality for a rather high price, no work surface protection, few functions on the control screen.

10. Tianfour Sparkmaker
Tianfour Sparkmaker. Photo: market-yandex.ruThis model is ideal for beginners, as it does not require additional settings at all before starting work. Externally, the printer has the shape of a cylinder with a height of 27.5 cm and a diameter of 17 cm. The realistic contours and smooth curves of the figures are ensured by LCD technology. The printer works with any photopolymer resins for 3D printing with a flash length of 405nm. nine0003
How to choose a 3D printer
Choosing a 3D printer is not such a difficult task as it might seem at first glance. Despite the relentless interest in 3D printing and the incredible number of devices on the market, the basic requirements for models remain unchanged. Komsomolskaya Pravda turned to Svyatoslav Vulf, a blogger and host of a YouTube channel about modern technologies and experiments, for help in this matter. He regularly monitors new products on the 3D technology market and tests them at home.
nine0003
Product size
Initially, you should decide what size of products you expect to receive in the end. The required area of the working surface depends on this. Note that the price of the device also depends on the size of the latter. For work at home, there will be enough indicators: 200 × 250 × 200 (WxHxD).
Technology
Today, there are several technologies for printing on a 3D printer. They differ significantly from each other. Let's consider some of them. nine0003
SLA-technology — works on the basis of liquid photopolymer, which under the influence of laser light changes its physical properties and hardens. It allows you to create figurines with the highest precision of microforms.
DLP technology is an alternative SLA method. However, instead of laser systems, LED projectors are used here, which significantly reduce the cost of 3D printers. When using this technology, the future prototype is formed layer by layer.
nine0003
The FDM method is ideal when prototypes are required that will be actively used, not just sitting on a shelf. Here, high-strength industrial plastics will be used for production. Please note that there are other technologies, but they are very similar to the above.
Material
Before buying a printer, you should also pay attention to what materials it works with, as they have significant differences from each other. For example, ABS can take many different polymeric forms. This is a very durable plastic. It is easily sanded and processed. PLA plastic is considered more environmentally friendly. It is made from agricultural products - corn, potatoes, beets and others. In its original form, it is transparent and can be colored. PLA is just as strong but tougher than ABS. The ductility and heat resistance of SBS make it the material of choice in engineering and mechanical applications. nine0003
Noise level and drivers
An important factor when choosing a 3D printer are drivers - device engines (not to be confused with software).

Learn more