Geeetech a20t 3d printer review
Geeetech A20 3D Printer Review
Larger i3 style aluminum extrusion printers have been dominating the 3D printer market for some time now. Although they perform well, they are large and midway through last year there was the release of a couple smaller form factors. The Geeetech A20 falls under the recent form factor which is an aluminum upper assembly mounted onto a sheet metal base providing a 255mm x 255mm x 255mm build volume with a price of $349 USD. While it has a different type of assembly, it is a clean looking 3D printer that should perform just as good as all the other V-wheel/V-slot printers like the Creality CR-10. Geeetech provided me their A20 3D printer so that I could provide an honest review. So, let’s take an in-depth look at the Geeetech A20.
Geeetech A20 Specifications
Printing technology: FDM
Build volume: 255*255*255 mm³
Filament diameter: 1.75mm
Nozzle diameter: 0.4mm
Filament: ABS / PLA /wood-polymer/PVA/HIPS/PETG, etc.
Max temp for hotbed: 100℃
Max temp for extruder: 250℃
Power supply: Input: 110V/220V
Output: DC 24V/15A
Connectivity: USB cable, SD card (support stand-alone printing)
Display screen: LCD 12864
Build Platform: Aluminum heatbed+ silicon carbide glass
Stepper Motors: 1. 8°step angle with 1/16 micro-stepping
Machine Dimension: 442 x 447 x 480mm³
Shipping box Dimension: 510 x 495 x 295mm³
Machine Net weight: 7.8kg
Unboxing
Geeetech’s packing job is as good as I’ve seen. Because they use a nice sturdy foam which protects the printer’s upper and lower assemblies, there were no missing parts or broken components upon inspection.
- Geeetech A20 – Unboxing 1
- Geeetech A20 – Unboxing 2
- Geeetech A20 – Unboxing 3
Assembly
The assembly process of the Geeetech A20 is really simple. Four m5 screws threaded through the base of the printer into the bottom of the upper assembly’s aluminum extrusion takes a couple minutes at most. Due to the mostly pre-assembled components, the remaining assembly requires installing the filament spool holder to the top of the frame and plugging in the electrical connectors.
First Impressions
Geeetech A20 – BaseIt is a clean looking 3D printer that feels sturdy.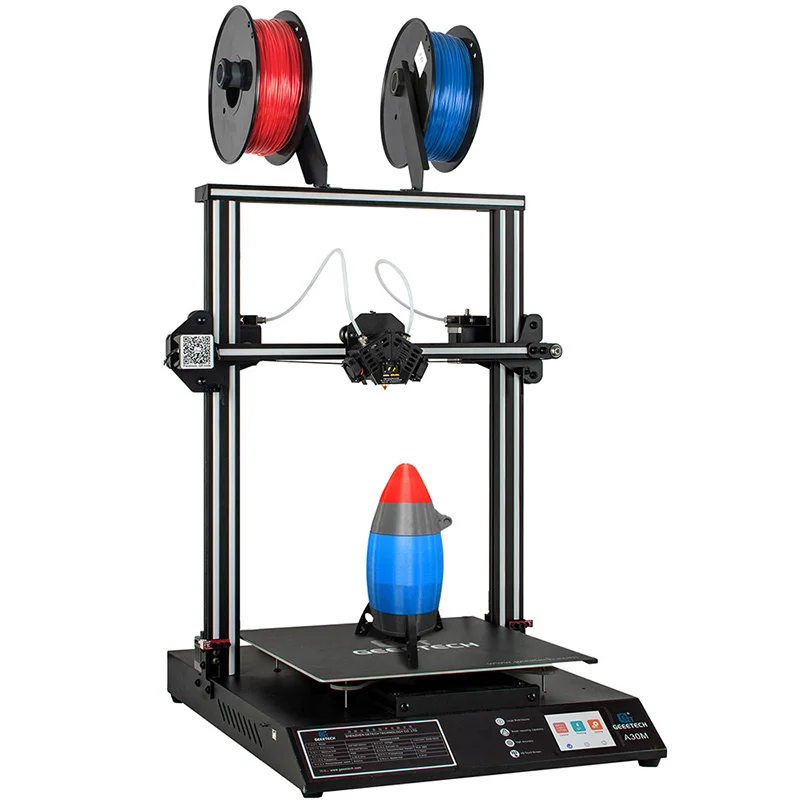 The base is sheet metal and they use a 2020 aluminum extrusion mounted underneath to add support for the top assembly. Because of the ample room in the base assembly, there is no tethered control box to contend with. The electronics are neatly assembled in the sheet metal base which is a feature I can appreciate as I do not print in enclosures and space is limited in my shop. Geeetech’s hot end assembly uses it’s own little breakout board to make future maintenance easier for replacement parts should that be required which I felt was a nice feature. In contrast, I was less impressed by the fact Geeetech has decided to move towards single bearing v-wheels for the Geeetech A20. Seems like this is a cost cutting exercise.
Hiccups
Geeetech A20 – Owl Pen HolderI leveled the bed and decided to go a little big on my first print, an owl shaped pen holder. I started off with a decent profile I had used for a Geeetech A10 in the past and I made some slight modifications to accommodate the size difference and proceeded. The results were fairly good to start with but you can see ghosting in the print. Ghosting was caused by Acceleration and Jerk values in the motion settings that were set too high. So, I reduced the Acceleration and Jerk settings. When I attempted another print my next set of troubles began.
Clog after clog, I could not complete a print. I removed the hot end assembly after watching a video Geeetech released on YouTube. The video showed how to disassemble their proprietary hot end. I removed the clog, rebuilt the hot end, and tried again. Another clog. I contacted Geeetech and they agreed with me something must be amiss with the hot end. As a result, a replacement hot end was sent out immediately. Once the replacement arrived I compared it to my old one. The new hot end had a PTFE tube in the heatbreak and the old one did not, it was missing. Certainly, this seemed like it would be the problem, so I mounted the new hot end and I had no more clogging issues going forward.
I also did try out the advertised filament run-out sensor and power outage resume feature. While both features worked (when replacing the filament and turning the power back on), the print had a layer shifted at each event. In short, the features function, but your results may vary.
Printing
Geeetech A20 – BenchyGeeetech A20 ColossusPrint after print I was able to start a print and I didn’t even need to watch the first layer. I would come back to my shop later on with a nicely completed print on the plate. As a result, this provided a comforting sense of reliability. Geeetech’s cooling duct was just barely adequate from my perspective. The Benchy printed quite nicely except the very back of the boat where there was some minor curling.
Geeetech A20 – Pen HolderGeeetech’s super plate held the prints fine on all except my largest print, this unique pen holder. The model is a decent size and took 22 hours. As a result, it did contract and lose some adhesion around the far edges. With the motion settings being tuned a little and slicing profile I was using working well, I was very happy with my print results. I would recommend moving to a better cooling duct to improve the print quality further. However for the purposes of a review I like to keep the 3D printer as stock as possible.
Community
Geeetech has a fairly large online community on Facebook. There are two groups that I am apart of. Similarly, both seem to have very friendly members with a decent amount of knowledge on the Geeetech A Series printers.
The Geeetech A10/A20/A30 Printer User Group: https://www.facebook.com/groups/206519003304580
Geeetech 3D Printer User Club https://www.facebook.com/groups/315127105604393
Conclusion
After approximately 100 hours of 3D printing I can say that I do like the A20. While I did have the hot end issue which I will conclude was a QC issue from the factory, Geeetech was responsive and remedied it quite quickly. After the hot end was replaced it was reliable with successful prints being churned out regularly. I can’t conclude how well the single bearing v-wheels will hold up over the long run, however they did not seem to affect the print quality during this review period.
I really do appreciate the cleanliness of the built-in electronics base and I also liked the ease of assembly and maintenance. Furthermore, it was nice having the hot end break out board as it made for an easier time replacing the hot end when I had to do that. Like any printer there is some tuning involved. However, once setup you will have a nice workhorse based on my experience. Therefore, I recommend the Geeetech A20 as a nice sized printer that will handle your needs in a 255mm x 255mm x 255mm build volume.
You can purchase directly from Geeetech here, and take $30 off using coupon code WCDSW (at the time this review was posted) :
https://goo.gl/HHuHoa
Buy Geeetech A20T 3 in 1 Out Mix Color 3D Printer Kit
Main Features:
Description:
Geeetech A20T 3D printer delivers mix-color objects and greatly enriches your 3D printing life. Keep the good performance of Geeetech 3D printers, it aims to provide users with quality printout and satisfactory printing experience. A20T makes the best of the building platform and enables you to view the printing details in 360-degree printing at the accuracy of 0.1mm, it delivers objects with smooth surface finish, clear angles and strong structure. Besides, A20T comes with filament detector and break-resuming capability, greatly enhancing your 3D printing experience.
Main Features:
Assembly modularized design
The modularized design makes it easy to build the printer in 3 steps. Its classic blue and black color combo impart a touch of simplicity and excellence, embodying commitment of Geeetech to quality products.
Mix-color printing capability
360-degree ventilation design
A20T extruder cover features 360-degree ventilation design, greatly enhancing the dissipation of heat and guaranteeing excellent printing quality.
High-performance gear train
A20T extruder motor uses a gear train of 3:1 speed ratio, amplifying input torque and improving your printing experience.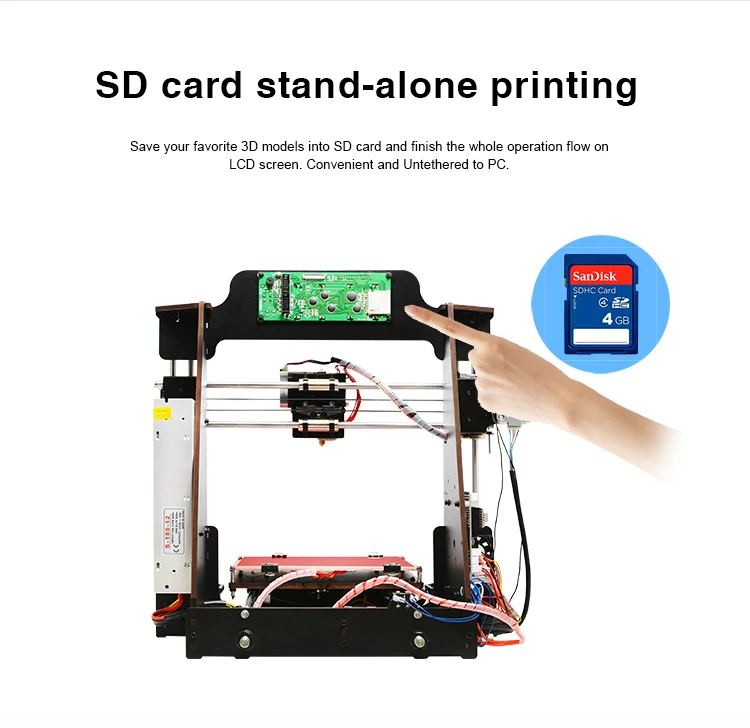 Adopting the modularized design for extruder wiring, A20T makes it easy to exchange the wire.
V-shaped rails and wheels
The V-shaped wheels and rails on each axis, made from the wear-resistant aluminum profile, could, in a large measure, reduce the printing noise and offer you a quiet 3D printing environment.
Auto-leveling
A20T control board supports auto-leveling, an optional add-on. Just connect the auto-leveling sensor and adjust the related parameters. Saving the efforts of manual leveling.
Software resource
Geeetech EasyPrint 3D host software provides a straight-forward platform for you to control the printer and complete the slicing process. Easy and convenient for both beginners and pros.
Combined with 3D WiFi module, A20T invites you to enjoy the convenience of cloud 3D printing solution, via which you could enjoy 50,000+ free 3D models, cloud slicer and remote control over your printer on EasyPrint 3D App.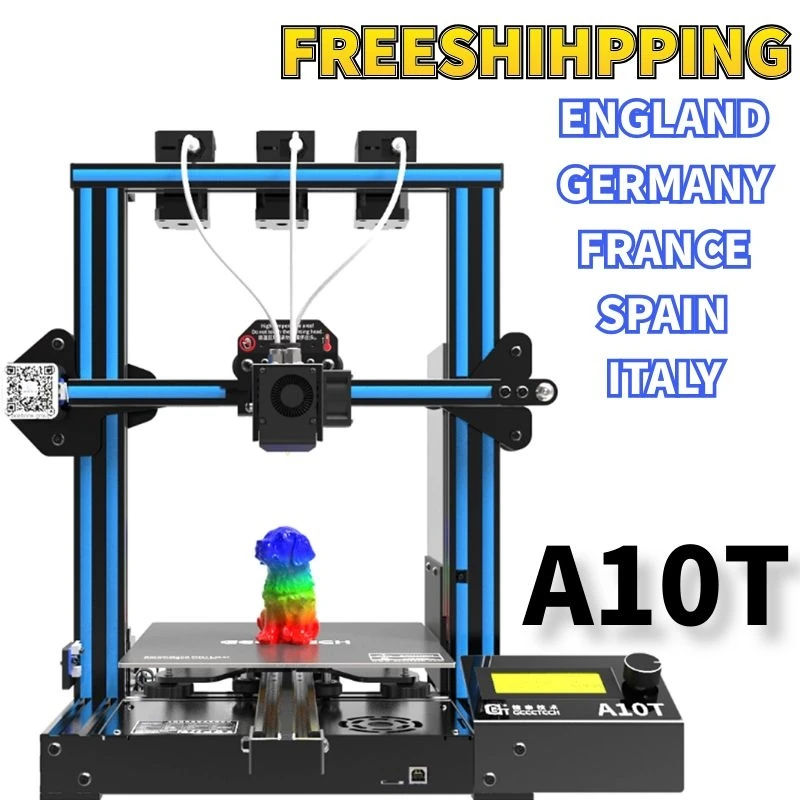 This self-developed App is responsive and user-friendly.
**Free and faster shipping (incl. of taxes) applies if the order ships from the local warehouses (US/EU/UK/AU/etc). Estimated shipping time may vary and you may have to pay import taxes/additional shipping costs if the order ships from the seller's original manufacturing facilities, usually China, Taiwan, Hong Kong, etc. We ship compatible plugs based on your location. Please refer to our FAQ for more details. If you have any presale questions, please contact us.
| Product Condition | |
| Item Condition | New |
| Printing Specifications | |
| X Y Axis Position Accuracy | 0. 011mm 011mm |
| Z Axis Position Accuracy | 0.00025mm |
| Print size ( X Y Z ) | 250*250*250mm |
| Print Speed | 60mm/s |
| Layer Resolution | 0.1mm -0.3mm |
| Filament Diameter | 1.75mm |
| Nozzle Diameter | 0.4mm |
| Filament Compatibility | ABS/PLA, etc |
| Software Specifications | |
| 3D Printing Software | Cura, Repetier-Host, Simplify 3D |
| Supported File Formats | STL/OBJ/Gcode/JPG/PNG |
| Operating System | Win, Mac and Linux |
| Temperature Specifications | |
| Extruder Temperature | 250 C |
| Heating Bed Temperature | 110 C |
| Electrical Specifications | |
| Power Requirements | Power input: 100-120V/200-240V
Power output: DC24V/14.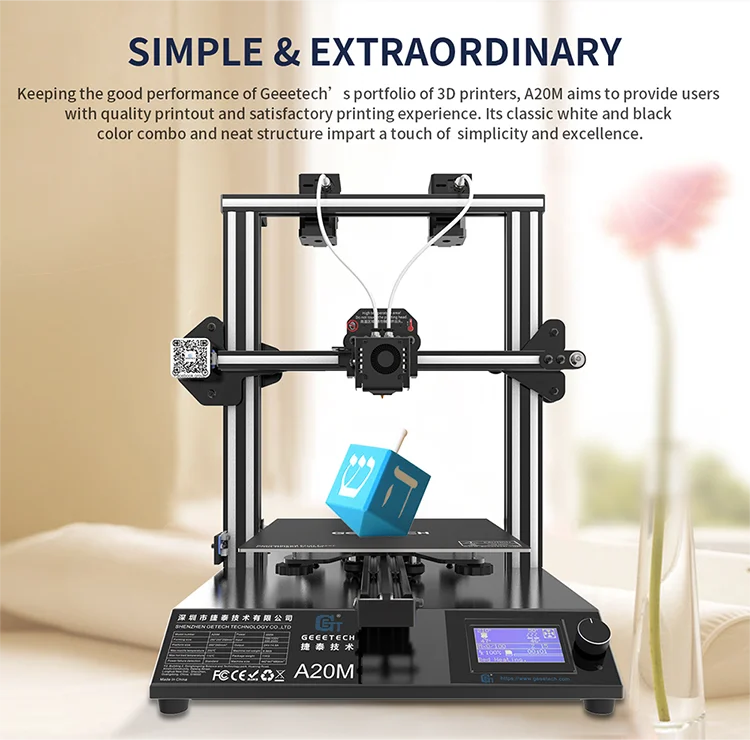 6A,350W 6A,350W |
| Connectivity (Interface) | USB,Wifi,TF Card |
| Shipping specifications | |
| Machine weight | 9 kg |
| Shipping box weight | 11.5 Kg |
| Machine Dimensions | 442x447x480 mm |
| Shipping box dimensions | 510x495x325 mm |
| Shipping Location | China |
| Lead Time (Processing/Handling Time) | 7 Business Days |
normal printing from first power on?
Hello. The review is dedicated to the mid-budget 3D printer from Geeetech. But a little preface: over the past year I have had as many as three such devices in my hands, among which there is even a model for printing with two plastics at the same time. Each had its own potential, some were easier for a beginner, and some were a real torment. Over time, my passion for printers faded away, but my knowledge remained. Thanks to this and, probably, the fact that the A20 turned out to be quite successful, the review turned out to be without superfluous. If you are interested in knowing how good a not the most expensive printer can be right out of the box, then welcome. There will be photos of the assembly, we will turn it on for the first time, print a test figure, deal with the quality and potential of the A20.
Overview summary:
1) Characteristics.
2) Box and delivery set.
3) Delivery set in more detail.
4) Inspection and assembly of the printer.
5) First launch and first print + quality analysis.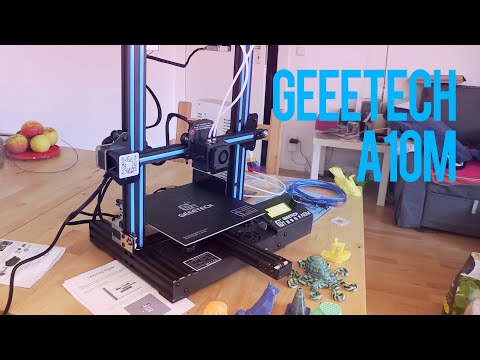
6) Study of software and printing problems.
7) Examples of printed models.
8) Conclusions.
There are not very many items, but they will be voluminous. Only at the first stage of the production of the review, more than 100 photos were taken.
Features.
Briefly, in the photo:
Characteristics in the form of text, in English and from the official page of the model:
Printing parameters
— Printing technology: FDM
— Build volume: 250*250*250 mm
— Printing accuracy: 0.1mm
— Printing speed: 180 mm/s (max)
— Filament diameter: 1.75mm
— Nozzle diameter: 0.4mm
— Filament: ABS/PLA /wood-polymer/PVA/HIPS/PETG, etc.
- Temp:
> Max temp for hotbed: 100℃
> Max temp for extruder: 250℃
Software resources
— Operating system: Windows, MAC, Linux
- Control software: EasyPrint 3D, Repetier-Host, Simplify 3D, Cura, Slic3r, etc.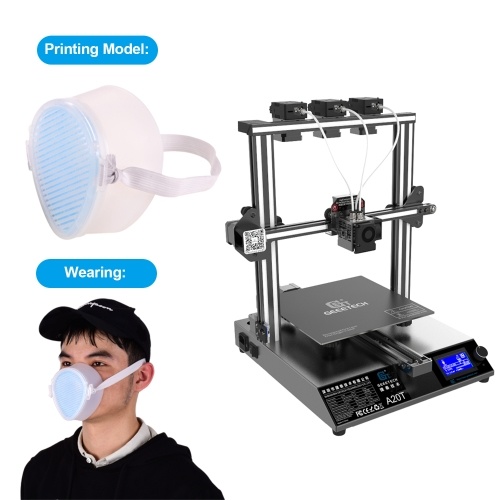
- Remote App: EasyPrint 3D App (with an optional 3D WiFi module)
— File format: .STL, G.code
Electrical
— Power supply: Input: 110V/220V
— Output: DC 24V/15A
- Connectivity: Wi-Fi (with an optional 3D WiFi module), USB cable,
— SD card (support stand-alone printing)
— Display screen: LCD 12864
Mechanical:
Frame: Aluminum profile
– Build Platform: Aluminum heatbed + plastic sticker
- XY Rods: Wear-resistant aluminum profile
— Z axis: Lead screw
Physical Dimensions & Weight
– Machine Dimension: 442 x 447 x 480mm
— Shipping box Dimension: 510 x 495 x 295mm
– Machine Net weight: 7.8kg
— Machine Gross weight: 10.2 kg
Nothing stands out here, except that there is a set of everything you need. I am sure that according to the characteristics you can find a dozen other full-fledged analogues, therefore a lot of advice and explanations on the Internet can also apply to the A20. I think this is a plus.
***
Box and delivery.
Let's start with the big one. Formally speaking, from the largest:
The box weighs about 10 kg, which is within the normal range for such a printer. Inside everything is packed as it should:
In three layers, we have the main part of the printer, the frame and the accessories.
Total:
The frame, which is very important, is fully assembled and ready for installation. This is a big plus for beginners, as there are models in which, for ease of transportation and, most likely, to reduce the cost, even it comes unassembled. For someone who is not in the subject, this would add about two, or even three hours of study and assembly.
The delivery set is traditionally large for any 3D printer and it is impossible to describe it in a few words even if you decide to simply list it. For this reason, now I will show it from the side, and then in more detail. Tools:
Parts and wires:
Well, a gift from the Chinese:
Also, do not forget about the documentation (will be in the next paragraph) and the print mat.
In short (in which case you can skip the next step), the box contains everything you need to assemble the printer and start printing.
***
Delivery set more detailed.
As I already hinted, this review item will be of most interest to those who are really thinking about purchasing a printer, and for the first time.
We are now greeted by documentation. Here it is:
This is a short but step-by-step color guide for getting started with the printer. If you do everything as shown there and do not rush, then there should be no problems. But for more confidence, I recommend watching the video instead of the instructions: www.youtube.com/watch?v=8_8TxbP2KjE
Second half of instructions:
In addition, there is a letter from the company:
And a special sheet of paper to adjust the height of the printing table. Naturally, it is better to use it, and not some other sheet of paper, because even such a parameter as paper density is important in this adjustment. What is said on the sheet itself, where the process is described point by point.
That's all.
Let's move on to the toolkit. Although, it is said loudly. Everything you have and everything you need:
In two small plastic bags you can find:
All this the Chinese put with a large margin. Also in the package you can find two spare 0.4 tips.
Of the cables, there is a USB-A for connecting the printer to a PC and a power cable. By the way, not the longest, about 1.5 meters. But for a working room, this should be enough.
Also, the Chinese did not stint on a spare tube for the filament, a scraper and a small piece of PLA plastic. But there is not much point in trying it, it is better to buy a normal 300m coil and select the print settings for your plastic, and not for a sample. But it is quite possible not to change the complete memory card, it may be know-name, but it works in the printer.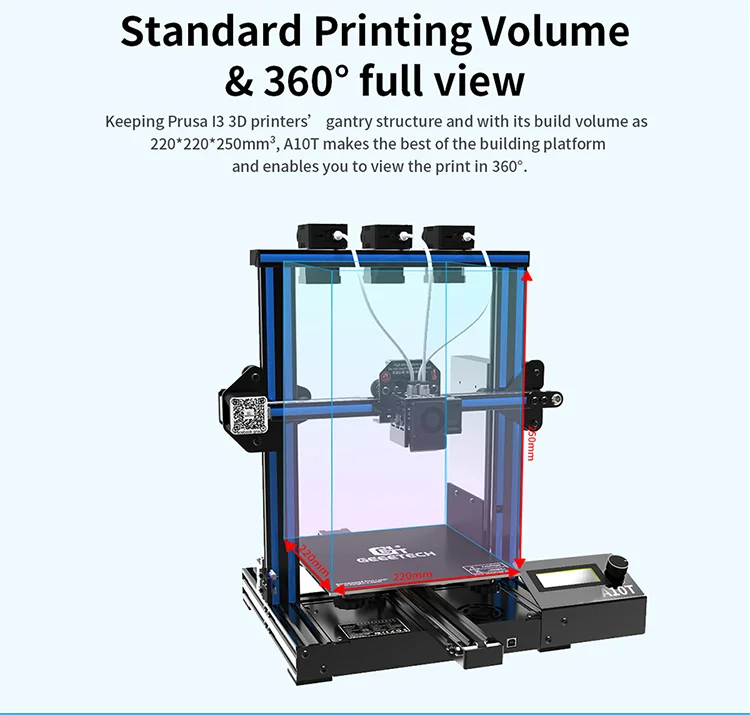 And where else can I get the test figure that they left there :)
I will finish the item with a plastic mount. Its original location is on top of the printer, and it fits there more or less organically.
Well, now everything. It would be possible to paint in more detail, but this is definitely no one needs anyone.
***
Printer inspection and assembly.
In the case of the Geeetech A20, most of the assembly work was done by the Chinese. Therefore, the printer really should not cause great difficulties even for a beginner.
Now let's look at it in more detail. I will write in a live format: approximately in the order in which I myself studied it.
Front frame:
Rear frame:
Extruder:
Back side:
Cooling looks good:
But the airflow is printed on another 3D printer and is of very shameful quality.
I have no idea how this could be missed in the finished assembly.
As you can see, the insides are clearly visible here. Tip (0.4mm):
Hotend itself:
Place of plastic supply:
The overall impression, if you close your eyes to the airflow, is very good. Even the belts are not tightened with ties:
And the Chinese have not forgotten the place for 3D Touch (a tool for auto leveling the printed table):
***
This part is sorted out. Now for the little things. Profiles:
Motors:
One of the "stoppers" (the second one is hard to reach, especially with the camera):
Z axis motor:
But this is no longer a trifle, the plastic feed mechanism:
I praise him very much, because he works for the top five. After him, I realized how big the problems with this were on my other printers.
Additional frames without description:
Everything is tight, nothing dangles. I hope that Geeetech will not walk from model to model.
***
Let's move on to the main part of the printer.
Display:
Printer characteristics duplicated on the front panel:
Heated table:
Inside view:
The table is adjustable in 6 places. At 4 corners with their help:
And with the help of wheels on one side of the relay. If your table is wobbly, then you need here and with a wrench. The table should be moderately tight and should not dangle at all or at least somehow play.
By itself, the design of the printed table here is reliable and does not make you doubt yourself.
We figured out the table, with the front panel - too. Now the side ones. Rear table motor:
And the voltage switch, which is well deepened:
The left side of the printer received a power connector and a backlit power button.
The right side of the printer received a connector for connecting to a PC and a slot for MicroSD (sorry, not just SD).
Let's look under the bottom:
I'll make do with a few photos:
In every review before, I have climbed inside the printer, but this time I decided to allow myself not to do this and get by with the most visual material that could be added:
***
Now briefly about the assembly.
All we need is enough space, a little time (1-2 hours) and a lot of attention. As well as paper instructions or the official video, to which I threw the link above (I will duplicate it).
In order to install the frame, we need the edge of any table. We put the printer in this way:
And we have access to attachment points:
We tighten it harder, because the rigidity of the structure will depend on this. Next, I attached a plastic spool holder.
Then the white tube for plastic must be installed all the way into the feed mechanism.
It's a matter of wires. You should not make mistakes here (as at any stage of the assembly). Well, it's not so easy to make a mistake here. Both the instructions and the video show pretty well what should be inserted and where. Some wires can't be put in the wrong place. For example:
And each has its own marking:
The final touch is filling the plastic. It must be inserted into the already familiar mechanism by first pulling the clamp. The plastic will enter the tube and it will need to be filled all the way until the plastic thread gets to the extruder.
This completes the build. In truth, when not doing it for the first time, the assembly takes no more time than examining the printer box itself.
After assembly and before printing, the printer table must be level. This will need to be taken as carefully as possible and done as advised on that special leaflet for this case.
This process took me about 5 minutes and I was pleased with the result.
***
First run and first print + quality analysis.
Here it is, assembled:
Insert memory card:
Turn on the button and the display lights up:
It displays all the basic information about printing: both the elapsed time and the temperature of the extruder, table; indicates the power of the cooling operation and simply the name of the printed file.
The screen is non-touch and the menu items need to be navigated using a single control, but this will not cause problems.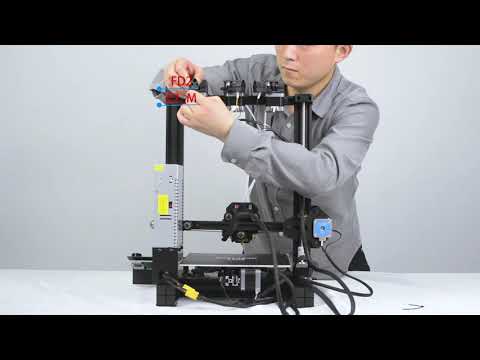
You can read about the basic printer settings using the display in my previous review on the A20M: mysku.club/blog/china-stores/81589.html
Now I will not focus on this. But I will mention the main thing: using the display, you can control the position of the extruder, heat it, heat the table, adjust the cooling speed and configure other, more complex parameters. Not to say that in a printer for a beginner it’s worth climbing there at all.
Instead, it is better to run a test figurine that was uploaded to a complete memory card. The figurine didn't have a description, so I didn't know what would be printed. Test figures, according to the idea, should be printed perfectly. Still, this is a demonstration of the capabilities of the printer.
And the first time I was successful: the printer circled the figure along the contour so that the nozzle developed and began to print. Plastic immediately stuck and nothing anywhere bullied or peeled off. This was a miracle for me because I had adhesion problems on all previous printers.
GIF:
The figurine was printed for three hours and during the printing process the only thing that bothered me was that I did not understand what would come out of it.
It gradually became clear:
What is printed dog model:
In the end, I rated the print quality at 6-7 points out of 10, and all for the most part due to poor printing of attachments. At the same time, the surface quality even with a layer of 0.2mm was excellent (when 0.1mm or less is taken for miniatures).
More photos:
So the first impression was positive. But after all, a printer is bought not only in order to print what the Chinese recorded on a memory card. Further it is always more difficult, then you need to write the necessary files to the card yourself and start printing, and for this you need to figure out what it is all about - a model for 3D printing.
***
Without going into details, the 3D printed model is a 3D model :)
If desired, each of us can make it special.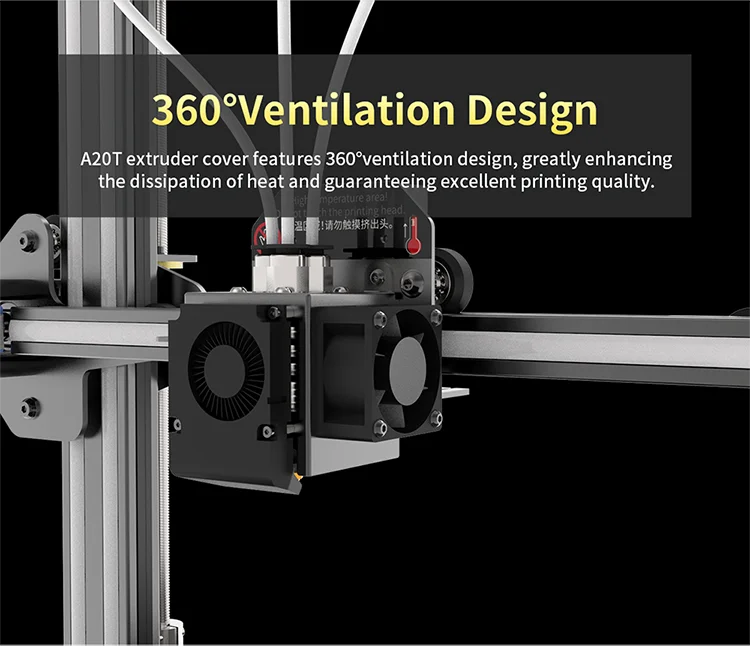 programs or just find it on the Internet. For example, on the site www.thingiverse.com/, where models can be downloaded for free.
Let's say you found a model, downloaded it and… what's next? Next, we need a program in which we will set all the necessary printing parameters, which can quite vary greatly from model to model, which comes with experience, and considerable.
***
Investigate software and printing problems.
In order to find the right program (it is also a slicer), you don’t have to go far. Although the Chinese could have thrown the .exe file on their memory card:
Nevertheless, we go to the Internet and download Ultimaker Cura. At the time of writing the review, the latest version of the free program was 4.9.1. When you start the program, you will either need to configure the printer manually or select from the existing ones. The program and Geeetech have grown to such a level that here you can find our model - A20.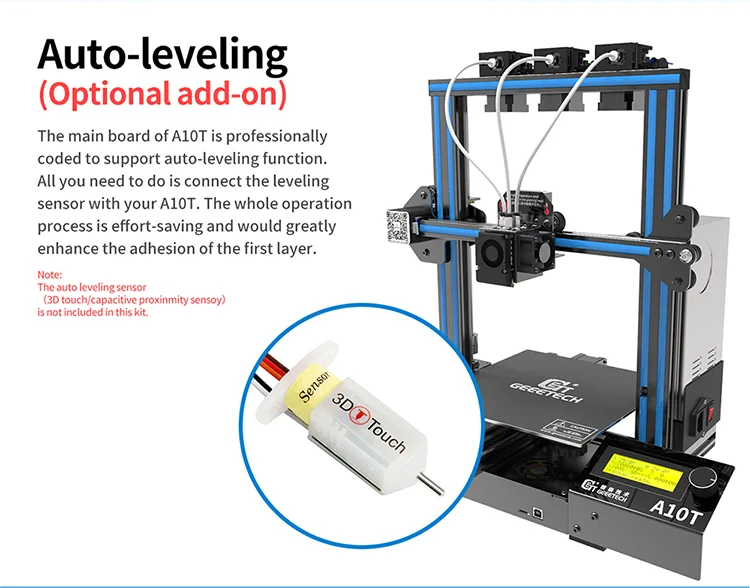
It would seem that everything ends here: we select one of the profiles for printing (which often vary only in the layer height, i.e., the detail of the study), write the file (already in the form of .gcode, not .stl) to the memory card and Let's go print.
I did just that: I found a model, loaded it into the program, chose a profile with a standard layer of 0.2mm, wrote it down on a memory card and went to print it. And I got my share of problems: for reasons unknown to me, the print settings were completely different from those that I observed on the printer display while printing the dog. At least because the table was left without heating. It turned out that in Cura, in the profile for the A20, there is no checkmark next to the presence of a heated table. For this reason, porridge has formed on the table, which is better to notice in time and turn off the seal. So it's best to never risk leaving the printer until it's printed the first layer.
Finding and ticking the program is not difficult (why did the Chinese make a mistake?), but this, unfortunately, did not solve the problem. The quality of printing and adhesion was so far from ideal that it is better not to say anything extra about it.
I'll go straight to the solution: while cursorily searching for a proven print profile for the A20 (because the main profiles in Cura were no longer trustworthy), I came across an English-language review of our printer - www.starfightersitalia.com/geeetech-a20-test-a -great-first-3d-printer-on-a-budget/
In it, a kind man shared more than 100 hours of printing experience, during which he picked up successful settings for printing with three different levels of detail. Believe me, this is a real gem - the settings for the printer, which someone has already checked and recognized as successful. For each, absolutely each printer, you need to look for them on your own experience, and this can take several times more than one hundred hours. I am familiar with this, therefore I am aware of the value of these profiles.
Then the next step is small: import them into the program and write the desired model with the desired settings to the memory card.
The result was not long in coming. Two hours later, the perfect components for the future model flaunted on my table.
In order not to be unfounded:
Details:
Everything was really good: from adhesion from the first layer to minimal seams on the surface and the absence of the consequences of plastic rollback when moving to a new print area (in the screenshot with the components these are blue stripes and, as you can see, there are a lot of them). In other words, the press really pleased.
This should be the end of the description of the seal, but unfortunately I can't. Because I had a completely different problem. Of a different nature, I would say that some will not believe in this: the models not only stuck well to the rug from the very first layer (if you knew! How many problems with the fact that it may not stick), but they stuck tightly to me . Nothing, absolutely nothing, and in no way without deformation, I could not remove them from the rug. No heat, no alcohol (recommended for printing on glass), no half-day downtime after printing. And no, all models were printed on a perfectly even layer and nowhere was the effect of the “elephant foot” (when the model is imprinted too much on the table) anywhere. They really were perfectly printed and just pasted into the rug.
I did not find a solution. Or rather, logical. I had to take the glass (2-3mm thick and the right size) and replace the mat. Which, by the way, is almost disposable. I really did not want to do this, and I was afraid of losing the gift that the printer had awarded me - perfect adhesion. But you can’t live like that: the figures existed only on the printed table, and could not be used anywhere.
This is a very strange problem that everyone who owns this printer seems to have. My last guess was to use a different plastic, but my PLA completely suited me and still does.
That's why I installed the glass.
***
Printed examples.
The problem of poor adhesion on glass did not touch me (the second miracle of the day) and on this the difficulties of printing left me alone.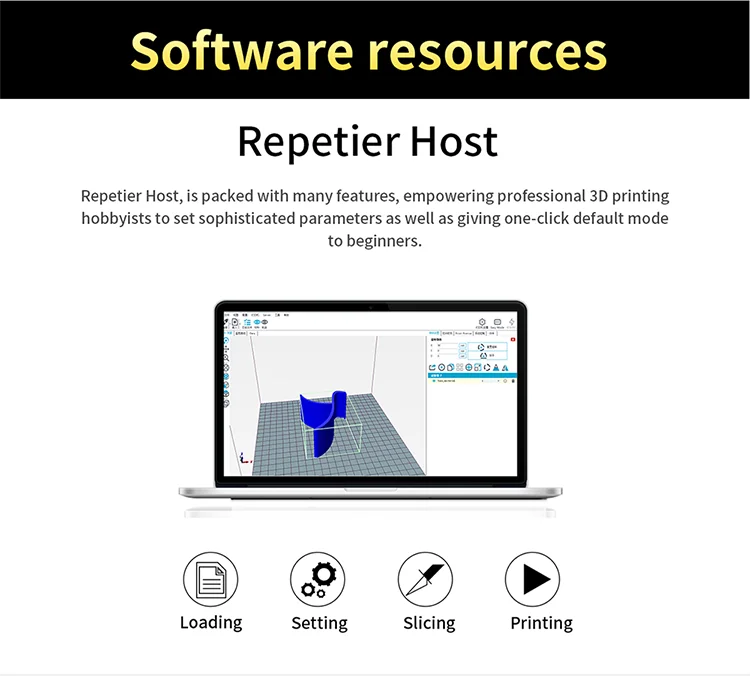
I printed the model I wanted completely.
All parts in one photo:
And the finished result:
Details:
Model link: www.thingiverse.com/thing:1921091
I would like to say that the glass installation did not reduce the overall print quality. The absence of problems with rollbacks and the good quality of the outer walls played a good service and now I rated the final result at 9out of 10. You can see for yourself from the photos above. Again, a huge merit of this result was the use of an already proven print profile and, according to my tests, the use of a height of 0.3mm for the first layer plays a significant role. The rest of the settings are quite typical (205 degrees for PLA, 60 degrees for the table and gradually increasing the blowing power from the second layer). But from their simplicity, they did not become worse.
You can end here.
***
Conclusions.
At the very beginning, I hinted that this printer model might look interesting for a beginner or a person who is generally dipping his toes into 3D printing for the first time.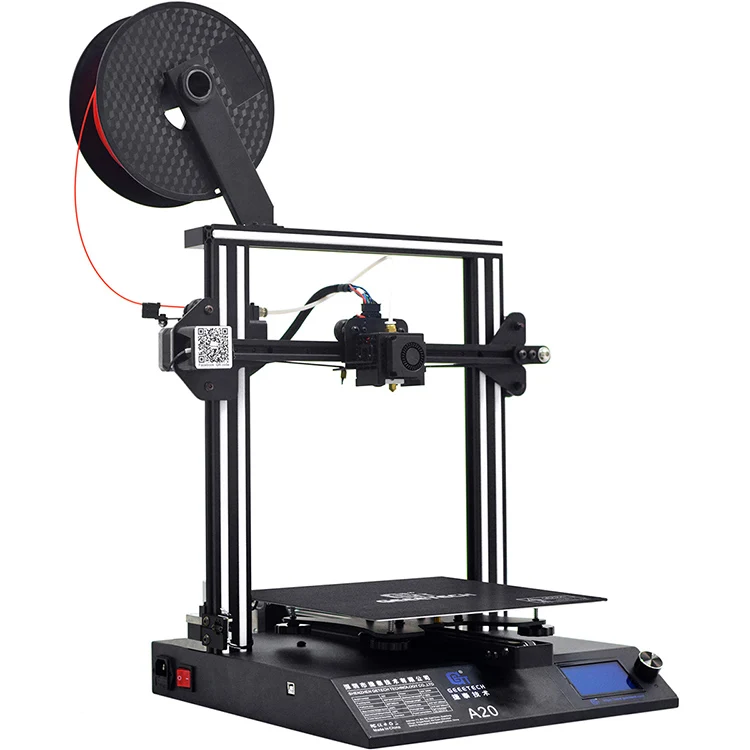 And, in fact, I did not change my opinion, but only strengthened it.
The Geeetech A20 is a fairly easy printer to learn. From the box itself, it is easy to assemble, has a normal instruction and its video version. It has a solid construction, familiar filling and a full range of basic functions for full-fledged 3D printing: it can work with most plastics, there is a table heating up to 110 degrees, an informative display, it can resume printing, and all this with a working area of 25x25x25cm. For its 250 dollars, the thing becomes on par with other proven options.
We add here the excellent print quality when using ready-made profiles for Cura Ultimate (link to them and their author in the review) and a really nice “machine” comes out.
The only drawback of the printer is the re-adhesion that has appeared (if I may say so): models stick tightly to the complete mat, which, unfortunately, puts an end to the absence of all those problems that could be encountered at all other stages of printing. Even despite the fact that there is one problem, and there is a whole lot. The solution is to put glass. The user experience will change, but the print quality will remain the same. The second proposed solution to the problem is to use a different plastic. The third option and the assumption is that I just could not be lucky with the rug. But this is just speculation, and it is simply unlikely. Usually you are unlucky when it sticks badly, and not vice versa.
Otherwise, the A20 is an interesting and even solid printer.
To take or not - to decide, as always, you, not me. The main features of the model are considered.
Thank you for your attention.
Product for writing a review provided by the store. The review is published in accordance with clause 18 of the Site Rules.
Geeetech A20T 3 in 1 Out Mix Color 3D Printer Kit – Services for 3D printing and 3D design, manufacturing and prototyping
Delivery up to a month.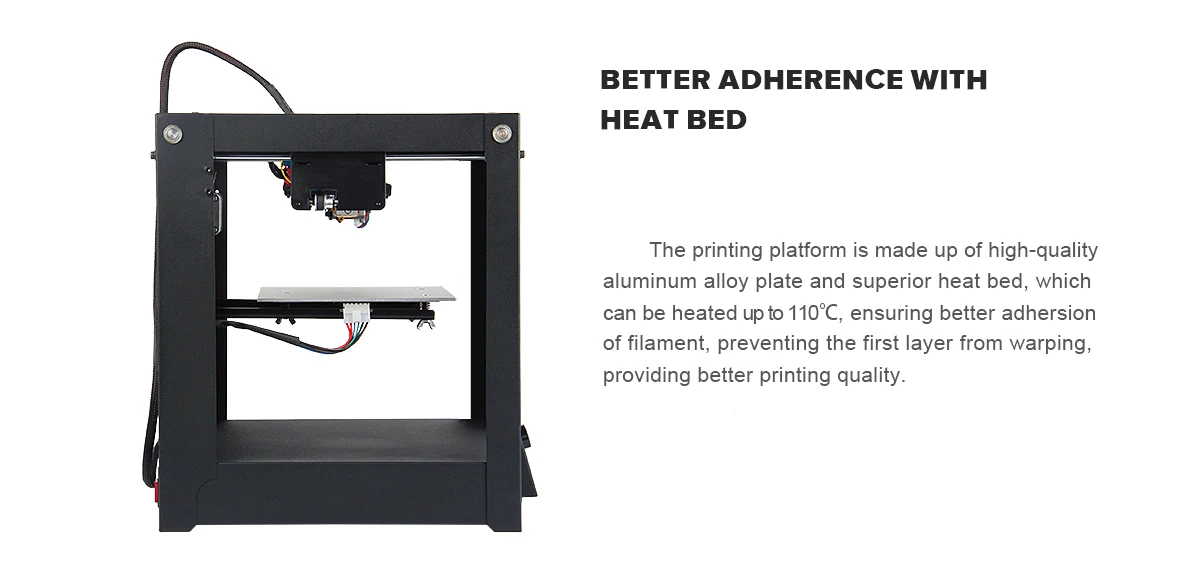
BGN 1,617.60
Geeetech A20T 3 in 1 Out Mix Color 3D Printer Kit quantity
Category3D printers, FDM/FFF printers, Machines for 3D servicesTags:3D printers, FDM/FFF printers, Geeetech, Machines for 3D services
- Description
- Vendor
- Reviews (0)
- Questions and Answers
Description
Geeetech A20T 3 in 1 Out Mix Color 3D Printer Kit
Main Features:
Description:
Geeetech A20T 3D printer delivers mix-color objects and greatly enriches your 3D printing life. Keep the good performance of Geeetech 3D printers, it aims to provide users with quality printout and satisfactory printing experience. A20T makes the best of the building platform and enables you to view the printing details in 360-degree printing at the accuracy of 0. 1mm, it delivers objects with smooth surface finish, clear angles and strong structure. Besides, A20T comes with filament detector and break-resuming capability, greatly enhancing your 3D printing experience.
Main Features:
Assembly modularized design
The modularized design makes it easy to build the printer in 3 steps. Its classic blue and black color combo impart a touch of simplicity and excellence, embodying a commitment of Geeetech to quality products.
Mix-color printing capability
360-degree ventilation design
A20T extruder cover features 360-degree ventilation design, greatly enhancing the dissipation of heat and guaranteeing excellent printing quality.
High-performance gear train
A20T extruder motor uses a gear train of 3:1 speed ratio, amplifying input torque and improving your printing experience. Adopting the modularized design for extruder wiring, A20T makes it easy to exchange the wire.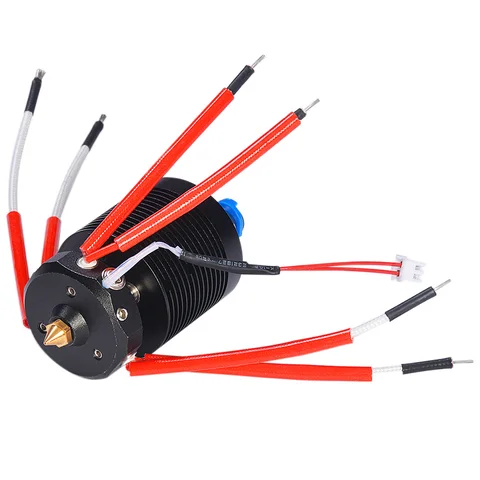
V-shaped rails and wheels
The V-shaped wheels and rails on each axis, made from the wear-resistant aluminum profile, could, in a large measure, reduce the printing noise and offer you a quiet 3D printing environment.
Auto-leveling
A20T control board supports auto-leveling, an optional add-on. Just connect the auto-leveling sensor and adjust the related parameters. Saving the efforts of manual leveling.
Software resource
Geeetech EasyPrint 3D host software provides a straight-forward platform for you to control the printer and complete the slicing process. Easy and convenient for both beginners and pros.
Combined with 3D WiFi module, A20T invites you to enjoy the convenience of cloud 3D printing solution, via which you could enjoy 50,000+ free 3D models, cloud slicer and remote control over your printer on EasyPrint 3D App. This self-developed App is responsive and user-friendly.
| Product Condition | |
| Item Condition | New |
| Printing Specifications | |
| X Y Axis Position Accuracy | 0.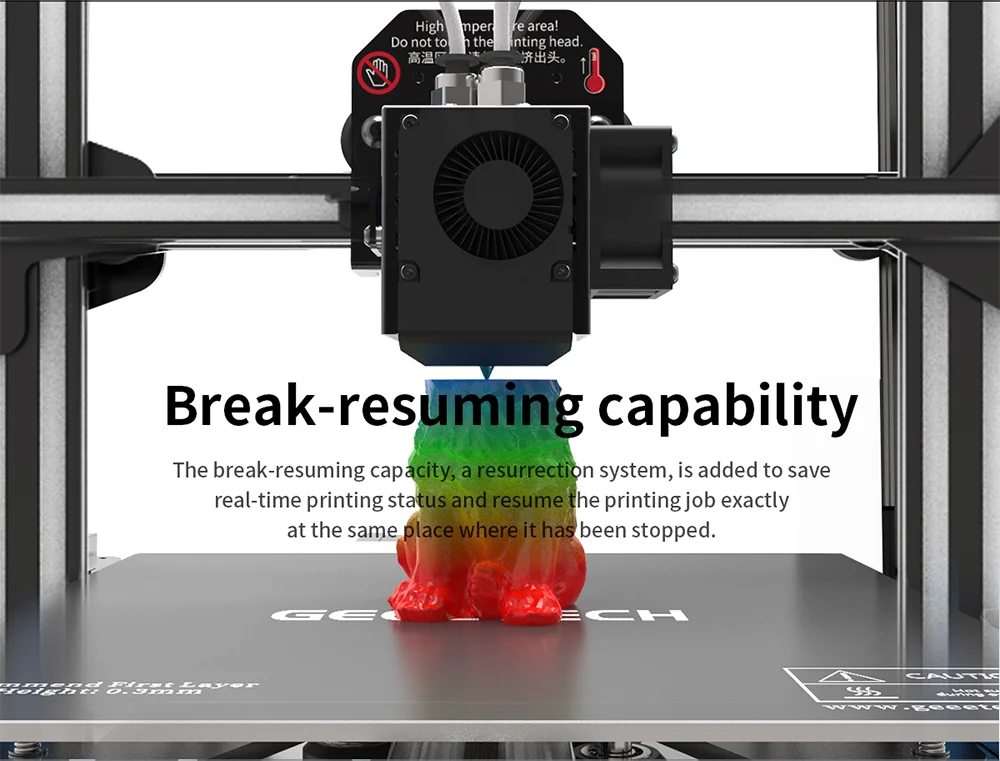 011mm 011mm |
| Z Axis Position Accuracy | 0.00025mm |
| Print size ( X Y Z ) | 250*250*250mm |
| Print Speed | 60mm/s |
| Layer Resolution | 0.1mm -0.3mm |
| Filament Diameter | 1.75mm |
| Nozzle Diameter | 0.4mm |
| Filament Compatibility | ABS/PLA, etc |
| Software Specifications | |
| 3D Printing Software | Cura, Repetier Host, Simplify 3D |
| Supported File Formats | STL/OBJ/Gcode/JPG/PNG |
| Operating System | Win, Mac and Linux |
| Temperature Specifications | |
| Extruder Temperature | 250C |
| Heating Bed Temperature | 110 C |
| Electrical Specifications | |
| Power Requirements | Power input: 100-120V/200-240V Power output: DC24V/14. |