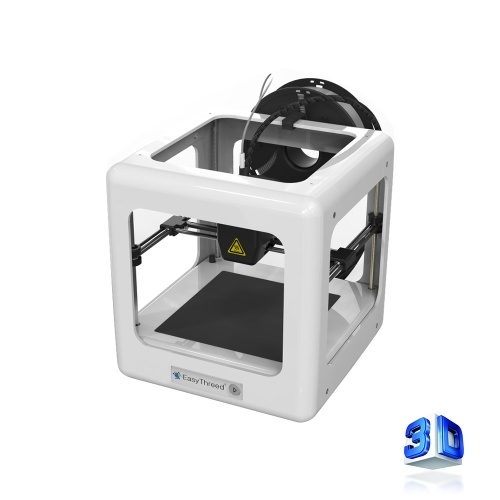
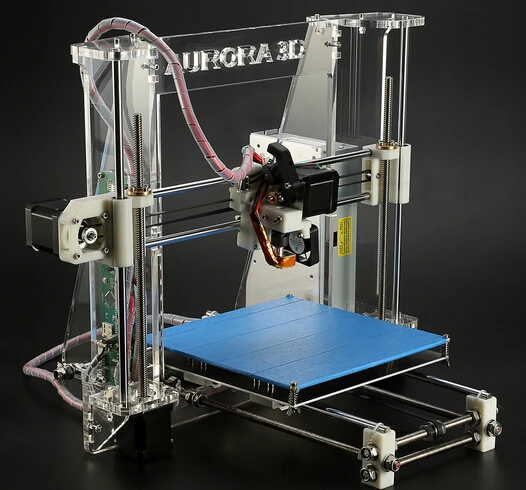
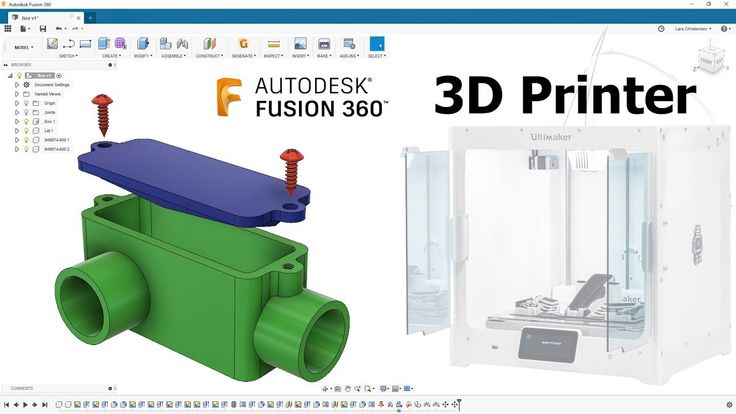
E3D nano 3d printer
EasyThreeD Nano 3D Printer Review - Is It Good For Kids?
Design
Reliability
Price
Assembly
Material Support
Support/ Service
Summary
All in all, this is a great little printer that you can take with you anywhere with ease, thanks to its small size and light weight. A good starting point for the young ones, but with adult supervision and expertise! Not the best prints you can get right out the box, but with some tweaks to the settings, this could be as good as any other printer plus the fact it can handle more than just PLA. A 'would' buy for me.
Final Score 6.4 Stars
Table of Contents
You have your 3D printers setup and whilst printing, your kids just stare in awe whilst it does it thing. (As do we no doubt!) EasyThreeD has produced an out of the box, compact 3D printer aimed at the younger audience. They have called it the Nano.
The Packaging
Now, this is where EasyThreeD can improve upon. Upon receiving my unit, it was shipped in a plain cardboard box with no branding at all. If I was a child receiving this as a gift, I’d be pretty disappointed. Aesthetics aside, the packing of the printer was good. It was securely wrapped in bubble wrap and the axis had some clips to hold them in place. Also contained, was a small white box which contained the following:
- PLA filament
- Plastic scraper
- Screwdriver
- USB SD Card reader
- USB cable
- Instructions
- 3D printed spool holder.
This was neatly put inside the printer itself, along with the power supply.
The Printer
The EasyThreeD Nano is a very compact printer and weighs just 1kg. This makes it easy to carry around with you. It is bottom heavy, which in a way is good as it keeps it stable, and with rubber feet absorbs any vibrations with ease. There are 4 clear window panels around the printer which are detachable.
Do these serve any purpose? They can keep little fingers out the way of the extruder and avoid any drafts but I think that’s about it. The clips can be quite tight to clip back on when putting the panels back on.
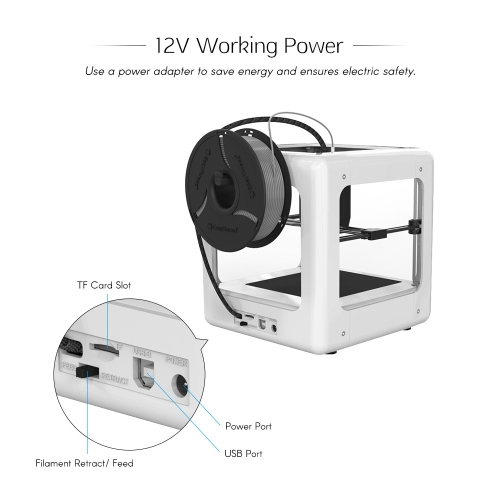
The rear of the printer has the sockets for the power and USB cable. There is also a small switch for the extruder motor and also the Micro SD card slot. From the pic below, you can see the cable does get in the slightest way of the SD card slot. So personally, I think the SD slot would be better suited at the front of the unit for ease of access.
The front of the printer is really simple, it has the EasyThreeD logo and 1 button which is used to start the print. When printing, it has a green light.
Now onto the inside…
The EasyThreeD Nano comes with a flexible magnetic removable build plate. This is a good thing, however, the build plate is quite thick and is tricky to remove. This is due to it sitting in a recessed metal plate and you need to try and get the corner up in order to remove it, and even once you have a hold, the magnetic force is strong on this one! The build size is 90mm x 110mm x 110mm.
Now, as this is meant to be a printer aimed for kids, they will most definitely find it difficult to do this, so adult help will be required! The adhesion to the bed is great, especially as this is a non-heated bed and removing prints is easy.
The extruder is enclosed in plastic housing right down to the nozzle, so it protects your fingers from the heat. The nozzle is a 0.4mm nozzle and this can be replaced, however, you won’t be able to use your standard nozzle. See below on how you can replace the nozzle.
It does have a small silicone sock on it though to help avoid heat creep. The PTFE tube is very short and sticks out the top so it is more or less a direct drive! I did successfully print TPU with this believe it or not!
There is no parts cooling fan, so you may find it a struggle to print models with long bridges. The belts and rods of the printer are small and there is some flex if you wobble the extruder housing.
This shouldn’t affect printing and the printing speed is quite slow! There is also one end stop of which I can see, which is a black plug that sticks up in the corner.
Assembly
There is no assembly of the printer when you get, so here is a video of the assembly for the EasyThreeD Nano from the manufacturer themselves.
Where does the filament go?
The spool holder that comes with the EasyThreeD Nano is actually 3D printed. It is designed to hold the small spool that comes with the printer. You will not be able to fit a 1kg roll on there either, as it is just too small. As the spool holder is mounted of either the left or right side, using a 1kg spool could cause it to tip over. I would suggest to print yourself a desk spool holder if you are using 1kg spools of filament.
Let’s get on to the printing!
Bed levelingNow, this is a little fiddly! There are 4 screw heads in each corner of the build plate, of which when you turn raises/lowers the bed as needed, There is no auto level, so you need to do this as a print starts, however, therein lies an issue.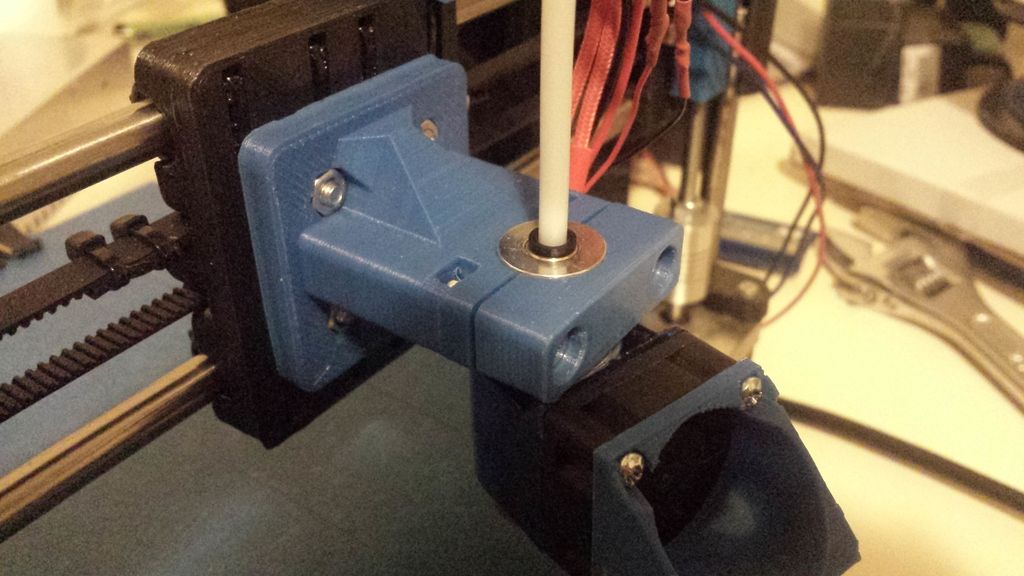
As the print head moves around, so does the metal rods its attached to and can get in the way of you turning the screws! Once you have managed to get the bed level, you shouldn’t need to alter again thanks to the removable build surface. It’s the metal tray this sits in you are leveling.
Loading the filamentInsert your desired filament into the PTFE tube at the top and set the switch at the back to feed. Once the nozzle reaches temperature, it will automatically pull the filament through. You will then need to put the switch back to the middle to stop it once the filament is visible. When changing filament, just do the reverse.
Starting a printThe EasyThreeD Nano comes with its own slicer called E3D Nano, which is very easy to install and has its basic functions at the start. You can go advanced and play around with additional settings, but it’s not as in-depth as Cura or Simplify3D. You can use other slicers if you wish as well.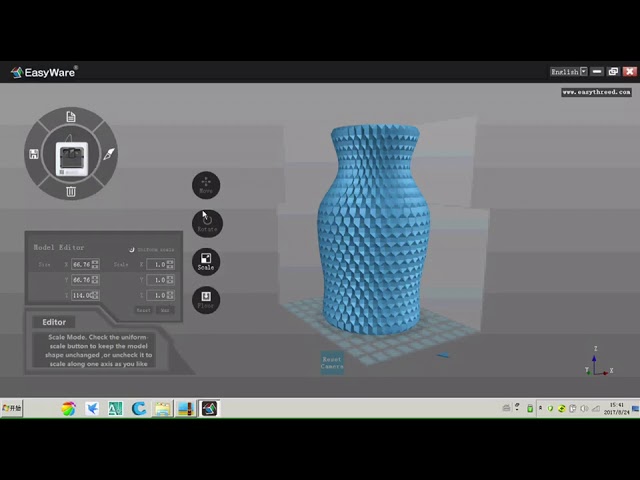
The interface can be difficult to navigate as nothing is labeled. See below…
To load your file into the E3D Nano software, click the top icon. Once loaded, you can move it, flip it, scale it and also put a surface to the floor. The next step is to then slice the file, which is done using the icon to the right. Here, you have a Onekey option or Custom. The bottom icon deletes the STL and the left icon saves as an STL.
Once you have sliced your file, save this to the SD card and this can now be placed into the EasyThreeD Nano! Due to the Nano having no screen or navigation options, it will only print the one file on the card. I have tried with several files on the card and it prints the latest file that is on there.
Onekey operation
With the Onekey operation, you have 3 choices of which I think to speak for themselves.
- Fast
- Standard
- Optimize
Using Custom allows you to change various settings for the print like layer height, walls, infill, etc.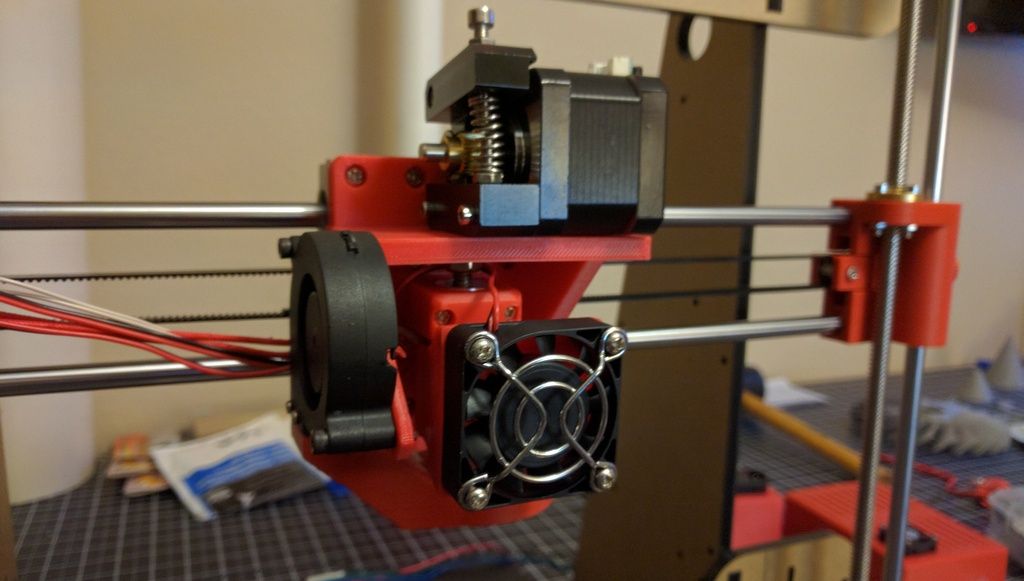 Having the Onekey operation is quite handy, but it all depends on the finished product! Here are 3 examples below of prints I have done using these 3 options and changing nothing else.
The Results!
Fast Standard OptimizedI used the Filament Clip by intofocus from Thingiverse using Anycubics White PLA. A raft is used on each option, which does use more filament but ensures good first layer adhesion at least. Sometimes, adhesion is too good as I found it difficult to remove the print.
As you can see, there may have been a partial clog with the gaps in layers. Overall though, not a bad print. The Nano is very quiet but is also slow. I believe the default speed is set to around 20-30mm/s and I also noticed that it retracts a lot between moves too. This could just be down to the slicing software.
I would need to play around with the settings to get much better prints from the EasythreeD Nano and this is where kids will struggle but as an introduction to 3D printing, I’d say its suitable.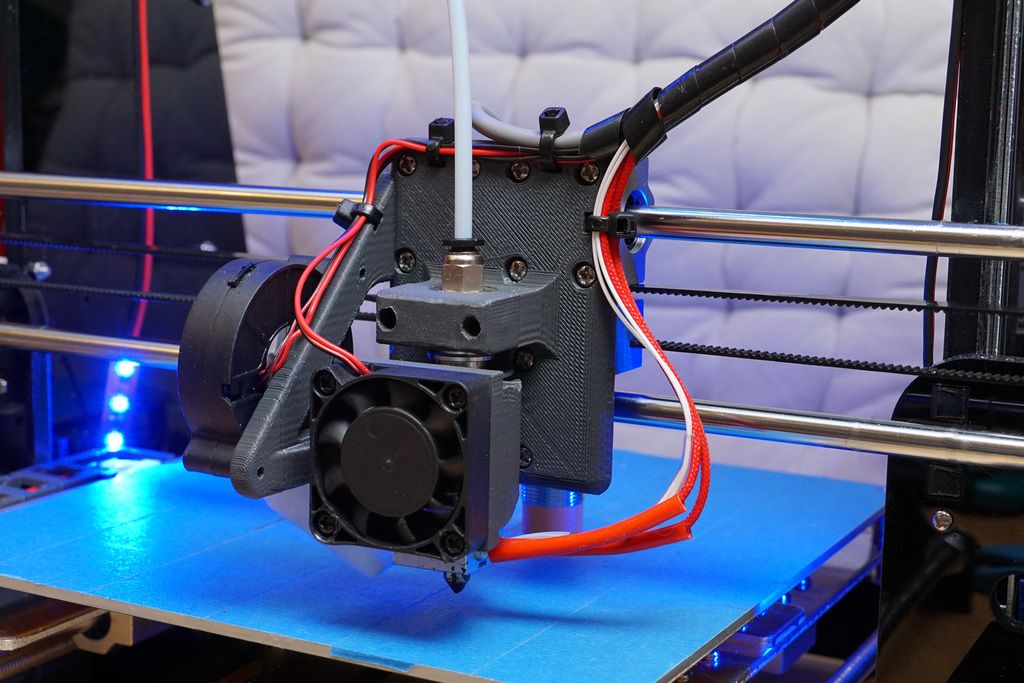
Printing TPU
As the Nano is a direct drive system, I thought I’d give TPU a go and got some good results! I printed just using the standard option, and as this printer is slow, it certainly helps with the TPU.
The first print I did was a tyre for the Open RC F1 car. This came out pretty well! I previously printed these tyres on my CR10S for the Open RC F1 project and the results were pretty much the same, if not slightly worse!
Secondly, I thought I’d give the Benchy a go. There is some room for improvement there for definite, however, it goes to show the EasyThreeD Nano can handle other exotic materials!
Detailed printing
I printed the Baby Groot flower pot: “Gardens” of the Galaxy 2 by Tom Davis to see how good the quality is with printing a detailed model, so therefore this was set up to print at 0.2mm layer and everything else as standard with the E3D Nano software (I did remove the brim option)
Upon first look, the print looks good, however, closer inspection reveals a few gaps of under extrusion (possible too low temp as printed with the nozzle at 200) Supports were printed too but these were fused to the model so these settings would need to be changed.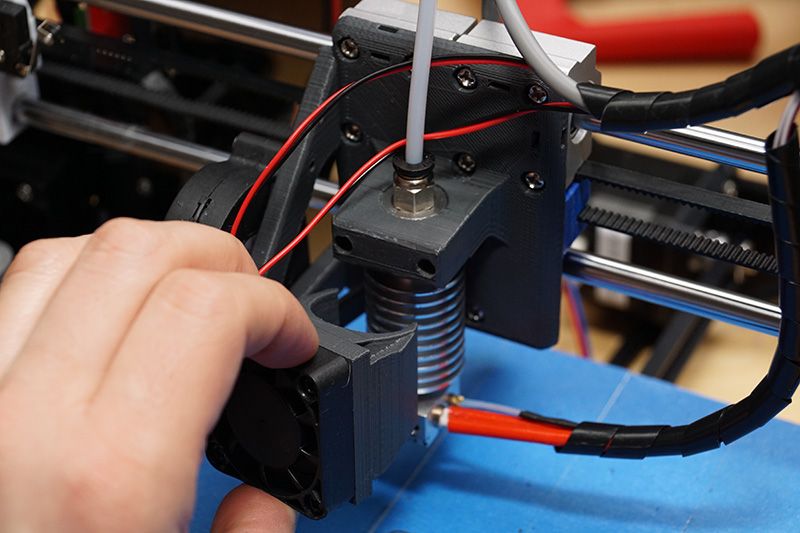 The model is strong and would serve its purpose. I’m sure a bit of post processing cleanup would get this looking perfect!
Vase mode
I loaded up Simplify3D and created a profile for the Nano, and the results are pretty good! I did try with Cura, however, this didn’t seem to work so well! More tinkering with that profile needed!
Conclusion
What are my thoughts on this and is it good for kids?
The Nano is a good introduction to 3D printing for kids but with an adult helps with setup and someone who is familiar with 3D printing. This is to ensure the best setup for the actual print. Personally, I’d say this printer is more suited for travel and portability rather than kids however, kids can be smart and pick things up easily, so I could be wrong!
This appears to be a hard wearing printer which would last a while, but you are limited on its size and functionality but for the price of around £120, it is a great price!
If you are lookign at buying, then please check out the links below!
- Gearbest
- AliBaba
- EasyThreeD
Thanks for reading and I’d be intrigued to read your comments on this if you have an EasyThreeD Nano!
Why not check out the review of the EasyThreed Dora by Scott Masson!
3D Printing Bird
Easythreed E3D Nano 3D Printer Review
The Easythreed E3D Nano is a fantastic starter 3D printer.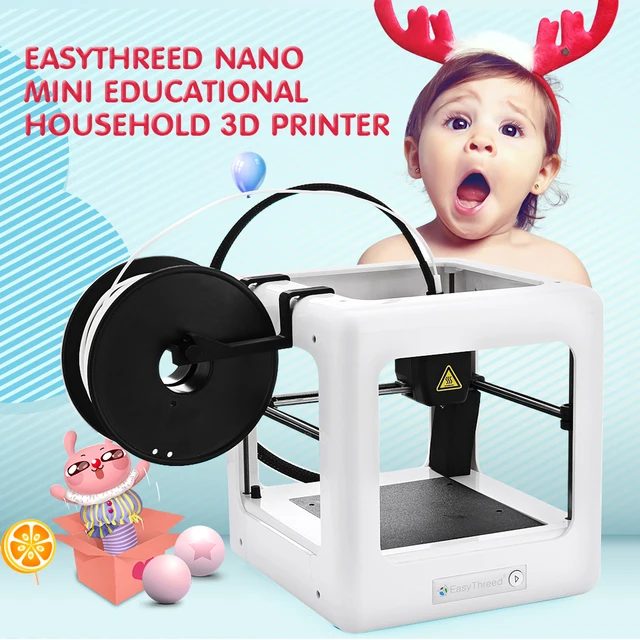 It’s easy to set up, easy to use and has very friendly software. Read on!
Official Specs and Features
Here’s a link to the Easythreed E3D Nano 3d Printer product page.
Versions
There are just one of these Nano printers, available in two colors (orange and white) and two power supplies (US and European). But the printer and parts are the same.
Price
Currently, this printer is listed at $180, but I’d look for prices in the $150s. Here’s a referral link to the item at Gearbest. Buy the orange. (I’ll trade you my white for it!! 🙂 )
Short Review
This is a simple and useful 3d printer, great for a beginner and useful for small prints.
Long Review
What’s Included
- Easythreed Nano E3D 3D printer
- Power cable
- Computer connect (USB) cable
- Filament (PLA, 0.25kg)
- USB micro-USB card reader and card (with files)
- Bed scraper
- Philips Screwdriver
Package and Manual
The Nano arrives in a nicely printed box, with general specs and features printed. The box fits the printer very well, with no slop. GearBest has its inventory sticker on the box, of course.
The manual is entirely in English and is very brief. I obtained most of the needed information from non-manual sources (including Youtube), when I had questions.
Build Quality and Disassembly
It’s worth taking note that the Nano arrives completely built. There are a few shipping pieces and a bunch of tapes to remove, but there’s nothing to build. The build itself is fine. The upper supports (the white body, that is) could probably fit together more seamlessly, but they aren’t loose or sketchy in the least, and this is strictly a “looks” fit issue. The photo below shows two of the shipping pieces which must be removed before use. They’re green, in the back behind the bed.
Below you can see how the parts of the body don’t fit together absolutely seamlessly, but again, this does not cause any issues whatsoever with the operation.
The two green shipping pieces are actually 3d printed pieces.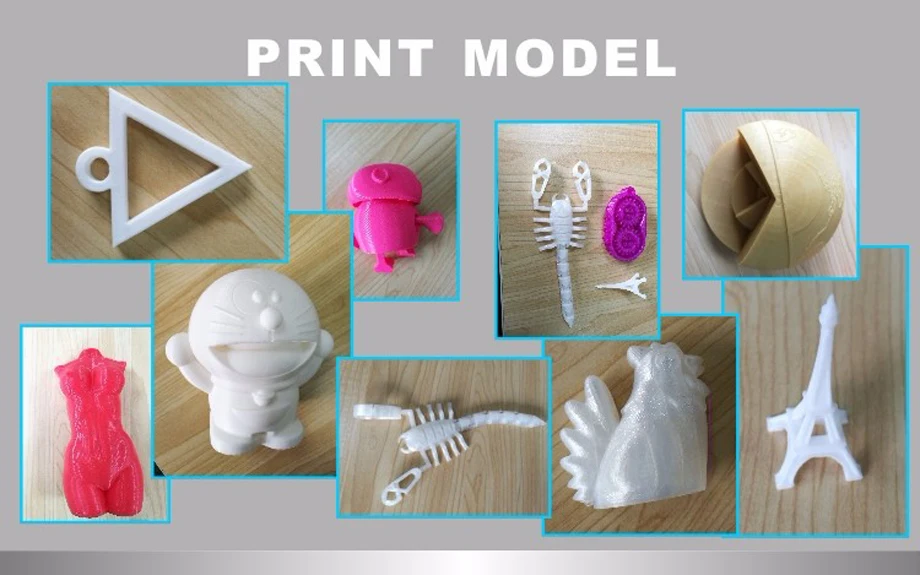 Also included is a filament holder, which is attached (below), and is also 3d printed.
There’s a sticker on the bottom which gives some useful specs, namely regarding power needs.
The base of the unit has some rubber donut feet, which have kept the Nano very stable during all of my prints.
Inside the print area, things are simple but work well and are well built. The bed of the Nano is not mobile. This means that the print head must move away from the bed as the print advances. This happens by a series of stepper motors and lead screws and a bunch of other stuff I don’t know anything about. But the stepper motors and lead screws allow the print head to move up and down and side to side with very fine control. These lead screws are very well fit into the body and seem very sturdy.
The print head has a fan built-in and a 0.4mm nozzle. The print bed is stationary, but there are four screws, one in each corner, for leveling the bed. This is important, and a feature I took advantage of during my use of the Nano.
The back panel of the Nano has a few connections. There’s a barrel plug for power. There’s a micro-USB port, which is where I fed files to the printer. And there’s a female USB type B 2.0, which allows connecting directly to and printing from the computer. There’s a toggle switch that is used for feeding or retracting the filament but is really only used in setup, or when switching filament.
Size
Officially the size is 18.80 x 18.80 x 19.80 cm. This is a small table-top 3d printer, with a correspondingly small print bed. Here’s the graphic by Easythreed:
There are two print cubes because the print head has more room when inside the body, but once the head gets to where it is in the photo above, the print dimensions shrink a little. Still, this is a great size for many prints! And the footprint of the unit is quite small, too.
Power
Easythreed provides a very capable wall wart brick, which outputs 5A at 12V. That’s quite a bit of current, but with the heated areas on the printer, that’s needed.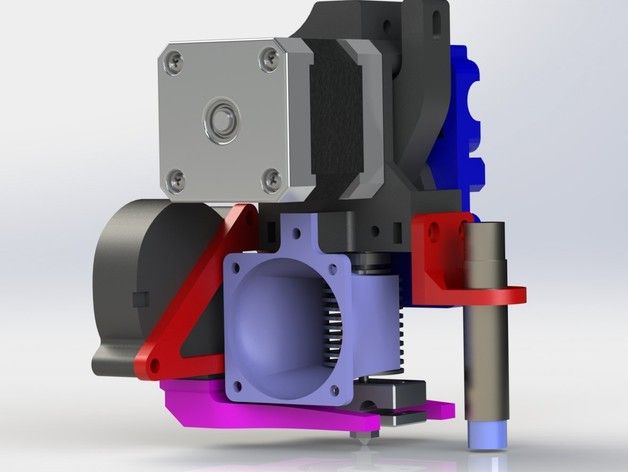
I believe it’s possible to power the unit just over USB, but it’s not possible to print in this way. USB doesn’t provide enough current.
User Interface and Operation
Essentially there’s one button for operating the Nano. This button is on the front, and it’s backlit with a green LED. To be honest, this is the only print button I used. It’s possible to use this printer in a very advanced (computer connected and controlled) way, but I’ve opted for my first 3d printing experience to be the simplest. The way this option works is that a user loads a print file (.gcode) to the microSD card, and places that card into the printer (slot is on the back). Once the printer is warmed up press the button here on the front, and printing of the first print file in the root directory will print.
As far as I can tell there’s no way to make the printer print the second (etc) file in the root directory. I mitigated this issue by always having the file I wanted to print (and only the file I wanted to print) in the root directory.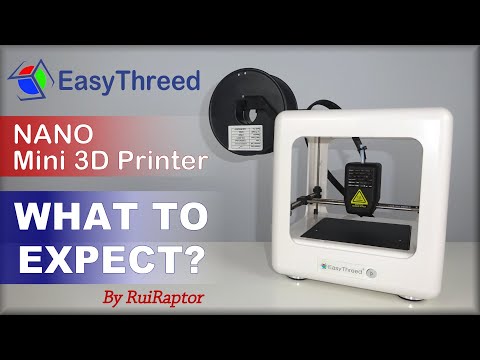 This really isn’t hard and never caused me any real difficulties.
Note that at least on my sample, the test files were actually misnamed. This caused quite a bit of confusion. The file labeled “heart” isn’t a heart – it’s a star. So when I thought I should be printing a heart and I didn’t, I was confused. Mac can load these files natively (though I do have XCODE installed, which may be a necessity), so once I looked at the file it was clear what had happened. Just bear this in mind when you’re printing for the first time.
I’ll cover more on how to get other .gcode files later in the review.
There are some other setup-type things that count as “interface.” When installing filament for the first time or changing filament, the toggle must be manipulated. In the center (seen here) is the “normal” operating configuration. One direction is to get the filament to feed into the head, and the other is to retract the filament.
Also noteworthy is that the button on the front can do a few other things. It can pause the print (just press during a print). It can continue the print (just press when paused). It can stop a print (hold for >3s). It can retract the print head after a print (hold the button for many seconds and release, and the print head will raise and ‘home’ [home of sorts], up a CM or two.
Software
The included microSD card contains many files which the user might find useful. Unfortunately, I can’t find a repository of these files anywhere, so carefully keep a copy for yourself somewhere (probably other than the microSD card).
The print software that’s included is called E3D Nano, and will only work on PC. It’s not the most refined PC software, but it does work fine.
Once the software is installed, open the program. I obtained .stl files from Thingiverse, and the example vase I’m using below is from there. I just picked one at random, and as expected the default size is too large for the Nano, which can be noted by the fully red color of the model. To resize, just click “scale” and in the bottom left window, just lower one of the settings. It’s possible to adjust the dimensions independently, and also to keep the model on the same scale as the original.
Once the model is scaled to an appropriate size for the Nano, the model will turn from blue to red. This means that the Nano should print the model. There could be some issues later depending on what kind of support structure you select, and I didn’t sort a way to make sure the support structure was always within the print bed (and those prints faulted). So basically don’t plan to print to the margins, unless you also don’t use any support structure.
It’s also possible to have a model in the software but not selected. In that case, the model is gray.
The top left bubble has some options. One of those is a little slicer, which will build the .gcode program for the printer. One-key makes this easy, but still adjustable – it’s possible to select Fast, Standard, and Optimized.
The other option, Custom, allows even more granular control over the print. See below for all these options. (Truthfully most of these mean little to me, and the One-Key served me well.)
When you’re satisfied with the settings, click ‘save data’ and the file will be built.
Here can be seen the print (bright blue) and support structure (red). In this case, the red doesn’t mean “off print bed,” it just means “this is cruft and will be cut away.”
Once the file has finished saving, this popup will pop. This is a tiny window and could cause some consternation. If you save and it then seems like the program isn’t responding? Look for this little window, and click “OK.”
It’s also possible to use the slicing software to see how the print will lay down (left, below) and also to look at any individual slices.
Among other things the software can do is manipulate the model in various, expected ways.
I believe, though I didn’t test it this way, that the E3D Nano software can be used for connecting to the printer and printing directly.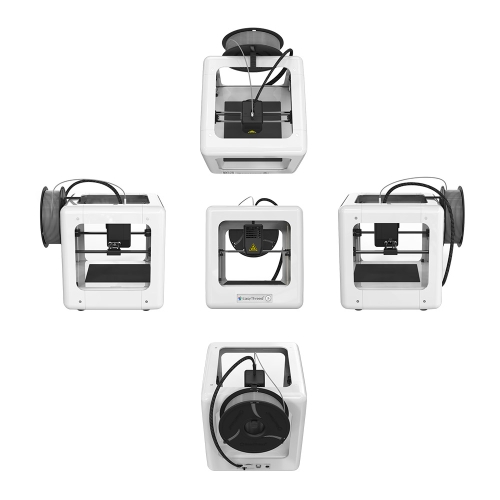 This didn’t make sense to me – why tether a computer when printing from a file will be less dependent on a separate system, and also work as well or better? What happens if the computer sleeps? Or some other program starts hogging the processor? With using the flash drive, these concerns are irrelevant. If you do opt for this setup, you’ll need to load an (included) driver to your computer.
Another included bit of software is Cura. Here’s exactly as far as I got with Cura, and since my printer isn’t shown here, and there’s no guidance on what I should do, this is where I stopped with Cura. Particularly since it seems that Cura does the same thing as the program I discussed already.
The manual states that it’s the Cura software that allows “online” (USB connected) printing.
Filament
Easythreed includes a bit of white PLA filament. It’s only 0.25kg, but it’s lasted me quite well.
One of the first things most people print for this particular printer is an arm for holding the filament spool. In the case of the item from GearBest, this is included!
1.75mm filament is required, and while GearBest states that only PLA is supported, the Easythreed product page says that PLA and ABS are both supported (but this could be bad copypasta on their part, as the actual copy refers to the “Mars” printer they also make.)
Prints
How to print has been covered above. What can you print? Well, lots of stuff! Below are two of the included files, at their default size. A vase, which I printed 4x, and the star (which was labeled “heart” in the file list). Prints are very consistent. Even the time taken is very consistent. Two of the vases have their raft left on just for demonstration – this comes off fairly easily.
Top view shows that yes, these vases aren’t perfect, but the print is very consistent.
Also, I printed a few random things I found around the web.
The little disk was a mechanical keyboard keycap, which didn’t survive. One of the MX compatible stems broke. Unlikely this was due to print, but I’m not sure.
Included Software and Things
There are a number of items included on the microSD card. I’m going to try to include them all here, for future users. First of all, two videos. (Posting them to youtube allows me to keep them from taking up huge space in the .zip from the microSD card).
Next is a download of Cura software. The version included with my unit is 15.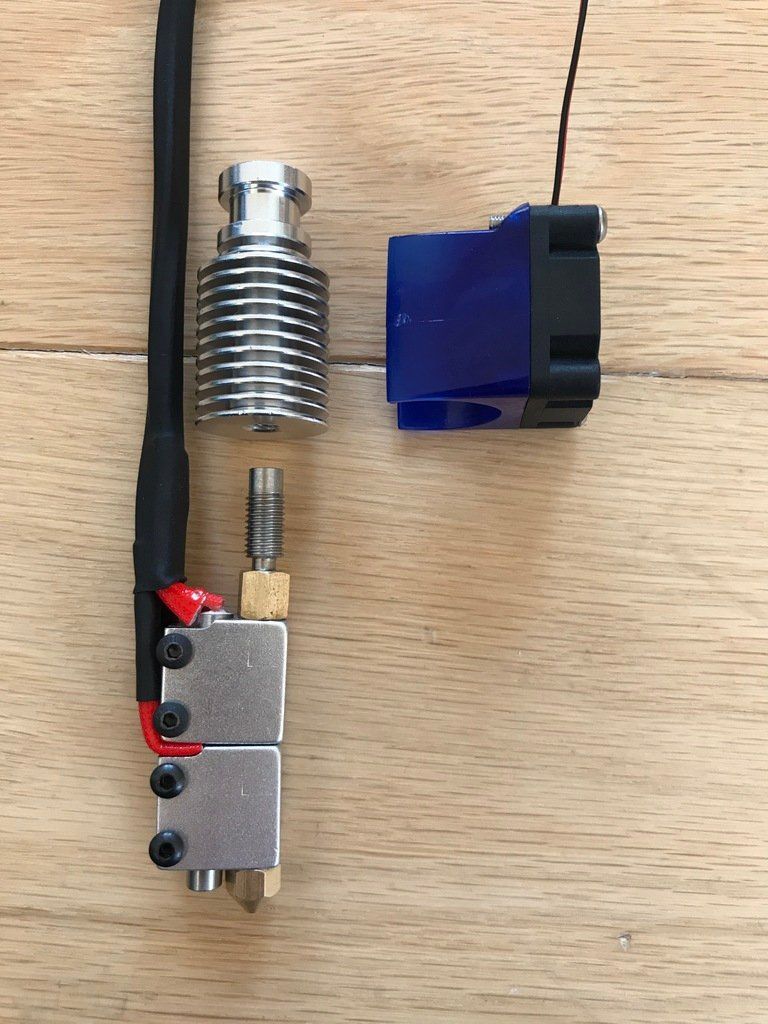 04.3, but I don’t find that software to be specific for this printer. With that in mind, I’d suggest that you just obtain the latest version from Cura themselves. (Also, 15.04.3 is still available there if you’d prefer to use it.)
There are two files I can’t see elsewhere on the web, and importantly, not on the EasyThreed website. (They have software – EasyWare – but it’s not for the Nano.)
So with all that said, here’s a link to what you need that isn’t included above. It’s a .zip archive, around 34mb.
Even a couple of test prints! (The ones included originally, and shown in the review here.)
Hope that helps everyone!
Conclusion
This is a fun printer! If you decide it’s the right printer for you, buy it here.
What I like
- Small size
- Full package including filament and wall wart, etc
- Easy to use with the microSD card and one click printing
- Included software works well enough and is intuitive
What I don’t like
- The print bed isn’t large
- No way to obtain original microSD card files if they’re deleted
- There’s a fair amount of software that isn’t covered in the manual, and this makes a few things unclear.

- Prints are precise but not accurate – bases on the vases weren’t round, for example, and they should be.
Notes
- This printer was provided by GearBest for review. I was not paid to write this review.
- This content originally appeared at zeroair.org. Please visit there for the best experience!
- For flashlight-related patches, stickers, and gear, head over to PhotonPhreaks.com!
- Use my amazon.com referral link if you’re willing to help support making more reviews like this one!
- Please support me on Patreon! Feeding flashlights is expensive! And funding Fun Fund Friday even more so. I deeply appreciate your support!
Liked it? Take a second to support zeroair on Patreon!
Like this:
Like Loading...
FlyingBear Ghost 5 3D printer. Review, testing, impressions.
So. So I got my Flying Bear.
I had a lot of reasons why I didn't have a single printer from their company before, I'll write in detail at the end.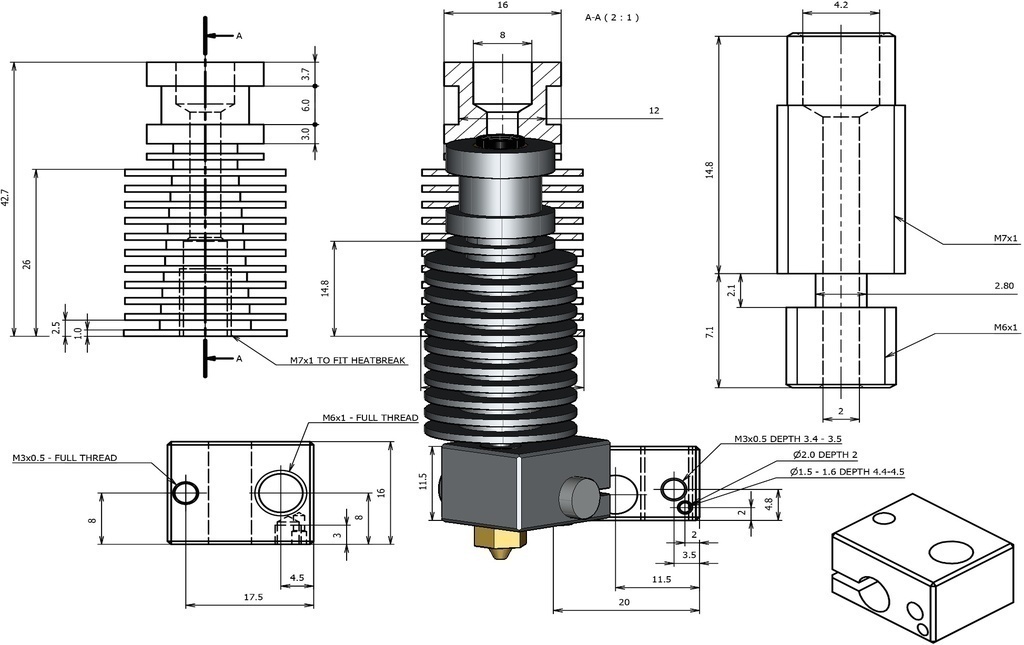 But this printer surprised me very, very much.
Let's start unpacking this heavy box.
Some things in this printer are pre-assembled, some we will need to assemble. Everything is stacked in several rows. Everything is in its place, very carefully placed.
Now we have all the contents of the box on our table, we can take a closer look.
I'll start with things about which it is impossible to remain silent. The first is the shafts, not even so. SHAFTS. These are table shafts, their thickness is 12mm! This is a definite first WOW. It’s not every day that you see such thick table rollers on a fairly budget printer.
The second is a standard BMG extruder. This is definitely a huge plus in the piggy bank. It is very rare to see at least Titan on a printer with Ali, and then BMG right away. And of course, there is also a filament end sensor, how could it be without it)
The third is the INSTRUCTIONS.
What instructions come with almost all printers? Assembly instructions, and one "troubleshooting" sheet, a little about how to add a printer to Cura, and that's it. But here we have a complete instruction for using the printer, according to how it is arranged, and so on. This is a great book for beginners to get to grips with the printer. It does not say anything about assembling the printer.
Usually what any user of a new printer does with the manual. It collects on it (and even if at least the assembly is well described), and throws it out. But there is a treasure trove of useful information. This is the first instruction that you don't want to throw in the trash after assembling the printer.
I was quite surprised by this beginning.
Portal pre-assembled The mechanics of the so-called Makerbot. The X-axis motor rolls along with the beam. The Y-axis motor rotates the shaft with an annular belt, and from this shaft the beam is already moving by belts.
I will write my attitude towards this kinematics at the end. But otherwise, everything is great. All fasteners are metal, the shafts are even, the bearings are of good quality.
Everything is done very compactly, neatly. The head is generally super packed, there is free space and there is no extra.
Table. The springs are good and hard. Instead of stationery staples, glass is rigidly fixed to an aluminum table, the solution is compact and reliable.
The table adjustment screws are tightened to the table with a nut, and adjustment is made from below as on all printers. But since the screw is fixed, it will not warp to the side, it will not turn when tightened strongly.
Steel table console, rigid. The table is insulated. There is a convenient slot on the table. Everything is thought out to fix the cable and it does not tear off the contacts.
The print area here is not standard square, 250*210 mm. This is a little more than standard printers, and I will say very often I lacked the width of literally 1-2 cm.
For accessories and tools.
Printed sachets are really nice. But there are things much more interesting. These are very high-quality wire cutters, a stylus for a touch screen and tweezers. TWEEZERS! What other printer has tweezers in the kit. But every printer sooner or later buys these things for convenience. And here everything is in the kit. This is a LUXURY kit for a printer.
Spare cube with thermistor and heater and thermal barrier included. The anti-play nut on the Z axis is also one of the non-standard and good solutions!
I really hoped that the radiator would be e3d, but this is some kind of radiator. I will say this, if you do not climb and print as is, it will print perfectly. I was looking at the future. I plan to assemble Direct here, I already have BMG, I will need to change the radiator to e3d and everything will be fine.
The base of the printer looks very nice, everything is metal except the bottom. It's plastic with vent holes. That's where I'm going to go now.
There is a lot of space in the basement.
MKS Robin Nano 1.3 board. Drivers for X and Y are quiet (I assume 2225 or their variation), for Z and E are the usual type 4988.
Power supply for 300w, 24v. The connectors are neatly crimped.
All plugs and sockets sealed with adhesive. So that nothing ever falls off the vibrations.
And now to the assembly. It was very unexpected, but I was sent to YouTube. But not just a link that you are tormented to enter, or a link on a flash drive. No. With search string or QR code.
This was very unexpected. Lately I've been assembling printers very quickly, usually 10 steps are enough to assemble. But not here. Here I plunged a few years ago, where to assemble a printer was a whole event of more than one hour.
But each step is described as detailed as possible, everything falls into place, everything is thought out to the smallest detail for each step.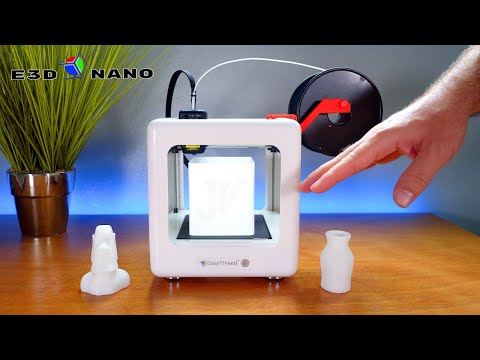 I really enjoyed the process, it was interesting)
The only additions from me. I bathed the table bearings in kerosene, dried it and applied a good amount of grease.
The printer comes with a piece of split corrugation, where it is suggested to lay the wires on the hotend. Aesthetically, I don't like it, so I wrapped the wires in a split braid.
So the printer is assembled. Of course he's handsome.
But I want to move away from the review a little. I've always been a bear hater. I always advised all my friends who chose a printer - just not a bear. My “dislike” lasts for a year since at least 2017.
While all manufacturers were moving away from acrylic dry-tables, and began to produce printers from a machine profile, the Bears decided to go their own way. They started making steel cases (P902 was an exception, but there were enough minuses there too), from foil alloy to be more precise. Outwardly, it looked good, but they were usually oblique, obliquely drilled, jelly.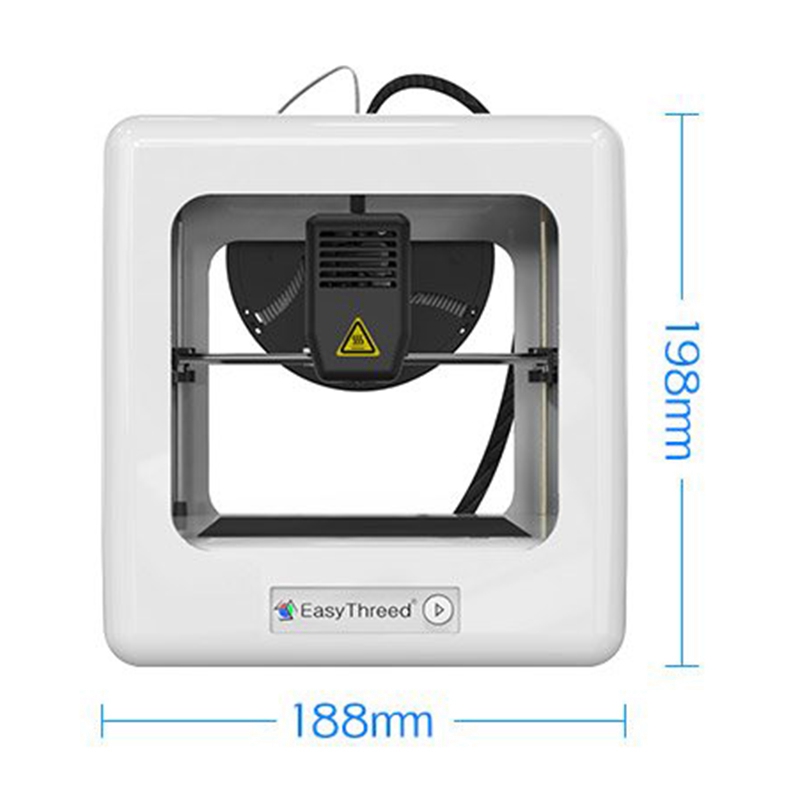 It was popular fun to buy it and then beef it up, re-drill it, remake it. And someday he started typing normally. I had almost all of their models repaired several times. I even have a photo of the most epic one. This is necessary to understand how jelly it was, since the owner decided to strengthen it with a tree.
The next thing I dislike about bears is their kinematics. That Makerbot. I followed every model, every new one came out and there was again a makerbot. On the one hand, the "cube" always attracted, but the kinematics spoiled everything. A very long time ago I had FLsun Cube, I had it for a short time. It was a mega ugly thing. The cheapest frame, low quality components, hence the crooked shafts. He typed slower than he crawled across the table from his crookedness. He just danced on the table.
And the Bears decided - they need to combine a jelly foil case, and wretched kinematics and produce their own printers.
Seemingly doomed to failure? But no.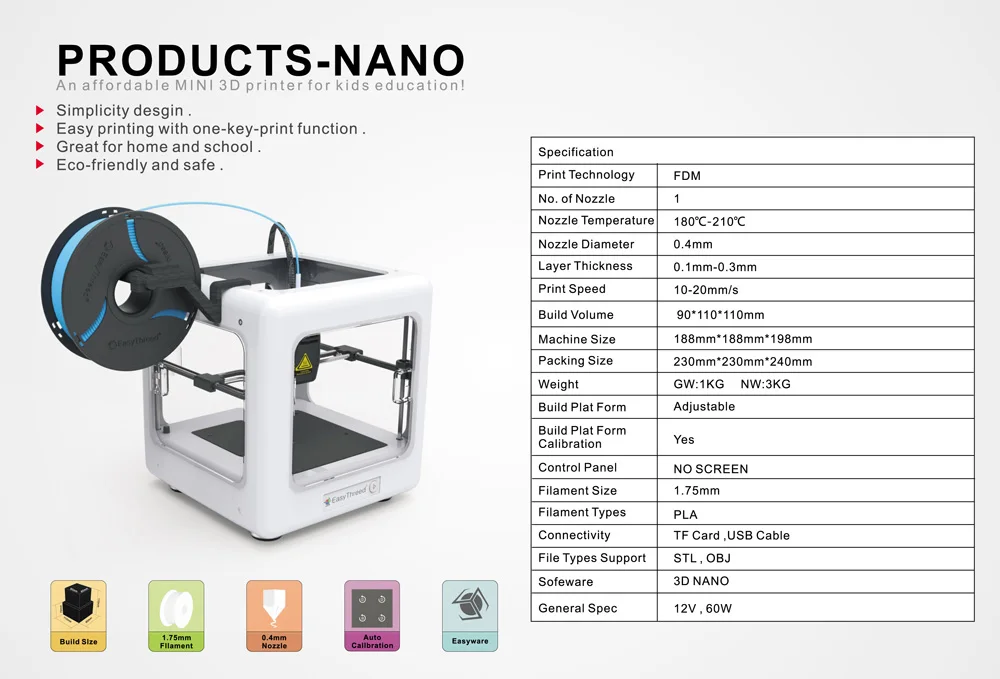 Many companies of those years no longer exist, but bears exist and produce printer after printer. So what's the focus? Previously, they tried to make the cheapest possible printer. It is impossible to build a good makerboat from acorns and seeds. But now it seemed to me that someone new came to the management and said, "let's make a normal printer, albeit an expensive one." And they built a very good printer. Yes, it is not the cheapest on the market, but it is still quite budget friendly.
The frame is very rigid, the steel is decent, everything is drilled perfectly. Components, for China, are very worthy. The kinematics moves smoothly, does not stick, does not hit.
Plus, I think they listened to their users very well, constantly improving various little things. It is felt in many details.
This is not the same "Bear" that was before. They sawed and sawed and sawed out the diamond. I am very pleasantly surprised.
And now let's get back to the review, we need to turn it on and print something.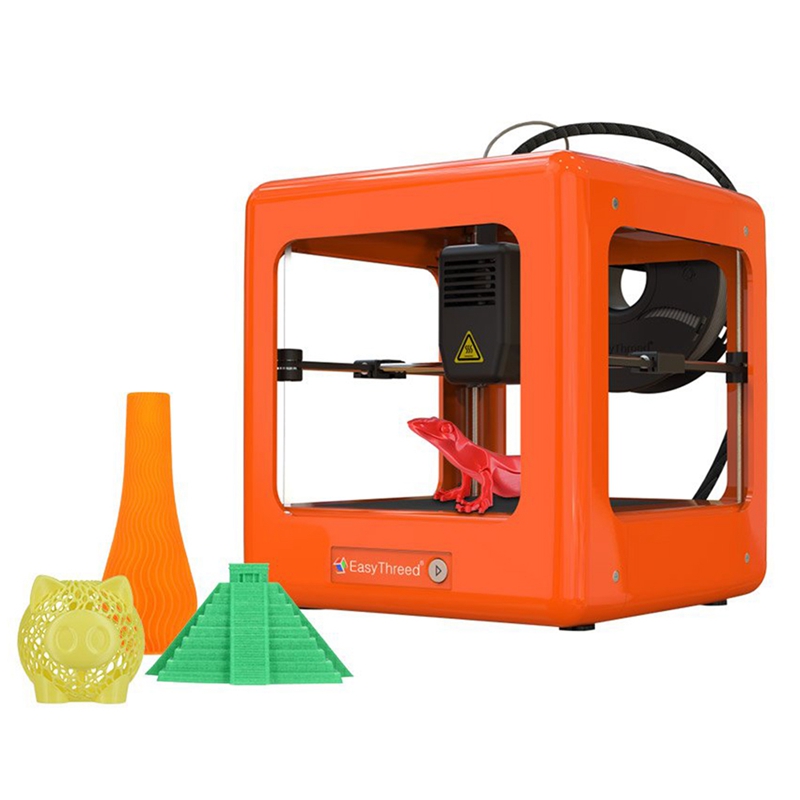 Touch screen. The menus are very convenient, the most important functions are placed on the main screen, the secondary ones are in a separate submenu. Table calibration, plastic broaching, preheating - everything is very conveniently done.
Now we need to print something. I usually take glass with this super-nano coating, turn it over, and apply 3D glue. But here the glass is screwed, and I decided - okay, good. Coating is coating. It holds well, what can I say.
Looking ahead, the first test cube was printed for a very long time. The whole problem was in the acceleration of the printer. They are very crowded here. Therefore, I had to go to the gcode menu and fix the situation a little.
And now for the cubes. There are no special complaints about him. It prints very well, the “flow” did not even have to be adjusted.
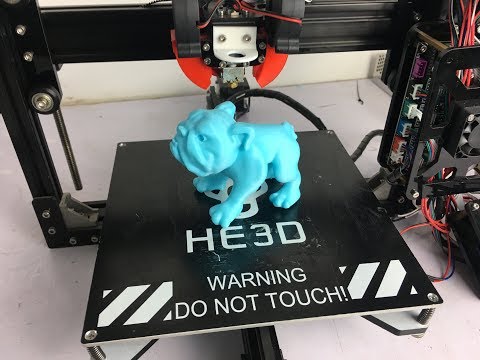
And of course some beautiful and complex vase needs to be printed.
The vase printed just fine.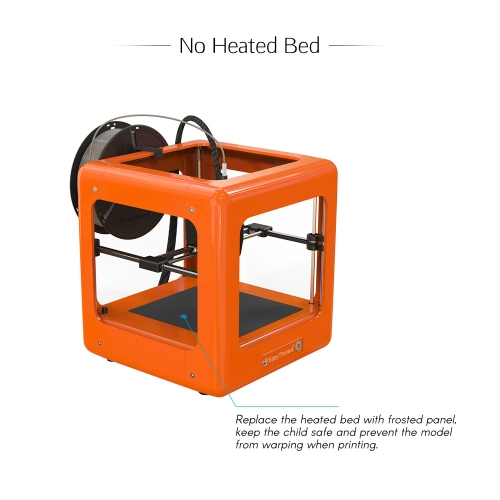 There can be no complaints about her. Conclusions.
I think this is a very good printer. Probably at the moment one of the best that China has to offer for little money.
Yes, makerbore kinematics it won't be fast like delta, ultimaker or corexy. But it will be clearly faster than the drygostol. And obviously the printing of complex parts will be much better than the dry-table and more stable.
Let it cost as much as 2pcs Voxelab Aquila, but there are enough advantages to cover this. And a good feeder, and a larger print field. It is very compact on the table. It is easy to sew it up completely. It is enough to add a door and a cap on top and it will be possible to print Abs with plastic. If you put direct, add an all-metal thermal barrier, you can get a professional machine that will chew almost all engineering plastics. And the print quality is very good.
3D printer FlyingBear Ghost 5. Review, testing, impressions.
So. So I got my Flying Bear.
I had a lot of reasons why I didn't have a single printer from their company before, I'll write in detail at the end. But this printer surprised me very, very much.
Let's start unpacking this heavy box.
Some things in this printer are pre-assembled, some we will need to assemble. Everything is stacked in several rows. Everything is in its place, very carefully placed.
Now we have all the contents of the box on our table, we can take a closer look.
I'll start with things about which it is impossible to remain silent. The first is the shafts, not even so. SHAFTS. These are table shafts, their thickness is 12mm! This is a definite first WOW. It’s not every day that you see such thick table rollers on a fairly budget printer.
The second is a standard BMG extruder. This is definitely a huge plus in the piggy bank. It is very rare to see at least Titan on a printer with Ali, and then BMG right away.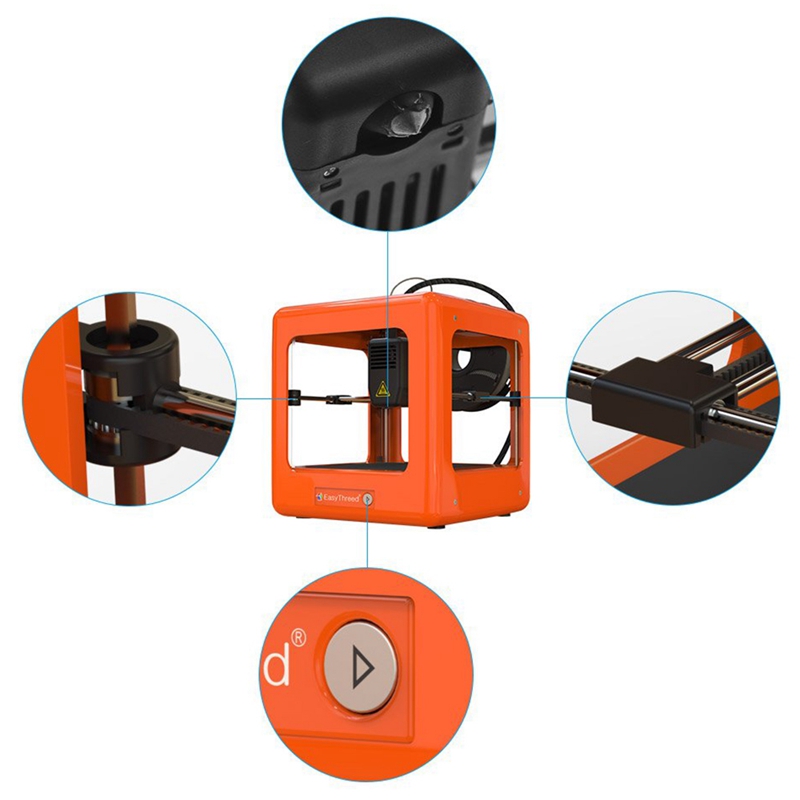 And of course, there is also a filament end sensor, how could it be without it)
The third is the INSTRUCTIONS.
What instructions come with almost all printers? Assembly instructions, and one "troubleshooting" sheet, a little about how to add a printer to Cura, and that's it. But here we have a complete instruction for using the printer, according to how it is arranged, and so on. This is a great book for beginners to get to grips with the printer. It does not say anything about assembling the printer.
Usually what any user of a new printer does with the manual. It collects on it (and even if at least the assembly is well described), and throws it out. But there is a treasure trove of useful information. This is the first instruction that you don't want to throw in the trash after assembling the printer.
I was quite surprised by this beginning.
Portal pre-assembled The mechanics of the so-called Makerbot. The X-axis motor rolls along with the beam. The Y-axis motor rotates the shaft with an annular belt, and from this shaft the beam is already moving by belts.
I will write my attitude towards this kinematics at the end. But otherwise, everything is great. All fasteners are metal, the shafts are even, the bearings are of good quality.
Everything is done very compactly, neatly. The head is generally super packed, there is free space and there is no extra.
Table. The springs are good and hard. Instead of stationery staples, glass is rigidly fixed to an aluminum table, the solution is compact and reliable.
The table adjustment screws are tightened to the table with a nut, and adjustment is made from below as on all printers. But since the screw is fixed, it will not warp to the side, it will not turn when tightened strongly.
Steel table console, rigid. The table is insulated. There is a convenient slot on the table. Everything is thought out to fix the cable and it does not tear off the contacts.
The print area here is not standard square, 250*210 mm. This is a little more than standard printers, and I will say very often I lacked the width of literally 1-2 cm.
For accessories and tools.
Printed sachets are really nice. But there are things much more interesting. These are very high-quality wire cutters, a stylus for a touch screen and tweezers. TWEEZERS! What other printer has tweezers in the kit. But every printer sooner or later buys these things for convenience. And here everything is in the kit. This is a LUXURY kit for a printer.
Spare cube with thermistor and heater and thermal barrier included. The anti-play nut on the Z axis is also one of the non-standard and good solutions!
I really hoped that the radiator would be e3d, but this is some kind of radiator. I will say this, if you do not climb and print as is, it will print perfectly. I was looking at the future. I plan to assemble Direct here, I already have BMG, I will need to change the radiator to e3d and everything will be fine.
The base of the printer looks very nice, everything is metal except the bottom. It's plastic with vent holes. That's where I'm going to go now.
There is a lot of space in the basement.
MKS Robin Nano 1.3 board. Drivers for X and Y are quiet (I assume 2225 or their variation), for Z and E are the usual type 4988.
Power supply for 300w, 24v. The connectors are neatly crimped.
All plugs and sockets sealed with adhesive. So that nothing ever falls off the vibrations.
And now to the assembly. It was very unexpected, but I was sent to YouTube. But not just a link that you are tormented to enter, or a link on a flash drive. No. With search string or QR code.
This was very unexpected. Lately I've been assembling printers very quickly, usually 10 steps are enough to assemble. But not here. Here I plunged a few years ago, where to assemble a printer was a whole event of more than one hour.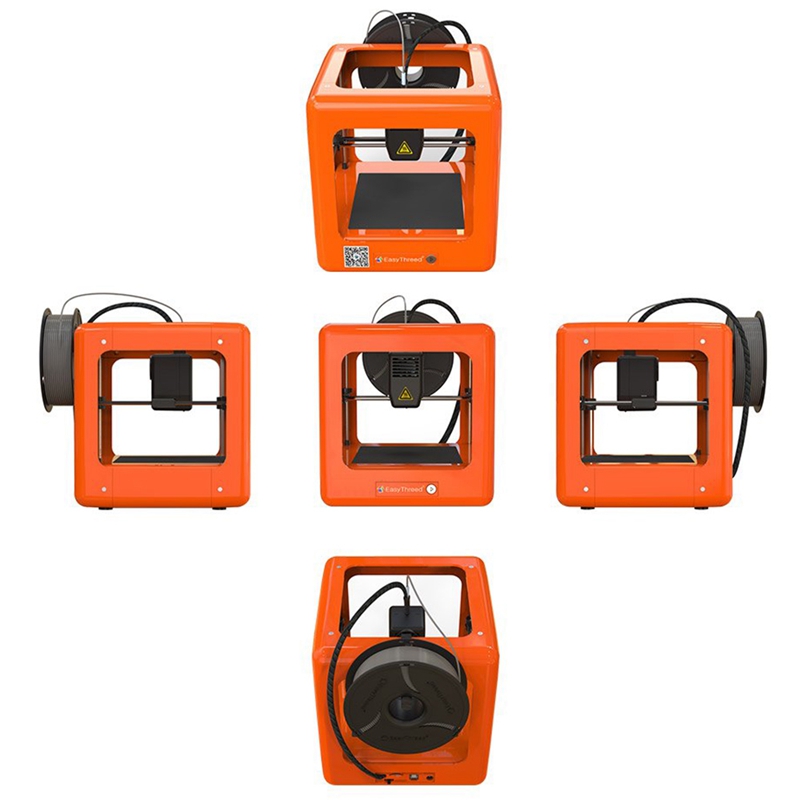
But each step is described as detailed as possible, everything falls into place, everything is thought out to the smallest detail for each step. I really enjoyed the process, it was interesting)
The only additions from me. I bathed the table bearings in kerosene, dried it and applied a good amount of grease.
The printer comes with a piece of split corrugation, where it is suggested to lay the wires on the hotend. Aesthetically, I don't like it, so I wrapped the wires in a split braid.
So the printer is assembled. Of course he's handsome.
But I want to move away from the review a little. I've always been a bear hater. I always advised all my friends who chose a printer - just not a bear. My “dislike” lasts for a year since at least 2017.
While all manufacturers were moving away from acrylic dry-tables, and began to produce printers from a machine profile, the Bears decided to go their own way. They started making steel cases (P902 was an exception, but there were enough minuses there too), from foil alloy to be more precise. Outwardly, it looked good, but they were usually oblique, obliquely drilled, jelly. It was popular fun to buy it and then beef it up, re-drill it, remake it. And someday he started typing normally. I had almost all of their models repaired several times. I even have a photo of the most epic one. This is necessary to understand how jelly it was, since the owner decided to strengthen it with a tree.
The next thing I dislike about bears is their kinematics. That Makerbot. I followed every model, every new one came out and there was again a makerbot. On the one hand, the "cube" always attracted, but the kinematics spoiled everything. A very long time ago I had FLsun Cube, I had it for a short time. It was a mega ugly thing. The cheapest frame, low quality components, hence the crooked shafts. He typed slower than he crawled across the table from his crookedness. He just danced on the table.
And the Bears decided - they need to combine a jelly foil case, and wretched kinematics and produce their own printers.
Seemingly doomed to failure? But no. Many companies of those years no longer exist, but bears exist and produce printer after printer. So what's the focus? Previously, they tried to make the cheapest possible printer. It is impossible to build a good makerboat from acorns and seeds. But now it seemed to me that someone new came to the management and said, "let's make a normal printer, albeit an expensive one." And they built a very good printer. Yes, it is not the cheapest on the market, but it is still quite budget friendly.
The frame is very rigid, the steel is decent, everything is drilled perfectly. Components, for China, are very worthy. The kinematics moves smoothly, does not stick, does not hit.
Plus, I think they listened to their users very well, constantly improving various little things. It is felt in many details.
This is not the same "Bear" that was before. They sawed and sawed and sawed out the diamond. I am very pleasantly surprised.
And now let's get back to the review, we need to turn it on and print something.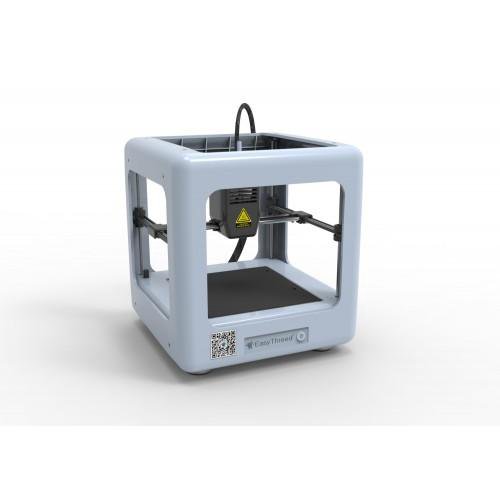 Touch screen. The menus are very convenient, the most important functions are placed on the main screen, the secondary ones are in a separate submenu. Table calibration, plastic broaching, preheating - everything is very conveniently done.
Now we need to print something. I usually take glass with this super-nano coating, turn it over, and apply 3D glue. But here the glass is screwed, and I decided - okay, good. Coating is coating. It holds well, what can I say.
Looking ahead, the first test cube was printed for a very long time. The whole problem was in the acceleration of the printer. They are very crowded here. Therefore, I had to go to the gcode menu and fix the situation a little.
And now for the cubes. There are no special complaints about him. It prints very well, the “flow” did not even have to be adjusted.
And of course some beautiful and complex vase needs to be printed.
The vase printed just fine.