Best 3d printer for rapid prototyping
Best 3D Printers Of 2023
Our list of the best 3D printers contains clear and concise information on all kinds of 3D printers. (Image credit: Future)The best 3D printers have become more affordable, and the 3D printer market is growing at an explosive rate, with new brands and styles of printing making an appearance each year. Where many 3D printers used to be huge, expensive machines, developments in technology and production now mean that many of the best options you can buy are increasingly affordable and can sit on a desk in your home without needing workshop space.
Naturally, this means there's now a massive choice of 3D printers that cater to all sorts of user needs and budgets. While this choice is excellent, picking the best 3D printer for your specific needs can be difficult. However, this guide can help, as we pick some brilliant 3D printers for all uses and budgets, with clear buying advice to help you determine which one you should buy.
Printing hardware has taken off in recent years, so while a handful of filament printers (otherwise known as FDM printers) were all that was once available, there's now a wide variety of different styles to suit your needs across a range of budgets.
Unlike office-style printers that just print ink onto paper, 3D printers turn digital models into real-world objects made from plastic, metal, and wood. FDM printers now come in all shapes and sizes and are well-suited to prototyping and crafting larger objects. At the same time, resin-based (SLA, MSLA, and DLP) allow for much greater detail, typically at a smaller scale, making them a fantastic buy for anyone looking to design jewelry or create tabletop miniatures.
You can use 3D printers to build complete products, make spare parts, or simply create things you’ll find helpful for your home, office, and workshop. And, since 3D printing technology is within the grasp of just about anyone, you don’t have to utilize one to your advantage.
Whether you’re just getting your feet wet or are an expert, here are the best 3D printers ranges to consider. We've compared these printers across size, functionality, and use case, so there should be something for you, whatever it is you’re looking for. We also looked at their print resolution, build platform, filament type, and pricing.
Remember that the more expensive choices are better suited for professionals, while the best cheap 3D printers are ideal for those just starting.
The best 3D printers of 2023 in full:
Why you can trust TechRadar Our expert reviewers spend hours testing and comparing products and services so you can choose the best for you. Find out more about how we test.
The best 3D printers
Original Prusa MINI (Image credit: Prusa)1. Original Prusa MINI+
Small, affordable, and remarkable 3D printer
Specifications
Print technology: Fused Deposition Modeling
Build Area: 18 x 18 x 18cm
Minimum layer resolution: 50 microns
Maximum layer resolution: 200 microns
Dimensions: 33 x 33 x 38cm
Weight: 4.5kg
Today's Best Deals
Reasons to buy
+
Great value for an FDM printer
+
Easy to use
+
Supports a variety of filament types
Reasons to avoid
-
Reel sits separately
-
Imperfect print quality
-
Calibration can be tricky
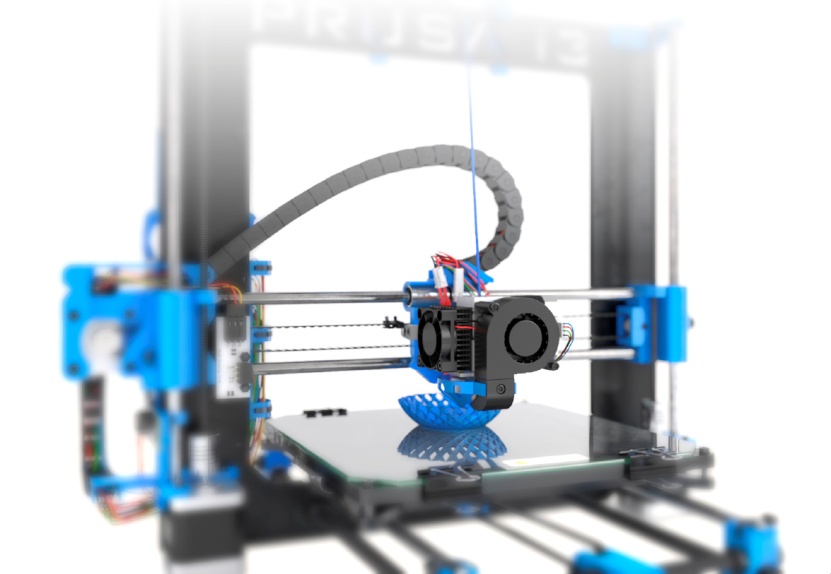
This affordable open-frame 3D printer is small enough to sit on your desk and easy enough to assemble yourself without expertise. It comes in kit form and uses FDM (Fused Deposition Modeling) to turn popular modeling materials such as PLA, PETG, ASA, ABS, and Flex into accurate printed products.
There’s a Network LAN and USB port for simple connectivity and a user-friendly interface. The 2.8-inch 65k colour screen makes navigating the options and settings easy, and on first starting the machine, it takes you step by step through the set-up process. This entry-level printer should be the first choice for crafters, modelers, and engineering enthusiasts.
The Original Prusa MINI+ is a replacement for the Original Prusa MINI (minus the plus), the key advantage being that it now comes with a superPINDA sensor, which is not temperature dependent allowing the first layer calibration to be faster and more reliable.
Read the full review: Original Prusa MINI.
CEL-UK RoboxPro (Image credit: CEL-UK)2. CEL-UK RoboxPro
Best 3D printer for commercial printing
Specifications
Print technology: Fused Deposition Modeling
Build Area: 210 x 300 x 400mm
Minimum layer resolution: 50 microns
Maximum layer resolution: 500 microns
Dimensions: 513 x 508 x 605mm
Weight: 26kg
Today's Best Deals
Reasons to buy
+
Swappable print heads
+
Dual Extruder and auto bed leveling
+
Network ready, no wired needed
Reasons to avoid
-
Large scale printer, not ideal for home use
-
Can be difficult to load filament
CEL-UK is a leader in 3D Printer innovation, with the original Robox printers introducing many new features to the world of FDM 3D printers. The RoboxPro is Robox on a large scale with a feature set that reads like a 3D print wish list; auto filament loading, auto bed leveling, Wi-Fi, network printing, and swappable tool heads.
The main focus of the machine is quality and reliability, designed for anyone wanting a printer that can realize product ideas and get them to market. The enclosed design makes it an ideal choice for commercial and educational use.
There's a sizable touchscreen panel built into the front of the machine. It displays the current materials and can be used to navigate settings and print directly from USB or other external drives.
Read the full CEL-UK RoboxPro review.
(Image credit: Creality)3. Creality Ender-5 S1
An ideal 3D printer for any 3D print enthusiast or small business on a budget
Specifications
Print Technology: Fused Deposition Modeling
Build Area: 220 x 220 x 280mm
Minimum Layer Resolution: 0. 05mm
05mm
Maximum Layer Resolution: 0.35mm
Dimensions: 425 x 460 x 570mm
Weight: 12.1kg
Today's Best Deals
Reasons to buy
+
Incredible value
+
Robust design
+
High-quality tool head
Reasons to avoid
-
Not a true CORE XY printer
-
Large footprint
-
No enclosure for enhanced materials (Optional extra)
Having a predecessor with a decent reputation instantly puts pressure on the new model to perform. From the small amount of initial construction needed to build the printer to the outstanding bed leveling technology, the Ender-5 S1 proves to be a decent upgrade and on a completely different level of quality to the original Ender-5.
The cubed design might not be a true CORE XY printer, but the robust frame and tool head design's and precision enables a print quality that pits this printer against models that are at least twice the price.
The design is refined, the tool head completely overhauled, and with upgrade options such as an enclosure and laser head, there is plenty of scopes to expand your creativity. This is a printer designed for both enthusiasts and small business users.
Read our full Creality-5 S1 review.
(Image credit: TRILAB)4. TRILAB DeltiQ 2
Distinctive delta design for professional 3D printing
Specifications
Print technology: Fused Deposition Modeling (FMD)
Build area: 25 x 25 x 30cm
Minimum layer resolution: 50 microns
Maximum layer resolution: Variable
Dimensions: 41 x 50 x 81cm
Weight: 10kg
Today's Best Deals
Reasons to buy
+
Elegant design
+
Easy expansion
Reasons to avoid
-
Not suitable for all materials
-
Fully open design
This elegant delta design should get your attention if you’re looking for a professional 3D printer for fairly large and complex projects._fwbw.jpg) It uses FDM technology to build 3D models from rolls of filament. Still, instead of the more common cartesian printers, the TRILAB DeltiQ 2 has a fixed round build plate with the extruder suspended between three arms that move the print head along three axes. It gives this model a fairly small footprint, while its high tower design ensures it can print some quite large pieces.
It uses FDM technology to build 3D models from rolls of filament. Still, instead of the more common cartesian printers, the TRILAB DeltiQ 2 has a fixed round build plate with the extruder suspended between three arms that move the print head along three axes. It gives this model a fairly small footprint, while its high tower design ensures it can print some quite large pieces.
And unlike most 3D printers, it has two extruder options, one for standard PLA and PETG and the other for flexibles. It just requires a little retooling to swap between them. The TRILAB DeltiQ 2 uses some of the best components available in its construction, and the interface is a smartphone running a dedicated app. This handsome, high-end workshop printer would sit well in any laboratory, studio or classroom.
Read our full TRILAB DeltiQ 2 review.
Original PRUSA SL1 (Image credit: PRUSA)5. Original PRUSA SL1S SPEED
The best MSLA printer just got better
Specifications
Print technology: Stereolithography
Build area: 320 x 450 x 500mm
Minimum layer resolution: 25 microns
Maximum layer resolution: 100 microns
Dimensions: 400 x 237 x 225 mm
Weight: 4. 5kg
5kg
Today's Best Deals
Reasons to buy
+
Rapid printing
+
Great build quality
Reasons to avoid
-
High maintenance
-
Limited build volume
Prusa Research revolutionized the FDM 3D printer market, and this model looks set to do the same for SLA printers. While this printer uses stereolithography technology, it's a slight variant known as MSLA.
This uses a monochrome LCD and UV LED to expose the resin, which is cheaper than precision lasers but just as accurate. The SL1S SPEED replaces the outgoing SL1, and as you might have guessed from that model name, it’s faster – around ten times faster and with a vastly improved print quality.
The SL1S's design hasn't physically changed a great deal over the SL1. It features the same touchscreen LCD on the front, which is again good and responsive.
The speedy new model looks set to lead the SLA market with support from the excellent PrusaSlicer software and a huge open-source community.
Read our full Original Prusa SL1S 3D printer review.
Anycubic Vyper (Image credit: Anycubic)6. AnyCubic Vyper
The best beginner friendly FDM 3D printer
Specifications
Print technology: Fused Deposition Modeling
Build area: 245 x 245 x 260mm
Dimensions: 508 × 457 × 516mm
Weight: 10kg
Colour
Black
Condition
New
Today's Best Deals
Reasons to buy
+
Built-in accessories drawer
+
Reliable automatic bed-leveling
+
Great value for the features you get
Reasons to avoid
-
Excessive initial stringing
-
Questionable build quality in places
-
Cura profile needs fine-tuning
If the world of 3D printing ever seemed too intimidating for you, look no further than the AnyCubic Vyper. While perfect for beginners with its auto-leveling feature and minimal assembly, seasoned printing hobbyists will also appreciate what it can offer, albeit with a few adjustments.
As the 'automatic leveling' might imply, the AnyCubic Vyper removes the need to align your build plate manually should you want to move the machine to a different location. It's fast and accurate, saving time when setting up your first print, which makes setting up and getting started a breeze.
The touchscreen control panel is satisfyingly fast and easy to use, but we found that the estimated print completion time was consistently incorrect. Once the printer is properly optimized, you'll enjoy impressive print quality.
Read our full AnyCubic Vyper review.
Raise3D E2 (Image credit: Raise3D)7. Raise3D E2
The best workhorse 3D printer
Specifications
Print technology: Fused Deposition Modeling
Build area: 330 x 240 x 240mm
Minimum layer resolution: 20 microns
Maximum layer resolution: 250 microns
Dimensions: 607 x 596 x 465mm
Weight: 35kg
Colour
Black
Condition
New
Today's Best Deals
Reasons to buy
+
High-resolution print capability
+
Innovative ouch screen interface
+
Dual Extruder system can work independently
Reasons to avoid
-
Huge and heavy, not ideal for home use
-
Careful placement of bed required
-
Needs manual assistance for filament loading
3D printing has come of age, and machines like the Raise3D E2 bring high-end FFF printing to the home, education, and business. This dual extrusion printer goes head-to-head with the RoboxPro and will fulfill most companies' design and development needs with slick business and network integration.
The printer display is vast and detailed, and you can swiftly access all the printer settings through the fast and responsive touchscreen interface. You can print directly from a USB key, wired connection, network, or Wi-Fi, making it ideal if several people are utilizing the printer. You will also find many step-by-step videos for many of the printer's features.
Home and educational users will benefit from a simple interface and near-faultless reliability. The only drawback of this machine is its size and weight.
Read the full Raise3D E review.
(Image credit: Anycubic)8. Anycubic Photon M3
Detailed 3D modelling for beginners
Specifications
Print technology: Stereolithography (SLA)
Build area: 18 x 18 x 18cm
Minimum layer resolution: 50 microns
Maximum layer resolution: 200 microns
Dimensions: 18 x 16. 4 x 10cm
Weight: 7kg
Colour
Yellow
Condition
New
Today's Best Deals
Reasons to buy
+
Good value
+
Detailed models
Reasons to avoid
-
Print size is small
-
Poorly placed USB port
The Anycubic Photon M3 is the ideal entry-level resin printer to introduce you to 3D printing. It’s relatively easy to set up and operate, and the box includes everything you need to get started except for the UV resin. This compact model will fit easily on your desk in a well-ventilated room, though the build volume is somewhat limited at 180 x 163.9 x 102.4mm or 7 x 6.5 x 4-inches.
This modest machine can turn out surprisingly detailed models for printing small plastic parts or artistic pieces. The interface is a 7.6-inch panel, and the software will help you print your project and slice it. If you want to make larger models, you should consider one of Anycubic’s larger 3D printers, but this is a great place to start for $299 (about £275 / AU$480).
Read our full Anycubic Photon M3 review.
Snapmaker 2.0 A350 (Image credit: Snapmaker)9. Snapmaker 2.0 A350
Best 3-in-1 3D printer
Specifications
Print technology: Fused Filament Fabrication, CNC, Laser
Build area: 350 x 350 x 350mm
Minimum layer resolution: 50 microns
Maximum layer resolution: 300 microns
Dimensions: 645 x 480 x 580mm
Weight: 29kg
Today's Best Deals
Reasons to buy
+
3D printer, CNC, and Laser cutter in one
+
Solid design and build quality
+
Easy to understand software
Reasons to avoid
-
Switching between uses takes time
-
Enclosure purchased separately
-
Very noisy when printing
A true 3-in-1 machine makes sense because 3D printers, CNC, and Laser cutters all use the same basic mechanics and technology. The original Snapmaker has a dedicated following, so it is no surprise that Snapmaker 2.0 builds on its predecessor's reputation and features.
The SnapMaker boasts excellent build quality and comes with clear assembly instructions. The assembly takes around 20 minutes. There's a 5-inch (720x1280px) touchscreen on the machine that can be used to select options, preview models, calibrate and open stored files. The touch screen is a powerful addition to the usability of the machine — it runs on Android OS and features a Quad-Core A7 CPU @1.1GHz.
The A350 is the largest of three models and proves proficient in all disciplines. Swapping between the three heads and beds does take time to reconfigure and calibrate, but for the price and features, it's worth it.
Read the full Snapmaker 2.0 A350 review.
- We've also featured the best printers and the best laptops for graphic design.
What is a 3D printer?
A 3D printer is a machine that creates three-dimensional objects using computer-created designs (like a digital 3D or CAD model).
These machines rely on an additive manufacturing process to build objects layer by layer.
How to choose the best 3D printers for you?
To select the best 3D printer, you'll need to consider what you're going to do with it. If you're going to be printing small objects, then a small-size printer is apt, but a large printer is naturally the best option for bigger creations.
For printing high-quality objects with fine details, you'll need a high resolution printer, but these prints will cost more and take more time to get ready.
Look out for the printer's interface and the overall ease of use, along with other aspects like the kind of software it uses, the type of filament, build platform, and pricing.
The best 3D printers: How we test
3D printers are tested using a collection of bespoke benchmarks that help show the strengths and weaknesses of each model that, after time, can be compared against other products. These will differ depending on printer type, but a filament printer will be tested for stringing, bridging, and speed, as well as additional commentary on detail, achieved, and noise levels.
This will be done fairly, with dues given to different materials and printer types, with resin printers being subject to smaller, more detailed models to replace the stringing test. Design, price, and performance will also be explored as sections within the reviews.
All our tests are conducted from the perspective of the printers target market where possible, so expect to see a lot of tabletop miniatures and figurines alongside the usual 'benches' (test models that are also dubbed as 'torture tests' to see where a printer needs to be better optimized for future prints).
Round up of today's best deals
Creality Ender-5 S1
$89.99
View
See all prices
Reduced Price
Anycubic Vyper
$499
$339. 99
99
View
See all prices
Deal ends Mon, Jan 9
Raise3D E2
$3,499
View
See all prices
Anycubic Photon M3
$319.99
View
See all prices
powered by
Sign up to theTechRadar Pro newsletter to get all the top news, opinion, features and guidance your business needs to succeed!
Contact me with news and offers from other Future brandsReceive email from us on behalf of our trusted partners or sponsorsCollin is the B2B Hardware Editor for TechRadar Pro. He has been in journalism for years with experience in both small and large markets including Gearadical, DailyBeast, FutureNet and more.
Creality Ender-5 S1 3D Printer Review
Skip to main contentWhen you purchase through links on our site, we may earn an affiliate commission. Here’s how it works.
An ideal choice for any keen 3D print enthusiast or small business that needs a professional-level printer on a budget
(Image: © Future)
TechRadar Verdict
We've seen Creality release suped-up versions of their existing 3D printers before, and each time we've seen a big performance upgrade. The Ender-5 S1 is true to form, and while the basic set-up might look much the same as the Ender-5, there's been a complete overhaul of the control board and hotend. The result is an impressive step up in speed and print quality. The price still pits this at the mid-range; however, the quality of the prints is comparable with printers many times more expensive.
TODAY'S BEST DEALS
Pros
- +
Solid performance
- +
High-quality components
- +
Accurate print dimensions
Why you can trust TechRadar Our expert reviewers spend hours testing and comparing products and services so you can choose the best for you. Find out more about how we test.
Intro
Creatlity's S1 machines are the suped-up versions of their standard 3D printers. While the frame and design remain much the same, styled along the Cartesian make-up, the parts that matter, such as the main board and tool head, have all been upgraded. As you check over the machine, you realize that multiple other tweaks have also been made, resulting in this being a very different machine from the standard version. That difference is also reflected in the price tag, with the S1 costing nearly double that of the standard.
(Image credit: Future)Specs
Print Technology: Fused Deposition Modeling
Build Area: 220x220x280mm
Minimum Layer Resolution: 0.05mm
Maximum Layer Resolution: 0.35mm
Dimensions: 425x460x570mm
Weight: 12.1kg
Once assembled, which is a smooth and easy-to-follow process, you realize that the enhancements that have been made upgrade the Ender-5 from an entry-level machine into something with real potential.![]()
- Creality Ender-5 S1 at GeekBuying for $89.99
The upgraded machine is excellent, but what peaks interest is the ability to upgrade the machine further with the inclusion of an optional enclosure and compatibility with the Creality Sonic Pad (available soon).
Sonic Pad is essentially a 3D print tablet that upgrades a machine's firmware and operates a visual interface for the machine. The sonic Pad not only upgrades the user experience but also improves performance.
At first, the Creality Ender-5 S1 might look like a tuned Ender-5, but it's a completely different beast.
Design
Firmly placed as a Cartesian machine, the Creality Ender-5 S1 differs from many standard 3D printers by having a print head that moves along the X and Y axis and a print bed that raises on the Z axis.
The design of these printers is a little more complex and does, of course, mean that with the square box design, the machines look far larger than standard Cartesian printers.
However, when it comes to size, the footprint is smaller than some printers with this size of build platform due to all the moving parts being contained within the size of the printer rather than having a build plate that slides back and forth.
(Image credit: Future)Read More
When the Creality Ender-5 S1 arrives, it does require a little assembly, but with a clear set of instructions, the whole machine can be built in around 10-20 minutes. There's nothing intricate to assemble, and the main bulk of the construction has already been done for you; you need to bolt in the uprights, install the tool head and then wire everything in. At each step, the instructions are clear, and for the most part, it's impossible to plug any of the wires into the wrong place. Even with no prior experience, there should be nothing here to challenge a complete novice.
As you go through the construction process, the real differences between this and the standard Ender-5 become apparent. The base is all-inclusive, with the main board and LCD touch screen nicely contained, and the tool head that incorporates both the hot and extruder is in another league, being direct drive rather than Bowden.
Once the machine is constructed, the filament reel can be popped on the side and fed through the system. A filament run-out sensor is included as standard, which is nice to see, and this is where the filament journey starts as it is fed through the system. From the filament run-out sensor to the top of the direct drive hot end is a connected Teflon tube that guides the filament through the system. While the new tool head is far more advanced, there's still no automatic feed for the filament through the system, so there's a little manual feeding of filament to get it started.
(Image credit: Future)This part of the printing process is slightly primitive compared with everything else about the printer. Unlike other printers of this quality, there's usually a load filament feature that automatically pulls the filament through. Here, you need to preheat the filament, PLA or ABS, then activate the extruder motor to feed the filament through the hotend until it drips out.
With the filament loaded, you can then follow the bed leveling process. The bed leveling utilizes the same process as the Ender-3 S1 Pro. This takes you through the leveling process of z-axis offset, then manual leveling, and finally, auto leveling. As I've seen with other Creality printers, the auto bed leveling is about the best I've come across.
Features
The cubed design of the Ender-5 S1 creates an incredibly solid printer that creates an ideal environment for the accurate printing of models. The print area of the S1 is slightly smaller than the standard model, not that you would notice, with 20mm less on the height to accommodate the new all-in-one hotend and extruder design. This gives a modeling dimension of 220x220x280mm, which is pretty decent for most projects.
Once again, the heated bed features a magnetic spring steel sheet that's slightly textured.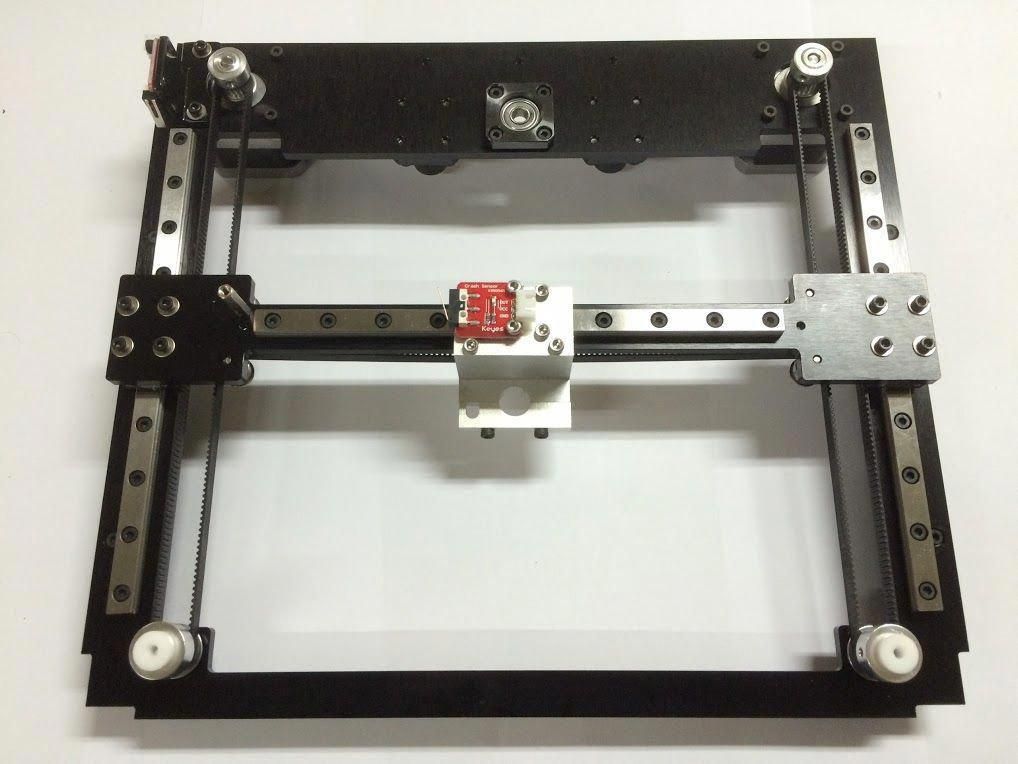 What's nice about the design of the sheet is that two alignment cuts outs ensure the sheet sits snuggly on the bed.
All functions and features are set through the LCD touchscreen interface, including the bed leveling. The process is extremely smooth, with the manual height adjustment made possible by four large wheels under each corner.
Before each print, the auto leveling double-checks the platform height with the CR Touch sensor fitted to the tool head's side.
(Image credit: Future)Creality has stuck with the standard 0.4mm nozzle, which can be swapped out for other nozzle sizes and replacements if needed. What's impressive is the new control board and motors enable a typical print speed of 120mm/s with the standard nozzle fitted. Checking through the settings, this can be pushed to 250mm/s.
One feature that appeals is the use of the direct drive extruder and tool head; this has the advantage of enabling compatibility with a huge variety of filaments from PLA to flex. To maximize the material compatibility, the nozzle temperature can reach up to 300ºC and the heated bed 110ºC.
There's also the option to add an enclosure if you frequently print with more advanced materials such as ABS and Nylon. Creality has also confirmed that it will be compatible with the Creality Sonic Pad.
Performance
On the first run watching the first layer being printed, a small amount of fine-tuning was needed on the Z-axis. This was easily controlled through the touch screen LCD. Once the first layer height is correct, the printer is set to go, and then it's over to the touch sensor to ensure the height is correct.
(Image credit: Future)Starting with the usual test prints, 3DBenchy, and other test models, they all rattled off the build plate at speed. The printer's solid build minimizes shake and vibration, which is apparent in the quality of the prints. The model's overall appearance at all default settings is excellent and shows a fine filament extrusion. At the finer layer heights, the layers are visible but show how good this printer is.
Printing at the typical 120mm/s and the print quality was superb, and as the layer height increases, this can be pushed to quickly fire out prints at a rate, although the quality does suffer, although the filament flow remains good.
Print quality
Dimensional accuracy - score of 5
Target 25 = 25.02mm / 0.02mm Error | Y: 25.02mm / 0.02mm Error
Target 20 = 20.06mm / 0.06mm Error | Y: 20.05mm / 0.05mm Error
Target 15 = 15.08mm / 0.08mm Error | Y: 15.02mm / 0.02mm Error
Target 10 = 10.07mm / 0.07mm Error | Y: 10.01mm / 0.01mm Error
Target 5 = 5.06mm / 0.06mm Error | Y: 5.00mm / 0mm Error
X Error Average = 0.058
Y Error Average = 0. 02
02
X&Y Error Average = 0.049
Fine Flow Control - score of 2.5
Fine Negative Features - score of 4
Overhangs - score of 4
Bridging - score of 5
XY resonance - score of 2.5
Z-axis alignment - score of 2.5
Adding up the totals gives a final score of 25.5 out of 30.
Verdict
There's no doubt the Creality Ender-5 S1 is a big step up from the Ender-5. This is a completely overhauled machine with so many additions that help dramatically boost the printer's performance.
From the outset, the machine is impressive, and while the initial build takes a little longer than the single vertical upright design seen on the Ender-3, the four columns help create a rock-steady base for the printer. What I also like about the design is that everything is contained, from the electronics to the print platform staying within the perimeter of the printer. It also features two handy carry handles, making it incredibly easy to move around the workshop when needed.
Ultimately the new control board and tool head leap this printer forward; add in the potential of the addition of the Sonic Pad in the near future and wrap it in a case, and you have a printer that is hard to beat.
For keen enthusiasts, modelers, product designers, and anyone who what's top-of-the-range quality from a mid-range priced machine, the Ender-5 S1 won't fail to impress.
- Looking for a great workspace for your 3D Printer? Check out our best standing desks
Creality Ender-5 S1: Price Comparison
$89.99
View
$119.99
View
$119.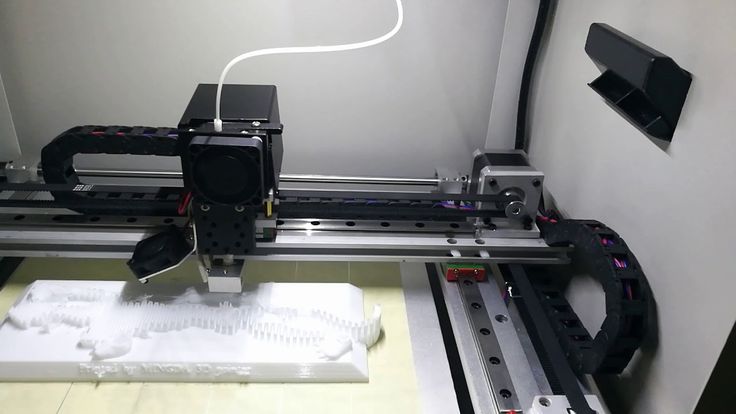 99
99
View
No price information
Check Amazon
powered by
TechRadar is part of Future US Inc, an international media group and leading digital publisher. Visit our corporate site .
© Future US, Inc. Full 7th Floor, 130 West 42nd Street, New York, NY 10036.
3D printing and other rapid prototyping systems / Sudo Null IT News
A little over a week ago, an article on this topic appeared on Habré, but it poorly covered the technical side of printing and caused a fairly large number of questions. What I will try to fix in this post.
Three-dimensional printing is one of the methods of rapid prototyping. There are now dozens of rapid prototyping methods. All of them differ from each other, but they consist in the layer-by-layer imposition of a composite material and can significantly reduce the time for manufacturing models for visualization, fitting, tooling and other applications, which provides:
- development cycle reduction;
- design improvement;
- quality improvement;
- reduction in product price and production;
- speed up design changes.
The main advantage is the ability to create a product in the presence of only a geometric model.
In this case, the product is created in one go, and there is no need to plan the sequence of technological processes. However, compared to CNC machines, the choice of material for the product is very limited. nine0003
The technology of forming products by gradually building up material appeared around the beginning of the 1980s. The process is based on 3 stages: the formation of a cross section, the layer-by-layer imposition of sections and the combination of layers. That is, to create a product, you only need to know the cross section. This solves some of the product creation problems:
- There is no need for topological design and conversion of structural elements into fabrication elements. Cross sections are generated from the model only. nine0009
- One-step production of a part minimizes the amount of equipment.
- No need to define empty space geometry, because material is being added, not removed.
- It is not necessary to design the design of fasteners and clamps.
- The process is toolless, so there is no need to develop additional tooling.
There are several ways to create and combine cross section layers:
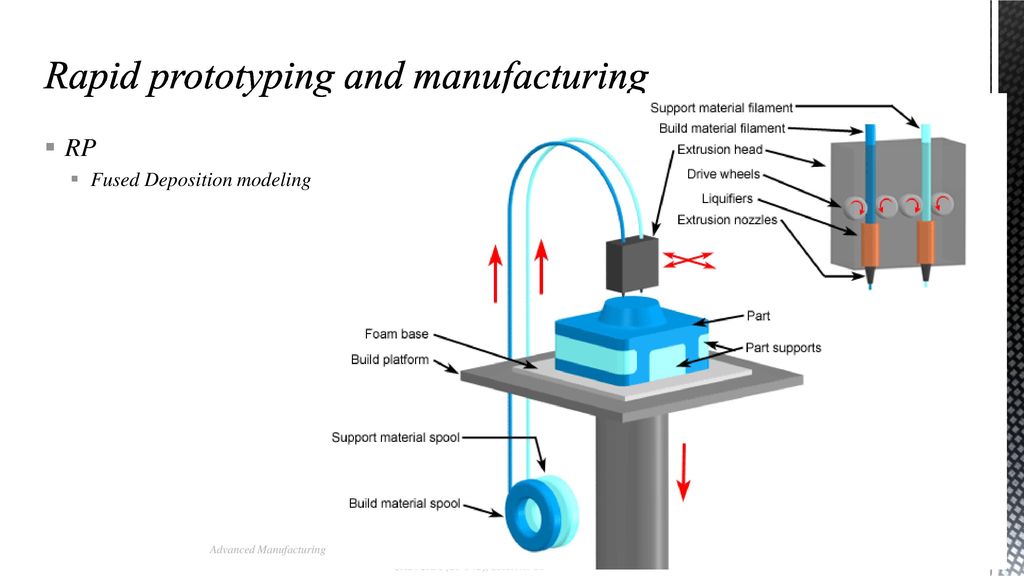
3D printing
It was developed at the Massachusetts Institute of Technology and got its name because of its similarity to printing with a regular printer. The process is as follows:
- A layer of ceramic powder is applied to the platform
- The print head applies a special binder, due to which the particles stick to each other and the required cross section is formed
- The platform is lowered one layer thickness and material is applied onto it. nine0009
- Applying the adhesive to the new layer and bonding it to the first layer.
- Execution required number of repetitions.
- Additional heat treatment during which the part hardens completely.
Solid Ground Curing (SGC)
Each layer is cured by exposure to a UV lamp. In this case, all points of the layer harden simultaneously, and final curing is not required. The process consists of the following steps:
- Based on the given geometric model and the desired layer thickness, a set of cross sections is calculated;
- For each layer, an optical mask is made according to the shape of the cross section;
- Platform coated with liquid photopolymer;
- A mask corresponding to the cross section is placed over the polymer layer and the plastic is exposed to an ultraviolet lamp;
- Removal of residual liquid;
- Filling voids with liquid wax. After it hardens, the layer is ground down to the required thickness with a grinding disc; nine0009
- The product is covered with a layer of liquid polymer and the process is repeated until the finished product is obtained;
- Cured wax is melted and removed from the product.

The advantage of the method is that there is no need for additional supports, since all voids are filled with wax. Also, due to uniform irradiation with ultraviolet, a greater uniformity of the product is achieved and additional curing is not required.
Laser Stereolithography
- Coined by C. Hull, who founded 3D Systems Corporation in 1986 to manufacture this equipment. Manufacturing process includes:
- The photopolymerizable composition is poured into a bath and a platform capable of moving in the vertical direction at a depth equal to the layer thickness is placed in the same bath.
- An ultraviolet laser scans the polymer layer, curing the polymer into a cross-sectional shape. nine0009
- The platform is lowered to the thickness of one layer and a new surface scan is performed. This is repeated until the finished part is received.
- Post cure for final curing. This is necessary because.
 That liquid areas may remain in each layer. Since the size of the laser beam is finite, the process can be compared to painting over a figure with a ballpoint pen.
The method is one of the most popular, but if the part has a cutout at the bottom, the creation of supporting structures is required. As a result, the surface roughness of the finished product without any processing does not exceed 100 microns. Cured FPC is easy to polish. The strength of the finished parts is comparable to the strength of products made from cured epoxy resins. Finished models can withstand heating up to 100°C without changes in shape and size. nine0003
where 1 is the laser; 2 - product; 3 - liquid monomer; 4 - bath; 5 - mobile platform; 6 - mirror controlling scanning; 7 - leveling knife.
Selective Laser Sintering (SLS)
The process was developed by the American company DTM and is as follows:
- Powdered material is applied to the platform with a special leveling roller;
- The layer of powder is selectively scanned and heated by a laser beam.
 As a result, the particles stick together and form the required cross section of the product; nine0009
 - The platform is lowered to the thickness of one layer and powdered material is applied to it;
- The laser scans again, resulting in particles and layers sticking together;
- Steps three and four are repeated until the desired item is obtained;
- Some materials require additional sintering.
Additional supporting structures are not required, due to the filling of voids with powder. The advantage of the method is the possibility of using any fusible powder, including metal. The method is mainly used for the manufacture of molds with a resource of 2,500 to 10,000 pieces. nine0003
where 1 is a laser, 2 is an optical system, 3 is a finished product, 4 is a movable (along the Z axis) working platform, 5 is a hopper for supplying powder material, 6 is a powder material, 7 is a movable hopper table, 8 is a feed roller powder and leveling layer
Lamination (LOM - Laminated Object Modeling)
The part is obtained by laminating and laser cutting the incoming sheet material. Sticking occurs due to the thermal adhesive coating.
- Each sheet is bonded to the workpiece using heat and pressure. The sheet material is fed as a continuous roll from one side and received from the other side. The required temperature and pressure are provided by the rolling roller. Moreover, when gluing a new layer of film, the support platform is shifted down by the value of the film thickness;
- After the sheet is attached, it is scanned along the cross section contour. Typically 25 or 50 watt carbon dioxide lasers are used. Due to the fact that scanning goes only along the contour, we get much better performance than when using methods with raster scanning; nine0009
- Areas outside the contours are cut into small pieces for subsequent removal;
- After applying the last layer, the excess material is broken and the finished part is removed;
- The part surface is then ground, polished or painted. The finished part can be coated with sealant to protect it from moisture.
The presence of additional material has both pluses and minuses. On the one hand, this allows you not to make special props. Due to this, the part is not deformed during the manufacturing process. However, removing this material is not an easy task. Furthermore, it is not possible to fabricate a hollow structure with closed surfaces. Also, the disadvantage of this method is a large amount of waste remaining in the roll and removed during the cleaning process. nine0003
Due to the bonding of the material layers, different physical and mechanical properties are observed depending on the height of the product. But at the same time, sheet material of any thickness can be used for the product, which ensures high accuracy of the part.
Although the method is applicable to many materials, including even metals, paper lamination is the most popular.
Rapid prototyping has become an essential part of the CAD/CAM process. Rapid prototyping technologies allow users to
check CAD data.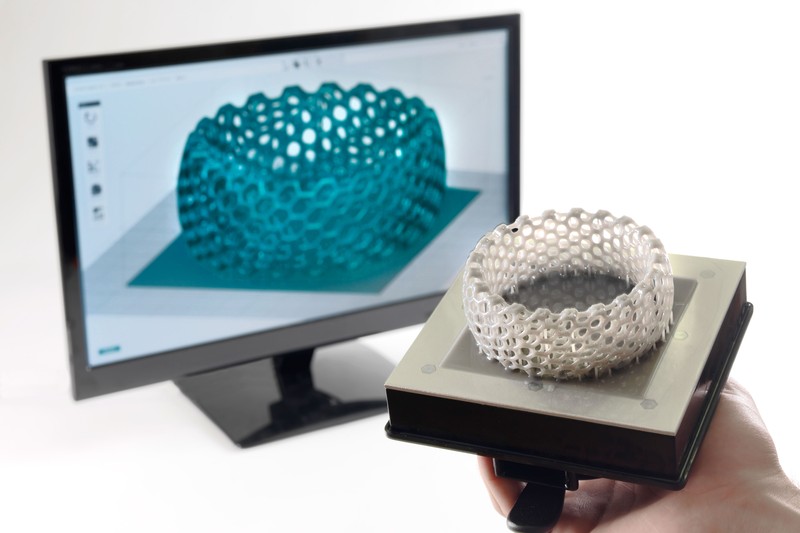 The increasing use of solid modeling is driving the spread of rapid prototyping technologies. The quality of materials and the accuracy of prototypes are improved. All this suggests that rapid prototyping technologies and systems will occupy an increasing place in computer-aided design. In the near future, such systems will be available to any user and will become a familiar designer's tool, improving the quality of design and reducing the time to release new products. nine0003
Rapid Prototyping Guide for Product Development
Prototyping is an important part of the product development process, but has traditionally been the bottleneck of production.
Product designers and engineers modeled concepts with basic tools, but functional prototypes and production-quality parts often required the same processes as finished products. Traditional manufacturing processes, such as injection molding, require expensive tooling and set-up, making it prohibitively expensive to produce a small batch of prototypes. nine0003
Rapid prototyping helps companies turn ideas into realistic proofs of concept, produce high-quality prototypes from those concepts that look and work like the final product, and guide it through a series of validation steps all the way to mass production.
With rapid prototyping, designers and engineers can prototype directly from CAD models faster than ever before, and quickly and frequently revise their designs based on real-world testing. nine0003
In this guide, you will learn how rapid prototyping fits into the product development process, its applications, and what rapid prototyping tools are available to today's product development teams.
What is “rapid prototyping”?
Rapid prototyping is a group of techniques used to quickly produce a scale model of a product or assembly using computer-aided design (CAD) data. Because these products or assemblies are usually made using additive manufacturing methods as opposed to traditional subtraction methods, the phrase has become synonymous with additive manufacturing and 3D printing. nine0003
Additive manufacturing is a natural fit for prototyping. It provides virtually unlimited modeling freedom, requires no tooling, and can produce parts with mechanical properties close to various materials made by conventional manufacturing methods. 3D printing technologies have been around since the 1980s, but their high cost and complexity mostly limit their use by large corporations or force small companies to outsource production to specialized firms, waiting weeks for a prototype to be ready. nine0003
The advent of compact and desktop 3D printing has changed this status quo and inspired many to mass-scale additive manufacturing with no end in sight. With DIY 3D printing, engineers and designers can quickly switch between digital designs and physical prototypes. Now you can prototype in one day and validate multiple versions of a design, size, shape, or assembly based on real-life testing and analysis. Ultimately, a rapid prototyping process helps companies bring better products to market faster than their competitors. nine0003
The benefits of rapid prototyping
Think and test the concept faster
Rapid prototyping turns initial ideas into low-risk concept studies that can look like real products in a short amount of time. This allows designers to go beyond virtual visualization, making it easier to understand the look and feel of designs and compare concepts side by side.
Communicate ideas effectively
Physical models allow designers to share their concepts with colleagues and clients to communicate ideas in ways that cannot simply be visualized on a screen. Rapid prototyping makes it easier to get the clear, actionable user feedback that creators need to understand user needs and then refine and improve their designs.
Step-by-step development and instant change
Design is always a step-by-step process, requiring several iterations of testing, evaluation, and refinement before moving on to the final product. Rapid prototyping with 3D printing provides the flexibility to quickly create more realistic prototypes and make changes instantly, making this critical development process more efficient. nine0003
Various stages of the development of a gripper for a manipulator, printed on a SLA 3D printer
A good model is a 24-hour development cycle: design as you go, 3D print prototype parts overnight, clean and test the next day, finalize the design, then repeat the previous steps.
Cost and time savings
With 3D printing, there is no need for expensive tooling and setup: the same equipment can be used to make different products. In-house rapid prototyping eliminates the high costs and lead times associated with outsourcing. nine0003
Thorough testing to minimize design flaws
In product design and manufacturing, early identification and correction of design flaws can help companies avoid costly design and tooling changes in the future.
Rapid prototyping allows engineers to thoroughly test prototypes that look and work like final products, reducing usability and manufacturability risks before going into production. nine0003
Proof-of-concept prototypes and test models
Proof of concept (POC) concept models or prototypes help product developers review ideas and assumptions and test the viability of a product. Physical conceptual models can demonstrate an idea to stakeholders, be a topic of discussion, and encourage acceptance or rejection of changes.
PoC prototyping occurs very early in the product development process, and these prototypes include the minimum functionality needed to test assumptions before moving on to subsequent product development steps. nine0003
The proof of concept should be simple, just enough to mimic how the product works. For example, a charging stand might just be a 3D printed case connected to a standard USB charging cable.
The key to successful conceptual modeling is speed; designers must generate many ideas before creating and evaluating physical models. At this stage, usability and quality are of lesser importance, and maximum reliance is placed on off-the-shelf parts. For example, designers from the Swiss design and consulting firm Panter&Tourron used SLA 3D printing to go from concept to demo in two weeks. nine0003
3D printers are the ideal tool for conceptual modeling. And unlike most work and production tools, desktop 3D printers are office-friendly, eliminating the need for extra space.
Scale prototypes
Scale prototypes represent the final product, but may not have many functional features. Their goal is to give a better idea of what the final product will look like and how the end user will interact with it. Ergonomics, user interface and usability can be tested with large scale prototypes before significant time is spent designing and developing the functional part of the product. nine0003
Development of large-scale prototypes usually starts with sketches, foam or clay models, and then moves on to CAD modeling. As designs complete, industrial designers strive to create scale prototypes that closely resemble the final product. They use the actual colors, materials and finishes that will be in the final product.
Working prototype
In parallel with the industrial design process, engineering teams work on other prototypes to test and improve the mechanical, electrical and other properties of the product. These working prototypes may differ from the final product, but they include key technologies and features that need to be developed and tested. nine0003
Often, these critical core features are developed and tested in separate departments before being integrated into the final product prototype. This sub-system approach makes it easier for teams to separate responsibilities and provides reliability at a more granular level before all elements are combined.
Engineering prototypes
An engineering prototype is the point at which design and engineering meet to create a viable version of the final commercial product. These prototypes are used for user testing in a lab. nine0003
At this stage, the details become more and more important. 3D printing allows engineers to create high quality prototypes that accurately represent the finished product. This makes it easy to test design, functionality and manufacturability before investing in expensive tooling and moving into production. After all, the time and cost of making changes increase.
Diving camera manufacturer Paraclenz has used 3D printing to create functional prototypes that have withstood tests at depths of more than 200 meters below sea level. nine0003
Modern 3D printing materials can closely match the look, feel and material characteristics of parts made using traditional manufacturing processes such as injection molding. Different materials can mimic products with fine details and textures, soft touch, low friction smooth surfaces, rigid and durable cases or transparent components. 3D printed parts can be finished by sanding, polishing, painting or electroplating. Any visual attribute of the final part is reproduced, including threads for assembling a product from several elements. nine0003
An engineer from Wöhler has created a working multi-material moisture meter prototype with a rigid body and soft buttons.
Engineering prototypes require rigorous functional and user testing to see how a part or assembly performs when subjected to loads and operating conditions in the field. 3D printing offers engineering plastics for high performance prototypes that can withstand thermal, chemical and mechanical stress. nine0003
Compliance and production
Rapid prototyping allows engineers to create small batches, one-off custom solutions and samples to evaluate product quality (EVT, DVT, PVT) and performance.
3D printing makes it easy to check tolerances against the actual manufacturing process and conduct comprehensive internal and “field” tests before moving on to mass production.
Rapid production through 3D printing can also be combined with traditional manufacturing processes such as injection molding, thermoforming to increase flexibility, scalability and cost efficiency. The technology is also effective in creating trial fixtures to simplify the process of functional testing and certification through data collection. nine0003
Medical device development company Coalesce uses special fixtures for internal testing.
With 3D printing, design development doesn't have to end with production. Rapid prototyping tools enable designers and engineers to continuously improve products and respond quickly and efficiently to emerging issues.
Rapid Prototyping Tools and Techniques
Additive manufacturing
Rapid prototyping has essentially become synonymous with additive manufacturing and 3D printing. There are many 3D printing technologies available, with the most commonly used for rapid prototyping being Filament Deposition Method (FDM), Stereolithography (SLA), Selective Laser Sintering (SLS).
Fused Deposition Method (FDM)
FDM 3D printing is a 3D printing method in which parts are made by melting and extruding a thermoplastic filament, which is deposited layer by layer by a printer nozzle in a build area. nine0003
FDM is the most widely used 3D printing technology at the consumer level, fueled by the advent of hobbyist 3D printers. Professional FDM printers, however, are also popular with both designers and engineers.
FDM has the lowest resolution and accuracy compared to other plastic 3D printing technologies and is not the best option for printing complex designs or parts with complex features. A better product can be obtained through chemical and mechanical processing processes. Some professional FDM 3D printers use soluble supports to overcome some of these issues. nine0003
FDM works with a range of standard plastics such as ABS, PLA and their variations, as well as engineering plastics or even composites. For rapid prototyping, FDM printers are especially useful for making simple parts that are machined.
Stereolithography (SLA)
SLA 3D printers use a laser to cure liquid resin into plastic in a process called photopolymerization. SLA is one of the most popular technologies among professionals due to its high resolution, accuracy and versatility. nine0003
Parts made with SLA technology have the highest resolution and precision, the sharpest detail and smoothest surface compared to other plastic 3D printing technologies. SLA is a great option for creating high quality visual and functional prototypes.
However, the main advantage of SLA lies in the large selection of resin types. Materials manufacturers have created innovative SLA photopolymer resin formulations with a wide range of optical, mechanical and thermal properties that match those of standard, engineering and industrial thermoplastics. nine0003
SLA 3D printing is also one of the fastest prototyping tools, up to 10 times faster than FDM 3D printing.
Selective Laser Sintering (SLS)
Selective laser sintering is the most common additive manufacturing technology for industrial applications and is trusted by engineers and manufacturers in various industries for its ability to produce durable functional parts. nine0003
SLS 3D printers use a powerful laser to melt small particles of polymer powder. The unmelted powder supports the part during printing and eliminates the need for special support structures. This makes SLS the ideal solution for complex geometries including internal features, recesses, thin walls. Parts produced with SLS printing have excellent mechanical properties and their strength is similar to that of injection molded parts. nine0003
In SLS rapid prototyping, 3D printing is mainly used for functional and engineering prototypes for rigorous testing of products (e.g. air ducts, brackets) and customer feedback in the field.
CNC machines
The machine tool with numerical control (CNC), unlike FDM, SLA or SLS, is a digital computing device for controlling production processes. A part of different materials is formed by cutting, boring, drilling and grinding. nine0003
CNC includes machining that removes material either with a rotating tool and a stationary part (milling) or a rotating part with a stationary tool (lathe).