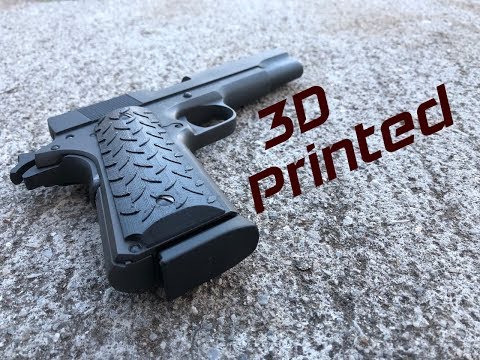
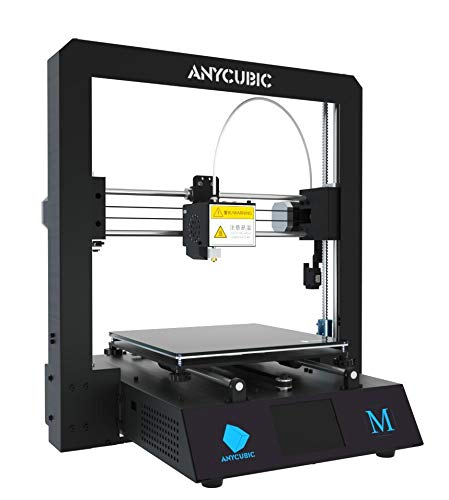
Anycubic full metal i3 mega 3d printer
Get the Anycubic I3 MEGA 3D Printer for Just $329.99
It seems like global users always looking for sale season, but here e-commerce industry always alert to provide best deals at best time, as we see GearBest deal section, maximum products on Flash sale there, with more than 10% off, few days back company started their annual mid-year flash sale in which all gadgets categories including smartphone, printers, projector, laptop, notebook, tablets, accessories, in a single place with heavy off, this is the best way to attract more customers online, even I also check there OP6 was costing just $489 which is pretty low, today we found a deal where you can avail Anycubic I3 MEGA 3D Printer just for $329.99, means it’s listed with 14% flat off, with two colors black, and white black, eu and us plug option, the product stored in China warehouse, if you live outside of the china it may cost you few dollars to ship to your doorsteps, but after applying shipping cost it cost you less because China is the hub of manufacturer anything at very low cost, so here you don’t need to think about pricing, Hurry there are only 95 units left at the time when we are writing.
According to customers reaction about Anycubic I3 MEGA 3D Printer, users rated it to 4.8 which is pretty good rating, Anycubic I3 MEGA Full Metal Frame FDM 3D Printer, comes with extremely simple assembly, which is more stable, and adopt any cubic ultra-base platform which help to remove the printed object easier, according to expert this feature is usually not available on 3D printers, the base and outer body designed with full metal frame including double z-axis double drive, even it’s very easy to install and uninstall the machine.
Anycubic
I3 MEGA Full Metal Frame FDM 3D Printer PriceAnycubic I3 MEGA Full Metal Frame FDM 3D Printer
Anycubic I3 MEGA Full Metal Frame FDM 3D Printer
$440.26
out of stock
Buy This Item
Gearbest.com
Anycubic I3 MEGA Full Metal Frame FDM 3D Printer
Anycubic I3 MEGA Full Metal Frame FDM 3D Printer
$383.77
out of stock
Buy This Item
Gearbest. com
com
Anycubic I3 MEGA Full Metal Frame FDM 3D Printer comes with single nozzle which is 0.4mm and support up to 260 degrees temperature, it also supports SD card and USB connectivity option to give them input when we use offline printing, and on the front it has TFT touch screen, offer 210 x 210 x 205 mm engraving area, there are so many other features included such as hot end with straight-through design, resume from accident power losses, bigger build volume, three steps fast assembly, filament sensor and lattice printing platform.
The Anycubic I3 MEGA Full Metal Frame FDM 3D Printer comes with ABS, HIPS, PLA, Wood supported material, with material diameter up to 1.75mm, included working voltage 110V/220V, runs on Cura software, multiple file formats AMF, DAE, G-CODE and STL, for the dimension & weight it’s 16.14 inch length x 15.94 inches wide x 17.83 inch height, 14.50 Kilograms weight.
AnyCubic i3 Mega 3D Printer Review
AnyCubic i3 Mega
I was first introduced to AnyCubic i3 Mega while I was searching the difference between the AnyCubic printers.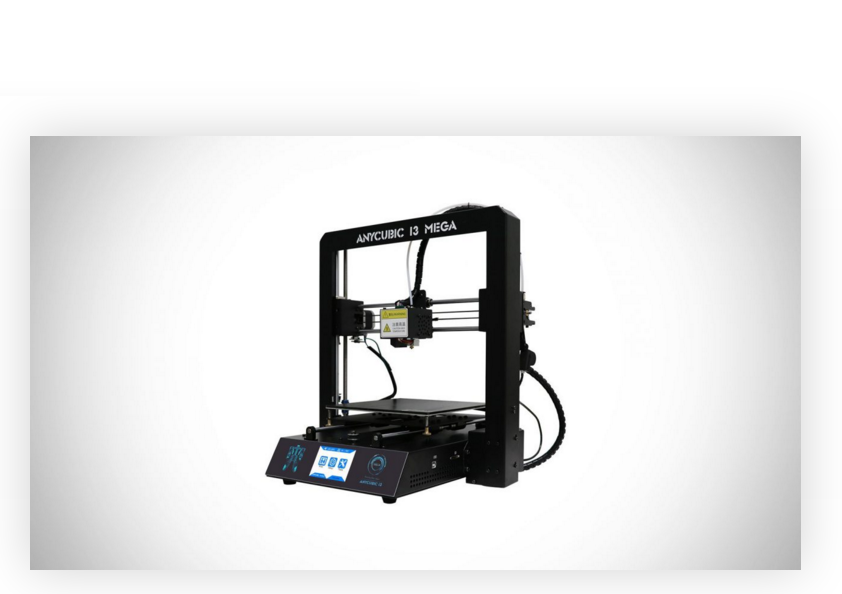 After seeing it’s interesting features and affordable price, I decided to review it. In this review, I will test its print and build quality, stability, ease of use and many other things.
AnyCubic I3 Mega is the third printer released by Chinese AnyCubic brand. Some of the notable features of i3 Mega are :
- Full metal made frame
- Auto-level
- Filament detector
- Resume from outage
- Touch-screen
Quite honestly, the printer itself picked some very good reviews online and at the first glance, it really seems like a good cheap 3D printer for beginners. But is it all that good? Let’s find out.
AnyCubic i3 Mega: Technical Specification
The best way to familiarize yourself with a 3D printer is to take a quick look at the technical specs of the product. In the table below, you’ll be able to see most notable features and characteristics of the AnyCubic I3 Mega.
Printer model
Printing size
Printer Dimensions
Printer Weight
Print speed
Layer resolution
Axis positioning accuracy
Material diameter
Printer Frame Material
Platform board material
Mainboard
Pre-assembled
Screen
Extruder type
Heated Bed
Max Nozzle Temperature
Max Heatbed Tempeature
Auto leveling sensor
Filament sensor
Resume from outage
Enclosure
Recommended Material
Power Input
Retail price
AnyCubic i3 Mega
210*210*205mm
405mm*410mm*453mm
10kg20mm/s - 100mm/s
0.
 05mm - 0.3mm
0.01mm - X 0.002mm Z
1.75mm
Metal
Aluminum
TriGorilla
3.5 inch TFT Touch Screen
Bowden
275°C
100°C
ABS / PLA / Wood / Nylon
110V/220V AC, 50/60Hz
~400$
Unboxing
The printer comes in a huge 15kg package. Once opened, the box contains two layers of mini foam boxes. These boxes contain all the parts you need to get your i3 Mega up and running. Everything inside is very well protected and packed. Nothing arrived scratched or damaged.
What I really loved is that AnyCubic provides not only a 1kg roll of PLA filament but also spare parts. Incredible. I am so pleased that they included an extra limited switch, gloves, spatula for removing the prints, but also bunch of tools you’ll need to assemble or disassemble the printer. One of my favorite things added is a spare hotend.
The manufacturer paid special care that you have parts in case something brakes, so you’ll have zero investments if some of these things stopped working.
So what’s exactly inside the box?
- 1x AnyCubic i3 Mega base
- 1x AnyCubic i3 Mega frame
- 1x 1k test PLA filament (random color)
- 1x quick start guide
- 1x SD card reader
- 1x 8GB SD card
- 1x USB cable
- 1x spare hotend
- 1x spare endstop
- 1x spool holder
- 1x power cord
- 1x tool set
- 1x tweezer
- 1x pillar
- 10x screws
- 1x scrapper
- 1x glove
Personally I was quite surprised to see some of the tools included such as tweezers (useful for removing extra filament from the nozzle), scrappers (extremely handy when removing printed objects from a surface) and glove (not much useful, but you’ll look like a doc while operating your 3d printer).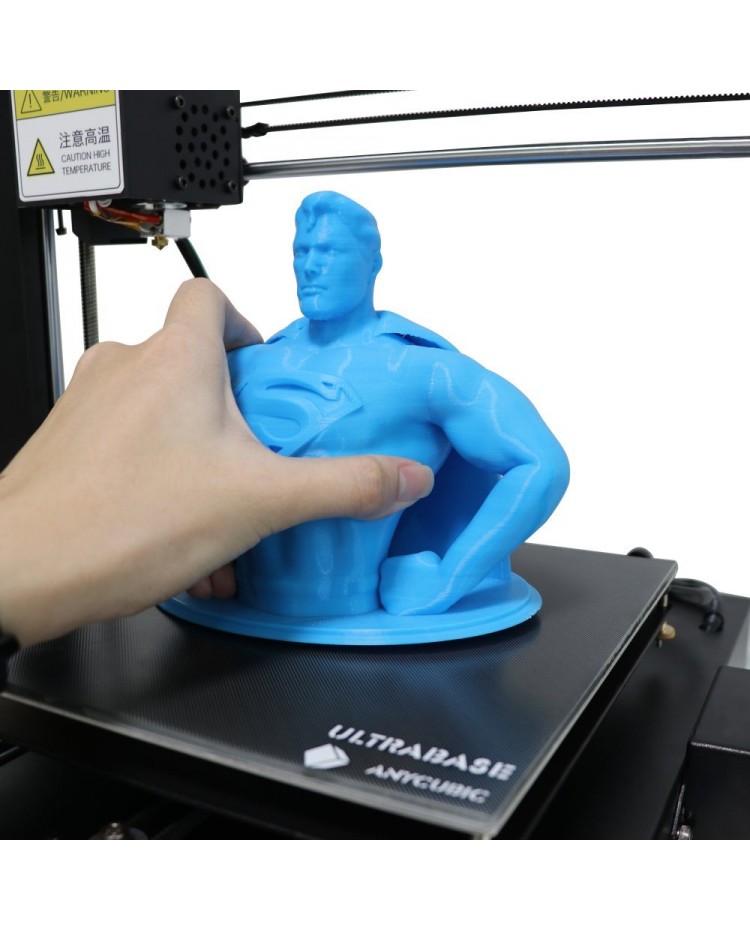
Assembly
The best thing about the AnyCubic i3 Mega printer is that it arrives nearly fully assembled. There are few minor things you’re required to do, which, depending on your previous experience with 3D printers might take from 10 to 25 minutes.
Assembling the printer
First thing first, you should check if all the parts are there. Upon checking, you need to assemble the Z carriage onto the base. There are only 8 screws to screw, and you assembled the printer.
Onto an SD card which came with the printer, you’ll find assembly instructions in PDF. Besides that, AnyCubic has a video guide on how to get your i3 Mega up and running.
Wiring
Even though this part may sound scary, wiring the AnyCubic i3 Mega basically means put the 3 cables into the proper connection.
The problem I had with the cables is that mine were not labeled. So I just had to figure out myself which is which, but that’s not hard at all. Speaking of wiring, the cable management is excellent. All the cables are tidy and neatly secured and the printer looks very clean.
Besides the 3 wires, you also need to put AC cable into your printer. Once connected, you can turn the printer on.
Bed-leveling
An essential thing in 3D printing is learning how to properly level your heat-bed. i3 Mega has an auto-leveling sensor already installed, which makes the whole process a bit faster, though the manual leveling isn’t hard either.
Software adjustment
In order to 3D print an object, you’ll have to “translate” the 3D model into a code that a 3D printer understands – G.code. Software which handles the “translation” is called a slicer. There are tons of 3D slicing software on the web. I’ve always used Cura, it’s free and it worked well for me so far.
On the micro SD card you’ll find the Cura software. The version provided in an SD card is quite outdated 15.04.06. This is something I did not quite like, so later on, I tried with the newest Cura 2. 6.1 but I was unable to make my prints work, though I must admit I did not invest much effort into it.
To summarize, AnyCubic I3 Mega works great with supplied slicer – Cura 15.04.06 if you follow the software setup instructions carefully. Making it work with never Cura versions requires some modifications I yet have to figure out.
In this paragraph, I will not talk much about how to configure Cura software, since the instructions manual covers that pretty well.
After adjusting your software you’re ready to print.
AnyCubic i3 Mega: Design and Build quality
After closer inspection of the printer, it was obvious that one of the biggest strengths of the printer will be – well the strength. In other words, i3 Mega is quite rigid, stable and well-engineered machine. It does not feel or look cheap at all. All the wiring inside and on the outside has been well made as well.
The only part of the whole pack, I did not like, is the stick for the filament roll, which is quite bigger than it should be. Well you can always 3D print a replacement for this one, or just put a marker or a pen instead.
Print quality
When you have everything set, initialize a print from a memory card or a PC (depending on if you’re having a 3D printer as an offline device or connected to the PC). Instructions on how to start print can be found in the instruction manual.
On the card, there’s a test file which already has been sliced so you can print even before you
First Print
On the card, there’s a test file which already has been sliced so you can print even before you adjust the software, right after you’re done with leveling the bed. This first print turned out pretty good though some slight overhangs can be found on the top. But for 0.2 resolution, I’m satisfied with how it turned out.
Printing PLA on AnyCubic i3 Mega 3D printer.PLA
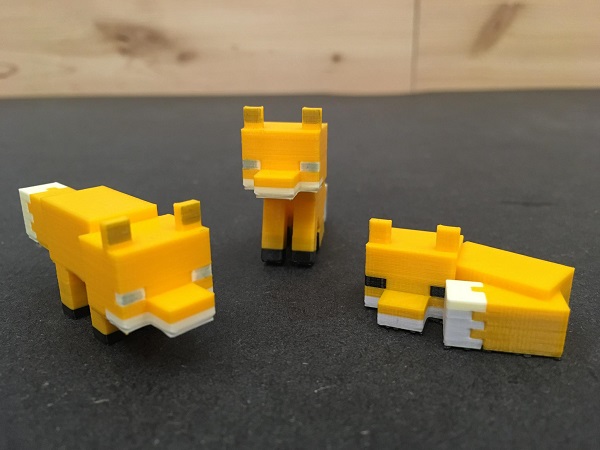
After printing some of the less challenging stuff and calibration objects, I decided to put the printer to a real test. Hollow Darudi is considered to be quite hard to print figure, especially because it’s printer without any supports.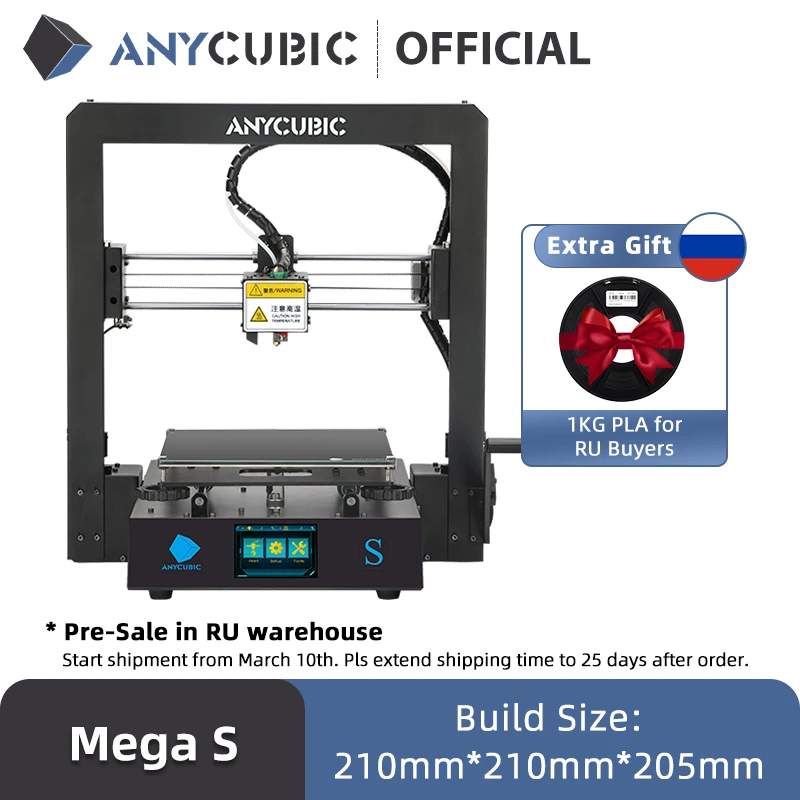 I was quite skeptical, but the print turned out great. I was impressed with the way i3 Mega handled such a complicated figure.
Next, I decided it’s time to print some upgrades for one of my 3D printers from Anet series.
I also 3d printed a frame which resembles the famous Wayfarer from Ray-Ban. You can download the STL file here.
PETG
PETG is a material which melts at a higher temperature compared to PLA. It’s slightly gloosier and easier to bend. In order to sucessfully print PETG, you’d have to put the hotend temperaure to 230-240 °C and slow down the printing speed slighty.
I used the 235 °C and 70 °C for the heated bed, and 30mm/s speed. All other settings were the same as in the instruction manual. Results were great. However the adhesion of the PETG is even stronger, so was very hard for me to remove the objects from the heated bed. Below you can see some of the PETG prints I made.
Here’s the link to the PETG filament I used in this test. I am very satisfied with how it worked and would recommend it.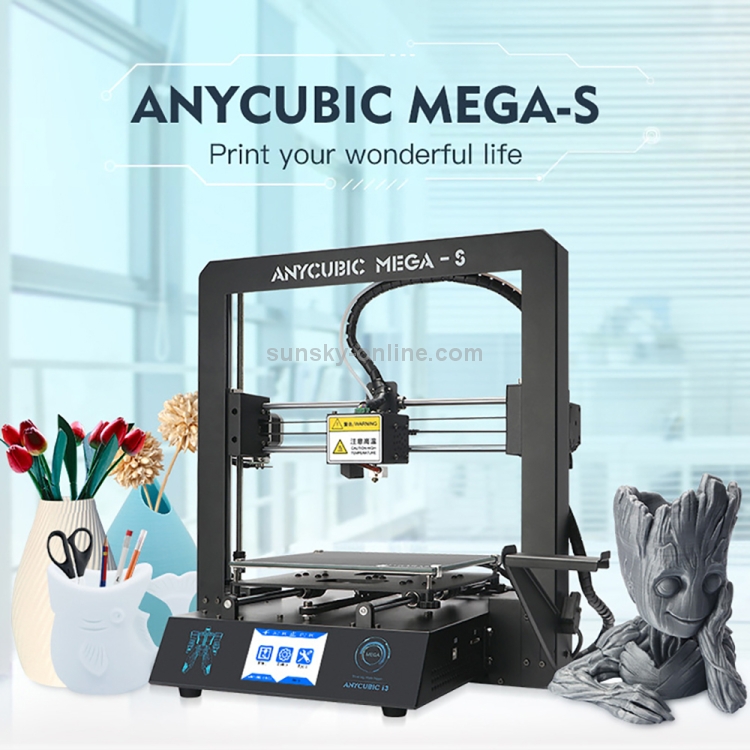
WOOD
The wooden filament is not 100% wood. It’s actually a mixture of some wooden elements and the PLA. It prints the same way as the PLA. This was my first experience with wood filament and I was shocked with how well the prints turned out. I used the same recommended settings and in my opinion wooden figures turned out better. This is probably because the temperature was about right for this type of filament.
Benchy, Calibration cube and MarvinThe only complaint I have when it comes to how wooden filament works with AnyCubic i3 mega is adhesion. Again, it was very hard to remove the figures from the build plate and since the wooden filament is slightly softer compared to the PLA I used, the damages caused by the spatula are obvious on first few layers. This is quite visible on the calibration cube and the Marvin leg.
Benchy 3D 3D MarvinLike most of the 3d printing enthusiasts printing with wooden filament, I wanted to print out a Baby Groot, a fictional superhero appearing in the Guardians of the Galaxy. The print came out amazing, even though I re-scaled its size it down by 60%. The figure was printed in whole, not in parts, with no supports.
I used this wooden 3D filament and I highly recommend it.
FLEXIBLE (TPU)
Quite honestly, I did not expect flexible filament can be printed on this printer. The reason for this is a Bowden setup which printer uses. The rule with cheaper 3d printers is that if a 3D printer has a Bowden extruder, it will either not be able to print TPU, or it would require modifications.
Benchy – printed with Flexible filamentWithout much hope I put the Flexible filament into an extruder. I was shocked when it began printing without issues. I realized that AnyCubic i3 Mega can print flexible filament with no modifications, right out of the box. There were no jams.
The particular flexible filament I used is SainSmart TPU 1.75mm.The end results were quite good. There was some stringing on the figures, but usually strings like that are normal for TPU filaments. I’m sure though that it can be reduced by tweaking settings.
In order to print the flexible filament, you’d have to adjust the hotend temperature (for the filament I used, temp range is 200-220°C). Additionally it is recommended to reduce the printing speed. I set my printer to 10 mm/s for these models.
User interface and navigation
You might not know, but on this site, we also test action cameras. We love user-friendly action cameras with an LCD screen. This is my first 3D printer which has a touch screen navigation. I must admit it’s quite simple and easy to use. Just like with tiny action cameras, the touch screen helps a lot.
My only complaint is that an LCD screen is not the most responsive one, so sometimes you’d have to put more pressure or press twice.
As far as the navigation goes, the design of the interface is simple and it won’t take long before you get used to it.
From the user perspective, i3 Mega is the remarkably user-orientated 3D printer.
New Ultrabase AnyCubic i3 Mega
As I was finishing this review, AnyCubic released the upgraded version of the i3 Mega called AnyCubic i3 Ultrabase. It is absolutely the same printer, but it has an improved hotbed and has no auto-leveling sensor. They also moved the filament sensor, which is a big plus. Basically with ultrabase edition they solved some of the issues.
The AnyCubic i3 Mega ultrabase can’t be easily found online under that name. The reason for this is because they want to replace i3 Mega with i3 Mega Ultrabase. It is possible that even if you buy the regular Mega, you’d get an Ultrabase, but to be on a safe side just ask the seller you’re buying from if it says Ultrabase on the heated bed.
Here are some stores where you can find AnyCubic i3 Mega Updated Ultrabase version
UPDATE : The ultrabase platform is now sold separately as well, so the previous version owners can easily upgrade. You can check it out here.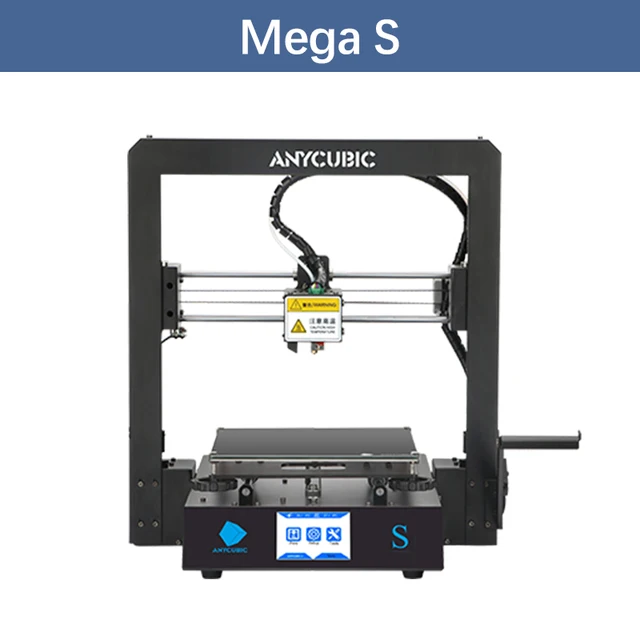
AnyCubic i3 Mega: Final thoughts
If I could describe this printer in a single world, that would be – reliability. From the moment I unboxed it I haven’t had a single major problem with printing, which was not the case with my previous 3d printers.
I am really impressed with the metal frame which makes the whole printer quite stable. It works right out of the box, it’s very easy and fast to assemble it. The instruction manual was quite good, though I think they should make a video about auto-leveling as well. Furthermore, I’m impressed with the cable management and features like filament, auto-leveling and outage sensor.
One thing that I really did not like sort of a BuildTak surface the printer has. Even though it makes layer adhesion work remarkably, it’s sometimes extremely hard to remove the printed objects from it. If I would have to nit-pick, the spool holder could have been better and if I was a designer of the printer, I would’ve put the filament sensor onto a printer, not on the filament holder.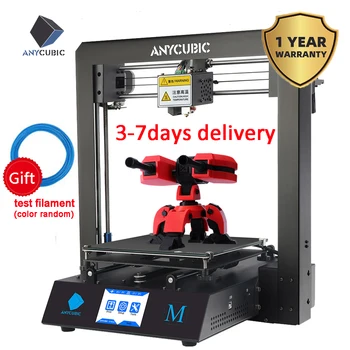
Personally, the build volume of the printer might be an issue for some, though personally for me it was more than enough. Recently large print volume appears to be a trend, so i3 Mega is slightly smaller than some of the competitor printers which appeared on the market in similar price range.
Pros
- Stable, rigid and firm build quality
- Easy to assemble
- Great print quality out of the box
- Prints multiple materials without any issue
- Easy to swap between filaments
- Bunch of spare parts included
- Resume from outage, auto-leveling and filament sensor are great features
- Very good and concise user manual
- Extremely easy user navigation thanks to a touch-screen and minimalist user interface design
- Good cable management
Cons
- BuildTak surface makes printed objects very hard to remove from the heated bed. Causes breakages of the figures in some cases.
- Not the most silent printer out there
- Touch-screen is not always responsive
- Filament sensor sometimes gives warnings on low filament level when turned on, even though the filament is loaded.
- Filament sensor position should be on the printer, not on the spool holder (there’s a 3D printable upgrade which solves this)
In conclusion, I wholeheartedly recommend AnyCubic i3 Mega as an extremely well-made, mid-range 3D printer. If you are a complete newbie who can spend around 350$ for this printer, I really think you’ll be satisfied. However, if it’s a bit over your budget, take a look at some of other cheap 3d printers we reviewed. I am quite happy with the printer and I already have plenty of fun projects in mind.
Where to buy AnyCubic i3 Mega?
Here are some reputable stores which sell AnyCubic i3 Mega
V5 J-head Hotend Kit Extruder Hot end 0.4mm 3D printer for Anycubic I3 Mega in Georgievsk
1 offer
- 2. Get offers from sellers.
- 3. Choose the most favorable purchase condition.
Payment and delivery
Payment
Cash upon receipt
Payment by card online
Credit or installment plan
Cashless payment
Delivery
from the seller’s warehouse
Aptory
Warranty
The exact warranty periods are described in the characteristics of the product
Exchange/Return
Exchange/Return of the Goods within 14 days
Video
Opinion on the 3D printer Anycubic i3 Mega S.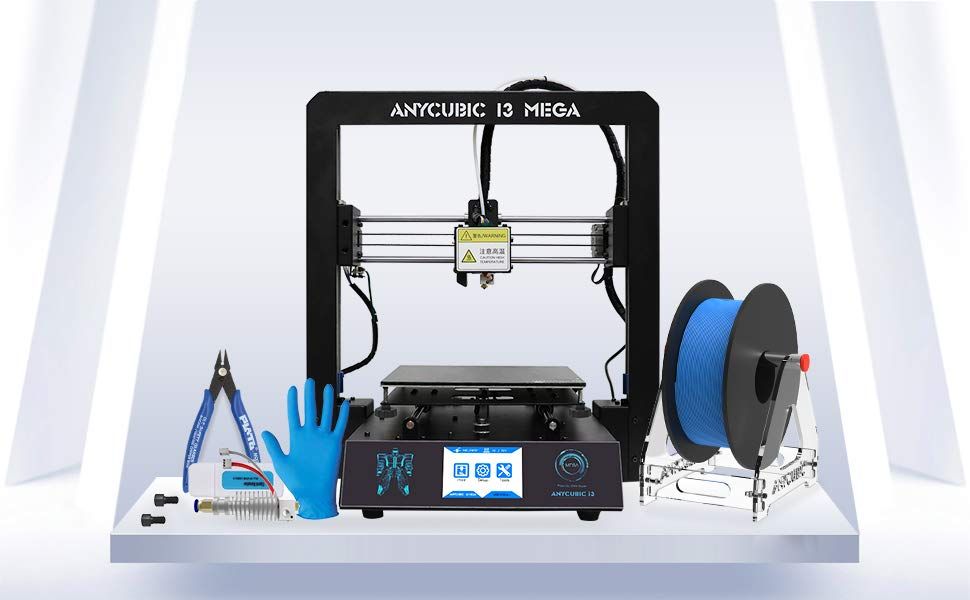
Anycubic i3 mega S 3D printer opinion after a year of use
PT6M58Strue
Anycubic i3 mega S 3D printer opinion after a year of use
THE BEST 3D PRINTER WITH ANYCUBIC I3 MEGA TOUCHSCREEN. COMPETITION
BEST 3D PRINTER WITH ANYCUBIC I3 MEGA TOUCHSCREEN. COMPETITION
PT6M58Strue
BEST ANYCUBIC I3 MEGA TOUCHSCREEN 3D PRINTER. COMPETITION
Review and assembly of ANYCUBIC i3 Mega 3D printer
Review and assembly of ANYCUBIC i3 Mega 3D printer
PT6M58Strue
Review and assembly of ANYCUBIC i3 Mega 3D printer
Review Any0cubic0 Mega3 9 Review Any0cubic0 Mega3
PT6M58Strue
Review Anycubic Mega X
Anycubic i3 Mega - EXTRUDER CALIBRATION for ACCURATE PLASTIC STRAND feeding!
Anycubic i3 Mega - EXTRUDER CALIBRATION for ACCURATE PLASTIC ROD feeding!
PT6M58Strue
Anycubic i3 Mega - EXTRUDER CALIBRATION for ACCURATE PLASTIC ROD feeding!
Anycubic Mega S, deep upgrade.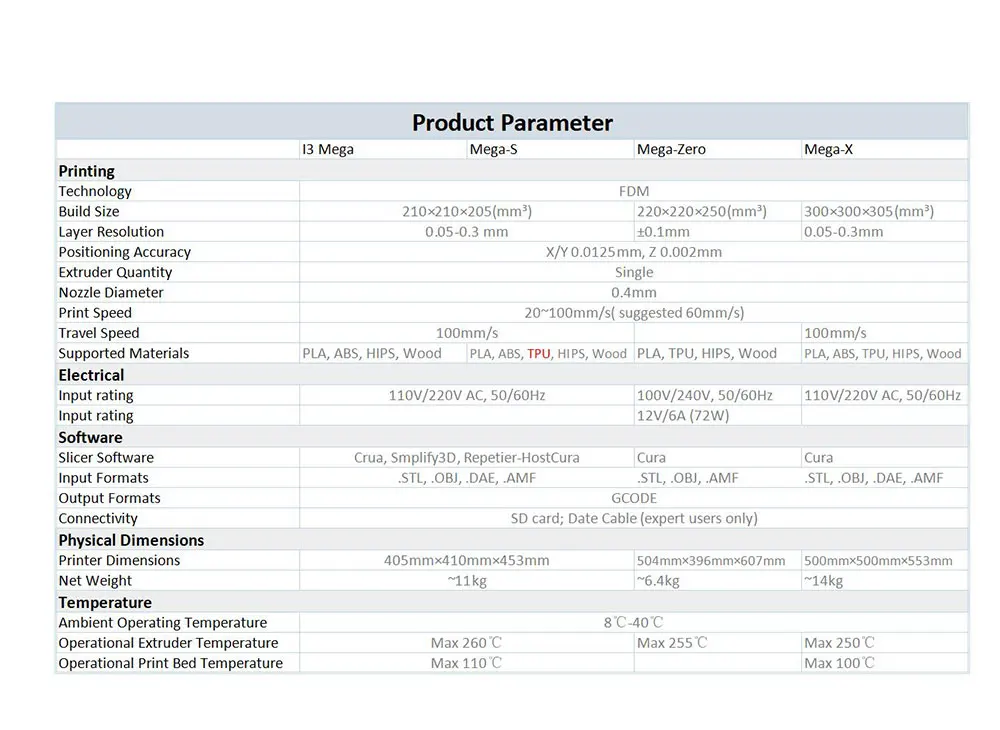 Part 2. Vneshka. BTT TFT V3.0 a story about all the possibilities.
Anycubic Mega S, deep upgrade. Part 2. Vneshka. BTT TFT V3.0 a story about all the possibilities.
PT6M58Strue
Anycubic Mega S deep upgrade. Part 2. Vneshka. BTT TFT V3.0 a story about all the possibilities.
replacement of ANYCUBIC I3 MeGA
replacement of Hothenda on Anycubic i3 Mega
PT6M58STRUE
Replacing the ANYCUBIC I3 MEGA
We insulate the new plastic bushes on the 3D printer Anycubic I3 MEGA sleeves for 3D printer Anycubic i3 mega
PT6M58Strue
We insulate the table and put new plastic bushings on the Anycubic i3 mega 3D printer
Review of the AnyCubic Mega-S 3D printer through the eyes of a kettle
Review of the AnyCubic Mega-S 3D printer through the eyes of a kettle kettle
[Obsolete] All about 3D printer extruders.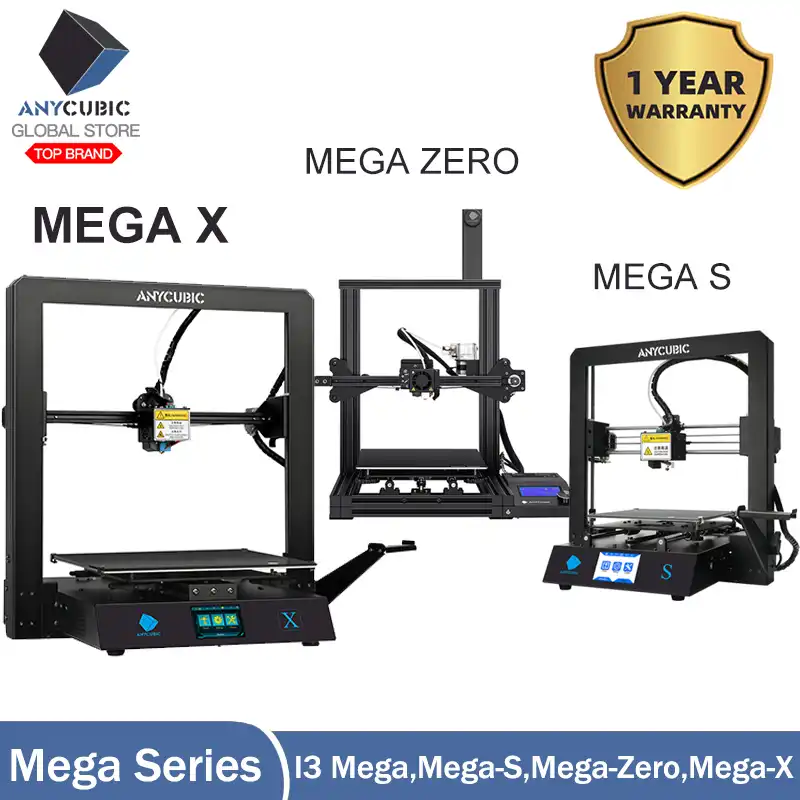 Working principle, problem solving, assembly instructions.
[Obsolete] All about 3D printer extruders. Working principle, problem solving, assembly instructions.
PT6M58Strue
[Deprecated] All about 3D printer extruders. Working principle, problem solving, assembly instructions.
Unboxing, first impression and 3D printing experience. Anycubic i3 Mega. Tips for 3D printing.
Unboxing, first impression and 3D printing experience. Anycubic i3 Mega. Tips for 3D printing.
PT6M58Strue
Unboxing, first impressions and 3D printing experience. Anycubic i3 Mega. Tips for 3D printing.
AnyCubic Mega-S print cart openers + cooling system upgrade. (replacement fan)
AnyCubic Mega-S print cart openers + cooling system upgrade.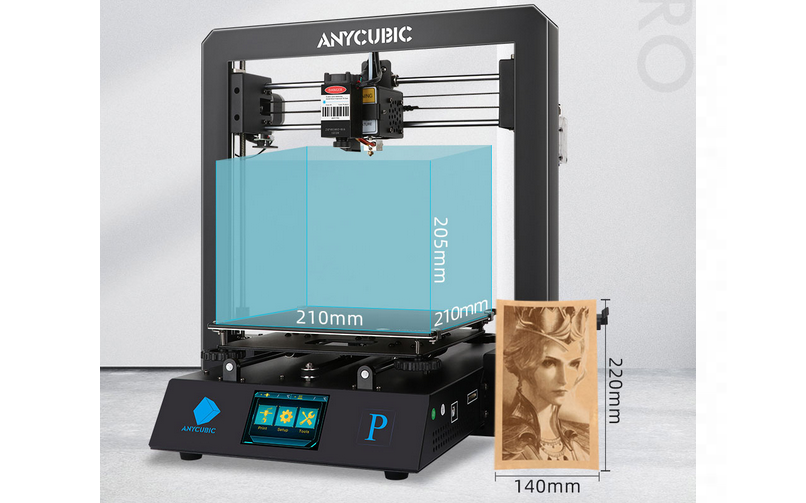 (fan replacement)
PT6M58Strue
AnyCubic Mega-S print cart openers + cooling system upgrade. (fan replacement)
Anycubic I3 Mega/Mega S disassembly and installation of the extruder
Anycubic I3 Mega/Mega S disassembly and installation of the extruder
PT6M58Strue
Anycubic I3 Mega/Mega S disassembly and installation of the extruder
If the hot end is leaking. Solving 3d printing problems.
If the hot end is leaking. Solving 3d printing problems.
PT6M58Strue
If the hot end is leaking. Solving 3d printing problems.
Anycubic i3 mega - A TOTAL UPGRADE OF A KILLED PRINTER! MUTE!
Anycubic i3 mega - A TOTAL UPGRADE OF A KILLED PRINTER! MUTE!
PT6M58Strue
Anycubic i3 mega - A TOTAL UPGRADE OF A KILLED PRINTER! MUTE!
Upgrade hot end Anycubic i3 mega (part 3)
Upgrade hot end Anycubic i3 mega (part 3)
PT6M58Strue
Upgrade hot end Anycubic i3 mega (part 3) X-Carriage MK3
Anycubic i3 Mega-S 3D Printer Hot End Heatsink with X-Carriage MK3 Head
PT6M58Strue
Anycubic i3 Mega-S 3D Printer Hot End Heatsink with X-Carriage MK3 Head
- 1.
 Click “I want to buy”.
 - 2. Get offers from sellers.
- 3. Choose the most favorable purchase condition.
Payment and delivery
Payment
Cash upon receipt of
Payment by card online
Credit or installment plan
Consumer Calculation
from the seller’s warehouse 9000 item
Exchange/Return
Exchange/Return of goods within 14 days
Video
Opinion on the 3D printer Anycubic i3 MEGA S after using
Opinion on the 3D printer Anycubic i3 Mega S after using
PT6M58STRUEE
Opinion about the Anycubic i3 mega S 3D printer after a year of use
THE BEST 3D PRINTER WITH ANYCUBIC I3 MEGA TOUCHSCREEN. COMPETITION
BEST 3D PRINTER WITH ANYCUBIC I3 MEGA TOUCHSCREEN. COMPETITION
Anycubic i3 Mega - EXTRUDER CALIBRATION for ACCURATE PLASTIC ROD feeding!
PT6M58Strue
Anycubic i3 Mega - EXTRUDER CALIBRATION for ACCURATE PLASTIC ROD feeding!
Anycubic Mega S, deep upgrade.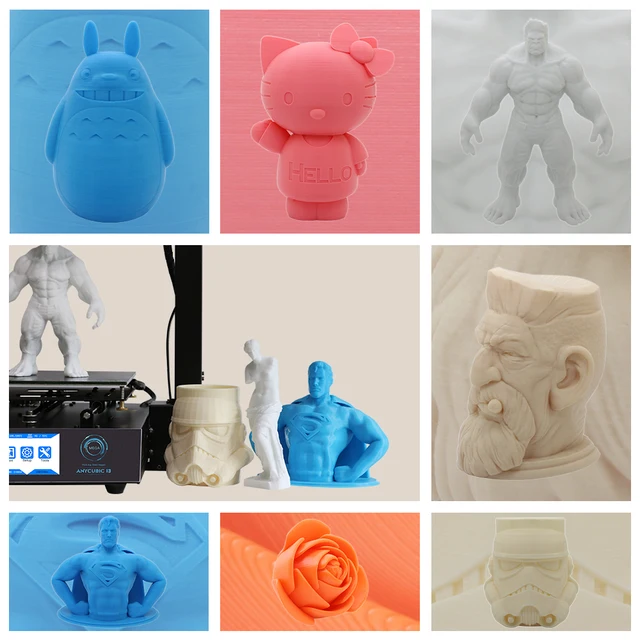 Part 2. Vneshka. BTT TFT V3.0 a story about all the possibilities.
Anycubic Mega S, deep upgrade. Part 2. Vneshka. BTT TFT V3.0 a story about all the possibilities.
PT6M58Strue
Anycubic Mega S deep upgrade. Part 2. Vneshka. BTT TFT V3.0 a story about all the possibilities.
replacement of ANYCUBIC I3 MeGA
replacement of Hottend on Anycubic i3 Mega
PT6M58STRUE
Replacing the ANYCUBIC I3 MEGA
We insulate the new plastic bushes on the 3D printer Anycubic I3 MEGA bushings for the 3D printer Anycubic i3 mega
PT6M58Strue
We insulate the table and put new plastic bushings on the 3D printer Anycubic i3 mega
Review of the 3D printer AnyCubic Mega-S through the eyes of a teapot
Review of AnyCubic Mega-S 3D printer through the eyes of a kettle
PT6M58Strue
Review of AnyCubic Mega-S 3D printer through the eyes of a kettle
[Obsolete] All about 3D printer extruders. Working principle, problem solving, assembly instructions.
[Obsolete] All about 3D printer extruders. Working principle, problem solving, assembly instructions.
PT6M58Strue
[Deprecated] All about 3D printer extruders. Working principle, problem solving, assembly instructions.
Unboxing, first impressions and 3D printing experience. Anycubic i3 Mega. Tips for 3D printing.
Unboxing, first impression and 3D printing experience. Anycubic i3 Mega. Tips for 3D printing.
PT6M58Strue
Unboxing, first impressions and 3D printing experience. Anycubic i3 Mega. Tips for 3D printing.
AnyCubic Mega-S print cart openers + cooling system upgrade. (replacement fan)
AnyCubic Mega-S print cart openers + cooling system upgrade. (fan replacement)
PT6M58Strue
AnyCubic Mega-S print cart openers + cooling system upgrade. (fan replacement)
Anycubic I3 Mega/Mega S disassembly and installation of the extruder
Anycubic I3 Mega/Mega S disassembly and installation of the extruder
PT6M58Strue
Anycubic I3 Mega/Mega S disassembly and installation of the extruder
Solving 3d printing problems.
If the hot end is leaking. Solving 3d printing problems.
PT6M58Strue
If the hot end is leaking. Solving 3d printing problems.
Anycubic i3 mega - A TOTAL UPGRADE OF A KILLED PRINTER! MUTE!
Anycubic i3 mega - A TOTAL UPGRADE OF A KILLED PRINTER! MUTE!
PT6M58Strue
Anycubic i3 mega - A TOTAL UPGRADE OF A KILLED PRINTER! MUTE!
Upgrade hot end Anycubic i3 mega (part 3)
Upgrade hot end Anycubic i3 mega (part 3)
PT6M58Strue
Upgrade of Anycubic i3 mega hotend (part 3)
Anycubic i3 Mega-S hotend heatsink light with X-Carriage MK3 head
Anycubic i3 Mega-S hotend heatsink light with X-Carriage MK3 head
9008Strue 3Heatsink light for Anycubic i3 Mega-S hot end with X-Carriage MK3 head
Direct extruder on worm gear for ANYCUBIC I3 MEGA
Direct extruder on worm gear for ANYCUBIC I3 MEGA
Sales25 Date23.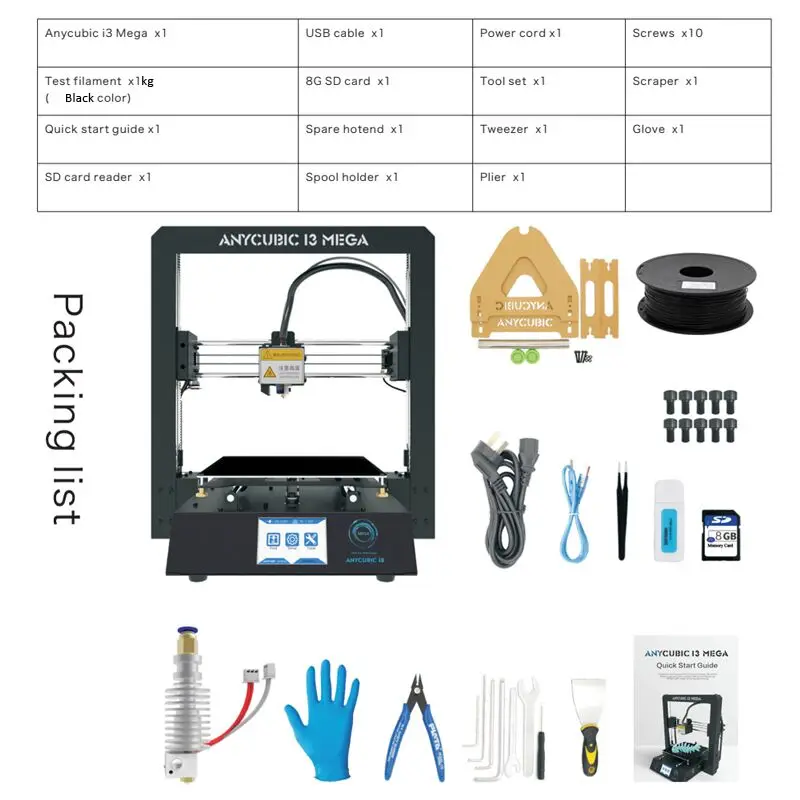 12.2019 Category3D Printers, Mega Series
The Anycubic i3 Mega is a 3D printer with a metal frame that comes semi-assembled. Assembly is simple and only takes a few minutes. The Anycubic i3 Mega 3D printer provides high quality printing. It supports multiple filament materials, including PLA, ABS, high impact polystyrene (HIPS), and wood.
23 000 ₽
Add to cart
quick view
i3 Mega S
Date27.12.2019 Category3D printers, Mega Series
Anycubic Mega S is a large FDM printer with a strong and rigid metal frame, reliable drive and modern design. The main advantage of the Mega S 3D printer is the Anycubic Ultrabase platform, which is dense, rigidly fixed and heated, which ensures high adhesion and printing accuracy.
23 000 ₽
Add to cart
quick view
Photon
Date27.12.2019 Category3D Printers, Photon Series
Anycubic Photon 3D printer is equipped with a full color touch screen with real-time print control.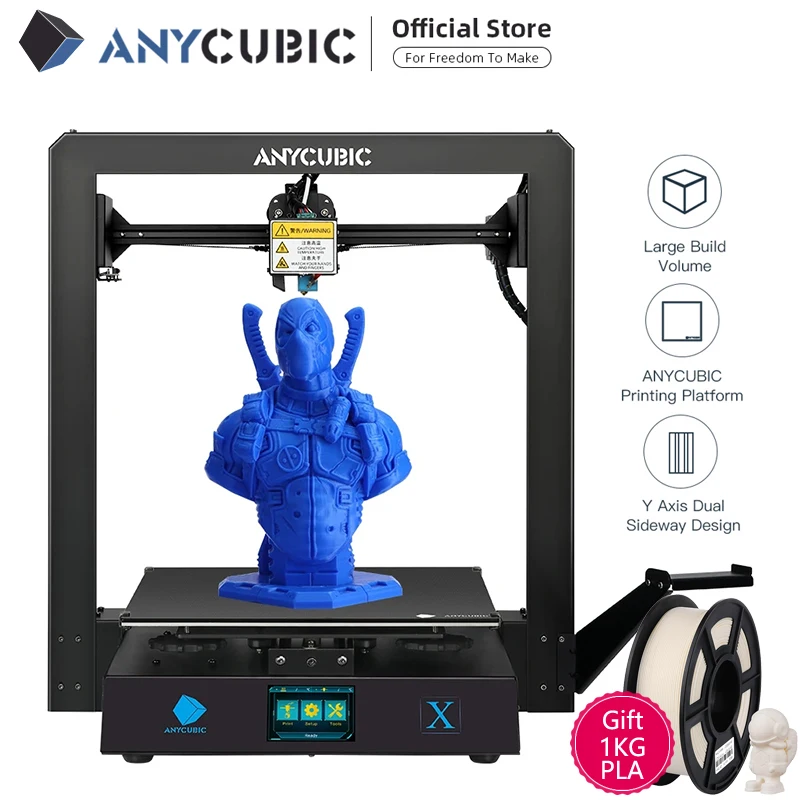 The Photon 3D printer has a 25W UV light source inside a steel capsule and is equipped with an 80x80mm heatsink.
32 000 ₽
Add to cart
quick view
Photon S
Date27.12.2019 Category3D printers, Photon Series
Anycubic Photon S 3D Printer is Anycubic's popular 3D printer, featuring large print area, high precision and useful features. The Anycubic Photon S is intended primarily for professional use.
32 000 ₽
Add to cart
quick view
4Max Pro
Sales2 Date27.12.2019 Category3D printers, 4Max Pro
The Anycubic 4Max Pro 3D printer is a large and powerful closed chamber FDM printer. It is worth noting the updated design, as well as the fact that the printer is fully assembled and ready to print: it does not need to be set up and calibrated, you can start printing immediately after unpacking.
39 000 ₽
Add to cart
quick view
Predator
Date27.