3D scanner for small objects
Your Guide to Choosing the Best 3D Scanner for Small Objects
Small components present particular challenges for measurement. Certain aspects of small parts contributing to these challenges include the fine level of detail required, the scale of dimensions and crevices between features, and the difficulty in setting up and positioning small objects.
If you'd like to skip to a specific section, click the section below to jump straight to it:
- Examples of Small Objects for 3D Scanning
- Budget vs. Functionality for 3D Scanners
- 3D Scanner Resolution & Quality
- 3D Scanning Versatility
- Scanning Sensor Repeatability & Precision
- 3D Scanning Ergonomics and Automation
- Handheld 3D Scanning
- Stationary Supports for 3D Scanners
- Semi and Full-Automation 3D Scanning
- Measuring Volume Options for 3D Scanners
Non-contact 3D scanning helps overcome these challenges by collecting complete measurement data, also known as full-field measurement data. Due to the ability to capture intricate details, 3D scanning is often used with smaller components such as:
• Mechanical components: often, in industrial settings, the ability to 3D scan objects gives a detailed, in-line measure of conformance to drawings and quality standards
• Jewelry: used in production, evaluation, modifications and repair
• Medical devices: due to their sensitive nature and small features, many medical devices make use of non-contact measurement and analysis in manufacturing and quality control settings
• Injection molded parts: these small, complex parts have tight tolerances, requiring the precise, accurate measurement results a metrology-grade 3D scanner delivers
While using a 3D scanner for small objects is a great way to capture fine details, not all 3D scanners are a good fit for this application. Sourcing the right 3D scanner for your purposes can be tricky, given the factors that must be considered when scanning smaller objects. In this article, we'll look at:
1. Budget & Quality Considerations
2. Handheld vs. Stationary vs. Automatic Scanners
3. Measuring Volume
Choosing the right budget for your 3D scanner is a key consideration. Inexpensive 3D scanners may work for hobbyists, but for applications requiring high data accuracy, it's crucial to invest in a high-quality 3D scanner to meet your requirements. There are specific factors that you should consider when choosing between a basic or high-quality 3D scanner.
Resolution & Quality
When selecting a 3D scanner, the first consideration is deciding the required level of detail you need to achieve based on the purpose of your scans.
• Low level: Maybe you just need a quick digital scan to create an image of an object for reference or presentation, and the details of the surfaces are not important. Capturing shapes, outlines and some rough dimensional measurements is the goal.
• Medium level: In many cases, the outline geometry plus dimensional accuracy will be enough to produce results for basic applications. Medium level resolution and quality allow some sizing and analysis and reveal defects at the edges of gross defects in a product.
• High level: Imperfections in surfaces and coating must be spotted and measured for metrology and quality control. The dimensional measurements are not only for outlining but must be precise and repeatable. Of course, this higher level of detail guides towards a different level of data quality than lower resolution 3D scanners.
Your specific application will dictate your requirements, with the level of detail and accuracy required having the most significant bearing on the cost of the system.
Versatility
Different scanners offer different levels of versatility in terms of applications, features, configurations, shapes, sizes and colors.
• Features: Budget scanners are great when you are just testing the water with 3D scanning.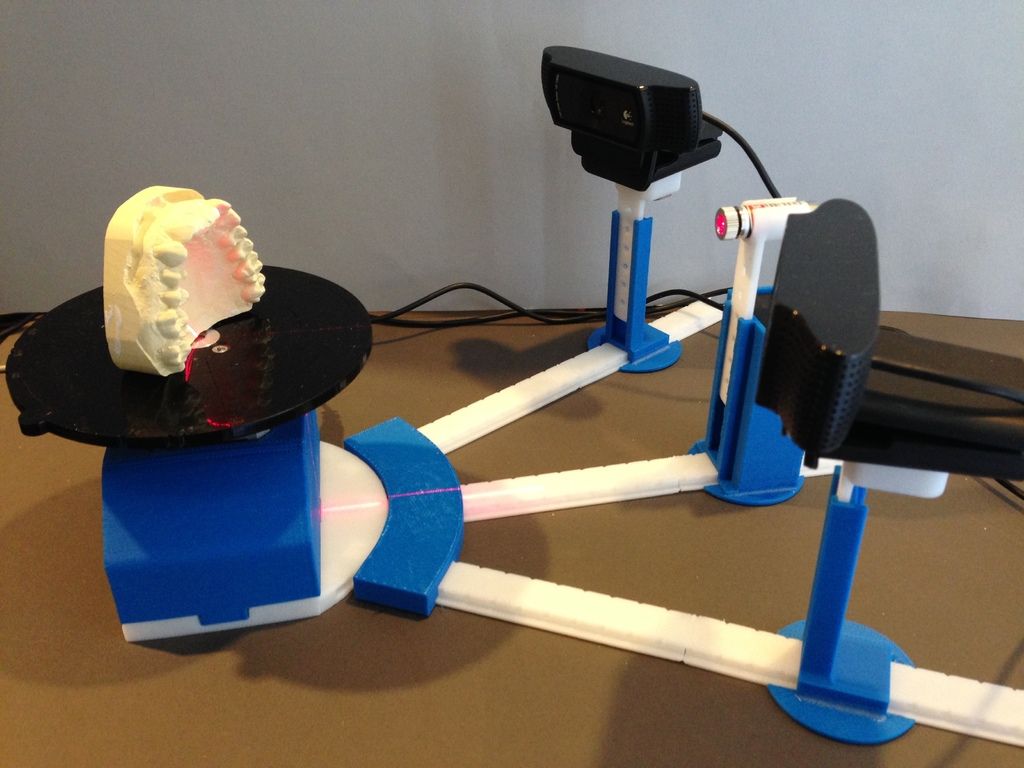 Handheld 3D scanners can be taken anywhere and offer a high degree of versatility and different applications. Higher-quality 3D scanners can be customized with automation to suit your application and increase throughput.
• Shapes and sizes: Many budget scanners can handle the basic scanning of large-scale objects such as construction connections, people or body parts, and large automotive components such as engine blocks. But they struggle with the smallest of objects in many instances. High-resolution stationary or automated 3D scanners are suitable for the smallest of objects with a high degree of customization on detailed sections, features, and measurements critical to quality control.
• Color and surface type: Many low-end 3D scanning systems will struggle with shiny or translucent materials. Some 3D scanners require sprays, spots or other identifiers added to the surface of an object, but a high-quality 3D scanner captures precise details without having to modify the surface. The ability to capture data from challenging surfaces is especially important for high-value components, where modifications or witness marks on surfaces are out of the question (such as jewelry or medical components).
ATOS Q offers the industry-leading standard for versatility and precision. This blue light 3D scanner captures high-definition, accurate and reliable data from objects of all sizes. Ideal for engineering, R&D and manufacturing, the ATOS Q is lightweight and portable (weighing only 4kg) and can be configured for manual or automated use.
Repeatability & Precision
The data quality your 3D scanner captures is impacted by how easily it is influenced by environmental disturbances during data acquisition. One example of an environmental disturbance that affects the quality of your measurement results comes from vibrations through the platform (or surface) upon which the component or 3D scanner is placed. A higher level of specification in your 3D scanner helps to reduce the vibration but also makes it more capable of filtering out disturbances.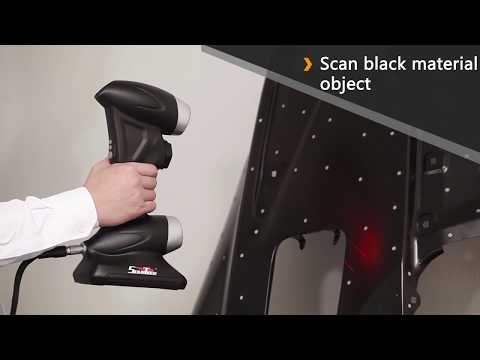
Budget devices can be useful for taking quick, partial scans of surfaces and shapes for contour analysis. In many quality control applications, the measurement process itself must be calibrated (or validated) and cannot vary, so an automated or semi-automated process of positioning and scanning is necessary. Where repeatability is required, the external vibrations and variations will require clamping in place, with precise, repeatable paths and movements of the 3D scanner.
GOM Scan 1 utilizes a stereo camera principle, allowing the sensor to recognize vibrations or disturbances during scanning. The 3D scanner compensates for the variation during scanning to produce a consistent result, regardless of the environment.
Choosing Stationary vs. Automated vs. Handheld for Small Objects
The type of positioning and support of the object you are trying to measure greatly affects the results your 3D scanner collects. There are three basic types of 3D scanning configurations to choose from:
1. Handheld
2. Stationary
3. Automation/Semi-automation
Handheld
Handheld scanners are great for objects like people and their features, cars and automotive components. Low-quality handheld scanners are notorious for losing their position during a scan (especially going around a corner). This issue results in the user having to stitch two scans together or restart the entire scan again.
High-quality handheld 3D scanners produce metrology-grade inspection data with no custom setups or platforms required for the object. The ZEISS T-SCAN hawk is an excellent example of a precision handheld scanner that can be taken anywhere and can switch between scanning modes at the touch of a button. This handheld 3D scanner also rapidly feeds your measurement data into GOM Software for analysis. Handheld scanners are the most portable 3D scanning option available. These can be easily taken outside for fieldwork in the open air. They are relatively easy to transport in a bag or case (compared to some larger and more built-in solutions).
Stationary
Stationary 3D scanners hold the scanner in position, and the object rotates in front of it using a turn table. This setup can be more repeatable than scans from handheld scanners, as the object's movement is in one plane (rotation around a central axis), which leads to fewer opportunities for error.
Scans produced from stationary scanners are usually far superior to handheld scanners due to the control of the movement, resulting in finer details and higher resolution. Stationary scanners are larger than handheld units but are more portable than automated systems.
GOM Scan 1 is excellent for use as a stationary scanner. This highly portable 3D scanner is lightweight and provides industry-leading precision. Highly suitable for many small and medium-sized applications, GOM Scan 1 is a reliable tool for reverse engineering, quality control, research, art, 3D printing and more.
Automated and Semi-Automated
When using an automated 3D scanner, the object is held in place, and the relative movement of the scanner or the object (or both) is controlled by the system itself. The object can be passed in front of the scanner at different angles using different paths to precisely control the speed and motion. This highly repeatable process can be finely tuned for precise details on small components. This advantage is especially important for quality control environments where repeated measurements are compared over time for drift or changes from a baseline. These units generally take up more space than handheld or stationary scanners and aren't meant to be used as a portable solution. Automated 3D scanners are usually larger and require more preparation for moving or transporting to new locations due to their size and layout. Semi-automated systems work similarly to automated systems, but the scanning or the rotation is somewhat manual, requiring the user to rotate the platform or otherwise interact with the system to create a scan.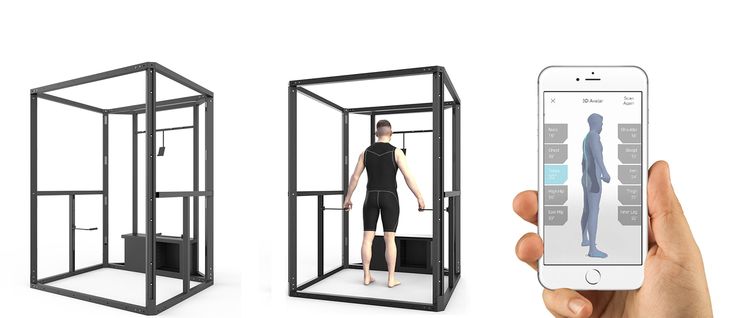
Measuring volume is an important factor when considering the best scanner for your application. Point clouds are the collection of individual points in space captured during a scan. These points in space are the boundaries of the object and its surface. The 3D scanning software uses these points to render the object's surface and create the digitized representation of the object that we see in the finished scan image.
Resolution is the distance between two points, with a lower distance between points giving richer detail in the end result. A greater number of points collected (a higher measuring volume) leads to higher resolution data. A high measuring volume and resolution are especially important when dealing with smaller objects because the ratio of the part's dimensions to the distance between the measurement point is much closer.
Higher measuring volume leads to more detailed data capture but also leads to large file sizes and slower rendering times. This problem is resolved when working with an advanced 3D metrology software solution such as GOM Software.
At the highest end of industry performance, ATOS 5 offers point-spacing down to 0.0236mm (the distance between two points on a scan). A single pass of this scanner captures up to 12 million measurement data points in as fast as 0.2 seconds per scan.
Find the Best 3D Scanner for the Small Objects You Work With
Contact a CAPTURE 3D team member to help you find the best 3D scanner for the small objects you work with. CAPTURE 3D carries various 3D scanners for small objects to fit your specific application. Schedule a demo of our accurate 3D scanning solutions or get a proof-of-concept to understand the benefits our technology brings to your components.
3D Scanners: What Are the Best Available Low-Cost Solutions?
Published on July 16, 2022 by Carlota V.
3D scanning is often used in the additive manufacturing (AM) sector to design a 3D model more easily than via modeling software. It captures data that is then transformed into a 3D model which can then be 3D printed. 3D scanners are based on two main technologies – laser triangulation and structured light – which will allow to obtain more or less precise details depending on the chosen device. Several affordable solutions, compared to professional scanners which are much more expensive, are available today to allow many users to bring their projects to life: whether you are a maker, a teacher or an industry leader, on of these low cost 3D scanners is bound to suit your needs! Easy to handle and transport, we have chosen some 3D scanners under $8,000 (€7,000), sorted by increasing price.
3D Scanner 2.0 from XYZprinting
Taiwanese manufacturer, XYZprinting, currently offers 5 scanners, though today we will focus on one of their more low-cost 3D scanners, the portable and high-resolution 3D Scanner 2.0. With a wider scanning range than its younger sibling the 1.0 A, the scanner can scan objects that are 5 x 5 x 5 ~ 100 x 100 x 200 cm using an Intel® RealSense™ Camera. The scan resolution is also superior to the 1. 0A, between 0.2 and 1.5 mm with an operating range ranging from 25 to 60 cm. The manufacturer also provides XYZScan Handy, a scanning and post-editing software to edit your models after scanning. The product is lightweight measuring 41 x 157 x 61 mm with a weight of 238 g. It is available from €199.
Structure Sensor from Occipital
The Structure Sensor solution adds precise 3D vision to your mobile device, enabling 3D scanning among other features. The only equipment you will need for this 3D scanner to work is an iPad, then once you have downloaded the app Skanect Pro, it will work instantly.
The new version of this device is smaller than the last, 109mm x 18mm x 24mm, and weighs about 65 g. It is recommended to use it on a 0.3 m to 5m scanning range. Some other features on this device include indoor mapping and virtual reality gaming! The Structure Sensor retails for $527, making it a low-cost scanner when compared to many other options.
POP 3D Scanner from Revopoint
The Revopoint POP is unique among 3D scanners as it has the distinction of being part of the highest crowdfunded campaign for a 3D scanner in Kickstarter, raising more than $2. 28 million USD. It was developed by Revopoint, a company founded in 2014 by a group of young doctors and researchers from MIT, Kent University and other higher education institutions when they decided to focus on developing easy-to-use and cost-effective 3D scanners. It is safe to say that they certainly succeeded with their POP 3D scanner.
A binocular structured light 3D scanner that uses infrared as its light source, the Revopoint POP is a full-color scanner with an accuracy of up to 0.3mm, texture scan and an 8Fps scanning speed. It has a number of interesting features, including the fact that it is easy to use outdoors because of it’s portable and can be powered by a power bank. With a cost of the scanner of only $549 in USA and about $599 in Europe, it is one of the most affordable options on our list, all while still being an effective, precise, high-resolution scanner. Not to mention, it can be used by a variety of users, as it supports four OS platforms – Windows, Android, Mac and iOS.
Creality CR-Scan 01
Known for its affordable desktop 3D printers, manufacturer Creality has also developed a low-cost 3D scanner, the CR-Scan 01. Weighing only 1.91 kilos, this portable scanner is easy to handle and offers a scanning area of 536 x 378 mm. You will be able to scan your objects with an accuracy of up to 0.1 mm and export them in stl or obj format. Several scanning modes are offered, either manual or on a turntable. It is currently available from 589 €.
SOL 3D Scanner from Scan Dimension
This scanner was developed by Scan Dimension, based in Denmark, and is essentially a hybrid solution. It uses a combination of laser triangulation and white light technology to 3D scan real-life objects. The SOL 3D scanner can provide a resolution of up to 0.1 mm. The 3D scanning process is automated and you can choose between a near and far scanning mode.
The SOL 3D scanner also includes software to simplify your entire workflow. In a few steps you will be sending your 3D model to your 3D printer.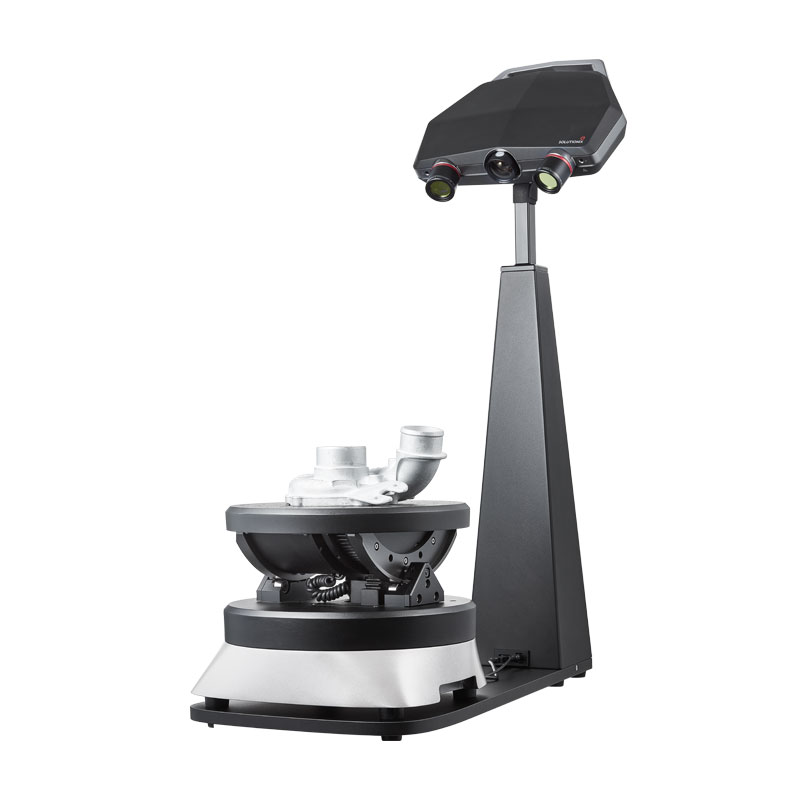 This is a solution meant for makers, hobbyists, educators and entrepreneurs who may not have the most experience with 3D scanners but still want to achieve great results with a relatively low cost. The SOL 3D scanner retails for $699.
V2 from Matter & Form
The Matter and Form 3D Scanner V2 is a desktop 3D scanning solution manufactured by Matter & Form, a company founded in 2013. This company has made it its mission to develop and distribute affordable, high-resolution 3D scanners. With the V2, it has achieved that mission: the 3D scanner is available from $750 and is capable of producing high-quality scans with an accuracy of up to 0.1 mm. It weighs 1.71 kilograms (3.77 lbs) and has a height of 35.5 cm (13.5 in) and a width of 21 cm (8.25 in). The slim and foldable design allows the device to fit on small desks. The V2 allows scanning of objects with a maximum height of 25 cm (9.8 in) and a diameter of 18 cm (7.0 in). Windows and Mac scan files are supported, with multiple export options for 3D printing as well.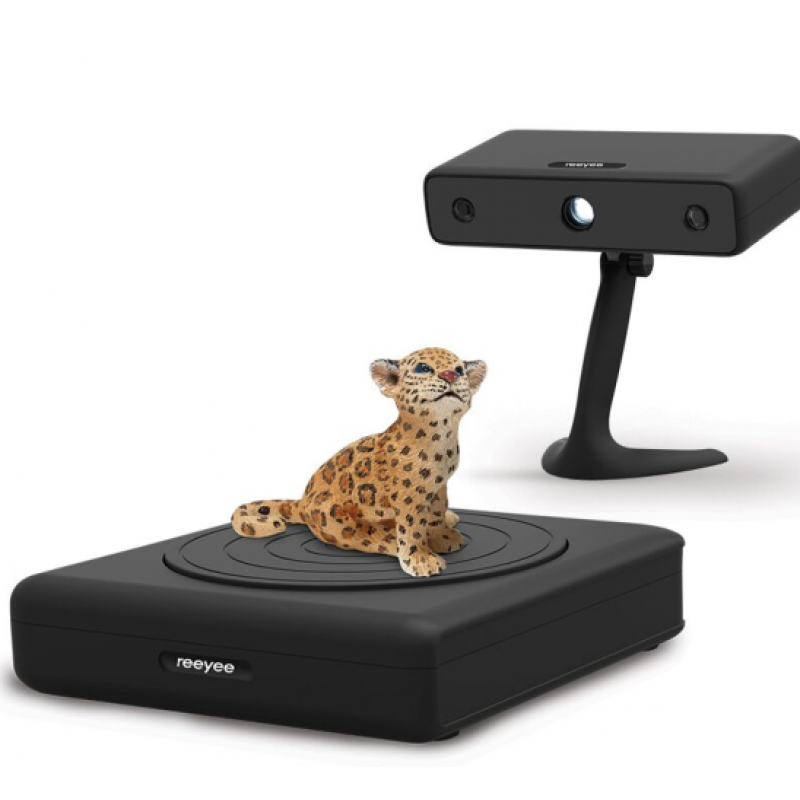
RangeVision NEO
The NEO 3D scanner from the manufacturer RangeVision is an entry-level device with two 2-megapixel cameras, which works using Structured Light Scanning (SLS) technology. With an automatic scan mode, the scanner is suitable for all those who have little experience in digitizing objects. The SLS-3D scanner can capture objects from 30mm to 1200mm with a precision of 0.05mm, with 3D scans created using RangeVision software. Also included is a turntable and tripod, which make scanning easier for the user. According to the manufacturer, the NEO’s scans are suitable for reverse engineering, 3D modeling, historic preservation and, of course, 3D printing. The RangeVision NEO is available from around €2,190, making it one of the few low cost desktop 3D scanners available.
Calibry, the low-cost 3D scanner, from Thor3D
Thor3D is a Russian manufacturer that is behind the Calibry portable 3D scanner. Based on structured light technology, it integrates a touch screen so that the user can follow the points it captures in real time. It offers accuracy down to 0.1 mm and is capable of scanning objects from 30 cm to 10 meters long. Black and glossy surfaces can be easily scanned and exported in stl, obj, ply or WRML formats. Finally, the Calibry is fast and convenient, capable of scanning up to 3 million points per second and weighing only 900 grams. It is available from 4,990 euros.
EINSCAN H from Shining 3D
The EinScan H is one of the most advanced versions of portable 3D scanners developed by the Chinese manufacturer Shining3D. Based on the hybrid structure light technology of LED and invisible infrared light, the EinScan H is able to perform human face scans more comfortably and without emitting strong light. It also incorporates a full-color camera and a large field of view for a truly impressive final quality of the models, ready for processing in just a few minutes. Its high resolution of 0.25 mm and data accuracy down to 0.05 mm make this a good choice in the market considering the price/performance ratio. In addition, it stands out for its light weight of almost 700g and intuitive user interface. The base price of this model is $5000 and you can get more information on the manufacturer’s website.
Eva Lite from Artec 3D
Artec 3D, based in Luxembourg, offers the Eva Lite as its cheapest option for 3D scanning. This professional scanner is specialized in the digitization of complex geometries, such as the human body, and is therefore increasingly used in the medical field. It works on the basis of structured light technology and, although it does not have the ability to capture colours and textures like most scanners of the brand, it has an accuracy of 0.5 mm.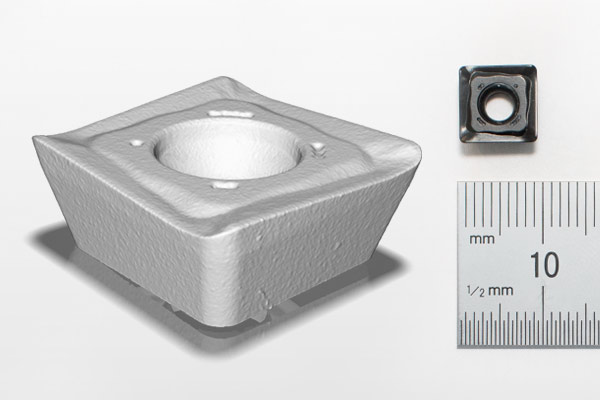
This 3D scanner works with the software package Artec Studio. Artec Studio is a powerful tool for an optimized 3D scanning process. This software is able to perform, assemble and repair 3D scans. It is currently available at a price of $9,800. You can find more information HERE.
Any other low cost 3D printing scanners you think should be on this list? Let us know in a comment below or on our Facebook and Twitter pages! And remember to sign up for our free weekly Newsletter, to get all the latest news in 3D printing send straight to your inbox! For more 3Dnatives articles about 3D scanners, click HERE.
90,000 technologies, methods and principles of 3D scanners04/16/2021
Content
-
- What is 3D scan and why it is used by
- How 3D scanner
- 3D scan technologies
- Methods 3D
- Contact 3D scanners
- Non-contact 3D scanners
- Types of 3D scanners according to the principle of use
- Advantages and disadvantages of 3D scanners
- Things to consider when choosing a 3D scanner
- Applications
Currently, few people are not familiar with such a concept as 3D printing.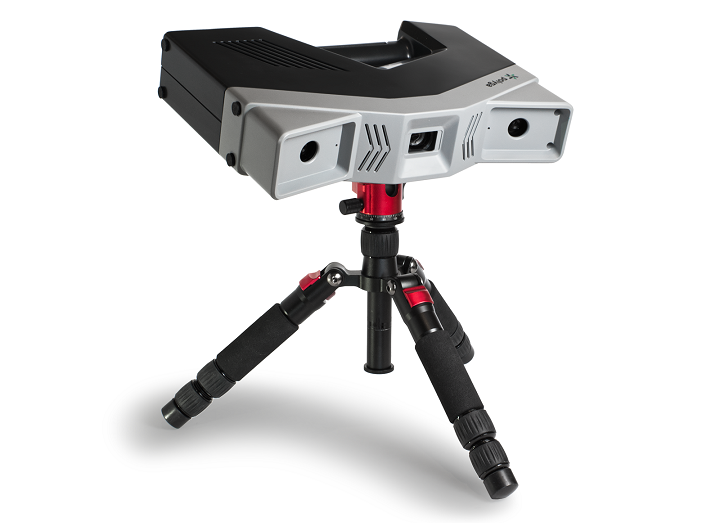 Many companies are using modern 3D printers with might and main, recreating layouts of various shapes and sizes with their help. There are also those that recreate whole objects - not only small ones (for example, phone cases, souvenirs, sneakers), but also large ones (houses, engine parts, etc.). But all this would not be possible without 3D scanners. It is they who allow you to accurately copy almost anything - from huge buildings and structures to humans, animals, small objects and much more.
What is 3D scanning and what is it used for
Three-dimensional scanning is a technology that appeared in the 60s of the 20th century. It was created in order to transfer the physical parameters of the object into a digital format in the form of a three-dimensional model. The need for this naturally arose when people around the world increasingly began to use computers both in everyday life and in production.
The first samples of 3D scanners were quite simple and did not have wide functionality. Gradually, they became more complex and improved, making it possible to achieve an ever clearer image of the object. This has become especially relevant with the advent of lasers.
3D scanners allow you to transfer object data into digital format
3D scanning has opened up new opportunities in various areas of human activity - from the automotive industry and the military industry to design, medicine and cinema.
How a 3D scanner works
A 3D scanner is a device that examines an object by digitizing it using sensors and using the information received to create a three-dimensional model. In fact, a 3D scanner creates a digital copy of a physical object of any configuration and complexity. In this, it fundamentally differs from its predecessors - conventional scanners that can only read information from documents and photos.
The scanning process itself can take place in different ways - depending on the type of 3D device and the technology used, as well as on what object you want to process with it - moving or static.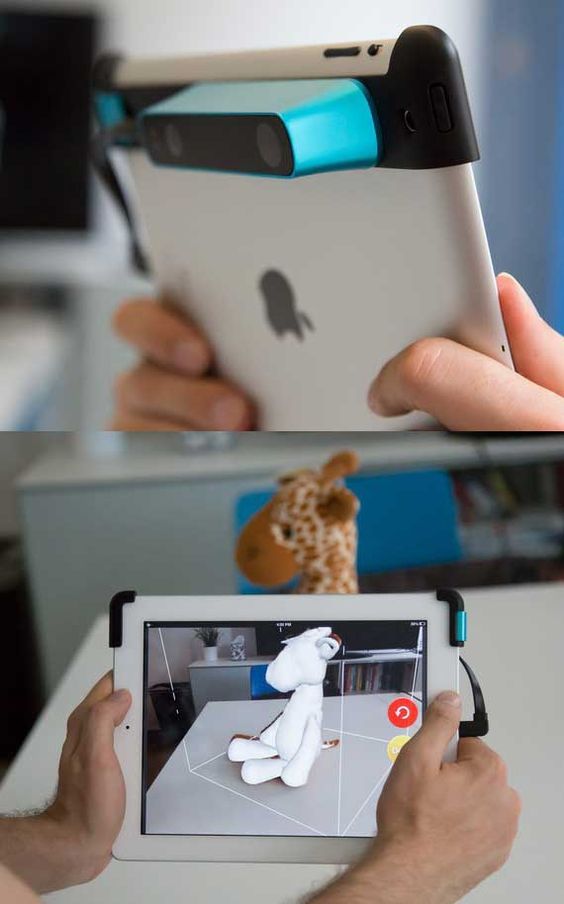
3D Scanning Technologies
There are 2 main types of 3D scanners - laser and optical. Their fundamental difference lies in how and with the help of what the “removal” of data takes place. Let's take a closer look at both.
Laser 3D scanning, as the name implies, uses a laser and can be carried out both at short and long distances from the object.
Laser Scanner
For the most part, 3D laser scanners work on the principle of triangulation, when the camera finds a beam on the surface of an object and measures the distance to it, after which a cloud of points is created, each of which has its own coordinates in space, and a 3D model is built. Their "advantages" are affordable price and ease of use combined with high scanning accuracy. Of the "minuses" - there are restrictions on the remoteness and size of the object.
Another type of laser scanner works by measuring the response time of a beam from the surface of an object - the so-called laser range finder. They are widely used where it is necessary to create 3D models of various buildings and structures. It is not advisable to use them at short distances, since in such cases the response time is very short and the accuracy of the data is reduced. Otherwise, this type of scanner is characterized by high scanning speed and the ability to read all the details.
The disadvantage of laser scanners is the impossibility of their use on moving objects. Then optical 3D scanners come to the rescue, which shoot with one or more cameras from different angles an object illuminated by a special projector. Based on the received image, a three-dimensional image is built.
Optical scanner
A "contraindication" for the use of this technology are reflective and translucent surfaces - shiny, mirror or transparent. But when scanning a person, they are simply irreplaceable.
3D scanning methods
Any object can be digitized both by contact and non-contact methods.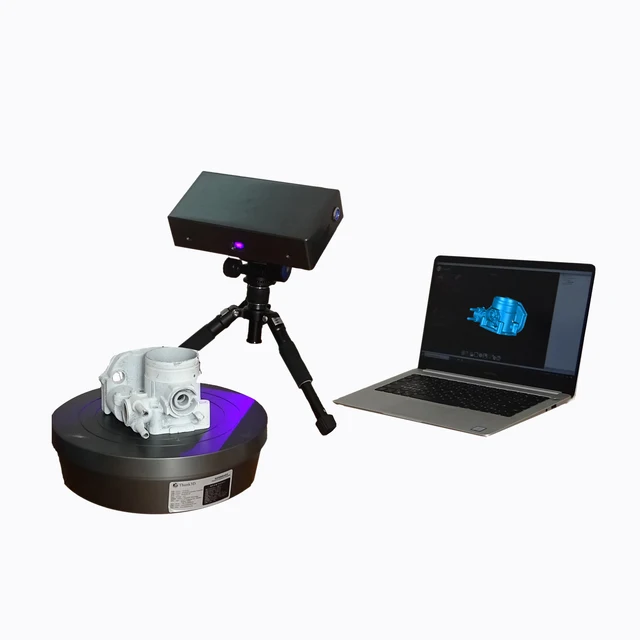 In the first case, active interaction with the subject is necessary, in the second, accordingly, no. Both of these methods have their advantages and disadvantages.
Contact 3D scanners
They have a mechanical probe with a special sensor that measures parameters and transmits the collected information to the device. To do this, the object under study is placed on a special surface and fixed (if necessary). Such tight physical contact makes it possible to determine and then build a 3D image as accurately as possible, however, there is a small risk of damage to the prototype.
Non-contact 3D scanners
This category includes all devices capable of scanning at a distance. This is especially true for objects located in hard-to-reach places.
Non-contact 3D scanner
A stream of radiation (it can be ultrasound, light, X-rays or a laser) is directed to the object and reflected from it, it is recognized by the 3D scanner. They are similar in principle to a video camera and may require the use of additional devices for better lighting.
Non-contact 3D scanners come in 2 types:
-
Active - work with the help of a laser beam or structured light directed at an object, which, when reflected, give information about the location of the object in the form of coordinates.
-
Passive - use time-of-flight rangefinders that read the time and distance that the laser beam travels to the object, and so - for each point in space, which ultimately allows you to accurately recreate its three-dimensional image.
Desktop 3D scanners are very popular and widespread, since they are mostly simple and safe to use, do not require any special technical skills and are quite cheap. The EinScan-SE 3D scanner is one such example. It can be used both at home and in the office. It has access to the API of many popular 3D printers, which makes it possible to immediately print the created three-dimensional model.
Add to compare
Product added to compare Go
| Manufacturer | Thor3D |
Add to compare
Product added to compare Go
| Manufacturer | Shining 3D |
Add to compare
Product added to compare Go
| Manufacturer | Shining 3D |
Add to compare
Product added to compare Go
| Manufacturer | Range Vision |
Types of 3D scanners according to the principle of use
There is also a variety of species here. Let's highlight the main ones:
-
Manual: The are handy and simple models that are easy to use as they are quite compact and do not require special skills. True, their technical capabilities may be somewhat limited.
-
Portable: are mainly used for field work, they are convenient to take with you.

-
Desktop: have extended functionality and are used to create high-quality 3D models. Most often used in offices.
-
Stationary: are used, as a rule, in production, various enterprises, as they can scan a large number of objects of the same type at once. Mounted on special turntables.
Handheld 3D Scanner Calibry
Such a choice of products allows you to select the right model for a specific task. In some cases, scanners independently measure objects, in others - with the help of a person who sequentially moves the device until all the necessary information is collected.
Such options for hand-held 3D scanners as Calibry are in high demand among buyers. Despite the apparent simplicity of execution, it has a high resolution and scanning accuracy, due to which it is able to digitize objects with a length of 0.2 to 10 meters. Objects that have a non-standard surface - dark or shiny, with a large number of corners and small details will not become a problem either. Among other things, its undoubted advantage is its low weight, only 900 grams.
Advantages and disadvantages of 3D scanners
Surely, many of the potential buyers are wondering: do you really need a 3D scanner to invest a lot of money in it? What can this acquisition give and will such an investment be justified?
3D scanning has become an integral part of any modern manufacturing process
In order to understand how much you need this equipment, we will list its advantages and disadvantages.
Benefits:
-
They make it possible to scan objects located at a remote distance and in places inaccessible to the presence.
-
They have the ability to "read" not only colors and images, but also to convey the texture of the surface.
-
Significantly speed up the process of "taking" data from any object, even a very complex one with a large number of planes.
-
A variety of models allows you to choose the most convenient version of the scanner, including manual or portable, which can be easily taken with you.
Weaknesses:
-
Some scanners are unable to recognize transparent or black and white objects. In this case, their preliminary preparation (treatment with a special composition) is required.
-
I do not always display complex objects correctly, with a large number of inserts and partitions.
-
To obtain a high-quality result, they require skills and abilities to work with certain computer programs for creating 3D models.
-
If the rules of operation are constantly violated, it may become necessary for expensive repairs to the equipment.
If you need high-precision and high-quality three-dimensional copies of objects, then you cannot do without a 3D scanner. It makes it possible to work in almost any conditions - indoors and outdoors, and with any objects by type and size. It is not surprising that now these devices are in great demand, which gives rise to the annual release of a large number of models, from which you can always choose the one that suits you in terms of quality and price.
What to consider when choosing a 3D scanner
The computer equipment market offers a huge amount of all kinds of equipment, including devices for three-dimensional scanning. Navigating that variety is sometimes not at all easy: some buyers are only concerned about the cost, others are interested in the number of options (sometimes completely useless), but the most far-sighted look at the ratio of the first and second.
Choosing the right 3D scanner is a big deal
It is not always easy to take into account all the technical points that can significantly affect what result will be ultimately achieved. We will tell you what you should pay attention to if you are thinking about buying a 3D scanner.
Focus on the following parameters:
-
How high is the accuracy of the 3D scanner.
 This is one of the most important features. It needs to be targeted first.
 -
Resolution also plays an important role. It follows from the first, since the accuracy of measurements and the quality of copying depend on the resolution.
-
In what range the device operates, how close / far it can be from the scanned object.
-
The scanning field is the parameters of that object, thing that it is able to process in 1 session.
-
Does the scanner capture various atypical types of surfaces with complex terrain - channels, partitions, holes, etc.).
-
Portability, mobility of the device - how easy it can be moved if desired, taken with you, its size.
-
The time it takes to prepare for work, as well as the duration of the digitization process itself.
-
The range of possibilities in terms of copying: are there any restrictions on shapes, textures, material, as well as operating conditions - temperature, light, etc.
Of course, the better the quality of the 3D scanner, the more expensive it is. However, you should focus primarily on the tasks that you face, and only then take into account everything else.
Applications
Three-dimensional scanners are in demand in many areas of human life. They are irreplaceable both in the industry, and for household needs. The range of their application is so wide that it is possible to list for a very long time. It's easier to say where they are not needed.
The most common areas of use are, of course, medicine, industry, architecture, construction, film industry and design.
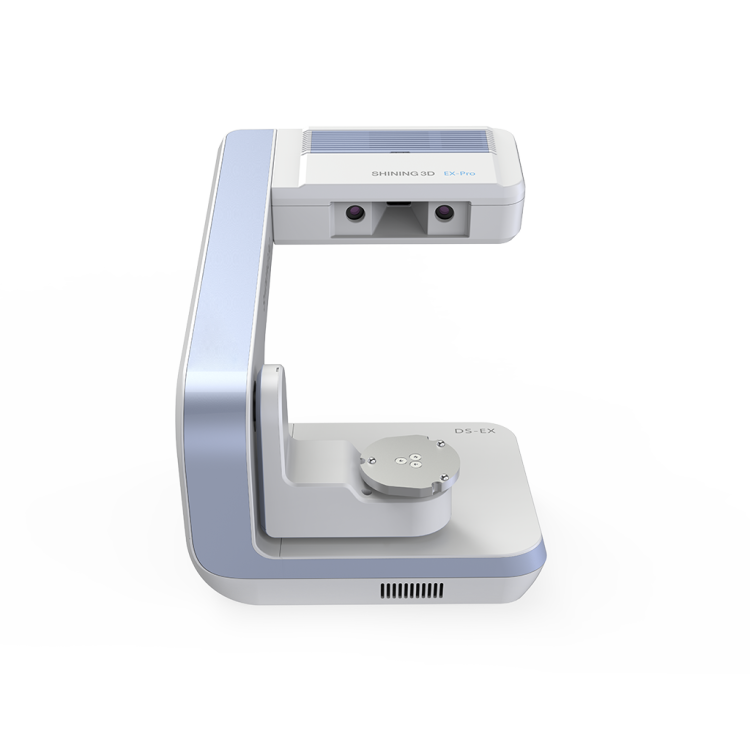
For example, in dentistry, these devices allow you to create ultra-precise three-dimensional models of dentures. One type of such a scanner is Shining 3D's AutoScan DS-EX PRO, which does a great job with a variety of tasks while being quite affordable and reliable.
Medical 3D Scanner
In engineering, such technologies are also indispensable.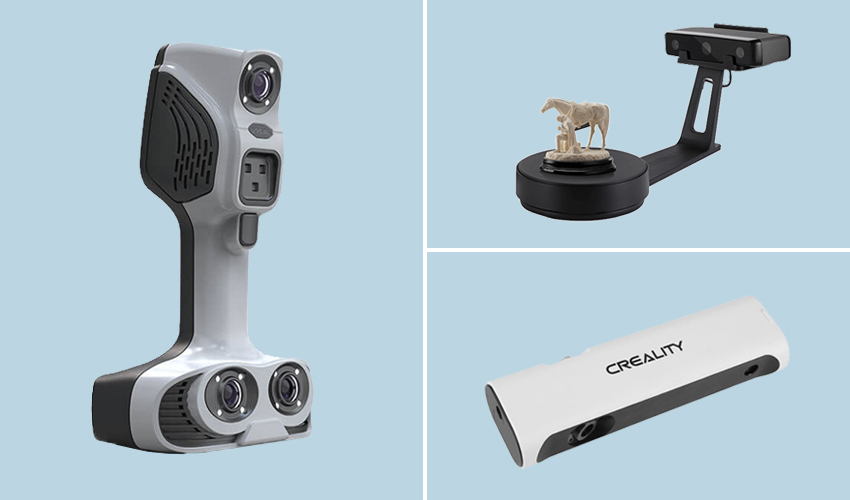 Digital building prototypes are now much easier and faster to obtain than in the past, when it required multiple manual measurements and then entered into a database. Any physical object can now be recreated in three-dimensional form, moreover, in the shortest possible time and with a minimum error.
In cinemas, we can see with our own eyes "revived" fantastic characters, which were created using motion capture technology, which made them as realistic and impressive as possible. This would not have been possible without 3D scanners.
A few decades ago, it was even difficult to imagine all the things that we use all the time today. And in many ways this has become achievable thanks to three-dimensional digitization. This approach provides huge advantages in work (especially for technical specialists - engineers, designers, designers), however, in order to use them to the maximum, it is also necessary to understand computer programs for 3D scanning.
We will talk more about this topic in one of our next articles. And if you want to know more about it, stay tuned.
#Useful
Expert in the field of additive and subtractive technologies, 3D equipment and CNC machines with over 10 years of experience.
Share
all materials
3D Scanning Tips for Beginners
Contents
-
- Always calibrate
- scanning of mechanisms
- Close all moving elements
- Take into account the texture of the object
- Use the masking tape when scanning large -sized objects
- Use the scan for scanning of thin walls
- . objects moving away from the center
- Do not move objects with variable geometry
- Stick more markers on segments that have complex geometry
- Stick markers on even segments
- Carefully prepare reflective or black segments
- Use fasteners for scanning small elements 9000
9000 9000 9000 9000 9000 9000 9000 9000 9000 9000 9000 9000 9000 vision - Use stand
- Use plasticine marker
- Fix the object with foam rubber
- Make your own backing
- Scan small objects by placing them on a plasticine "mushroom"
- Based on the geometry of the object, determine the alignment method
- Select the DirectX format
- Match the size10 of extra objects with file size
- Scan large-sized objects step by step
- Call up the calibration field with Alt + E
- Use measuring instruments
- Take into account the field of view of the two cameras
- Keep the same conditions
- Protect the 3D scanner from vibrations
enjoy. We've put together a quick guide to help you take your scanning technique to the next level. By taking the tips below into account, you will be able to digitize even the most complex and highly detailed objects of various sizes and shapes.
Always calibrate
Calibrate the 3D scanner before you begin. For this, a special calibration panel is used.
Mechanism scanning
The first difficulty that owners of even the most high-tech 3D scanners face is scanning complex mechanisms. The presence of a large number of moving parts often confuses even those who have previously had experience with scanning equipment. For the procedure to be successful, we recommend that you start digitizing the object from a position in which all spare parts and moving elements are in their normal position. After that, disassemble the mechanism into its component parts and scan each of them separately. Thus, you will receive a three-dimensional model of the mechanism as an assembly, as well as all its constituent elements. The CAD operator will have all the data to recreate a three-dimensional projection of even the most complex mechanism and understand all the nuances of its operation.
Block all moving parts
The quality of the scan depends largely on how static the object being digitized is. Therefore, it is recommended that all moving parts be securely fixed before operating the 3D scanner. This will minimize errors and get an exact three-dimensional copy for further processing in CAD and printing on a home or industrial 3D printer.
Take into account the texture of the object
The nature of the surface of the object is important when obtaining its three-dimensional copy through scanning. Even the most expensive and high-tech 3D scanners have difficulty capturing specular or porous surfaces. To avoid such difficulties, it is recommended to glue them with a thin masking tape.
Use masking tape when scanning large objects
For more accurate capture of markers from large objects, it is recommended to apply them on masking tape.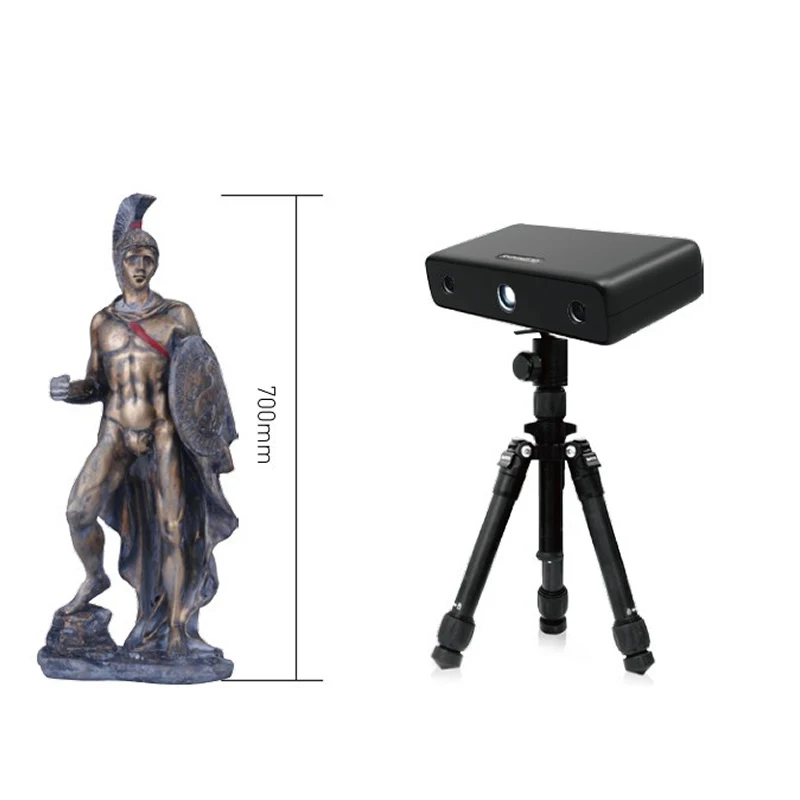 This simple procedure will make scanning easier and more accurate.
Use the optional underlay to scan thin-walled objects
To digitize thin-walled objects, use the optional underlay. It is placed in such a way that the 3D scanner can capture markers from each side. In turn, the marks on the main substrate can act as a reference grid.
Scan medium-sized and large objects moving from the center
If the object size is 2-3 volumes captured by the scanner, you need to start scanning from the center. The 3D model will then turn out to be more accurate, and the scanning process itself will take less time.
Do not move objects with variable geometry
Using the 3D scanner, you can only move objects with fixed geometry. If the geometry is variable, then when moving, all elements must be securely fixed.
Stick more markers on segments with complex geometry
If the object being scanned has a lot of teeth, depressions, height differences, stick more markers so that the 3D scanner can accurately capture all surfaces.
Apply markers to flat segments
When applying markers, make sure they do not kink or kink. All markers must be applied evenly and without overlapping adjacent surfaces. If the angle of the surface changes, use different marker lengths. The main thing is that one tape does not change the angle during the application process. There should be no bends.
Carefully prepare reflective or black segments
All deep dark shade segments and reflective surfaces must be carefully matted. To do this, use a special spray, which is easily erased after scanning with an alcohol wipe.
Use the mounting frame to scan small items
A 3D scanner may not always be able to capture details and understand the position of small objects. In this regard, manufacturers of scanning equipment recommend using a special accessory - a mounting frame with pins. Markers are glued to the frame itself around the perimeter, and pins hold small elements in a fixed position. Thus, the 3D scanner "understands" their position, and the accuracy obtained as a result of digitization is enough for their subsequent processing in CAD with the possibility of further reproduction from PLA or ABS plastic.
Digitize groups of small parts
If you need to scan a group of small objects, place them at a small distance from each other and make sure that the surfaces do not overlap. In this case, the 3D scanner will be able to digitize a whole group of elements in one go.
Set the correct light
This condition is important to observe if you are digitizing an object with a complex multi-colored texture. Correctly directed light will allow you to convey all the nuances of the surface in as much detail as possible and accurately reproduce colors.
Check the field of view
When using a turntable, make sure that the object you are scanning fits completely into the field of view of the 3D scanner, and that when rotated around its axis, none of its elements will go beyond the view of the cameras.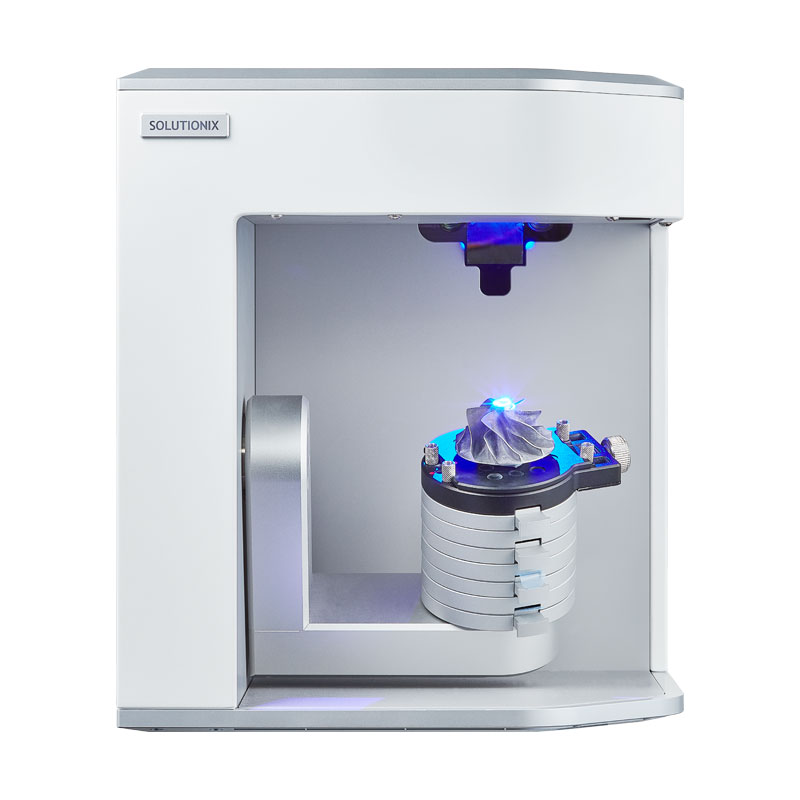
Use a stand
To make it easy to clean the resulting 3D model of unnecessary details (texture elements of the shelf or table on which it is installed), use a special stand. This will remove the parasitic geometry in no time.
Use putty for markers
Some 3D scanners are not good at capturing symmetrical objects. To make it easier for the equipment, add some extra geometry with plasticine and stick markers on top.
Fix the object with foam rubber
When scanning objects that are unstable and cannot be placed vertically, use a thick sheet of foam rubber. Make a small incision in it with a clerical knife and insert the edge of the object to be scanned into it.
Make your own mat
If you don't want to buy a mat, you can make your own. If everything is done correctly, the 3D scanner will work properly and will not notice any difference. The main thing is to choose a solid material and ensure that all markers are securely fixed.
Scan small objects by placing them on a plasticine "mushroom"
If you need to scan a very small object, such as a coin or a brooch, make a small support from plasticine and place the object on it. A 3D scanner will capture such a "mushroom" as a single element, but the scanner software will easily separate the one-color plasticine from the scanned object.
Rely on the geometry of the object, determining the alignment method
If the geometry of the object is well read, the 3D scanner will have no problem capturing it. In the case of a predominance of moth-eye segments, most manufacturers of scanning equipment recommend manual alignment.
Choose DirectX format
The universal DirectX format is the most preferred for saving data after stitching all the segments received by the 3D scanner.
Remove unwanted objects
The 3D scanner does not distinguish between the target object and the substrate and scans the entire area. In this regard, extra objects often fall into the area. They can cause errors during the gluing process, and therefore it is better to remove them in specialized software immediately after scanning.
Match the step size with the file size
Consider the size of the scanned object when choosing the step. Note that if the object is too large, a small step size will result in a significant increase in the size of the file containing the 3D model.
Scan large objects in stages
When digitizing very large objects, break the process down into several steps. This will speed up the procedure and simplify further gluing and processing.
Call up the calibration field by pressing the Alt + E keys
If you accidentally hit the 3D scanner and are worried that this could lead to its displacement, call the calibration field by simultaneously pressing the Alt + E keys. If the detected error turned out to be too large, it has meaning to recalibrate.
Use measuring instruments
Not all 3D scanners can capture hard-to-reach segments, such as deep depressions. In this regard, there are difficulties in processing the product in CAD and its subsequent printing from ABS or PLA plastic. To more accurately reproduce the geometry of an object, use classic measuring instruments to measure hard-to-reach segments. For example, a caliper.
Consider the field of view of two cameras
When placing an object, make sure that both cameras of the 3D scanner see the segment being scanned.
Be careful to maintain the same conditions
Changes in lighting and even temperature in the room where you are scanning can interfere with the operation of the 3D scanner. Consider this moment and maintain the same conditions throughout the procedure.
Protect the 3D scanner from vibrations
Before you buy a 3D scanner, make sure that your room is not subject to vibrations.