3D printing underextrusion
How to fix Underextrusion
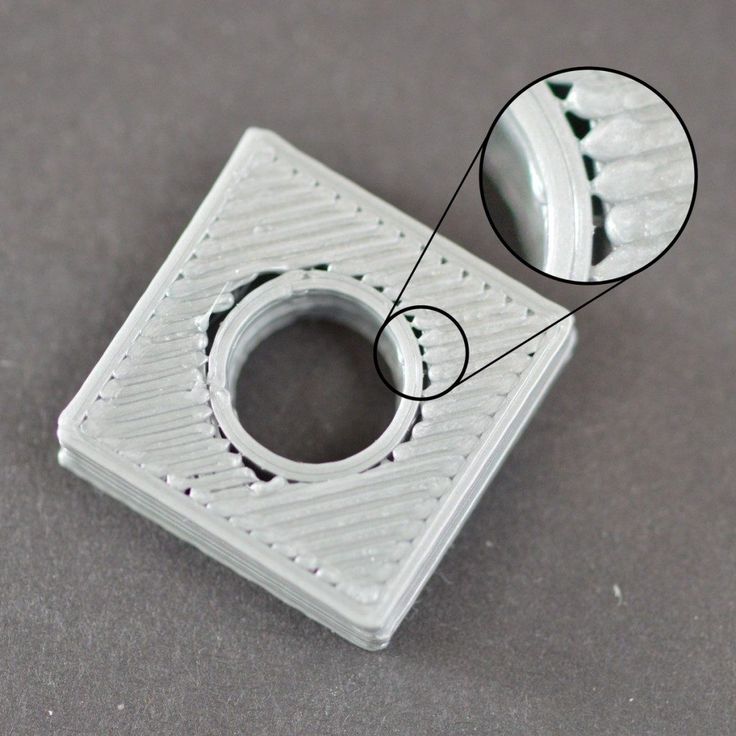
The most common printing issue in 3D printing. It consists of a lack of extruded material in the printed part that will show as missing layers or spongy prints. In this article, you will learn how to fix this issue
What is Underextrusion and why it happens
Underextrusion, as the name states, happens when the hotend extrudes less filament than desired. This issue directly affects the quality of the printed part, making it look rough, incomplete, and weaker than usual. There are many factors that can make this happen.
| We recommend using BCN3D filaments with our 3D printers. The default BCN3D Stratos profiles for BCN3D filaments are tailored by our Lab to deliver the best quality and reliability for your prints, so if you find underextrusion in one of our filaments, it's possible that the filament simply needs to be dried, or that there's a problem in the hardware itself. |
How to fix it
Being that this underextrusion has many different causes, troubleshooting it can be complex. Here's a list of all the causes and ways you can resolve them. If one method does not solve the issue, move on to the next one.
1. Update BCN3D Stratos
BCN3D Stratos is constantly updated with new profiles that improve the quality of the service. Pay attention to the release of new versions of BCN3D Stratos, and make sure to keep it updated.
To know how to download and install Stratos, visit this article: BCN3D Stratos.
2. Update the Firmware of your printer
A printer with outdated firmware can have some bugs that may cause underextrusion. To upgrade the printer firmware, click on the picture corresponding to your printer type to check the corresponding article:
| How to update the firmware | |||
3.
 Adjust the printing profile for your material
To avoid underextrusion, we recommend the default profiles in Stratos. These profiles are made to ensure the best print quality. If you are experiencing underextrusion with our material while also using our default profiles, go to the next point.
If you are using custom profiles or filaments from a different brand, note that there are some factors that can also cause underextrusion:
- Printing Temperature: Normally if you find underextrusion, the first thing to look at is the printing temperature. To find the right temperature, you can print a temperature tower test and change the temperature until you find the best quality.
- Printing Speed: If the printing speed is too high, you'll notice that the hotend is not able to extrude enough material. Printing at 50mm/s is generally good for ABS, PLA, and PET-G, while other filaments may require slower speeds.
- Retraction Settings: Retraction is a feature in which the filament is pushed out of the nozzle a bit to prevent oozing during travel.
 If the number of retractions, the retraction distance or speed is excessive, you might find gaps appearing on the walls of the print or experience hotend clogs.
 - Take into account that underextrusion also depends on the filament and room humidity, room temperature, and manufacturing defects.
- For third-party materials: feel free to contact their manufacturer to get a printing profile for your filament, they know their filaments more than anyone else.
To prevent other issues with our filaments, check the following tips and tricks articles for each material:
4. Check the bowden tubes
The bowden and the filament are in constant friction. Occasionally an excess of friction can stop the filament and cause underextrusion. Check the bowden and whether it is bent or has a bad shape.
If this is the case, contact us or your reseller of choice to get a new bowden tube.
5. Check the cooling of your hotend
An excess of temperature in the printing head can cause a clog in the hotend, this will cause a gradual underextrusion along with the print until no filament is extruded. Check if the cooler fans are clean and use a vacuum cleaner or a brush to ensure that nothing is blocking the fan.
- To check if the fans are working properly, click on the picture corresponding to your printer type:
| How to check the operation of the cooler fan | |||
- In some cases, room temperature can influence, especially with PLA. Check that the room temperature is not over 25ºC and there's correct airflow in the room.
6. Clean or change the Hotend
A constant underextrusion throughout the piece shows that the issue is likely located in the hotend, specifically if you use different materials in the same hotend because it can clog over time, sometimes this is accompanied by a repetitive clicking noise. You should always clean the hotend with nylon every time you change material types.
- Click on the picture corresponding to your printer type know how to clean or unclog the hotend:
If the problem persists, the hotend is probably damaged. Try to swap the hotends and print, if the problem changes to the other side, you will need to swap it out for a new one. The following articles have information about this process:
| How to change the hotend | |||
- Warning! Hardened steel hotends shouldn't be used for non-abrasive materials like PLA, ABS, PET-G, TPU, etc. For these materials, it's best to use brass-tipped hotends.
If the hotend is burnt or damaged, it is likely that the extruder board has a problem. Continue to the next section to find more information about this.
7. Check the Extruder Board
This component sends the signals that control the hotend temperature and the funcioning of the fans. If the extruder board doesn't work properly, it can lead to random underextrusion and overheating issues during the print job.
To check if the problem is the extruder board, swap them. If the problem moves to the other printing head, you will need to swap out the extruder board in question for a new one.
- Click on the picture that corresponds to your printer to know how to swap and change the extruder boards:
| How to change the extruder board | |||
8. Adjust, clean, and check the extruder motor
If the extruder motor can't push the filament correctly, the result will be underextrusion. Keep the motor clean and check that the thumbscrew is correctly adjusted.
- To fix the extruder motor, click on the picture that corresponds to your printer:
| How to check the operation of the extruder motor | |||
If the problem continues, swap the extruder drivers and check if the problem moves from side. Click on the picture that corresponds to your printer to know how to swap the drivers:
| How to change the extruder driver | |||
- Keep your printer and slicer updated to avoid bugs that could cause underextrusion.
- Use the recommended profiles to check if the problem is coming from the printing settings or the hardware.
- Keep your filament dry and correctly stored to avoid underextrusion issues related to the humidity.
- Adjust the temperature, reduce the printing speed below 50mm/s and avoid aggressive retraction settings.
- Clean your hotend each time that you need to change the type of material to avoid clogs.
- Keep the cooler fans free of dust or strings of filament.
- Remember to clean the extruder motor if you have experienced underextrusion issues.
- If you still experience underextrusion issues, get in contact with our support team.
| Send us your comments about this article | |||
|
RELATED ARTICLES | |||
How to Fix Under-Extrusion in 3D Printers – Not Extruding Enough – 3D Printerly
A problem that I’ve experienced with my 3D printer is an inconsistent extrusion from the nozzle with a print, which looks bumpy. I wondered how to fix this problem, so I researched exactly how to fix a 3D printer that stopped extruding consistently and got some answers that I’ll share with you.
The best way to fix a 3D printer that is extruding inconsistently from the nozzle is to clear any clogs or jams in the extrusion system, whether that’s in the extruder gears, Bowden tube or nozzle. You should also make sure your filament spool can rotate freely and use a larger layer height.
There are other factors that contribute to your 3D printing extruding inconsistently, which will be explained further in this article.
Why Does My 3D Printer Stop Extruding Consistently?
Bad Filament Pathing or Tangled Filament
If the filament is wounded improperly or the threads are not rolled off by the 3D printer correctly, the filament can get stuck resulting in uneven extrusion.
When the filament spool gets jammed, it produces friction which usually loses its grip on the material when fed into the printer. This results in lower emissions through the reduced flow of the material.
If the filament spool is empty, you will have to load the spool before moving forward. If the spool is not empty, you should check that the filament can easily pass through the Bowden tube.
Check to see if there is much resistance and consider cleaning the tube or applying some lubricant in the pipe.
Extruder Motor Issues
The extruder motor is the most functioning component of the 3D printer. It pushes and pulls the plastic back and forth constantly.
This fast motion requires a current, and if the printer’s electronic components are not cooled enough, the extruder motor will be overheated.
In this case, the motor controllers usually have a thermal cutout which causes the controller to stop working until the temperature goes down. So turn off the printer for some time allowing components to cool down.
Slipping of the Extruder Gears
If your extruder gears have start to wear out over time, it can’t get the same grip that it needs on the filament to extrude it through smoothly. I would check on your extruder gears and look for noticeable blunt areas on the teeth.
A good dual-geared extruder or a fresh extruder should correct this easily.
Layer Height Too Low
The layer height has a significant impact on 3D printing. If you are trying to print something at a low layer height, there will be very little room for the plastic to come out of the nozzle. Make sure to use the appropriate layer height for the printer.
You can change the layer height directly in your slicer software which has different methods depending on your program, but it should be fairly easy to operate.
Increase your layer height gradually through trial and error, and you should be able to eliminate the problem of not extruding during the print if this is your cause.
Inaccurate Extrusion Width
Like the layer height, extrusion width can also cause problems. Different extruders have different extrusion width, so be sure to choose the right extruder and assign the right extrusion width to get a silky and smooth 3D print.
It becomes difficult for the printer to extract material if the width of the extrusion is significantly less than the diameter of the nozzle.
According to the manufacturers, the perfect extrusion width is 100% to 150% of the diameter of the nozzle. You should be able to find these in your slicer using the search function, or by expanding the basic/advanced level view of your settings.
Extruder Jammed or Clogged
If the printer is not extruding enough, the extruder may be clogged. If this happens, check that the filament is clean and the spool is dust-free. If there is a lot of dust on the reel, it can block the extruder as it accumulates inside the nozzle.
In some cases, the plastic isn’t extruding properly, so you can try extruding some plastic manually. If you are still facing issues, you may need to clean the nozzle by following the instructions provided in the video below by Thomas Sanladerer.
Bad Quality Filament
A filament of inadequate quality is one of the most common reasons that cause printers not to extrude enough. Bad quality filaments contain some additives or have unstable filament diameters that affect the consistency of the flowing plastic.
The filament of high quality includes a dryer in the packaging because PLA absorbs the moisture from the air and affects the quality of the printer. If you think this is the problem, try replacing the existing spool with a new, sealed spool of better quality.
If your PLA has absorbed moisture and starts popping while being heated to high temperatures, some people have fixed this by placing it in an oven at a low heat. You can also use a food dehydrator to do the same job.
Heat Creep Issues
Heat creep is a form of a blockage or clog within your extruder system. It occurs because of a temperature imbalance, where the heat actually travels a little further than it’s supposed to into the PTFE tube.
What then happens is filament because softer within the filament tube and starts to get pushed around the outer extrusion path, leading to extrusion problems.
This can occur if your PTFE tube has worn out, or you have a bad heatsink which doesn’t negate heat away from this area.
How to Fix Inconsistent Extruding From Nozzle?
Patience is something that you will need to consider 3D printing as a profession or hobby. None of the solutions mentioned in this article is complicated. But you will need the patience to clean, remove, and fix the problem efficiently.
Once you find the cause of your inconsistent extrusion, the solutions becomes a lot easier to figure out as illustrated above.
The best intervention is to buy good quality filaments, make sure that the filaments and nozzles are clean, and review the best printer settings for your filament.
If you are experiencing under extrusion at a certain height, you want to check that your Bowden isn’t getting pinched at those higher heights. One thing you can do is to raise your Z-axis through the control box on your printer and see if there are any issues.
Installing a longer Bowden tube should fix this problem. The Creality Capricorn Bowden PTFE Tubing from Amazon is a good choice for your printer.
Increasing your printing temperature is another method that has worked for many users to fix under extrusion at a certain height, so I’d try raising your temperature to see if that helps.
You may be experiencing under extrusion after a nozzle change, retraction, on small parts or even at the start of a layer. There are fixes for each of these specific with the right knowledge.
One of the main reasons why you experience under extrusion after a nozzle change is due to not tightening your nozzle against the heatbreak. If you end up leaving a small gap, you can start to have melted filament slowly leak out of this area.
I’d also make sure to clean out your extruder gears of dust and debris. Also, make sure you don’t over tighten the gears on your extruder, and you want it to be tight enough to have a fairly good grip.
If you are getting under extrusion after retractions, I’d try increasing the retraction length as well as adding some “Retraction Extra Prime Amount” in Cura or your chosen slicer to 0.25 – 0.5mm. Increasing this setting means you add more pressure in the nozzle chamber after a retraction.
It can take a little bit of testing, since larger values can results in blobs on your prints.
Sometimes people get under extrusion on small parts which can be a pain. For one user, the cause was through a badly wound spool of filament that was twisting and causing strong resistance in the Bowden tube. I’d check for the filament pathway and make sure things are going through smoothly.
In some cases, you may just have to change your nozzle to a fresh one, especially if you have never changed your nozzle and you use a brass one. With standard filament, brass nozzles can hold up pretty well, but after a few hundred hours of printing, or from scraping on the build plate, a change can be in order.
If you are getting under extrusion at the start of a layer, check that your “Retract at Layer Change” setting is unchecked as this can decrease the pressure in the nozzle chamber. I’d also try increasing your “Retraction Extra Prime Amount” to a value around 0.5 – 0.8mm.
Another solution for this issue that has worked for many users is to try turning “Combing Mode” off in Cura or your slicer.
How Can You Tell if a Nozzle is Clogged?
The most obvious symptom is that the filament does not come out of the nozzle properly. The filament is curling or sticking to the tip of the nozzle. There will be a sound or clicking from the extruder. The other signs include:
- The extrusion is looking inconsistent.
- A lot of dust around the extruder motor.
- The print is not silky or smooth.
- Dotted lines around the print.
- The printed parts are too fragile.
- The filament spool has stopped turning.
How Do You Fix a Clogged Nozzle?
When you have a clogged print nozzle, you can use a number of cleaning techniques to resolve the issue depending on the material that is causing the hassle.
The method always recommended by the experts is to use cleaning filaments regularly, but this method is only suitable for partially clogged nozzles and will not open the completely clogged issue. Below are some other techniques to fix a clogged nozzle.
- Use a brass wire brush to clean the dirt from the nozzle.
- Acetone is well known to dissolve thermoplastic. Cleaning the nozzle with an acetone bath helps to remove unwanted particles and will fix the clogged nozzle.
- The other way to fix a clogged nozzle of 3D Printer is to clear it using an acupuncture needle.
- Heat the nozzle to 250 degrees Celsius and insert the cleaning filament into the nozzle until the nozzle is completely free of old threads.
 Remove the filament and reheat the nozzle to remove tiny filament particles and then clean the nozzle thoroughly.
It’s usually easy to distinguish under extrusion vs over extrusion for your 3D printer. You’ll see that your 3D prints have more gaps and are generally weaker than usual if you have under extrusion.
Over extrusion is also clear to see, where you have plastic squashed together, leading to a low quality 3D print that isn’t very dimensionally accurate. It is most visible in the outer dimensions of your 3D print.
How To Clean & Prevent 3D Printer Jams
There are various solutions to fix 3D printer jams, but the ideal solution is to prevent it from clogging. Below are the tips that will help you to clean and deter 3D printer jams in the future.
Thoroughly clean the nozzle when switching between filaments.
- Print at the right temperature to avoid electronic components overheat
- Use a clean filament of high quality
- Calibrate your printer bed at the right level
- Set an optimal and perfect layer height of 50% to 70% of the nozzle height, which is recommended by the experts.

- Try to store your spool in an airtight bag because this will not only prevent dust from accumulating but also prevents the absorption of the moisture from the air.
What is 3D printing and how it can be used! Interesting!
What is 3D printing
3D printing technology was patented in the 80s of the last century, but gained popularity relatively recently. New, promising techniques have been developed and the possibilities of 3D technologies have reached a completely new level. However, to this day, the technique is not known in all circles, and not everyone is aware of what 3D printing is. In today's article, we will try to explain in detail and in an accessible way what 3D printing is and where it is used.
In short, 3D printing is a technique for manufacturing three-dimensional products based on digital models. Regardless of the specific technology, the essence of the process is the gradual layer-by-layer reproduction of objects.
This process uses a special device - a 3D printer, which prints certain types of materials. More details about it are written here. Other names for the technology are rapid prototyping or additive manufacturing. Often the phrase "additive technologies" is used in the meaning of "3D technologies".
3D printing steps
To make it clearer what 3D printing is, let's take a look at the playback process step by step. Below are the specific stages of 3D printing. How it works:
- 3D modeling of the required object is performed according to certain rules;
- The file with the digital model is loaded into the slicer program, which generates the control code for the 3D printer;
- Sets required 3D printing options;
- The code is written to a removable memory that connects to the 3D printer;
- 3D model reproduced.
Objects are reproduced gradually. According to the required shape, the selected material is applied layer by layer, forming the finished product. It is worth noting that the possibilities of 3D printing are almost limitless, that is, anything can be made.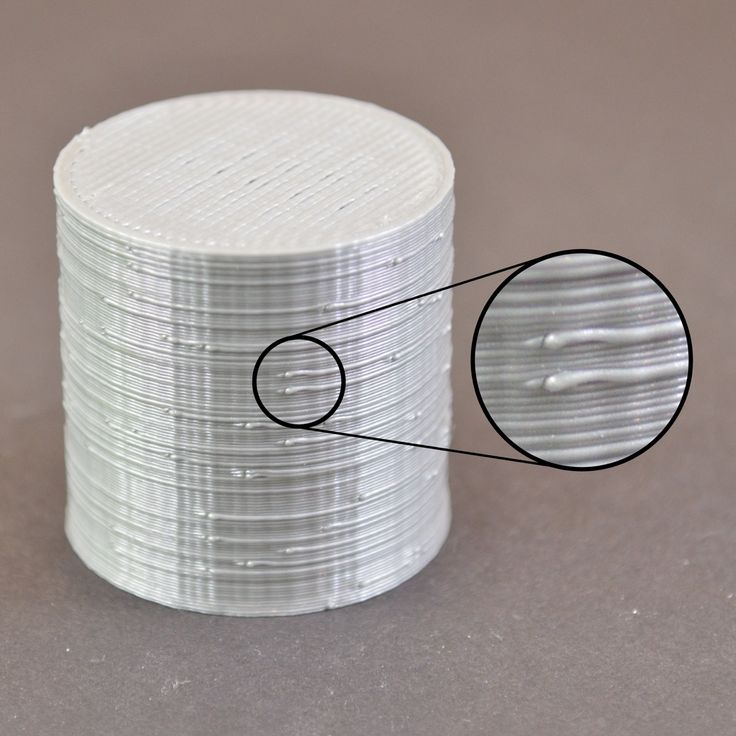 In some technologies, very thin overhanging elements are provided with supports, thanks to which they can be avoided from sagging.
Naturally, this is a very simplified description of the stages of 3D printing, but they give a very clear idea of the essence of the technique.
Other questions and answers about 3D printers and 3D printing:
- Basics What is 3D scanning?
- Basics What is a 3D model?
3D Printing Technologies
Different 3D printing technologies are used to reproduce different objects. They differ both in the consumables used, and in the speed and accuracy of printing. Here are the main 3D printing technologies:
- Fused deposition modeling (FDM) . One of the most common 3D printing technologies, used in most desktop 3D printers, and represents an ideal price / quality ratio. Printing occurs by layer-by-layer supply of a thread of molten plastic;
- Laser stereolithography (SLA) .
 The formation of the object occurs due to the layer-by-layer illumination of a liquid photopolymer resin by a laser, which hardens under the influence of radiation. One of the variations of this technology is DLP 3D printing. It uses a special projector instead of a laser. Both 3D printing methods are used to create objects with a high degree of detail. In the case of DLP printing, speed is also an added advantage;
 - Selective laser sintering (SLS) . Reproduction is performed by layer-by-layer melting of a special powder under the action of laser radiation. This 3D printing method is widely used in the industry for the manufacture of durable metal elements
3D Printing Applications
As you may have guessed by now, 3D printing is extremely versatile. The second name of the technology - rapid prototyping - speaks for itself. In the manufacture of prototypes and models of models, 3D printing can be simply indispensable. It is also a very cost-effective solution for small-scale production. In the aerospace and automotive industries, 3D technologies are already being used with might and main due to the high profitability and speed of manufacturing components. Culinary professionals are working on the development of 3D food printers, and in medicine, 3D printing has become something of a technology of the future. With the help of 3D bioprinting, it is planned to produce bones, organs and living tissues, but for now, implants and full-fledged medicines are printed on 3D printers. Desktop 3D printers can be used for domestic purposes: for repairs, making various household items, and so on. And designers, fashion designers, sculptors and artists appreciate the possibilities of 3D printing and 3D modeling as an unusual way to realize their talent.
Well, that was a brief description of what 3D printing is. We hope we were able to provide the necessary information in an accessible way. If you have additional questions that we have not covered, write to us by e-mail and we, if necessary, will add your questions! Best regards, 3DDevice team.
We also want to remind you about the possibility to order 3D printing, 3D scanning, 3D modeling services or purchase of related equipment and consumables with delivery throughout Ukraine in 3DDevice. If you have any questions, please contact us at one of the phone numbers listed here. We look forward to collaborating!
Return to the main
90,000 company Desktop Metal has released a 3D printer for working withWood
Subscribe to
Subscribe
I do not want
this is earlier in cases of reciprocal of the flight certificates and the unless unless unless you are noted. children had to plan cabbage from logs, and now you can use additive technologies. Let's talk about progress.
Let's start with a little background. Last May, Desktop Metal announced a new process called Forust that allows wood to be printed. Well, like new: this is a variation on the theme of inkjet-powder 3D printing or Binder Jetting, where a binder material is sprayed onto layers of small particles that form the contours of products. Variants of this technology are widely used for 3D printing with polymers, gypsum, and even metals – in the latter case, blanks are grown from powders for subsequent sintering into all-metal products. In other words, the choice of compatible materials is very wide, and now it comes to wood.
To be more precise, the consumables are production waste from woodworking enterprises. The developers' logic is simple: if you want to help save nature, don't throw away shavings and sawdust. In a new version of the technology, the chopped wood is bound by a sprayed epoxy bio-resin, and the output is something like fiberboard, only of an arbitrary shape.
This is exactly where the advantages of 3D printing come into play - you can grow almost any squiggle, including those that are too complex for milling, and even with the parallel processing of waste instead of additional deforestation. The technology allows you to imitate different types of wood, the resulting products lend themselves well to grinding, are durable, pleasant to the eye and touch, and even smell like wood.
Initially, Desktop Metal did not deal with inkjet-powder 3D printing, but recently it has been aggressively crushing well-known brands, including the German company EnvisionTEC and the German-American ExOne. EnvisionTEC is known primarily for professional stereolithographic 3D printers, but in 2017, together with Viridis3D, it piloted a robotic additive system for inkjet-powder 3D printing of foundry tooling with sand mixtures. ExOne is generally considered one of the leaders in the field of Binder Jetting, although it specializes in systems for working with metal powders.
These companies were bought out by Desktop Metal for a reason: the fledgling Massachusetts company is simultaneously eliminating competition and leveraging the expertise of its subsidiaries to perfect its own branded blasting systems, such as the Desktop Metal Shop pictured above. So it was adapted for 3D printing with wood, and at the same time renamed the Shop System Forust Edition, adding a green strip to the front panel - because ecology, “green” technologies, and all that. 93/hr or 21 mm/hr on the Z-axis. Mainly maple and oak waste from sawmills is used, and the binder is an eco-friendly lignin-based epoxy, either colorless or brown. This combination of materials makes it possible to reproduce different shades and textures that imitate ash, mahogany and other varieties. The processing of 3D printed products is basically the same as the processing of natural wood: you can drill, sand, impregnate, varnish, and so on.
Some products with the new technology can already be found on the commercial market, such as the decorative Cocoon lights in the illustration above. Another interesting project is a guitar by Oakland University additive manufacturing professor and 3D printed musical instrument enthusiast Olaf Diegel ( in the illustration below ).
In general, if someone needs to solve the problem of the demographic crisis using the latest digital manufacturing technologies, ask for suggestions on the Forust project website. On November 15-18, the technology will be available at the Formnext 2022 trade show in Frankfurt am Main.
Do you have interesting news? Share your developments with us, and we will tell the whole world about them! We are waiting for your ideas at [email protected].
More interesting articles
ten
Subscribe to the author
Subscribe
Don't want to
The project is experimental and symbolic: the structure was erected by 3D4Art to celebrate...
Read more
9
Subscribe to the author
Subscribe
Don't want
Monochrome liquid crystal matrices with increased sharpness, light transmission, durability...
Read more
82
Subscribe to the author
Subscribe
Don't want
Collaboration 3D
We are pleased to present you our joint development with Speci.