3D printing transparent material
Guide to Transparent 3D Printing
Clear materials, such as glass or acrylic, have a wide variety of applications in consumer products, industrial uses, healthcare, and more. However, prototyping or producing low volumes of clear parts can be expensive and inefficient with traditional methods, which raises the question: can you 3D print transparent parts? The answer is yes, with the right technology and materials.
Stereolithography (SLA) 3D printing can create transparent objects that, with some post-processing, can be made optically clear. Formlabs' latest SLA 3D printers, the compact Form 3+ and the large format Form 3L, take clarity one step further by using a flexible resin tank that reduces peel forces, resulting in clearer parts with smooth surface finish.
There are multiple materials for producing translucent and transparent 3D printed parts:
- Clear Resin is a rigid material that polishes to near optical transparency, making it ideal for fluidics, moldmaking, optics, lighting, showcasing internal features, and any parts requiring translucency.
- BioMed Clear Resin is a rigid, transparent material for biocompatible applications requiring long-term skin or mucosal membrane contact.
- Elastic 50A Resin is a soft and stretchy material that is semi-translucent. It is ideal for prototyping parts normally produced with silicone.
- Flexible 80A Resin is a more stiff soft-touch material that is also semi-translucent. It is ideal for simulating the flexibility of rubber or TPU.
In this guide, we walk you through various finishing methods to create transparent 3D printed parts for a variety of applications, from optics to light pipes to fluidics. Methods range from quick solutions for adequate transparency, to niche techniques for creating optically clear parts.
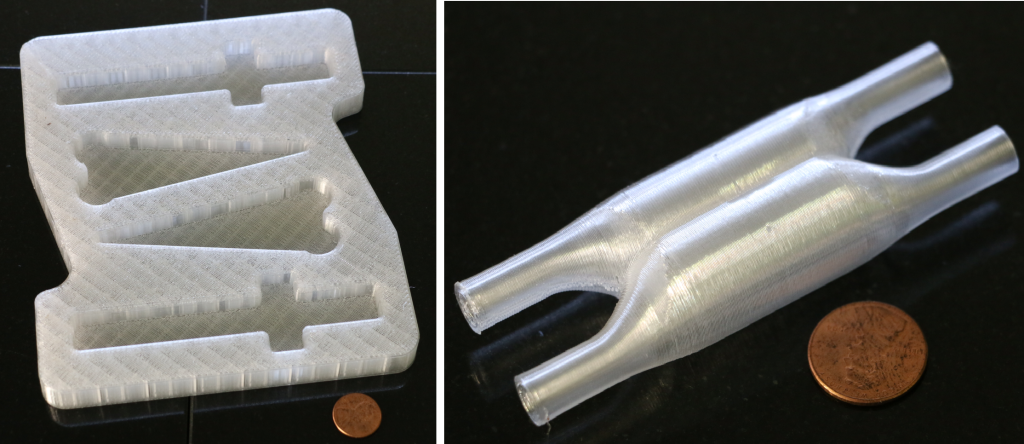
Clear and transparent 3D prints are ideal for creating clear prototype parts, showing internal cavities and details, housing LEDs, creating windows, or printing see though anatomical models and medical devices. Formlabs and our customers have used Clear Resin to create a completely optically clear lens for a fully 3D printed camera, tiles for a Fresnel lens installation in Times Square, light pipes, prisms, millifluidic devices, and more.
Formlabs applications engineer Amos Dudley designed and 3D printed a lens for a fully 3D printed camera.
Sample part
Curious to see how transparent 3D prints SLA 3D printing is capable of? We’ll ship a free clear 3D printed part to your office.
Request a Free Sample Part
Yes, but with caveats. Polymethylmethacrylate (PMMA), commonly known as acrylic, is a transparent thermoplastic that is commonly used as a more durable alternative to glass. While 3D printing acrylic is possible with fused deposition modeling (FDM) 3D printers, it's not really user-friendly as the material itself is toxic and prone to warping, while the 3D printed parts are only semi-translucent due to the lower resolution of FDM printers.
For a 3D printing acrylic-like fully transparent parts, we recommend printing on an SLA 3D printer with Clear Resin and then post-processing the 3D printed parts for full transparency using one of the methods mentioned in this article. Using an acrylic spray is one of the methods to ensure clarity.
We’ve tested several techniques for post-processing parts 3D printed in Clear Resin. In this post, we’ll cover manual sanding, clear coating, and resin dipping. Each finishing option requires varying levels of effort, depending on the degree of transparency and surface finish your part requires.
Applications: Manual sanding and polishing can be effective for simple shapes with few details, but are less suited to finishing complex models. It is very difficult to reach total optical transparency with this method.
You’ll have to sand to extremely fine grits to manually finish a transparent part, but with some effort, you can sand and polish parts to be as clear as a magnifying glass. It is, however, very challenging to completely eliminate all layer lines via manual finishing—you may notice micro-scratches when holding the part at a shallow angle to the light.
Instructions: Use a range of incremental sandpaper grits to smooth your surface, then polish the part with acrylic cleaner and a microfiber cloth.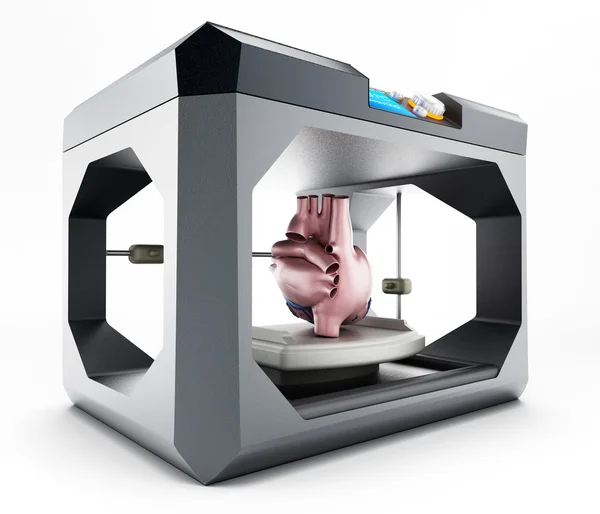
At around 3000 grit, transparent 3D printed parts become glossy and very smooth to the touch. By 12000 grit, they are reflective. Try using a range of sandpaper and micromesh pads with grits from 400 to 12000, in increments of 200, slowly and carefully to clean the parts between grit levels and to eliminate scratches from the previous level before moving on to the next.
Our support site offers a simple visual step-by-step guide for manual sanding, including an optional finish with acrylic spray.
Tip: If you only need semi-transparency, simply use mineral oil to create an even finish and hide any light spots on your part.
We’ve tested a variety of methods of polishing clear 3D prints, from hand sanding and spray coating to resin dipping.
Applications: Spray coating is an easy, fast way to improve the clarity of parts without much reduction in detail. This method is effective for all kinds of models, as it's able to coat complex details that may be hard to reach with regular sanding and polishing.
Clear coating alone helps to conceal layer lines and protect parts from UV exposure, which can cause yellowing and unintended post-curing. If you’re looking for a smooth, glass-like surface finish, perform the manual sanding and polishing technique prior to coating; the more sanding that comes before clear coating, the better the clarity. This additional step is great for post-processing prototypes that look like fully transparent plastic, e.g., packaging, bottles, and microfluidics.
Instructions: There are several options for clear coating 3D prints, from inexpensive sprays to products that require a dedicated room and tools.
- General purpose clear coat spray paints: There is a wide variety of high quality and affordable sprays. We recommend using a 2K clear coat.
- Automotive sprays: High-solids acrylic urethane clearcoats offer very high gloss and are designed for air-dry and baking conditions, but require a spray gun and dedicated space for spraying, as well as a base coat.
For spray coating, start with a clean, dry part already washed in isopropyl alcohol (IPA). Do not post-cure the part ahead of spraying, as this can cause yellowing. Let the part air dry. Once it’s completely dry, apply two to three spray coats in a dust-free environment.
Tip: For a fee, auto body shops may do the coating for you with a spray like Lesonal Universal Clear. In most cases, these shops will use a light solvent, like naptha to clean and prepare the part’s surface prior to painting.
For an installation in Times Square, Window to the Heart, the Formlabs and Aranda/Lasch teams worked with an auto body shop to spray coat each tile in Lesonal Universal Clear.
Applications: This method is best for when you need very transparent parts, and only works on flat or near-flat surfaces, such as a lens or a window into the interior of a part.
Resin dipping results in parts that are extremely smooth, with clear and sharp surface reflections.
This technique can be used to create an even smoother finish for parts printed in other SLA materials, although it can reduce detail.
Instructions: Apply Clear Resin to the part with drops from a syringe, or by dipping the part as as desired. The viscous resin will fill layers and scratches on the part, forming a completely smooth surface.
The layer of resin should be as thin as possible, while still eliminating layer lines. Pull off any bubbles with a syringe. Completely post-cure the part using the appropriate settings, then repeat the process for the other side, both dipping and post-curing.
Three stages of resin-dipped lenses, with the final lens on the left.
Note: The dipping process alters focal length slightly for lenses. For our 3D printed camera lens, Formlabs applications engineer Amos Dudley designed and printed a lens testing device.
With the Form 3+ SLA 3D printer, you can create clear and fully transparent 3D prints affordably and with minimal post-processing.![]()
Download our white paper for a detailed overview of SLA ecosystems and the step-by-step 3D printing workflow.
Curious to see the quality and clarity firsthand? Request a free transparent 3D printed sample part.
Request a Sample Printed in Clear Resin
How to 3D Print Clear Plastic Parts
Back
-
Materials
Materials by Service
Injection MoldingCNC Machining3D PrintingSheet Metal
Materials by Type
PlasticsMetalsElastomers
Related Links
Customer Supplied ResinsColors
Injection Molding Material Alternatives Guide
Struggling with thermoplastic material shortages? We created a detailed guide to resin substitutes for ABS, PC, PP, and other commonly molded thermoplastics.
Download
-
Resources
Design Tips Guides and Trend Reports Case Studies Design Aids Webinars and Trade Shows
Blog Videos FAQs Educators and Students Glossary
Industries Medical Aerospace Automotive Consumer Electronics Industrial Equipment
-
About Us
Who We Are Why Protolabs? Research and Development Cool Idea Award Partnerships Sustainability and Social Impact
Careers Investors Locations Press Procurement
Contact Us
Proto Labs, Inc.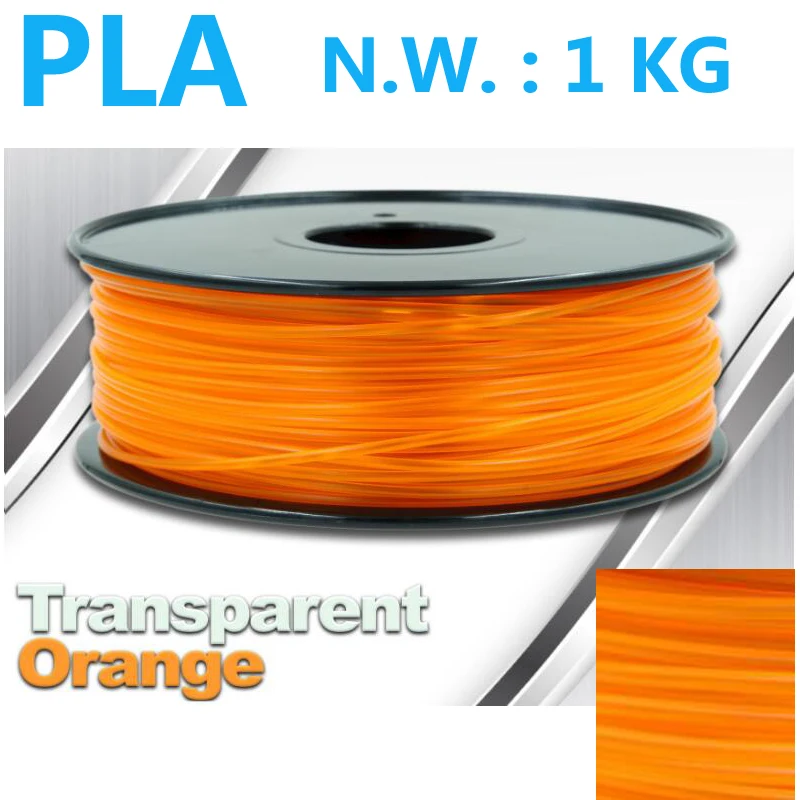
5540 Pioneer Creek Dr.
Maple Plain, MN 55359
United StatesP: 877.479.3680
F: 763.479.2679
E: [email protected]Best-in-Class Online Quoting
After uploading your part design, you'll receive an online quote that includes manufacturing analysis to help improve part manufacturability. Within your quote, you can also adjust quantity and material and see price changes in real-time.
Learn More
Get a QuoteSign In
MFG 360
Posted On November 11, 2020 By Rachel Hunt
Let’s just dive right in here and take a close-up look at clear parts for industrial-grade 3D printing (additive manufacturing). At Protolabs, we offer three different 3D-printing material options when you are looking to receive translucent or clear parts:
- ABS-Like Translucent/Clear (formerly known as WaterShed XC 11122)
- PC-Like Translucent/Clear (formerly known as Accura 60)
- Digital Translucent/Clear
Check out our materials comparison guide and 3D printing materials guide for more detailed information.
ABS-Like Translucent/Clear was used to manufacture and custom finish these light pipes.
ABS and PC-Like materials are 3D printed using stereolithography (SLA), so you can expect well-defined parts with high feature resolution. Option 3, our digital material option, is printed using our PolyJet technology, so you can expect parts with flexible features in your selection of Shore A hardness. All of these materials are ideal for fit, form, and functional prototyping. They are also used in applications where part clarity is desired for aesthetics or functional reasons.
Stereolithography: ABS-Like Translucent/Clear
ABS-Like Translucent/Clear offers a unique combination of low moisture absorption and near-colorless transparency. Custom finishing is required to achieve functional clarity. Its tensile strength and elongation at break are among the highest of 3D-printed, thermoset materials. This material can be used for general-purpose applications but is ideal for flow-visualization models, microfluidics, and light pipes.
Clear material options are ideal for designers needing to see internal structures, such as micro channels.
Stereolithography: PC-Like Translucent/Clear
PC-Like Translucent/Clear is ideal for parts with fine details that require translucence and high stiffness. As with ABS-Like Translucent/Clear, custom finishing is required to achieve functional clarity.
PC-Like Translucent has a high tensile strength and modulus, making it ideal for prototyping parts similar to molded polycarbonate.
In addition, this material is an ideal option for polycarbonate-like parts when thermal properties are not required.
Finally, PC-Like Translucent is often used for prototyping electronic housings, medical devices, and lighting components.
Here is a PolyJet overmold that was built as one part. The rigid interior window is finished with a custom clear coat.
PolyJet: Digital Translucent/Clear
Digital Translucent/Clear is one the material options available from the PolyJet technology.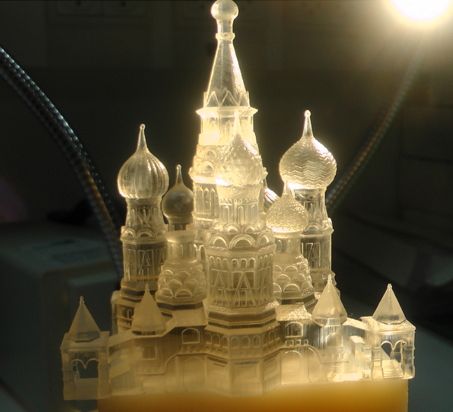 3D printing with PolyJet provides the ability to choose a desired hardness or combine material properties into a single build, which makes it ideal for prototyping overmolding parts. Shore A hardnesses of 30A, 40A, 50A, 60A, 70A, 85A, 95A are available for any of the PolyJet materials.
Digital photopolymers can be leveraged in a variety of 3D-printing applications that incorporate soft touch and flexible features. Two-toned coloring aesthetics and improved grip and impact resistance drive designers to select this material. It’s routinely used to prototype overmolded and liquid silicone rubber parts such as gaskets, seals, covers, and straps.
In the image at right, a digital overmold was built as one part. The outer shell is Digital Black 40 Shore A durometer built in normal resolution—0.00118 in. (0.029972mm) layer thickness. The interior panel is printed using rigid Digital Translucent/Clear and finished with a custom clear coat. Note: If clear transparency is of utmost importance in your design, we recommend selecting one of our two SLA material options. While we can apply our custom clear finish protocol to Poly Jet parts, you may note some slight haziness compared to SLA parts.
Finishing Levels: From Translucent to Functionally Clear
We’ve already given you a teaser on some of the finishing options available for these three materials, but here is the official rundown. When selecting a finish level on your part, there are four options to choose from: unfinished, natural, standard, and custom. The images on this page show what you can visually expect from each level of finishing. We built these stereolithography parts using ABS-Like Translucent/Clear in normal resolution—0.004 in. (0.1016mm) layer thickness.
With the unfinished option, below left, aesthetics will vary based on build orientation because the parts are not uniformly grit blasted. In addition, tiny dots or standing nibs remain evident on the bottom of the part as unremoved elements of the support structure remain intact.
With natural finishing, below center left, aesthetics will vary based on build orientation because the parts are not uniformly grit blasted. All up-facing part surfaces will appear glossy.
Parts with standard finish, below center right, are grit blasted. All part surfaces appear matte or frosted in appearance.
With custom finishing, below right, layer lines are removed and a clear coat is applied. All part surfaces appear clear and glossy.
Unfinished
Natural
Standard
Custom
After hand sanding, clear coat was applied to the bustier dress.
Custom Finishing in Action: Met Gala
Last year, we had the opportunity to custom finish a strikingly clear, additively manufactured part for the 2019 Met Gala at the Metropolitan Museum of Art in New York as part of fashion designer Zac Posen’s collection.
The bustier that was created is a clear, printed bustier dress with four-piece assembly for custom fit. The interior was designed to perfectly match actress Nina Dobrev’s body. The part took approximately 160 hours to print and nearly 40 hours to custom finish.
The custom, clear-finish bustier dress for Dobrev, was just one of several pieces worn at last year's gala that were designed by Posen and built by Protolabs and GE Additive.
Actress Nina Dobrev in her 3D-printed bustier dress at the 2019 Met Gala.
Dobrev's dress, 3D printed used SLA, was made of ABS-Like Translucent/Clear. This piece is a prime example of, as described earlier, a well-defined part with high feature resolution.
In all, the bustier dress, four gowns, a head-dress, and other accessories, were worn by British supermodel Jourdan Dunn, and actresses Katie Holmes, Julia Garner, Deepika Padukone, and Dobrev.
As Posen commented at last year's event: 3D printing holds lots of potential for the future of fashion. It allows customization, precision, and scaling that cannot be created by hand. I think it will allow designers to really push the boundaries of fashion and create elements in their designs that couldn't have been achieved before."
For more materials information, check out our Materials Comparison Guide.
Rachel Hunt is the marketing manager for 3D printing at Protolabs. A former Protolabs customer, she has held engineering and marketing positions within the medical device industry. Hunt has worked globally with end-use customers and manufacturing suppliers to commercialize surgical devices. She holds a B.S. in Biomedical Engineering from North Carolina State University and a Master’s degree in Engineering Management from Duke University.
Tagged: 3D Printing, Additive Manufacturing, Clear 3D Printing Material Options, 3D printing materials
Transparent 3D Printing Guide
Stereolithography (SLA) 3D printing can produce transparent objects that, after some post-processing, become optically transparent.
Formlabs' latest stereolithographic 3D printer, the Form 3, improves model transparency by using an elastic resin reservoir that reduces forces on the model, resulting in smoother, more transparent parts. 3D printing on a Form 3 in Clear Resin is a great way to produce parts that require light transmission and, with the right post-processing techniques, transparency. nine0003
The following processing methods can be used to 3D print transparent parts for a variety of purposes, from optical devices to light guides and liquid elements. Techniques range from quick solutions to obtain sufficient transparency to specialized techniques for creating optically transparent parts.
Clear and transparent 3D models are ideal for creating transparent prototyping elements, showing internal cavities and details, making LED housings or windows. Formlabs and our customers have used Clear Resin to create an optically clear 100% 3D printed camera lens, Times Square Fresnel lens tiles, light guides, prisms, millifluidic devices, and more. nine0003
Formlabs application engineer Amos Dudley designed and 3D printed a lens for a fully 3D printed camera.
Curious to see with your own eyes what a transparent SLA 3D printed part looks like? We will send a free transparent 3D printing sample directly to your office.
Request a Free Sample
We have tested several post-processing methods for 3D printed Clear Resin parts.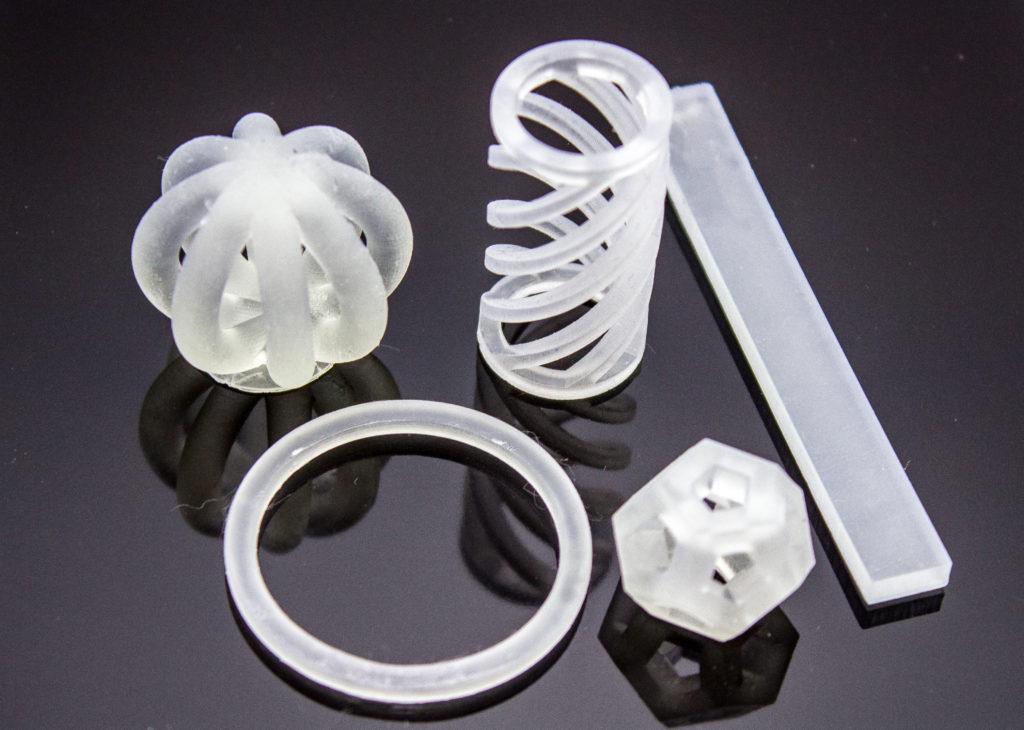 In this article, we will cover hand sanding, spray clear coating and resin impregnation. Each treatment option requires a different amount of effort, depending on the required degree of transparency and surface quality. nine0003
Application of : Hand sanding and polishing can be effective on simple shaped models with few fine details, but is not suitable for complex shaped models. With this method, it is very difficult to achieve complete optical transparency.
Hand sanding will require you to sand with very fine grit sandpaper, but with some effort you can sand and polish the parts to the transparency level of a magnifying glass. However, it is very difficult to completely remove all the layer lines with manual processing - if you turn the part at a slight angle to the light, you can notice micro-scratches. nine0003
Instruction : Use sandpaper to smooth the surface, then polish the part with acrylic cleaner and a microfiber cloth.
With approximately 3000 grit sandpaper, transparent SLA 3D printed parts become glossy and very smooth to the touch. After sanding with 12.000 grit, they reflect light. Try different sandpapers and abrasive sheets from 400 to 12,000 grit in 200 increments. Before moving on to the next grit step, slowly and carefully clean the lens and remove scratches from the previous level of sanding. nine0003
Our support site offers a simple step-by-step manual sanding guide that includes an acrylic spray finish.
If all you need is translucency, mineral oil will suffice to create a smooth surface and hide light spots.
We have tested various polishing methods for transparent 3D models, from hand sanding and spray coating to resin impregnation. nine0012
Application of : Spray coating is a quick and easy way to improve the transparency of parts without significantly reducing detail. The method is effective for all types of models, since it is possible to spray the coating on complex-shaped parts, which can be difficult to grind and polish.
Clearcoat application helps to hide layer lines and protect parts from UV exposure which can cause yellowing and unintended final cure. If you require a smooth, glass-like surface, hand sand and polish before coating; the more thorough the sanding before applying the clear coat, the better the clearness. This extra step is great for post-processed prototypes that look like completely transparent plastic, such as packaging, bottles, and microfluidic devices. nine0003
Instruction : A variety of aerosols can be used to apply a clear coat, from inexpensive sprays to products that require a separate room and tools.
- General purpose clear aerosol paints: : The selection ranges from good, very inexpensive options like Rustoleum Painter's Touch 2X to affordable high quality aerosols like Spray Max 2k Clear Glamor.
- Automotive sprays : Products such as Lesonal Universal Clear, a high solids acrylic urethane clear coat, give a very good glossy effect.
 They are designed for air drying and stoving and require a spray gun and free space to spray. A base coat must be applied before applying Lesonal Universal Clear and similar aerosols.
Coat a clean, dry model already rinsed in isopropyl alcohol (IPA). Do not finalize the model before spraying as this may cause yellowing. Air dry the model. Once it is completely dry, apply two to three coats of spray in a dust-free environment. nine0003
For a fee, a coating such as Lesonal Universal Clear can be applied at a workshop. In most cases, bodyshops use a volatile solvent such as naphtha to clean and prepare the surface of the model prior to spraying.
For the Times Square installation, Window to the Heart, Formlabs and Aranda/Lasch spray-coated the tiles with Lesonal Universal Clear in an auto body shop.
Application of : This method is best suited for cases where very high transparency of parts is required and can only be applied to flat or nearly flat surfaces such as lenses or "windows" into the interior of the part.
Resin immersion produces very smooth details with crisp and sharp surface reflections.
The method can be used to increase the smoothness of parts printed with other SLA materials, although it may reduce detail. nine0003
Instruction : Apply Clear Resin to the part using a syringe or by dipping the part into the resin, as desired. The viscous polymer will fill in the delaminations and scratches present on the part, forming a completely smooth surface.
The resin layer should be as thin as possible while still eliminating layer lines. Remove all bubbles with a syringe. Completely cure the part using the appropriate parameters, then repeat the process on the other side, both dipping and final curing. nine0003
Lens subjected to a 3-step polymer immersion procedure, final result on the left.
The polymer immersion process slightly changes the focal length of the lenses. Formlabs Applications Engineer Amos Dudley designed and 3D printed a lens tester to create a fully 3D printed camera.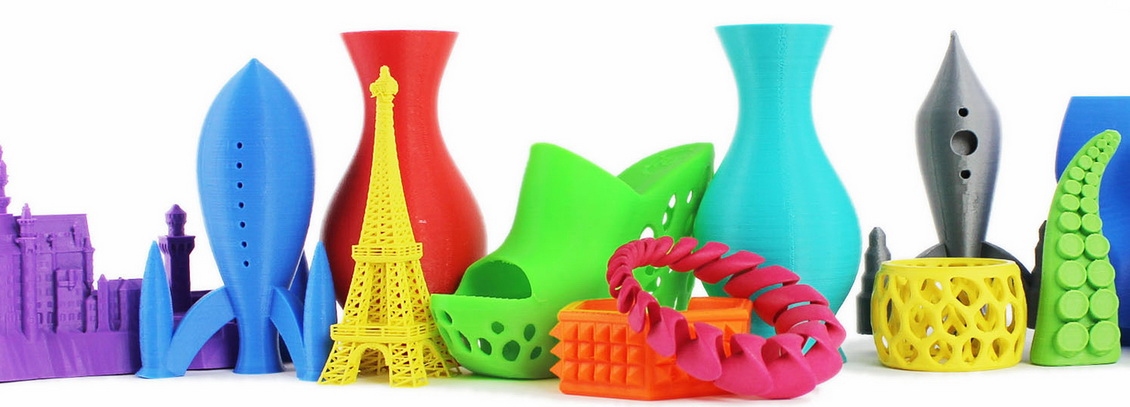
With the Form 3 Stereolithographic 3D Printer, you can create crisp and fully transparent 3D models at an affordable price with minimal post-processing. nine0003
Check out our white paper, , for a detailed overview of SLA ecosystems and a step-by-step 3D printing workflow.
Would you like to see the resulting quality with your own eyes? Request a free transparent model sample.
Request a sample printed in Clear Resin
Crystal clear material? But it happens)
3DRU
Loading
03/03/2016
5643
3D printing
Follow author
Follow
Don't want
7
Article applies to printers:
ProJet 6000 HDAs you can see, we dilute the FDM thoughts of the portal participants with industrial machines;)
Our previous post on industrial SLA printing had questions about the ProJet 6000HD 3D printer from 3D Systems.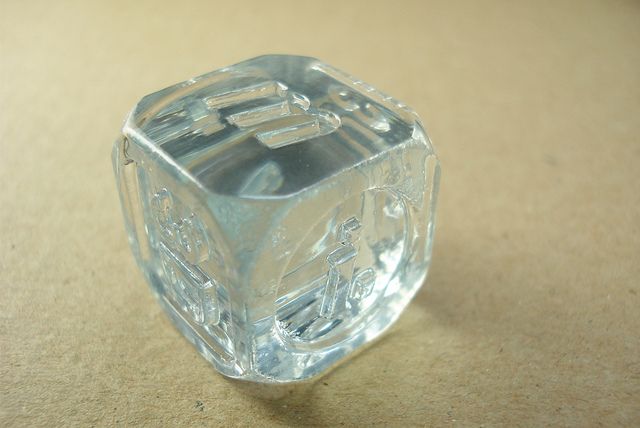 Print volume 250x250x250 mm. This 3D printer is successfully working in our production. We also wrote about it here. SLA technology is one of the highest quality 3D printing methods. nine0003
- Accuracy
- Smooth surface
- 50 µm layer pitch
Every month orders become more interesting and varied, and customers are more demanding and creative in their requests. That's why we introduced transparent SLA into our production.
VisiJet SL Clear SLA now available for ProJet 6000/7000.
What can be done now? Yes, anything!
- Jewelry
- Prototype parts
- Decorative bottles (smooth and clear)
- Decorations and lights
- Modeling
What is VisiJet SL Clear for ProJet 6000/7000?
- Polycarbonate properties and optics
- Crystal clear
- Durable
- Biocompatible
- Ideal for imaging
- Allows you to make castings using the QuickCast™ method nine0003
Balloon dome element
And again the lower jaw.
Industrial 3D printing becomes available, folks.
Our cost for SLA printing is currently 3 c.u. for 1 cm3. (1 c.u. = $1 at the exchange rate of the Central Bank of the Russian Federation)
3D.RU – we make life easier with 3D technologies!
+7(495)212-07-01
Follow author
Follow
Don't want
7
Article comments nine0003
More interesting articles
23
Subscribe to the author
Subscribe
Don't want
The use of 3D printers in construction is becoming commonplace. This year was no exception, even...
Read more
eleven
Subscribe to the author
Subscribe
Don't want
Introduction
So, good day to all! This is my second post.