3D printing first layer rough
3D Printing first layer problems
Contents
- 1 3D print first layer
- 2 3D printer bad first layer
- 3 3D printer troubleshooting first layer
- 3.1 Perfectly calibrated bed
- 3.2 Extruder at the right distance
- 3.2.1 3D print stringy first layer
- 3.2.2 3D print first layer is rough
- 3.3 Slow down
- 3.4 No cooling
- 4 Correctly calibrated extrusion
- 5 First layer height 3D printing
- 5.1 First layer too thin
- 6 3D printer first layer doesn’t stick
- 7 3D printer bed cleaning
- 8 Use some help
- 9 Mind the materials
- 10 Conclusion
3D print first layer
The first layer represents the foundations of the print, and as they always say, those who start well are halfway through the work. Below are listed a series of measures to improve the perfection of this layer, and to achieve perfect bed adhesion.
3D printer bad first layer
I have already talked about the first layer in other articles, but now its time to analyze it furthermore! The first layer of every print is important for the overall success of the printing process. A bad first layer can lead to
- Bad bed adhesion – When you have problems with bed adhesion most of the time you can’t rely on your printer for long prints. For who makes long prints that can last for days it is fundamental to have a proper bed adhesion so you don’t lose your print halfway
- Bad layer consistency – If you’re bed height is not calibrated properly most certainly you’re going to have an inconsistent layer. This is an aesthetic issue as the side that lays flat on the bed will look bad.
- Elephant foot -In some cases when the extruder is too close to the bed the excess plastic is pushed outwards. As the layers increase, the imperfections will disappear but the first few layers will look over extruded.
3D printer troubleshooting first layer
Perfectly calibrated bed
The first and fundamental rule to get an excellent first layer is to work with a perfectly flat build plate. Having a deformation-free and calibrated printing bed will allow us to have the first layer without errors. Getting a uniform line in height and consistency is an excellent starting point for any print.
If you have doubts about your bed and if you think it may be warped then you should get a glass plate to eliminate warping.
Extruder at the right distance
The second and perhaps the most important point is the printing distance between the build plate and extruder.
| ||||||||||||
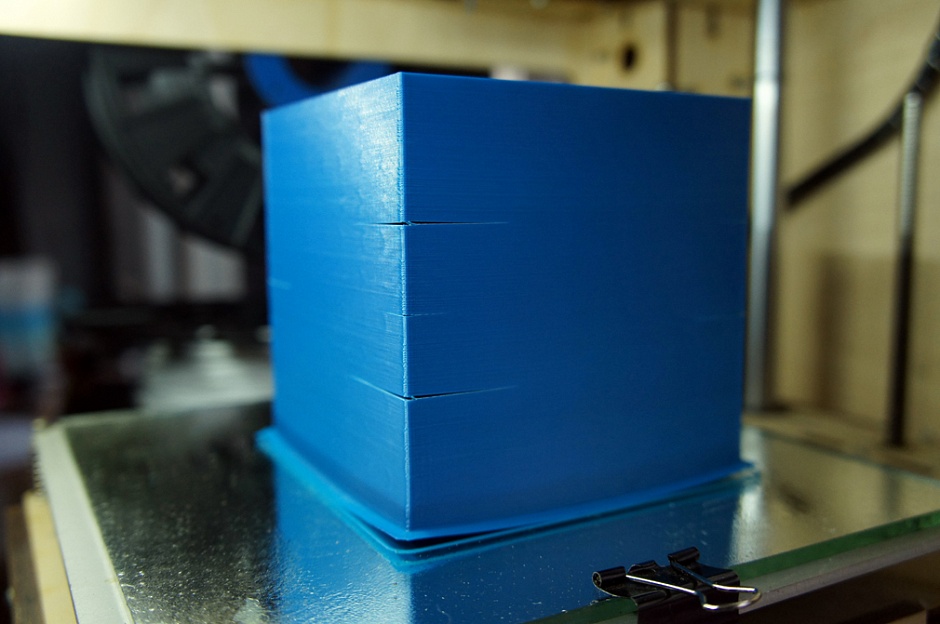
3D print stringy first layer
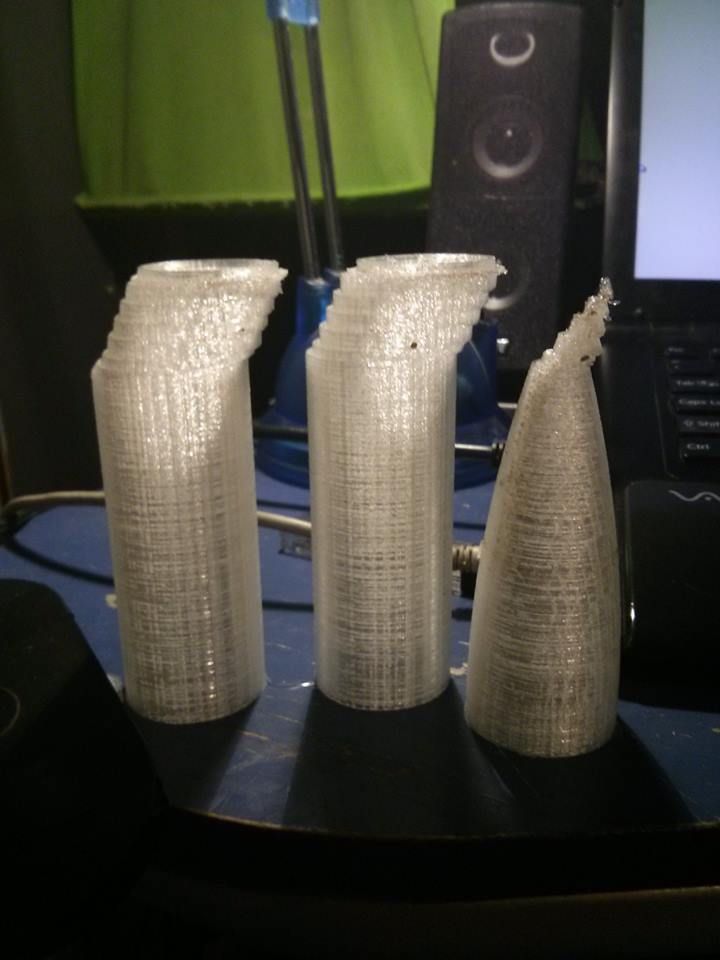
An excessive distance will be recognizable by the lines drawn by the nozzle, they will appear stringy and not connected. These lines will not match each other as they should but will present spaces between them. In addition to the aesthetic factor, we may also have problems with very low bed adhesion, which could compromise the success of the print.
In the worst-case scenario, the filament will not even stick to the bed and it will get dragged all around the nozzle.
3D print first layer is roughIf your first layer seems rough on the touch then you’re bed is to close to the hotend. When the distance is too small, the first layer will result in a mass of material spread on the plate. Even if bringing the nozzle closer to the plate can in some cases reduce some adhesion problems, it can certainly create others.
A rather common problem is the loss of steps of the extruder motor. In some cases, the motor cannot push all the filament it should with the little space available between the plate and the extruder. This could damage the whole system in the long run.
I have illustrated different types of heights and it’s not that easy to spot the difference, but with training, you will be able to recognize a perfect first layer withing seconds! It’s a skill that will never abandon us.
One easy way to eliminate this problem is by using an automatic bed leveler like the BL-touch. It is a great investment! It reduces failed prints but also it spares you lots of time manually leveling the bed!
Creality BLTouch V3. | Official Artillery Genius-Pro 3D Printer Latest Model 98% Integrity, Silent Mainboard | ||
 1 Auto Bed Leveling Sensor Kit Ender 3v2/3/Pro/Ender 5/Pro/CR-10
Slow
downSlowing down the movements for the first layer reduces the forces applied to the molten material, reducing the possibility of poor adhesion. It is advisable to reduce the speed of the first layer to 50% / 60% of the normal printing speed and to avoid going below this threshold, only in cases of particular problems(Like with PETG).
No cooling
Although cooling for PLA printing is one of the essential elements for obtaining quality prints, it is strongly discouraged to ventilate the first layer. The longer the first layer remains hot, the more it binds to the plate. In fact, all slicers have the default setting to turn off cooling for the first layer of the print. However, it doesn’t hurt to repeat it, no cooling, at least for the first layer.
What I’ve described so far are the cardinal principles, and by applying them surely you will get excellent results but I wanted to give a few more tips, in order not to leave anything to chance.
Correctly calibrated extrusion
It is very important to have the amount of extrusion well set as an under-extrusion / over-extrusion could be exchanged for incorrect positioning of the plate. Obviously, in these cases, the corrective maneuvers at the level of the bed would not bring any benefit and we will see over extrusion/under extrusion within the next few layers.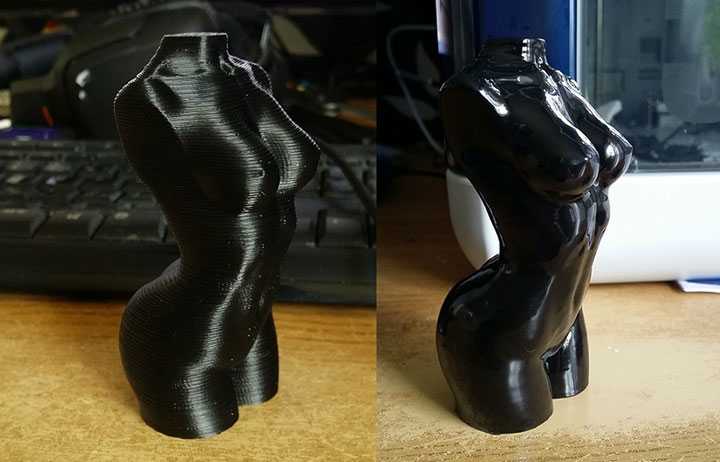 If even after leveling you find yourself with a first layer that does not satisfy you, before checking and re-carrying out the whole calibration process, you can spare a few minutes and test if the quantity of extruded material is correct.
First layer height 3D printing
First layer too thin
A higher layer height will provide more flow, therefore more heat, better adhering to the printer bed. A greater thickness of the first layer also has the property of increasing the tolerance of the leveling error of the build plate. It is recommended to increase the height of the first layer in combination with the nozzle diameter, e.g. with a 0.4 mm nozzle it is recommended not to exceed 0.3 mm. This is possible due to the low printing speed, so never use a 0.4 nozzle to print at 0.3 layer height if not for the first layer.
AS you can see a 0.1 layer height isn’t enough to compensate for the errors when manually leveling.
3D printer first layer doesn’t stick
To increase the adhesion, the consistency, and the appearance of the first layer, it is possible to set a temperature slightly higher than normal. A 5/10 degree increase in nozzle and plate will make the plastic more viscous and helps eliminate the low adhesion.
The temperature can be set by a slicer or by hand, in the second case remember to return to the usual temperature once the first layer has been completed.
3D printer bed cleaning
It is pretty obvious that without proper cleaning you’re going to have problems with adhesion.Wipe the bed with alcohol and in extreme cases use acetone (especially with a glass build plate).
Use some help
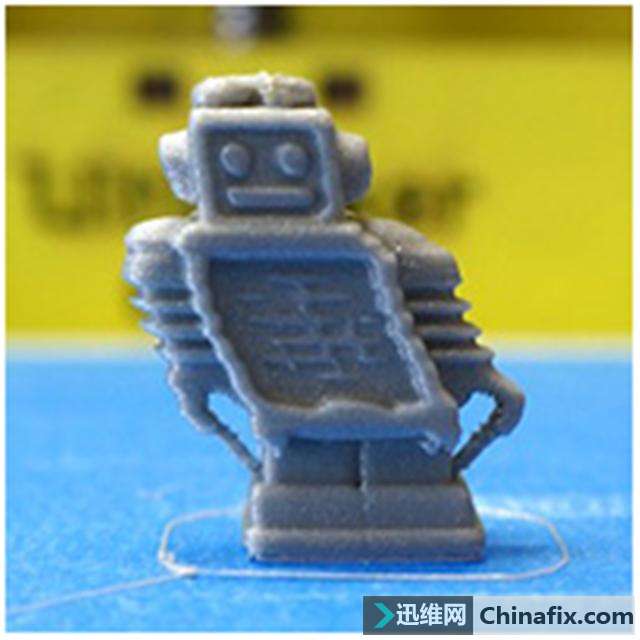
In some cases, we need some extra help from rafts or brim. When printing small parts we must use something to increase the volume of the print so that it won’t unstick that easily.
3D Printer Adhesive Glue Bed Weld Original, Strong Grip Reduces Warping for ABS, ASA, PLA, and PETG Filament on Heated Build Plates, 118ml, 4 fl oz | |||
Mind the materials
Every material act in a different way. Some need some extra help, others may stick to much.
If you have followed this guide carefully you will be able to have the first layer like this:
Conclusion
The key to a perfect first layer is a perfectly flat build plate and a correct bed leveling even if this means losing some bed adhesion. Bad bed adhesion can be solved by tweaking speed and temperature.
This post may contain affiliate links
Summary
Guide on How to Solve First Layer Problems – Troubleshooting (Cura) – 3D Printerly
There are many possible issues that you can experience when it comes to the first layers in 3D printing, causing further problems in your models. I decided to write an article going through some common first layer problems and helping you solve them.
To solve first layer problems, it’s important to have a clean, well-leveled build plate to get better adhesion to the surface. You can also use more advanced bed surfaces like PEI which have a textured surface that filament adheres to better.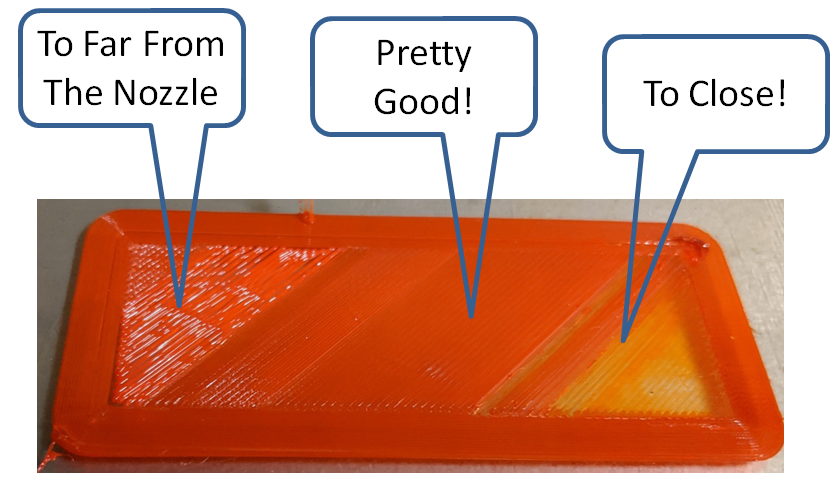 Fine tune settings like bed temperature and initial flow rate.
Keep on reading for more information about solving your first layer issues.
How to Fix a First Layer That’s Rough
A rough first layer on a print is usually due to over-extrusion and a poorly leveled print bed. It can also occur if the distance between the print bed and the nozzle is too small.
Here are some ways you can fix this.
Level Your Print Bed Properly
If your print bed isn’t correctly leveled, some parts of the print will be higher on the bed than the others. This will drag the nozzle on the higher regions, creating a rough surface.
To avoid this, make sure you level your print bed properly. Here’s how you can do it.
The method we will use is from a popular YouTuber named CHEP. It uses a G-Code to move the print head to the corners of the print bed for easy leveling.
- First, download the leveling G-Code file from CHEP. It will tell your printer where to move during the leveling process.
- Transfer the G-Code to your 3D printer and run it.
- The printer will auto-home itself and move to the first leveling position.
- Slide a piece of paper under the nozzle at the first leveling position.
- Adjust your print bed’s spring until there is slight friction between the nozzle and the paper. However, you should still be able to slide the paper out.
- Once you’re done, press resume on the printer. The printer will automatically move to the next spot to be leveled.
- Repeat the procedure at the next spot until all corners of the bed and the center are correctly leveled.
Some people love using an auto-leveling bed sensor like the Official Creality BL Touch from Amazon. This sensor will measure and automatically adjust the height of your nozzle as it extrudes material, resulting in great first layers.
Calibrate Your Extruder’s E-Steps
Your 3D printer has a setting called the extruder steps per mm which determine the precise movement that should occur when a command is sent. Some 3D printers have these settings a little too high for the extruder specifically, meaning that too much filament is extruded.
Calibrating your extruder’s E-Steps and first layer calibration is one way you can solve rough first layers in your prints. So, let’s see how you can carry it out.
Step 1: First off, retrieve the previous E-steps settings from the 3D printer
Step 2: Preheat the printer to the printing temperature of the test filament.
Step 3: Load the test filament into the printer.
Step 4: Using a meter rule, measure a 110mm segment on the filament from where it enters the extruder. Mark the point using a sharpie or a piece of tape.
Step 5: Now, extrude 100mm of filament through the printer through the settings in your control screen
Step 6: Measure the filament from the entrance of the extruder to the 110m point marked earlier.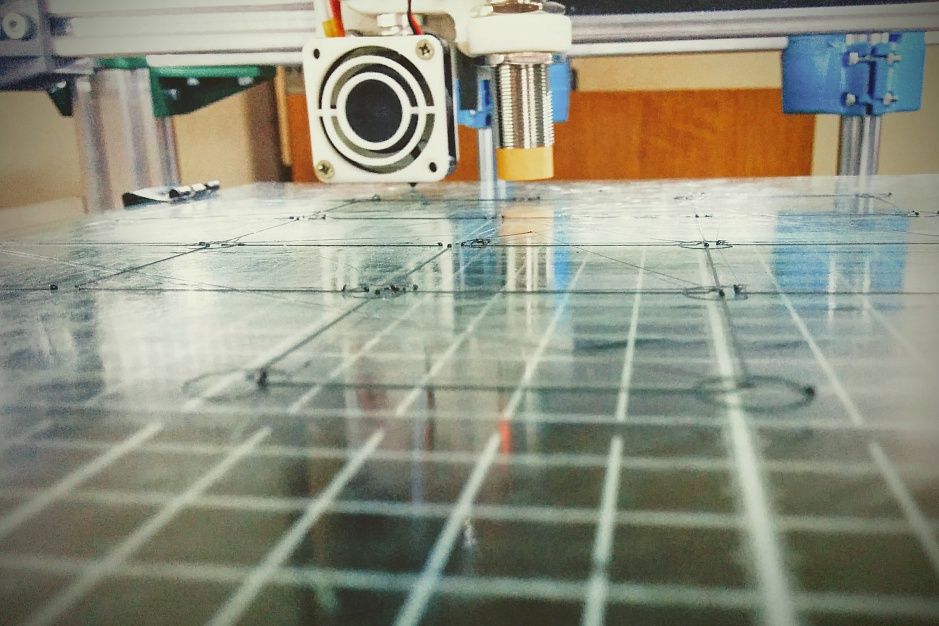
- The printer is calibrated correctly if the measurement is 10mm precisely (110-100).
- If the measurement is over or under 10mm, the printer is under-extruding or over-extruding, respectively.
To solve under-extrusion, we’ll need to increase the E-steps, while to solve over-extrusion, we’ll need to reduce the E-steps.
Let’s look at how to get the new value for the steps/mm.
Step 7: Find the new accurate value for the E-steps.
- Find the actual length extruded:
Actual length extruded = 110mm – (Length from the extruder to mark after extruding)
- Use this formula to get the new accurate steps per mm:
Accurate steps/mm = (Old steps/mm × 100) Actual length extruded
- Viola, you have the accurate steps/mm value for your printer.
Step 8: Set the accurate value as the printer’s new E-steps.
Step 9: Save the new value to the printer’s memory.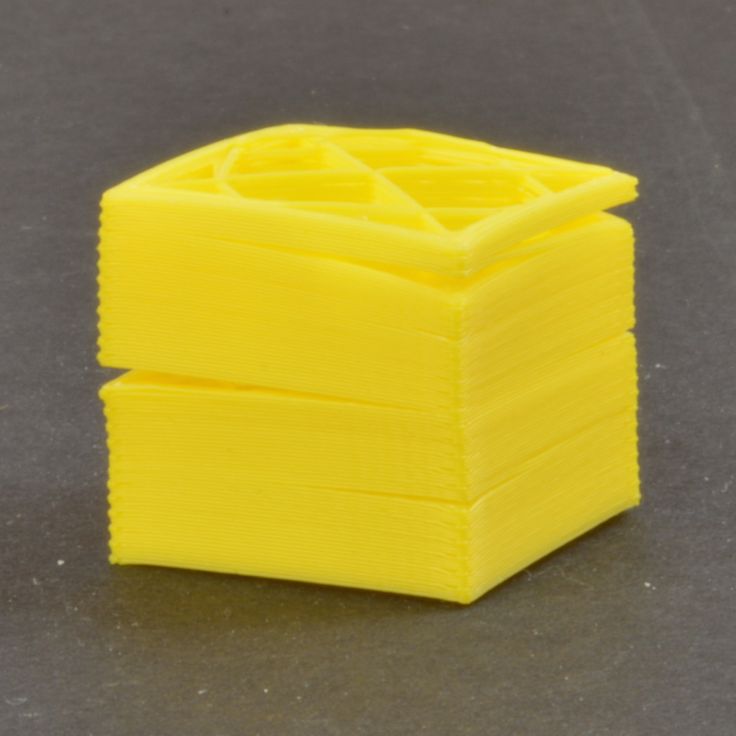
Check out the video below for a visual illustration of how to calibrate your e-steps.
Make Sure You Have the Proper Filament and Nozzle Diameter Set
You can actually set your filament diameter and nozzle diameter within your slicer.
If these values aren’t accurate in your Slicer, the printer is going to calculate the wrong amount of filament to extrude. So, make sure you set it correctly in your firmware.
Here’s how you can:
- Measure your filament in 10 different spots with a caliper and find the average value (to compensate for manufacturing errors).
- Open up the Cura slicer and click on the Printer
- Under the tab, click on Manage printers
- Select your printer and click on Machine settings
- Under machine settings, click on Extruder 1
- Change the Compatible material diameter value to the one you just measured.
Remember to adjust this when you change filament or you won’t be extruding material optimally.
Change a Worn Nozzle Tip
A worn nozzle tip can also affect the first layer quality, especially if it gets clogged frequently. It can also drag across the print’s surface, giving it a rough texture that no one wants.
So, inspect your nozzles for any sign of wear, buildups, or clogs. If you find any clogs, clean the nozzle thoroughly and try using it again if it’s still in good condition.
If it’s not in great shape, replace the nozzle with a new one and check the results.
Another interesting way you can check for a worn nozzle is by extruding filament while the nozzle is in midair, then seeing if it extrudes material smoothly downwards, or it starts to curl up.
You can get something like LUTER 24Pcs MK8 Nozzles from Amazon which includes a 0.2, 0.3, 0.4, 0.5, 0.6, 0.8 & 1mm nozzle diameters.
Reduce Your Printing Speed
Printing at high speed often leads to rough surfaces and thin first layers. For the best first layer quality possible, slow down your printing speed to about 20mm/s, so the layer has enough time to “squish” and set. This printing speed value should be the default in Cura.
Use a Good Bed Surface
A good bed surface that’s well-leveled will do a lot to produce a great first layer. After personally trying out a PEI surface, it fixed a lot of my adhesion issues and print failures.
I’d recommend trying out the HICTOP Flexible Steel Platform with PEI Surface from Amazon. It comes in many sizes to fit your specific 3D printer and they state that you can get great bed adhesion even without additional adhesives like glue.
It even fixes many warping issues where 3D prints curl in the corners.
Check out my article on How to Get the Perfect First Layer on Your 3D Prints for more details.
How to Fix First Layer Ripples
To fix first layer ripples in 3D prints, the first thing you should do is ensure your bed is leveled correctly. A nozzle too close or too far can lead to an uneven first layer, causing ripples. Even a 0.05mm difference in height can cause ripples. You can get auto-leveling devices like the BL-Touch to help.
If you’re noticing ripples on the first layer of your print, it’s probably because the bed is close to the hotend. However, it can also result from over-extrusion or high printing speeds.
Let’s see how you can fix this.
Level Your Bed Properly
After leveling the print bed, there won’t be enough space for the filament to come out if your nozzle is too close to it. This results in the filament being forced out in a ripple pattern.
To fix this, make sure you level your bed correctly, using a piece of paper (around 0.1mm thick).
Raise Your Nozzle With a Z-Offset
After leveling your print bed, you might still be experiencing the ripple effect due to the nozzle still being too close to the bed. This happens when you’re using a large layer height, and you level your bed with a card or paper with a small thickness.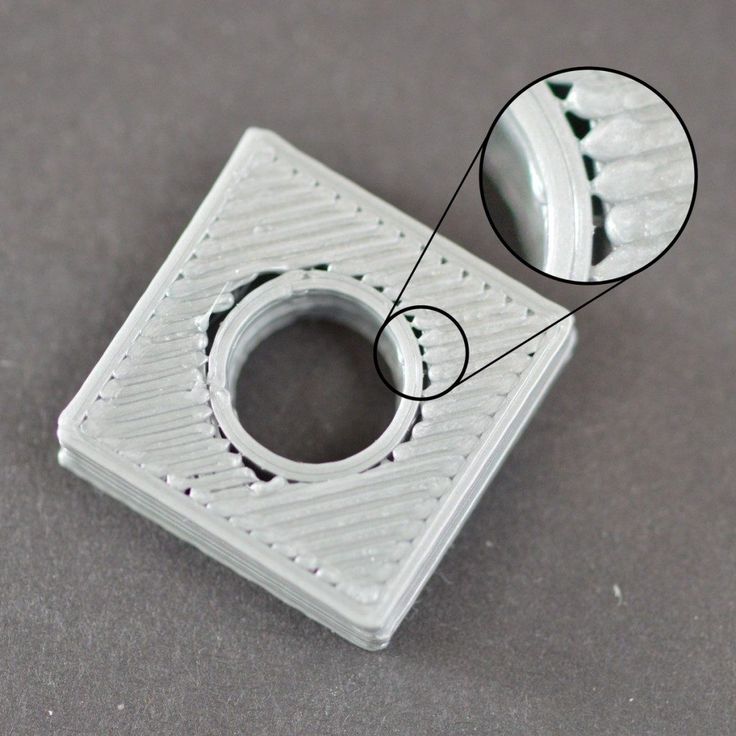
You can solve this problem by specifying a Z offset in Cura. Here’s how you can do this:
First, you have to download the Z-offset plugin from Cura Marketplace.
- Open Marketplace
- Click on plugins and scroll down till you see Z offset settings.
- Install it and restart Cura
Now, set an appropriate Z offset.
- Under Print Settings, select Build Plate Adhesion
- Under the build plate adhesion, you’ll see the Z-offset value
- Start with a value like 2mm and increase or decrease it in 0.01mm-0.04mm increments until you reach an optimal value.
- Just keep in mind if you increase it, the nozzle goes higher. If you decrease it, the nozzle goes lower.
Lower Extrusion Multiplier
If you notice that the waves and ripples on your first layer have some pretty prominent ridges, then you might be facing over-extrusion. The best way to eliminate this is to re-calibrate your extruder’s E-steps.
However, you can opt for the more straightforward route and reduce the first layer extrusion multiplier. Here’s how:
- Open the file inside Cura
- Under the print settings tab, look for the Materials
- The value you need to modify is the Initial Layer Flow
- You can also search for it in the search bar
- It’s usually at 100%. Reduce it in 2% increments and see if it takes care of the issue.
Reduce the Printing Speed and Turn Off Cooling
A low printing speed is essential for a good first layer. It lets the layer set and cool properly without printing defects like ripples.
Also, you must turn off the cooling fans when printing the first layer. This slows down the print’s cooling to ensure the first layer sets properly without warping.
Check out my article on What is the Best Print Speed for 3D Printing? Perfect Settings & How to Get the Perfect Print Cooling & Fan Settings for more information about getting your settings right.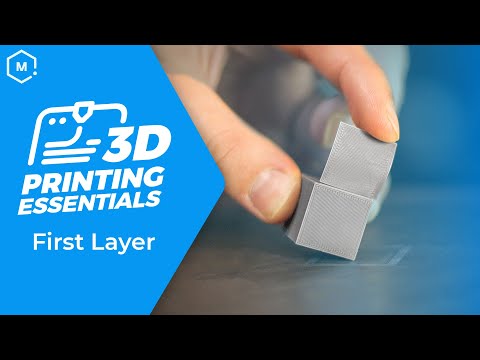
How to Fix First Layer Squish
To fix a first layer squish in your 3D prints, make sure your layer height isn’t over 75% of your nozzle diameter and that your nozzle isn’t damaged or clogged. Adjusting settings such as Z-offset, initial layer height & initial layer width can help. Also, make sure your bed or printing temperature isn’t too high.
Getting the perfect first layer squish is very important to build plate adhesion. First layer squish refers to the extent to which your first layer is pushed into the build plate by the hotend.
For a great first layer and a smooth bottom surface, you need a good amount of squish. However, in some cases, if the squish is too much or too little, it can lead to issues like elephant’s foot, squished layers, poor bed adhesion, etc.
Here’s how you can get the best first layer squish.
Clean The Bed and Check It for Warping
A well-prepped print bed always provides an excellent squish for the first layer. Make sure you clean your print bed between prints with a solution like IPA to remove any residue.
Also, it’s tough to get a good layer on a warped bed, no matter how well you level it. So, inspect your bed for any signs of warping and fix or replace it if you can.
Check out my article about Learning How to Fix Your Warped 3D Printer Bed.
Use The Proper First Layer Settings
Your first layer settings play critical roles in determining the quality of the squish you get. Three settings, in particular, are vital to getting a good first layer squish: Z Offset, Initial Layer Height, and Initial Layer Width.
Adjust Your Z-Offset
This is the distance between the bed and the nozzle. Ideally, it should be at a value like 0.25mm after leveling the print bed with paper.
However, if your first layer isn’t being “squished” properly to the bed, you can adjust it in –0.04mm increments. Also, if you are experiencing over-squishing, modify it in +0.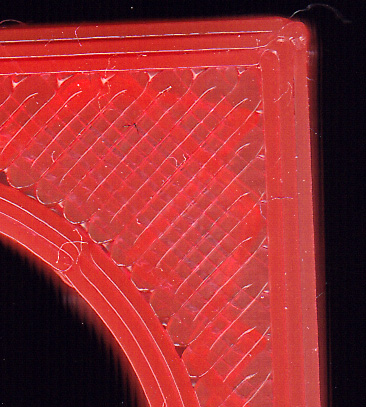 04 increments.
You can adjust it in Cura or use the bed springs to move the print bed.
Initial Layer Height
Like the name says, this is the height of the first layer. Getting it right is essential to obtaining a good squish.
The default value is 0.2mm in Cura for a 0.4mm nozzle, but you can increase it to 0.24 – 0.3mm for a better bottom layer or around 60-75% of your nozzle diameter.
Initial Layer Width
For a great squish, the layer lines should blend in with each other a bit. To achieve this, you can increase the layer width of the first layer.
You can set the value between 110% and 140% for a good initial layer width. For a 0.4mm nozzle, a 100% Initial Layer Line Width usually works well but you can increase it to 0.44mm or 0.48mm and see how it works out.
Adjust Your Print Temperature
If your nozzle temperature is too high, it can cause over-squishing and issues like elephant’s foot. Conversely, if it’s too low the filament will not melt properly, and you’ll encounter problems with build plate adhesion.
So, if you are encountering any of these problems, try and reduce or increase the nozzle temperature in 5⁰C increments to see if there are any changes.
Check out my article on How to Get the Perfect Printing & Bed Temperature Settings.
Inspect and Repair Z-Axis Components
If your Z-axis components are faulty or poorly calibrated, the Z-axis can have trouble lifting after the first layer. This may cause the subsequent layers to squish together, causing elephant’s foot.
To avoid this, check your Z-axis components to ensure they are in excellent condition. Here are some tips you can follow.
- Clean your Z-axis leadscrew if it’s straight. Remove it and roll it on a flat table to see if it is warped.
- Apply a bit of PTFE oil on the leadscrew for lubrication.
- Make sure the screws on the Z motor coupler are well-tightened.

- Inspect the rollers on the Z gantry to make sure their eccentric nuts aren’t too tight. Ideally, the wheels shouldn’t roll freely, but they should still be loose enough to move on the Z-gantry with little force applied.
For more tips on resolving your Z-axis issues, you can check my article on How to Fix Z-Axis Issues.
Turn Down the Bed Temperature
If your print is squishing a little too well into the print bed and causing defects like elephant’s feet, rounded or rough edges, etc., then the problem might be the print bed’s temperature.
So, reduce your bed’s temperature in 5⁰C increments and see if you get better results. However, be careful not to stray out of the range specified by the manufacturer. You can change the Build Plate Temperature, as well as the Build Plate Temperature Initial Layer for more control of the first layer.
How to Fix First Layer Too Low in 3D Prints
Your nozzle printing too low to the print bed can cause quality issues in the print’s first layer. First off, the plastic will have trouble coming out of the hotend leading to a clicking noise coming from the extruder.
Secondly, the print head will scrape over the first layer resulting in an unsightly top surface. It may even cause a highly squished first layer that’s difficult to remove, potentially leading to the damaging of your model.
Additionally, it can also damage the tip of your nozzle when it scrapes against the build surface, especially if it’s a textured surface.
To solve this issue, here are some steps you can use.
Level Your Print Bed Properly
When leveling your print bed, use a standard piece of A4 paper. You want to avoid really thin materials like a receipt or magazine page, as well as materials too thick like cardboard.
Also, some users get better results by using a feeler gauge. It provides better accuracy than a piece of paper.
Increase Your Z Offset
You can use the Z offset setting to raise the nozzle slightly up from the print bed. For example, you can start with a value like 0.2mm, then keep increasing it in + 0.04mm increments until your first layer starts coming out well.
Best Cura First Layer Settings
After cleaning and leveling your print bed, the next step to a great first layer involves programming your slicer settings. Cura provides several settings for adjusting the first layer of your print.
Let’s look at some important ones and their optimal values
Best Cura Initial Layer Flow
The initial flow layer is like an extrusion multiplier for the first layer. It forces more material out of the nozzle when printing to fill in the gaps between lines in the layer.
If your extruder is perfectly calibrated and you do not see any gaps between the lines, you can leave the value at 100%. However, if you need a bit of over-extrusion to eliminate the gaps between lines, you can set this value to around 130-150%.
You can start at 130% and increase it in 10% increments to see if there are any changes.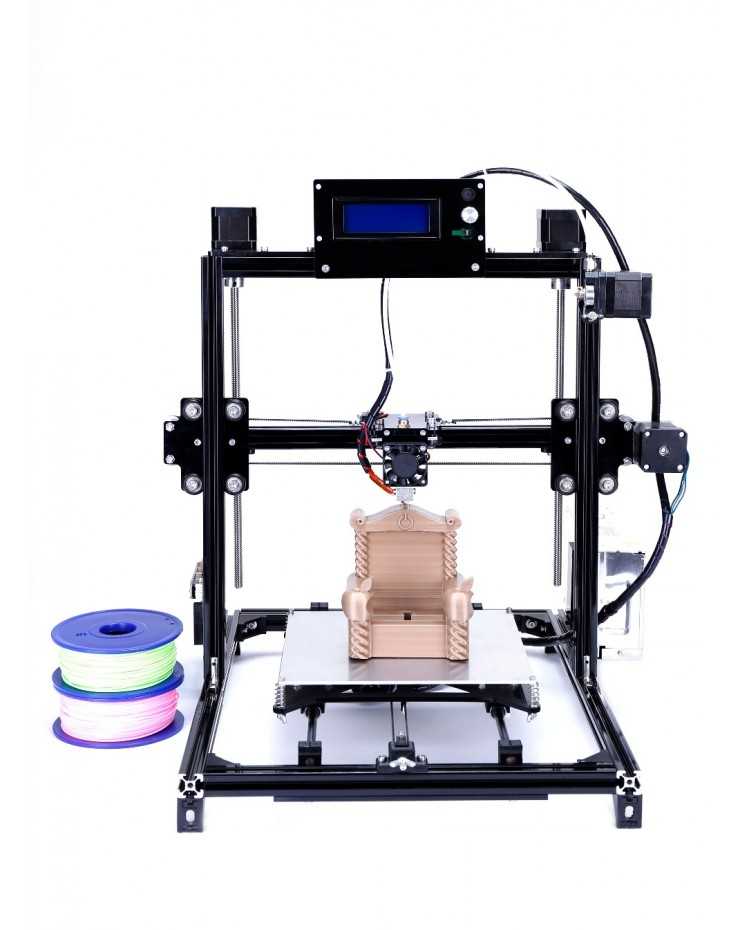
Best Cura First Layer Temperature
When printing the first layer of a print, it’s essential to print it hotter than the rest of the layers for the best adhesion. Also, you should turn off cooling when printing the first layer to allow it to set correctly.
Let’s look at the optimal values for the print and the bed.
Printing Temperature Initial Layer
Typically, the recommended temperature for the first layer is 10-15⁰C higher than the temperature you’re printing the rest of the print.
Build Plate Temperature Initial Layer
For the print bed, you can use the temperature specified by the manufacturer for the best results. You can increase it by 5-10⁰C if you’re having adhesion problems, just be careful not to go out of that range since it can make your filament a little too soft.
Best Cura First Layer Speed Settings
The best first layer speed setting for Cura is the 20mm/s which is the default speed you’ll find in Cura. You can tweak it within the 20-30mm/s range and still get good results, but going any lower may result in over-extrusion. A slow first layer is usually the best way to do it since it helps the material set better.
Best Cura First Layer Pattern for 3D Prints
The best first layer pattern in Cura is the Concentric pattern in my opinion, but it does depend on your personal preference. The Concentric pattern provides a circular geometric pattern around the print going from the inside to the outside. You can get some really good look bottom layers by using this pattern.
Cura provides a setting for selecting the infill pattern of the first layer. You can choose between Line, Concentric, and Zigzag patterns.
I personally recommend using the concentric pattern. It provides a smooth, well-connected first layer for your print.
A word of caution, when you select the concentric layer pattern, also select the Connect Top/Bottom Polygons setting. This ensures the lines in the pattern connect to each other for a firm first layer.
Check the video below by CHEP on tips to fix the first layers on your 3D prints.
So, that’s all there is to a perfect first layer. I hope these tips help you get an ideal foundation for your print.
Good luck and happy printing!
Problems with the first layer in 3D printing: how to make it perfect
The first layer of 3D printing plays a huge role in the success of the project. If you follow simple procedures and use the experience of professionals, there will be no problems.
Expert Tips
Printing the first layer with a 3D printer is important because this step forms the base, requiring more plastic.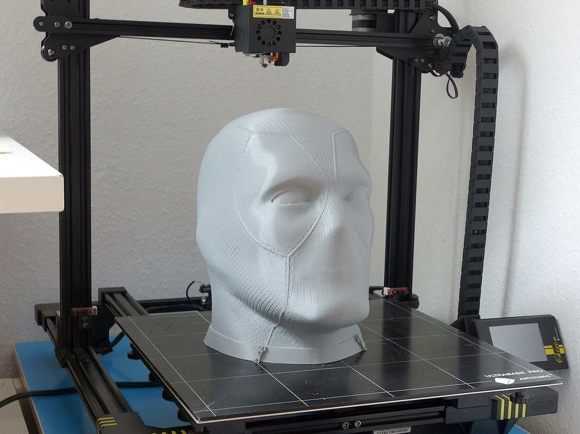 If the starting layer does not adhere well to the work surface, the model may move before it is completed, resulting in scrap. Excessive adhesion should also be avoided, as it will then be difficult to separate the finished object from the table. The first layer should strike a balance between print stability and ease of removal of the model from the desktop plate.
Setting the first layer settings
First you need to properly level the surface to build. Many new printers already have built-in auto leveling technology.
The key to a successful first coat is optimizing your print settings. By adjusting the settings in the slicer, you can ensure that the initial level is successful and the appearance of the rest of the printed product remains unchanged.
Most useful settings:
• Extrusion and table temperature. Higher heat levels will allow the plastic to melt and adhere better to the plate, so it's worth trying to raise the heat of the nozzle and table by about 5°C each.
• The line width of the first layer. Setting this value higher will allow the layers to cling to the platform and hold well, reducing the chance of failure. You can often set this to twice the nozzle size of a 3D printer (which is typically 0.4mm).
• First layer height. A higher level will mitigate the effect of small leveling errors, effectively increasing reliability. Usually the thickness can be increased up to 0.3 mm using a standard nozzle.
• First layer print speed. A slower build process will give the plastic more time to melt, which will have an effect similar to raising the print temperature. It is worth trying this adjustment if the layer height or line width is increased.
• Auxiliaries for the first layer. The rafts, supports and margins help with adhesion by refilling the nozzle to ensure a smooth flow of plastic. In the case of rafts and boards, they also increase the surface area for better traction.
When the first layer settings are ready to work, care must be taken to care for the plate to "grow" the object.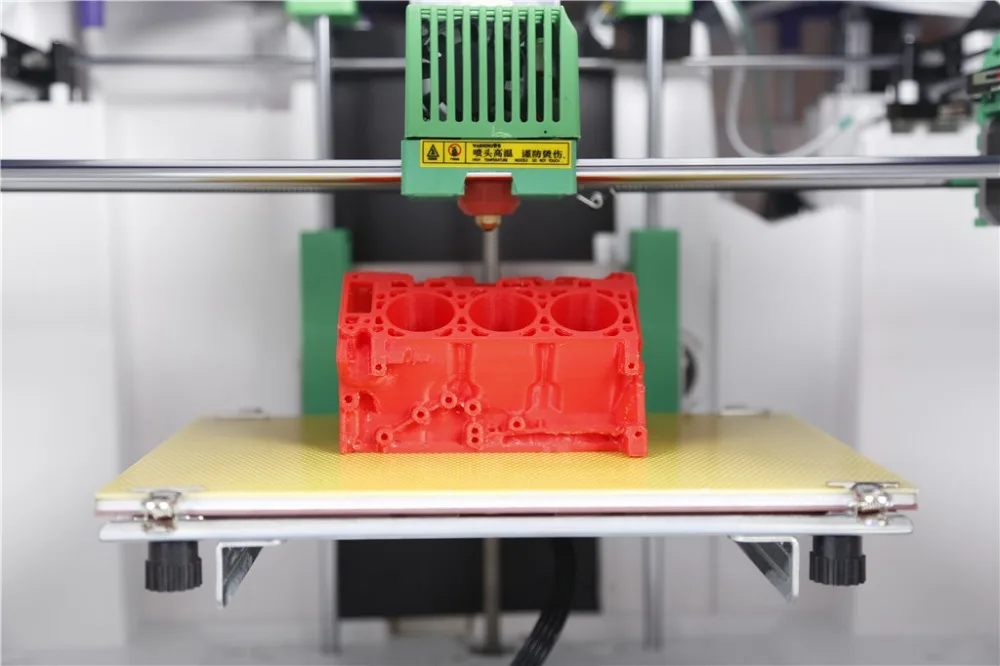
Cleaning the build platform
If the printable surface is dirty and greasy, then correctly set first layer settings will not help. The base layer will most likely not stick, and the print will fail.
To avoid these problems, you should wipe the platform before each print cycle, or at least between several cycles.
The procedure can be performed with isopropyl alcohol (regular rubbing alcohol or IPA) and a paper towel. It only takes a couple of seconds, but it will be an excellent preparation for work.
IPA can also be used to clean models when ready, so it's a good idea to keep the liquid in an accessible place.
Material selection
Finally, you need to make sure that all available resources are taken into account. This applies to both the filament, which is built, and the print surface of the printer. The following tricks will help you avoid trouble:
• Apply a thin layer of adhesive to the platform to improve adhesion to the table plate. This can be hairspray, blue masking tape, or standard household glue. This will help tough materials stick, and will also act as a spacer for materials that adhere too well, preventing damage to the surface.
• Avoid printing directly on the TPE and PETG board. These filaments are notorious for sticking unnecessarily to the print bed and can rip out pieces of any surface, including PEI, Kapton tape, and even glass. For these materials, a release agent must always be used.
If these simple guidelines are followed when 3D printing the first layer, then problems will disappear as the user creates a solid foundation for successful work. It is worth remembering these tips whenever problems appear on the first layers that need to be quickly eliminated.
3D printing tutorial with Repetier-Host for beginners
3DPrintStory 3D printing process 3D printing tutorial with Repetier-Host for beginners
Some 3D printing software products are easier to learn than others. Repetier-Host is one of those softwares that is more difficult to get acquainted with. Moreover, the entry threshold sometimes seems so high that it can discourage the desire to do 3D printing in principle. Since I had a hard time learning this software, I have written a short tutorial for beginners, which I hope will help you get to grips with this amazing software faster.
Set 3D Printer Settings in Repetier-Host
- " Printer Settings " is where you choose the size of your 3D printer's workspace in Repetier-Host, and how it interacts with the computer. Open Repetier-Host and click " Printer Settings " in the top right corner of Repetier. Remember these settings because you will need to enter them later in the slicer settings.
- In the 3D printer settings press " Add " at the top (next to " Configuration " ) to add a new printer. Be sure to enter a friendly name because you will need to refer to it again if you decide to set up multiple 3D printers.
 After adding a new Printer you should see 4 tabs: " Connection " , " Behavior " " Dimension " "" "" "" "" "0078 Advanced " . This is where you enter the general settings for your 3D printer. These are different for each printer and should be provided to you by the printer manufacturer. temperature, infill, speed, and support material settings.0078 Configure ".
 - After you click " Configure ", a window will appear at the top of the Repetier with three tabs: " Print Settings ", " Filament Settings ", and "8 Settings ". Each of these tabs has settings that you need to adjust. In the 3D printing settings on the left, there are many options.0003
- Let's start with "Layers" and "Perimeters".
 This is where you set the height of the layer, as well as the vertical and horizontal walls. For the layer height, set it to whatever height suits you: 0.1mm is considered good quality and 0.3mm is considered rough, so a number between 0.15 and 0.2mm can be a good compromise between 3D print speed and quality. It is recommended to set the first layer height to around 0.3mm, even if your part is higher resolution than that. This will help create the first layer correctly, which will help limit any 3D printing glitches on the first layer.
 - The next parameter to be adjusted is " Infill ". This is where you select the percentage to fill the solid areas of your object. Usually I choose something between 10% and 15%. Using a lower infill percentage can significantly reduce 3D printing time, material consumption, and the weight of your models. Repetier-Host has several options to choose from when it comes to the fill pattern. I have found that honeycombs tend to be the most durable.
 Well, the most optimized in terms of quality-speed - rectilinear trajectories.
 - Once the fill is set, it's time to move on to speed. 3D printers can print from 1mm/s to over 400mm/s. As a rule, as the speed increases, the quality decreases. I usually print at 60 to 120mm/s.
- The next Repetier-Host setting is " Skirt " and " Brim " where you can choose how much filament to feed into the nozzle before printing the main pattern to clean it. The default value is 2 loops at a distance of 6 mm from the model. As a rule, this is enough to start quality 3D printing. If these settings are not enough, you can increase either the number of loops or the distance from the model. By increasing any of these parameters, you increase the amount of material being fed. When changing the distance to the object, keep in mind that as the distance increases, you will be able to visually determine if the table is well calibrated. The other side of the coin is that as the distance from the model increases, 3D printing can go beyond the boundaries of the workspace.
 In general, it is physically impossible to increase this distance too much, especially if your 3D model has a wide base.
Set the slicing parameters of the 3D model: Filament Settings
- Material settings in Repetier can be found in slicer settings on the tab " Filament Settings " to the right of "9007 Settings8 Print Setting them up is relatively easy. First, specify the material diameter that is marked on the spool - usually 1.75 mm or 3.00 mm. The extrusion multiplier should be 1 unless you are compensating for under or over extrusion.
- The temperature depends on the type of filament: PLA is approx. 200 - 230° C and ABS is approx. 230 - 260° C. Start low and gradually increase the temperature. If the plastic doesn't stick to the table, you should probably increase the temperature. For better adhesion of the first layer, it is recommended to set its printing temperature 5 - 10°C higher than the rest.

- A heated bed can help improve PLA adhesion and is essential for ABS printing. The ideal temperature for 3D printing with ABS plastics is around 110°C, but unfortunately it can take a long time for the table to reach this temperature. Depending on the 3D printer, the table temperature can be slightly reduced. A sign that the table temperature is too low is that the 3D models start to flake off the table during 3D printing.
Set the slicer settings for the 3D model: Printer Settings
- The last step in setting up the slicer settings in Repetier is to set up the 3D printer settings. These settings can be found in the slicer settings under the tab " Printer Settings " to the right of " Filament Settings ". The setting in this section largely duplicates the settings in the upper right corner of the Repetier. After you enter the printer settings in the slicer, press " General "And enter the size of the table and zero position.

Add the scale and turn STL file
- To add the model of the model in REPETIER, click" OBJECT " click " Add STL File ". The model should sit on the table.
- To resize the object, enter a scaling factor in the field to the right of " Scale ". By default, scaling will occur along the x, y and z axes by the same amount. If you want to scale along each of the coordinate axes separately, disable the checkbox" Lock Aspect Ratio ".
- You can Rotate the 3D model by changing the x, y and z values next to " Translation ".0086 NOTE . Some versions of Repetier for Windows have a software bug that prevents the 3D printer from printing. If you're having trouble connecting, try clicking " Manual Control " and then " Ok " in the bottom right corner next to " Debug Options ".

Learn more
- Let's start with "Layers" and "Perimeters".