3D printer glass
Glass 3D Printing
3D printed glass manufacturing
Research team (Glass I): John Klein, Michael Stern, Markus Kayser, Chikara Inamura, Giorgia Franchin, Shreya Dave, Daniel Lizardo, Peter Houk. Prof. Neri Oxman
Research team (Glass II): Chikara Inamura, Michael Stern, Daniel Lizardo, Tal Achituv, Tomer Weller, Owen Trueblood, Nassia Inglessis, Giorgia Franchin, Marianna Gonzalez, Yinong Liu, Kelly Egorova, Peter Houk. Prof. Neri Oxman
Year: 2015-present
Location: MIT Media Lab, 2015, Cambridge, MA
Projects: Glass I, Glass II
Position
Glass 3D Printing 2 (G3DP 2) enables an entirely unique means of digital design and fabrication with glass. It is a high fidelity, large-scale, additive manufacturing technology for 3D printing optically transparent glass structures at architectural dimensions.
This novel additive-manufacturing platform includes a digitally integrated thermal control system to accompany the various stages of glass forming. It also includes a novel 4-axis motion control system permitting flow control, spatial accuracy and precision, and faster production rates with continuous deposition of up to 30kg of molten glass.
Process
G3DP2 uniquely enables the additive manufacturing of optically-transparent glass by restructuring the machine’s architecture and process control operations as informed by material properties and behaviors of silicate glass to 3D print building components with tunable, predictable mechanical and optical properties.
This enabling technology builds upon our previous efforts to 3D print optically transparent glass for product scale applications.
Age of Glass Manufacturing in Years
4500
Ancient yet modern, enclosing yet invisible, glass was first created in Mesopotamia and Ancient Egypt 4,500 years ago. Glass can be molded, formed, blown, plated or sintered; its formal qualities are closely tied to techniques used for its formation.
From the discovery of core-forming process for bead-making in ancient Egypt, through the invention of the metal blow pipe during Roman times, to the modern industrial Pilkington process for making large-scale flat glass; each new breakthrough in glass technology occurred as a result of prolonged experimentation and ingenuity, and has given rise to a new universe of possibilities for uses of the material.
Micro CT scan SEM image of a printed glass wall SEM image of the interface between 2 layers of glass Micro CT scan in cross section SEM image of a printed glass wall in cross section SEM image of the interface between 2 layers of glass The tunability enabled by geometrical and optical variation driven by form, transparency and color variation can drive, limit or control light transmission, reflection and refraction, and therefore carries significant implications for all things glass.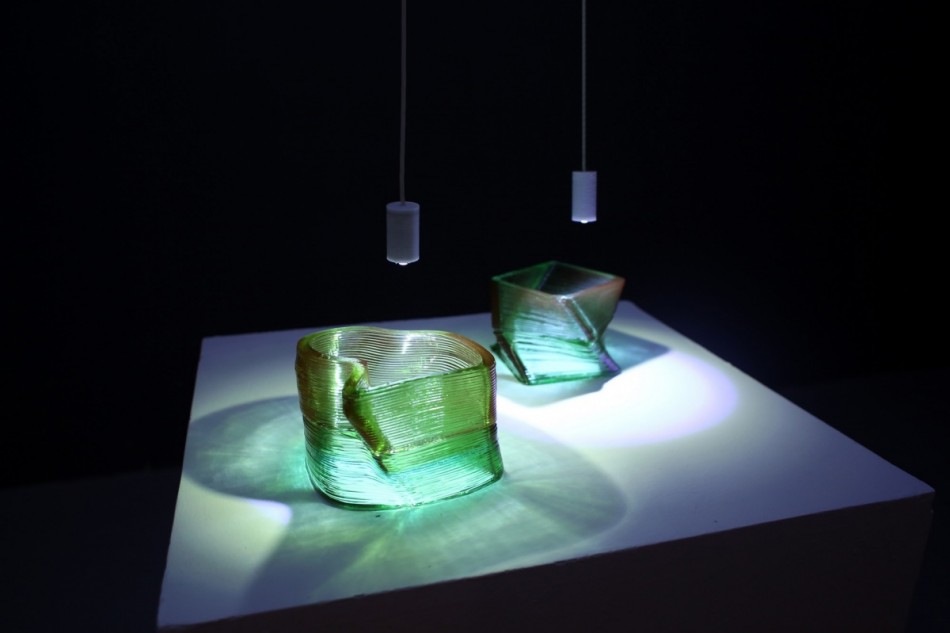
The computational methodology used by G3DP2 is designed to interact intelligently with the constraints of the manufacturing with glass. A wide range of shapes determined by desired mechanical and optical properties can be printed through feedback-enabled control systems.
Internal temperatures and feed rate are precisely regulated in order to ensure the precise deposition and cooling rate of molten glass that enables not only the high-fidelity realization of designed geometries, but the preservation of optical transparency and superior strength.
The worlds first molten glass 3D printer named G3DPPublications
Additive Manufacturing of Optically Transparent Glass (2015)
High-Fidelity Additive Manufacturing of Transparent Glass Structures (2018)
Patents
Methods and Apparatus for Additive Manufacturing of Glass
Methods and Apparatus for Additive Manufacturing with Molten Glass
Credits
Collaborators & Contributors: Mary Ann Babula, P.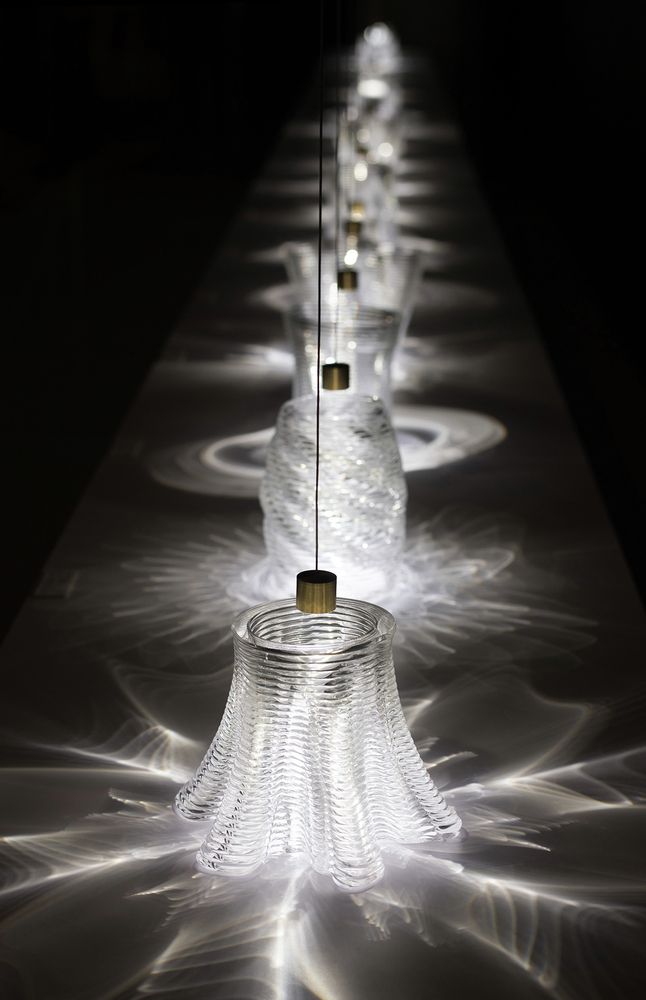 T. Brun, Jeremy Flower, Wyss Institute at Harvard University, Rubix Composites, Skutt Kilns, The Glass Art Society, MIT Center for Bits and Atoms, MIT Edgerton Center, MIT Central Machine Shop, MIT Mechanical Engineering Department, MIT Glass Lab, MIT Media Lab
All images and videos courtesy Neri Oxman and The Mediated Matter Group
Scientists develop rapid new method of 3D printing glass into parts with "the thickness of hair”
0Shares
Researchers at the University of Freiburg have worked with colleagues at the University of California, Berkeley to come up with a novel means of rapidly 3D printing complex glass parts at a microscopic scale.
Known as ‘ Microscale Computed Axial Lithography’ (Micro-CAL), this approach involves exposing resin to 2D light images of a desired shape from multiple angles, which when they overlap, trigger polymerization. When used to print the Glassomer material previously honed at Freiburg, the team say their layer-free process has the potential to unlock devices with new microfluidic or micro-optical functionality.
“For the first time, we were able to print glass with structures in the range of 50 micrometers in just a few minutes, which corresponds roughly to the thickness of a hair,” explains the University of Freiburg’s Dr. Frederik Kotz-Helmer. The ability to manufacture such components at high speed and with great geometric freedom will enable new functions and more cost-effective products in the future.”
The researchers’ ‘Micro-CAL’ 3D printing process. Image via the University of Freiburg.‘CAL’ vs serial deposition 3D printing
According to the scientists, glass has “innumerable uses” thanks to its high level of optical transparency, as well as its thermal and chemical resistance, and low coefficient of thermal expansion. Given these qualities, it’s hardly surprising that the material is sometimes used within 3D printing as well, however, the researchers say that layer-by-layer deposition can “induce defects” and “limit geometric freedom.”
Though many 3D printing processes rely on serial deposition, one alternative that does exist is Computed Axial Lithography (CAL). Rather than build up objects in layers, CAL polymerizes light-sensitive resins into 3D structures by exposing them to iteratively optimized projections, which in turn, cause them to hit a threshold at which their entire volume hardens simultaneously in a precursor material.
As there’s no relative motion between this precursor and the object being printed, it’s possible to utilize high-viscosity nanocomposites as part of the process. Another benefit of CAL over layer-by-layer techniques, is that supports aren’t required to hold builds in place, hence the process is potentially better suited to creating intricate microstructures.
Some of the team’s 3D printed glass samples and imaging results. Image via the University of Freiburg.‘Micro-CAL’ printing ‘Glassomer’ objects
In order to assess the potential of CAL for producing glass structures at a microscale, the researchers have built their own Micro-CAL system. Equipped with a laser light source combined with a low numerical aperture optical fiber, the prototype has proven capable of demagnifying the light pattern emitted by a digital micromirror device across several tests.
In these experiments, the scientists polymerized a nanoparticle-loaded material inside a nanocomposite resin, which served to suitably support the build, before it was removed and reused in the creation of further objects. Once ready, the resulting green parts were then debinded and sintered, in a process which caused their nanoparticles to bond together, yielding a fully-dense glass component.
This process was made possible by a revised version of the polymer-based silica glass developed by the University of Freiburg and its spin-out Glassomer, tweaked to be both highly transparent, and harden quickly at a predetermined threshold.
In practice, Micro-CAL 3D printing the material enabled the team to produce microstructures in the space of 30-90 seconds, with features down to sizes of 20 µm and 50 µm in plastic and glass respectively. Compared to traditionally-manufactured silica glass, the researchers’ prototypes also featured a higher tensile stress at failure of 187. 7 MPa, as their process was found to limit the formation of microcracks and indentation.
With these benefits in mind, the team behind the project believe that Micro-CAL could soon be used as a means of producing various micro-optical parts, ranging from those used in VR headsets to modern microscopes. Given that most lab-on-a-chip devices also rely on the precise integration of complex microfluidic channels, the scientists believe their method can be used in clinical diagnostic tools too.
A set of Micro-CAL 3D printed glass prototypes. Image via the University of Freiburg.The emerging field of glass 3D printing
Despite the Freiburg-led research team’s critique of many existing approaches to glass 3D printing, a number of these are now starting to show commercial potential. Formnext 2021 start-up challenge winner Nobula, for instance, told 3D Printing Industry last year that it aimed to bring a dedicated glass 3D printer and feedstock to market in 2022.
On a similarly commercial note, Optiswiss installed Luxexcel’s VisionPlatform 7 platform in November 2021, with the aim of using it to 3D print lenses for eyewear customers. After the deal was signed, Optiswiss CEO Samuel Frei claimed that it gave his firm “a clear path towards the large-volume manufacturing of prescription smart glasses.”
At an experimental level, scientists at the University of Freiburg have also worked with Nanoscribe in the past to 2PP 3D print glass silica microstructures. Again, through the use of Glassomer materials, the project participants found they were able to create complex objects with a surface roughness of just 6 nanometers, significantly less than the 40-200 nanometers seen in many other glass parts.
The researchers’ findings are detailed in their paper titled “Volumetric Additive Manufacturing of Silica Glass with Microscale Computed Axial Lithography.” The study was co-authored by Joseph Toombs, Manuel Luitz, Caitlyn Cook, Sophie Jenne, Chi Chung Li, Bastian Rapp, Frederik Kotz-Helmer and Hayden Taylor.
To stay up to date with the latest 3D printing news, don’t forget to subscribe to the 3D Printing Industry newsletter or follow us on Twitter or liking our page on Facebook.
For a deeper dive into additive manufacturing, you can now subscribe to our Youtube channel, featuring discussion, debriefs, and shots of 3D printing in-action.
Are you looking for a job in the additive manufacturing industry? Visit 3D Printing Jobs for a selection of roles in the industry.
Featured image shows a set of ‘Micro-CAL’ 3D printed glass prototypes. Image via the University of Freiburg.
Tags Frederik Kotz-Helmer Glassomer Luxexcel Nanoscribe Nobula Optiswiss Samuel Frei University of California Berkeley University of Freiburg
Paul Hanaphy
Paul is a history and journalism graduate with a passion for finding the latest scoop in technology news.
glass-ceramic, borosilicate and perforated do-it-yourself
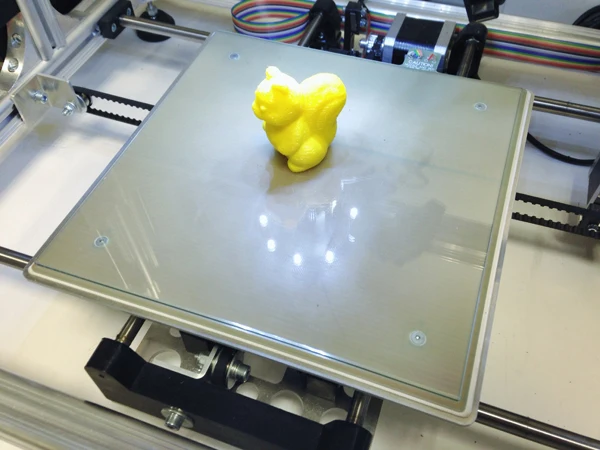
3D printers are very popular in many areas. Today, such devices are widely used in dentistry, jewelry, architecture and business. But in order for any printer to print quality parts, you should take care of choosing a surface for your desktop, taking into account the material used. Next, we will tell you how to do it right.
What types of glasses are available for a 3D printer table?
All 3D printers have one thing in common: the desktop. It is on it that a three-dimensional product is created, the quality of which will depend on adhesion with the platform. Usually the desktop is covered with glass, but there may be other options.
Sitall glass
Sitall glass is one of the most popular adhesion methods to avoid sticking of the product to the desktop and ensure its reliable retention on the surface. The only drawback is the rather high cost of such material.
For reference.
Sitall is a crystalline material with properties such as transparency, wear resistance, chemical and thermal stability. It was first developed in the Soviet Union for use in the aviation industry.
The use of glass-ceramic glass in 3D printing allows solving a number of the following problems:
- the ability to print with different types of plastic;
- solid surface mounting;
- no deformation when printing samples even when exposed to high temperatures;
- production of quality parts;
- does not require the use of glue or other adhesive materials.
All you have to do is calibrate the height between the nozzle and the build plate and start printing your first 3D products.
Borosilicate glass
Borosilicate glass has a low coefficient of thermal expansion, making it more resistant to heat than ordinary glass. When printing 3D models on a platform equipped with a similar surface, high-quality products are obtained. This is achieved by tightly attaching the first layer to the site and ensuring good adhesion.
Borosilicate glass is made from tempered materials and is used in medicine, energy and everyday life. It is resistant to temperature extremes and chemical attack. The secret is simple - in the production of borosilicate glass, boron oxide is added to the composition and the content of air bubbles is excluded.
Even a beginner will have no problems installing the glass - it is attached to the desktop of the 3D printer with clerical clips or bolts.
Perforated glass
Special tempered glass with a perforated coating ensures that the future 3D part is firmly attached to the work platform. Another plus is that such material provides easy separation of finished products from the table after they have cooled. Perforated glass is used in a range of heated desktop 3D printers. On such devices it is easy to work with any kind of plastic./i.s3.glbimg.com/v1/AUTH_08fbf48bc0524877943fe86e43087e7a/internal_photos/bs/2021/D/U/EhJXt3SIOfpdVeJy6mnw/2015-08-21-impressao-3d-vidro.jpg)
What should I do if the glass comes off the 3D printer table?
Many buyers and beginners in 3D printing are faced with the problem of keeping the model on the desktop or dealing with surface irregularities. In these cases, glass comes to the rescue. It provides a dense fastening of the product with the surface and allows you to produce high-quality three-dimensional models. But in words, everything is easy, but in practice, a beginner may have problems not only with printing, but also with such a problem as glass peeling off the desktop. In this case, you should not panic - it is better to carefully study the possible causes, watch videos on the Internet and take possible measures:0003
- Check table calibration settings - we recommend doing this with the bed and extruder preheated to operating temperature.
- Reduce print speed.
- Eliminate poor adhesion - glue or hairspray is suitable for this purpose, as well as alcohol, which is recommended to degrease the surface.

- Fix the glass with special clamps or screws.
How to work with glass?
If you have recently bought a 3D printer and do not yet know about all the features of this device, then most likely you will have many questions during the first and subsequent use. One of the possible options is what kind of surface to choose for the desktop and how to work with glass correctly. Here are a few helpful tips to get your 3D printing process up and running and produce quality products:
- Remove the protective film from the glass surface.
- Before placing the glass on the workbench, preheat the platform to facilitate easy removal of the protective film from the surface with minimal adhesive residue.
- Remove the sticker carefully.
- If adhesive remains on the platform, remove with acetone or thinner.
- Mount the glass on the work table using the clips.
note . Before you start printing, adjust the table height for your glass thickness and calibrate the platform.
Done right, 3D printed pieces will bring maximum comfort without the risk of them sticking to the platform. You can easily get high-quality models and avoid the risk of platform deformation when heated to high temperatures.
How to make glass with your own hands?
If you decide to save on buying glass, there is another way out - to make it yourself. This method may well become an alternative if there is not enough money to buy or there is no time to wait. We list several options for making glass with our own hands:
- Use blue tape or masking tape. One of the most effective and inexpensive ways to get the product to grip the work surface. Opt for wide rolls for quick surface coverage, and optionally use adhesive to avoid using extra heat when printing.
- Make a table with duct tape and hairspray . This method is suitable for printing with ABS plastic - spray regular hairspray on the surface of the desktop and place Kapton on top.
- Use window glass or a mirror and a sanding disc with grit 53 for the surface. This will create excellent adhesion when working with any plastic. You can fix the structure with ordinary clerical clips.
Mistakes and how to avoid them
Many beginners in 3D printing have problems, in particular with incorrect glass selection or installation. Follow these simple guidelines to avoid common mistakes:
- Select glass according to the plastic you are going to print with. It is best to give preference to glass-ceramic or borosilicate material - this option is not the most budgetary, but the most reliable.
- Before printing 3D models, make sure the desktop is properly calibrated.
- If the product sticks to the desktop surface, use additional methods of adhesion - glue or varnish.
- When making your own desktop surface, use tempered glass if possible and attach it tightly to the platform.
We hope that the first experience of 3D printing and our advice will help you to produce high-quality three-dimensional products with minimal losses!
- April 19, 2021
- 7050
Get expert advice
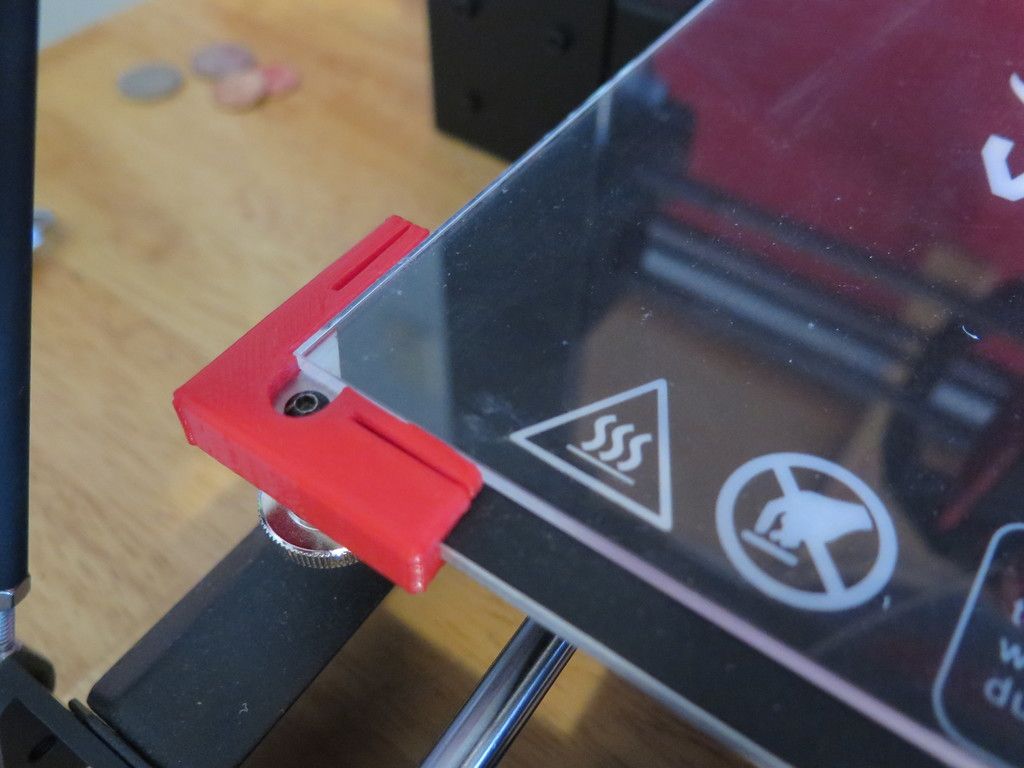
Install glass on the Wanhao Duplicator i3 3d printer
Many of those who decide to buy a Duplicator i3 3d printer soon after purchasing it think about installing glass on the printing platform. You can learn from the experience of many who have decided to do this, on forums and reviews on the Internet. We recommend buying borosilicate glass of the right size for your 3d printer's print platform.
Glass comes well packaged and protected from damage. The kit includes four clips to hold it in place. Some owners of the Wanhao duplicator i3 3d printer prefer to glue the glass to the print platform, we decided to get by with clips. Please note that incorrectly installed clips can interfere with the movement of the 3D printer nozzle when printing.
First, tear off the sticker that covers the 3d printer platform. It comes off easily enough, but there is quite a lot of glue left on the platform. In order for the sticker to come off easier and less glue left, try preheating the 3d printer platform. If you bought your 3d printer a long time ago, and your Wanhao i3 is an old generation, then there are no stickers on the desktop, and you don’t need to tear anything off.
Clean the build platform of the 3d printer from adhesive residue with solvent or acetone. It will certainly take a lot of time, but the result is worth it.
Once you're done cleaning, place the glass on the 3d printer bed. Please note that in the photo the clamps are installed in a temporary position. If left as is, they will be in contact with the extruder nozzle.
Attention! Before printing, adjust the desktop height according to the thickness of the glass. Usually the height of the springs is sufficient to compensate for the increase in the level of the platform. Set the clips to a permanent position that won't interfere with the 3d printer. If necessary, experiment with clips of different sizes. You can easily find them in office supply stores. After installing the glass, we recommend that you manually disassemble and remove the shiny nickel-plated part of the clips, as it will be in contact with the printer frame.
Another simple option, you can print on the printer itself special glass holders for the Duplicator i3 3D printer. You can download the model from our website.
| Glass holder model for Duplicator i3 3D printer | Download |
More details:
What are the pros and cons of installing a printer glass.
- Installing glass on the desktop of a 3D printer greatly simplifies the process of removing the finished model. You simply remove the glass from the table and remove the model behind your workbench without fear of damaging the 3D printer table top. It also eliminates the need for frequent platform calibration.
- When the table is heated to high temperatures and large models are printed, the aluminum platform may deform and its surface becomes uneven. The glass prevents possible deformation and improves print stability and quality.
- Easy and convenient removal from the surface; glue, or other compositions to increase sticking (adhesion).
- The disadvantages include the fact that due to the thickness of the glass, for high-quality adhesion, the temperature of the table must be increased by 5-10 ° C from the standard settings.
Why is it so expensive.
- This is not ordinary, but high quality borosilicate glass, which is much more expensive to produce. Borosilicate glass is characterized by high thermal conductivity, heat resistance and structural integrity. It is stronger than ordinary glass, but under high pressure, or falling, it can break or crack. Borosilicate glass has a wide range of applications ranging from laboratory glassware to mirrors for astronomical telescopes. This glass is used to make lenses for high-quality flashlights, teapots and much more.
If I live far away, will it not break on delivery?
- The glass is wrapped in bubble wrap and as described above is significantly stronger than normal glass.