3D print sewing
Sewing best 3D printer files・Cults
Cross-Stitch Travel Card (small)
Free
Care Bear button
€0.50
Seam Punch
Free
Sewing Machine Gear
Free
Functioning DIY sewing machine with chain stitch hook
€10.90
Box for sewing thread
Free
Singer Tradition vertical spool holder (for large, medium, and small coils)
Free
Needle Tool
Free
Bent tip darning needle for knitting
Free
support brother innovis nv880e
€0.50
Buttons with a decorative structure
€0. 59
Buttons with spherical decorative cutouts
€0.59
skadis coil holder
€1
Sewing Foot Adapter
Free
Sewing box
Free
Sewing box Gutermann 100m
Free
CROSS-STITCH THREAD ORGANIZER HOLDER
Free
Fabric Tape Measure Holder (Rounded)
Free
FHW: Singer Sewer 80mm fan guard (Please sing me the song of your people)
Free
Sewing table hinge router template
Free
Sewing cabinet door handles
Free
Thread and Bobbin holder
Free
Pfaff 96 and other Engine pusher
Free
Finger Presser Sewing Tool
€1. 28
28
gun/curved ruler
Free
SEWING MACHINE PART
€0.77
Singer Sewing Machine Tray
Free
Sewing Machine Scissors Holder
Free
Vis et écrou Buste couture Psyche // Psyche sewing bust screw and nut
Free
Cone adapter / spool of thread
€0.58
Bobbin and spool of thread stand - bobbin and spool of thread stand
Free
Vertical door storage box system
Free
Needle Plate - Singer 367
Free
Mate Imperial flower guard leather stitching
€2.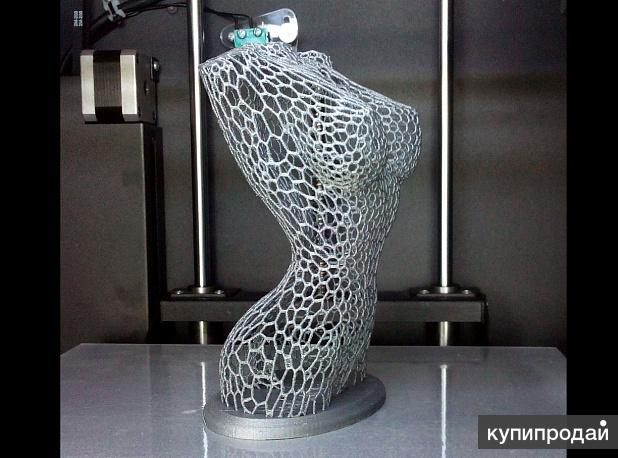 85
85
Singer yoknaz series under pulleys (alt kasnaklar)
€8
Perforated sewing machine bobbins
€0.97
Sewing machine bobbins with one-side perforation
€0.97
Smooth sewing machine bobbins
€0.97
CROSS-STITCH THREAD ORGANIZER HOLDER
€1
BUTTONS
€1
Thread holder for sewing machine
€1
TOOL FOR ZIPPER CURSORS #SEWING #SEWING #SEWING #TOOLS
€0.50
christmas bauble sewing profession
€0.50
Texture Rollers — Art Deco Patterns
€2.95
Plug pedal sewing machines
Free
sewing machine brother
Free
Sewing machine pot
€1. 16
16
sewing machine gear
€5
Custom-Designed, 3D Printed Tools For Sewing and Quilting
Using the power of 3D printing, our October Hacker of the Month creates custom-designed tools to make sewing and quilting easier for everyone.
Posted on September 19, 2019
by
Chris Morgan
Our October 2019 Hacker of the Month is a northern California resident who has taken her desire to create cookie cutters and turned it into a full-time product design and 3D printing manufacturing business for custom sewing and quilting accessories.
Heather Snow, of purplehobbies.com, first caught the 3D printing bug back in 2014, “I first learned about 3D printing from Make magazine. I read their 3D printer review articles that encouraged me to purchase my first 3D printer.”
Heather's Snowflake Cookie Stamps and some finished cookies
But Heather’s initial urge to pursue 3D printing came from the need to create custom cookie cutters. “You’re going to laugh—I wanted to make cookie cutters and pasta extruder discs. I was using free 3D software online to make what I thought were simple daisy-shaped flower cookie cutters. The software kept crashing and it was driving me crazy. A friend at work recommended SolidWorks, so I bought a copy (I was working at a high tech company at the time and this was my way of relaxing—at least that’s how I justified the purchase at the time.) Several years of trying to learn SolidWorks on my own left me frustrated but still determined.”
“But a few years ago I was fortunate enough to be able to quit my day job and enrolled full time in SolidWorks classes at DeAnza Community College. The professor started the class saying “We build things that don’t fall out of the sky”, referring to designs for airplanes and helicopters. I sat there thinking, “I just want to make cookie cutters!" I took several SolidWorks classes at De Anza Community College and this made a tremendous difference in the quality of my designs and my understanding of 3D modeling. I still have lots to learn of course, but De Anza Community College continues to be an excellent source of the latest in industry news for 3D printing and classes for all of the most popular CAD software.”
Heather's 3D printed Jelly Roll Rug Binding Tool
With all her design experience and education, Heather creates her prints with an overriding principle that we can all get behind: No Supports. “I spend a tremendous amount of time designing my objects so there are no supports needed. I do have to do a little bit of sanding rough edges on some of the parts, but my goal is to be as close to zero post-processing as possible! The most extensive post-processing I do is with the Dinosaur TacoBuddy—I bake them to anneal them which also makes them dishwasher safe!”
Heather currently has a small print-farm consisting of several Ultimaker 3s, a Raise3D Pro2, a Dremel 3D40 (her favorite for printing TPU) and a Dremel Digilab 3D45. She sticks with the native slicers for each of the printers; Cura for the Ultimakers, Dremel’s Cloud software, and IdeaMaker for the Raise3D. She still uses SolidWorks to create all her designs, even though it was not easy to learn, she says the time she invested into SolidWorks was well worth it.
Heather and her family are always ready for something to break in the house and use 3D printing to come up with a quick, cost-effective solution, as well as going through the iterative process to create the perfect print. “We use 3D printing for EVERYTHING at my house. If something is broken, we create a replacement part. If we need a tool, we create and print one. 3D printing is awesome, but the real magic comes when you combine it with the ability to create your own designs. Now, whatever we can imagine we can hold in our hands in a matter of hours (OK, sometimes days) and that’s still totally amazing to me. I love solving problems, and the more I learned about 3D modeling, the more things I saw that I could “fix” with 3D printing. From dinosaur-shaped taco holders to custom-designed quilt tools I’ve been having a blast with 3D printing. ”
”
Clever mason jar lids to protect water from pesky cats!
“My son’s cat loves to drink water from anywhere but his water bowl. Whenever I set down a glass of water the cat would immediately appear and stick his head in the glass to start drinking. YUK! I created lids with straw holes for mason jars to keep the cat out. The first ones I made were out of PLA and they would leak if I tilted the jar so I started to print them using TPU and they work great! They are also dishwasher safe which is an added benefit.”
“I’m also a fan of giant coffee mugs and mine was leaving rings on our new wood table. There aren’t coasters on the market large enough for my coffee mug so I designed my own and now it’s a place for us to decorate for the holidays: flowers in the spring, snowflakes in the winter, etc.”
Heather has taken all of her education, experience, and design-savvy to create a business producing tools for another industry; sewing and quilting. “I have created lots of quilting tools that have helped keep people safer and more efficient. I was taking a quilt class one day and the woman next to me kept stabbing herself with pins every time she tried to pick one up. I thought that there had to be a better way to hold the pins so she wouldn’t keep getting hurt and the Magnetic Pin Cup was born. It’s a cup that holds the pins sharp side down with magnets, but it also has a telescoping carrying case and lid that twist shut to securely transport the pins. There are several other quilting tools I created to make things either safer or easier. My BladeSaver Thread Cutter allows people to reuse a 45mm rotary blade that they would have otherwise thrown away. The design safely holds the blade and allows threads to be cut but doesn’t allow fingers anywhere near the blade. There are several other tools that help quilters when a third hand would come in handy.”
A 3D printed Bladesaver Thread Cutter
Heather primarily uses PLA in her 3D prints, “ I’m concerned about the particles emitted from printing with other filaments. I use a lot of Matterhackers MHBuild and PRO Series filament because it’s so consistent (no, I wasn’t told to say this!). I also use TPU for mason jar lids and a few other gadgets I’m currently designing.”
Heather is also a fan of how 3D printing allows her to be flexible in her business model when the need arises, “3D printing allows me to offer many colors and scale production to create whatever is in demand at the moment. A friend blogged about my products and I had a run on a special color that she mentioned. It was great to be able to immediately ramp up production of that color for a few days and then return to the regular set of colors afterward.”
“I was also lucky enough to get a distributor interested in selling my products. This meant more volume was needed quickly. It was great to be able to order a few more Ultimakers from MatterHackers and have them busy producing products just two days later, and at a fraction of the cost of injection mold tooling!”
3D printed Magnetic Pin Cups
Most of Heather’s passion for creating these products comes from her love of baking, sewing, and quilting - another level of Making that pairs extremely well with 3D printing and vacuum forming. “Quilting and cooking are my two favorite hobbies. Every time I struggle and wish there was a simpler way to do something I think about how I could solve the problem with 3D printing.
“My grandmother used to cut a hole in the top of her Morton salt containers so she could stick a measuring spoon inside. I took that idea one step further and created a swiveling lid for the salt container. I love to make cookies but I’m terrible at decorating them so I create combination cookie cutters and stamps. The cutters obviously cut out the shapes and the stamps provide the lines for the designs. Easy!"
Dinosaur Tacobuddies!
“Chocolates are one of our favorite things to make. I use a combination of 3D printing and the Mayku vacuum forming machine to make custom chocolate designs. We created special 80th birthday chocolate discs for my father’s birthday.”
“Someone stole one of the round tow covers from the bumper of my car. This left an ugly hole in the bumper so my son designed and 3D printed a set of flowers to fill the hole (and replaced the remaining tow cover so it’s symmetrical). Yes, 3D printing is contagious. Both of my sons create and 3D print things regularly.”
3D printed Pinnable Quilt Block Markers
Heather hopes to see many of the things that the community is looking for in the future for 3D printing; accessibility, and sustainability. “I want to see 3D printers in every home so people can purchase and download designs to print in whatever color and material they want. I would love to see 3D modeling offered to all students as a basic skill. It took me a while to rewire my brain to think about how to design things in 3D, but now that I can create whatever I can dream up I’m having a blast! I would also like to see recycling for filaments and printed parts. PLA is labeled as biodegradable, but if we could get it recycled that would be awesome for users and for the earth.”
Finally, pulling from personal experience, Heather knows that education surrounding digital fabrication methods like 3D printing is paramount. “I’m a huge believer in hands-on learning. I would love to see more programs like DeAnza Community College has where they teach 3D modeling as well as how to use 3D printers, how to choose the correct 3D printing process, etc. The challenge is that programs like this focus on professional 3D printing—I would like to see more training for home use. I enjoy the YouTube videos that MatterHackers publishes as well as those published by many 3D printing enthusiasts, but nothing beats real, hands-on experience. It would be great if there were multi-day boot camps to teach people how to use 3D printers and how to maintain and troubleshoot them. We also need 3D printing superstores where you can go in and get help from a 3D printing expert with either troubleshooting a printing problem or help with creating a design for 3D printing.”
A measuring-spoon friendly salt lid.
We can’t wait to see how Purple Hobbies continues to be successful with Heather’s creative drive and spirit! If you would like to learn more about Heather and Purple Hobbies, you can visit her website here:
https://www. purplehobbies.com/
Are you a 3D printing Hacker or know someone that is? We would love to share their stories with the 3D printing community! Please email [email protected] with information, and you or your friend could be our featured Hacker of the Month.
3D printed mesh fabric
Prologue
Hello everyone! I am developing "smart sequins" - electromechanical color-reproducing devices for designer clothes. Our team is passionate about the idea of creating clothes and accessories that can change their color at the request of the owner or depending on environmental conditions.
In this article I want to talk about how we used 3D printing in our project, share our experience and tools.
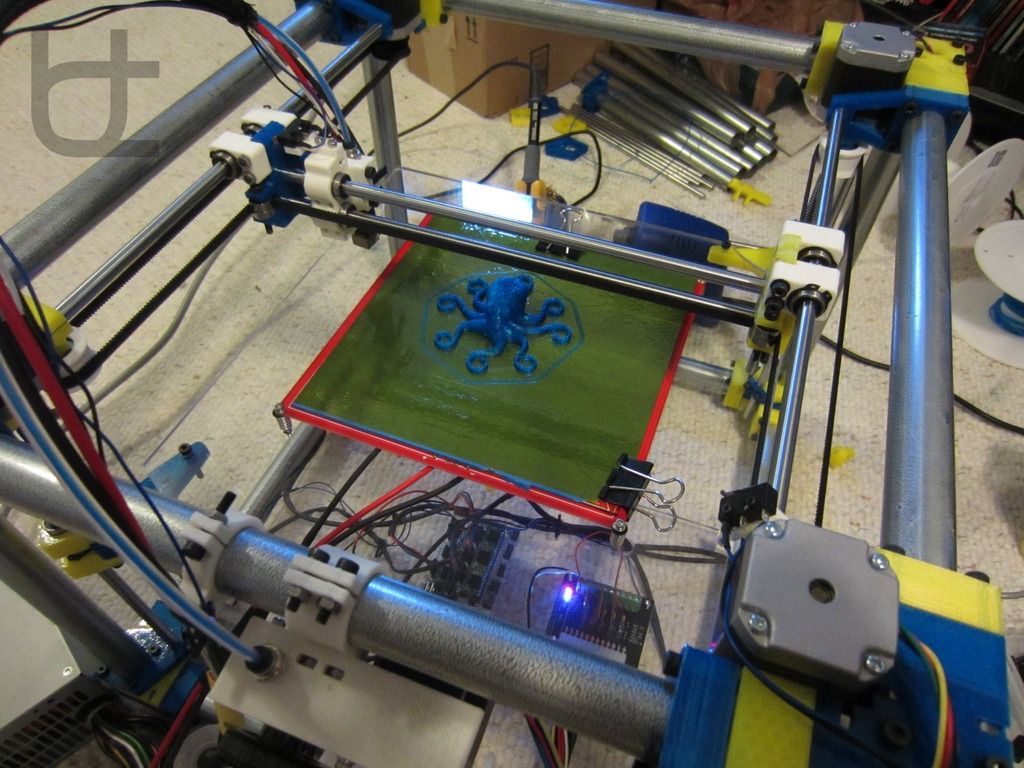
3D printing on fabric
One of the tasks that I had to solve was to figure out how to make an elastic fabric out of plastic sequins, which in its properties would resemble textile materials. At the same time, it is necessary to provide for the possibility of easily creating electrical connections between the sequins.
There are quite a few articles and materials on making clothes on a 3D printer. Many different methods have already been invented, from creating hinges right in the printing process to printing with elastic plastics.
While looking for a solution, I came across this video. From it, I first learned about the method of printing on mesh fabric using a conventional FDM 3D printer.
The author himself claims that he spied the idea here: Shorey Designs.
The essence of the method is very simple. We create a 3D model of a fragment of the future canvas, then arrange a lot of fragments so that we get a whole canvas. We start the slicer and prepare the G-code. Before sending it to the printer, you need to insert a pause and raise the extruder before printing a certain layer. The printer will stop during operation. At this point, we cover the printed layers with a mesh cloth. We continue to print. Due to the presence of large holes in the fabric, the layers of plastic will interlock with each other, as in conventional printing, and the mesh fabric will be firmly integrated into the parts.
Modifying G-code
I use Cura version 3.2.1 as a slicer. 3D printer - homemade H-bot controlled by a board based on ATmega2560 (RAMPS 1.4) with Marlin firmware.
To pause the printer, there is an M25 command. Command for lifting in Z by 20mm: G0 Z20. It is noteworthy that the M25 must go before the ascent, otherwise the next command is processed first. Why this happens is a mystery to me, apparently somehow connected with the processing of commands by the printer.
Add commands to G-code:
Operation automation
Manually searching for the required line in the G-code file and inserting commands is not the most modern solution, I thought and wrote a simple program that allows you to open and view toolpaths.
For the convenience of viewing the layers, the “explode” command is provided, which allows you to visually increase the distance between the layers of the model. After pressing the "insert pause" button, the distance between the marked layer (red) and the previous one increases. This means that the print will be interrupted precisely between these layers.
To understand where one layer ends and the next begins, I used the comments that Cura kindly provides in its output files. The keyword ";LAYER:X" allows you to accurately find the boundaries of layers in a text file.
Pressing the "write file" button allows you to save the modified G-code in the specified location.
Save the file to the SD card and bring it to the printer.
It's funny that only while preparing this article, I came across a video that tells how you can do the same using standard Cura tools ... But the process is already running, it's too late to slow down! Here, starting at 7:30, it is described in detail how to do it. Well ... hurry up - learn how to parse G-code!
Trying to print
Formation of the first layers. We print on glass. Heated table. Table temperature 60⁰С, printing temperature 220⁰С. The print material is PLA plastic. Layer height 0.2mm.
During the pause, place a piece of fabric and fix with magnets. Since the table is aluminum (paramagnetic), we put the magnets on the top and bottom sides of the table. Fixation is made in 4 places, in the corners of the part. This is quite enough. The main thing is not to place them too close to the print area, otherwise the magnets will stick to the print head.
After 40 minutes, this is the structure. The thickness of each 6 carbon element is 1mm. The gap between the elements is 2mm.
In this experiment, tulle was used as the backing fabric. It is a lightweight mesh fabric of medium stiffness, woven from polyester threads.
Experiments have also been made with mosquito net printing. In the hardware store, there were two types of them: fabric and fiberglass. Fabric mesh is softer than tulle, but has greater mechanical tensile strength, as well as less elasticity. The fiberglass mesh is harder than tulle, its mechanical strength is the highest of all participants in the experiment.
Hexagonal sequin printing on fiberglass mosquito net. The gap between the elements is 1mm. The matrix is very hard. Clearance is clearly not enough.
Round sequin printing on fiberglass mosquito net. The gap between the circles is 2mm. It has a lot of flexibility, but there is too much unfilled space between the sequins.
After several test prints, the fabric mesh was chosen. She formed the basis of the matrix of smart sequins. The resulting matrix can bend in all directions.
The video demonstrates the operation of the program, the printing process and the final result.
Conclusion
The method of printing on mesh fabric proved to be very good. This is an ideal solution for our task, because the fabric substrate allows us to weave conductive threads into it, which are used to provide electrical connection between the individual sequins of the matrix. Moreover, the formation of a “pattern” of conductors can be carried out at the preparatory stage. And the 3D printing itself is later.
The strength of the resulting structure depends mainly on the strength of the substrate material. But the flexibility will also depend on the distance between the sequins, as well as their shape.
The developed program still needs to be improved. For example, you can finish the retract before lifting, allow the user to adjust the height of the extruder.
Link to the source code for the processing environment.
And also a link to the release with the .exe file of the program.
By the way, we recently launched our "smart sequins" on the crowdfunding platform. For those who want to get to know our work better, I will leave a link.
What is 3D printing. Features of 3D printing technology. 3D printing on fabrics and souvenirs
What is 3D printing is the transfer of prints to various types of surfaces, while maintaining high image accuracy. Using this technique, you can create an exclusive design for clothes, souvenirs, etc. Men's, women's and children's T-shirts with three-dimensional drawings are firmly in fashion and do not lose their positions. You can decorate clothes and accessories with original prints.
3D Fabric Features
Various types of textiles are suitable for 3D textile printing. In order for the image to retain all its qualities for a long time, it is necessary to take into account such characteristics of the material as:
- Composition.
- Structure.
- Density.
The method of surface treatment, purpose of use and storage conditions of the fabric must be taken into account.
3D printing can be done on light and dark surfacesWhich fabrics are suitable for 3D printing
3D printing is a universal method for which all types of fabrics are suitable:
- Natural.
- Synthetic.

- Mixed.
- Awning.
Quote. 3D printing can be large format. It has found application in advertising, interior decor, art, etc. Used to create decorations, wallpapers and more
Various weaves are allowed, such as:
- Textile . Jeans, silk, linen, satin, velveteen.
- Knitted . Interlock, cooler, footer.
Technologies for creating 3D printing on fabric
3D printing technology on fabric involves the use of various methods of transferring and fixing prints. Among them are:
- Sublimation . The paint penetrates the fibers without affecting the properties of the material. Only synthetic and mixed materials are suitable for the method. The advantage of technology in the saturation and durability of prints.
- Digital direct printing .
 Such 3D printing does not require additional media. Prints are applied directly to the fabric. It's fast, but can be expensive.
 - Screen printing . Drawings are created using stencils through which the dye is printed. Suitable for processing fabrics with a rough structure.
- Thermal transfer . Film or paper is used for transfer. Application is carried out by a special heat press at high temperature.
Following the rules for the care of decorated products, even with frequent washing and everyday wear, prints will remain flawless
3D printing features on phone cases
. Both smooth, glossy and rough surfaces are suitable for processing. In a special vacuum thermal press, several units of products can be processed simultaneously.
Before phone cases are placed in the machine, they are covered with a film with an image, which is securely fixed.