Sli3Dr 3d printer
Sli3DR 3D Printer design files up on Youmagine
Hello everyone,
Just a quick update to say the design files, source files and other info are now (finally) up on Youmagine (and GitHub) - Yay!
Yet another 'FreeD' RepRap Printer for you to play with :)
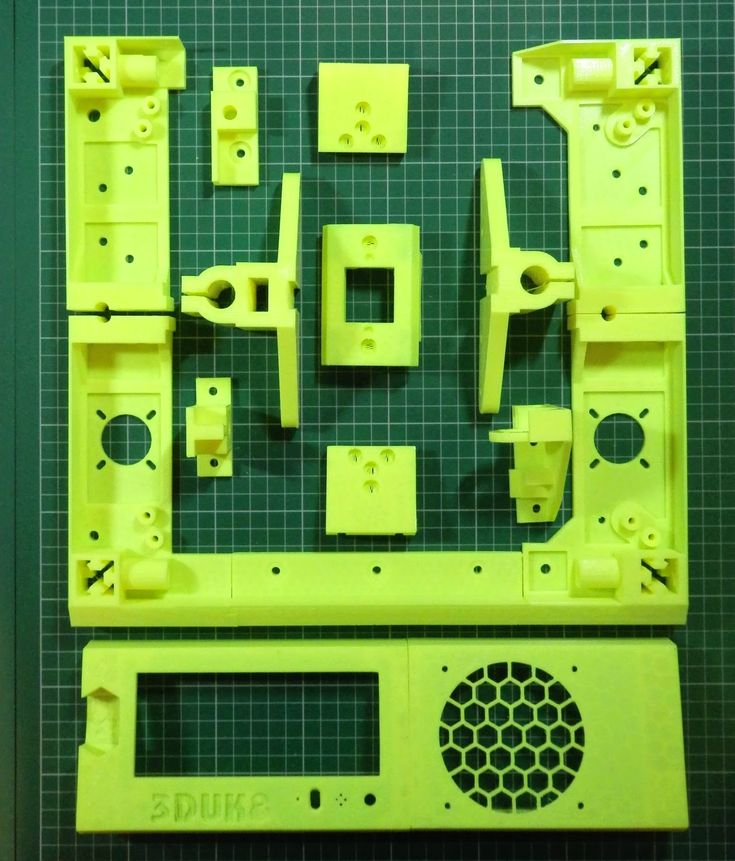
Sli3DR, originally discussed here, (wow! was that really back in July, sorry for the delay, time is going fast) - files are now posted up on Youmagine Here
Do also take a look at the images on Youmagine to see how to build one, most of the fittings are M3 and M4.
You will need some 20mm Alu extrusions - (sizes on Youmagine) and some M4 V groove bearings (eBay)
I have added Repetier Firmware for it up on my GitHub here
It's also as a RAR archive on the Sli3DR Youmagine page
Firmware is setup and running for RAMPS 1.4
You can configure Repetier Firmware for other Hardware using the fancy online tool here - Load the Config. json file.
This time, I didn't do a Marlin release for it, if you make one, let me know or just share it.
I hope you build one, the print results I have had from it are outstanding.
0.2mm Layers - Really great Z -layer registration - finally as good as my Delta's -
My quest for the perfect Cartesian Z axis is complete... for now.
********************************************************************************
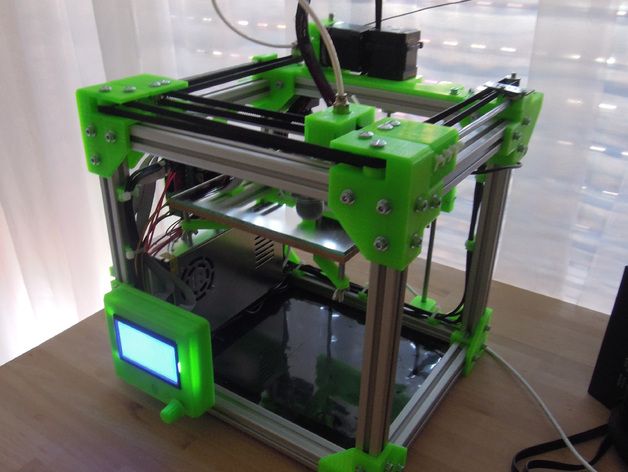
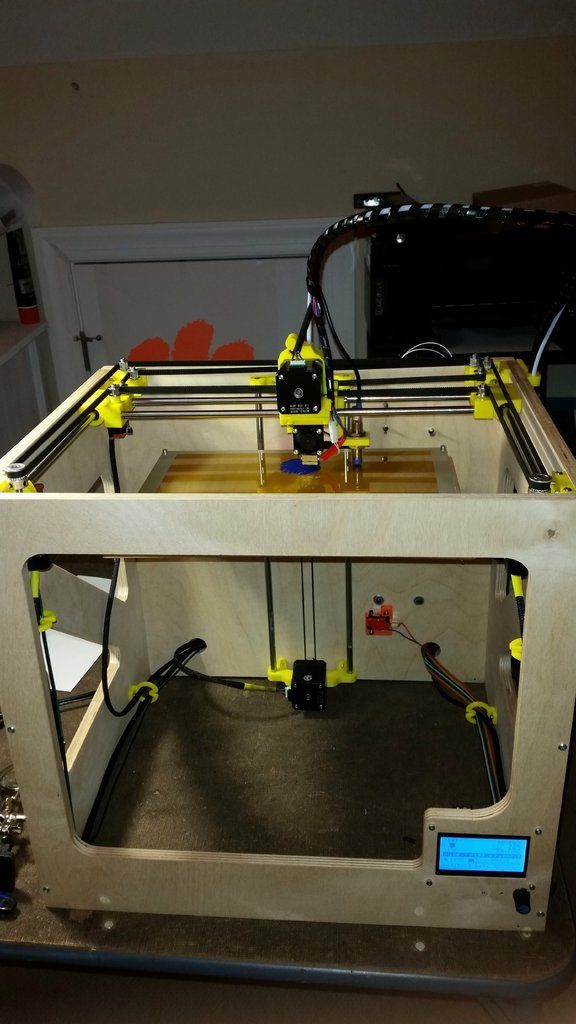
Sli3DR_MAR2014_REV3_012_Final_machine_build.
License, project and contact info -
This Design is part of the RichRap Sli3DR 3D Printer (A RepRap project)
Thank you for downloading, please be aware and abide by the license all these files.
The RichRap Sli3DR 3D Printer uses an Attribution - ShareAlike Creative Commons V3 (CC BY-SA 3.0) - http://creativecommons.org/licenses/by-sa/3.0/
This License is not greatly restrictive at all, so please don't forget to attribute my work and acknowledge.
If you decide to print and sell these or make further changes, improvements or additions, that's great! I want you to do that !
I hope this work has been of some use to you, if you wish to say hello or donate towards further developments please see my Blog here - www.richrap.blogspot.com
Many thanks - Richard Horne (RichRap)
Please feel free to contact me.
My website - www.richrap.com
Catch me on Twitter @RichRap3D
Watch me on YouTube - http://www.youtube.com/user/RichRap2011
Google+ https://plus.google.com/+RichardHorne_RichRap3D/about
Please see www.reprap.org for information about the RepRap Project.
Please visit the RepRap forum - http://forums.reprap.org/
These files were originally shared on - https://www.youmagine.com/
Please support this growing and open community.
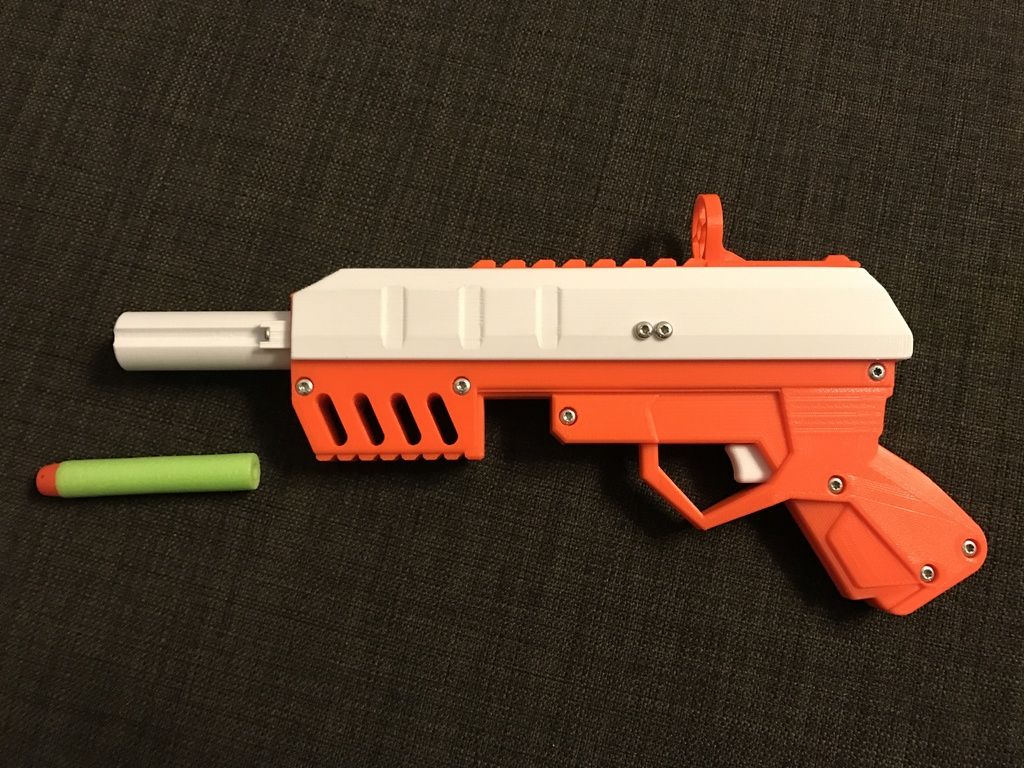
Sli3DR What? - Reminder what Sli3DR is -
Sli3DR - (pronounced Slider)
Sli3DR is not a Delta based printer, rather it's based on an intriguing 'unnamed mechanism' that was floating around on the RepRap Forum and G+ last year. Billy ZelsnackIdentified it as used in a very old (Rikadenki) Pen Plotter design here. A few people have tried it out for 3D printing using off the shelf mechanical parts, I wanted to make it with 3D printed parts and Spectra Line based on this mechanism.
Edit - This bit's updated for correct back credit of bringing the mechanism to the attention of the RepRap and 3D printing community - David Moorhouse over on G+ showed a cable bot design 1st November 2013, see here -https://plus.google.com/104904818050178236499/posts/WpzzVuULM2z
David's original video sparked great discussion over the mechanism, Tim Rastall Made a great sketch of the 'unnamed mechanism' - still unnamed as far as I know.
https://lh5.googleusercontent.com/-753_E-QeVmo/UlYKlAfRqGI/AAAAAAAAIEg/Ki-oSosqbEU/w471-h514-no/Unna...
Find out more about David's build over here - http://astro.smugmug.com/Hobbies/3D-Printer-Cablebot/
It just needs a door and it's complete.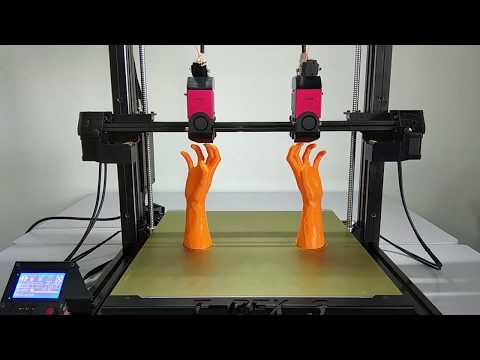
Spectra Line - Fantastic stuff.
All the essential 3D printed parts
Designed for an E3D V5/6 hot-end
Hopefully the 3D model of the entire machine in Sketchup will help you understand it, if you decide to build one questions are best asked over on the Youmagine Sli3DR comments page here
Happy Building, and as always let me know if you build one... or thousands.
And a quick grumble about backing up files - I had a hard drive crash last night, and like all disasters with computers it wasted a lot of time trying to restore things. I'm not yet sure how much was lost, most was backed up, but the last 3 months - not so much. I do already know I lost half of the 3DRnano V2 design I was working on a few months back. That caused much swearing and grumpy kicking of things.
Instead of getting too annoyed, I managed to finally release Sli3DR, so at least that's made me happy again. - If you do nothing else tonight, back up your projects to a memory stick, or on-line.
I will be releasing 3DRmega next, (as soon as possible) stay tuned.
Back soon.
Cheers,
Rich
3ders.org - RichRap shares Sli3DR 3D printer design files
Nov.7, 2014 | By Alec
Nowadays you can find some cool designs online and then download print these on a desktop FDM printer. But here are others who don't get a big enough kick out of this. These people feel the need to take things a bit further. They involve themselves in the revolutionary RepRap community and make 3D printing a complicated engineering endeavour.
While there are a lot of people involved in RepRap, some of them are a bit more 3D printer-mad than others. People like Richard Horne (perhaps better known by his internet identity RichRap), who have designed and created numerous 3D printers by hand and are thus doing wonderful work in getting to the fundamental basics of this cool manufacturing technology.
Richrap is an electronics engineer and product designer, and has been nourishing his passion for 3D printing technology since 2009, when he first came across RepRap. RichRap has already shared a number of designs and creations online, many of which involve different designs, printer fundamentals, sizes and colors. And he has recently shared another intriguing 3D printer that would make a very interesting construction project for anyone looking for a bit of challenge: the Sli3DR 3D printer.
As can be seen in the images above, this 3D printer is an unusual model, and not just for its color scheme. For those of you who were wondering, that's Faberdashery Cyber Yellow, an unusual color that will brighten up any room, day or night (Rich lets his children decide which color he uses).
Aside from that, the Sli3DR (pronounced slider) is unusual for its almost unique printing mechanism. Rich has based it on an intriguing 'unnamed mechanism' that he found floating around on the RepRap Forum and G+ a while ago.
As he revealed, this mechanism has been identified as being used in a very old Rikadenki Pen Plotter. What's a Pen Plotter, you ask? For that, you'd have to go deep down into the history of computer-aided design, as it's an old-fashioned type of printer that sketches designs on paper using a pen attached to an XY axle. Essentially, it's the predecessor of the inkjet printer.
Its basic design is unlike any of the Cartesian bots currently used in the common FDM 3D printer. A few makers have tried it out for 3D printing using off the shelf mechanical parts, but Rich wanted to make it with 3D printed parts and Spectra Line based on this mechanism.
And he's shared all the designs and STL files on YouMagine, so anyone can tackle this cool and exciting project themselves. However, he hasn't written a step-by-step tutorial for it, so you will have to rely on your own engineering experience. To make the whole thing easier to understand, Rich did include an entire 3D model in Sketchup.
Rich had already been looking to design a 3D printer with an unusual positioning mechanism, and had looked into the CoreXY and HBot before settling on the 'unnamed mechanism'. It's especially intriguing because of its age and it challenge.
Rich invites everyone to take on this challenge for themselves. He did add a creative license to it (ShareAlike Creative Commons V3 (CC BY-SA 3.0)) to avoid things getting completely out of hand. 'If you decide to print and sell these or make further changes, improvements or additions, that's great! I want you to do that! Happy Building, and as always let me know if you build one... or thousands.'
Posted in 3D Printers
Maybe you also like:
- Polyes Q1 3D printing pen uses light to harden ink, Kickstarter launch coming soon
- Dutch company By Flow working on a truly portable 3D printer that can print in plastic, ceramic & food
- Peachy Printer released its latest 3D prints, now available for pre-order
- Polish company launches BlackJet 3D printer: 'the link between RepRap & professional printers'
- Russian man creates a €195 SLA 3D printer from old CD/DVD drives
- gCreate releases gMax 1.5 & gMax 1.5 XT 3D printers boasting large build envelope
- Pi-Top 3D printed laptop launches on indiegogo, super early bird price $229 for full Kit
- 'The Bug', a 3D printer that prints in Fiber Composites
- Manli introduces SimplyPrint 3D Printer, priced at $1299
- Pocket-Sized Pocket3DPrinter will be a portable combination of FDM & SLA technology
busyman wrote at 11/17/2014 4:32:36 AM:
Check out this video from October 2013. ..
https://www.youtube.com/watch?v=B0-Qv0-Y8Fw
..
https://www.youtube.com/watch?v=B0-Qv0-Y8Fw
Overview of slicers for 3D printing. Print preparation software
Anyone familiar with 3D printing knows what a slicer is. This program is a software that allows you to cut a 3D model saved in an STL file into flat parallel layers. This is how any 3D model is grown in a 3D printer - layer by layer. And the slicer generates the so-called GCode, which is necessary to explain to the device how to print, how much and which way. Thus, the slicer can be considered as an intermediary between the 3D printer and the programmed model.
GCode programs are generated automatically according to pre-set parameters. However, it can be edited manually if necessary. It is clear that this requires elementary skills, but rather experience and skills.
There are a huge number of slicers, allowing you to choose exactly the option that will be convenient in a particular case. We will consider a number of these programs below, but first we will give general information in the form of a convenient table.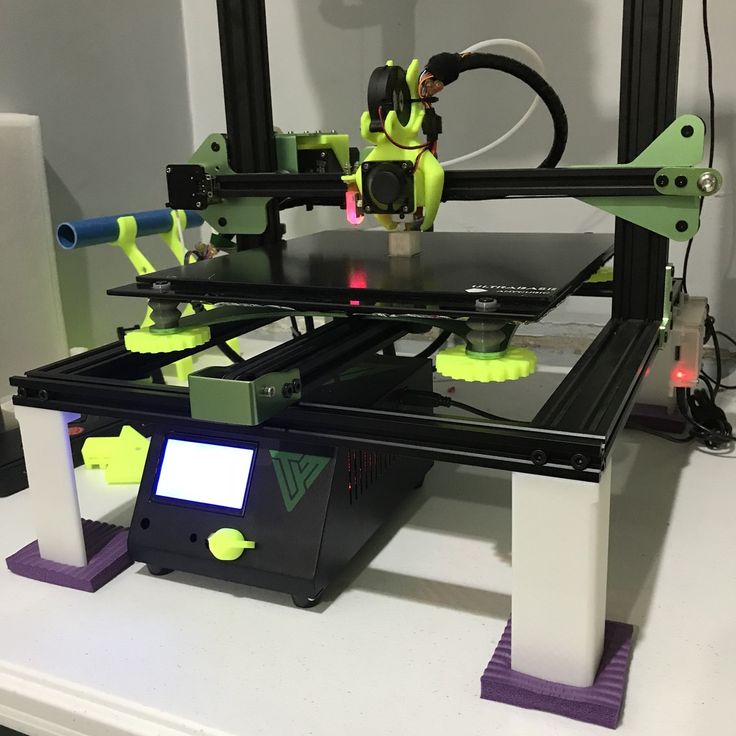
|
|
Types of slicers
Generally speaking, all slicers perform the same basic function and therefore are the same. For this reason, the choice of one or the other software will come down to your resources and personal preferences. There are a very large number of slicers at the moment and it is quite difficult to list them all. In addition, there are a lot of articles, blocks, channels that are engaged in a comparative analysis of all these programs. In them, one can draw knowledge about the advantages and disadvantages, although one must understand that these judgments are sometimes very subjective. And in general, most experienced users are not limited to using only one software tool. For example, even with a licensed Simplify3D slicer, I prefer to use Cura as a beta version for printing on BCN. For other purposes, I almost always use the cloud slicer, which is in Fomide.
Nevertheless, let's dwell on the slicers indicated in the table in more detail, giving a brief description, highlighting the advantages and disadvantages.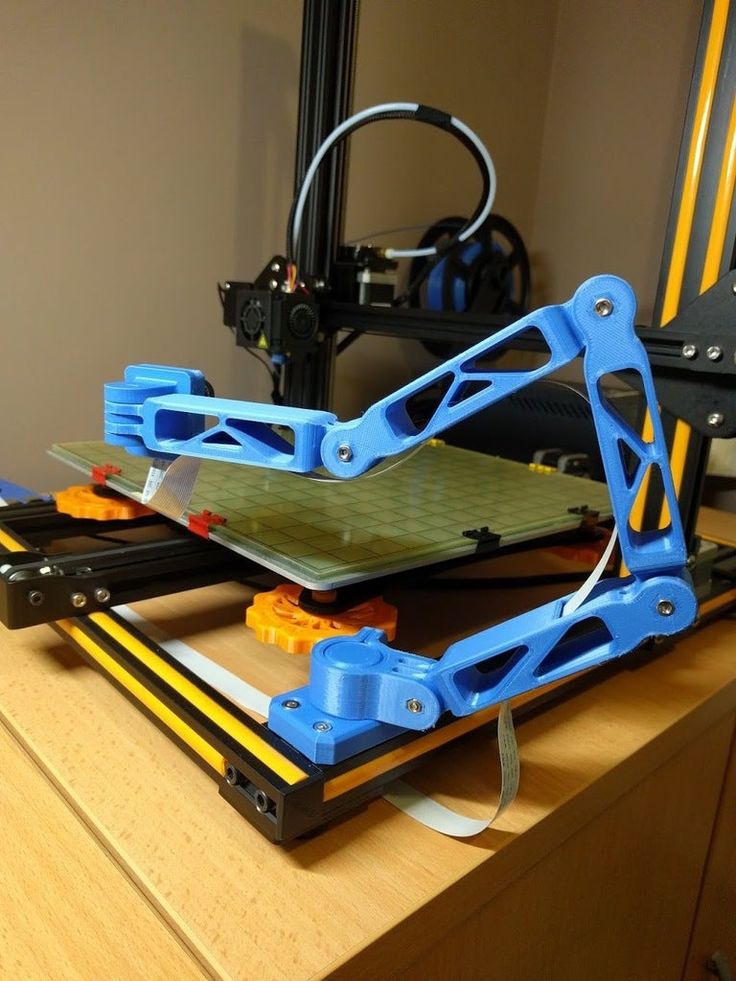
So let's get started...
3DPrinterOS
This software is a cloud platform that combines various components used for 3D printing. And the name of the program perfectly illustrates the work: we connected the 3D printer to the computer, placed it in the browser and use it.
3DPrinterOS offers not only cutting the model into layers and generating a G-code, but also a number of other useful functions, including restoration of the mesh in different versions, download from the Sketchfab.com service. Even 3D printing on industrial-grade equipment is possible. Of course, some functionality will be available only in paid versions of the program. However, the manufacturer himself assured that in any case, the slicer itself will always be free.
3DPrinterOS has three largely identical applications. We are talking about Cloud Slicer, Slicer 2 and Makerbot Slicer. The first application is standard, and the last is special. All applications support a huge range of 3D printers, which is generally expected from a typical commercial product.
The standard Cloud Slicer and the custom Makerbot Slicer are very similar in interface and functionality. It is possible to choose between the level of user experience (simple, advanced and expert). The application is also able to estimate the cost of the item.
Slicer 2 differs from the above applications in a different way. There is a list of presets, but they can be adapted to your requirements. There is also a manual mode for connoisseurs of fine tuning.
Advantages of 3DPrinterOS:
- The generated GCode can be viewed in a special function. You can generate your own Json code if you are a confident user.
Disadvantages of 3DPrinterOS:
- A number of functionalities are paid, but I would like to use all the features of the program, but this is unprofitable for the company, and it will be dishonest in relation to the work of its employees.
Compatibility with OS:
3dprinteros is compatible with:
- Browser,
- Windows,
- Mac
- 3DPRINTEROSS, as the beginning users, as the starting users, as the starting users, as the starting users, as the SLOWS.
 environment.
The 3DPrinterOS slicer can be downloaded from the official resource
Astroprint
The Astroprint cloud platform is similar in concept to 3DPrinterOS and Octoprint. By means of Astrobox, 3D printers are hosted. The most commonly used is the Raspberry Pi. Thanks to this, control over a 3D printer can be carried out from anywhere in the world using, again, any web device.
Astroprint can connect to 3DPrintCloud to help fix 3D printing problems when a model doesn't turn out right.
This 3D slicer is simple. There are several modes. You can simply select a material from the list and specify the quality of the product. There is also an advanced mode.
Advantages of Astroprint:
- It is possible to integrate with other web services, which opens up great opportunities. The program is free.
Astroprint disadvantages:
- The slicing process is convenient, but the flexibility of settings and control is somewhat limited.

Compatibility with OS:
Astroprint is compatible with:
- Raspberry Pi,
- PCDUINO,
- Browser
- SOFT NOT WEARS.
You can download the Astroprint slicer from the official resource
CraftWare
CraftWare software is developed by CraftBot, a 3D printer company. Many people compare this program with Simplify3D, calling it a great alternative, which is also free. This software is compatible with almost all 3D printers that use standard FDM technology.
Users are greeted by a colorful interface, which is also characterized by intuitive clarity and convenience. All available settings allow you to fully control the 3D printing process.
The functionality of CraftWare is quite decent. A striking example is the interactive control of the 3D printing process. With this feature, build times can be reduced as well as optimized supports can be added. There is a GCode visualization function. Thus, from any angle you can see the whole process and each layer separately. The visibility is 360 degrees.
According to the developer CraftWare, the slicer works on the basis of an algorithm that generates the most appropriate path for 3D printing. In the program, you can easily rotate, clone, scale a 3D model before it is placed on a virtual work platform.
CraftWare Advantages:
- A colorful, intuitive and simple interface that can compete with paid programs. Free software.
CraftWare Disadvantages:
- Print quality is not as good as Cura and Simplify3D, according to some users.
Compatible with OS:
CraftWare compatible with:
- Browser,
- Windows,
- Mac
Level:
- CraftWare is suitable for beginner 3D printers as well as experienced 3D printers who want to use functionality similar to Simplify3D for free.
You can download the CraftWare slicer from the official resource
Simplify3D
Simplify3D is a program that is essentially universal. It combines the functions of a high-end slicer, a tool for restoring STL files, analyzing and editing. The functionality has a GCode visualizer, thanks to which the user can track the trajectory and view all flat layers. Viewing and parsing GCode can be done in web tools. For example, gcode.ws etc.
Simplify3D is positioned as a slicer for professionals. The cost of the license is 150USD, but it is designed for two computers. This program supports, probably, all existing models of 3D printers and allows you to download and import more than a hundred profiles into the program. If your printer model is not listed, it can easily be added.
You can manipulate the model as you like: rotate, scale, import, restore, achieving its correctness. You can import STL, 3MF, OBJ files into the program. This is done very simply and quickly, and even huge grids will be displayed very quickly.
Simplify3D offers the user a wide variety of settings. These are layer management, extruders, temperature settings, model fill methods, scripts, and raw GCode. All these settings offer a huge field for experimentation. In this case, you can save your processes. And when you hover over the button, you are offered help information.
Simplify3D Features:
- Professionals will appreciate the adjustable feet. The print quality will be great. On the one hand, this slicer seems to be overloaded with functionality, documentation, etc. But this is not the case at work. The choice of options is huge and there is a suitable one for everyone, and therefore working with the program is really convenient and uncomplicated.
Simplify3D Disadvantages:
- Well, the cost of 150 USD, frankly, is not small. Although this remark will not be fair to the developers who have made a really high-quality product. And it turns out that the investment is justified if you plan to do 3D printing professionally.
Compatible with OS:
Simplify3D compatible with:
- Windows,
- Mac
Level:
- Simplify3D is suitable for anyone who wants to get high-quality prints, although we will not prevaricate, experience in 3D printing is necessary to work with such a program.

You can download the Simplify3D slicer from the official resource
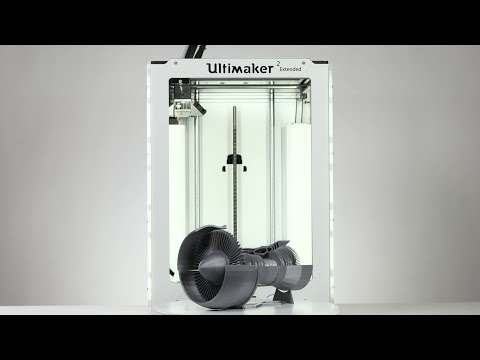
Cura
One of the most popular free slicing programs is Cura. This slicer does a good job, although it can take a significant amount of time to process, at least measured in minutes, not seconds. However, Cura will let you control the standard variables that users usually control. These are layer thickness, wall thickness, temperature, supports, speed, model fill types, fan, and G-code.
Cura is also a series of templates designed for specific printer models with specific print quality settings. The developers created this slicer specifically to work with Ultimaker 3D printers, which is why the company supports this program. Her Github community also contributes. The developers claim that the program is free and will always be free.
Cura supports STL, OBJ, 3MF formats. In the program, you can edit the loaded models if necessary. The finished model will contain data on the trajectory, print time and material evaluation. The company is constantly updating the slicer, improving it. Users who develop third-party plugins also participate in this.
Cura Advantages:
- This slicer can be used by both beginners and experienced users. For experts, the program offers more than 200 settings. The interface is convenient, fast, even double prints can be processed, albeit with some features. The processing speed of a huge STL file is normal. In addition, the program is free.
Disadvantages of Cura:
- The program is not equipped with some features that are very useful. A prime example of Octoprint. Print times are estimated with up to 20% variation.
Compatible with OS:
Cura Compatible with:
- Windows,
- Linux,
- Mac
Level:
- Cura
You can download the Cura slicer from the official resource
IceSL
The IceSL slicer is a great tool that stands out among 3D printing programs. This program not only performs the functions of a slicer, but also allows you to carry out 3D modeling. There is a window on the left that offers the possibility of editing the grid directly in the Lua code. On the one hand, this can be frightening, alarming, but this allows for elegant parametric modeling similar to OpenSCAD. The central window then displays the model as a live preview.
The right side has a rich functionality that allows you to customize slices. For beginners, this can be intimidating and confusing. And, of course, there is the richest standard functionality for all 3D printers: support formation, two-color printing. What distinguishes IceSL is a number of useful functions. This is a layered representation of the G-code, as well as an anti-stick protection that can protect the model from drops of material.
IceSL Features:
- Experienced programmers will appreciate the degree of control.
Slicing is simplified with a number of functions.
 Supports can be created both automatically and manually. The software also offers editing of incomplete models, automatic printing of models from several files. IdeaMaker can be very useful if you need to cut complex models, as the slicer is able to separate parts in auto mode. The user can view the cross section of the models.
 IdeaMaker despite the wealth of functions and settings in terms of use is very simple. To prepare the model for printing, you need to make only 4 mouse clicks.
IdeaMaker can be used not only as a slicer, but also as a 3D printer control tool. The interface allows you to control multiple print profiles, while switching between them is simple and smooth, as well as between the corresponding settings. Print tracking and management can be remote.
IdeaMaker is compatible with STL, OBJ, 3MF files. Another advantage of IdeaMaker's multilingualism is that you can work in Korean, English, Chinese and other languages. Well, the main advantage is that the program is free.

Advantages of IdeaMaker:
- Simplicity and clarity of use on a literally intuitive level, multilingual, free.
IdeaMaker Disadvantages:
- Due to the fact that this software is not as popular as Cura, the formed community of users who can provide support is not so large and strong.
OS Compatible:
IdeaMaker Slicer Compatible with:
- Windows,
- Linux,
- Mac
Level:
- IdeaMaker is suitable for both beginners and intermediate users.
You can download the IdeaMaker slicer from the official resource
KISSlicer
The abbreviation of this software tool - KISSlicer - is very misleading. It stands for Keep It Simple Slicer. In fact, this product is not suitable for all users. Someone is happy with it, for someone the interface seemed confusing and not very clear.
The free version of KISSlicer is a solution for hobbyists who print with only one extruder with a minimum of settings.
 For professionals working with two heads, the PRO version is available, the cost of which is 35USD. There is also an educational version of the program, costing 25USD. The professional version has an extended set of settings, including the ability to combine several source STL files into one model.
 KISSlicer benefits:
- This slicer is an excellent cutting tool that supports most 3D printers and can become a worthy alternative to other similar programs.
KISSlicer Disadvantages:
- If your printer is not in the list of supported 3D printers, then you will have to adapt the slicer and GCode manually.
Compatible with OS:
KISSlicer Compatible with:
- Windows,
- Linux,
- Mac,
- Raspberry Pi
Level:
- The KISSlicer program is suitable for both beginners and users who can enjoy all the benefits of the advanced version.
You can download the KISSlicer slicer from the official resource
MakerBot Print
The MakerBot Print slicer is primarily focused on the MakerBot 3D printer line.
 This program is different from others that focus on a huge range of 3D printers. MakerBot Print automatically adjusts the cut settings for a specific mode and extruder type. The developers have made sure that users have a very useful feature, which is to automatically arrange the grid on several or one assembly platform. This function will be very useful for those who are preparing a series of components.
 You can access and print models from Thingiverse directly from the program. If the printer has a built-in webcam, then in MakerBot Print you can use it to control the 3D printer and print.
Advantages of MakerBot Print:
- If you have a MakerBot 3D printer, then with this program you can achieve the best quality prints. Beginners will appreciate the simplicity and clarity of the program, and experienced users will appreciate the help when printing a large number of models. In addition, the program is free.
MakerBot Print Disadvantages:
- The slicer does not work with other printers, so if you switch to a device from another manufacturer, you will have to look for a new program.

OS Compatibility:
MakerBot Print Slicer is compatible with:
- Windows,
- Mac
Level:
- MakerBot Print Slicer is compatible with all the benefits that beginners, Print users will enjoy, and all the benefits that users of the advanced version of MakerBot will enjoy.
You can download the MakerBot Print program from the official website
MatterControl
MatterControl is a free computer host. This means that you need to connect the 3D printer to your computer to manage printing, although you can also save the GCode to an SD card and load it into the printer, but this is already a matter of expediency and convenience. MatterControl has a structured interface. On the left side there is an option to switch the print queue. Thus, the program can be a kind of control hub. On the right side, any of the prints can be cut at your discretion.
The program offers a choice of three basic cutting processes.
 These are MatterSlice, Slic3r, CuraEngine. That is, in your hands the opportunity to choose the optimal mechanism for your printer and model to achieve the best result. The basic mode also allows you to set parameters such as infill, layer height, support material, raft. Moreover, all settings are saved and can be used in the future.
 There are also advanced settings that allow you to automatically restore the mesh and even print with multiple extruders. Thanks to the advanced functionality, it is possible to prevent errors in printing due to layer-by-layer viewing of the entire printing process.
MatterControl Benefits:
- The MatterControl slicer is suitable for all users, regardless of experience. If you started using it at the very beginning, then this program will remain relevant when you reach experience. In addition, the slicer is completely free.
Disadvantages of MatterControl:
- There are better and more mature slicers that MatterControl is not up to yet.
OS Compatible:
MatterControl Slicer Compatible with:
- Windows,
- Linux,
- Mac
Level:
- MatterControl is suitable for both novice and advanced users who type a lot.
You can download the MatterControl slicer from the official resource
Netfabb
The Netfabb slicer has a rather long history. It all started as a free program, which has gradually become a powerful set of tools for processing files in the STL format. Now Netfabb offers great functionality for analyzing, repairing and editing STL files. And, of course, high-quality cutting of models.
In 2015, Netfabb was acquired by Autodesk, which divided the program into several levels: Standard, Premium and Ultimate.
The Standard version is basic, but even it offers a very extensive and powerful toolkit for 3D printing.
Netfabb Advantage:
- Netfabb is like a Swiss army knife.
 Students are encouraged to try out Netfabb for 3 years.
Netfabb Disadvantages
- Like many other projects, Netfabb is provided on a subscription basis, the cost of which is quite considerable. The trial version is offered for a period of 30 days. This, according to the developers, is quite enough to evaluate the entire functionality of the software. An annual subscription to the Standard version will cost 1000USD, and the Premium version will cost 4300USD, while prices change from year to year, actual prices are not always fixed on the site.
OS Compatibility:
Netfabb Slicer is compatible with:
- Windows
Level:
- Netfabb is suitable for professionals and semi-professionals.
You can download the Netfabb slicer from the official resource
OctoPrint
The OctoPrint slicer is a mechanism for controlling all the functions of a 3D printer through a browser and portable devices.
 The application is based on the Raspberry Pi. At the same time, it is extensible through plugins, cameras, etc. Thanks to this, models can be loaded for printing without using all kinds of cards.
 OctoPrint offers a lot of useful features. One of them is an integrated slicer based on the CuraEngine engine. In practice, this means that you will no longer need to perform cutting on the computer, the file is sent in STL format, and the 3D printer does all the necessary work.
OctoPrint Features:
- This free wonder is open source and the number of its users is increasing every day.
OctoPrint Disadvantages:
Repetier
If you are already experienced in 3D printing and ready to move to the next level in software, but at the same time want to stay in an open source environment, then Repetier can be a great solution for you. Among 3D printing software, this software will be the great-grandfather, but at the same time, RepRap developers love and respect it very much.

The application is aimed at intermediate and advanced users. Repetier is a complete solution that supports multiple extruders (up to 16 in total). The software also supports several slicer options through plugins. In addition, it is compatible with all 3D printers on the market today.
Repetier supports remote access via Repetier Server. The software simply installs on your Raspberry Pi and you can access your 3D printer from any device from anywhere through a browser on your smartphone, tablet or PC.
Repetier Pros:
- Good freeware, a favorite among RepRap developers. Open source.
Repetier Disadvantages:
- Newer programs such as Cura allow for better print quality.
In fact, you can send the finished model for cutting, while editing all the indicators: layer height, density and fill type of the model in percent, print speed, and others. There are also additional advanced tools for managing the process of preparing a model for printing.
 Next, the generated G-code is loaded and that's it, the model is ready for printing.
 SelfCAD Benefits:
- After the slicing process is complete, you can preview the layers. The program also calculates other parameters: approximate printing time, material consumption, final weight of the model. There is a spaghetti filling type. It is chaotic, because of which it sometimes spoils the model, but it can give pleasure.
SelfCAD Disadvantages:
- SelfCAD is removed from the actual printing, albeit literally one step away. Now, if the code could be downloaded directly to the printer, for example, through the cloud, then SelfCAD would be a much more powerful competitive force. The program is free only for 30 days, then for a month of use you will have to pay 9.99USD.
OS compatible:
SelfCAD compatible with:
- Windows,
- Linux
Level:
- The SelfCAD program is aimed at beginners and intermediate level.
 It can give a noticeable jump, but no height is an absolute limit.
You can download SelfCAD from the official resource.
Slic3r
Slic3r is an open source software used for cutting 3D models. This program has proven to be excellent as a unique solution. Currently, Slic3r users can view the future model in several modes and evaluate it.
Slic3r offers an interesting honeycomb insert. This is an infill pattern implemented in three dimensions, which can vary across layers. Thanks to this approach, it is possible to achieve various variants of the filling pattern, which in reality increases the strength and rigidity of the finished model.
A special feature of Slic3r is its direct integration with the well known and much loved OctoPrint. Just by pressing one button after cutting the models, they can be sent to the field of this program.
The community has been diligently collecting information about all materials, technologies, issues, settings for 3D printing.
 Everything that could be compiled was implemented in Slic3r. The program includes a number of functions that were innovative in their time, and are now perceived as the most common and integral. We are talking about support for multiple extruders, micro-levels, edges, bridge detection, layer height variables, command line slicing, as well as splitting, sequential printing and honeycomb filling.
 Slic3r features:
- Integration with OctoPrint, fast work even on the slowest machines. Work only with those parts that are affected by the changes made. Incremental slicing, real-time viewing in 2D and 3D planes. adjustable bed, 3D honeycomb fill, adjustable pressure settings, etc. And with all this, the program is completely free.
Slic3r shortcomings:
- Missing time and cost indicators
Compatibility with OS:
Slic3r is compatible with:
- Windows,
- Linux,
- Mac
Level:
- SLIC3R program is designed for professionals.

You can download Slic3r from the official resource.
SliceCrafter
SliceCrafter is a 3D printer software based on IceSL. This is an online software tool, thanks to which even MAC users can use it, albeit partially, since the desktop version allows, among other things, editing OpenSCAD. The slicing is identical to IceSL, although there are limitations in relation to a number of functions of the advanced series. The ability to download the STL file from the link is quite remarkable.
Advantages of SliceCrafter:
- G-code can be generated without software installation, registration in the largest online service. Plus, SliceCrafter is completely free.
SliceCrafter Disadvantages:
- A number of features are only available in the desktop version.
Compatible with OS:
SliceCrafter compatible with:
- Windows,
- Mac,
- Browser
Level:
- SliceCrafter is designed for advanced users who like to tinker with settings to achieve the best print result.

You can download SliceCrafter from the official resource.
Tinkerine Suite
Most of the slicing softwares reviewed are characterized by decent performance and a wide range of supported 3D printers. The Tinkerine Suite software tool is also worthy of attention, and here's why. This software was created by the developers of Tinkerine 3D printers. Initially for the Ditto and Litto device series. And the result is one of the most convenient software for cutting. In fact, even a cursory glance will be enough to be convinced of this. The interface of the program is fresh and uncluttered. Along with this, the slicer offers everything you need for basic editing, forming supports. Settings are selected quickly and easily. The set of options is quite powerful, which allows you to experiment.
Tinkerine Suite Benefits:
- For Tinkerine devices, this program guarantees the highest quality results. The program is completely free.
Tinkerine Suite Disadvantages:
- If you decide to use a device from another manufacturer, then this slicer will not help you.
Compatible with OS:
Tinkerine Suite compatible with:
- Windows,
- Mac
Level:
- The Tinkerine Suite program is suitable for beginners as well as intermediate users.
You can download Tinkerine Suite from the official resource.
Z-Suite
The Z-Suite program is a development of the manufacturer Zortrax, focused on working only with 3D printers of this brand. The software has limited functionality for editing. This is grid layout, scaling, etc. Of course, the user is limited in the options that are included in this software, but it satisfies all needs in the field of slicing. There are 4 filling types to choose from, as well as the ability to create support structures. In addition, Z-Suite is characterized by the formation of a patented Z-code.

Advantages of Z-Suite:
- The program works with a specific brand of 3D printers and only with it, without spraying and adjusting to a large number of models on the market, as a result of perfect compatibility. The software is supplied free of charge.
Disadvantages Z-Suite:
- What is considered an advantage can also be considered a disadvantage.
Compatible with OS:
Z-Suite compatible with:
- Windows,
- Mac
Level:
- Z-Suite is suitable for beginners.
You can download Z-Suite from the official resource.
Formide (Katana)
Formide is an online platform that can manage STL files and generate G-code and share them. The program also includes a slicing mechanism for the Katana model. Previously, this slicer was offered as an application as a standalone cloud service. But it ceased to exist and is now fully integrated into the Formide architecture.

There is an opinion that it is impossible to find a good and powerful slicer on the Internet. However, Formide offers over 90 options that you can control and customize, as well as several pre-made templates. In addition, there is a list of available 3D printers, a set of various materials, which allows for high-quality 3D printing. Through the cloud, you can control 3D printers that are connected to Formide, adjusting the parameters of extrusion speed, nozzle temperature, etc.However, a number of improvements are required. In particular, informativeness in relation to the description of variables. In other slicers, each variable is described as informative as possible, which allows you to set values, achieving optimal print quality.
Formide works very fast even when compared to other popular slicers. But there is a drawback - the platform is paid.
Formide advantages:
- Fast slicer, wide range of settings, power.
Formide disadvantages:
- Insufficient description of variables.

Compatible with OS:
Formide compatible with:
- Browser.
Good or bad: criteria for choosing a slicer
To select the optimal type of slicer, you should be guided by the following criteria:
- STL import speed indicator - if the software is good, then it can quickly and without errors scale any point, rotate the model.
- Repair file in STL format - if your model that you uploaded in the STL file contains errors, then good software will definitely tell you about it, and in ideal conditions it will even automatically correct them.
- Comfort is a very subjective parameter. However, there are still some nuances, in particular, is there a level for beginners, advanced expert settings, how intuitive is the interface, is it possible to save history, cloud storage of files and local data, are there undo and redo functions, etc.
- Preview option - good programs offer a preview as well as additional data - print time (approximately), material consumption, etc.

- Price - "free" will always be a priority for any user, but quality issues will also play a significant role.
What is SLS 3D printing. How does an SLS 3D printer work? Overview of additive technologies.
What is SLS?Hello everyone, Friends! 3DTool is with you!
In this article, we will talk in detail about one of the most promising technologies 3D printing . Selective laser sintering.
Selective Laser Sintering (SLS) is a additive manufacturing process that belongs to a broad family of wafer synthesis methods. In SLS, a laser selectively sinters polymer powder particles, fusing them together to create layer after layer. Granular thermoplastic polymers are used as construction material. Options for such devices can be considered in our catalog. For example, the Sintratec 3D printer.
This technology is used both for prototyping functional polymer products and for integration into small production runs, as it offers complete design freedom, high precision and produces parts with good and stable mechanical properties, unlike FDM or SLA .

Naturally, as in any other case, the possibilities of technology can be used to the full only if its key advantages and disadvantages are taken into account, so let's take a closer look at its features and principle of operation.
SLS printing process
How does SLS work?The SLS fabrication process works as follows:
I. The powder chamber, as well as the entire printable area, is heated to just below the melting temperature of the resin, after which the leveling blade distributes a thin layer of powder over the build platform.
II. The CO2 laser scans the contour of the next layer and selectively sinters (melts) the polymer powder particles. The cross section of the component is scanned ( is sintered ) completely, so the part is monolithic.
III. When the layer is completed, the work platform moves down and the blade re-coats the surface with powder.

The process is repeated until the entire part is completed.
After printing, the part is completely sealed in the non-sintered powder, so the chamber and powder must cool before being removed. Cooling down can take a significant amount of time, up to 12 hours. Then the resulting part is cleaned of powder residues with compressed air. The unsintered powder is collected for further reuse.
Schematic diagram of an SLS 3D printer.
Printer OptionsIn SLS, almost all print options are set by the printer manufacturer. The default layer height for is 100-120 µm . For example, the Sintratec 3D printer we mentioned above allows you to print a much thinner layer, the layer thickness declared by the manufacturer varies from 50 to 150 micron.
The main advantage of method SLS is that the part does not need supports . In this case, the non-sintered powder plays the role of the necessary support. For this reason, the SLS method can print geometries of any shape that are impossible to print with any other additive or subtractive manufacturing method.
When printing with this method, it is very important to use as much of the printable area as possible, especially in small-scale production. Regardless of the amount of detail in the printable area, if the overall height is the same, printing will take the same amount of time. This is because it is the recoating step that determines the total print time ( the laser scanning and sintering itself is very fast ), and the printer has to cycle through the same number of layers. Also, you need to take into account the time for refilling the hopper with powder, because the same amount is poured into the chamber, regardless of the size of the printed part.

Layer cakingWhen using method SLS the sintering strength of the layers to each other is excellent. This means that printed on SLS printer parts have almost isotropic mechanical properties.
As an example, the mechanical properties of samples printed on SLS using standard polyamide powder ( PA12 or Nylon12 ), the most commonly used material in SLS printing , are shown in the table in comparison with the properties of solid nylon:
Parts printed on SLS have superior tensile strength and modulus comparable to solid material, but are more brittle ( their elongation at break is much lower than ). This is due to the internal porosity of the resulting part.
!A typical SLS part has a porosity of about 30%!
Porosity gives parts printed on SLS a characteristic grainy surface. This porosity also means that the parts can easily absorb water and are easy to paint.
 At the same time, such parts require special post-processing if they are to be used in a humid environment.
Shrinkage and deformationSLS-parts are subject to shrinkage and deformation: when the newly sintered layer cools, its dimensions decrease and internal stress accumulates in it, due to which the underlying layer is pulled upwards.
Shrinkage of 3 to 3.5% is typical for SLS printing and printer operators should take this into account during model preparation.
Large flat surfaces are most prone to deformation. This problem can be mitigated slightly by orienting the part vertically on the build bed. But still, the best way to reduce deformation is to minimize the thickness of the flat areas of the part, and add cutouts to the model where the design allows. These actions will also reduce the overall cost of the part, as less material will be used.
Finished sls-part with embedded embedded elements.

Excessive cakingOver-sintering occurs when excess heat around the contour of the part melts the unsintered powder around. This is fraught with loss of detail on small objects such as slots and holes.
Excessive sintering depends on both element size and wall thickness. For example, a slot with a width of 0.5mm or hole diameter 1mm will print successfully on wall thickness 2mm but will not print if wall thickness is 4mm or greater. As a general rule, slot widths from 0.8mm and holes from 2mm in diameter can be safely printed in SLS without fear of excessive sintering.
Powder removalSince printing method SLS no supports required, hollow section parts print quickly and accurately.
Hollow sections in this case reduce the weight and cost of the part, as less material is ultimately used.
 But you will need to make outlet holes in the part to remove unsintered powder from the internal cavities. The general recommendation in this case is to add at least 2 outlet holes with a diameter of at least 5 mm to your part.
 If high rigidity is required, the parts must be printed solid. An alternative here would be to make the structure hollow, with no outlets. In this way, the powder will be compacted tightly into the part, increasing its mass and providing some additional support when mechanical loads increase, without affecting print time. Also, instead of one solid internal cavity, you can add a honeycomb structure ( similar to the infill patterns used in FDM ) to further increase the rigidity of the model. Laying out the part in this way will also help reduce warping.
Removing powder from an SLS part
General materials SLSThe most commonly used material for SLS is Polyamide 12 (PA 12) , also known as Nylon 12 .
 At the moment, there are more and more materials with different properties for SLS 3D printing every day, for example, elastic polymers are represented by TPE powder and its analogues. Other technical thermoplastics such as PA11 and PEEK are also available but are not as widely used.
 As an example, you can see the list of materials used in our catalog: Sintratec Powder Sls.
Polyamide powder can be supplemented with various additives ( such as carbon fibers, glass fibers or aluminum ) to improve the mechanical and thermal properties of the printed part. Materials supplemented with additives are usually more brittle and have higher anisotropy.
Post-processingSLS produces parts with a powdery, grainy finish that is easy to paint. The appearance of printed parts of SLS can be improved to a very high standard using a variety of post-processing methods such as polishing, classic painting, spray painting and varnishing.
 Their functionality can also be improved by applying a waterproof coating or metal coating.
SLS advantages and limitationsSummarizing the above, the key advantages and disadvantages of the technology are given below:
- SLS parts have good, isotropic mechanical properties, making them ideal for functional parts and prototypes.
- SLS does not require support, so parts with complex geometries can be easily printed.
- SLS manufacturing capabilities are excellent for small to medium series production.
- Only industrial SLS systems are currently widely available, so lead times are longer than other 3D printing technologies such as FDM and SLA.
- SLS parts have a grainy surface and internal porosity that may require post-treatment if a smooth surface or water resistance is required.
- SLS cannot accurately print large flat surfaces and small holes as they are prone to distortion and distortion.