3D printer modifications
25 Best 3D Printer Upgrades in 2022
3D printers are becoming more and more popular as they become cheaper and easier to use. As technology evolves, even the best 3D printers can be improved with upgrades. Upgrading is a great way to get the most out of your machine and extend its useful life. Perhaps you have an older model that you want to keep up to date, or you're looking to improve the performance of your current printer. With so many different parts and upgrades available, it can be tough to know where to start.
This article will discuss 25 of the best 3D printer upgrades that you can buy in 2022.
1. Raspberry Pi
The Raspberry Pi is a credit-card-sized computer that can be used for various projects, including 3D printing. It can be used to remotely control your 3D printer, stream live video of your prints, or even turn your 3D printer into a networked device. A Raspberry Pi costs around $269.99.
2. Smoke Detector
A smoke detector works in conjunction with an alarm that alerts an individual of fire or traces of smoke that may be coming from an electronic device. Most printer hot ends reach temperatures upwards of 500 °C. Having a smoke detector handy will be helpful in detecting any dangerous conditions. They typically cost around $15. The location of the detector and its sensitivity are important determinants when choosing a smoke detector.
3. Adhesive
Adhesives, such as Scotch glue sticks, are used to attach 3D printed objects to the build surfaces or printing beds. The use of an adhesive will ensure firm contact during the duration of the printing operation. A good adhesive costs about $2.50 on Amazon. When choosing an adhesive, consider the surface to which the object is being attached.
4. Nozzle
Nozzles are used to dispense the filament during 3D printing. Nozzles come in a variety of sizes and can be made from different materials. The nozzle size determines the speed of extrusion. The larger nozzles print faster, while smaller nozzles print more accurate details. Nozzles cost about $15. When choosing a nozzle, consider the size needed for your specific part being printed.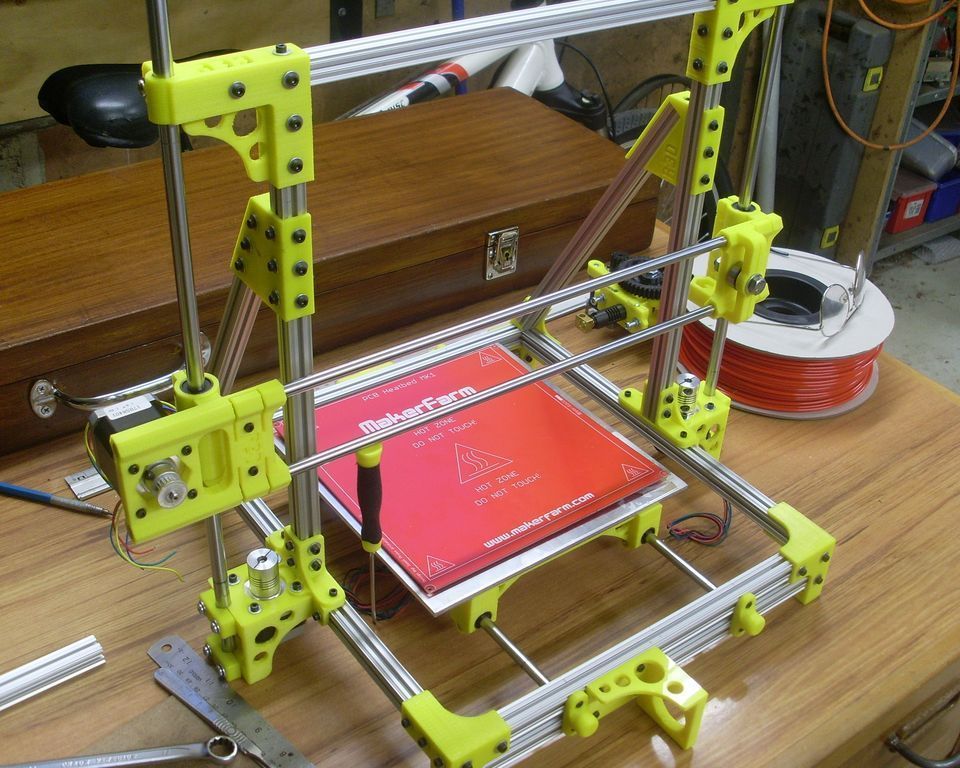
5. Enclosure
An enclosure is a box or chamber that can be used to enclose your 3D printer. It is among the best 3D printer upgrades because it protects the printer from dust, dirt, and other contaminants. Different types exist, but a photography tent enclosure typically costs around $40.
6. Belt Tensioner
A belt tensioner is a useful device that helps to maintain the dimensional accuracy of objects during printing. It keeps the belts tight and free of slack. A belt-tensioner replacement costs around $15. For a DIY belt tensioner, download all the necessary files from Thingiverse (a website where open-source hardware designs of all sorts can be accessed) and print the design.
7. LED Lighting
LED lighting can be used to illuminate 3D prints to improve visibility as well as to help cure UV-sensitive materials. LED lights typically cost around $15. When choosing LED lights, consider the type of light, the color of the light, and the intensity of the light that will meet your needs.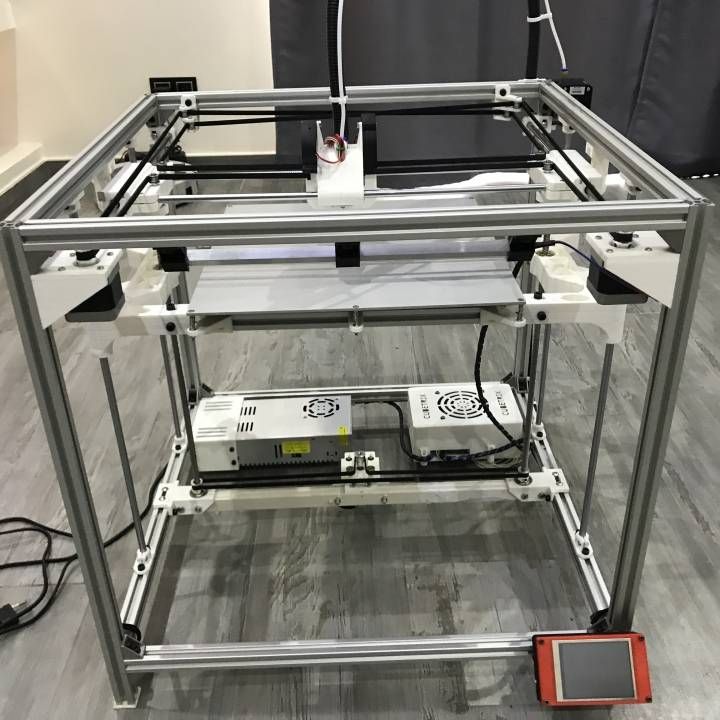
8. Extruder
An extruder is a device that is used to extrude filament during 3D printing. Extruders come in a variety of sizes and can be made from different materials. Extruders typically cost around $90.
9. Filament Dryer
Many filaments absorb significant amounts of moisture from the air, which reduces print quality. As such, this device has been added to the list of the best 3D printer upgrades. It helps to improve the quality of the 3D prints by removing moisture from the filament before 3D printing takes place. Filament dryers (also called dehydrators) typically cost around $90.
10. Corner Bracket
A corner bracket is a device that supports the corners of the 3D printer's frame. Corner brackets, when properly fixed, can help to maintain the dimensional accuracy of the printed object. To get one, simply download the files from Thingiverse and print. When choosing corner brackets, ensure they hold the frame together.
11. Spool Holder
A spool holder is a device that is used to hold filament spools during 3D printing.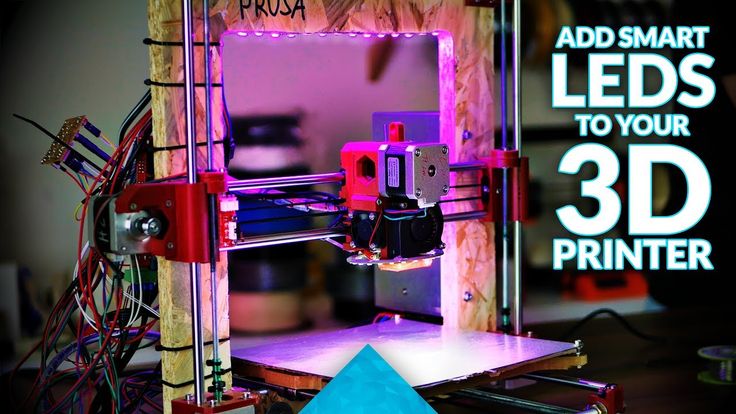 Spool holders help keep the filament spools organized and free from tangling. You can also print your own spool holder by downloading all necessary files from Thingiverse. Design a holder that can hold the filament in place.
12. Webcam Mount
A webcam mount is a device that holds a webcam during 3D printing. Webcam mounts help to improve the quality of the 3D prints by providing a clear view of the build process. A webcam mount can be 3D printed at home by downloading all the necessary files from Thingiverse. When choosing a webcam mount, consider the size of the mount and ensure it is strong enough to support the camera.
13. TL Smoother
A TL smoother is a device used to smoothen the surface of 3D prints. These typically cost around $10. TL smoothers are used mostly with FDM printers such as the EasyThreed desktop FDM 3D printer. Always check the smoother for compatibility with your 3D printer.
14. Fan Duct
A fan duct is a device used to channel airflow during 3D printing. Some thermoplastics like PLA, in their liquefied state, need proper cooling as soon as they are extruded from the nozzle. To get one, simply download all necessary files from Thingiverse and create one.
15. Build Surface
A build surface is a platform that is used to support 3D prints during printing. Build surfaces can help improve the quality of your 3D prints by providing a flat, level surface for printing. Build surfaces typically cost around $25.
16. Stepper Damper
A stepper damper is a device used to reduce vibration during 3D printing. This qualifies to be listed among the 3D printer upgrades because it dampens or reduces the noise produced by the machine. Stepper dampers typically cost around $10.
17. E3D V6 Hot End
The E3D V6 hot end is responsible for melting the filament before it is extruded. The E3D V6 hot end can help improve the quality of the 3D prints by providing better temperature control. An E3D V6 hot end typically costs around $60.
18. ABL Sensor
An ABL (automatic bed leveling) sensor is a device used to measure the height of 3D prints. ABL sensors can help to improve the quality of the 3D prints by providing more accurate measurements. An example of a 3D printer that comes with an auto-leveling sensor is Labists 3D printer. ABL sensors typically cost around $40. When choosing an ABL sensor, you should consider the size and accuracy of the sensor, as well as the compatibility with the 3D printer.
19. Bed Leveling Knob
A bed leveling knob is a device used to adjust the level of your 3D printer bed. Bed leveling knobs help improve the quality of your 3D prints by providing a more consistent surface. Download all necessary files from Thingiverse and print one out. When choosing a bed leveling knob, consider the size of the knob and ensure it fits well with the wing nut.
20. Quality PTFE tubing
PTFE tubing facilitates the easy movement of the filament to the extruder. Quality PTFE tubing typically costs around $12.
21. Wire Strain Relief Bracket
A wire strain relief bracket is a device used to support the wires/cables of a 3D printer. It keeps the wires in place, greatly reduces fatigue caused by printer movement, and keeps them from coming into direct contact with the hot printer bed. Download all necessary files from Thingiverse and print out a suitable version. Ensure the wire strain relief bracket holds the wires firmly in place.
22. PSU Covering
A PSU covering protects the power supply unit (PSU). This might as well be among the DIY box mods parts. A convenient PSU covering can be designed with a 3D printer. Download all necessary files from Thingiverse and print.
23. 32-Bit Control Board
The capability of a 32-bit control board is enormous. It controls all the logical processes in 3D printing. Some of them include but are not limited to regulating temperature, analyzing G-code files, and motion control. The higher processing speed also allows for faster printing. A 32-bit control board typically costs around $60.
24. Multicolor/Multi-Material System
With a multicolor/multi-material system, the print can come in a variety of colors or designs. Multicolor/multi-material systems typically cost around $300 on Prusa Research.
25. Unique Extruder System
Unique extruder systems give 3D printers the option of printing other materials other than the conventional filament material. Among them are chocolate extruders and pellet extruders. A CNC milling machine can also be mounted on the printer for cutting and engraving objects. Thus, the printer becomes an all-in-one manufacturing device. Unique extruder systems typically cost around $300 on ChocoL3D. When choosing a unique extruder system, check for compatibility with the 3D printer.
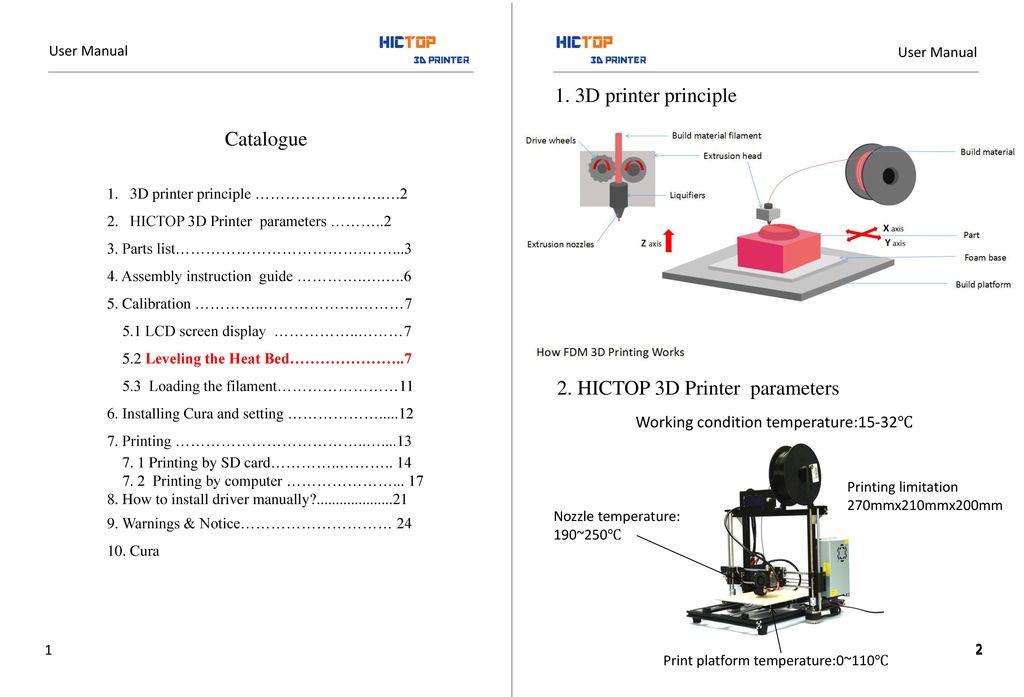
What Is a 3D Printer?
A 3D printer is a machine that creates three-dimensional (3D) objects from a digital file. The printer uses additive manufacturing processes to successively build up layers of material to create the desired object.
For more information, see our 3D printing guide.
How Do You Know Which 3D Printer Part To Upgrade?
When it comes to upgrading a 3D printer, it's important to consider which parts will best improve the performance of the machine. Depending on your specific needs, an upgrade of the extruder, nozzle, bed, or filament may be important.
For more information, see our guide on the parts of a 3D printer.
What Are the Best Extruders for 3D Printers?
Some of the best extruders for 3D printers include the E3D V6, Bondtech BMG, and Prusa i3 MK3. These extruders are known for their high quality and performance.
What Is the Cheapest Way To Upgrade a 3D Printer?
One of the cheapest ways to upgrade a 3D printer is to switch to open-source software. Open-source software is often free or very low cost, and it can provide significant performance improvements.
What Are the Benefits of Upgrading a 3D Printer?
There are many benefits of upgrading a 3D printer, including improved performance, increased speed, better print quality, and more options for filaments and materials.
Why Should a 3D Printer Be Upgraded?
A 3D printer should be upgraded for various reasons. If the printer is an older model, upgrading can help to keep it up to date. Additionally, upgrading can improve the performance of the machine and give one access to new features and capabilities.
Is It Expensive To Upgrade a 3D Printer?
Yes and no. The cost of upgrading a 3D printer will vary depending on the specific upgrades chosen. Some upgrades, like switching to open-source software, can be very affordable. Others, like buying a new extruder, can be more expensive. Ultimately, the best way to save money on upgrades is to focus on those upgrades that will best improve the performance of your particular machine.
Summary
This article reviewed 25 upgrades that can be done to improve the capabilities and performance of a 3D printer.
Xometry provides a wide range of manufacturing capabilities, including 3D printing and other value-added services for all of your prototyping and production needs. Visit our website to learn more or to request a free, no-obligation quote.
Disclaimer
The content appearing on this webpage is for informational purposes only. Xometry makes no representation or warranty of any kind, be it expressed or implied, as to the accuracy, completeness, or validity of the information. Any performance parameters, geometric tolerances, specific design features, quality and types of materials, or processes should not be inferred to represent what will be delivered by third-party suppliers or manufacturers through Xometry’s network. Buyers seeking quotes for parts are responsible for defining the specific requirements for those parts. Please refer to our terms and conditions for more information.
Team Xometry
This article was written by various Xometry contributors. Xometry is a leading resource on manufacturing with CNC machining, sheet metal fabrication, 3D printing, injection molding, urethane casting, and more.
25 Best 3D Printer Upgrades/Improvements You Can Get Done – 3D Printerly
1.
 New Extruder, Higher Performance
Many people are after quality when it comes to 3D printing. There are many ways to increase your quality, from changing settings to getting better quality filament but you can only do so much with the equipment your have on your printer.
3D printers out there like to save on costs so they opt-in for cheaper parts, whether being the frame, heated bed, or hot end.
You would be surprised just how much your print quality can change with a new extruder, especially one that’s premium like the Hemera Extruder from E3D.
It has the ability to print flexible materials with ease, due to it’s compact design and gearing system which gives it extra torque.
Check out my review on the Hemera here for the fantastic benefits that it will give your 3D printing journey, but it doesn’t come cheap.
If you are looking for a more budget extruder that still works pretty well, I’d go with the BMG Extruder Clone from Amazon. Although it’s a clone, it works extremely well and is high quality.
One downside is that it can be hard to manually advance filament through as the gears should be greased to have it working better.
You can just send a quick g-code to your printer to do this. It gives great retractions, with it’s CNC-machined hardened steel drive gears.
2. Convenient Spool Holder
Many 3D printers already come with easy-to-use spool holders, but for the ones that don’t it’s a great addition for your printing journey.
Even some that do don’t do the job very well due to not being long enough to hold certain spools such as the Maker Select 3D printer.
We have a brilliant creation by Filamentry called The Ultimate Spool Holder or TUSH for short. Simply download the STL file, print four, get some 608 bearings, attach them and voila!
You have a working spool holder at a cheap price. These 608 bearings are a good price from Amazon and come in a 10-pack so you have spares for other uses.
The simplest way to get the problem solved, if you are willing to spend is to purchase one. A spool holder I recommend is the Crecker from Amazon. This has the benefit of having a very simple, durable design, yet with much flexibility.
You are able to position the spool holder in such a way that it can hold any spool of filament that you come across.
The holder provides a good amount of tension to allow filament to feed properly through your printer. All you need is a flat surface and you can get it going.
3. Nozzle Upgrades Make All the Difference
Most 3D printers come with factory nozzles which are cheap, but still get the job done. After some time, depending on what you are printing and what temperatures you are using, your nozzle is going to degrade and wear out.
Brass is the standard material for a nozzle because of it’s thermal conductivity and it’s easy for manufacturers to produce.
Even before nozzles wear out, they can be the cause of filament jamming up and costing you precious time and materials trying to solve the problem.
You can opt-in for a standard replacement nozzle or you can go one better, and get yourself a nozzle of higher quality which will improve your printing experience.
For example, an affordable and great quality nozzle is one made out of hardened steel.
These Hardened Steel Wear-Resistant Nozzles from Amazon fit standard MK8 3D printers such as the Ender 3 & Prusa i3, and are great for printing harsh filament like carbon fibre, glow-in-the-dark filament, or wood filament.
The usual brass nozzles you are used to don’t do the job as well as this material, and would quickly wear out.
You will be able to print composite filament which are abrasive like carbon fiber infused filament, and it will give you a lot of printing hours before wearing out.
Another type of nozzle I would recommend is the Micro Swiss Plated Nozzle from Amazon. The benefits of this nozzle is it’s temperature stabilization and thermal conductivity.
It’s brass but steel coated, allowing filaments to extrude smooth and consistently while allowing you to print abrasive filament with little issue.
The steel plated nozzle is great for materials like PETG which can have issues sticking to the nozzle. You will likely see an instant improvement in quality once you change your nozzle, less curling as well.
Retractions should improve and result in less oozing and stringing, so definitely get a quality nozzle and see the difference it makes.
Just make sure you have the correct threading (for your printer) and nozzle size. The usual nozzle size is 0.4mm.
4. Direct Air Properly With Fan Ducts
You may think quality issues are coming from your filament, your temperature settings, or your heated bed. What if none of these were the issues and you just had cooling problems with your 3D prints.
These things can be hard to identify, but once you have it is something that can easily be fixed.
Insufficient cooling diagnosis is usually done through overhang tests and gap bridging. Once you’ve identified that it’s an issue, then you know the solution.
Using a fan duct on your printer could easily be the difference between prints going well from start to finish, and prints getting knocked off the build platform mid-print.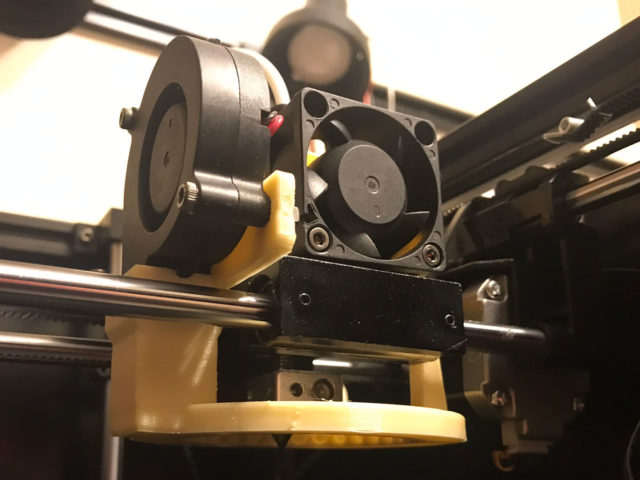
This happens more so with inexpensive 3D printers that don’t have these issues at the forefront and are more worried about the competitive price points for a budget printer.
If your fans are too far away from prints, or there is little airflow direction you can print yourself a fan duct for many different types of printers.
Here are fan ducts for the following prints on Thingiverse:
- Ender & CR 3D Printers
- Anet A8
- Anet A6
- WANHAO i3
- Anycubic i3
- Replicator 2X
5. Belt Tensioners Make A Difference
Temperature changes the length of objects so in many cases, your 3D printer’s belt may lose tension over time with the heat. This is where a belt tensioner can come in handy.
Some people advise to lower your jerk and acceleration settings due to each move leading to stretch and compression of your belt.
For the most part, belt tensioners are beneficial if you aren’t adjusting your tension accurately, as they bring in elasticity where it’s not necessary. You want to make sure you’re not using a sprung tension method and something that simply pulls the belts tight enough.
A good belt tensioner is one for the Ultimaker using a much simpler design than usual. It can fit belts of other 3D printers or be scaled up or down in your slicer to be applied.
Here is a Y-axis belt tensioner which works for Prusa type printers. It takes a bit of DIY to set up but it’s a massive help.
With a well-tightened belt, your print quality should increase. Below is an example of the difference it made with a print.
6. Stepper Motor Dampers For Noise Reduction
Motor dampers are usually small pieces of metal and rubber combined together which screw onto your motors and the frame.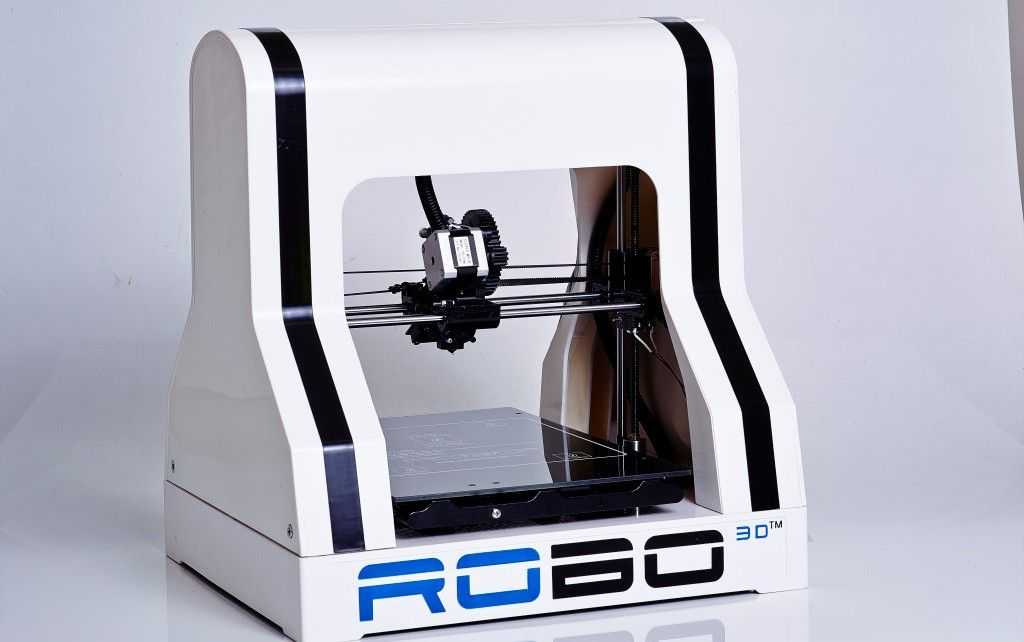 What it does is separates the motors from the frame to prevent vibrations and oscillations from echoing.
It does a great job to take loud printers, and convert them to quieter printers. You simply install them on each of your motors (X, Y and Z), being either 3 or 4 if you have 2 Z motors.
Most sounds that come from your 3D printer do come from the vibrations of the frame so this is a cheap, easy fix.
If your pulley are press-fit and you can’t remove them, the video below shows you how to tackle that issue. You’ll need a bunch of screws, washers and nuts, and then you can get started (materials in the video’s description).
The stepper motor dampers I would recommend, that have helped many people out is the WitBot Dampers which also come with heat-sink if your motor gets hot.
7. Heatbed Silicone Levelling Columns
Say goodbye to your springs and hello to silicone. These are made to replace those skinny levelling springs that do the job, but not so well. Once you install this upgrade, they are set and won’t go anywhere.
They do a great job cutting back vibrations compared to the alternatives, and have reliable guarantees to work. These are specially designed for the Anet A8, Wanhao D9, Anycubic Mega and many more printers out there.
You need a goo amount of heat-resistance and pressure resistance for your levelling columns, and these silicone upgrades work perfectly to handle the wobble of your printer, resulting in higher quality prints.
There is little benefit to sticking with the traditional bed springs that your printer comes with.
8. Get Yourself Some Premium Fans
Noctua NF-A4 is a premium fan which you will want for your printer for a few main reasons.
It’s extremely quiet, it has serious flow rates and cooling performance, making a huge difference to how well optimised your 3D printing process is, and has rubber isolating mounts to make sure the vibrations don’t travel through to the other parts of your printer.
Check out this previous article I’ve written for tips to reduce noise on your 3D printer.
Factory fans won’t be as good as this one in any right, so if you want a trusted fan to work for your 3D printer, this is one I would go for and not look back! You have different cable adapters to fit your needs.
The fan is more compact, yet more powerful. Some people report pushing up to 20% more air compared to standard fans while it’s around 25% smaller than stock fans.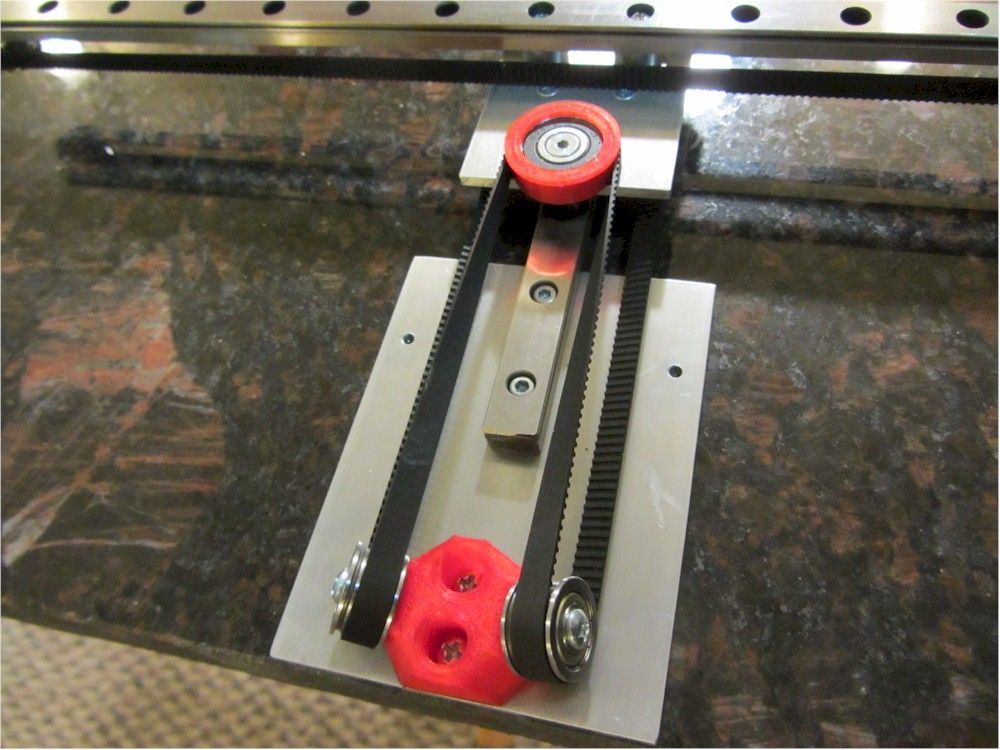
Even with a low speed setting, you will see your fan working efficiently to make sure your prints come out the best that they can.
9. Flexible Magnetic Print Surface
How often have you spent an unnecessary amount of time trying to remove a print from your printing surface?
It’s one of the more common issues that people face when it comes to printing, and it can get very frustrating knowing you had all your settings correct, just like your last print but it happens again.
Some people have even injured themselves trying so hard to remove a print or had many near misses. This is something that can be easily sold with the right product. It’s just not worth the time and money using a bad print bed, so avoid the hassle and constant replacements.
If you want one product that will get the job done, you need to start using a flexible build plate on your 3D printer.
The reason these work so well is you don’t need to wait for any cool down, you can reach for your flexplate, give it a quick bend and your part should immediately come right off. Then you can put the flexible surface right back onto your printer and start the next print.
It has a magnetic base which comes in all different sizes so it can be put on several 3D printers. Then it has the actual flex plate, usually a piece of spring steel which attaches to the base.
The great thing is that the flex plate can come as a standalone product, meaning you can have a whole host of different materials as the printing surface such as PEI or Garolite.
After much research I chose the Creality Ultra Flexible Removable Magnetic Surface on Amazon. It is a great price with great functionality for hassle-free print removal. It’s easy to install, works with all FDM printer models and can be cut to size if necessary.
If you want the premium, branded version of this you definitely want to go for the BuildTak 3D Printing Build Surface on Amazon. It’s more expensive but you won’t find a better print surface.
The build sheet adheres to print beds to help filament sticking during prints and is compatible with PLA, ABS, PET+, Brick, Wood, HIPS, TPE, Nylon and more. The BuildTak is a premium magnetic square sheet and has given owners of the surface years of use.
End the need for all the fancy blue tape, glue sticks, hair sprays and get yourself a proper build surface.
10. Stay Prepared With a 3D Printer Tool Kit
After some time in the field of 3D printing, you realise there are a number of useful tools that you regularly use, whether it be for fine-tuning your printer or post-processing.
Rather than buying these separately when you figure out you need them, it’s a better idea to buy a 3D printer tool kit that incorporates a list of useful items in one purchase.
One of the full 3D printer tool kits I recommend is the Filament Friday 3D Print Tool Kit from Amazon. It’s a 32-piece essentials kit which contains many accessories which assist you with cleaning, finishes, and the printing process. You will find many items that don’t come in the usual kits that you can get.
It includes items such as removal tools, electronic calipers, needle nose pliers, glue stick, filing tool, knife clean up kit, wire brushes and much more, all fitted into a nice carry case.
It may seem like a high price, but when you consider the quality and quantity of product you are receiving, it’s a great valued purchase. These are items that you will most likely use at points in your 3D printing journey, so getting them in one purchase is ideal.
This tool kit will make life much easier and is better quality than most items that come free with your 3D printer.
If you want a kit specific for removal, cleaning and finishing 3D printers, look no further. I’d go with the AMX3d Pro Grade Tool Kit. This tool kit also covers the basics needed for 3D printing, but at higher quality.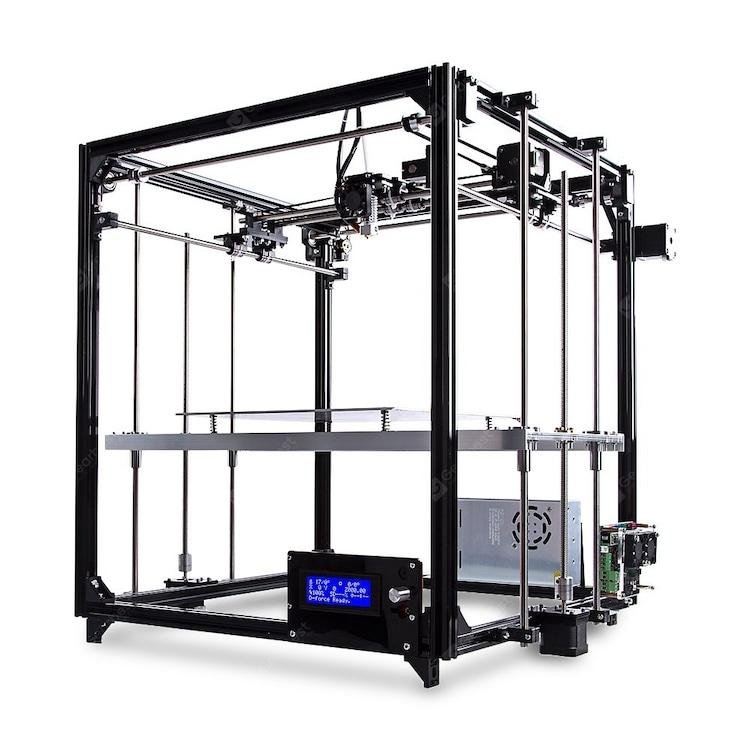
If you want a great steel set of tools with a product designed based on feedback from customers, then definitely go for this one.
Nozzles do require maintenance over time, without it you’ll definitely take a hit on print quality and more time spent troubleshooting. To avoid such issues, I recommend REPTOR 3D Printer Nozzle Cleaning Kit.
`
You get some amazing curved precious tweezers, as well as a set of needles which fit into a variety of nozzle sizes. It has an ergonomic design for added accuracy and accessibility of your nozzle.
11. Auto-Levelling Sensor With Ease
Having your bed levelled correctly is the difference between a successful print and a print that’s wasted your time and filament due to coming out badly.
Sometimes it takes 3D printer users many hours and tests to figure out that their actual issue was a bed that was incorrectly levelled.
Even when you think you have corrected the issue, it is something that isn’t a permanent fix because over time, beds can warp, parts change in size and it only takes a very small change to effect your results.
The simple fix to these issues is getting yourself an auto-levelling sensor.
How this solves your problem is the sensor tells your 3D printer exactly where the print bed is, in comparison to the height of the whole print bed, so if one side is higher than the other, your printer will know.
This is done through a small pin from the sensor being pushed in, activating a switch which sends a message about the Z value and location.
Even if your bed is extremely warped, your 3D printer will automatically adjust for that during the printing process. This will solve many adhesion and print quality issues in one swoop, so an auto-levelling sensor really is a time and money saver in the long-run.
The main downside here is that installing one might require a new mount for your 3D printer’s tool head, along with some changes to the firmware. But nothing to worry about as there are many easy to follow guides to put you in the right path.
Now that we have the solution, the auto-levelling sensor I recommend is the BLTouch from Amazon. Although it’s a fairly pricey item, the benefits of it, issues it will solve and frustrations it will save is well worth the investment.
It’s simple, high-precision and works with any kind of bed materials you have. This should last you years.
Many people go with cheap, cloned sensors based on the BL-Touch and get poor results. They just end up having to manually adjust their bed to get successful prints, so it ends up just being a waste of time.
You are better off going with the original, which has a tolerance of 0.005mm.
Below is an example of how it works, simply let the sensor work and let the printer work for you rather than working for the printer.
Get the BLTouch today from Amazon today.
12. Insulation Mat Sticker/Thermal Pad
Heated beds aren’t always as efficient as you think. Many times they will transmit heat in the places you don’t need it, such as the bottom of the heated bed.
This results in taking longer for your surface to get to the desired temperature, as well as a waste of energy, so time and money.
It’s worth investing in your 3D printer to decrease this unnecessary waste. Some printers have trouble simply getting the bed up to temperatures of 85°C and it can leave you frustrated thinking you are stuck with this issue.
The solution to this problem is an insulation mat. The one I would recommend is the HAWKUNG Foam Insulation Mat If you have an uninsulated heated bed, this upgrade is a no-brainer.
The installation process is very easy, all it takes is cutting the mat to size, peeling the adhesive layer and sticking it down to your heat bed. Keep in mind though, it’s a very strong adhesive so it requires steady hands and focus to get right.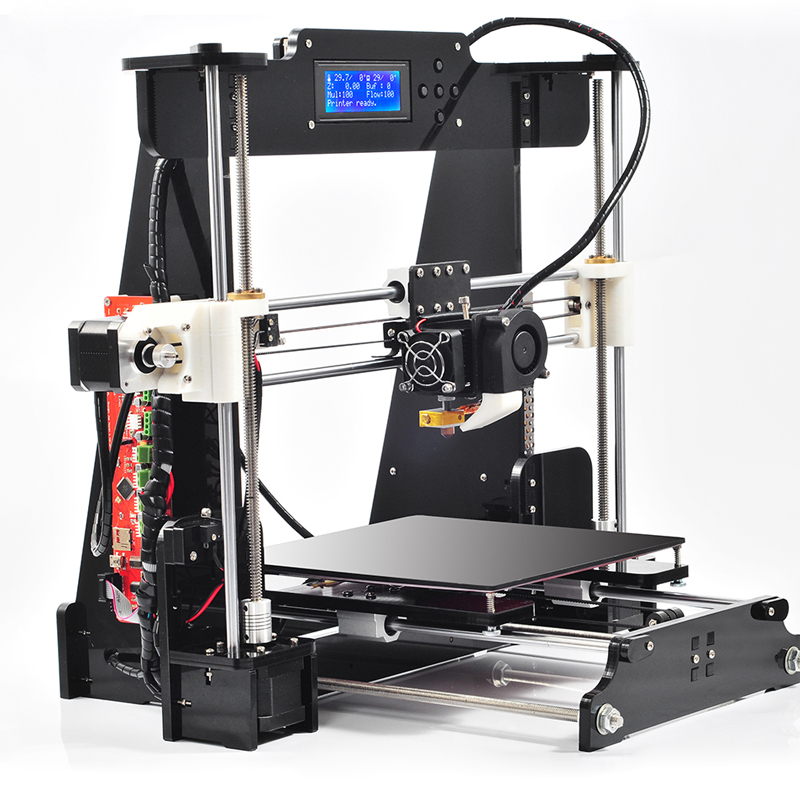
It can fit the majority of 3D printer beds out there, having a 220 x 220 version and a 300 x 300 version. They are also very easy to cut to size if need be.
The benefits to you and your 3D printer are vast. Your bed temperatures will heat up faster, stay stable over time, cool down very slowly and improve your layer adhesion and print quality.
Many people have reported an insulation mat being the fixer of their ABS printing issues. If you want to print your first large ABS print, you can feel confident after having this upgrade.
The insulation mat is non-flammable, durable, insulates sound well and has low thermal conductivity (traps heat well).
You’ll need to re-calibrate your printing settings after this upgrade because your heated bed will get hotter and more efficient. You’ll see a reduction in the energy used to power up your heated bed to maintain the temperature.
13. Aesthetic LED Lighting
3D printers tend to be put in dark, secluded places where it can be difficult to get a good visual of the process.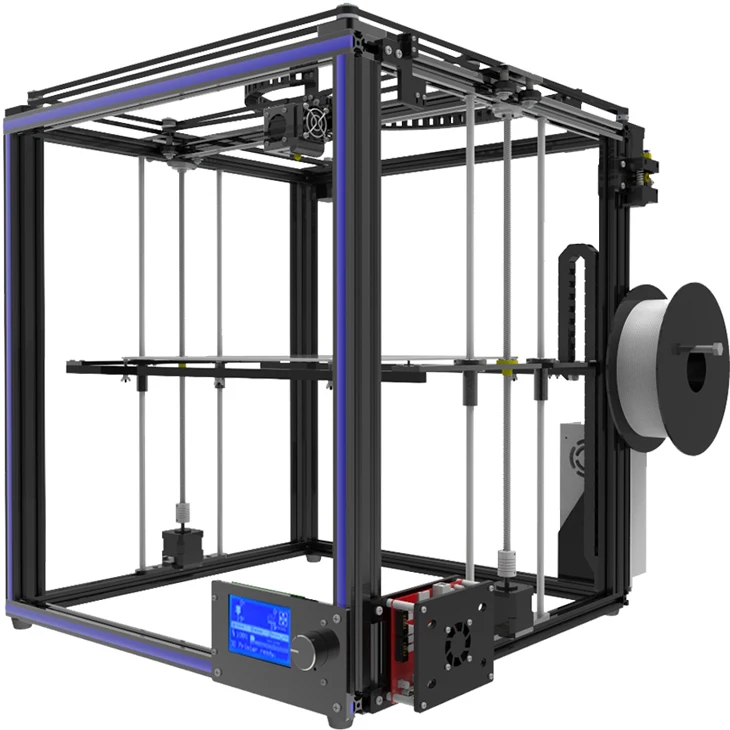
The wiring to get LEDs installed is very simple and it can be set up in a way to get your 3D printer automatically control the lights. LED strips are the usual type that people use for their 3D printers as they are flexible, easy to setup and relatively cheap.
14. PSU Covering To Protect It
When it comes to your 3D printer, there are many components that you need to manage to increase your safety. Without managing your risks there are issues that can arise that affect you and other people around your 3D printer.
One of these safety management issues is your power supply. It’s a good idea, if your printer doesn’t already have one, to implement a cover for your PSU to deter any electric shocks and keep your PSU secure.
You can simply print out a nice PSU cover for your power supply. The design from Thingiverse can be found here which covers standard size power supplies such as the one found here on Amazon.
The cover should reduce potential hazards by providing you with a good mounting point for the IEC switch.
If your 3D printer does not have an off switch, particularly for the Anet A8 printer you can get yourself a 3-in 1 Inlet Module Plug from Amazon and get it set up.
15. Get Rid of Moisture With a Filament Dryer
Ever heard of your filament being hygroscopic? It means your filament is absorbing moisture from the air, leaving it open to damage when heated at high temperatures. Proper storage in an airtight container of some sort is required to get the best results with your prints and there are a few ways that people decide to do this.
One of these ways is using an filament dryer product which actually takes the moisture out of your filament, making sure it is in optimal form for printing.
Rather than getting an actual branded filament dryer you can use a food dehumidifier which does the same job. Depending on which one you get, it may require a few small modifications so your can fit your filament in there.
I would recommend the Sunlu Filament Dryer from Amazon. They can get usually get to a nice 55°C and will work good enough to get your filament dry and ready for use.
Many prints get ruined due to improper handing of their filament and bad a humid environment so this should counterract that.
A spool holder comes in handy with filament dryer, I’d recommend the Plano Leader Spool Box which is an airtight container to protect your filament from moisture.
16. Vibration Feet Dampers
Most people aren’t a big fan of the noises a 3D printer makes, especially in the middle of the night when you are going for that big, detailed print. It can get pretty agitating, not only for you but for the people around you, and you may have got complaints before.
Some people are more sensitive to noise than others, so even if it doesn’t bother you that much, a family member or spouse might not feel the same!
This is where vibration feet dampers come in and there are a couple different solutions.
Sorbothane feet are an efficient, but premium product that many 3D printer hobbyists use to reduce the noise of their printers.
I would recommend the Isolate It Sorbothane Non-Skid Feet because it is a proven product which does wonders to isolate vibration, decrease shock, and damp unwanted noise. It has an adhesive bottom so it doesn’t slip and is very easy to install.
If you want to try out the inexpensive option which involves a print through Thingiverse, then there is definitely some options.
This link will take you to Thingiverse with ‘vibration damper’ searched to show you an extensive list of vibration feet that fit under each corner of your printer to reduce vibrations.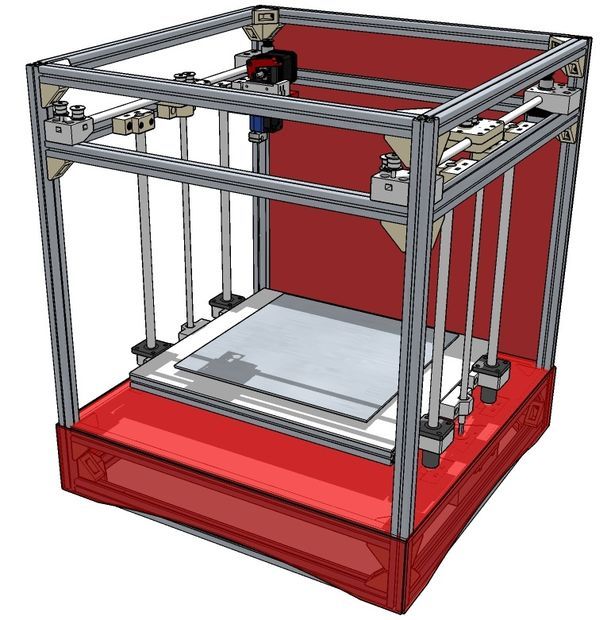
If you haven’t found your printer, simply go to Thingiverse and type in ‘vibration damper + your printer’ and a sweet model should pop up that you can get started with.
Vibration damper for the following printers:
- Anet A8
- Creality Ender 3 Pro
- Prusa i3 Mk2
- Replicator 2
- Ultimaker
- GEEETech i3 Pro B
17. Raspberry Pi (Advanced)
Raspberry Pi is a credit-card sized computer that gives you extra capabilities. When mixed with a 3D printer, it’s basically printer control on steroids. It gives you the ability to do so many things you didn’t even know were possible with your 3D printer.
When you have a raspberry pi, you gain access to the use of Octoprint (known as OctoPi).
Octoprint is an open source 3D printer controller application which gives you access and control of your 3D printer through a unique web address.
This means, as long as you have an internet connection, you can do the following:
- Heat up your printer
- Prepare files for prints
- Monitor your print progress
- Calibrate your printer
- Carry out some maintenance
This can all be done without physically being at your printer. You also gain access to Octoprint’s powerful plugin system, which gives extra functionality.
For example, if you have your printer in your garage and don’t want to have to go back and forth, you’ll want to upgrade to using a raspberry pi so you can do it from your desired area.
Many people set up a webcam to watch their printers using the raspberry pi system, to which they can view through a web browser.
You can create time lapse videos, stream your print live, and if you see your print failing you have the ability to stop your printer. The recommended camera for doing so it the Raspberry Pi V2.1.
It has an 8 MegaPixel capability with 1080p and is used by many other 3D printer users.
Now, the raspberry pi I recommend is the CanaKit Raspberry Pi 3 which comes with a nice quick start guide. It has many features and allows you to not only remotely control and view your printer, but from anywhere around the world as long as you have an internet connection.
The features of the OctoPrint application OctoRemote are:
- Control and monitor multiple 3D printers through OctoPrint servers
- Upload and download files
- View your printer through the webcam viewer
- Move the print head and control the extruder
- Download rendered videos and change the timelapse
- Control and monitor the hotend and bed temperature
- Slice STL files through OctoPrint’s CuraEngine plugin
- Send system commands to shut down or reboot your server
- Send commands to the terminal and monitor it
- Add custom controls with inputs and sliders
18. Brackets for Wire Strain Relief
The wiring system in your 3D printer can easily get damaged if they aren’t organised properly, so it’s a good idea to get a good system in place.
It may not affect you for some time, but after much exposure, wires can start breaking off and shorting from the constant movements of the printer’s components. One of these is the wires from the heated bed.
Some printers, the Creality for example, already implement these wire strain relievers to aid in the wiring system. Many others don’t so it’s a good idea to get this upgrade set up on your 3D printer.
The Creality CR-10 Mini strain relief bracket for the heated bed can be found here on Thingiverse. The link for the Anet A8 printer is here. For other printers, you can search on Thingiverse or on Google for the STL files.
For your extruder motor wires, you can use this to prevent your wires from getting bent when the carriage moves around. It’s a good idea to print it in ABS or another heat-resistant material since the bracket will be in contact with the motor.
19. Filament Sensor
There are quite a few issues as a 3D printer user that you have to be able to minimize to give yourself the best chance to get successful prints.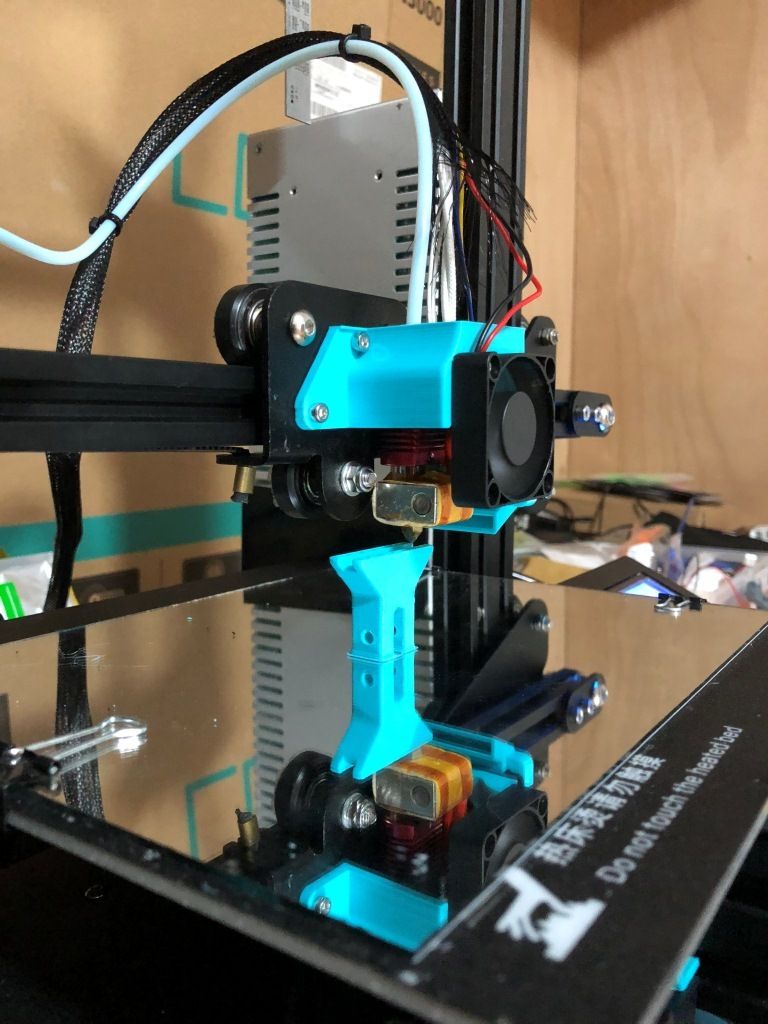 When it comes to those longer, several hour prints, this is even more important to make sure your process is in order.
This one is a fairly straight forward upgrade. Some printers come with filament sensors built in, but several don’t. What these do is simply detect when the filament loaded into your printer has run out or is about to run out, automatically stopping your printer.
Without this automatic detection, your printer can continue printing the file without filament, leaving yourself with an incomplete print which requires a reset.
If you run out of filament during a 10 hour print, 7 or 8 hours in, it can easily render your print useless, meaning you have wasted plenty of expensive filament and your precious time.
This is one issue that you can completely avoid by using this simple upgrade, a filament sensor.
What this does to benefit you is it gives you the luxury of being able to load filament and let your prints run, without having to worry. When your printer automatically stops, just reload your filament and it will get back to your print.
It’s a simple, but effective product which will help with those longer, more detailed prints so it’s a good idea to invest in a filament sensor to aid your 3D printing journey.
After much research I chose this model on Amazon. It’s a cheap, reliable option that gets the job done without any fancy extra bits.
Do watch for retractions because the feeder could push the new filament out so wait until the filament is running well before leaving your printer.
This IR-Sensor from Amazon is for a Prusa i3 Mk2.5/Mk3 to upgrade to a Mk2.5s/Mk3s.
20. 32-Bit Control Board – Smoothieboard (Advanced)
The control board of your 3D printer gives you access to most of the electrical features such parsing g-code, temperature regulation and the actual movement of the motors.
It used to be a time where the control board was simply to get the 3D printer working, but now it’s a part which can offer extra features.
It’s a big upgrade but it can get fairly complicated, so you want to either have previous experience with this or have a very good guide to take you through the process of changing your control board.
The benefits of upgrading your control board can be vast, depending on which one you go for. One I would recommend is the BIQU Smoothieboard V1.3, from Amazon.
This upgrade does require knowledge of configuring Marlin V2.0.x firmware as well as basic wiring skills. It not a simple plug and play type upgrade, so you’ll need to do a good amount of research beforehand.
Overall, it has many features and is a great control board, that can support quiet operation, homing without sensors, native support cloud printing over the internet, touchscreen interfaces and higher processing speeds allowing you to print quicker.
Some control boards require soldering wires and whatnot, luckily it is already done for you with the recommended controller board.
It supports resume printing, automatic shutdown after printing, filament break detection and much more.
You ideally want to get a 32-bit controller as they have a higher capability to support motor drivers of better quality. Another added bonus is they are usually reported to run quieter and more efficiently compared to 8-bit controllers.
21. A Simple 3D Printer Enclosure
This upgrade has a lot to do with controlling the environment inside and outside of your 3D printer to your benefit. Particularly for materials which are prone to cooling issues like ABS.
Enclosures aren’t essential but they can definitely help your print quality by stopping it from cooling too quickly, resulting in warping and ruining your print.
A good enclosure will keep your print safe from drafts, temperature changes and will protect you from accidental injuries that can happen when a 3D printer is out in the open.
Many printers are already enclosed in it’s design, but many others aren’t so an enclosure can be either purchased or built using a range of materials. Some people have built an enclosure from cardboard, insulation foam or Ikea tables with fibreglass.
You have quite a few options here depending on what you are comfortable with.
Instead of goign with the DIY option, if you want a done-for-you solution that actually works, you can’t go wrong with the Creality Fireproof & Dustproof Enclosure from Amazon.
Benefits of an enclosure are vast, they do a good job limited emitted fumes from materials, protects your printer from dust, improves fire safety, increases print quality and much more.
If you want to build your own enclosure I would recommend reading All3D’s post on it or use this popular guide from Prusa 3D:
22.
 Clean Up With Filament Filters
This is a simple upgrade you can apply pretty quickly. It has the benefit of protecting your filament from needing cleaning, and oil can be added for lubrication.
The sponges are used to clean the filament of any dust particles which stops them from being able to clog your extruder. It will extend the life of your nozzles and hotend, and it can be used with Direct-Drive or Bowden Extruders.
The STL file can be found here from Thingiverse.
An even more basic method is an option which is just using some tissue/napkin and a zip tie. It’s illustrated simply in the video below.
https://www.youtube.com/watch?v=8Ymi3H_qkWc
If you want a premium version of this that’s professionally made, check out this Filament Filter from FYSETC on Amazon. Many people report that after using this upgrade, they see an instant change in the quality of their prints.
It’s a low cost and gets the job done properly so you can stay on top of your 3D prints.
23. TL Smoothers for Noise & Quality Benefits
This one is a quality control upgrade which lowers the vibrations from your stepper motor drivers. With a good TL smoother add-on installed, you should get a smooth movement in your stepper drivers and less noise from your printer.
Many people have reported a huge decrease in their printers volume after using this upgrade.
The main benefit that people use these for it for their ability to eliminate salmon skin (a printing defect) in their prints.
With TL smoothers, it’s important to place them in an appropriate area because they can run pretty hot, even when not printing.
It’s a very inexpensive fix for your motors to alleviate some print quality issues and it’s fairly easy to install as they have a plug and play type setup.
The TL smoother with great ratings on Amazon and one I’d also recommend is the ARQQ TL Smoother Addon Module this model.
I would double check the wiring before installing your TL smoother as sometimes the extension cables can be wired in reverse.
You do want to make sure your printer doesn’t already have this upgrade installed from the factory, such as on the Ender 3, or it won’t be of any use to you. It’s great on Tevo 3D printers, CR-10S and a Monoprice Delta Mini.
Specifically for the Monoprice Delta Mini, ZUK3D created a TL Smoother Board Mount on Thingiverse you can use to implement the TL smoother easier.
24. Webcam Mount For Viewing Prints
If you want to monitor your 3D printer but you don’t have the Raspberry Pi upgrade, you can create yourself a universal webcam mount. It fits many printer designs and camera sizes. You can also search for a mount for your specific 3D printer to make it more compatible.
25. Dual Extruders, Dual Capability
The majority of 3D printers use single extruders to transform their filament to lovely pieces and parts. This is easy, efficient and works very well without having to do much else. This isn’t the only option, you can open up your 3D printing experience with a dual extruder.
It’s a fairly difficult task which does require a good amount of experience to do, but it’s definitely possible. I found a guide on Instructables to convert a CR-10 printer to a dual extrusion printer, with BLTouch auto-levelling sensor.
Do keep in mind that you use more advanced STL files as they have to incorporate both extruders into one file. This means you will have a harder time designing prints and will have to learn the process.
For people struggling with various 3D printing issues, you might want have wanted more guidance towards getting ideal 3D printing results. I created a full course that's available to purchase called Filament Printing 101: Beginner's Guide to Filament Printing that takes you through some of the best 3D printing practices early on, so you can avoid those beginner mistakes.
3D printer modifications - higher print quality, quieter operation
Based on our extensive experience with different 3D printers, we have prepared several modifications that will improve print quality, make your 3D printer quieter and more functional.
1. Motor dampers (Buy here)
A damper is a simple passive device that consists of two strips of metal filled with rubber. It turns out the correct vibration decoupling without hard contact. The main task of dampers is to dampen small vibrations from the operation of motors, thereby significantly reducing noise and damping small print irregularities that arise from it. Hard rubber is used, so this installation of dampers will not affect the tension of the belts and the rigidity of the printer itself in any way. In fact, installing a damper even on one motor makes the printer noticeably quieter in operation. There is a thread on the metal plate itself, so there will be no transmission of vibration and noise through the fixing screw. The only thing I advise you, before ordering dampers, be sure to check whether there is enough space for its installation on your printer model. The height of this insert is 7 millimeters, and it happens that you can stick it to all points of installation of motors.
2. TMC Drivers 2208 (Buy here)
This is another upgrade that greatly reduces the noise from the printer motors. Most often, 3D printers have an old, and therefore cheap, replacement A4988 driver installed, and when it works, an unpleasant howling, whistling humming noise occurs from the motors. This sound comes from the motors themselves, but it is the drivers that control them that create it. The fact is that manufacturers strive to reduce the cost of the printer, not caring about the noise during its operation, which is why they install the A4988. But, of course, there are many modern drivers on the market today. One of them is TMC 2208. Its feature is that it is almost completely compatible with the A4988 driver. It is enough to take out the A4988 and install the TMC 2208 instead. Of course, it is important to observe the pinout of the contacts, otherwise you can stupidly burn not only the driver itself, but also the control board. The pins are signed, so just be careful. Next, you need to adjust the motor current for your printer. This is done by a variable resistor on the driver itself. There are no exact setting values, since printers and their mechanics are different. The point here is that you need to set the minimum required current so that there are no skipped steps when moving. For example, for an Anycubic Kossale delta on lubricated and easy-rolling rails, I got a value of 1.1 volts. According to the formula, this is approximately 0.75 amperes per motor. In general, this value is suitable for most printers, but I repeat, you must calculate the settings yourself using the formula indicated on the product page on Aliexpress.
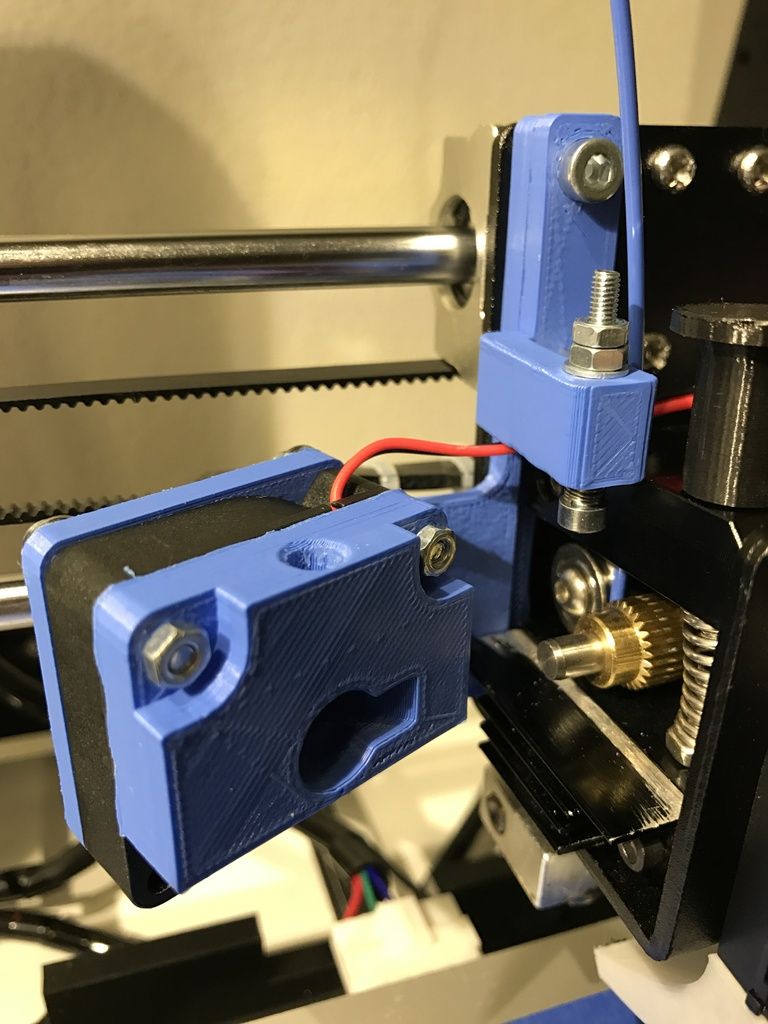 And the last thing that is required of you is to invert the operation of the motor. The output pins on the drivers are located differently, so you will either have to invert the firmware outputs, replacing false with true, or physically rearrange the wires in the motor connector. They are signed on the driver itself 1A, 1B, 2A, 2B. And here we also just observe their new pinout. But of course, the easiest way to do this is in the firmware.
So let's do it again: First, install the new driver, following the pinout. Second, we adjust the current with a variable resistor. And third, we invert the operation of the motors either in the firmware or in the physical connector. After that, the output is an absolutely quiet printer.
When ordering, please note that for deltas you need to install three drivers - on the X, Y and Z axes. And for the cartes only 2 drivers will be enough - on the X and Y axes.
It would seem, well, what's wrong with that, nozzles in most cases are sold under 10 pieces for one dollar, but there are those that cost 5 bucks for one nozzle. But for a printer, this little detail is almost the most important, because the quality of the nozzle will determine how the extruded thread of hot plastic is formed, and how it will fit on the model. In appearance, all nozzles are similar and no significant difference can be seen between them. But it is worth looking at them under a microscope and this difference will immediately become noticeable. Some nozzles have scuffs on the edges, others are generally bent, but there are also almost perfectly even ones. After studying all the nozzles, we can say that there is not a single visual good among cheap nozzles and it turns out that you will have to arm yourself with a microscope and check cheap nozzles for their curvature before installing them on the printer, or immediately buy expensive and high-quality ones.
Still neglected by many when printing, but the main cause of nozzle gaps is dust and dirt that builds up over time on spools of filament or is already present on them during production. Therefore, I recommend covering them with bags and additionally printing a dust filter, stuffing foam rubber in it and putting plastic on them. Installing such a simple filter significantly reduces the likelihood of nozzle clogging and saves you from one of the most common problems with 3D printers.
4. Foil insulation (Buy here)
Manufacturers of Chinese 3D printers save on everything, especially budget models. Therefore, printers often come without a table insulation at all. But its absence, of course, causes heat loss and uneven heating of the table, which leads to large models coming off during long-term printing. If you have a table without insulation, then I definitely recommend ordering foil insulation. It costs only 2-3 dollars. It is simply molded on the self-adhesive from below, immediately insulating the entire table, and thereby stabilizing its temperature. Of course, instead of it, you can use a sheet cork or any other heat insulator, because the tables usually do not heat up above 100 degrees.
5. Tensioners (Buy here)
Probably the most useful little thing. They are needed for GT2 belts. On many models, it is very difficult to tighten the belts by hand and often does not work well. But in order for the print to be of high quality, the belts must ring like a string. For this, you need to use such small spring tensioners. They need to be installed in places where they do not interfere with the movement of the carriage. This is usually a point near the attachment of the belt to the extruder.
6. Linear bushings (Buy here)
If your printer has steel guides and steel linear bearings roll along them, over time, dust settled on the guides will get into the bearing balls, blocking them. Bounce, jamming and uneven movement of the carriage and table along the axes appear. In this case, you need to remove and wash the bearings from dirt. An alternative to them is a plastic sleeve. It is not affected by dust and even completely dirty does not produce a rumbling noise when moving.
7. Ultrabase - Ultrabase (Buy here)
This perforated tabletop is the best choice for long term printer installation. If you have a film on your table, then over time we recommend replacing it with Ultrabase. These glasses are even, heat-resistant and have good plastic adhesion. Thus, such a coating provides a high-quality bottom layer of the model. Perforation is needed so that when the table cools down, the model itself comes off and can be easily removed without any effort. Ultrabase base can be used without any additional adhesives.
8. Scroll fans (Buy here)
Most of the budget 3D printer models come from China with a weak plastic blowing-cooling system. This causes a number of problems when printing fast model layers, when the plastic does not have time to cool down, flows down or, on the contrary, lifts up.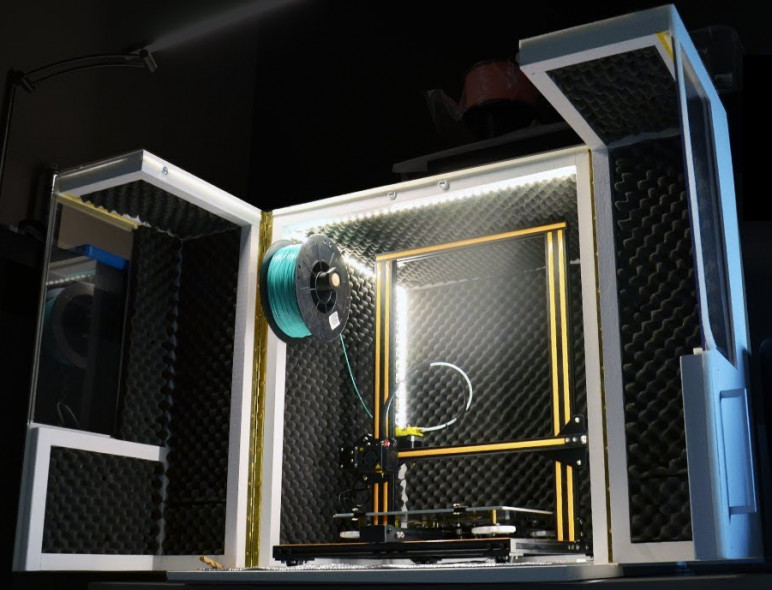 Therefore, the cooling system of such printers has to be modified and made more powerful. As a replacement for standard fans, it is best to use radial snail fans. They create several times more powerful cooling air flow and allow you to completely eliminate plastic laying defects by quickly cooling it at the outlet of the nozzle. You can take the simplest cheap fan models, or you can take more expensive branded models. For example, a Sunon fan with the same size and power consumption blows one and a half times more powerful and runs quieter.
9. Octo print (Buy here)
Many of you are familiar with the Raspberry PI single board computer, which can be used as a print server to run a 3D printer. There will be no improvements in the quality and accuracy of printing, the control code and the mechanics of the printer remain the same, but the server will allow you to remotely control and start print jobs. Installing and configuring Octoprint is simple, you just need to deploy the finished image from disk to USB flash drive. Next, directly on the computer, open the configuration file from this flash drive and configure the Wi-fi network connection. If you connect the network with an Ethernet wire, then no configuration is required at all. Optionally, you can connect a webcam for visual remote control of printing. A list of compatible cameras is on the Octoprint website, for example Logitech c270. You can use the stock Raspberry pi camera, but the picture quality will be worse. Logitech connects to the raspberry USB port and does not require any settings other than a reboot. The camera will allow you to see the printing process itself remotely online and it will be possible to automatically record beautiful print time-lapses. In the event of a failure, it will be possible to see the cause of the defect if the print suddenly becomes. Octoprint works with all printers that have Marlin firmware installed. As a result, you will fully control the printer remotely, start and stop printing on it, adjust the temperatures, and, of course, see how the printing is going at the current moment.
3D printer types, materials, etc.
Affordable, reliable Formlabs 3D printers for office and workshop use set the industry standard for professional 3D printing for businesses around the world. Scale your prototyping and manufacturing with cost-effective, high-resolution, print-quality industrial 3D printer models.
Industry Leading LFS
(Low Force Stereolithography) Desktop 3D Printer
Learn more about Form 3
First affordable high-volume resin 3D printer
Learn more about Form 3L
Scalable multi-printer solution
Industrial power of selective laser sintering in your workshop
Explore Fuse 1
3D printing or Additive Manufacturing (AM) technologies are used to produce three-dimensional physical products from models created using a computer-aided design (CAD) system by sequentially adding material layer by layer.
Although 3D printing technologies have been around since the 1980s, only recent advances in machinery, materials and software have opened up the possibilities of 3D printing to a wider range of companies - previously only a few high-tech industries used such tools.
Today, affordable professional desktop and workshop 3D printers make it easier for businesses across industries to innovate. Such industries include engineering, manufacturing, dentistry, healthcare, education, entertainment, jewelry, and audiology.
Any 3D printing process begins with the creation of a CAD model, which is exported to the software to prepare the design for printing. Depending on the technology used in the 3D printer, models are made layer by layer by curing a photopolymer resin or by sintering a powder. The models are then removed from the printer and post-processed depending on the intended use.
3D printers create objects from 3D models, mathematical representations of 3D surfaces created using computer-aided design (CAD) software from 3D scan data. The design is then exported to an STL or OBJ file, which is read by the 3D printing software.
3D printers come with software for setting print parameters and the ability to analyze the digital model in layers, which are horizontal sections of the printed object. Customizable print options include model orientation, support structures (if required), layer height setting, and resin type. Once the settings are complete, the software sends instructions to the printer via a wireless or cable connection.
Some 3D printers use a laser to turn liquid photopolymer resin into hardened plastic, others create objects by sintering small particles of polymer powder at high temperatures. Most 3D printers can perform the printing process without an operator, and modern systems automatically refill the material needed to create objects from cartridges.
Depending on the technology and material, printed models may require washing with isopropyl alcohol (IPA) to remove uncured polymers from their surface, final curing to stabilize mechanical properties, manual processing to remove supporting structures, or cleaning with compressed air or an appropriate apparatus to remove excess powder. Some of these processes can be automated with accessories.
3D printed objects can be used immediately or after post-processing and necessary finishing by machining, decorating, painting, fastening or joining.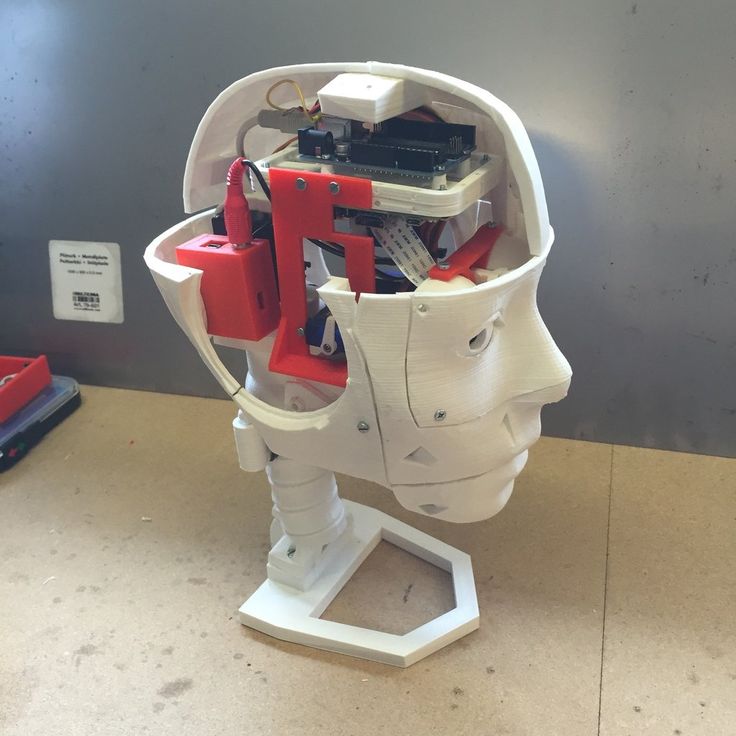 Often 3D printing also serves as an intermediate step, being used in combination with traditional manufacturing methods such as casting blanks for jewelry and dental prostheses, or molds for custom products.
Can't find the 3D printing technology that best suits your needs? In this video tutorial, we compare Fused Deposition Modeling (FDM), Stereolithography (SLA), and Selective Laser Sintering (SLS) technologies in terms of the top factors to consider when purchasing.
Each 3D printing technology has its own advantages and disadvantages, making them better suited for different applications. In this video, we compare the functional and visual performance of Fused Deposition Modeling (FDM), Stereolithography (SLA), and Selective Laser Sintering (SLS) 3D printers so you can find the solution that best suits your needs.
Do you need to produce custom models or prototypes quickly? Compared to hiring a third party or using traditional methods such as machining, having your own 3D printer cuts lead time by weeks. In this video, we compare print speeds using 3D printing technologies such as Fused Deposition Modeling (FDM), Stereolithography (SLA), and Selective Laser Sintering (SLS).
3D printer cost comparison goes beyond labeled prices, which do not give you an idea of the actual cost of a 3D printed model. Learn about the three factors to consider to learn about costs when using 3D printing technologies such as Fused Deposition Modeling (FDM), Stereolithography (SLA), and Selective Laser Sintering (SLS).
Traditional manufacturing processes can take weeks or months to complete. 3D printing turns CAD models into physical objects within a few hours: in this way, products and their combinations can be created based on one-time conceptual models, as well as functional prototypes, and even small production runs can be tested. This enables developers and engineers to develop ideas faster and helps companies bring products to market faster.
3D printing eliminates the need for expensive injection molding or machining tools and equipment; the same equipment can be used to create parts of various geometries, from prototyping to production. As 3D printing becomes more relevant in the production of functional end products, it can complement or replace traditional manufacturing methods for a growing range of small to medium volume products.
From shoes and clothing to bicycles, we are surrounded by uniformity as businesses strive to standardize products and make production more economical. 3D printing allows you to change only the digital design and adapt each product to the client's requirements without additional equipment costs. Because of this, 3D printing has found its way into industries where custom fit is key, such as medicine and dentistry, but as 3D printing becomes more accessible, it is increasingly being used to mass-modify consumer products.
3D printing can create complex shapes such as overhangs, microchannels and organic shapes that would be expensive or even impossible to produce with traditional manufacturing methods. This makes it possible to form combinations from fewer individual parts, reduce weight, reduce the number of weak joints and reduce assembly time, which opens up new possibilities in the field of design and construction.
Product development is a cyclical process consisting of several stages of testing, evaluation and adjustment. Finding and fixing flaws in templates early on can help companies avoid costly redesigns and additional tooling during the manufacturing process. With 3D printing, engineers can thoroughly test prototypes that look and work like final products before they go into production, and reduce the risks associated with usability and complexity in manufacturing processes.
By creating the necessary prototypes and 3D printing special tools, molds and production aids, manufacturing companies can automate production and optimize workflows at a much lower cost and in much faster time than traditional manufacturing. Thus, production costs are reduced and defects are prevented, quality is improved, assembly is accelerated and labor productivity is increased.
Digital Dentistry reduces the risks and uncertainties associated with human error, enabling consistent quality and accuracy at every step of the workflow, and improving patient care. 3D printers can produce a range of high quality custom products at low cost, providing exceptional fit and reproducible results.
3D printers are versatile tools for creating immersive learning and research environments. They stimulate creativity and introduce students to professional-level technology, enabling the implementation of the STEAM method in the fields of science, technology, art and design.
Affordable, professional-grade desktop 3D printing helps clinicians create medical devices that meet the needs of each individual and increase the effectiveness of treatment. At the same time, the organization significantly reduces time and money costs: from laboratories to operating rooms.
High-resolution printed physical models are widely used in digital sculpting, 3D character modeling and prop making. 3D-printed models have been featured in animated films, video game characters, theatrical costumes, and even special effects for blockbuster films.
Professional jewelers use the power of CAD and 3D printing to rapidly prototype, customize jewelry to customer specifications and produce large batches of castings. Digital tools allow you to create dense, highly detailed models without the tedious, error-prone production of stencils.
Formlabs offers two professional 3D printing technologies: stereolithography and selective laser sintering, making these powerful and user-friendly industrial production tools available to creative professionals around the world.
Stereolithographic (SLA) 3D printing uses a laser to turn liquid photopolymer resin into solid isotropic models.
The most common method is inverted stereolithography, in which a platform is lowered into a reservoir of polymer, leaving only a thin layer of liquid between the platform and the bottom of the reservoir. The galvanometers guide the laser through a transparent window under the resin tank to obtain a 3D cross section and selectively cure the resins. The model is formed from successive layers less than a hundred microns thick. If necessary, the protruding parts are supported by support structures attached to the platform.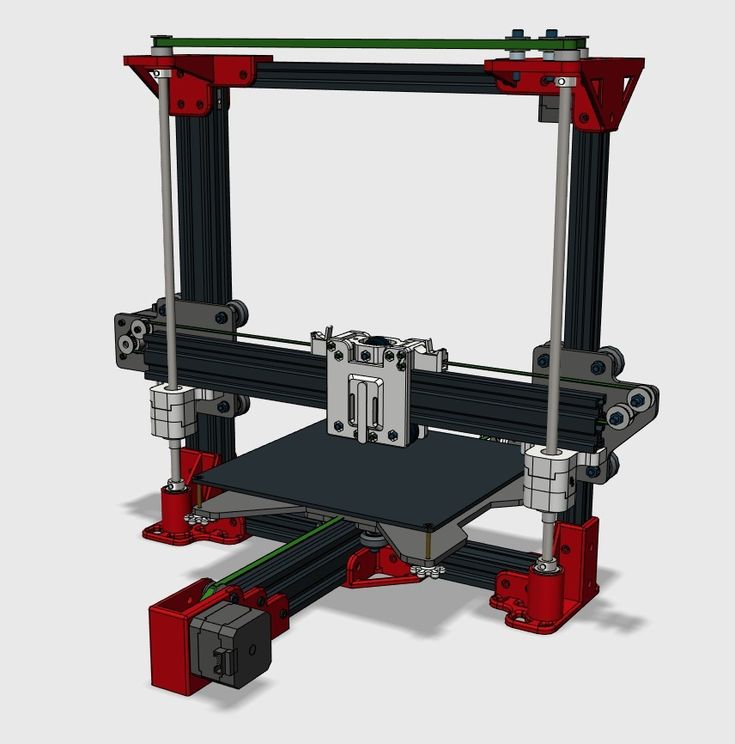 When the layer is completed, the model is lifted from the bottom of the tank to allow fresh polymer to flow under it, and the platform is lowered again. The process is repeated until the print is complete.
-
rapid prototyping;
-
functional prototyping;
-
concept modeling;
-
small-scale production;
-
manufacture of dental products;
-
Jewelry prototype making and casting
rapid prototyping;
functional prototyping;
concept modeling;
small-scale production;
manufacture of dental products;
jewelry prototyping and casting
Learn more about stereolithographic 3D printing
Selective laser sintering (SLS) 3D printers use a powerful laser to sinter small particles of polymer powder into a solid structure.
A thin layer of powder is applied to the top of the platform inside the build chamber, and the printer preheats the powder to just below the melting point of the feedstock. The laser scans the cross section of the 3D model and forms a solid object by mechanically fusing the particles. The unsprayed powder supports the model during printing and eliminates the need for special support structures. The platform is lowered into the build chamber one layer, typically 50-200 microns thick, and the recoater applies a new layer of powder from above. The laser then scans the next slice of the model and the process is repeated for each layer until the model is complete.
-
functional prototyping;
-
production of final models;
-
small-scale production and customization.
functional prototyping;
production of final models;
small-scale production and custom-made products.
Learn more about selective laser sintering
The market for 3D printing materials is broad and growing: printers are being used to print everything from plastics to metals, and even potentially food and living tissue.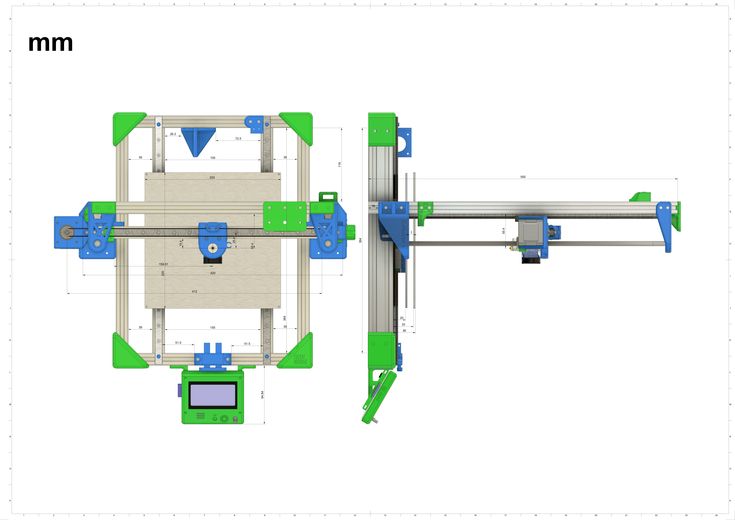 Formlabs offers the following range of photopolymer materials for desktop 3D printing.
Standard 3D printing materials provide high print resolution, excellent model performance and a smooth surface, ideal for rapid prototyping, product development and simulation.
Standard resins are available as Black, White, Gray resins for matte finish and opacity, Clear for translucent prints, and Color Kit to match virtually any color.
View standard 3D printing resins
These are 3D printing materials for engineering, manufacturing and product design. They offer advanced functionality, withstand numerous test tests, work under stressful conditions and do not lose strength over time.
Engineering resins are ideal for 3D printing strong and accurate concept models and prototypes to quickly evaluate design quality, shape and fit, and optimize manufacturing processes.
Explore Engineering Resins
Dental Resins are empowering dental labs and dental practices to quickly, cost-effectively, and outsource a range of dental products, from dental models to biocompatible surgical templates, splints, and orthodontic models of thermoformed retainers and aligners.