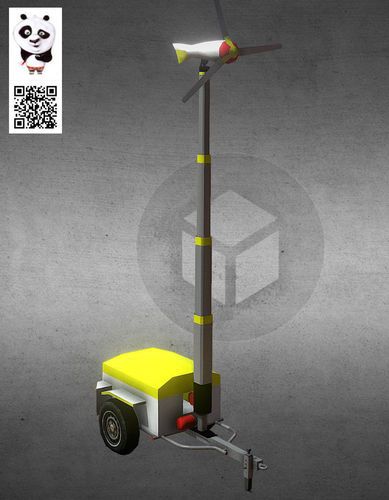
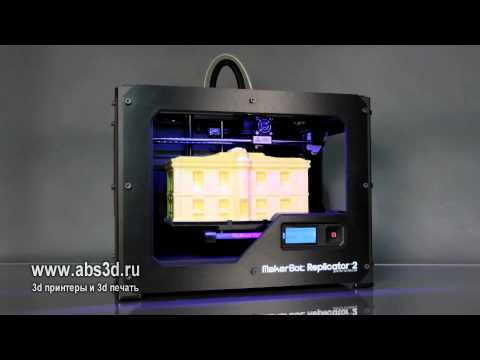
3D printed wind generator
6 Amazing 3D Printed Wind Turbines: Free Energy, Bubbles, and More!
Did you know that it’s possible to 3D print your own wind turbine?
Now, people installing wind turbines on their property is nothing new, be that for free energy generation, aesthetics, or simple novelty.
Spending around $100 on a wind turbine, and mounting it high enough, can generate a continuous power output of 600watts. Practically speaking, this is enough to recharge a car’s battery, run a coffee machine, or keep a small fridge-freezer running indefinitely. Pretty good for a turbine not much bigger than a football.
But $100 is still $100, so it’s unsurprising that there are plenty of examples of people building their own. DIY turbines have been made from car alternators, ceiling fans, and there’s even a case from the UK involving kites attached to a bike!
A wind turbine made from salvaged car componentsYou may not have a spare ceiling fan laying around, or the engineering know-how to turn it into a working wind turbine; but if you’ve got a 3D printer, then you’ve got more options than you think. Here are three ways to 3D print your own wind turbine!
1. Just for Show: 3D Printed Wind Turbines for the Aesthetic
While we will explore the ways that 3D printed wind turbines generate free power, it’s worth remembering that for many people, a wind turbine exists mainly for aesthetics.
And luckily for them, there exists a wealth of open-source files ready to be printed into your very own kinetic ornament. And these aren’t simple wind spinners either, with the following examples showing off how 3D printing can make potentially complex models accessible to even the least technically-minded individuals.
Here’s some cool 3D printed wind turbine projects that, while they don’t work and provide power, are just really cool and innovative designs.
Jacky Wan’s VAWT Wind Turbine.
Jacky Wan, also known as “Valcrow” online, designed this wind turbine model upon the request of Ultimaker in 2016.
At the time, Ultimaker were releasing their “Ultimaker 2+” 3D printers, and intended to use this model to show off their new line’s capabilities.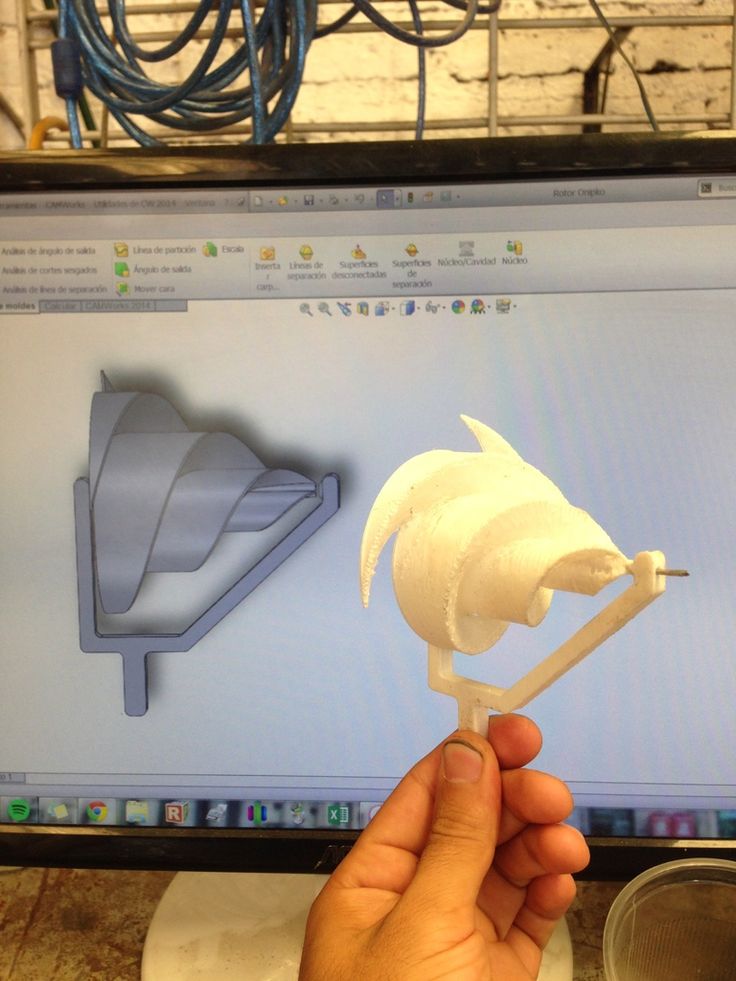
Jacky Wan came up with a desktop-sized Vertical Axis Wind Turbine (VAWT), so-called because they stand upright with their generators and gearboxes mounted on the ground, allowing them to work in any wind direction. His design, in particular, was notable because the model’s pieces could be easily snapped together without any adhesives or fasteners, allowing it to be easily reproduced by end-users.
Although the design was a promising demonstrational piece for Ultimaker, Valcrow’s model was just that, a model. A generator or gearbox was not incorporated into the design — so it’s just an ornament.
That being said, if you do want to make something more complex, then you do have options.
Nilheim Mechatronics’ 3D Printed wind turbine
Unlike Jacky Wan’s design, this model resembles a more conventional wind turbine, with an upright construction and propeller style blades. What perhaps separates this turbine from others though, is its use of functioning internal gears.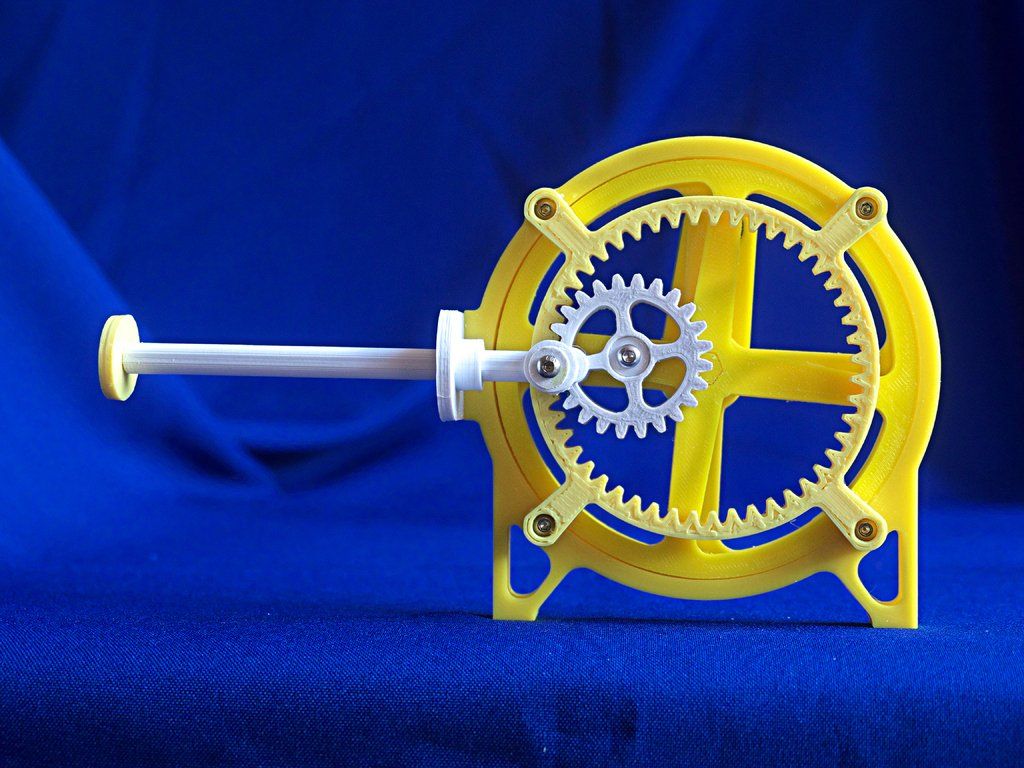
Will Cogley, the turbine’s designer, was sent a Makeblock 3D printer, and decided to design a wind turbine model to test his new printer’s capabilities. He explained that:
“It’s loosely based on what a real turbine looks like on the inside, and by pointing a fan at it you can make the turbine spin and you can see the gears moving… I was extremely pleased with the quality of the gears I managed to print. I even managed to produce some tiny little gears in areas using the same settings and they came out gorgeous.”
Will Cogley
Provided you already own a 3D printer, these two examples should come in at under $100, and demonstrate the flexibility that 3D printing allows for when choosing just how you want your wind turbine to look.
But what if you don’t want an ornament? What if you want it to generate power?
2. 3D Printed Power Generating Wind Turbines
Although far from impossible, building a homemade wind turbine capable of storing or generating power is harder than it may initially seem.
This would help to explain why the majority of open-source wind turbine 3D printing files don’t include power generation components, with the instructions tending to either leave the end-user to figure it out, or admitting that the turbine is essentially an ornament.
A pre-built stepper motorTo sidestep the need to build your own generator, most 3D printed wind turbines capable of generating power use mechanical-style gears and pre-built stepper motors, which can then either be plugged into an appliance, or battery. Although this method allows the gears to be 3D printed, it also results in a less efficient system than a store-bought $100 wind turbine, with these DIY prints rarely generating more than 50 watts of power.
That being said, for something you put together on a desktop 3D printer, 50 watts of free energy isn’t anything to scoff at, and these two projects will show you exactly how it’s done.
Daniel Davis’s “MKIII 50Watt 3D Power Turbine”
Published under his moniker, “3dprintable1”, Davis’ design strikes a balance between accessibility and function.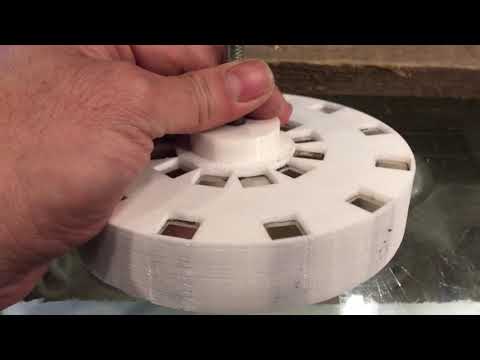 According to Davis:
A user created “Power Turbine”“This fully functional wind turbine has been specifically designed to be manufactured, assembled, and operated at home with its unique 3D printable design.” And his turbine’s many features seem to support this.
The “Power Turbine” features a passive variable pitch (PVP) design, which automatically controls the turbine’s blades to both optimize power generation, and to prevent dangerously fast spinning speeds in high-winds.
It’s modular, with end-users able to modify the size of the turbine’s blades and generator/stepper-motor without changing the base architecture or structural components.
The design is also efficient, with 95% of the turbine requiring no post-processing or print supports, further reducing the amount of plastic used and the cost of the final turbine.
Another user created “Power Turbine”All in all, the package here seems be just what most people are looking for, 50 watts (potentially) of ready-to-print power… Unless of course, you did want to have a go at building a generator yourself?
K&J Magnets
Similar to Davis’ design, K&J built a relatively simply upright wind turbine. However, they pushed the envelope by also building their own 3D printed generator.
The build was inspired by the inner workings of a sailboat’s windmill; they used magnetic wire to wind their own coils, then added stepped block magnets and a fidget spinner’s ball bearings to create a working rotor. The entire assembly was then housed in a 3D printed frame, creating their turbine’s generator.
Helpfully for us, K&J made the STL files used for their wind turbine available for free, as well as a video explaining their process. This allows you, should you feel so inclined, to build your very own wind turbine generator entirely from scratch.
However, this doesn’t mean that you should… when spinning their generator with a power drill, they only managed to generate 20Volts, and a single watt of power, barely enough to light up a LED.
K&J have quite transparently admitted that its practical value is limited:
“We’re not quite ready to disconnect from the grid using this device.
It’s going to need some serious improvements to make more power. Still, it was a fun demonstration, illustrating the concepts behind larger wind turbines that do provide useful power!”
Bubble Power: Dylan Phillip’s mini turbine
Here’s a wind turbine you probably weren’t considering building until now. And yes, it may not net you any free electrical power, but it wouldn’t have been right to publish this listicle without mentioning bubble power!… Bear with me.
Dylan Phillips, also known as “Pikkle,” designed, printed, and released files for a wind turbine bubble blower.
Phillip’s designFor a device not much bigger than your fist, he managed to fit a lot of functionality into it too! Once the wind catches the turbine’s wands, they dip into the bubble solution, where the wind again blows the bubbles. If the wind changes direction, then the attached wind vane steers the whole turbine, allowing it to blow bubbles from any direction!
In addition to also making his files available for open-source download, Phillips also released two videos, one an animation detailing the turbine’s construction, and the other showing the device in action, with the 3D printed wands releasing a surprising amount of bubbles for their size.
Is bubble power too small for you? Let’s look at the scale’s other end then.
3. 3D Print Your Own Full-Scale Offshore Wind Turbine!
Okay, so this one may only really apply to millionaires, but… Did you know that full-scale offshore wind turbines are now beginning to be 3D printed?
Yep, one of these!In September 2021, a research partnership was announced between three companies: Energy provider GE Renewable energy, 3D printing company Voxeljet, and Fraunhofer IGCV (Institute for casting, composite, and processing technology).
Together, they set out to develop the world’s largest 3D printer ever built for offshore wind production, with the aim of 3D printing full-scale wind turbine blades.
Like many industries, the research was motivated by a desire to increase efficiency. 3D printing with sand molds is much cheaper than the composite and carbon-fiber materials used in conventional wind turbines. But most importantly, 3D printing could allow for these blades to be constructed on-site, rather than in a factory, and then transported in pieces to the often remote or offshore installation sites.
By reducing so much transportation, 3D printing offers massive environmental and bottom-line benefits.
Voxeljet announced on their website that “the partners expect to launch the project during the third quarter of 2021, with initial printer trials starting during the first quarter of 2022.”
So, who knows, maybe next year you will actually 3D print your own offshore wind turbine.
Other articles you may be interested in:
- 50+ Useful & Cool things you can 3D print
- 3D printed fidget toys – 25 designs
I designed and 3D printed a full-scale wind turbine on an SLA printer – mind.dump()
Back in high school, I wrote SOČ (student-paper) about designing and building a small horizontal wind turbine (available here, only in Czech). It was an interesting experience and I learned a lot about aerodynamic. Ten years passed and I decided to revisit the idea of having a small DIY wind turbine. However, with a modern spin on it in the form of 3D printing the whole full-scale turbine on an SLA printer.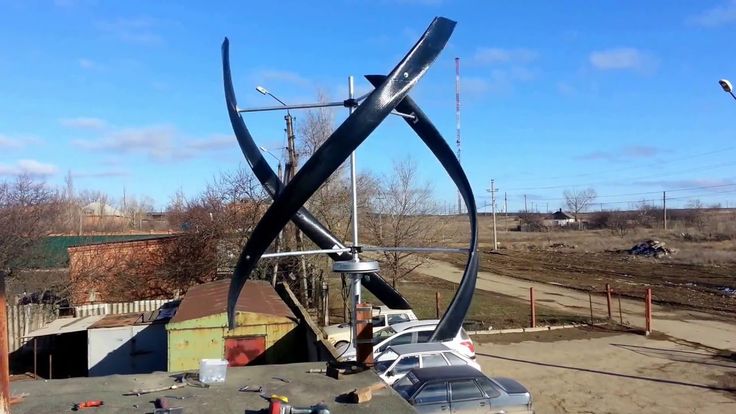 Spoiler: it turned out perfectly!
The Old Design
Before I dive into the process of making a new turbine, let’s briefly recap the design and manufacturing process of the old turbine.
The whole turbine was designed using the Galauert vortex theory. Back in the days, I wrote a simple C++ program, that numerically solved the equations to fnd the right angle of attack and profile lenght of the turbine.
Then I imported the data into Solidworks and designed a model. Then I handcrafted the turbine blades out of styrofoam using a hot wire and a series of templates. The styrofoam blade was glued to a beam out of spring steel. Then it was covered in several sheets of Tyvek (non-woven fabric) soaked in dispersion glue. Basically, it was a primitive form of making a laminate body. Surprisingly, once painted the material is rigid and very durable. It withstood outdoor weather conditions (-20 °C in winter, +30° in summer, a lot of sunshine) for 4 years with no apparent damage.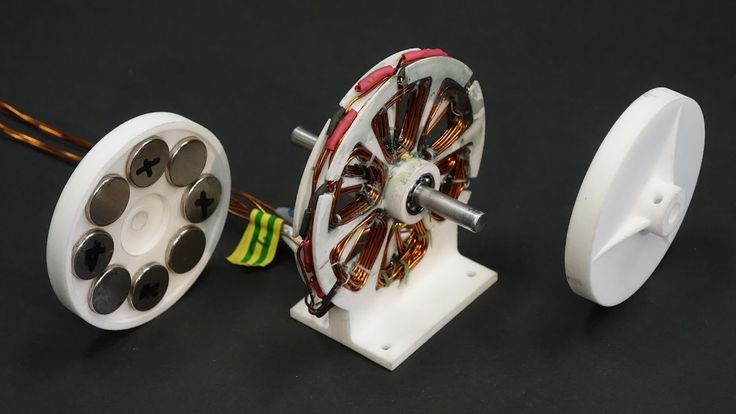 Overall, this primitive manufacturing technique worked, but it was laborious and relatively imprecise. So I decided to print it!
The old manufacturing process - manually cut pieces of styrofoam using a hot wire
"Laminated" blades with tyvek and dispersion glue
Designing a new turbine
10 years passed and I become more skillful, but also a lazier programmer. So instead of revisiting my old primitive program, I did my research and I found out that there is QBlade. QBlade is an amazing piece of software for designing wind turbines. It allows you designed and simulate air profiles and blades. It is really powerful and yet easy to use. Just note there is a version 0.9 on Sourceforge which is vastly improved compared to version 0.8 on the main website. Just to give you a sense what QBlade can do:
With QBlade I can design a turbine. However, to print it, I need a proper 3D model. QBlade allows you to export the blade as STL. However with STL you cannot do much – I need to split the blade into smaller pieces, add infill, holes for transoms, and also to design some jigs to be able to precisely assemble it.
QBlade allows you to dump the critical blade data (profile length and blade twist) into a simple TXT file (an example). So as I (still) use Fusion 360 as my primary CAD tool, I decided to write a plugin that takes this file and builds a model of a single blade. I call it YBlade and I made it publically available on my GitHub. With this plugin, you get the basic blade shape that you can easily modify (add infill, cutouts, etc.).
The turbine is designed to have three blades with a diameter of 1.5 m. It uses the NACA4412 air profile. It is designed for tip-to-windspeed ratio 6. In theory, it should provide 80W for 5 m/s wind, 550W for 10 m/s, and 900W for 15 m/s (note that the wind energy increases with the third power of its speed). The computed efficiency should be around 50 % (roughly half of the wind kinetic energy is turned into the kinetic energy of the turbine).
I decided to reuse most of the components from the old design, so I preserved the metal hub and also use the same beams.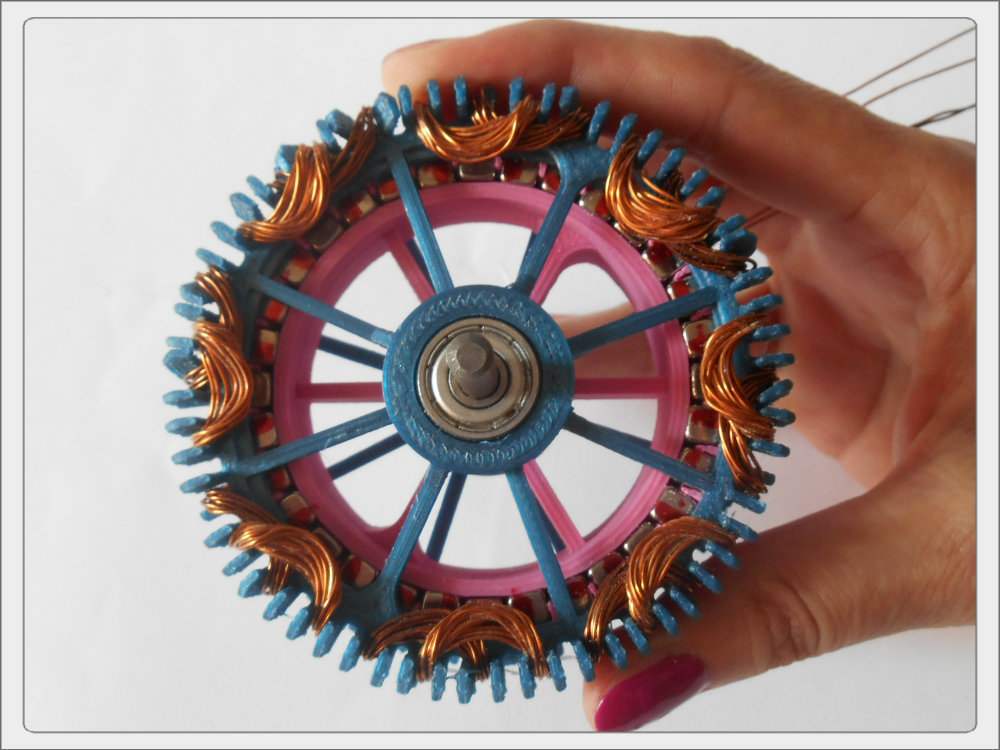 The whole blade is a thin shell – the outer thickness is 1.2 mm and it has internal diagonal fins spaced 30 mm apart. You can see the model below (note that Fusion 360 wrongly makes the internal fins visible).
Also, there is an interactive preview of the model:
Printing
I split each blade into 4 roughly 190mm segments, so they fit on my Elegoo Saturn. I printed the blades on supports, though they have nice flat faces on the split planes. The reason I decided to not print them flat on the bed is to not form a suction cup and to allow the air from the to escape via the beam hole during the printing. If I printed them flat on the bed, the blades would collapse and form holes during printing. I also made sure that the infill does not form any closed cavities where the air and resin can get trapped.
Surprisingly, you can fit all three blades on a single build plate! With generous light-off time (the reason for this will be explained in an upcoming blog post) the print took about 12 hours to finish:
Priting the blades.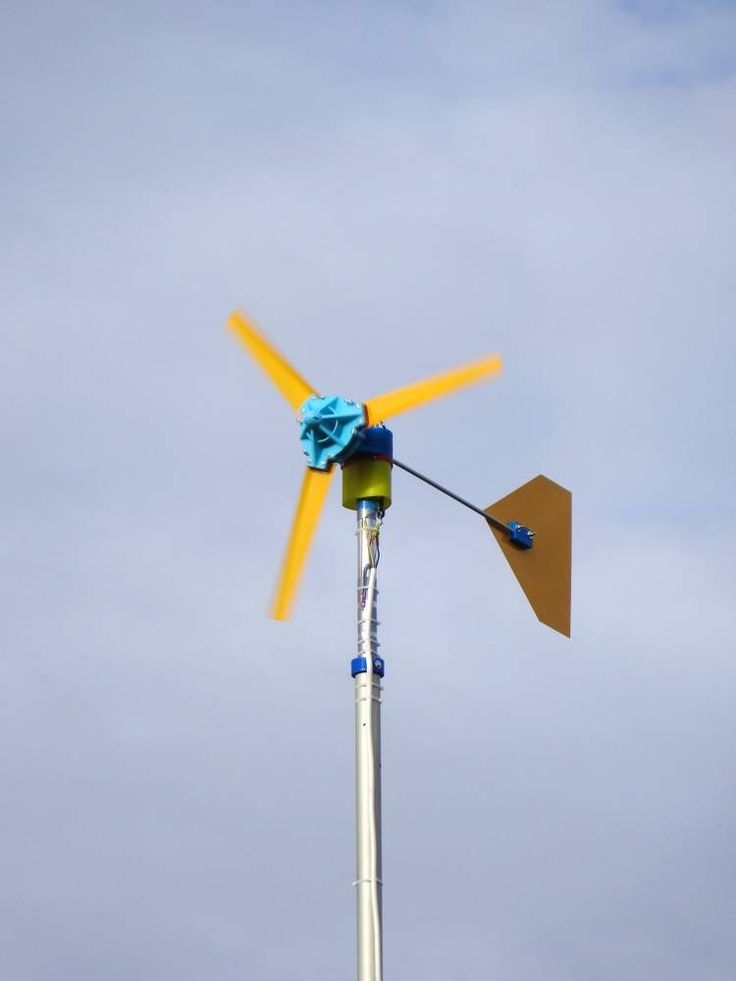 All three blades fit on a single build plate!
Finished model
Finished model
Dry assembly
You can see the infill inside
First, I wanted to use Resione M68. It is a tough, quite flexible, and not fragile resin that is nicely snow-white. Recently I used it a lot and I like it. I even make the insert for my resin pouring spouts from it. However, on the first try I found out it has one property, that makes it not suitable for outdoor usage – it soaks moisture quite a lot. See the photo below. I made some experiments – read my findings of resins soaking water. Therefore, I decided to switch the resins and go with my favorite durable mixture – 80% Siraya Tech Fast and 20 % Siraya Tech Tenacious. This mixture is quite tough (though not as Resione M68, but it has a much harder surface and it is cheaper) and easy to print. The printed part of the blade weighs 158 g – therefore it is actually quite cheap to print the blades!
Resione M68 soaks water and wrinkles the surface
Resione M68 soaks water and wrinkles the surface
I also printed the turbine hub cover. It was a simple design. It is made out of two components that screw together so I can access the screws on the metal hub that hold blades. I used too lightweight supports, so the thread (M70) deformed slightly, but that is nothing that cannot be fixed with a file and a little handwork.
Printing the hub
Finished hub
Finished hub
Finished hub
Finished hub
I used too light supports.
If you are wondering why the components have light and dark stripes on them: I like the snow-white color of M68. Therefore I experimented with mixing white pigment into my mixture. However, two things went bad: I mixed too little resin, therefore I had to mix a new batch during printing and I didn’t manage to get the tone right. And as I was mixing in rush, I didn’t mix the pigment properly, so there are some darker and lighter spots. It is just a cosmetic issue.
Assembly
Once printing is done, the tricky part comes – assembling the blade. The tricky part is gluing the individual pieces of the blade to the steel beam in a correct twist and placement.
I came up with the following process: I printed the followin aligment jigs:
Stop jig for the first piece
Stop jig for the first piece
Jigs for seeting the correct twist. They are put directly below the partition face between two pieces of the blade.
The allow me to put glue on all the pices, put them on the beams, assemble the beams with hub and them put the whole turbine on this jigs and put some weights on it. In this way, the blades will have a correct twist.
However, in order to make this procedure work, I need a flat surface to put it on. The alignment has be quite precise (otherwise the turbine looses efficiency). I used three old marble boards (they are out of old windowsill). I used spirit level to put them in plane like this:
Then it was just a matter of working quick – put glue on the spring steel beams, put the printed pieces on them and align them using the jigs:
Dry-assembly
Blade fits on the marble boards
Everything is glued and it just need to cure
The rest of the process is pretty standard and easy.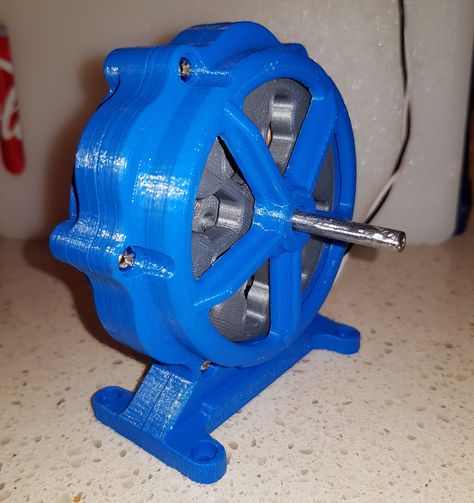 I wet-sanded the blades and the hub to smooth out any small imprecistions, I used a putty for plastics to cover up small imperfections and then I spray painted the blades:
The finished blades with a putty before painting.
Finished turbine. Such a beaty, isn't it?
There were just two finishing touches to the blade. First, I drilled holes through the plastic pices and beams to put 2mm pin there to make sure the blades can’t fall of when the glue fails (e.g., due to weather conditions – extreme head). I modeled a massive pieces for the pins in the blade model. Second, I glued small winglets on the tips of the blades to make it less noisy.
Result
The finished turbine on the old body looks like this:
How does it perform in practice? Unfortunately, I don’t have a video of the new video on the pole (there was bad weather after installation). But once it was assembled I had to test it. Unfortunately, there was no wind on that day so I had to “walk the turbine” like a dog.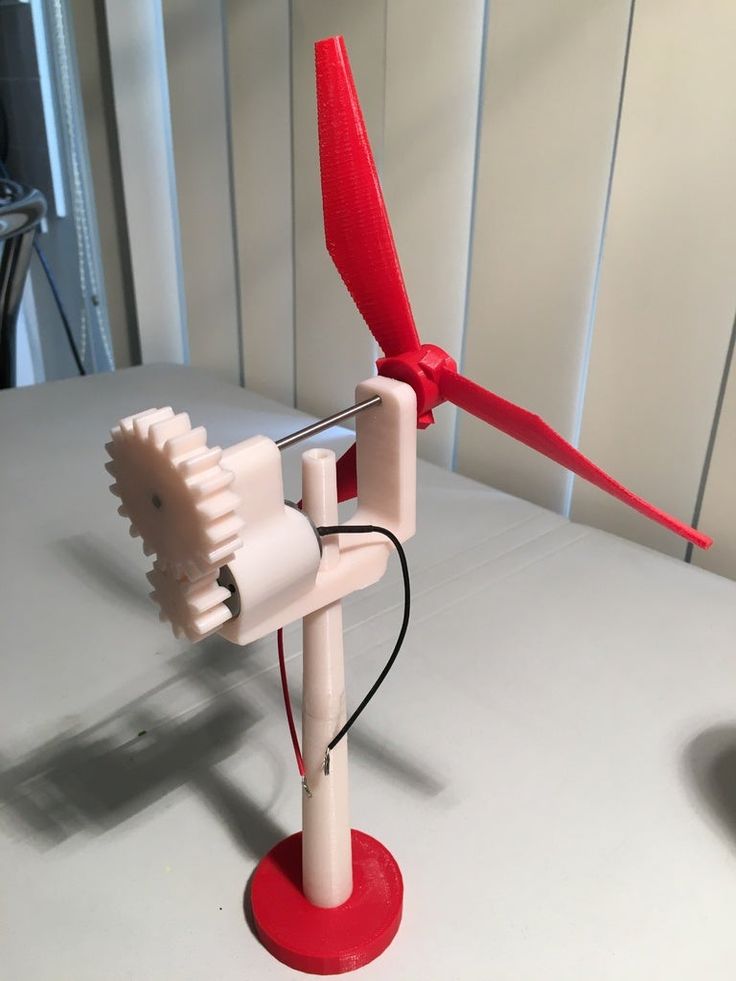 It spins really nicely. It starts easily and it is really responsive to wind speed changes:
If you are interested in the turbine on the pole, I have a video of the previous version:
So now you might ask – how much electricity does the turbine produce? The answer is – currently none. There is no generator in the assembly. The turbine is just braked to prevent it from going into ridiculously high speeds. So all the energy goes to heat.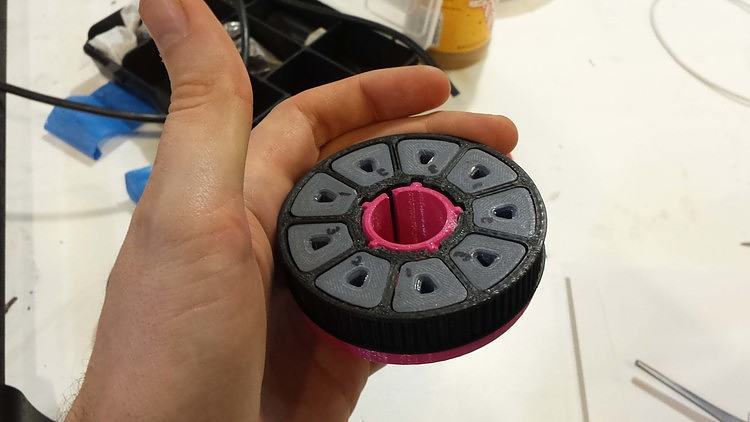 Adding a proper and efficient generator to the turbine is actually quite challenging. Unfortunately, most of the DIY videos about wind turbines generating electricity are rubbish (I don’t want to be dishonest, but there is no proper engineering nor theory behind these videos). The authors usually just measure the voltage and they don’t care about current and power (so no information value on the actual power) or they connect 60 W light bulb that barely shines and they claim they “produce 60 W of power”. In fact, they probably produce less and with the size of the turbines they use, they should be able to get at least a couple of hundreds of watts. Also, none of the authors deals with the problem that the rotational speed of the turbine is linear to the speed of the wind, however, the power grows with the third power of wind speed. Therefore, to maintain a constant tip-to-speed ratio (and thus preserve optimal efficiency) you have to regulate the power you extract from the turbine. This is something I plan to do, but I haven’t actually managed to do so.
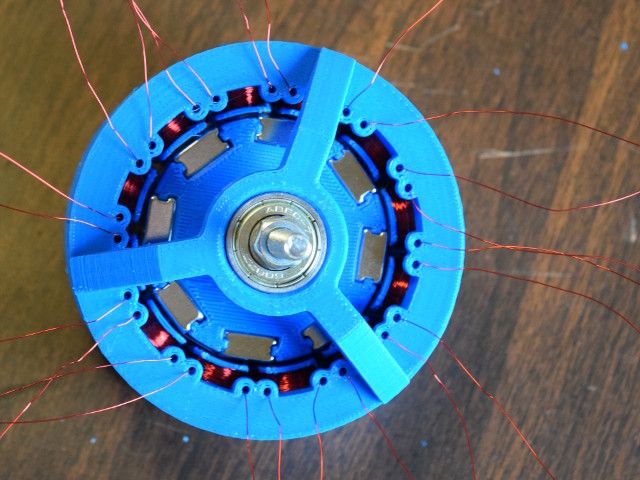
The second question you might ask “Why did you call it Aurae?”. Well, every project needs a decent name. Aura is the nymph of the breeze in Greek mythology. Why plural? It just sounds better.
What’s next?
This was my first attempt at printing the turbine. It worked quite well, but there is still room for improvement. In the next revision, I would like to focus on the infill of the blade. Recently, I stumbled upon Chaos (his Twitter and Youtube Channel) who prints aircraft on an SLA printer. He has some interesting findings, so be sure to check out his work. Based on his observations, I would like to improve the infill structure and consider making the last section of the blade self-supportive without a steel beam.
Another thing is that I will leave the current design outside for a few months to see how the resin copes with the weather conditions. I think it should do fine as it is painted.
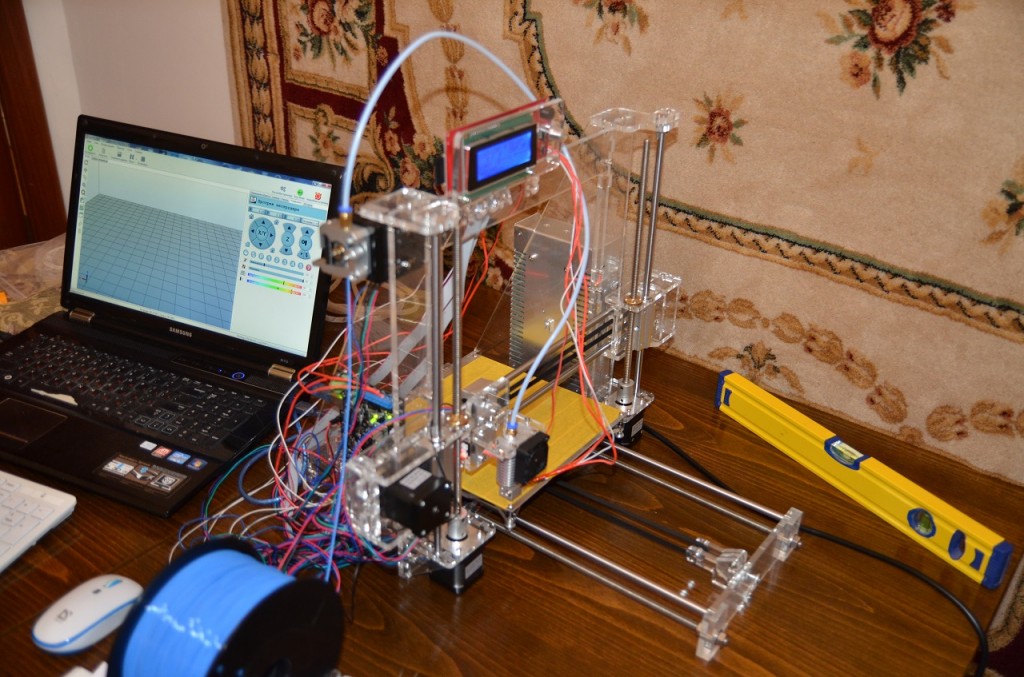
Wind turbine blades on a 3D printer (creating a wind turbine, part 1) / Habr
For 15 years, the dream of building a wind generator has remained unfulfilled.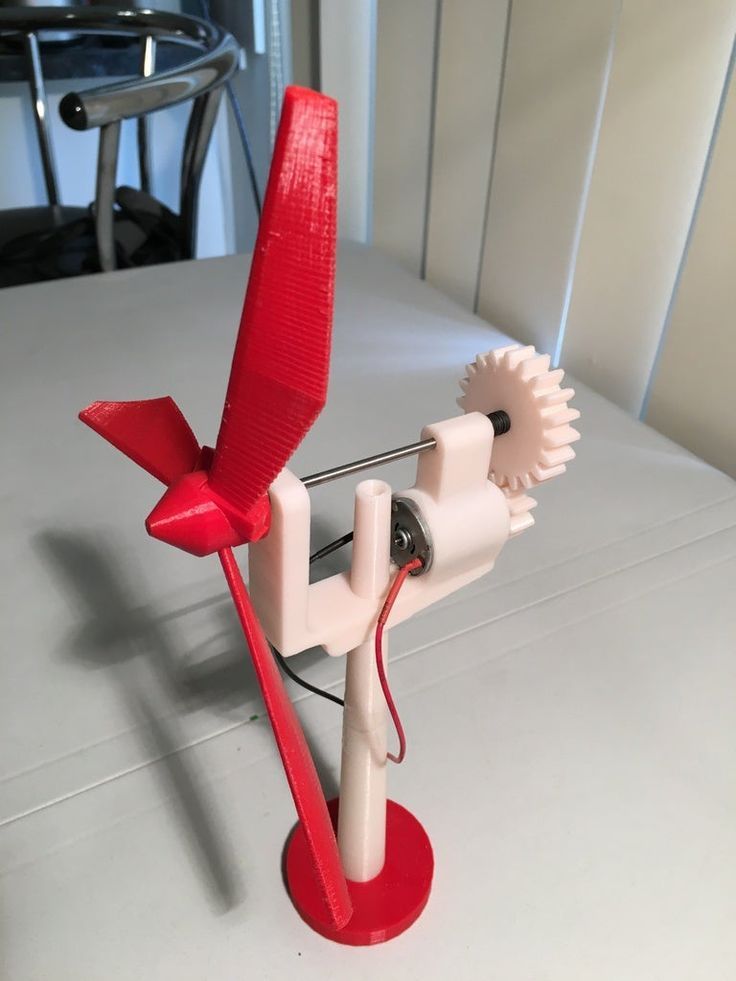 It would seem that attempts to electrify the dacha with the help of a barrel and a generator from a Zhiguli have long since sunk into oblivion, although no, people are still haunted by the publication in "Young Technology" of the 80s ;-)
But modern technologies have breathed new life into the old idea. And the approach will be much more scientific.
First, I built an ultrasonic anemometer with wind energy calculation. Field trials are just around the corner. nine0003
Now you should decide on the type of rotor - horizontal or vertical - this is more a matter of religion and a topic for holivars.
Therefore, without any explanation, I will say - I chose a Darier rotor with a vertical axis, like this:
But the design in the photo has a power of 5 kilowatts and the dimensions of the blades by no means fit into Pryusha's printing area - 200x200x200mm.
And I don't need this, because you can use the concept of windmills garland:
Then the task is to choose the size of the "base cell" and fine-tune its energy efficiency.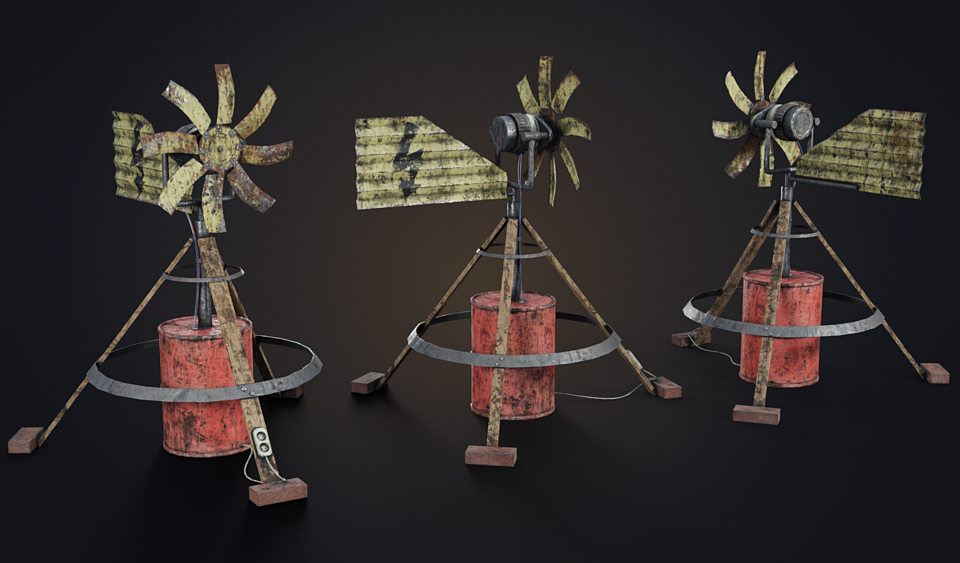 By the way, this will save you from spending "all the money" in the event of a fail - even a student can afford to make a rotor with a swept area of 1 square meter. nine0003
By the way, the power taken from one cell should be from 100W (at a wind speed of 8m/s), which can be a good solution for fishermen/tourists/hunters.
But back to our rams windmills - we need to create a 3D model of the NACA-0021/0012 profile used in Darrieus rotors since the 50s of the last century.
Finding a ready-made drawing of these profiles in SVG format is not difficult:
But it's flat, how can I make it three-dimensional?
Elementary! Even the simplest 3D modeling tool is suitable for this. I used the online resource tinkercad.com, imported a drawing there, and got a vomer fish 8-0
But we remember the ratio of chord (length) to thickness - by setting it we get the desired picture.
Now it remains to set the required height, holes for threaded studs (I will assemble an experimental version on them) and sockets for nuts:
That's all, it remains to export the finished model in STL-format and cut it with your favorite slicer (I use CURA)
Experiments will now follow with different lengths of chord relative to the diameter of the rotor (usually 10-18%), the number of blades (2/3/4) and their relative thickness. Let me remind you that my rotor diameter will be 1m, I will start with short (chord-10cm) and "thick" (21%) blades, 2 pcs.
To begin with, the efficiency criterion will be the number of revolutions of the rotor without load, because the "speed index" / speed is an indirect criterion for efficiency / KIEV.
Just as a general rule, the Wind Energy Utilization Factor is directly proportional to the speed (blade speed relative to the wind - from 3x for Darier), which, translated into a circular motion, gives RPM. nine0003
But not everything is so simple - the generator itself and the gearbox cause the most questions.
For a meter turbine, a toothed belt drive with a tensioner is requested (gear ratios up to x10), but more on that in the next publication.
In the meantime, the 3D printer prints 166 mm sections of blades for the upcoming energy independence of the hives day and night without cooling the extruder ;-)
his honey), just led her for a while on a separate site.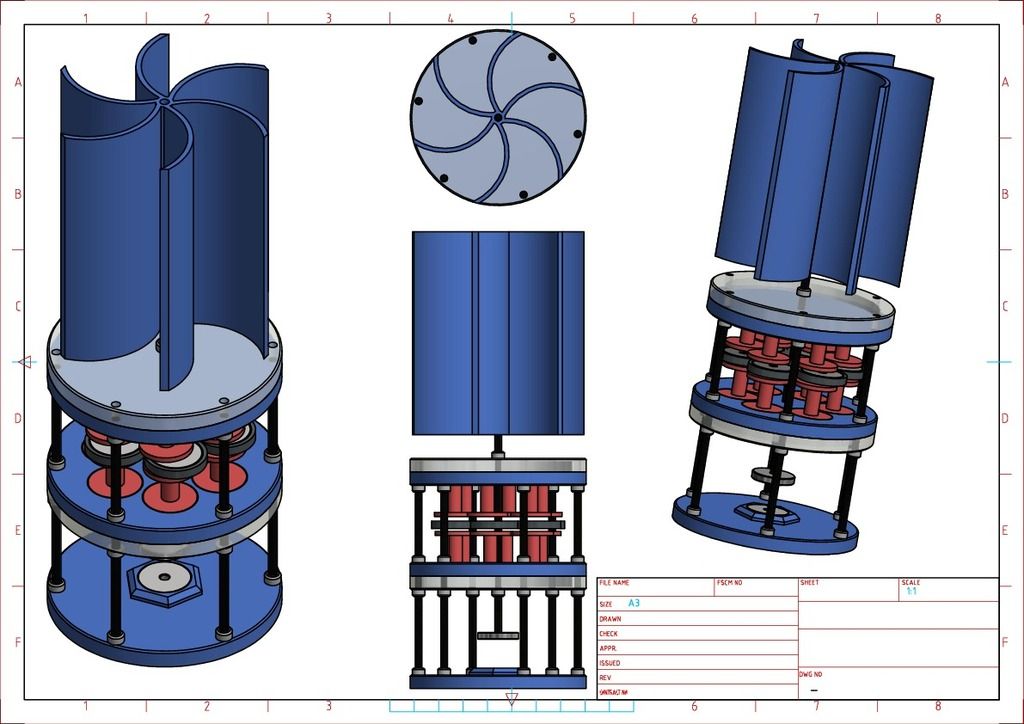 nine0003
See you soon on the pages of Habr, electric beekeeper Andrey
3D printed radial electric generator with permanent magnets.
Application
Subscribe author
Subscribe
Don't want
147
3D printing, as a type of activity, makes it possible to create not only decorative crafts and toys, but also more complex things. I love that a 3D printer allows you to make quick prototypes of models that used to take an incredible amount of time and money to produce. And many ideas and technical solutions received a second wind. nine0003
I would like to introduce to the respected community 3dtoday Gen6 is a miniature power generator.
This generator was developed as a bench prototype for one of the alternative energy projects.
All bearing and body parts are 3D printed. The generator is useful to everyone who is interested in the topic of energy. For example, in small camping wind and hydro generators. With minor modifications to the fasteners, it can be used as a bicycle generator. Also, as a wind generator, it can provide autonomous power for all kinds of remote electronic devices (for example, video cameras and Wi-Fi access points, LoRa systems, and so on). nine0003
Features:
1. Rotor .
Its magnetic system is made in the form of Halbach-assembly (Halbach array). This provided two benefits. First, there is no need for a magnetic circuit. Secondly, the Halbach assembly is a kind of analogue of a lens for a magnetic field. That is, on one side of the assembly, the magnetic field is almost absent, and on the reverse side, the field intensity is twice as high (relative to a single magnet and for ideal conditions). The disadvantage of this method of assembling the magnetic system of the generator is that it requires twice the number of magnets relative to the number of poles. In total, there are 16 neodymium magnets 20X5x5 N42 in the rotor, that is, 8 poles. nine0003
For more details about the Halbach assembly, see my video 'Kinetic Generator Powerbank'.
2.
Stator.There are 8 identical spools on the printed base. Two coils fall on one pair of poles in such a way that two magnets with different poles pass the active conductors of the same coil at the same time. That is, the distance between the active parts of the coils (more precisely, their centers) is equal to the pitch of the rotor poles. The coils are assembled in pairs and molded in such a way that part of one coil enters the center of the second. Thus, we can say that this is a 2-phase generator with a rotor on a magnetic Halbach assembly. nine0003
Next, paired and unpaired coils are connected in series.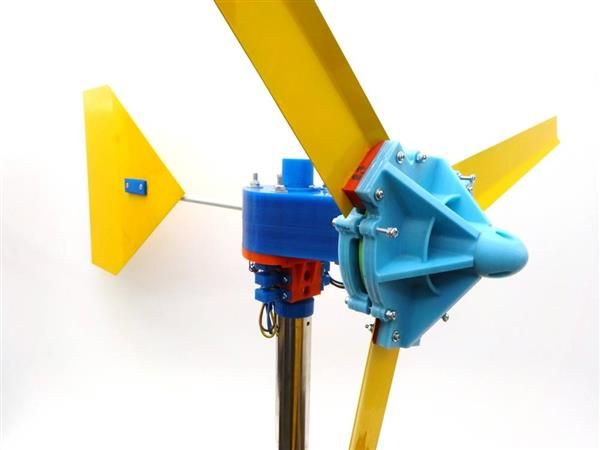 And the voltage on the coils is summarized after two diode bridges.
Coils are wound with 0.2mm wire, but other diameters are also available. Please note that to obtain the desired voltage, you may need to add a multiplier, such as a planetary type. I am sure that for 3D printers this will not be a problem. ;)
Shaft 5 mm, magnets NdFeB 20X5X5mm N42 16 pcs.
Generator dimensions 60X45 mm without shaft length, weight 260 grams. nine0003
Testing is still ahead, I will report the results a little later.
3.
Assembly order. After all parts of the generator are printed, the compound rotor is assembled first. We pay attention to the correct assembly of magnets. Next, insert the shaft into the rotor. After that, we put the rotor in the holder of the stator coils. This will make it easier to assemble the stator and mold the coils. Forming coils is not a difficult task, but requires the application of physical strength, so I had to strain.