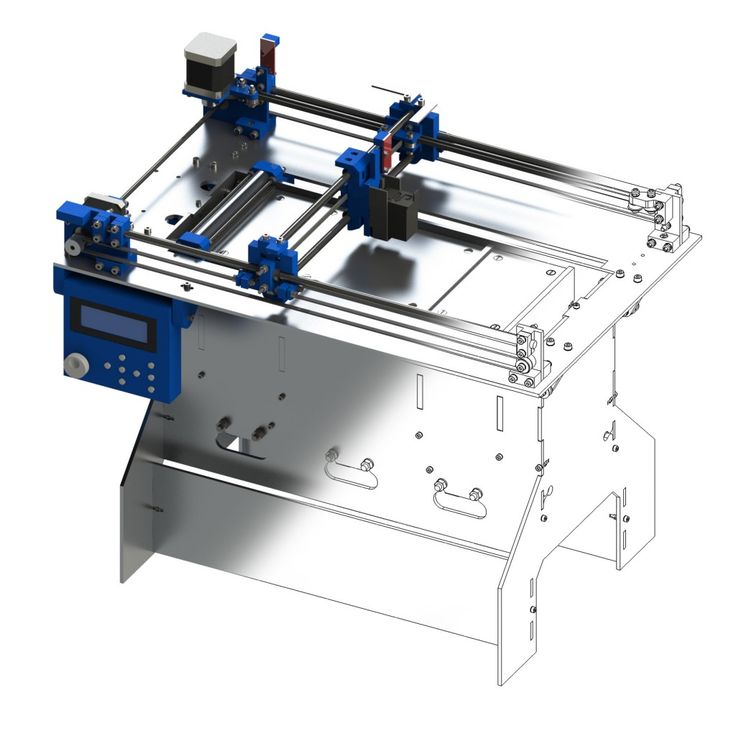
3D printer building plans
Best DIY 3D Printer Kits & Build Plans 2022
Building your own DIY 3D printer can be an affordable option to get started 3d printing as well as a learning experience as one gets familiar with the mechanics or the nuts and bolts of a 3D printer. You learn how it works and how to fix it when it breaks. Building a 3d printer is more challenging than buying a completely assembled machine that’s ready to print. In this article, we review the best DIY 3d printers and list some of the options available. Here’s a guide for the list of considerations when planning your 3d printer build.
- Documentation & Assembly Guides
- DIY Kits vs Pre-Assembled 3D Printers
- Self-Source Parts vs DIY Kits
- Documentation
- Community
- Build Volume
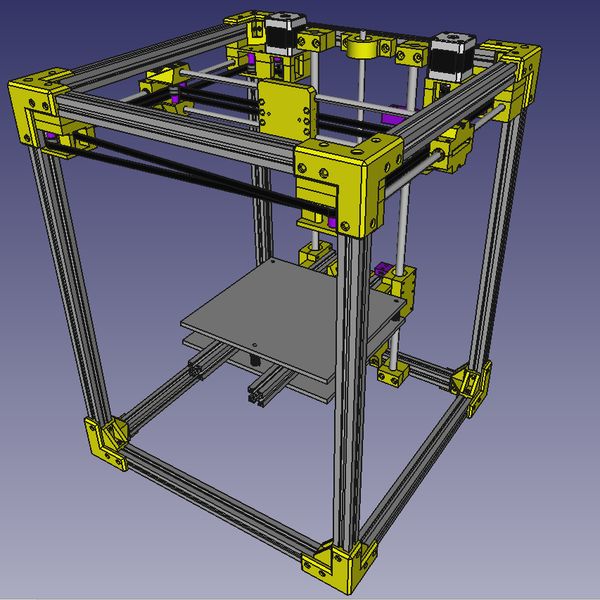
- 3D Printer Kinematics
Table Of Contents
- DIY 3D Printer Build Advantages
- DIY 3D Printer Build Disadvantages
- DIY 3D Printer Kits vs Pre-Assembled Printers
- Complete 3D Printer Kits vs Open Source Build Plans
- Self-Source Parts
- Advantages of Building Your Own 3D Printer
- Challenges In Building Your Own 3D Printer
- Open-Source 3D Printers & Build Plans
- 3D Printer Kits vs Pre-Assembled
- Complete 3D Printer Kits
- Self Sourced DIY 3D Printer Plans
- Railcore II 300ZL
- Pros & Cons
- Hypercube Evolution – H.
E.V.O.
- Voron 2.4
- Rat Rig V-Core 3
- The Evolution of The RepRap Project
- Self-Source Parts vs DIY Kits
- Cantilever Bed vs 3-point Bed Leveling
- Lead Screw vs Ball Screw vs Belt Drive
- Lead Screw vs Belt
- Lead Screw Pitch & Required Torque
- Build volume
- Rods vs Linear Rails
- White Knight: DIY Conveyor Belt 3D Printer
- Best Large DIY 3D Printers 2022
- Modix BIG-40
- Raise3D Pro2 Plus
- BigRep – STUDIO G2
- Piper 2: Piper 3D Printers Made From Conduit Pipe
- Gantry 3D Printer Design – Reducing Moving Mass
- Large Scale 3D Printing vs Batch Printing
DIY 3d printer plans make it easier to get started and are a great option for beginners who want to learn how the mechanics work. The kits usually come with everything you need such as tools, parts, and instructions which take out some of the guesswork when building your printer.
Building a printer can be challenging and time-consuming. There are many things that can go wrong, so it’s important to have some experience with building or repairing electronic devices before starting this project. Also, you may not have all the parts you need, which could lead to delays in printing.
DIY 3D Printer Kits vs Pre-Assembled PrintersThere are pros and cons to each option. If you choose a kit, it’s important to consider how much time you have for assembly, the difficulty level of the project, your budget, versatility options (e.g., build volume or filament types supported), and the quality of the community support.
Complete 3D Printer Kits vs Open Source Build Plans
While many printer designs are available in complete kits some open source designs are currently still self-sourced, meaning that builders will have to source individual 3d printer parts and get it all together which results in complexity as some parts may take long to receive and increases the chance that one might order the wrong part number. With that said, is the price still about the same depending on extruder options print size.
A common option is to source all your own parts. This can be more affordable, but it takes more time and effort to find compatible parts and can be difficult depending on experience level. The advantage of this approach is that you can customize your printer to fit your needs.
Advantages of Building Your Own 3D PrinterThere are several advantages of building your own DIY printer:
- -You learn how the machine works and can troubleshoot problems on your own.
- It can be more affordable than buying a pre-assembled printer.
- You can customize your printer to fit your needs.
- The community is usually very helpful and supportive.
DIY Printer Build
Challenges In Building Your Own 3D Printer
There are also some disadvantages of building your own printer:
- It can be more challenging than buying a pre-assembled machine.
- There’s a higher chance of something going wrong during the build process.
- You may not have all the parts you need, which could lead to delays in printing.
The best DIY printer for your needs depends on your level of experience, budget, and goals. We hope this article provides some helpful advice for choosing the right printer kit for you. Happy building
Open-Source 3D Printers & Build Plans
Documentation is important when choosing a 3d printer to build or buy and effects overall user experience. Poor documentation can lead to downtime as users assemble or troubleshoot their machine to get it printing. Look for kits or build plans that are well documented and comprehensive for your skill level. Good documentation will also include tips and tricks for getting the best 3d prints, troubleshooting common problems that you may experience.
3D Printer Kits vs Pre-AssembledWhen it comes to the Best DIY kit printers, there are many options.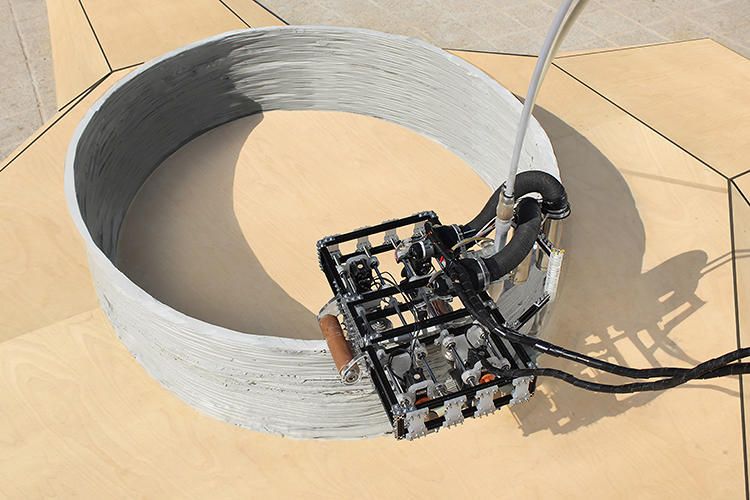 The advantages of a pre-assembled machine is that they usually come with some documentation and have been assembled by someone else so you can trust in them being functional machines already. This makes them less complicated than self sourced kits and more appealing to beginners.
If you’re not comfortable with sourcing your own parts from various suppliers, there are also pre-assembled printers available. These machines come with everything or almost everything to assemble a working machine, including all of the screws and tools needed.
Complete 3d printer kits make it easier to get up and running rather than sourcing all the parts yourself from different suppliers with different shipping dates or quality. It is also a great way of saving money on shipping which can be quite costly when buying small amounts of parts.
The downside of a pre-assembled machine is that they can be more expensive than DIY kits, lack upgradability, and might not have the best quality control.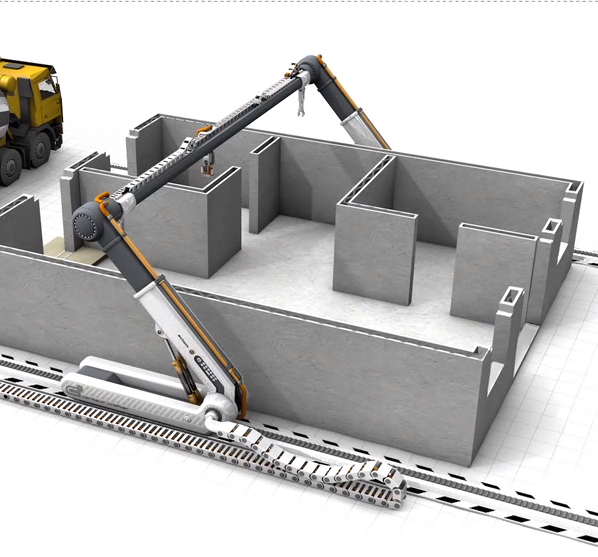
When sourcing your own parts for a printer there are a few things you need to take into account: what type of printer do you want to build, what parts do you need and where can you source them from.
The best 3d printer kits give a great range of options depending on performance needs and budget. Beginners can start off with an unassembled diy kit which is less expensive than pre-assembled machines.
Railcore II 300ZLThis is a pre-assembled machine that comes with an excellent build guide and video tutorial. It uses a CoreXY motion system which gives it good print quality and speed. The kit can be sourced from different sellers, or you could buy the fully assembled machine directly from Printed Solid.
Each of these kits have their own pros and cons, so it’s important to do your own research before settling on a printer. For example, the Rat Rig V-Core uses a corexy kinematics which is known for its speed and accuracy, but can be more difficult to calibrate.
Original Prusa i MKS+
This kit is based on the popular Original Prusa i MKS printer and comes with an excellent build guide. It’s a great option if you want to get started right away with minimal assembly.
Hypercube Evolution – H.E.V.O.This kit is a great option for those looking for an upgradeable machine. It comes with a variety of parts that can be swapped out or upgraded as needed.
Voron 2.4This open source design is great for experienced builders and offers good print quality and speed.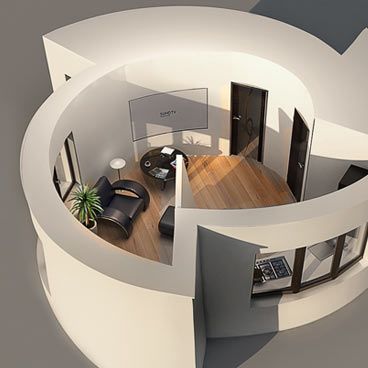
When sourcing your own parts, it’s important to do your research and decide which seller to use and consider shipping rates.
Rat Rig V-Core 3The Rat Rig V-Core 3 is a great option for those looking for a specific size or options as kits can be configured for specific needs or price. The complete printer kit comes in a range of options with a well documented build guide and instructions. The V-core 3 uses the CoreXY motion system which offers good print quality and speed. The v-core 3 kit can be purchased from the Rat-Rig website, or could be self sourced.
The Evolution of The RepRap Project
Self-Source Parts vs DIY KitsWhen sourcing your own parts, there are a few things to take into account: what build volume is needed and type of parts to use which is usually related to how much you’re willing to spend.
There are a range of options for extruders and electronics, so it’s important to decide on the features you need.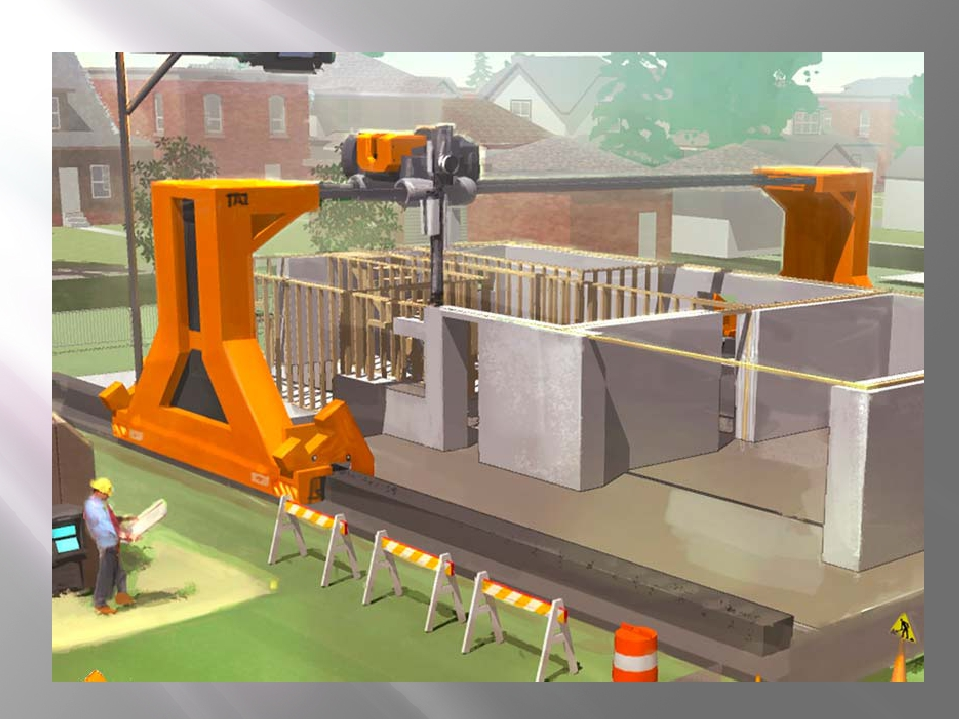 If you want a machine with high resolution, then you will need more precise parts which can be expensive.
Cantilever Bed vs 3-point Bed Leveling
While many of the original DIY 3d printers used cantilever beds to lift the print bed or build plate constrained POM wheels or smooth rods. The newer 3d printer designs use linear rails and have adopted more functional mechanisms such as belted z-axis, and non-planar 3d printing concepts such as 3-point bed leveling or tilting print beds. Although the simplicity of older Reprap 3d printers were less technical and easier for newbies, the increasing number of options and features can easily be adopted from corexy design platform to another, which has exponentially inspired contributors as they work to identify or fix potential issues or increase overall print volume.
Lead Screw vs Ball Screw vs Belt DriveMechanical components and kinematics are critical to the functionality and can compromise speed or quality.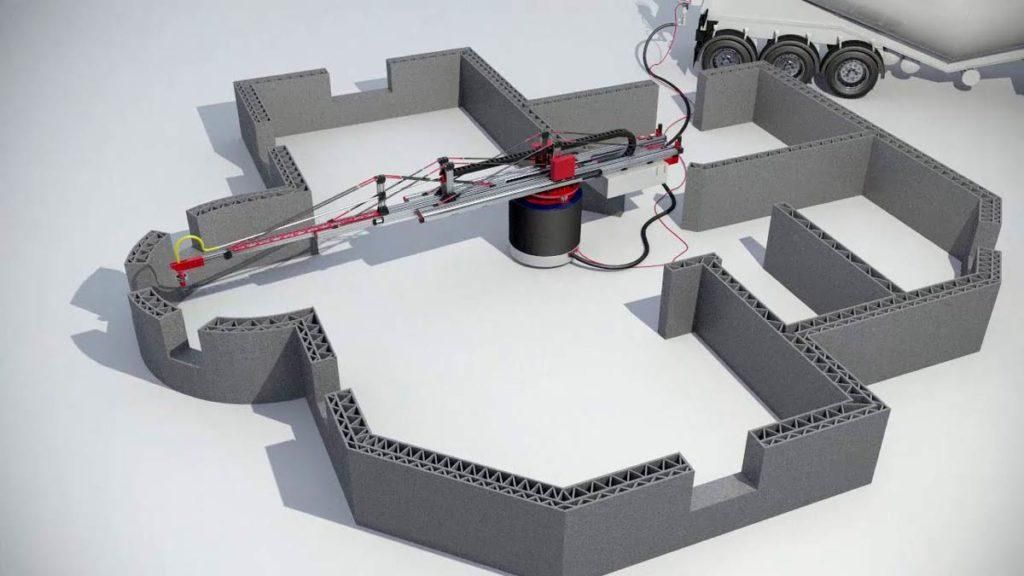 Lead screw which is commonly used to drive the z-axis or lift the print bed is known for backlash but backlash can be eliminated using anti backlash nuts or may not be an issue due to gravity. Lead screw pitch and lead is critical for speed and precision. Issues with speed, resonance, artifacts can be a challenge in any 3d printer build but can be reduced by travel speed and acceleration but is compromised with slower travel speed the longer it takes to print an object.
Quality lead screws and ball screws cost much more but cheap lead screws can have tolerance issues. Longer ball screws may wobble at a distance and need support and rigidity. Although backlash is mostly a problem in XY-axis movements while the z-axis is the preloaded weight of the bed and gravity.
Lead Screw Pitch & Required TorqueLead screws are similar to a gear. When the pitch changes the lead and torque needed to drive the system changes as well. Most 3D printers use 1/16 or 1/32 microstepping but the resolution of 3d printed plastic can only be so precise. Larger motors have more inductance and need more voltage to reach the same RPM. Increasing the step rate for the reduced travel rate of the drive, a higher voltage stepper driver and supply may be needed to reach ideal motor performance.
Build volume
Build volume refers to the print bed size which dictates the maximum size of 3d printed objects.
Rods vs Linear Rails
Many of the earlier 3d printers were designed around cheaper mechanical parts such as carbon rods or stainless steel smooth rods which were once commonly used and recommended. As the cost of linear rails become cheaper and cheaper due to the economy of scale and increasing number of buyers and large volume production of manufactures and suppliers. 8mm steel rods and linear bearings are slowly being somewhat phased out but still used on cheap kits found on Aliexpress.
White Knight: DIY Conveyor Belt 3D Printer
The White Knight 3D Printer is a belt printer designed by Carl from NAK3DDesigns. The Unlimited Z-Axis has a large build area for continuous 3d printing.
Best Large DIY 3D Printers 2022
Large scale 3d printers are becoming more accessible to the average user as open-source designs continue to improve. One challenge of large scale 3d printing is bed leveling and layer adhesion Deciding on a large 3d printer to build or buy is a balance between price and reliability. In this section, we review and list the best large scale 3d printers available.
Large-scale 3d printing is increasing in demand as 3d printing becomes more accessible. Large scale printers allow users to 3d print large objects that would otherwise be constructed from multiple smaller printed objects from smaller machines.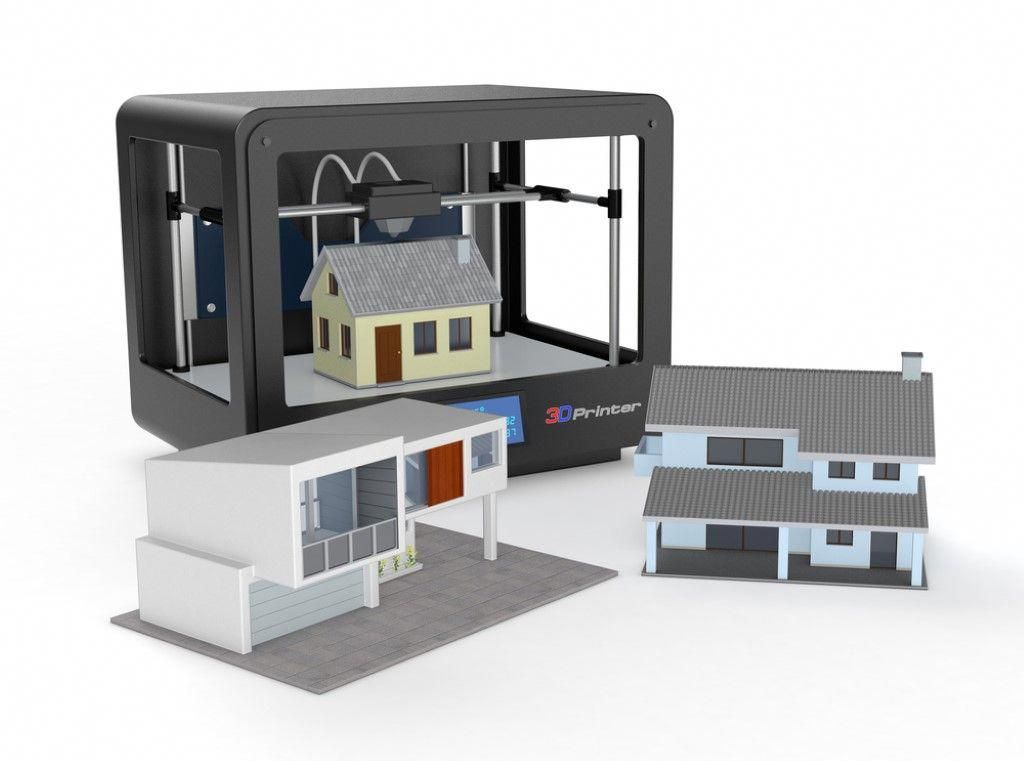
Modix BIG-40
- Made In Israel
- Build Volume 400 × 400 × 800 mm
- Price $5,000
Modix specializes in large format 3D printers that are available in DIY self-assembly kits, which is a much more affordable 3d printer compared to the larger commercial 3d printers on the market.
The Modix BIG-40 is an industrial grade machine that uses a dual-zone heated bed and a PEI print surface with auto bed leveling and an enclosure option.
Raise3D Pro2 Plus
- Made In US
- Build Volume 305 × 305 × 605 mm
- Price $5,999
- Extruder/Hotend Dual Extruder
Raise3D is known for their high quality 3d printers that are made in the USA. The Pro2 Plus is the latest release which offers the largest build volume compared to their other Raise3D models.
The Pro2 Plus has a 305 mm x 305 mm x 605 mm build area and reaches temps up to 300°C which allows users to expand their range of materials to print with.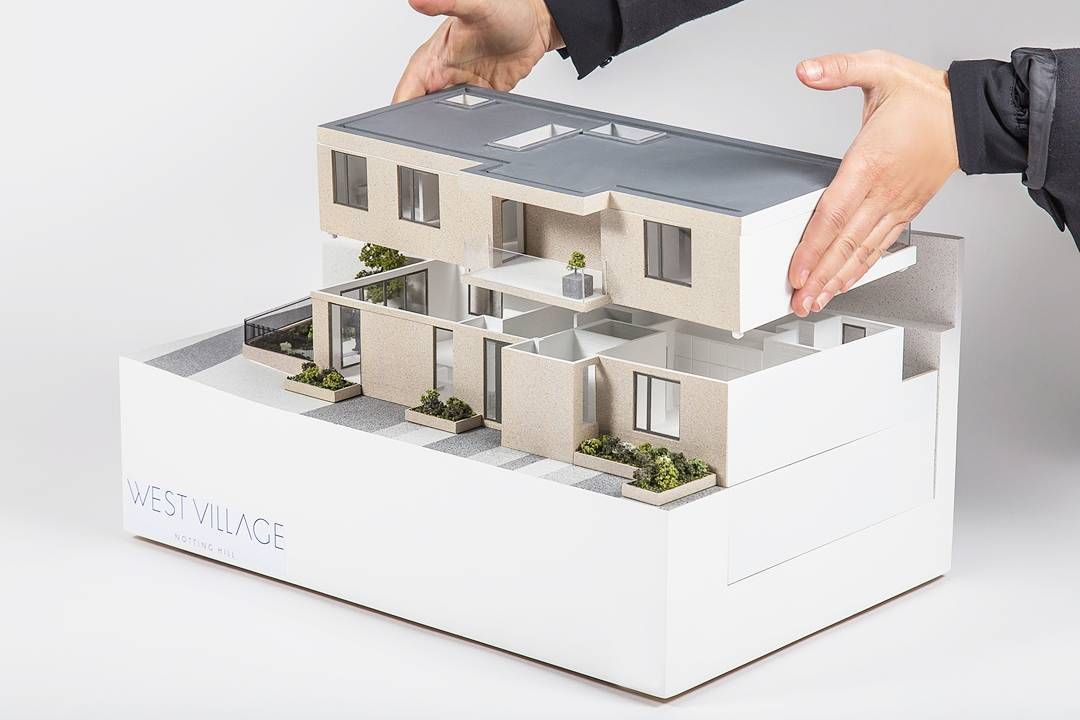
BigRep – STUDIO G2
Made In Germany
Build Volume 500 × 1000 × 500 mm
Price $60,000
The BigRep STUDIO is a large format 3d printer designed to print engineer grade materials and uses dual extrusion ruby nozzles for abrasive materials. The large machine is equipped with a dual filament chamber with each chamber independent controlled temperature environments and features a touchscreen interface and the BigRep BLADE software.
Piper 2: Piper 3D Printers Made From Conduit Pipe
Piper 2: Piper 3D Printers Made From Conduit Pipe.Piper 2 by Piper 3D Printers is a open source corexy DIY 3d printer design made from conduit pipe.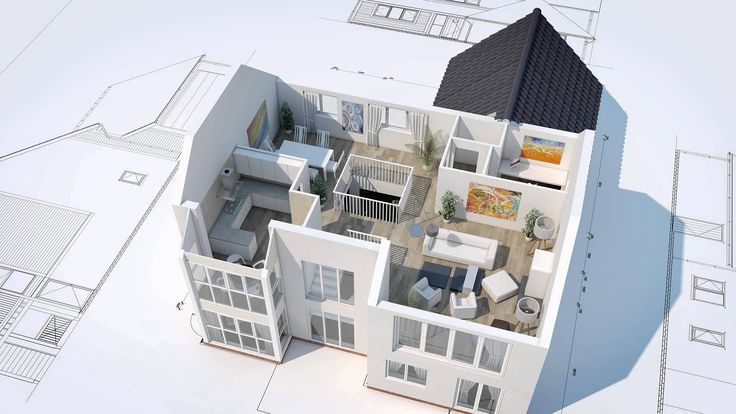
see Piper 3D Printers
see Midwest RepRap DIY 3D Printer Festival
Gantry 3D Printer Design – Reducing Moving Mass
Many earlier 3d printers kinematics use the classic “bed-slinger” design that originated from the early Reprap designs. As 3d printer builders and designers gradually pushed the limits of scalability, the classic y-axis traveling bed kinematics became more problematic. Although there are large scale 3d printers that work fine with this mechanical arrangement, they are often using industrial grade hardware such as linear rails and ball screws driven with high end servo motors to maintain print head position at all times, print beds that travel laterally, typically along the Y-axis.
While a simple and cheap solution for kinematics that works for countless desktop 3D printers, this potentially poses a challenge to a large-format 3D printer in that it’s putting a lot of moving mass on one of the two main axes engaged in travel during printing. A large moving mass consisting of the print bed, the carriage it’s riding on, and the increasing weight of the print being deposited on it means greater inertia to overcome with each direction change in that axis.
The timing belt tightness and the linear guides may be rigid enough to handle the inertia, but the frequent direction changes can leave artifacts such as ghosting on 3d printed objects. Not only this, a print that has poor adhesion to the print bed, moving vigorously back and forth through the Y-axis, can risk the success of the print.
These problems are not an issue for large-format 3D printers which use a static bed setup that is stationary and moving only through the Z-axis layer changes. While the motion system is more complex it can maintain the mechanical advantage compared to “bed-slinging” designs.
Large Scale 3D Printing vs Batch PrintingLarge volume 3d printers can be considered as a great solution for batch printing, or alternate to multiple smaller 3d printers. A typical sized object or print job can be arranged and stacked for mass production. However, a print farm can complete a large quantity run or job quicker than a single object 3d printed as a batch of 3d printed objects are spread across a number of machines and can decrease the number of failed prints.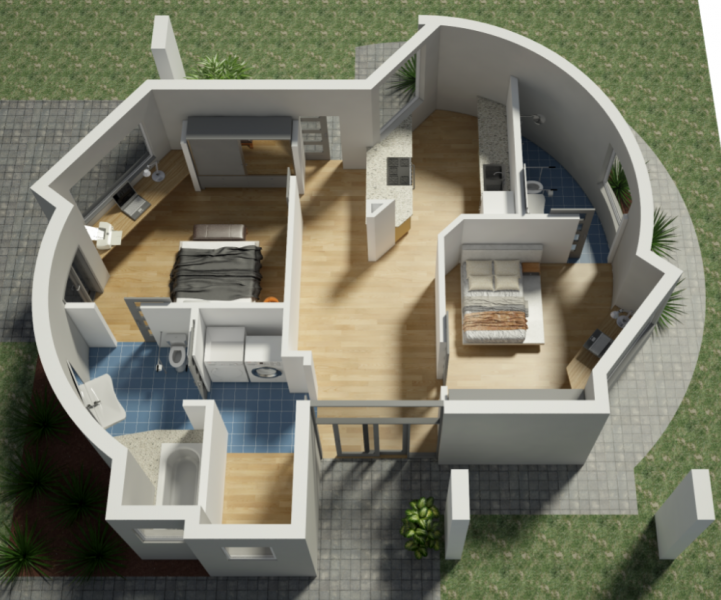 Failed prints are isolated to a single machine without affecting the rest or potentially ruining the entire job.
Like this:
Like Loading...
Visualizing House Plans: What is 3D Printing?
All Categories
About Our Plans Building a Home Building Your Home Green Building Hobbies & Recreation Home Building Tips and Information Home Design Home Exterior & Framing Homepage Articles House Plan of the Week How We Work Ideas and Inspiration Industry News Infographics Information & Resources Inspired Spaces Interior Design Kitchens Mascord News Modified Home Designs Outdoor Living Personal Stories Plan Support Products and Services Real Estate Remodeling & Renovating Showstoppers3D printing is an additive manufacturing process that involves laying down multiple cross sections of material in succession to duplicate or model a full object. Let’s imagine a chair, for instance. A 3D printer would be able to scan the chair’s dimensions, slice the design into numerous cross-sections, and then replicate the chair at any scale by laying down one layer at a time. To give you an idea of just how thin these layers are, most 3D printers create models with layers that are 0.1 mm thick, although certain models are capable of producing print layers as narrow as 16 micrometers (i.e., 16 millionths of a meter). Polymers and gels are some of the most commonly used materials in 3D printing.
The potential for 3D printing technology to change our world appears limitless. Imagine every household with a 3D printer at its disposal. Why go to the store for that new product when you can download the design and print it at home? Beyond consumer uses, manufacturers, artists, teachers and even medical professionals can use 3D printing – doctors may soon be able to “print” replacement body parts with “bio-printing.” Over the next few decades, it is quite likely that 3D printing will change the face of society as we know it.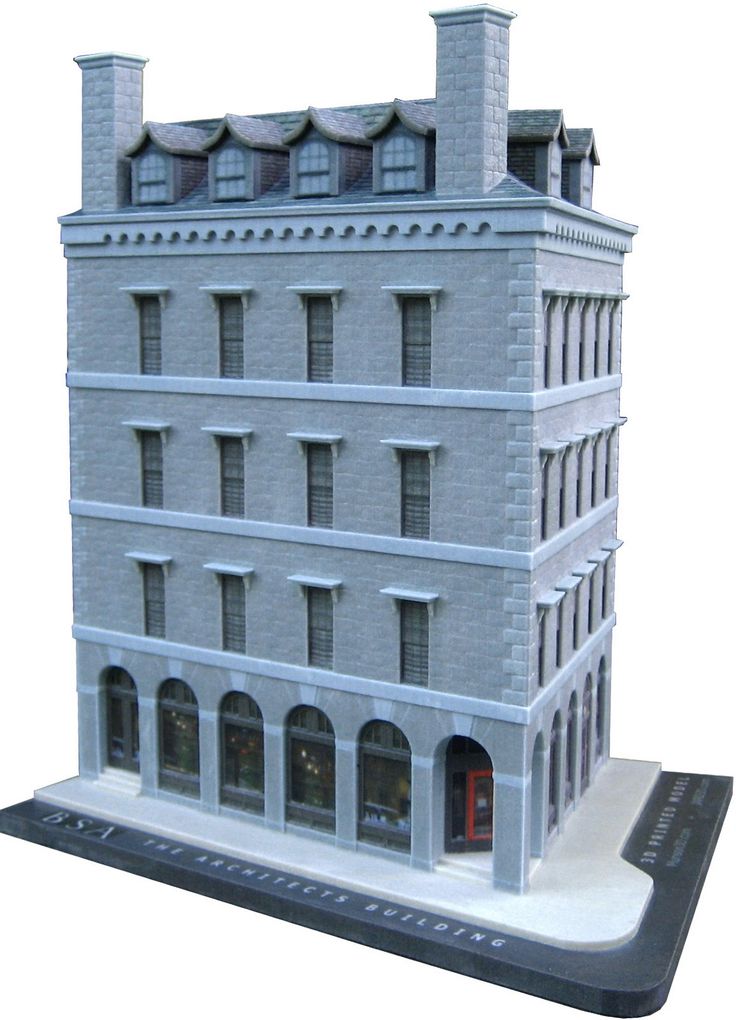 However, few consumers are aware of the applications that 3D printing currently offers. This article focuses on one such application: 3D printing for house plans.
Introduction to 3D Printing for Home Plans
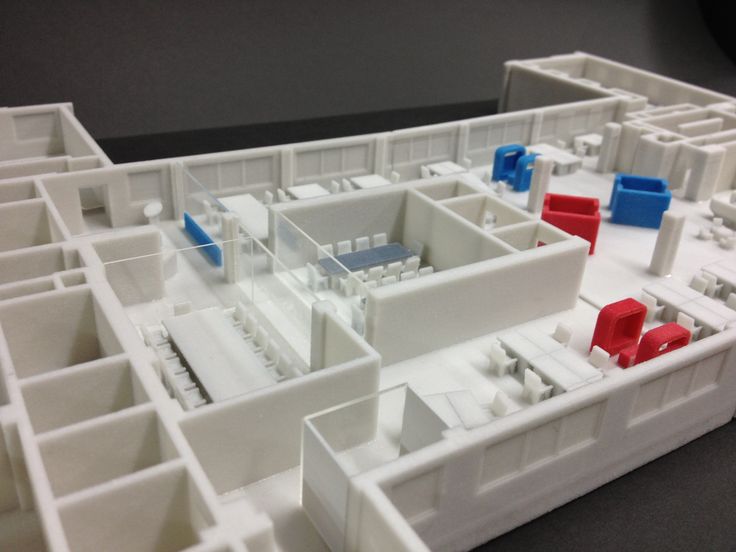
Those Americans who are familiar with the concept of 3D printing of floor plans probably got their introduction through the public television program This Old House. Last October, This Old House did what they normally do: They ripped apart and rebuilt an old farmhouse in the Boston area – that of Revolutionary War hero Nathaniel Page. What made this foray into home renovation so interesting was the method the show’s producers chose to visualize the home before and after renovation; namely, 3D printing.
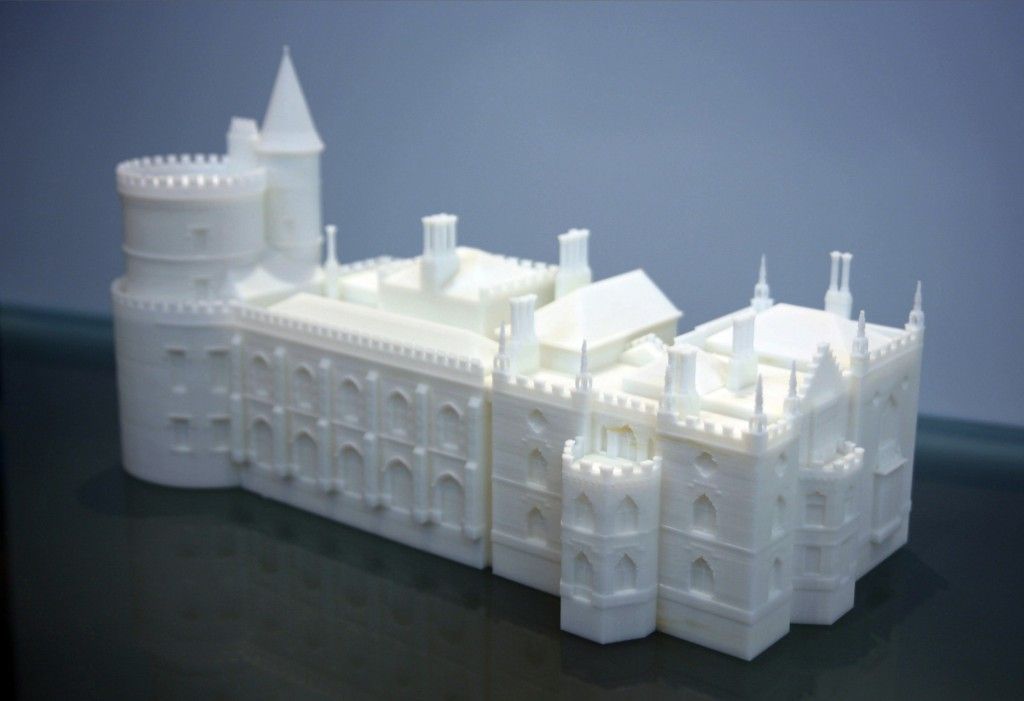
The 3D printer, Z Corp, produced a 14-piece model that measures 28 x 21 x 9 inches. Z Corp’s process produces full-color models. The model made it easy for home viewers to comprehend the renovation changes This Old Houseundertook.
But you don’t have to be a national television program to have your home plans transcribed into a three-dimensional model. Architects, contractors and realtors across the country are now using 3D printing to better visualize floor plans. There are many benefits to this approach, as outlined below.
Benefits of Printing House Plans in 3D
Easy to understand. 3D printing creates a model that anyone can easily understand. Just think about the last time that you looked at a set of blueprints; unless you’re reviewing floor plans every day for your work, it’s difficult to quickly imagine what the final outcome will look like. However, 3D printing allows homeowners and developers to immediately comprehend the meaning behind blueprint floor plans.
Cost savings. 3D printing brings cost savings in two ways. First, automated 3D printing is typically much less expensive than hand-built models. Second, having an accurate model of a proposed home plans design prevents costly changes later on by ensuring all parties can accurately envision the final outcome.
Faster than other modeling technologies. Architects and builders appreciate the speed of 3D printing, which is 5-10 times faster than other three-dimensional modeling approaches.
Full-color, detailed printing. As mentioned above, home plans can be produced in full color with three-dimensional printing. Furthermore, printers can include labels and very intricate details, such as deck railings.
Realtors, contractors, architects and owners all find different benefits from three-dimensional printing of house plans, but at the most basic level, everyone benefits from the most basic fact about 3D printing: It makes any project easy to imagine. As Dan Quaile, project manager for the Page home, said: “The designers, contractors, viewers and homeowners get a much clearer image of the project than they could through 2D plans and conversation alone.” So whether you’re an architect looking for a cost-effective way of conveying designs to potential client, or a homeowner who wants to minimize future problems by clearly envisioning your house plans, 3D printing could be the solution you need.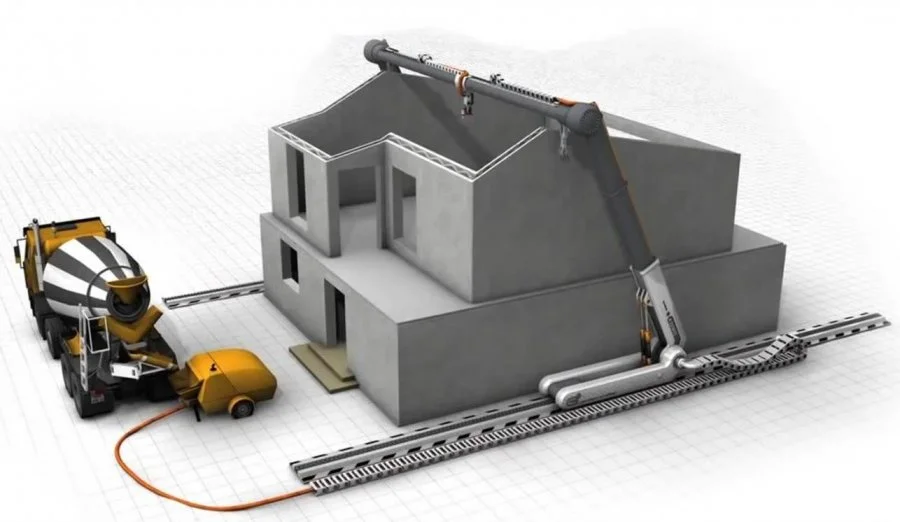
Note: The home shown above is The Clearfield House Plan 2374.
3D printing - to schools (technomarathon for assembling 3D printers in Yekaterinburg) / Sudo Null IT News We have been developing this very interesting and promising direction for the third year already. During this time, our residents managed to hold a lot of events, seminars and lectures aimed at popularizing the technology.
The technical education of schoolchildren can be considered an equally important area of work for hackspace. On these issues, we even have several articles on Habré (one, two, three, four). And it would be foolish of us not to try to combine these two directions. Give children printers , and children's printers .
What is the best way to combine 3D printing and children's technical creativity? And most importantly, where to start? Probably, you can buy a printer for school, tell the computer science teacher how to use it. is that enough? Obviously not.
This year, together with the Ural New Education Club, a friendly organization, we launched a series of events to assemble 3D printers by teachers and schoolchildren.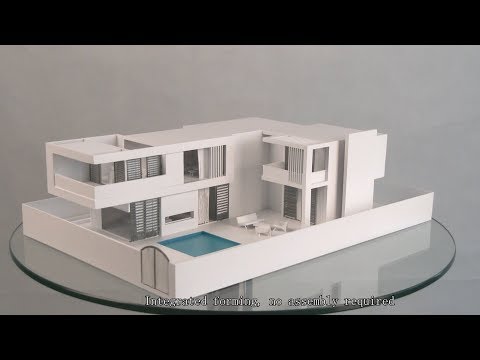 What is it, and did we manage to assemble these same 3D printers, read below under the cut! nine0011
Techno marathon
The first event was held as part of the City of Technocreativity festival, which started in February in our city. At the suggestion of the head of the club, Irina Zakirova, this action was called "Technomarathon".
History
The idea of an event for the collective assembly of 3D printers is not new. In our country, for example, guys from the Navigator Campus hackspace are engaged in such a noble cause. They call this action "Makerton 3D Printer". nine0003
The essence of the event is extremely simple. We invite several teams of participants who are invited to assemble a 3D printer on their own. For assembly, the teams are given everything they need - a kit for assembling a printer (in varying degrees of readiness), tools, instructions. It is also necessary to have competent engineers ready to help at any time.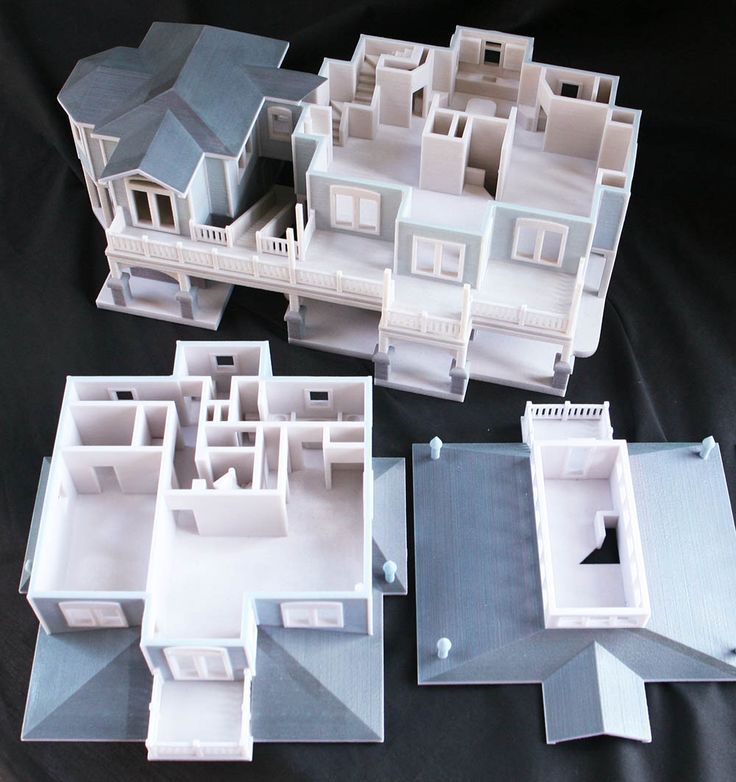 Often times, a build is like a competition. The one who assembles his printer faster than the rest gets some useful prize. For example, he gets a 3D printer for free! nine0003
We've been dreaming of this idea since we were founded, waiting for the stars to align, so to speak. And finally, half a year ago, we managed to combine our engineering knowledge with the organizational skills of Irina Zakirova, and began preparations for the 3D printer assembly technomarathon!
Why?
So, let's start with the most important question: why does a school need a 3D printer? We encounter a lot of skepticism about this, which we constantly have to break up with examples from life and world experience. So what is a printer for? Yes, at least for the quick reproduction of tutorials. Looking at the portals of foreign 3D printers, you can find many different objects that allow a child to more effectively learn a particular lesson. nine0003
A simple example is a biology lesson.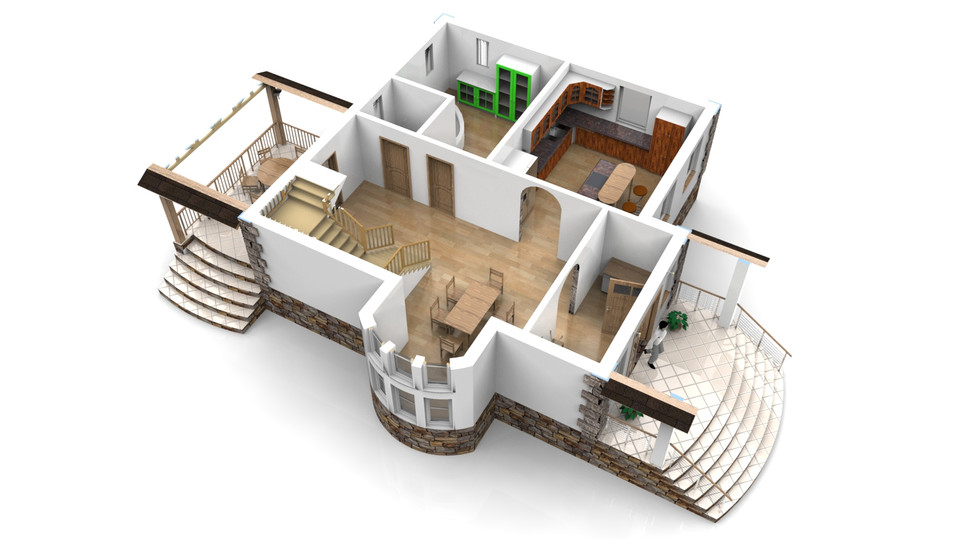 What if, instead of a picture of DNA, each child could print out a piece of the double helix, touch it, understand its spatial features? Even to throw at a neighbor, and then it will be more useful than contemplating a picture.
Another example is a plant cell. You can pull out a mitochondrion :)
For a biology lesson, you can also print, for example, bones, organs, or whole animals. In physics: working models of mechanisms, stands for physical experiments. In mathematics: surfaces given by tricky functions, sections of figures, fractals. Etc. I think we will devote an entire article to this separately. nine0003
The same question can be asked to the house of creativity. But there the answer is even easier. A 3D printer in technical creativity is an indispensable tool for the rapid production of parts. Today, printed parts are widely used in educational robotic projects, in aircraft and ship modeling. A good example is a 3D printed quadcopter.
There is an even more valuable layer of applicability of a 3D printer - this is 3D modeling. It's one thing to just print the finished model. Other: first invent an object, then design an object, and finally print it on a 3D printer. It is this case that is most interesting to us from the point of view of children's technical creativity. nine0003
At whose expense is the banquet?
But back to our techno-marathon. And the first question: who will buy printers for schools?
The first option that we have tried is to try to get some kind of specialized grant. Unfortunately, the option didn't work. This does not mean that the approach is wrong in principle, we just failed.
The second option is to ask big (and not so big) companies for money. As you know, industrial enterprises often take patronage over schools, and do their best to help these schools with the ruble. But in order to bring such an idea to the company's management, you need to have direct connections and recommendations. We started our event with a clean face, and we didn’t have any friendly enterprises.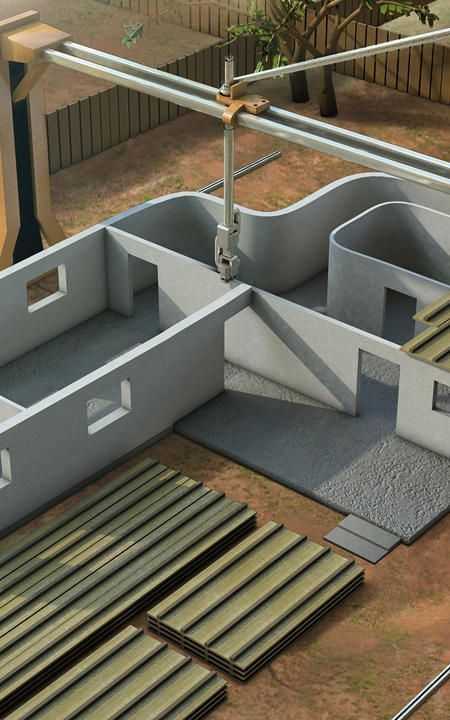 As a result, of the six teams that applied, one company (Beloyarsk NPP) paid for the 3D printer, the other bought the printer with grant money (thanks to SKB-Kontur, and hello to all IT companies). Again, the option itself works. After the first techno-marathons, we hope for a much wider support from the enterprises of the region. nine0003
The third option is to pay for printers from non-budgetary funds of the school or art house. As practice has shown, this is also quite a working option. Of course, provided that the 3D printer costs reasonable money. Here, in fact, the second big organizational question arises:
What kind of printer will we assemble?
The first thing that comes to mind is the RepRap series 3D printer. These are printers that have been specifically designed to be assembled at home. There is a lot of documentation, videos on RepRap, and in our hackspace we once started with just such a simple machine. In general, the choice fell on the Prusa I3 from the Spanish company BQ.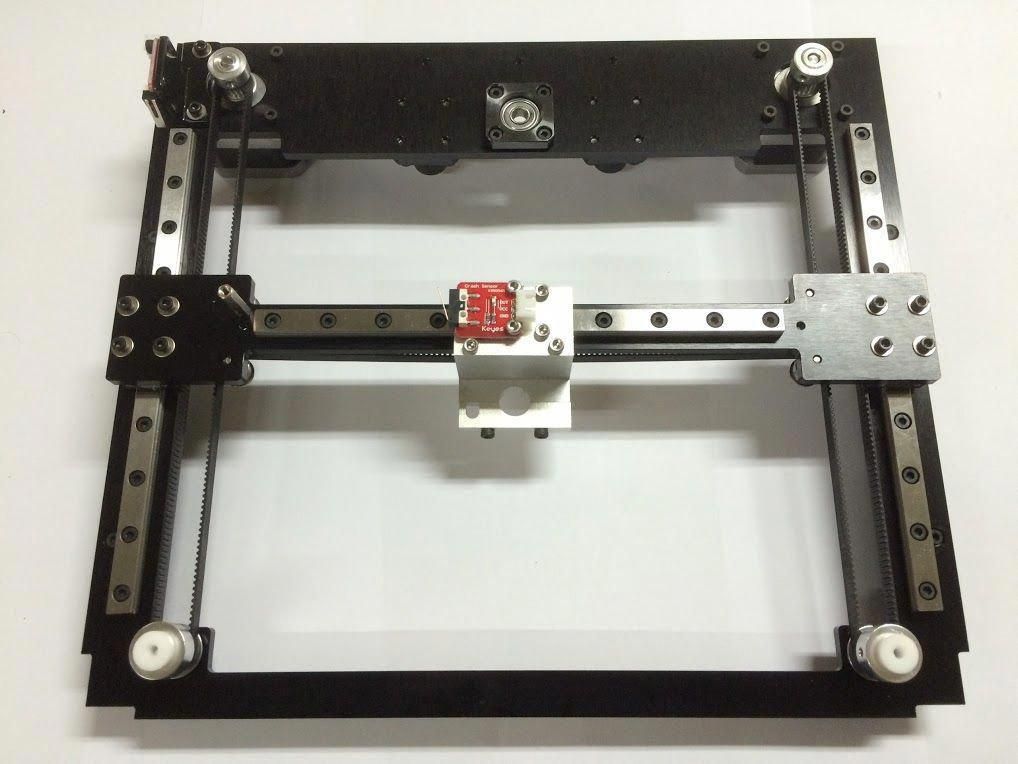 Here he is handsome, in the photo. nine0003
By the way, one of those collected by our tech marathon runners.
Members
According to the generally accepted practice, teams of an arbitrary number of people take part in the event. As many teams participate as the organizers are able to withstand at a time. In our case, three teams per day was the best option. In total, six teams entered our first techno-marathon, which we divided into two groups:
February 28, 2015
- Upper Pyshma Center for Education and Vocational Guidance;
- School No64 from the city of Lesnoy;
- Polytechnic department of the Palace of Youth.
March 5, 2015
- Children's Art Center of the city of Irbit;
- School No1 GO Zarechny;
- House of children's creativity in the Oktyabrsky district of Yekaterinburg.
Everything you need
In order to assemble printers, in addition to the teams of participants, we needed:
- soldering irons - to solder nuts into the plastic parts of the printer;
- files (flat and round) - for finishing parts that fit into each other;
- screwdrivers and hex set;
- drill and drill bit set - drill poorly printed holes;
- scissors and stationery knife;
- ruler - for calibration;
- pliers - to flatten everything :)
- hammer or mallet - to drive the bearings.
 nine0085
And of course, all this had to be multiplied by the number of teams.
And we also need helpers, who can be students of technical universities, or just handy guys (or girls). You always have to be on the alert and help the lagging teams.
Assembly
The assembly of 3D printers was carried out according to a clear (Russian-language) step-by-step instruction provided by the manufacturer. In general, it must be admitted that the Prusa I3 Hephestos printer from BQ was ideal for the tech marathon. Yes, there were awkward moments with breaking parts and ill-fitting grooves, but it is extremely difficult to find Russian-language analogues for such money. nine0003
So let's unpack the boxes with the parts. Everything is packaged very conveniently and presentably.
We intensively put together all the body parts. At this stage, by the way, several times there were problems with the layout. The fact is that the frame of the printer is almost symmetrical, and you can easily confuse which side to put it on. Of course, it has a large "Prusa I3" written on it, but the participants, immersed in the assembly, often did not pay attention to it. As a result, some printers had to be rebuilt at a pace (not completely, of course). nine0003
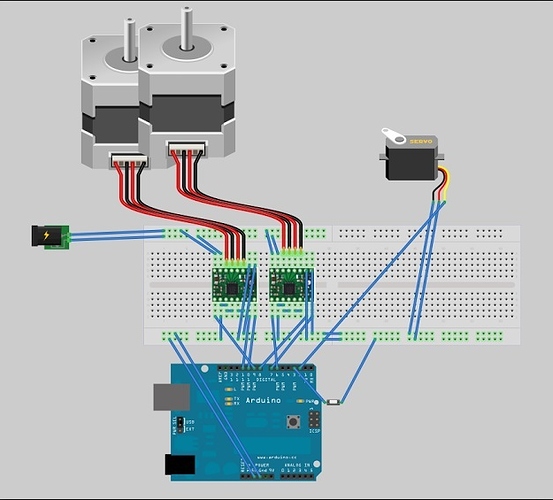
Electronics
The most important part. If you mess up something, you can easily burn the 3D printer controller or some sensors. Fortunately, in the native instructions there are color schemes, following which it is difficult to confuse anything.
Calibration
The printer is already ready. All axes work as expected, moving in the right direction. The penultimate stage before printing comes - calibration. In fact, we need to adjust the working surface and the vertical axis limit switch so that the nozzle is at a distance of 0.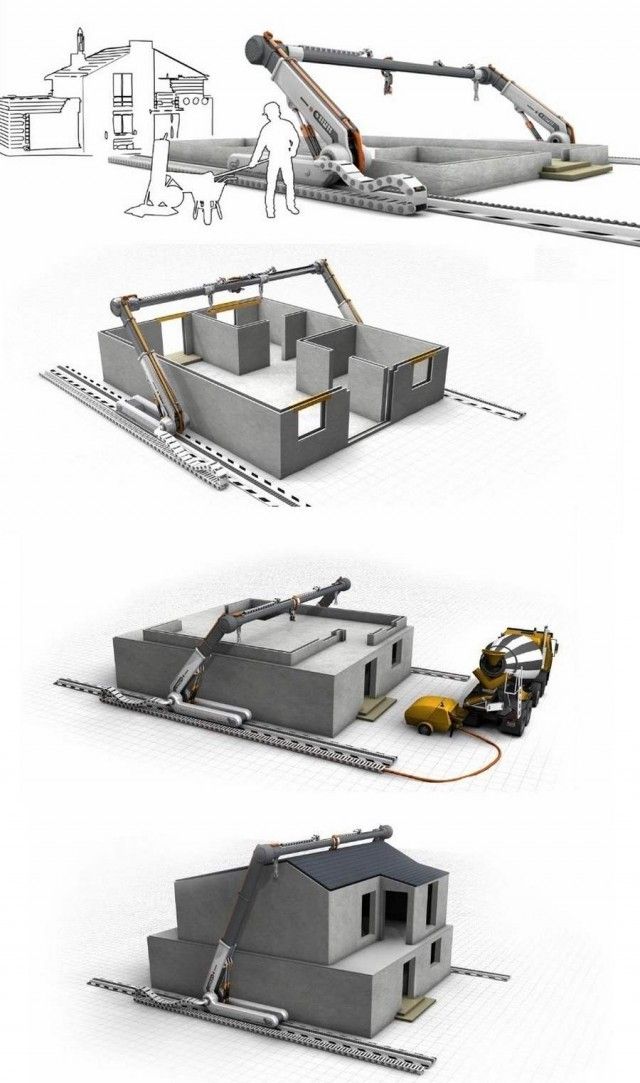 3-0.5 mm at all points in the field. nine0003
Duration
Now about time. Initially, we allocated 5 hours for everything about everything. This was supposed to include an introductory lecture for 30-40 minutes, lunch, and the assembly itself. Oh, how wrong we were! The first event ended in the evening, at about 8 o'clock!
The second tech marathon took about the same time. From this we can conclude that, on average, assembling a printer takes about 8 hours (if you mess around and mess around a little less).
Final
And here are our satisfied participants with their 3D printers!
Team of the Polytechnic Department of the Youth Palace of Youth of Caterinburg
Team of the Center for Education and Professional Orientation of the Verkhnyaya Pyshma
Team of the NO64 school from
The Center for Children's Creativity of the city of Irbiti
9000 Team House of Children creativity of the Oktyabrsky district of Yekaterinburg. nine0003
Team of School No1 GO Zarechny
What are 3D printers working on after the technomarathon?
We ourselves, as the organizer, are terribly interested in the further fate of the assembled 3D printers. The very first feedback came from Leonid Gushchin, a teacher at the Robotodrom of the Palace of Youth:
So, 3D printing technologies have come to our circle!
The 3D printer is calibrated and printed the first model: a small robot figure. In honor of the fact that this model is the first, she even received the name Erem. Well, meet our plastic friend! nine0212
Of course, the robot figure was not limited:
On Wednesday we played around with robot models))
And today we have already printed mounts for servos:
And one more thing:
Well, a 3D printer is really an extremely useful thing! And of course, you understand his work much better when he assembled it himself.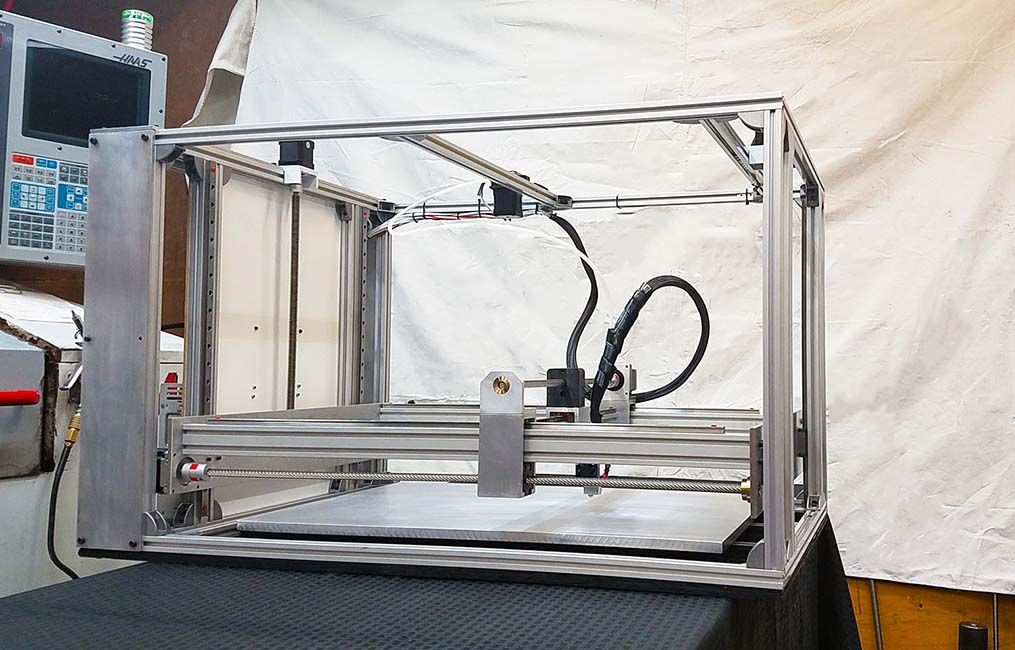
So once again, thanks to the organizers and experts for the techno-marathon!
Acknowledgments
- Thanks to Irina Zakirova, the main organizer of the event: “When you organize and hold an event, the results of which are so satisfied with the participants, you feel joy and pride in the quality of the work done. We did it!" nine0085
- Thanks to Alexey Samoilov, Head of Witbox Maker School (Witbox Russia)
- Thanks to the Ural Polytechnic College for the excellent venue for the techno-marathon and help in organizing this event.
- Thanks to our experts: Oleg Evsegneev and Pavel Tomshin for their professional work. On March 5, volunteer guys — students and technical specialists — Fedor Zyablitsev, Ilya Bannikov and Igor Vormanov helped the teams a lot in the assembly. Thanks a lot! nine0085
- Thanks to all the participants who, despite being tired and stressed, made it to the end!
In the news
The 3D Printer Assembly Technomarathon even got into the local issue of Vesti-Ural:
What's next?
In the near future, we plan to develop a small master class on modeling and 3D printing, which we will offer to all participants of the technomarthon, or just happy owners of 3D printers.
The masterclass will take place on a separate day and will approximately take about 8 hours, including lunch and coffee breaks. The main goal of such an event is to make sure that upon returning to the educational institution, a large queue for printing forms at the printer. nine0003
Application for participation
Well, the most immediate plan is to recruit a new group for the techno-marathon! For convenience, we have created a small questionnaire for participant .
Write if you are from Yekaterinburg or the Region. But also check in if you are from other regions of Russia, and for you:
– schools,
– House of creativity,
– robotics club
- or another club - where children study,
It would be interesting to build a 3D printer. And if you do not have enough funds to participate, we will try to help, find sponsors. nine0003For sponsors
In turn, for sponsors, if you want to support the development of 3D printing in schools in Yekaterinburg / region, or in your city - check in this form: questionnaire for patrons .
All registered participants will be contacted by the organizer Irina Zakirova and will discuss all organizational issues.
instructions how to work from scratch for beginners and dummies, what it looks like
Three-dimensional printing has become increasingly introduced into our daily lives. Thanks to new technologies, it has become possible to easily print from a small detail to a large building. The range of products is also pleasing - today you can find a lineup that includes both affordable devices and more expensive ones. But how to work with a 3D printer? This is a completely normal question that any beginner will have, it is for this reason that we will try to answer it as simply and accessible as possible. nine0003
What is a 3D printer and how does it work?
The 3D device consists of the printer itself and a computer that controls all processes. The principle of operation of such a design is to create 3D models by superimposing layers of liquid material.
There are a large number of printer models - from large industrial ones to compact ones, but they all have the same principle of operation and component parts:
- Extruder - the print head through which the thread passes. The head heats the thread to a semi-liquid state and evenly supplies the material to the working surface. nine0085
- Work surface - a printing platform on which a 3D model is formed.
- Motors - mechanisms responsible for the accuracy of movement and speed of printing.
- Sensors are electronic devices that limit moving parts to specified coordinates.
- The frame is the structure that connects all parts of the printer.
How a 3D printer works: features
Work with the aim of building a three-dimensional model begins with a sketch, which is created in a special program. After that, the software independently generates a plan for the movement of the print head and a print sequence. The 3D model is reproduced by strongly heating the plastic and distributing it evenly.
nine0003
3D printers are used in many areas. Let's list some of them:
- Architecture - creation of models of buildings.
- Medicine - dental prosthetics, making models of organs for study.
- Construction - production of houses using 3D printing technology.
- Education - a visual aid for learning 3D printing.
- Automotive industry - creation of tuning parts, prototype layouts and other products.
This is a small list of industries where 3D printing is actively used. Today, almost every entrepreneur and just an enthusiastic person can afford a printer. nine0003
The following printers are distinguished by design features:
- RepRap - self-reproducing printers that can create their own copies.
- DIY-kit - the device comes disassembled with instructions, which will take a sufficient amount of time to assemble.
- Ready-Made - models are delivered assembled and ready to use.
- Commercial and industrial - devices capable of printing metal, concrete, polymers and other materials. nine0085
How to use a 3D printer: tips for beginners, where to start
Mastering the technique of 3D printing is not difficult if you follow the recommendations and tips. Especially for those who plan to learn the basics of 3D modeling, an up-to-date list of questions and detailed answers to them has been prepared.
Printer Installation
To begin, you will need to carefully unpack the box and remove any stops. The next step is to install the printer on the surface using the building level. This will allow you to place the device as evenly as possible, which will provide better printing. nine0003
Note. Some 3D printers come with a level for installation.
Next, you will need to connect the printer to your computer and install the necessary drivers. The software disc comes with the 3D device.
Preparation for work
To get started, you need to calibrate the working surface - without this, printing quality products is impossible. This process is carried out automatically or manually. The attached instructions have detailed information on how to perform manual calibration. nine0003
Extruder patency test
The next important step is setting up the extruder. First of all, you will need to check its nozzle. If the printer has already been used, the nozzle should be cleaned of solidified particles that will interfere with the throughput of the material. Refueling the 3D printer The thread is fed into the extruder directly from the spool. But there is one caveat - for this you must first warm it up. To thread the thread, you will have to make a small effort in order to loosen the presser mechanism. nine0003
Working with models
Models can be created using a variety of 3D modeling programs. The process of manufacturing three-dimensional parts is creative, requiring careful preparation.
The better and more detailed the model is drawn, the better the 3D layout will be at the output.
Start printing
After creating the model in the program and preparing the printer for work, you need to send the file for printing and wait for the result. The print speed varies depending on the printer model and specifications, as well as the media used. nine0003
Processing of the finished product
3D products obtained by printing on a printer usually do not please the user with an ideal appearance: the parts have an uneven surface. But this is typical for models of 3D printers on FDM, SLA and DLP devices, which are distinguished by higher print quality. Owners of FDM printers should not despair - a simple processing of products will give products an attractive appearance and make the surface smooth.
Several powerful ways to post-process 3D printed parts:
- Mechanical - carried out by sanding the surface with sandpaper or a special sponge for grinding.

- Chemical - surface treatment with aggressive solvents such as acetone and dichloroethane.
- Mixed - In this case, the above two processing methods are used.
What are the possible mistakes and how to avoid them?
3D printing technology can be mastered even by a beginner, but despite this, the production of the first products causes excitement for the user. Simple operation, detailed instructions and recommendations on the Internet will allow everyone to deal with almost any printer model. But there are a few useful life hacks, the knowledge of which will help you avoid typical beginner mistakes:
- Calibrate and test the 3D printer before starting work.
- Be sure to use the correct file extension for quality printing.
- Do not remove the finished product from the printer immediately after processing, as this may damage the part and cause defects.
- If you encounter errors during the 3D printing process, try restarting the device - this usually helps.
Learn more